Use the Module History page to audit, compare, or restore previous versions of a module. Every time a Creator saves changes in a module, a digital record known as a revision is saved in Module History. Each revision details what elements have been added, deleted, or moved, and the Creator who saved the module.
The Module History page includes the following functions:
Preview a module's revision in Express View.
Restore a previous version of a module.
Duplicate a previous version of a module.
Add a description to a revision.
Compare two versions of a module.
Bookmark a revision to easily find it later.
Rename a revision.
For in-depth module revision management, view our UDLC Module Revision Dashboard Tool article.
Access the Module History Page
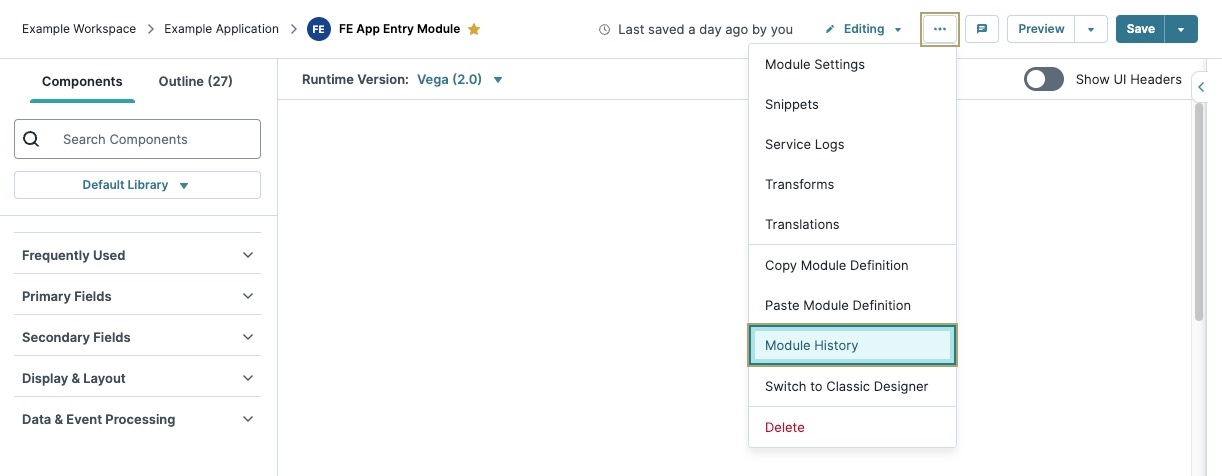
To access Module History from the Module Builder:
Navigate to and open an existing module that has been previously saved.
In the Module Builder, click the
.png) (ellipsis) settings button. A drop-down menu displays.
(ellipsis) settings button. A drop-down menu displays.Click Module History. A new tab opens in your browser, displaying the module's Module History page.
Navigating the Module History Page
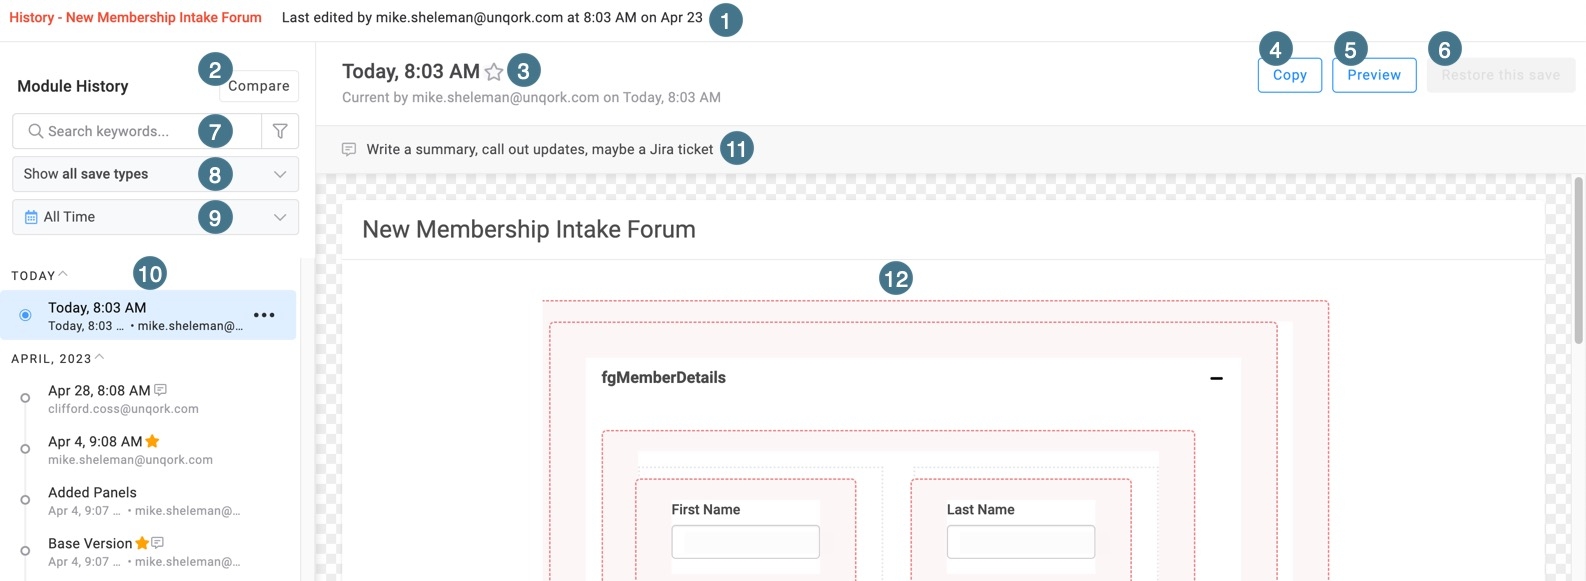
The Module History page contains all the elements needed to review, restore, audit, or copy a previous version of a module.
# | Setting | Description |
|---|---|---|
1 | Last Edited By | Displays the Creator, time, and date when the module was last saved. |
2 | Compare | Click the Compare button, then select two modules from the history list.
|
3 | Saved Revision Title | The title of the saved revision. Click the title text to rename it. Under the title, the Creator, date, and time of the revision display.
|
4 | Copy | Clicking this button opens the Module Builder in a new tab, containing a copy of the revision. Copied modules include the following title text:
|
5 | Preview | Click this button to open the revision in the Preview Archive Express View.
|
6 | Restore this save | This button is disabled when the most current revision is selected. When an older revision is selected, clicking this button opens the Restore Module modal. Storing a previous revision does not overwrite the current version.
|
7 | Keyword Search Field | Enter a Revision title or part of a description to filter by. Use the Date Range Filter to search for revisions that do not have custom names or description values. |
8 | Filter Drop-down | Filters the Revision History List. Filter types include:
|
9 | Date Range Filter | Use this drop-down to filter the Revision History List using a date range. Predefined values include Today, Past Week, and Past Month. Otherwise, select a start date and end date using the Calendar tool. |
10 | Revision History List | Displays a list of revisions for the module. Revisions are sorted by month and year. Filter this list using the Keyword Search Field, Filter Drop-Down, and Date Range Filter functions. Select a revision to display in the Revision Canvas. Hover over a unselected revision to display the
|
11 | Revision Description | Click to add a description to the revision. |
12 | Revision Canvas | Displays changes made in the revision. All elements display a red dashed border. |
Comparing Module Revisions
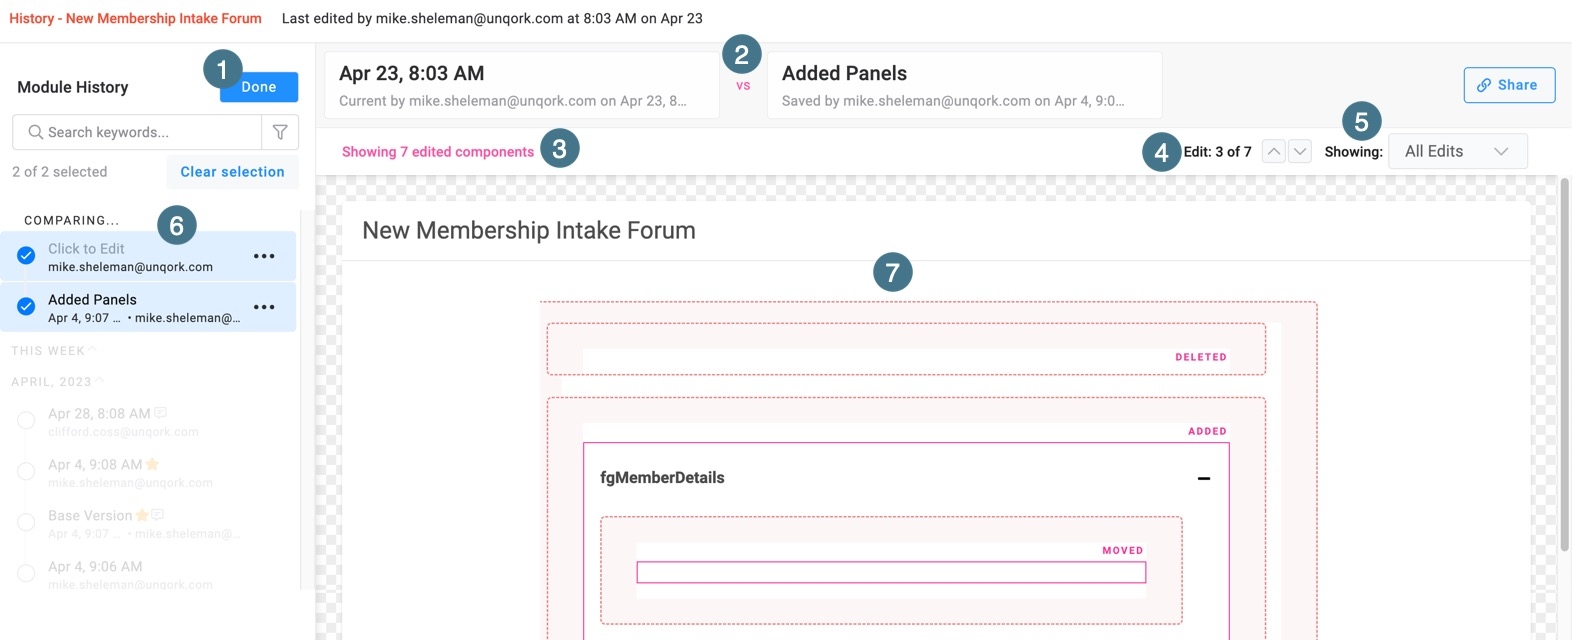
To compare two revisions of a module, click Compare. Then, select any two revisions from the Revision History List. When comparing revisions, you'll see the total number of edits, where you can filter by the edit type. Edit types include Added elements, Deleted elements, and Moved elements.
Navigating the Module History Compare View
# | Setting | Description |
|---|---|---|
1 | Done | Returns you to the Module History View. |
2 | Revision Comparison Header | Displays the selected revision's titles, the Creator who saved the revision, and the date and time the revision was saved. |
3 | Total Edits by Edit Type | Displays the total edits based on the selection made from the Edit Type drop-down. For example, if the newest module version was the result of editing three components, Showing 3 edited components displays. |
4 | Current Edit and Total Edits | Displays the currently highlighted edit and the total amount of edits for that type. Click the ˄ (up) or ˅ (down) buttons to highlight a different edit. Highlighted edits display in a slightly darker shade of purple. |
5 | Edit Type | Filter the Revision Comparison Canvas view by edit type. Types of edits include:
|
6 | Selected Revisions | Displays the two revisions under the COMPARING tab. Click on a revision card to deselect it. The |
7 | Revision Comparison Canvas | Displays which elements have been modified between the two revisions. Modified elements display a bright pink border with the edit types of ADDED, DELETED, or MOVED. |


