Overview
Unqork classifies end-users by roles and groups. Groups determine what submissions team members can see. And roles determine what team members can do. Those roles are organized using a role hierarchy of parents and descendants. These are the basics of RBAC (role-based access control). But how do you actually build out an RBAC infrastructure to match the needs of a client or application? Role and group assignments can be tricky to configure. It might be complex to get everyone in the right place with the right access. This article uses an example scenario to show you how to think it through.
What You'll Learn
In this article, you'll learn how to determine end-user permission needs and translate them into plain language.
Determining End-User Permissions
There are 2 main factors you'll consider while designing an RBAC infrastructure:
What modules should an end-user be able to interact with in your application? And will they have access to every component in those modules, or only some?
What submissions should an end-user be able to access?
The answer to the first question determines what role you assign to an end-user. It also determines where they fall in your role hierarchy. For example, you'll know if they have any parent roles or descendant roles. The answer to the second question determines which group(s) you assign to the end-user. Depending on your client's requirements, you'll likely assign an end-user to multiple groups.
Keeping these questions in mind is crucial, but let's look at how you answer them in context.
Sample Client Scenario
Let's say you're asked to build an application for the following scenario:
The city unemployment office is administering several programs to help unemployed residents build job skills. The office doesn't run the programs on its own, though. Instead, they work with non-profit agencies to offer programs based on different skill sets. Each agency has its own program managers who work directly with clients. In this case, clients are the unemployed residents looking to attend a program. So, they'll also need to access portions of the application.
Now, you know what the client wants out of an application. But how do you take that information and build an RBAC infrastructure?
The first step is to explain the needed permissions for each end-user in plain language. Here's a table laying out each potential role (end-user) and the permissions they need:
Role | Access |
|---|---|
City Administrators | Access to all submissions. |
Agency Administrators | Access to all submissions in agency. |
Agency Program Managers | Access to only their own submissions and clients. |
Clients (Residents) | Access to only their submissions. |
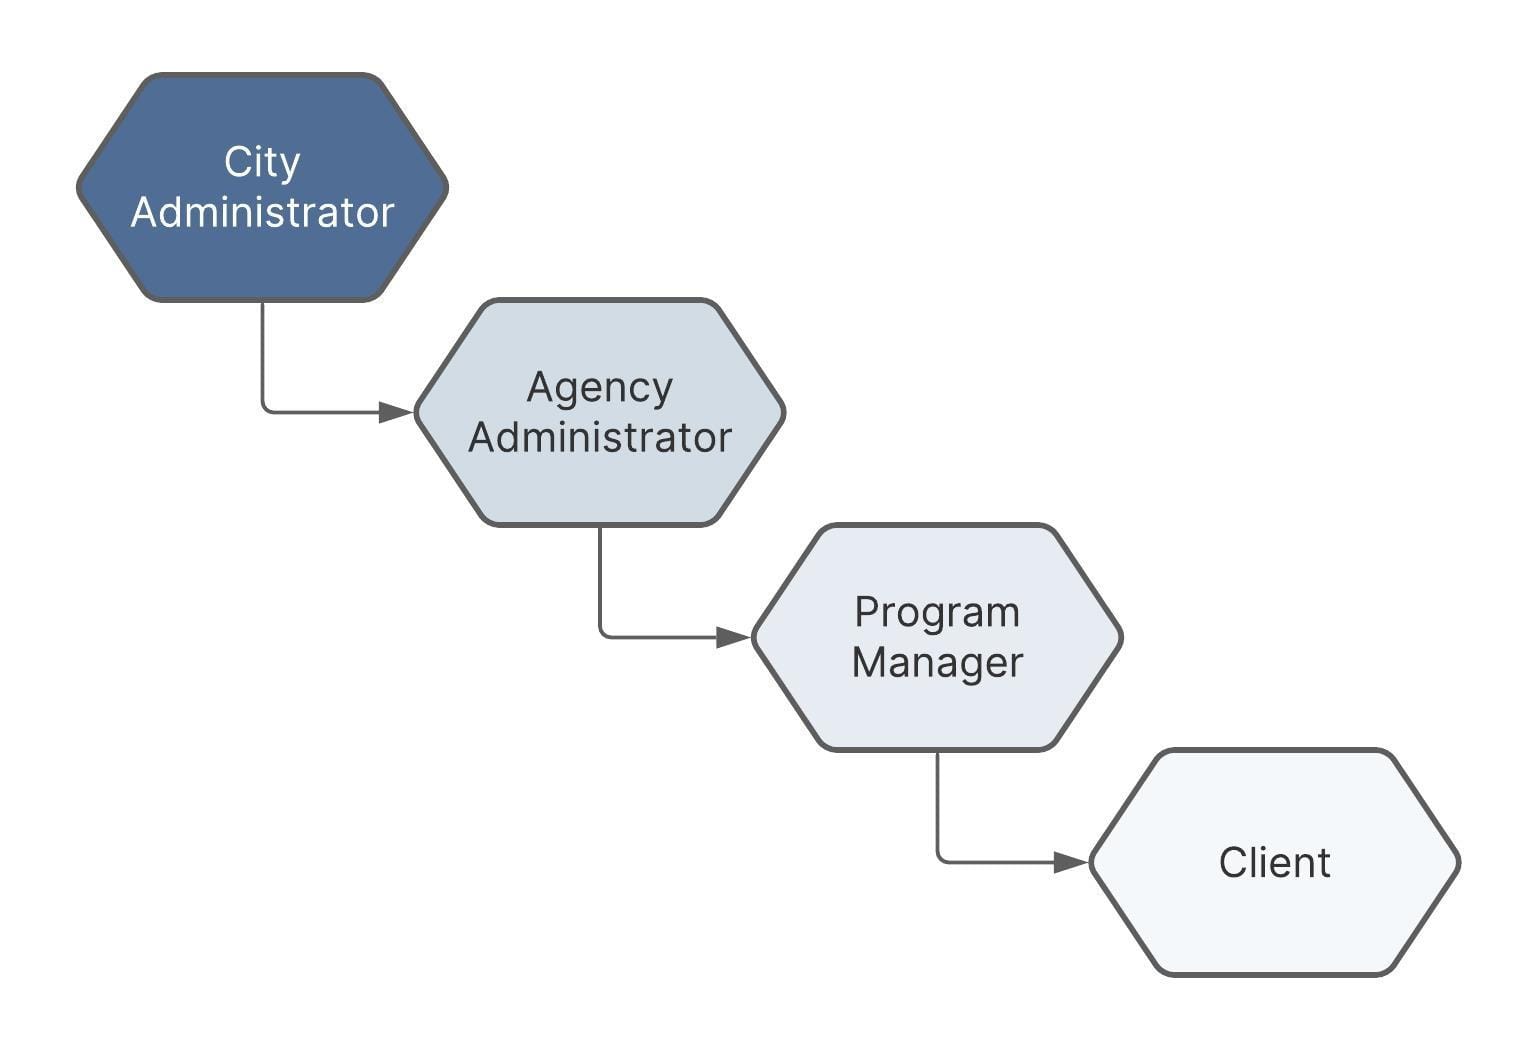
With this laid out, you can proceed with setting up your groups and roles. An example role hierarchy puts each role in the table above as the parent to the role below it. So, you'll configure each role from the top down. Here's a visual look at this hierarchy:
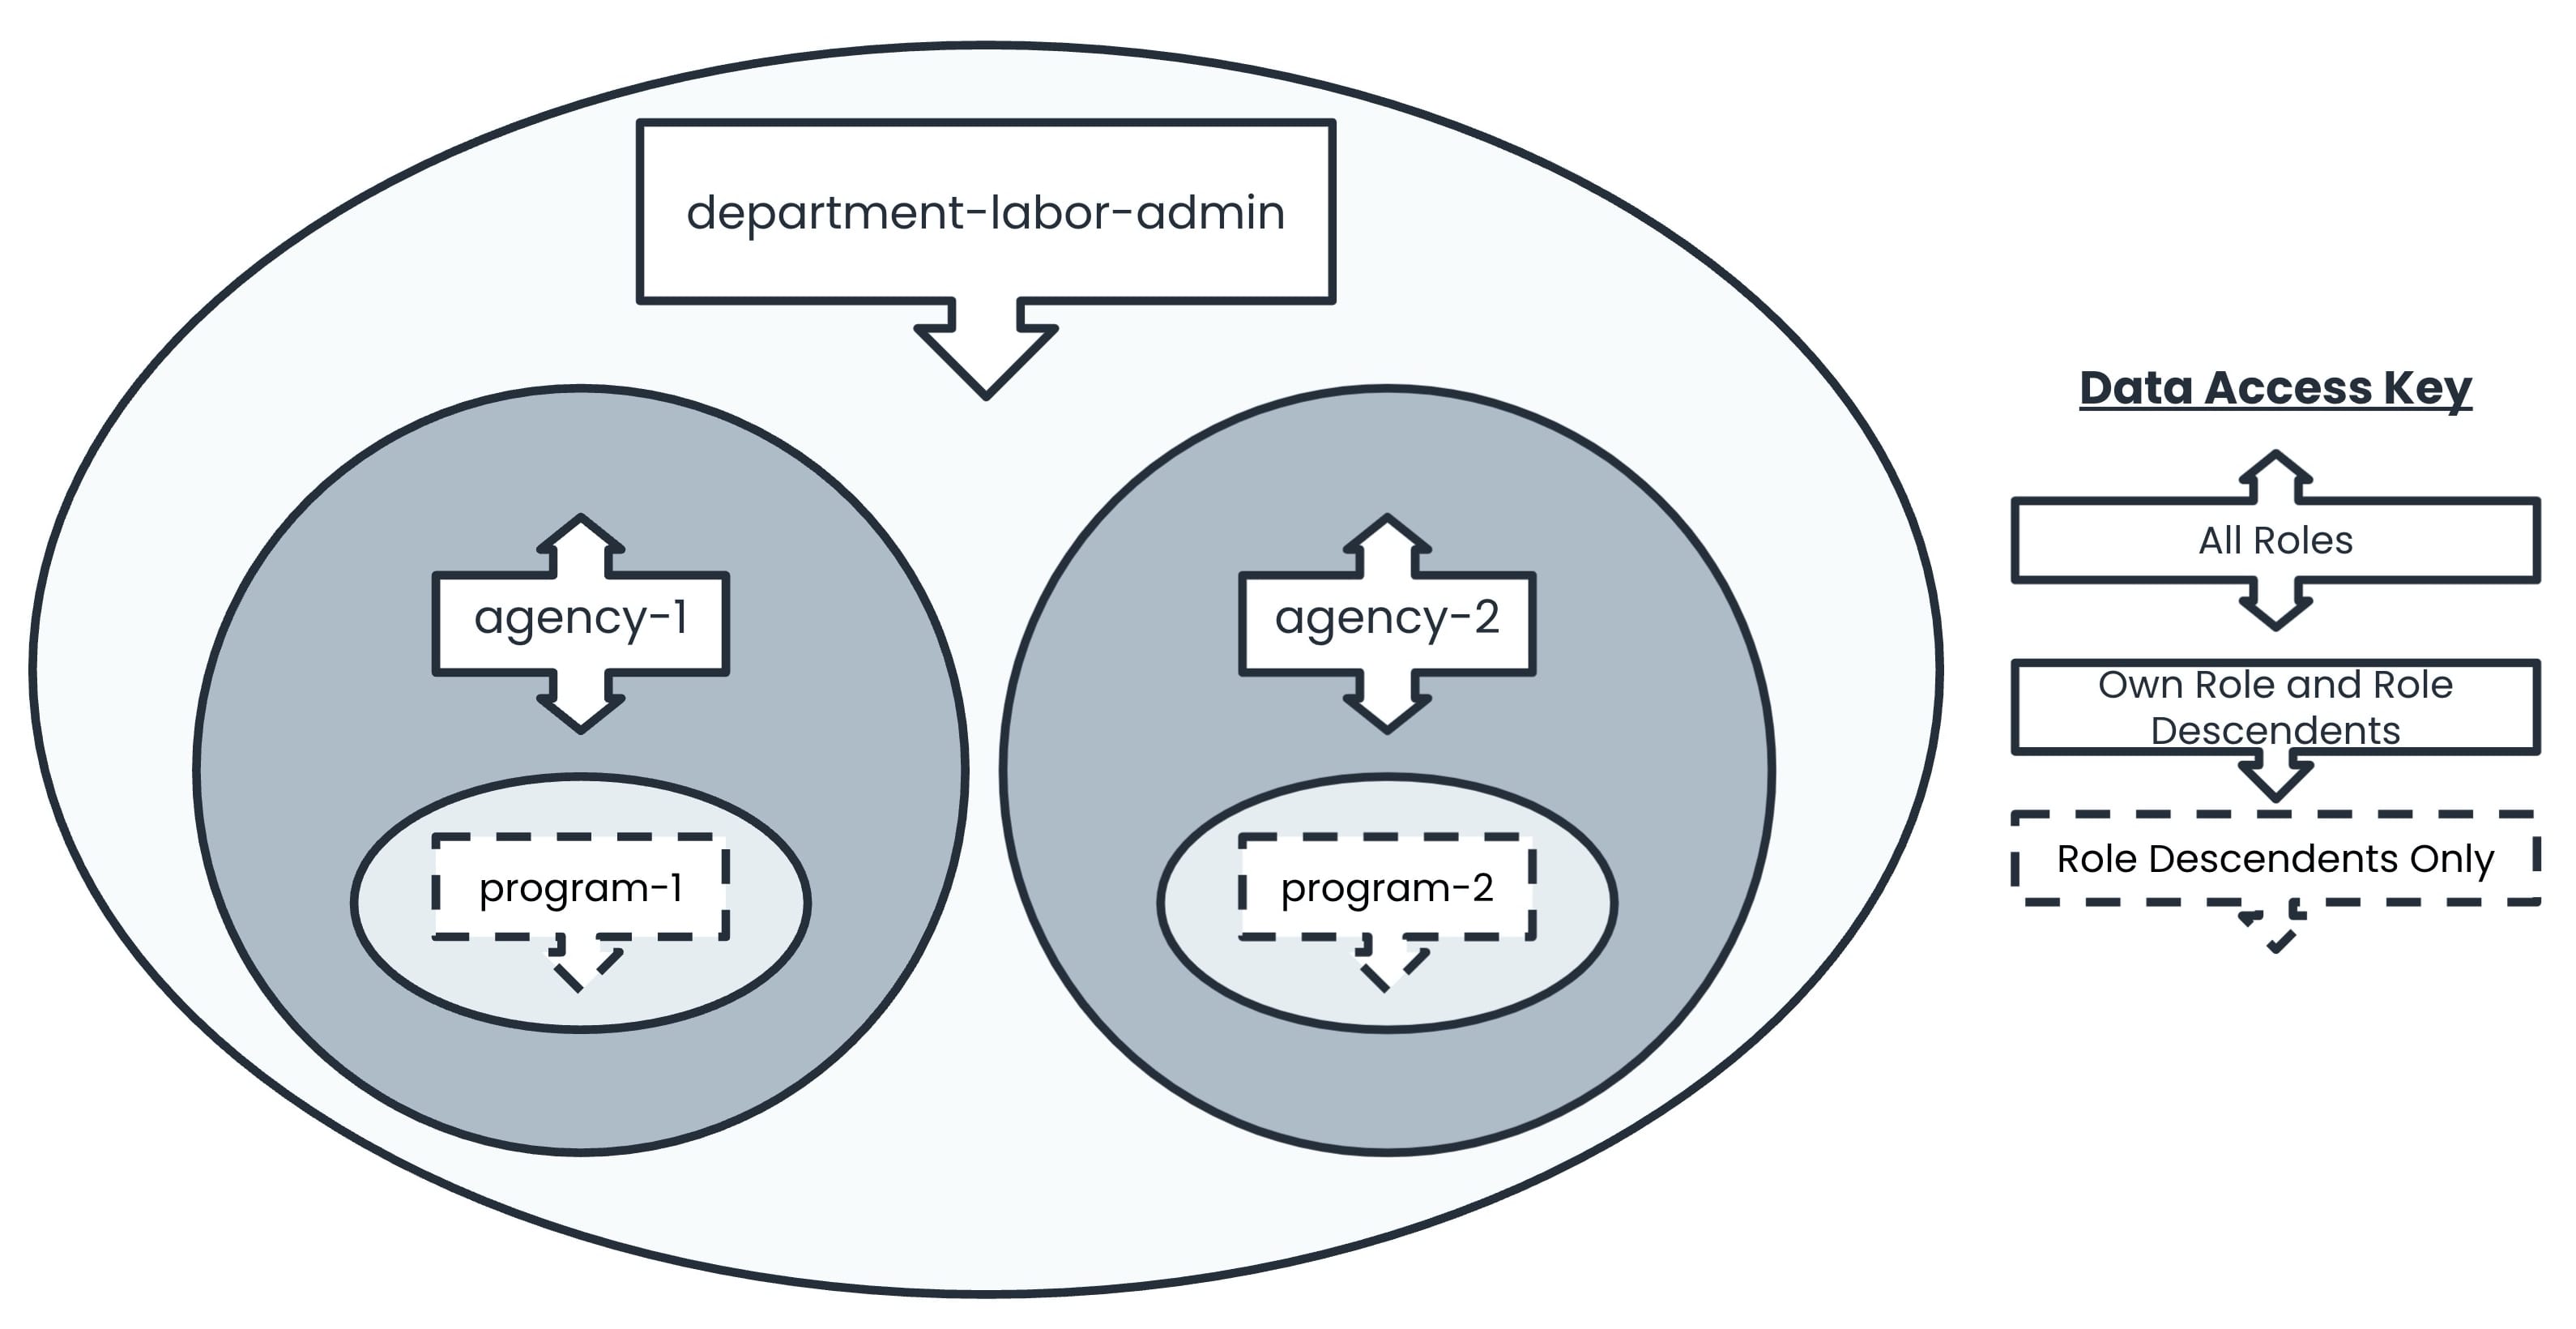
And for your groups, you'll need one for each separate agency. You'll also need a separate group for each project in an agency. Here's a look at how each of these groups might look, as well as the data access each group would grant to its users:
Now that you know the roles and groups it’s time to put them together. A common mistake is assuming the role hierarchy on its own allows end-users who share roles to see each other's submissions or allows them to see descendant role submissions. This is not the case. For an end-user to see someone else’s submissions, they must share at least one group. From there, the permissions of the group and the role hierarchy take effect.
It is helpful to use a chart of your roles and groups to match up what groups each role should be a part of. To start, you know you want to assign City Admin users to the depart-labor-admin group. This group allows users to see submissions from their own role and their descendants. By adding the City Admins to this group, you ensure they will be able to see each other's submissions.
The next level is the Agency level. You need to add Agency Admin users to their respective agency group. An Agency Admin needs to see all the submissions for their agency even if they were submitted by a higher role. So, the permissions for the agency groups include all roles. But if you leave only the Agency Admins in the agency groups, they won't share a group with the City Admins. This leaves them unable to see City Admin submissions. To fix this, you'll add City Admins to all the agency groups as well.
In each agency, there are multiple programs. A Program Manager only needs to see submissions by clients, not submissions by other programs or antecedent roles. So, Program Managers belong to their program group only. The City Admin belongs to all programs at all agencies. And the Agency Admin belongs only to program groups at their agency.
Finally, Clients belong to the appropriate program group at the appropriate agency. Setting client permissions to descendants only prevents them from seeing any submissions but their own. They won’t have permission to see within their own role and there are no descendant roles after clients.
To help organize this information, take a look at it in chart form:
The roles and users are combined in the far left column.
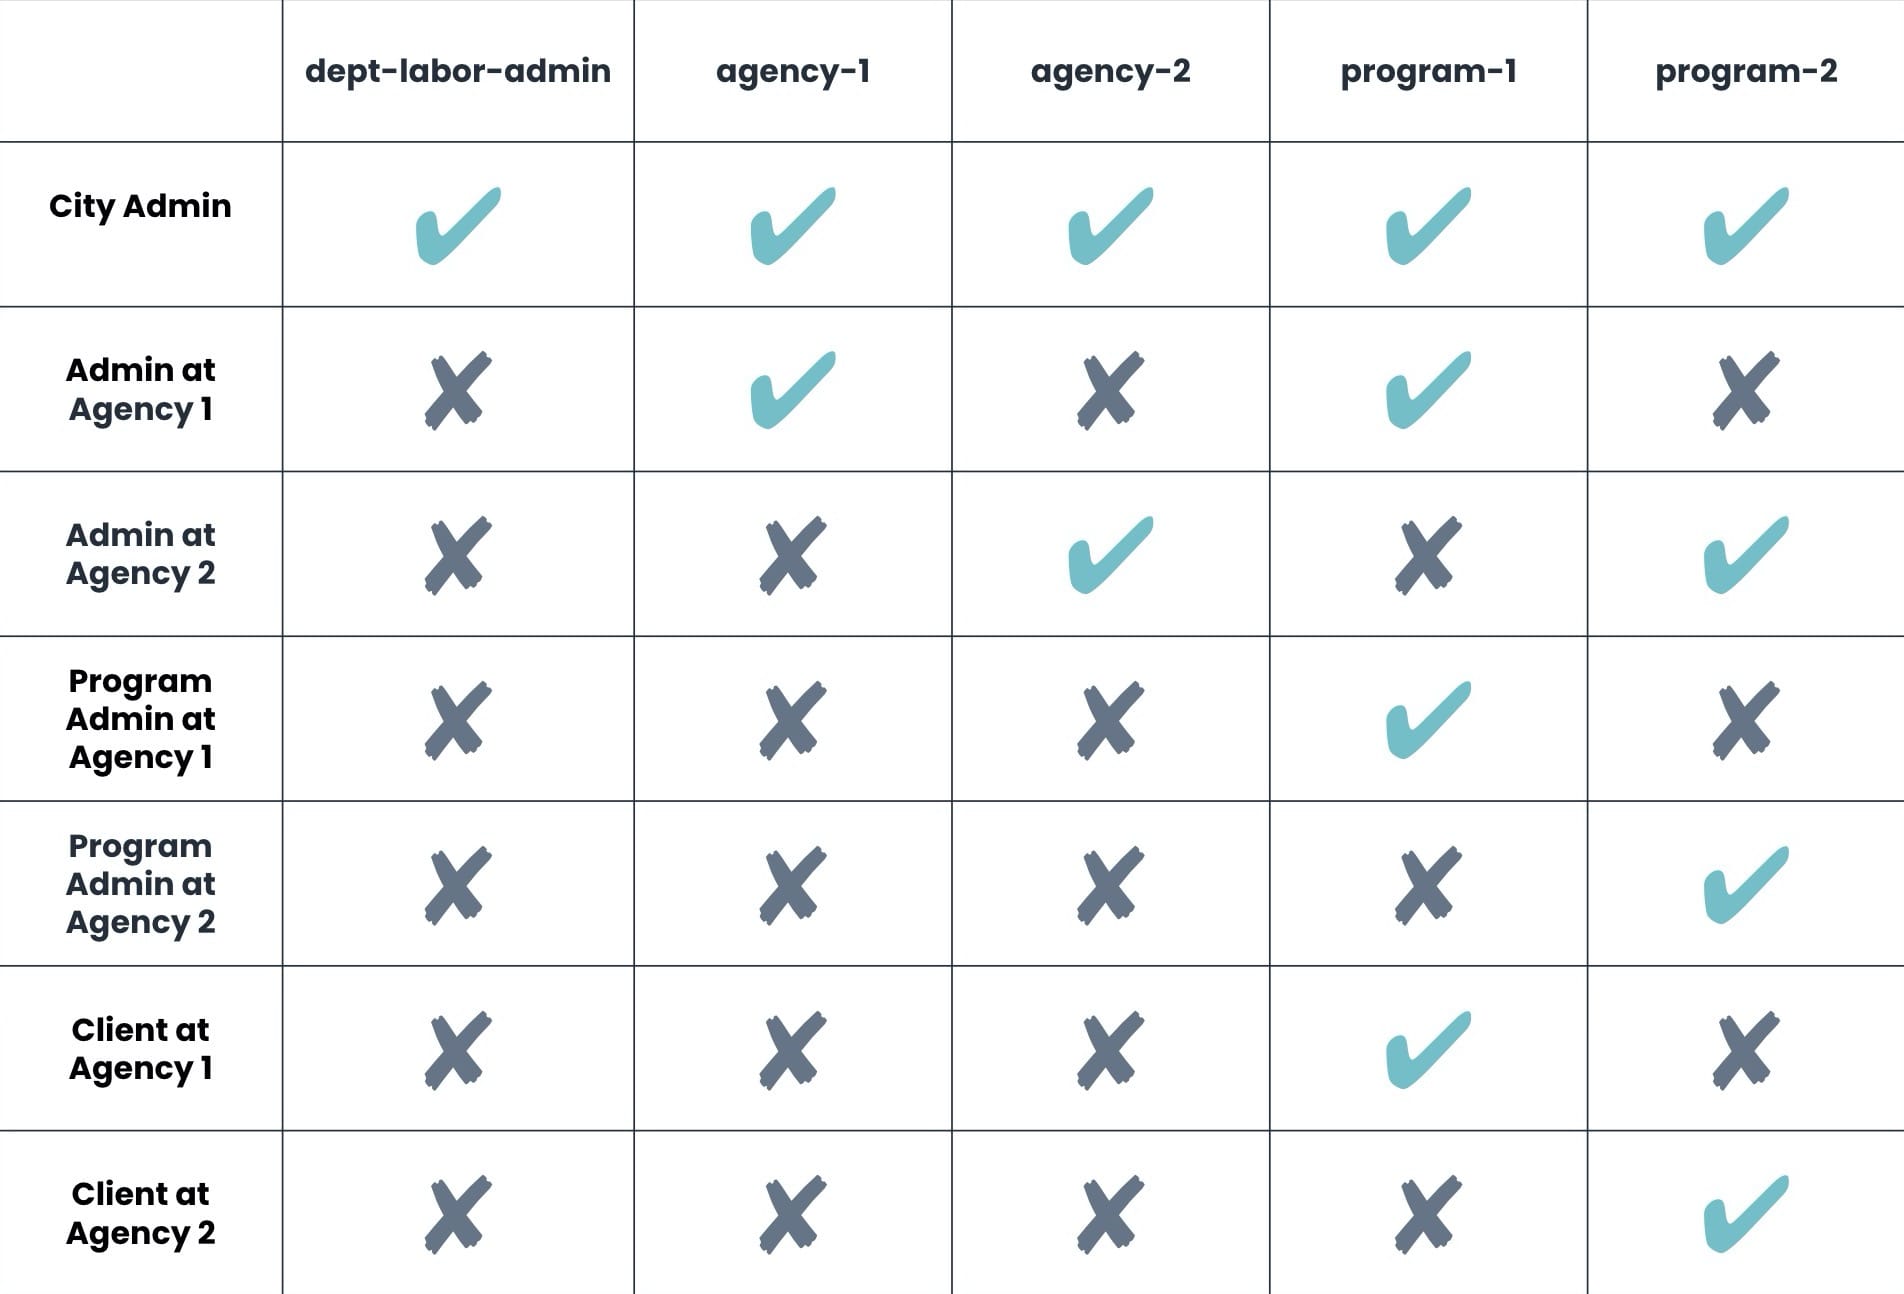
This chart lets you see that the roles you want to have some sort of shared visibility share at least one group. You can then check the permissions of the group to understand which way the visibility goes. Some roles share more than one group, including the City Admins and Agency Admins. For these, the highest level of permissions supersedes all others. Here's an example: Agency Admins have access to all roles in the agency groups. They have access to City Admin submissions even though this isn't granted in all groups shared by these roles.
Before you're done and ready to test your RBAC, there is one more consideration to make. You have two options when adding roles to groups. First, you can set up your roles so that any end-user created in that role is added to a set of groups. Or, you can add the end-user to groups after their account exists. Let’s look at an instance of when we would want to use each.
The City Admins have several groups they need to be a part of. They should always have access to all groups. So, it is most efficient to automatically assign them using the role settings.
When setting up RBAC, keep in mind inheritance logic. The City Admin role inherits from the Authenticated role. Other than that, you don't want any permissions inherited. So, all roles should be assigned the No Access base setting as a best practice.
Compare that to Agency Admins. Each individual end-user in the Agency Admin role has different agency group assignments. So, it is most efficient to assign groups after you create the end-user accounts. Inheriting roles will only lead to confusion. This is also the case for all remaining roles in this example.
Adding user accounts to groups individually doesn't require going through User Administration. You can also do this from your application using a Plug-In component.
Once you configure your application's RBAC, be sure to test it out to ensure group and role assignments are working as expected.