About this Configuration Guide
This guide covers setting up the Infermedica application template. Using this guide, you'll explore how the Infermedica Symptoms Checker template works. You'll learn how to install the template in your environment and how to build an application from it. Plus, you'll see how to customize the application to fit your needs.
Here’s a high-level overview of the elements:
Title | Element Type | Description |
|---|---|---|
Infermedica Template | Workflow | All the modules come together here for a seamless experience. In Express View, users go through each module to retrieve a preliminary diagnosis. |
Infermedica: Diganosis (API) | Module | A behind-the-scenes module that stores answers and generates follow-up questions. |
Infermedica: Diagnosis | Module | Creates a table with preliminary diagnoses based on the information provided. Also, asks clarifying questions to improve accuracy. |
Infermedica: Symptoms | Module | Users select the symptoms they're experiencing. Optionally, they can add any potential medical risk factors they have. |
Infermedica: Symptoms (API) | Module | Filters the symptoms and risk factors users can choose from based on their demographics. |
Infermedica: Demographics | Module | Asks for users' age and sex, which narrows down symptoms and risk factors. |
Infermedica | Service | Infermedica is a leading digital health company specializing in AI (artificial intelligence)-powered solutions. This service provides advanced preliminary diagnosis and triage tools. |
All images used in this guide are for illustrative purposes only. Images are subject to change without notice. All images are correct at the time of publication.
Overview
When you have medical concerns, it helps to know what you might be dealing with. The Infermedica Symptoms Checker template gives users a way to determine possible causes of their symptoms. The template connects to an Infermedica account to analyze symptoms. The included workflow asks for demographics, health risk factors, and symptoms. Based on these responses, it populates a table with likely causes.
This template is great for hospitals, insurance companies, and other healthcare services that want to screen patients for potential preliminary diagnoses. It comes with everything you need to add a symptoms checker in your application. Besides setting up the service, you don't need any extra configurations to make this template work.
Here's a 1-minute GIF of the template in action:
Features
With this template, you can:
Input demographic information, symptoms, and risk factors.
See a chart of likely diagnoses.
Gain further diagnostic insight by answering AI-driven clarifying questions.
Requirements
To use this template, you must have:
Administrator-level access to an Unqork environment.
An active Infermedica account.
Adding the Template
Before you can build an application from this template, you must install the template in your environment. Then, you can visit your Library and build an application from your new template.
Adding the Template to Your Environment
To add the template to your environment:
At the top right of the Unqork Designer Platform, click Library.
Click Templates.
Click Marketplace.
You can also access the Marketplace at any time by visiting https://marketplace.unqork.io.
In the Search the Listings Directory field, enter Infermedica.
Click the Infermedica Symptoms Checker tile.
Click Install to Environment.
Click Install Template.
If you aren't logged in, you'll see a field for Environment URL and a Login button. Enter your environment's URL where you want to install the template. For example: [environmentname.unqork.io]. Click the Login button. Then, return to step 4 and click Install to Environment again. Follow the remaining steps as listed.
Now, you can use your newly installed template to create an application.
Creating an Application from the Template
After you add the template to your environment from Marketplace, you can use it to create an application. This template creates a workflow-type application.
At the top right of the Unqork Designer Platform, click Library.
Click Templates.
Find the Infermedica template tile.
Click Create App from Template.
From the Workspace drop-down, select the destination workspace. This is where your application lives once created.
Enter your unique App Name. The App Path autofills as you type your App Name.
If you want a different App Path, enter it in the App Path field.
From the Style drop-down, select a preview style. A style specifies your application’s appearance in Express View. If left blank, your application uses your environment's default style.
You'll notice the App Type and App Entrypoint are grayed out. The template automatically takes care of these for you.
Click Create App.
The application opens in the workspace you specified. You land on the Workflows tab of your application.
Your Workflows tab looks something like this:

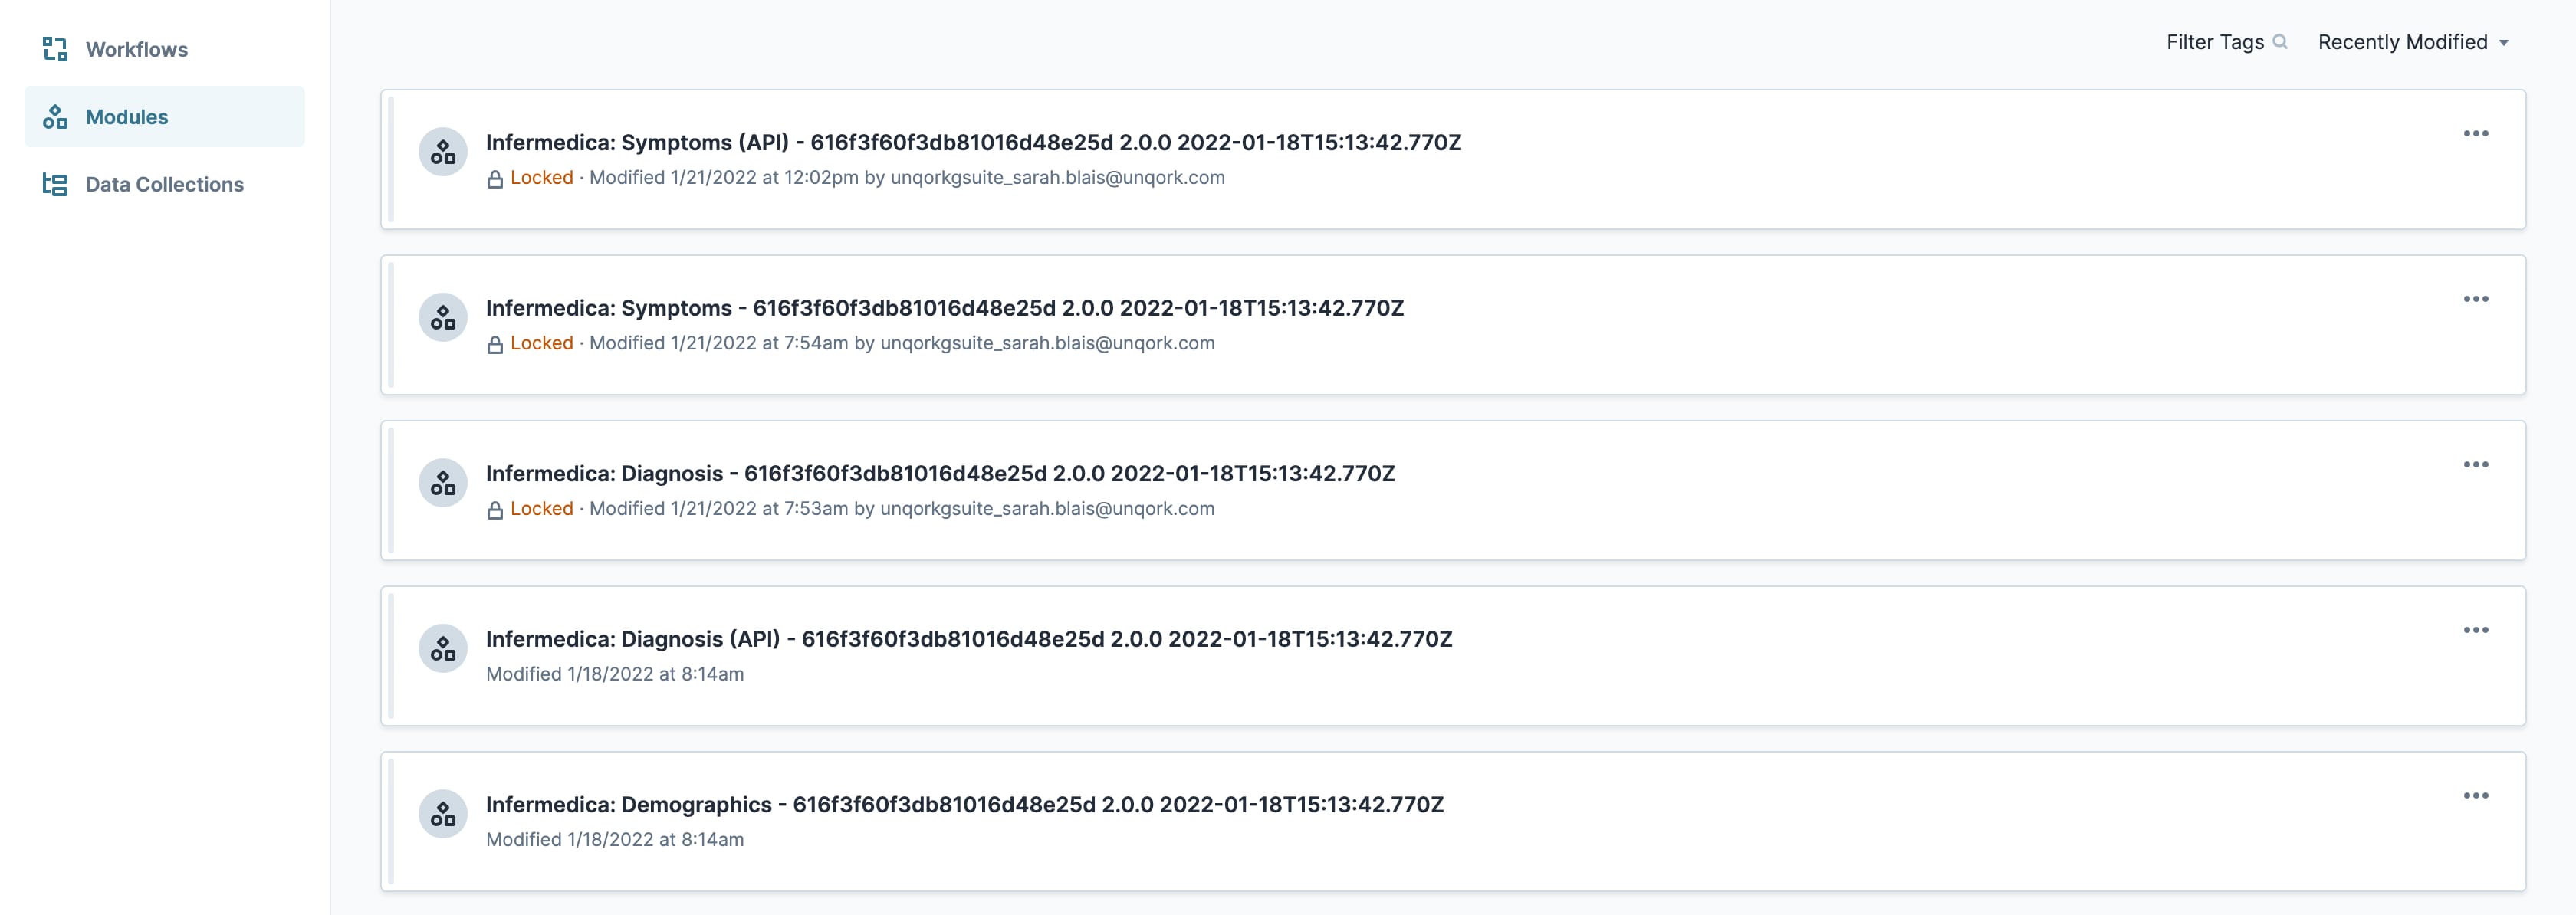
When you create an application from the template, your module names automatically include the template ID and a time stamp. This is to prevent any duplicate module paths. You can change module names and module paths at any time. Any service or workflow you create with your template also has a template ID and time stamp.
Your Modules tab looks something like this:
And here's an example of an Infermedica service in Services Administration:

How the Template Works
This template has a workflow, 5 modules, and a service. The modules connect to the workflow to provide a seamless application experience. The Infermedica service powers the AI used to populate diagnoses.
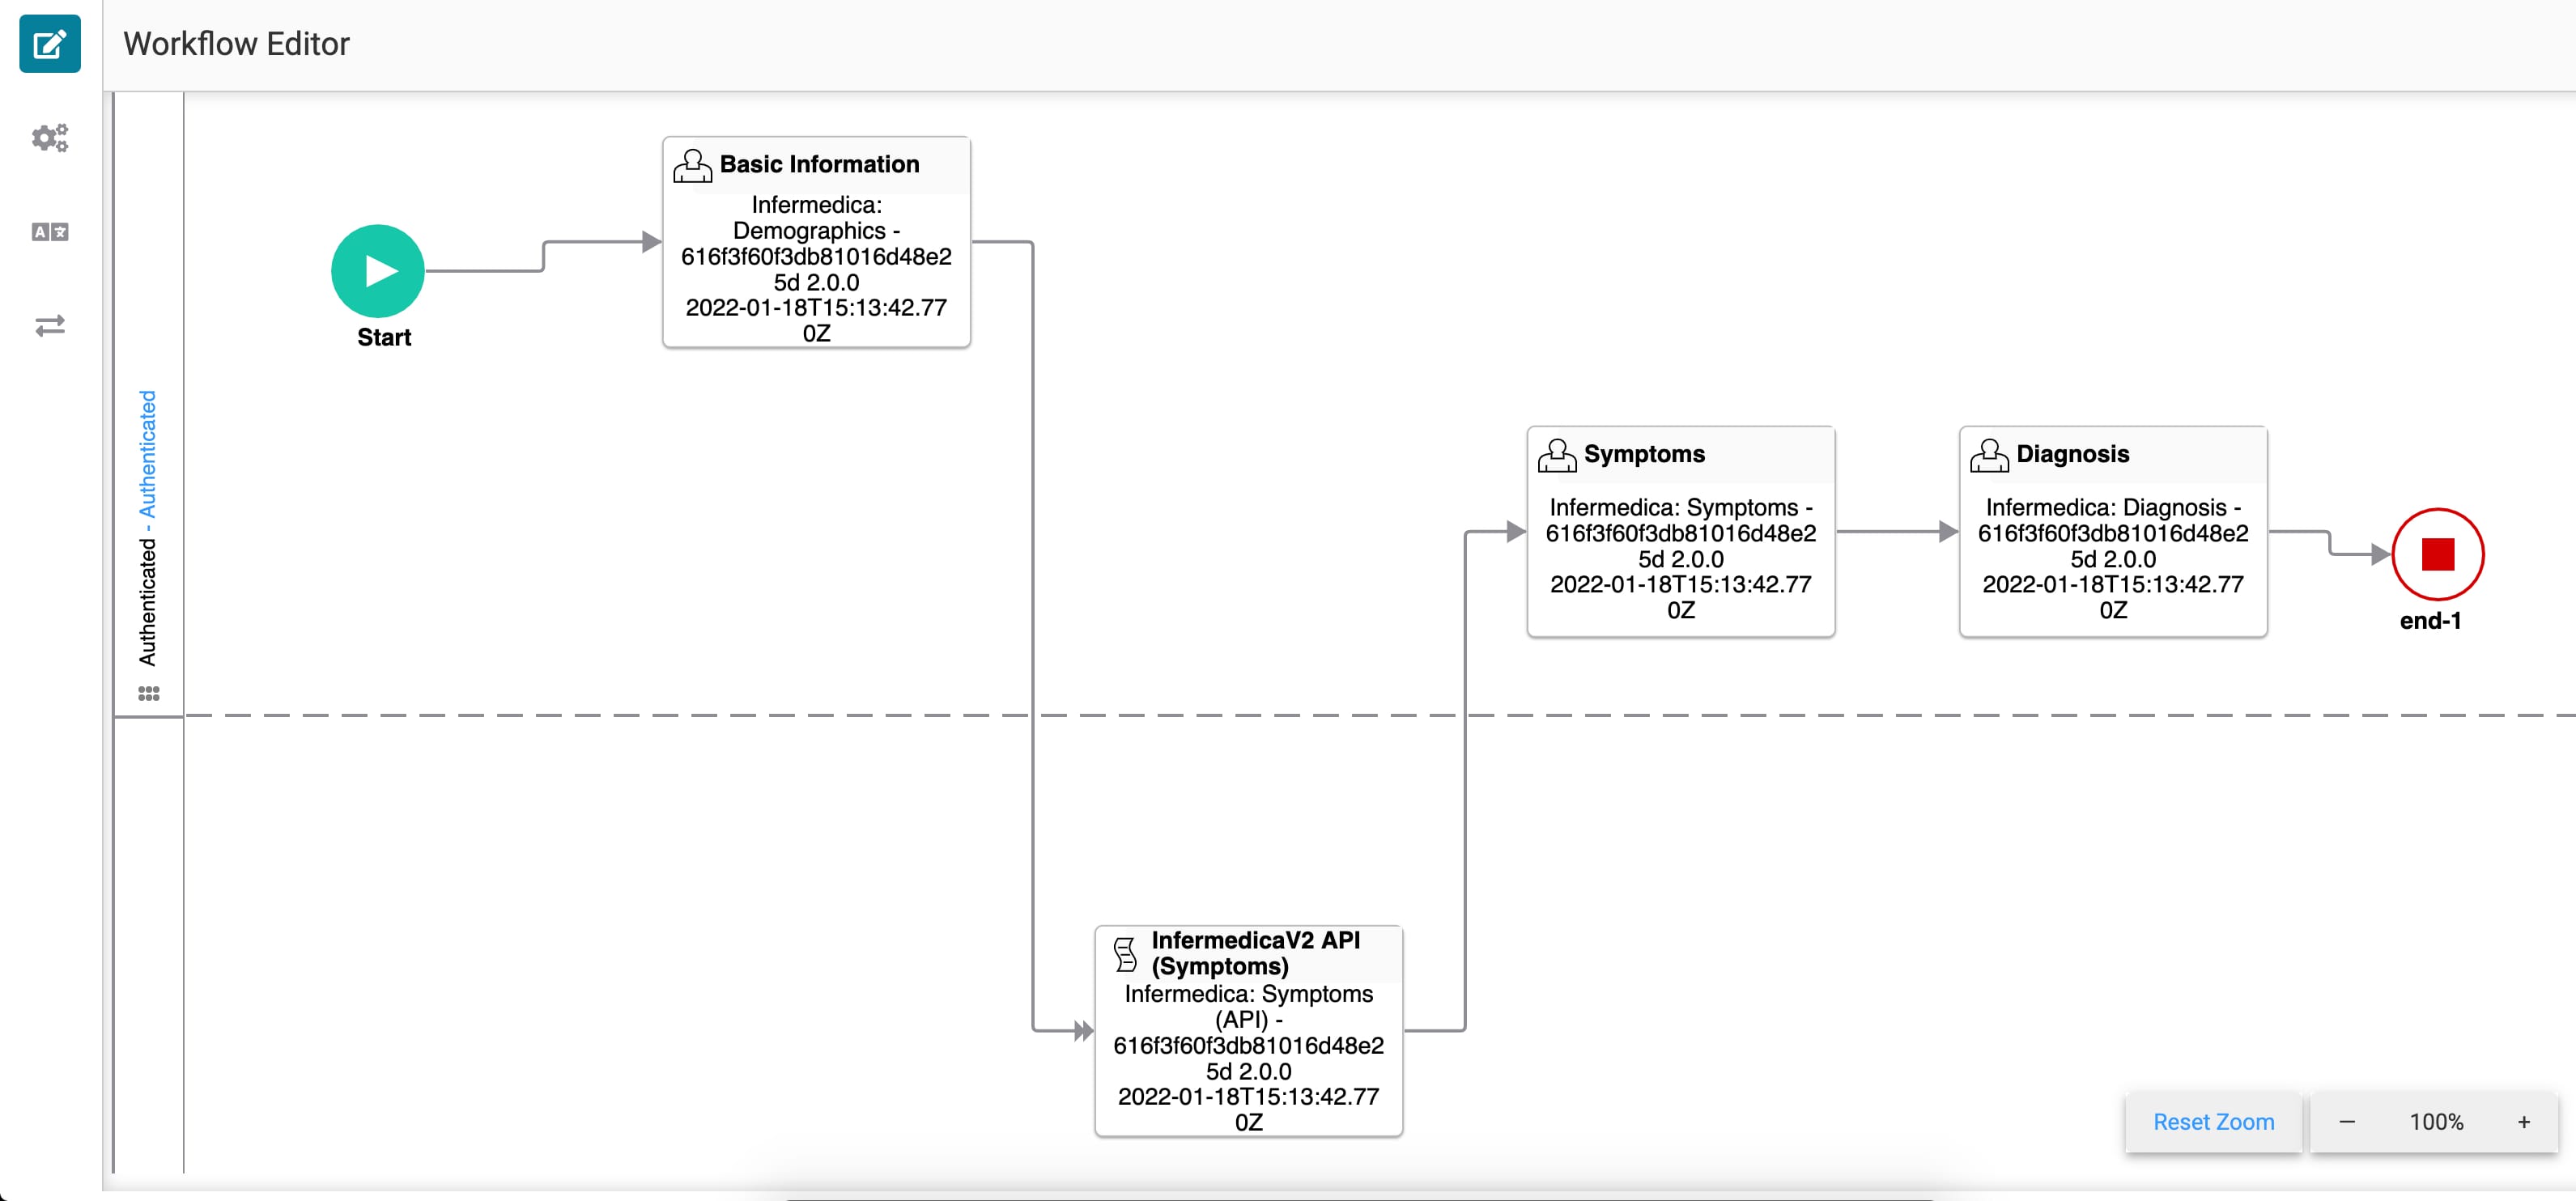
When you open the workflow editor, you see:
Basic Information: Provides a disclaimer acknowledgment and asks for age and sex. Connected to the Infermedica: Demographics module.
InfermedicaV2 API (Symptoms): An API (application programming interface) module that lives in the Automated swimlane and filters symptoms based on the provided sex. Connected to the Infermedica: Symptoms (API) module.
Symptoms: Asks for symptoms and potential risk factors. Connected to the Infermedica: Symptoms module.
Diagnosis: Provides a table of potential causes of symptoms, and asks clarifying questions. Connected to the Infermedica: Diagnosis module.
This is a workflow integration template. An integration is a service external to Unqork. Here, the service is an Infermedica API that stores symptoms and risk factors. You'll set up your Infermedica account directly through Infermedica. Your API keys generate automatically after creating your Infermedica account.
How the Infermedica Service Works
Infermedica provides AI solutions for medical companies, including a dynamic symptom checker. The template creates a possible diagnosis that guides people on the proper levels of care.
Unqork uses an API call to pull symptoms and risk factors from the Infermedica database. Infermedica pulls data into your application through an API call when you download this template. Users can choose from over 100 stored symptoms and risk factors.
How the Infermedica Template Workflow Works
The workflow is where all modules come together to create a streamlined experience. There are 3 Task nodes in the Authenticated swimlane: Basic Information, Symptoms, and Diagnosis. The API (Symptoms) Task node lives in the Automated swimlane. First, the user inputs their age and sex. The API (Symptoms) task eliminates certain potential risks based on this information. From there, the user inputs their symptoms and risk factors and receives a list of possible diagnoses.
Here's how the workflow looks in the Workflow Builder:
In the next few sections, you'll preview each module of the workflow in Express View.
How the Infermedica: Demographics Module Works
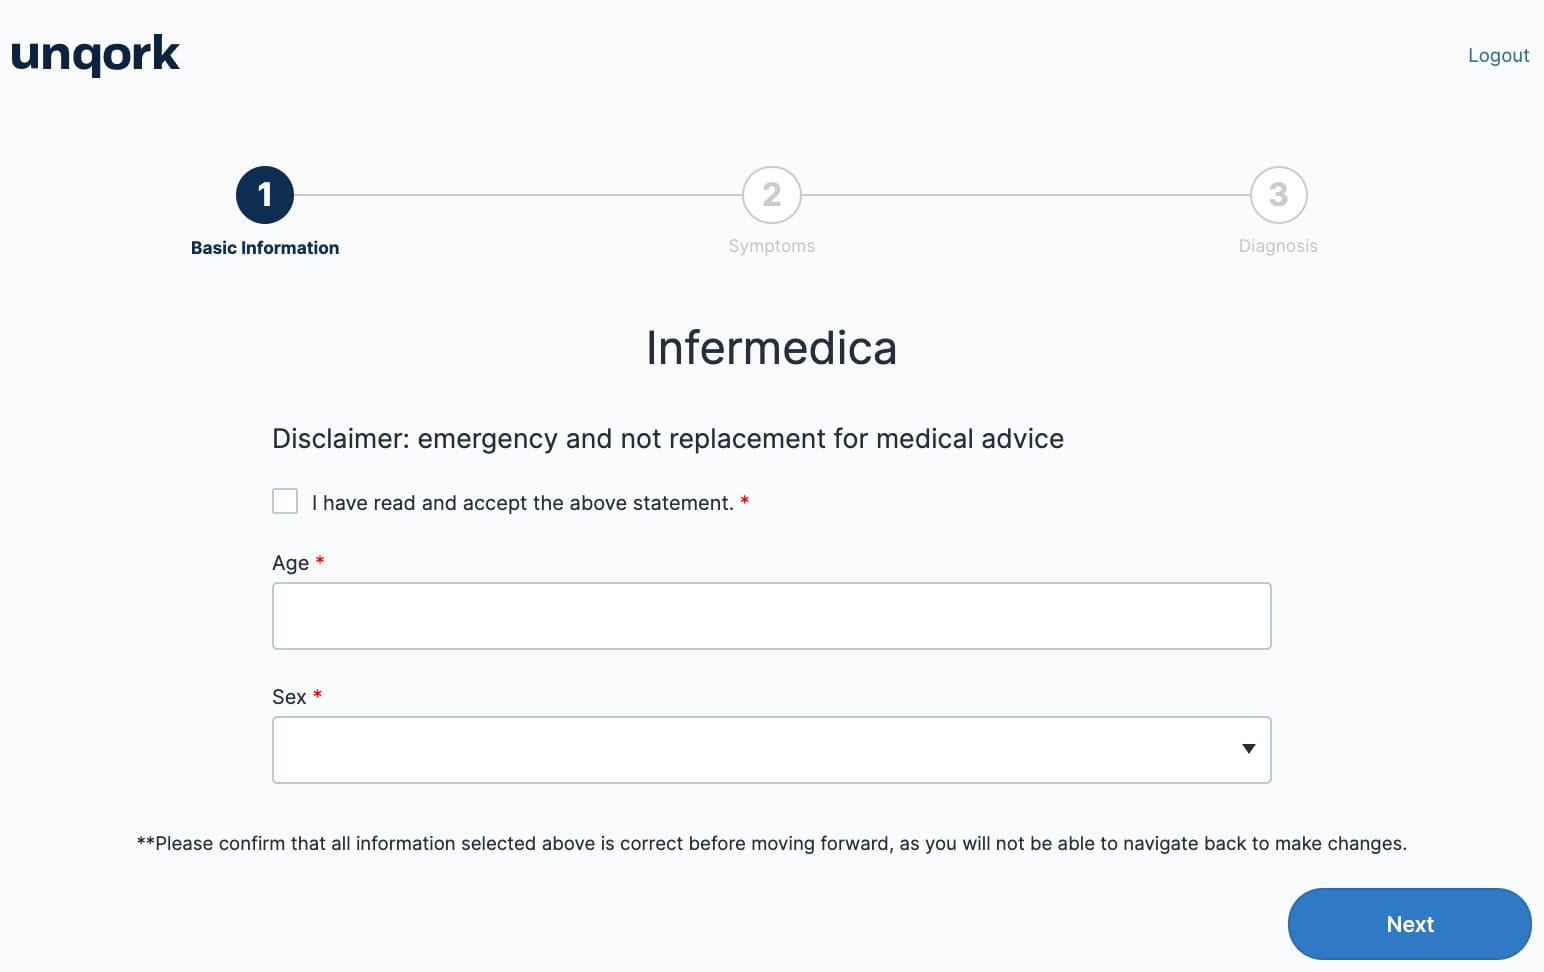
This is the first screen in the workflow. It includes a disclaimer agreement checkbox, a text box for age, and a drop-down for sex. The module requests this information upfront to help narrow down symptoms and risk factors. You can also replace the disclaimer with your company's language.
Here's how the workflow looks in the Module Builder: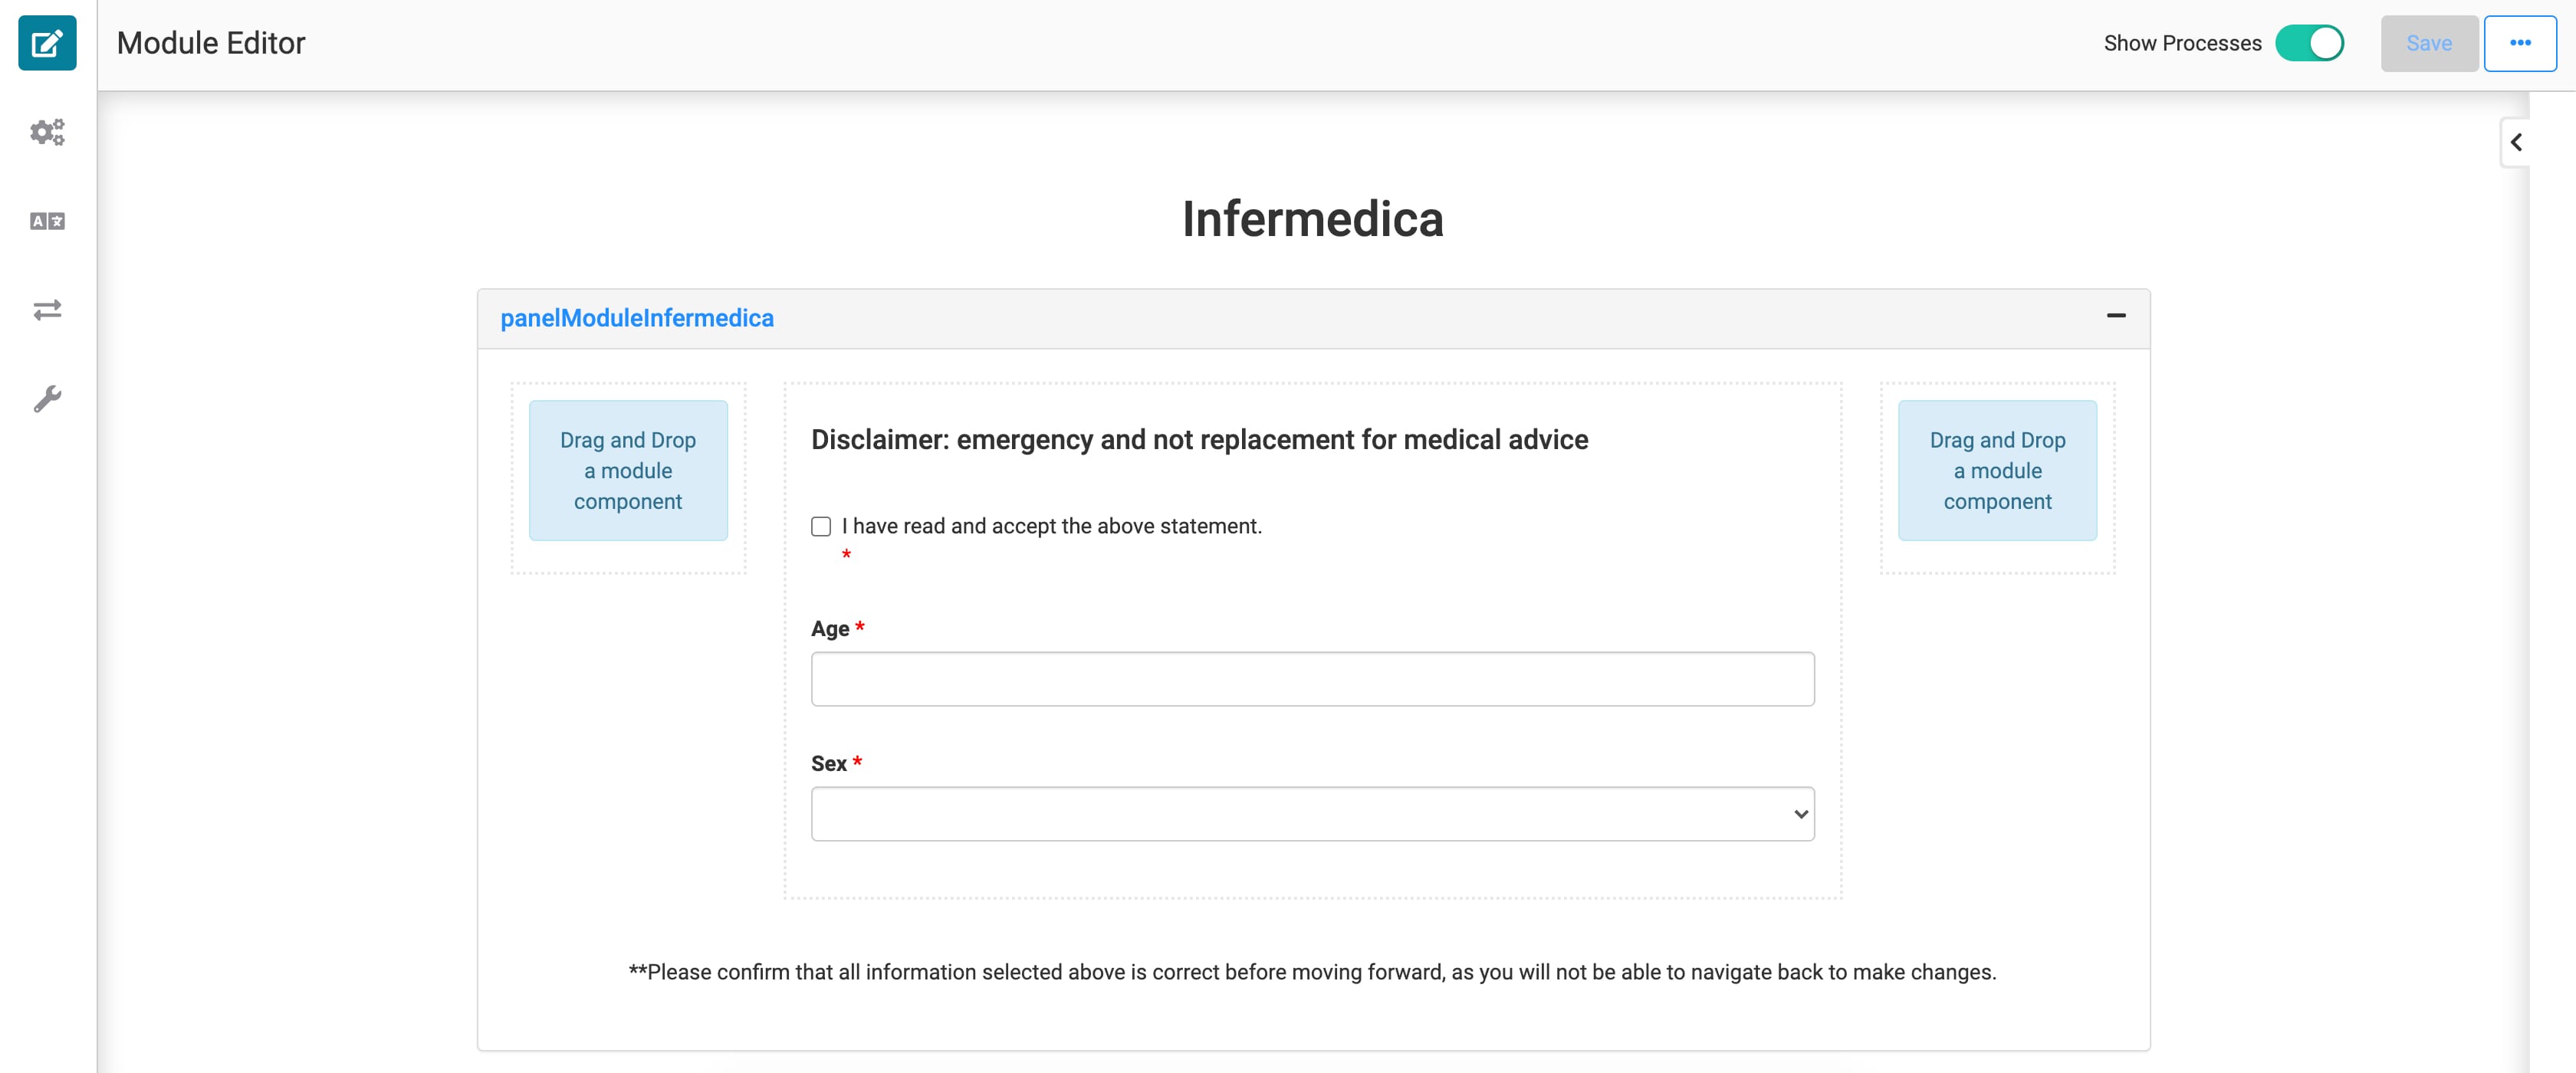
And here's how it looks in Express View within the workflow:
How the Infermedica: Symptoms (API) Module Works
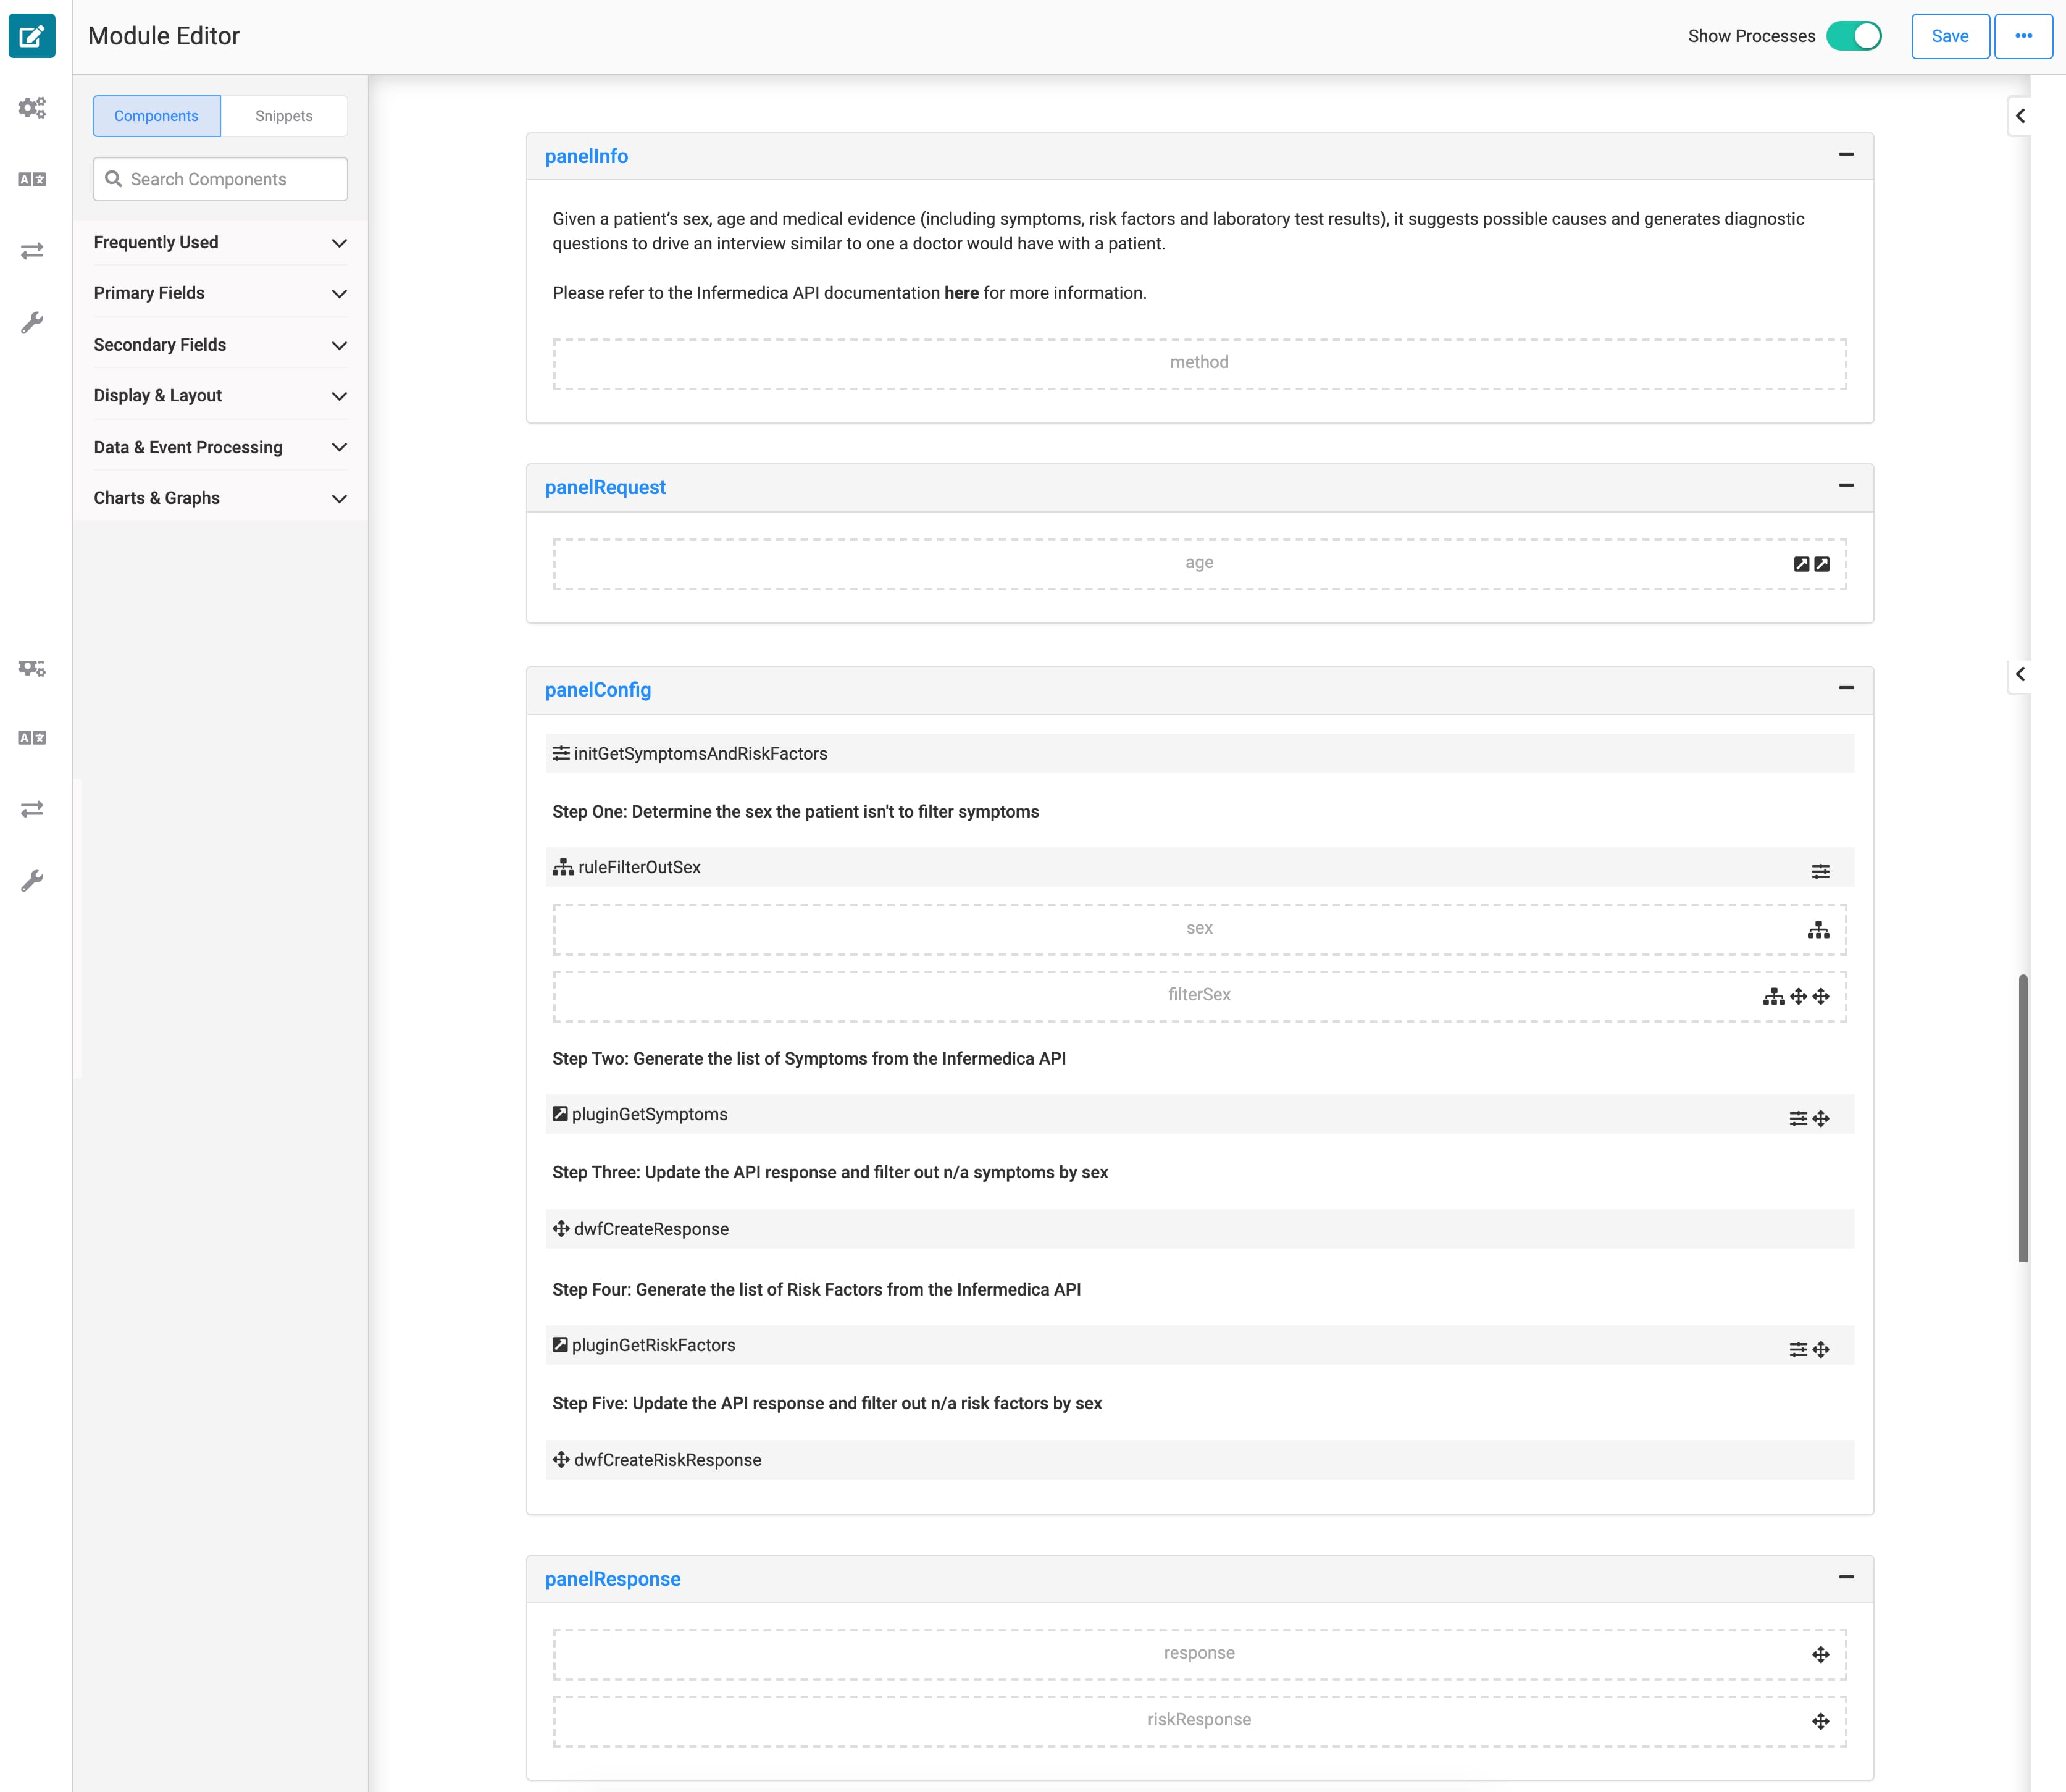
Next, the demographics are sent to the Symptoms API module in the Automated lane, and 2 things happen. First, the API filters symptoms and risk factors based on the user's sex. For example, it doesn't show pregnancy as a potential risk factor for a user who lists their sex as male. Second, it stores the age to help create possible diagnoses. The API also calls the Infermedica service to populate symptoms and risk factors.
Here's how the workflow looks in the Module Builder:
How the Infermedica: Symptoms Module Works
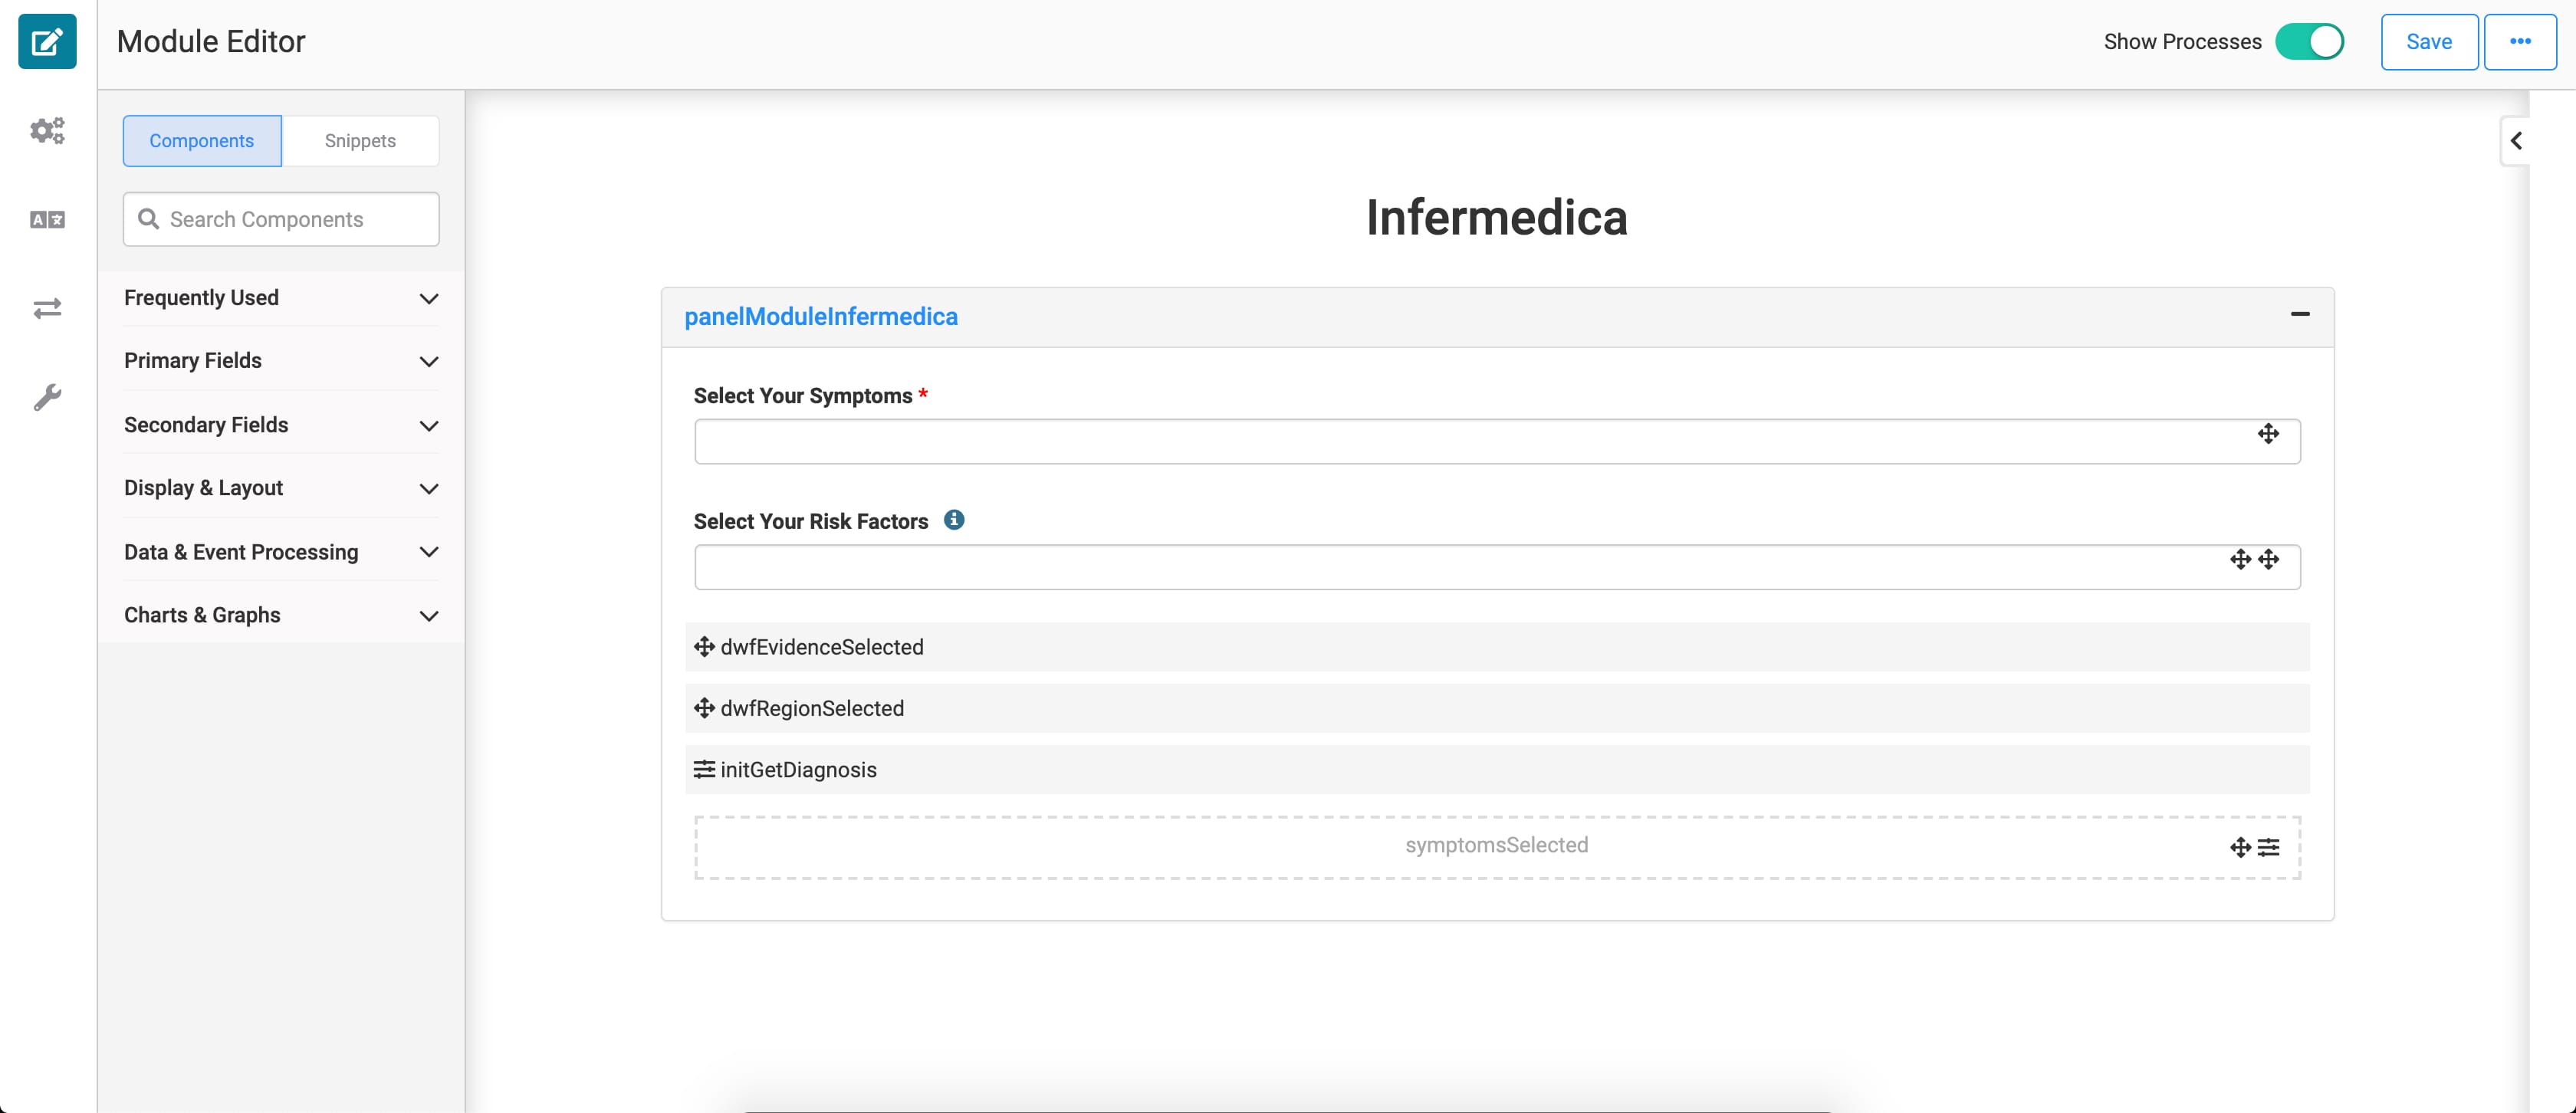
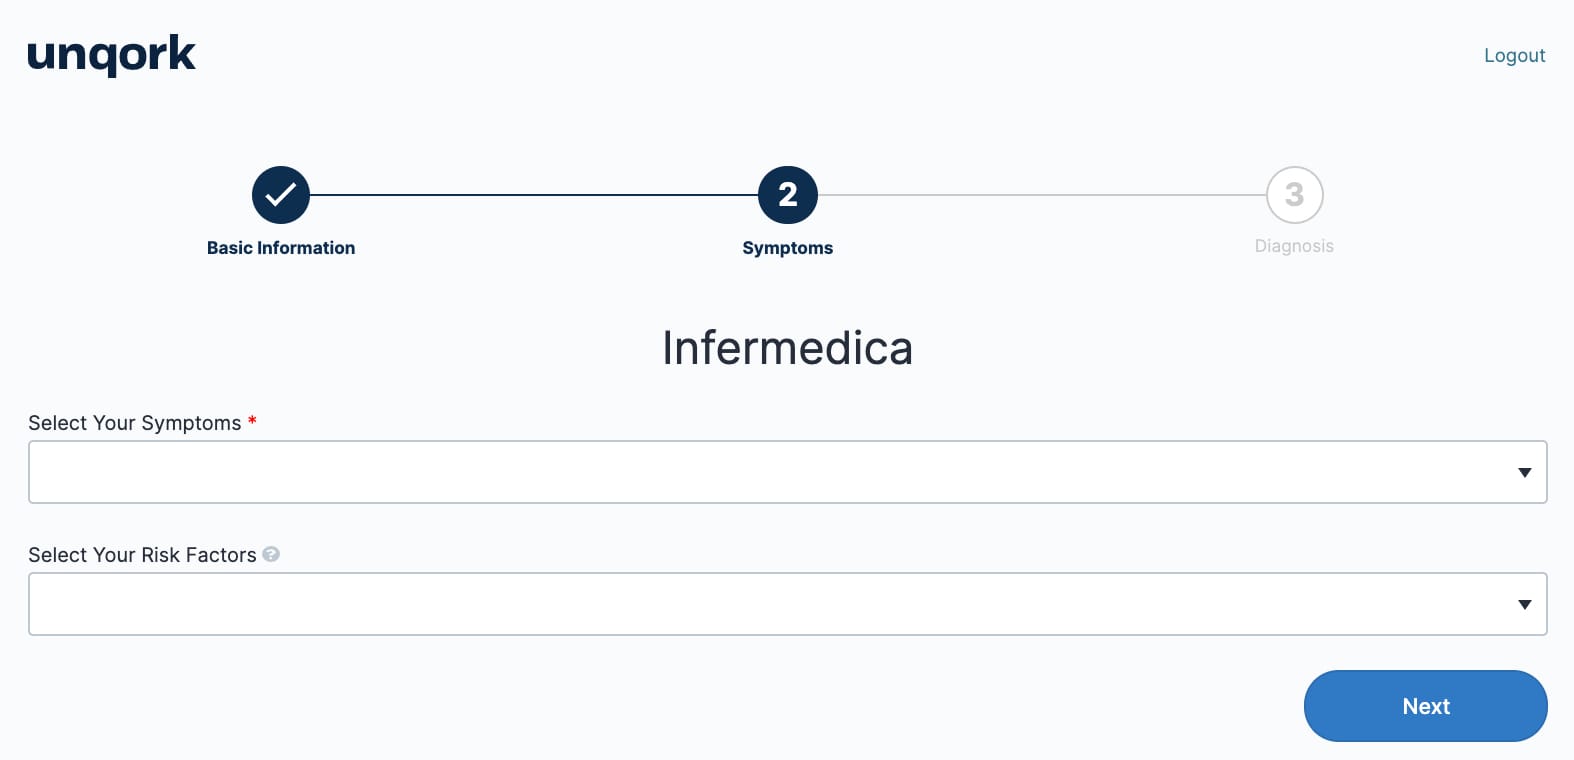
This is the second screen in the workflow. Users pick their symptoms and any medical risk factors. They can either type them or choose from the drop-down menu. This information gets sorted and collected in 2 Data Workflows and a Hidden component. This module also has an initializer that triggers the diagnosis on the next screen.
Here's how the workflow looks in the Module Builder:
And here's how it looks in Express View within the workflow:
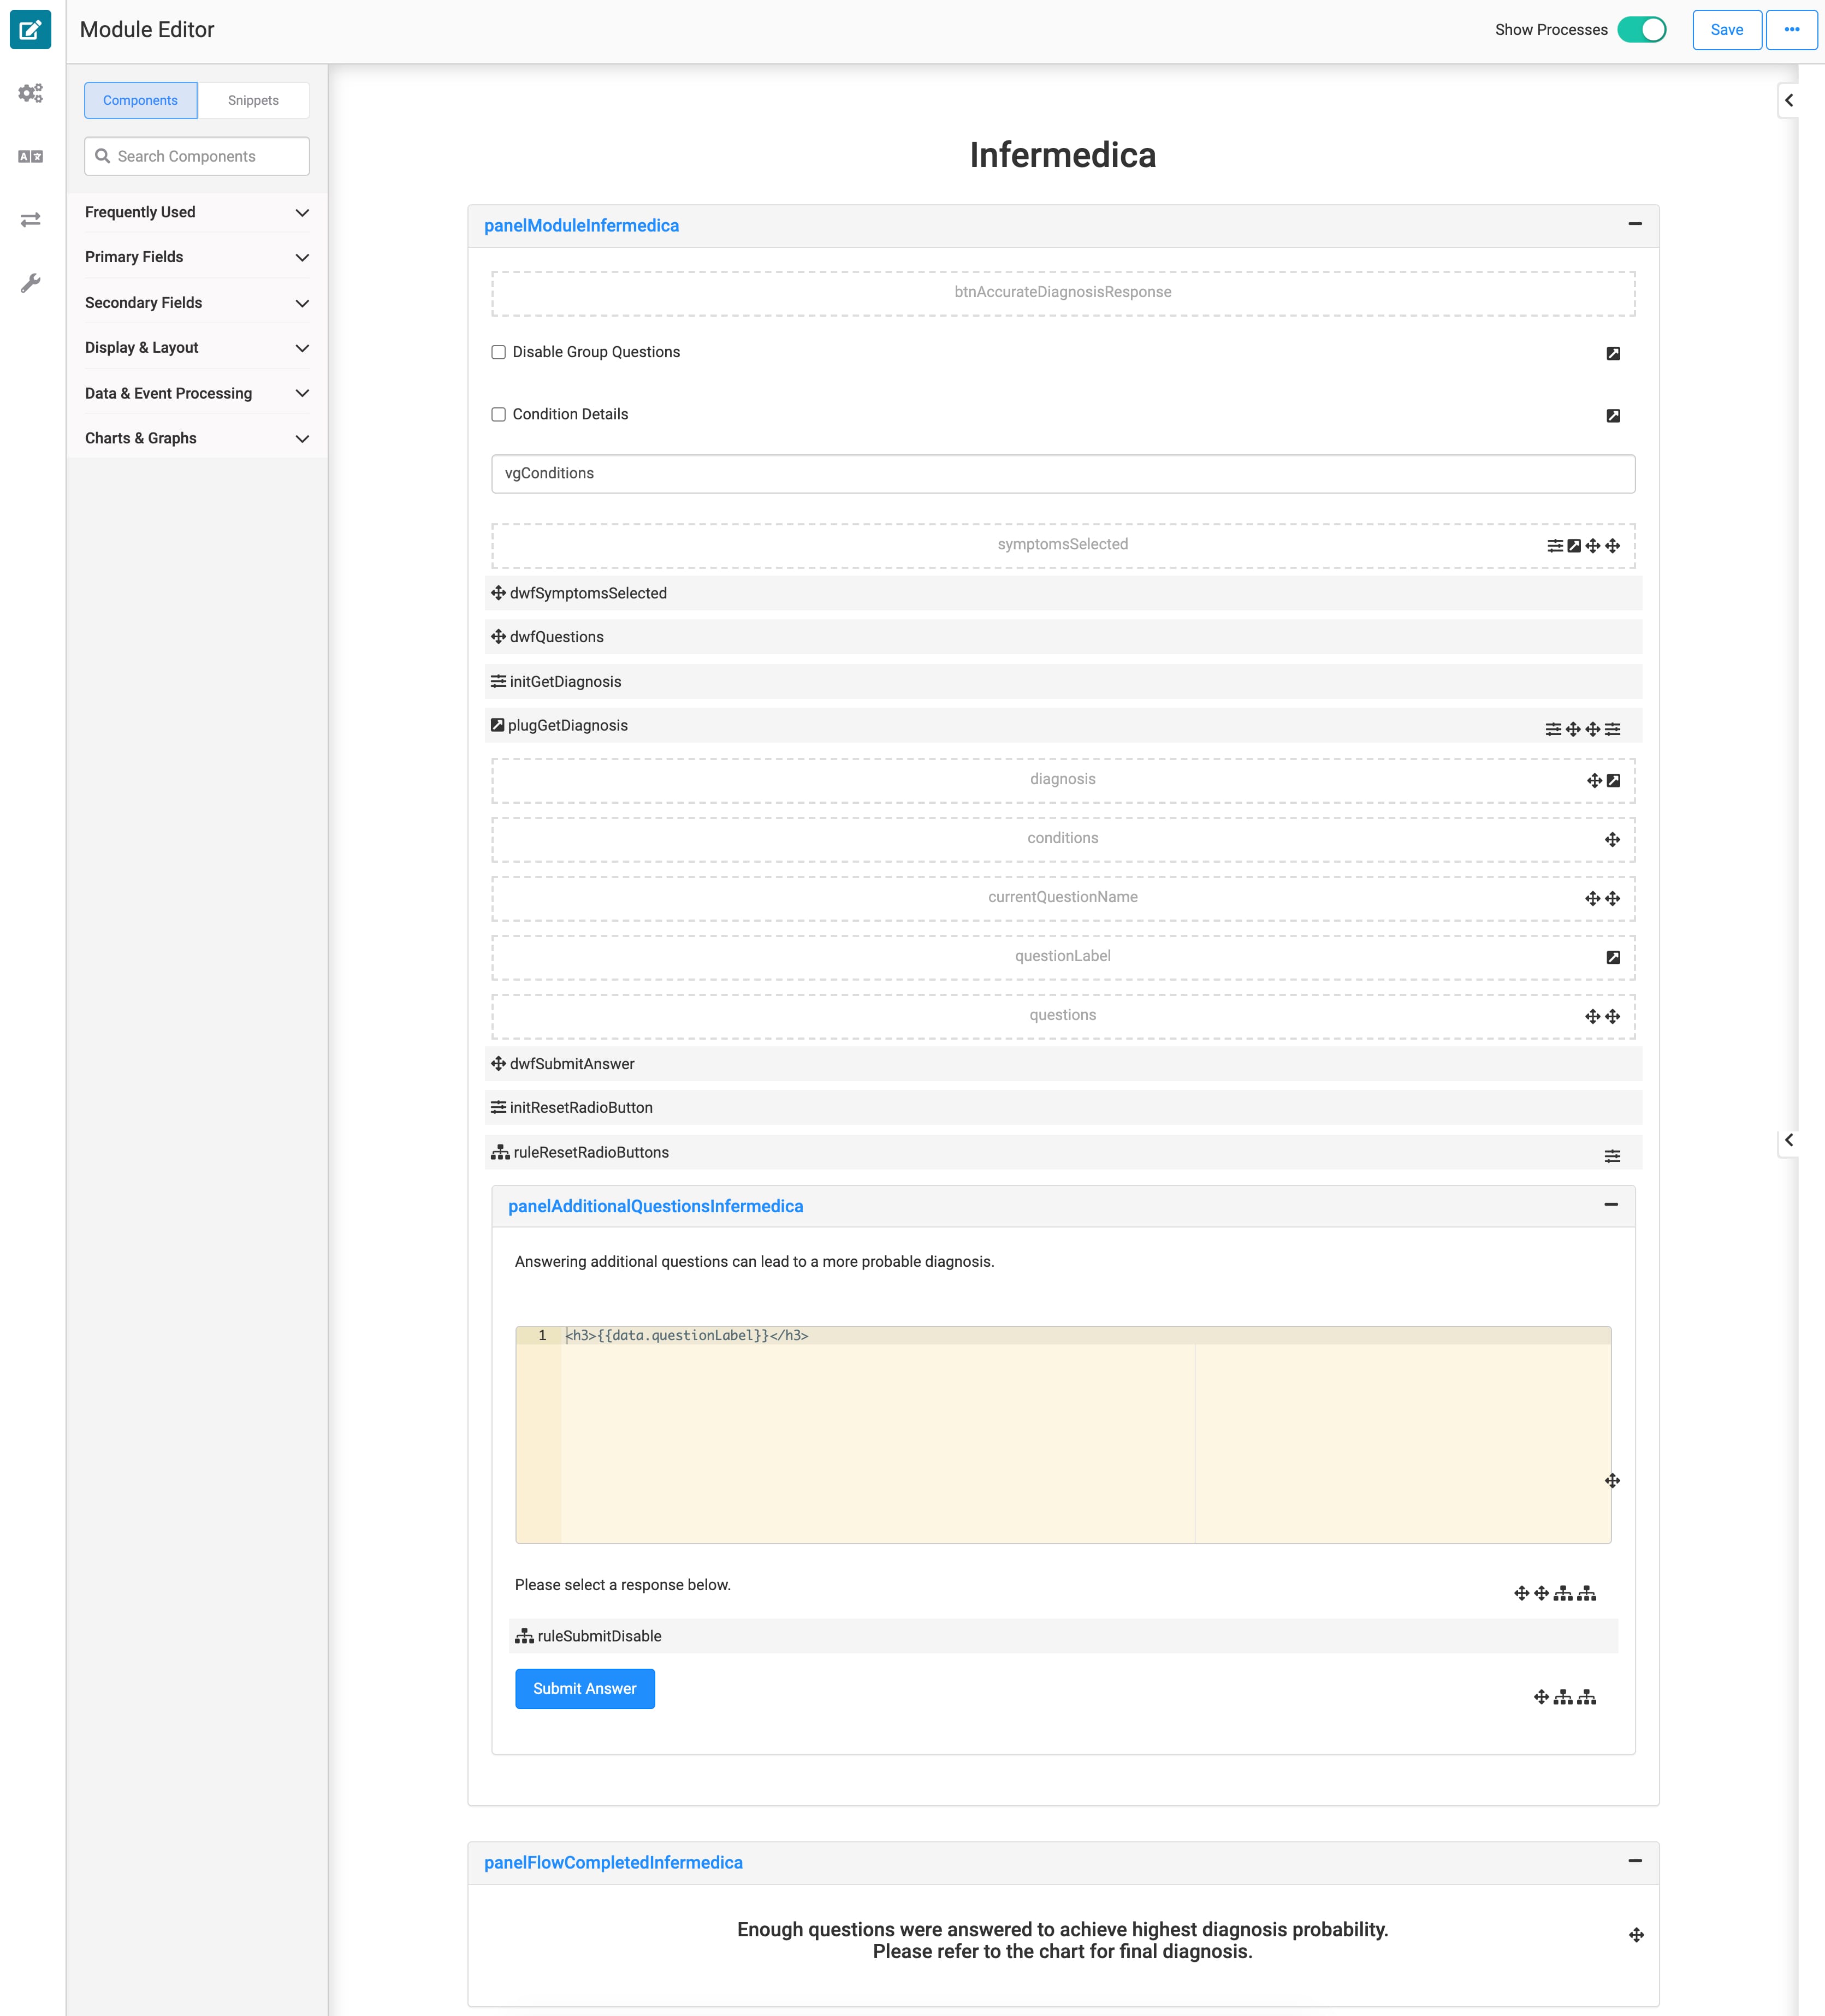
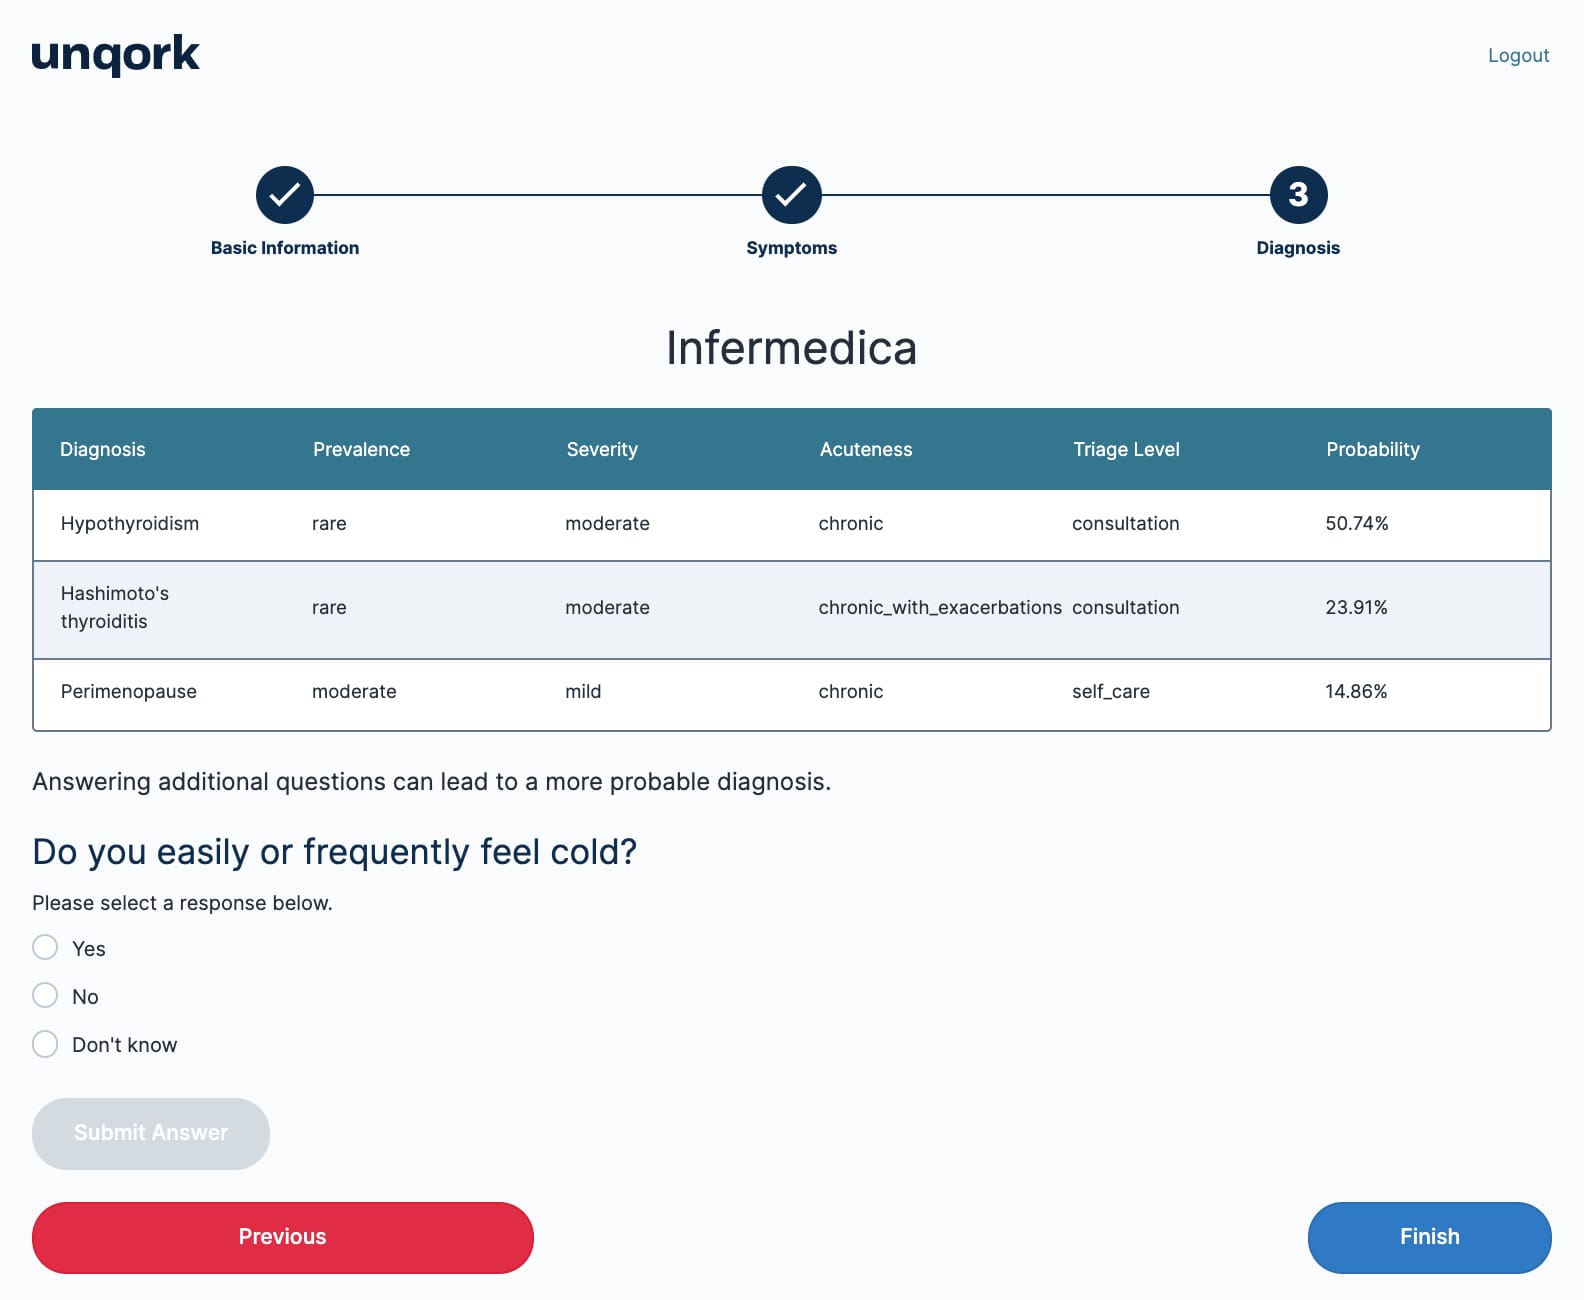
How the Infermedica: Diagnosis Module Works
This is the third screen in the workflow. A few things happen in this module. The dwfSymptomsSelected component gathers all the demographics, symptoms, and risk factors. Then, it presents all the diagnoses in a table. It lists the potential diagnoses in order of most to least probable, along with more details.
This module also asks questions that help narrow down a diagnosis. To do this, it uses the 5 Hidden components underneath plugGetDiagnosis. These store conditions and questions from Infermedica. It also has a Decision component to repopulate questions as needed. It continues to ask questions until it can't pinpoint a diagnosis any further. Answering these questions is optional, but helps improve the diagnoses' accuracy.
Here's how the workflow looks in the Module Builder:
And here's how it looks in Express View within the workflow:
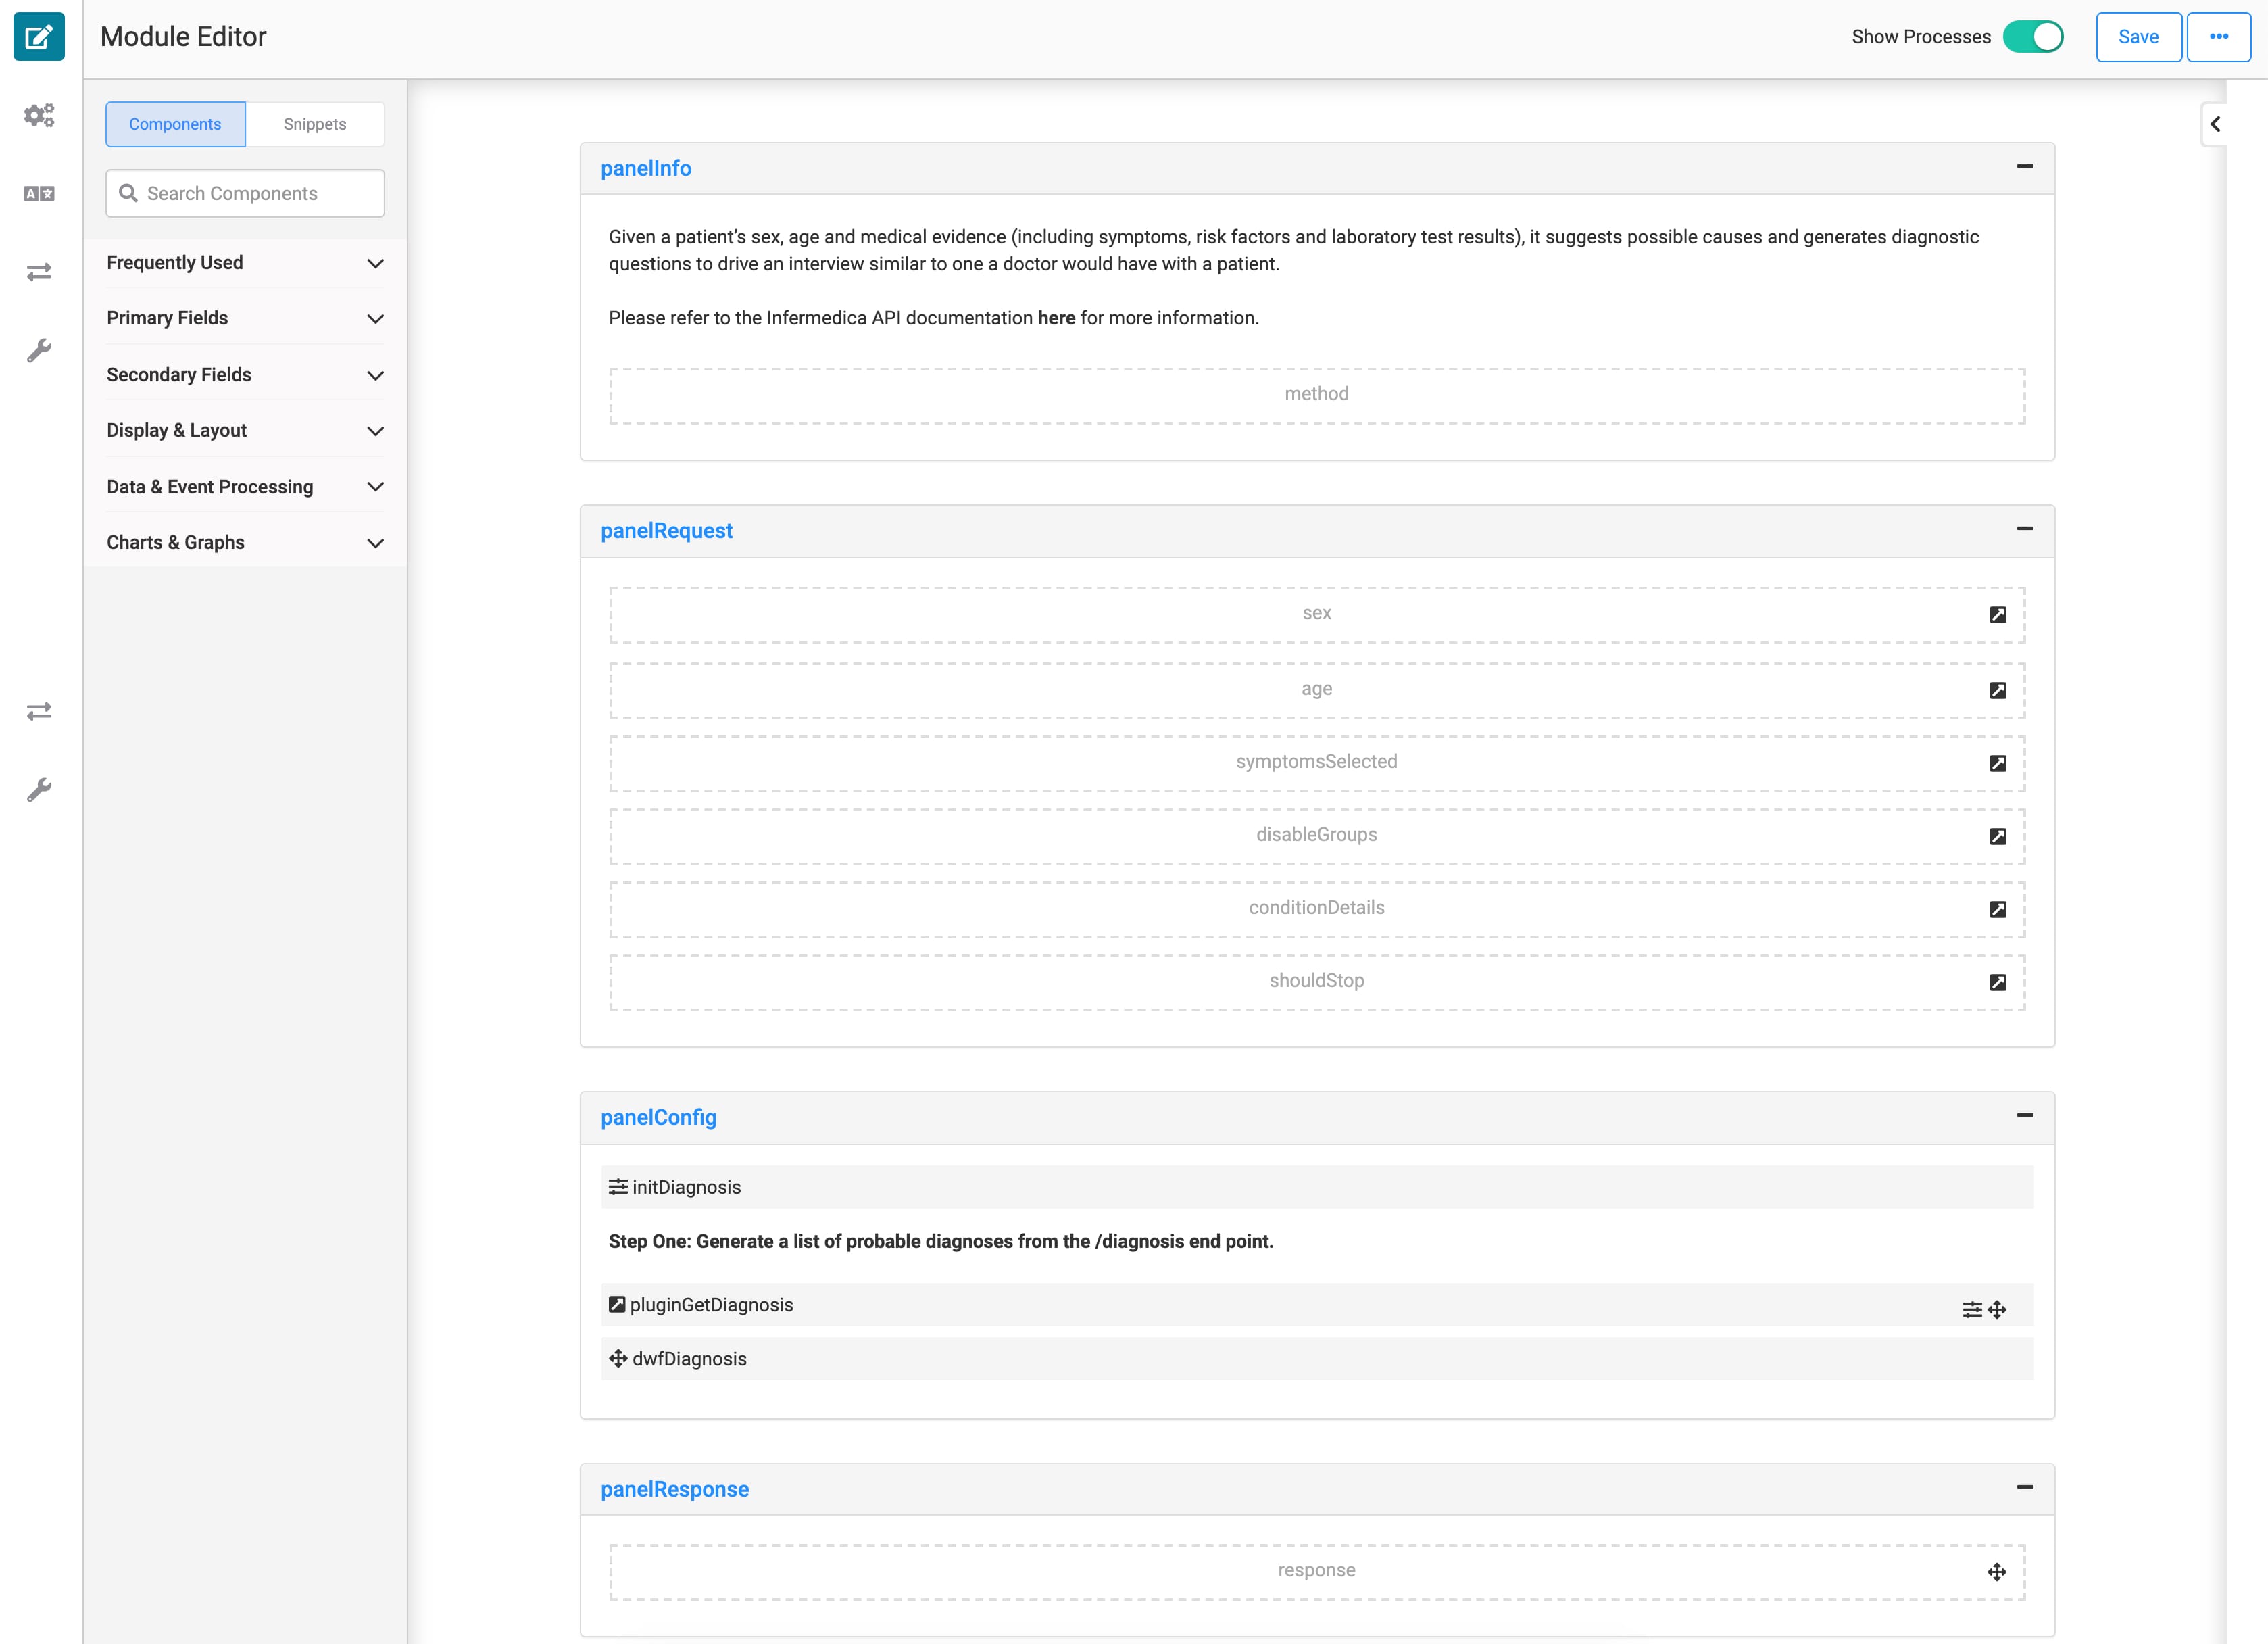
How the Infermedica: Diagnosis (API) Module Works
The Diagnosis (API) module is the only module that you don't see in the workflow. It works in tandem with the Diagnosis module. It stores everything needed to create a diagnosis: the demographics, symptoms, risks, and answers to the extra questions. The Diagnosis module references these pieces of information in real-time.
Here's how the workflow looks in the Module Builder:
Configuring the Template
To use the template, you need to update your Infermedica service in Services Administration. Let's look at the configuration in more detail.
Configuring the Infermedica Service in Services Administration
To access Services Administration:
At the top right of the Unqork Designer Platform, click the Settings drop-down.
Click Administration.
Under Integration, select Services Administration.
To configure the Infermedica service:
Scroll to the bottom of your Active Services list.
Click your Infermedica service.
What if your environment has more than one Infermedica service? Look for the service with the same template ID and time stamp as the template's modules.
Scroll to the top of the page.
In the first Header Value field, enter your App ID.
In the second Header Value field, enter your App Key.
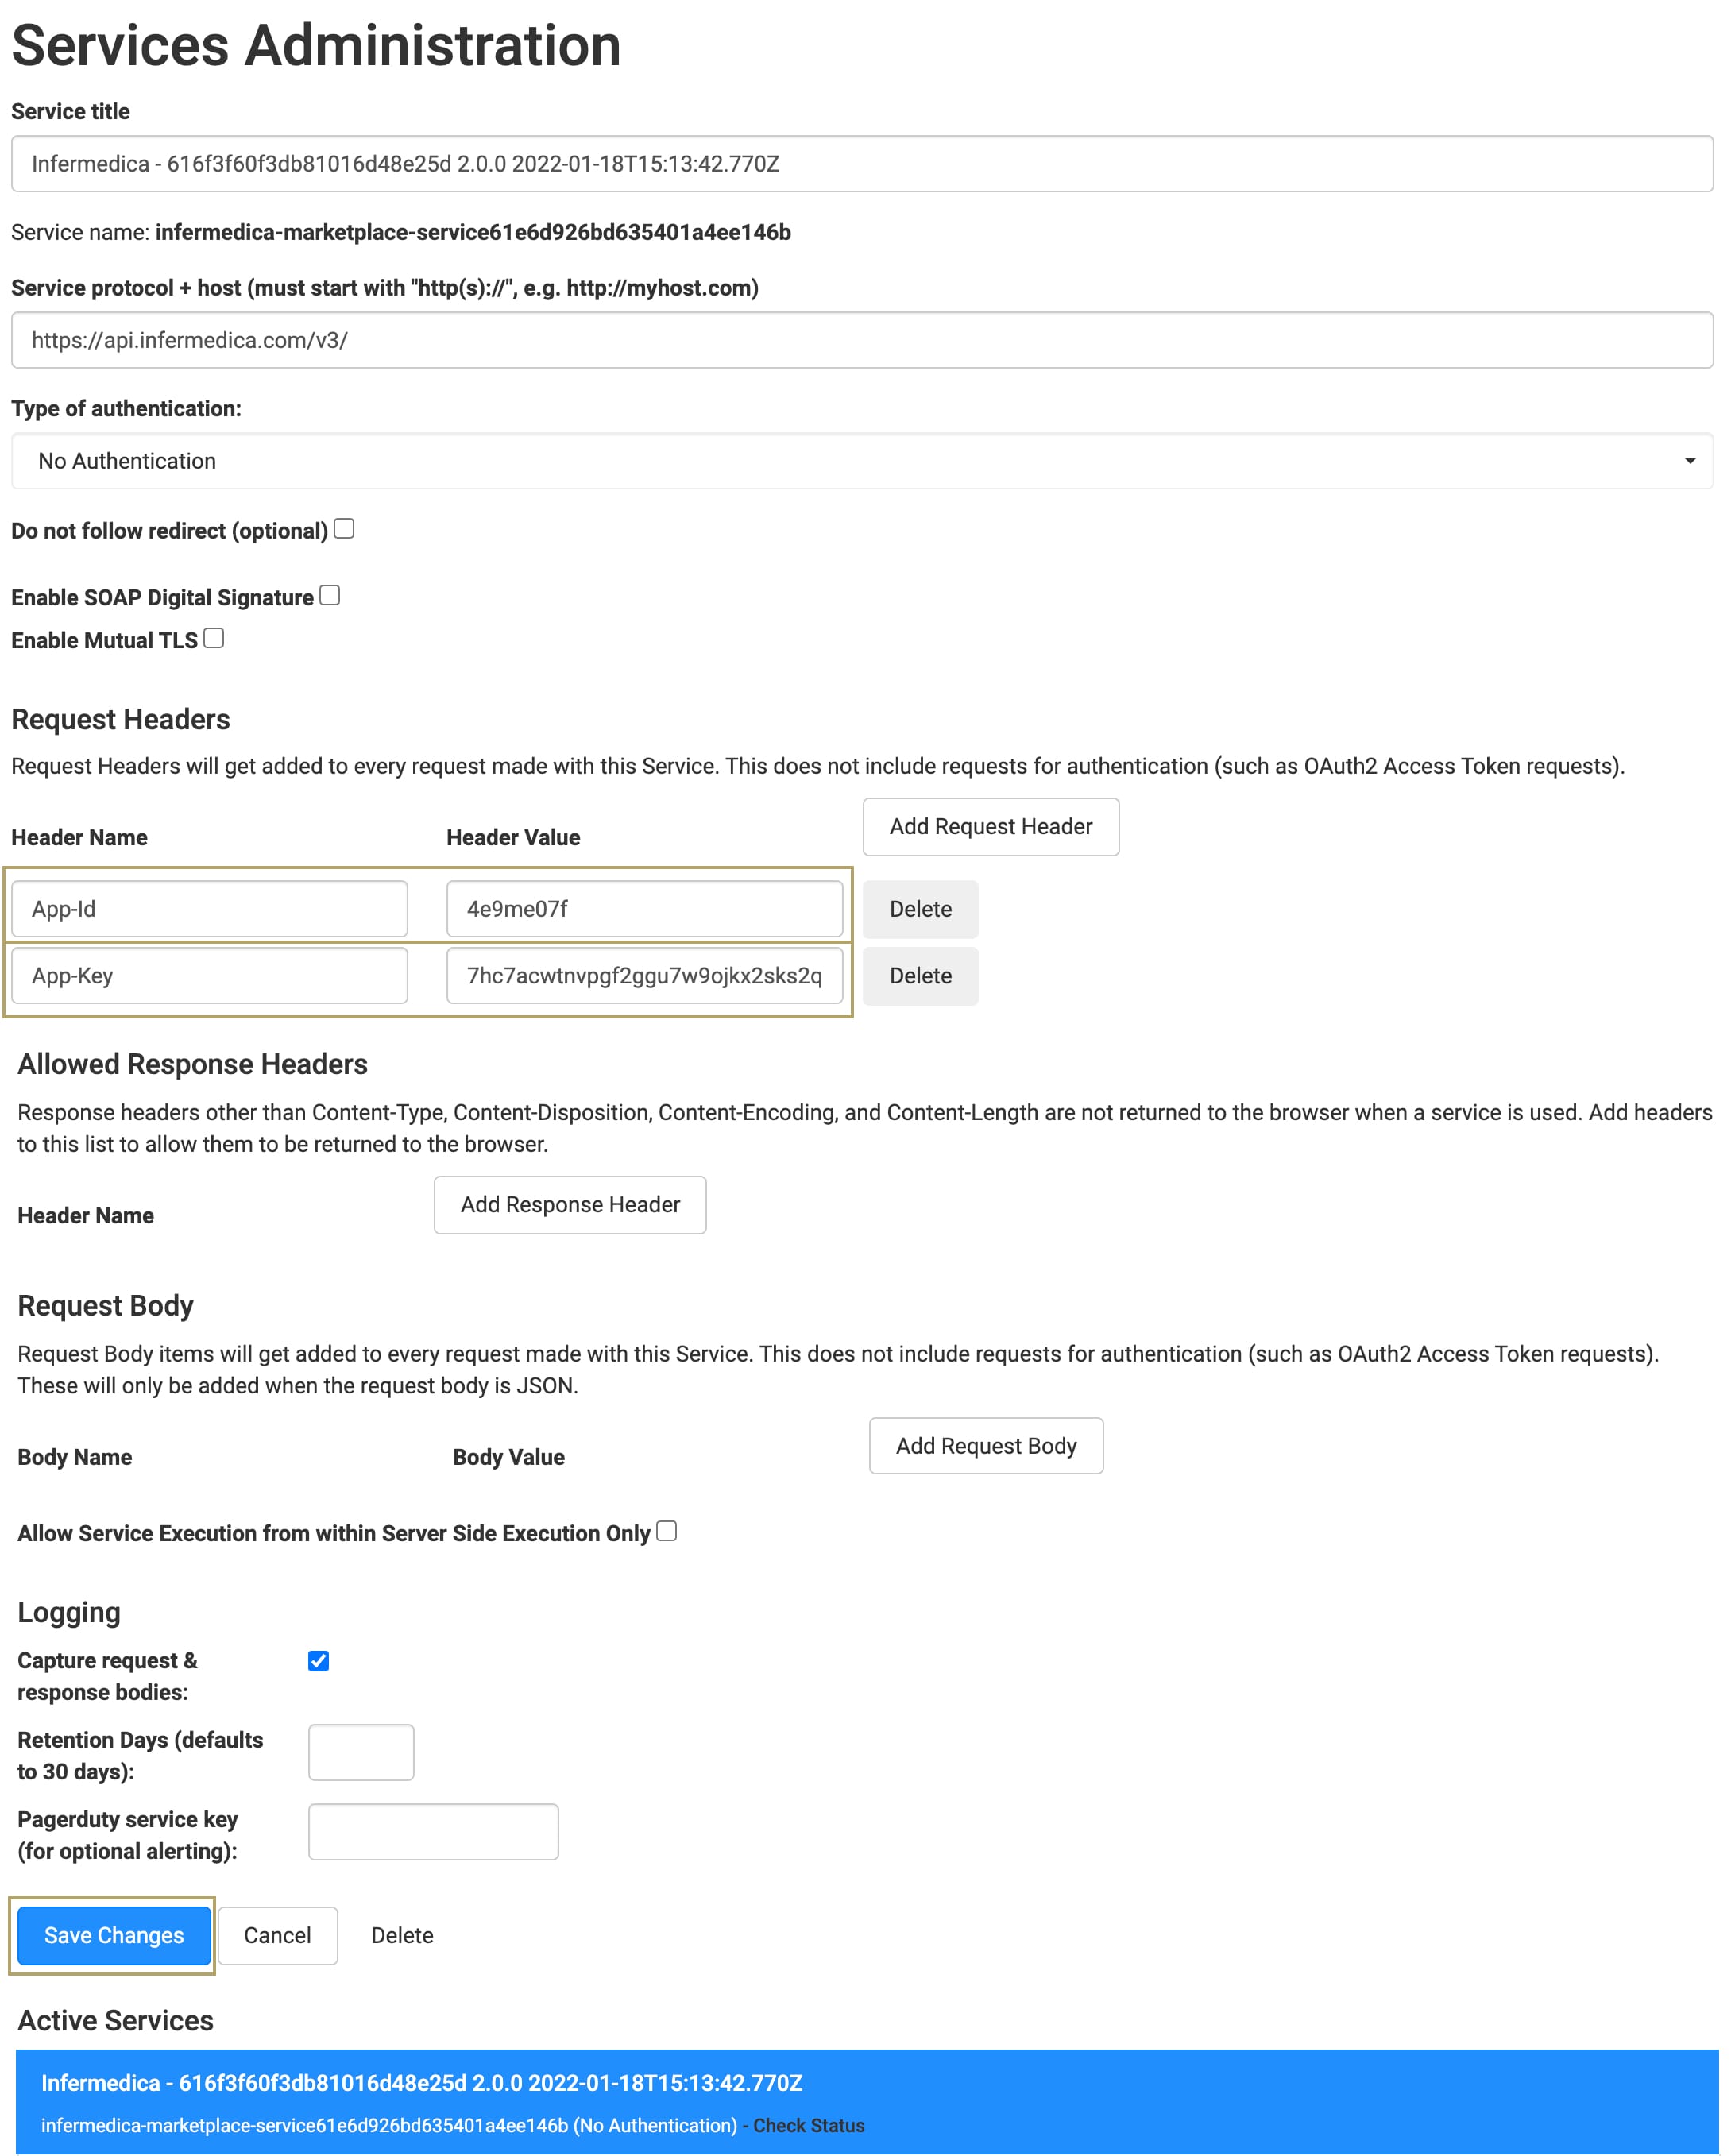
Click Save Changes.
Testing the Template
To test your template:
Open the Infermedica Template workflow in Express View.
Select the disclaimer checkbox and enter an age and sex.
Click Next.
In the Select Your Symptoms drop-down, begin typing or select symptoms. Optionally, in the Select Your Risk Factors drop-down, begin typing or select risk factors.
Click Next.
Now you have a table that lists potential medical diagnoses. You can also continue answering questions to further narrow the diagnosis.
Removing the Infermedica Template
There are 3 steps to removing the template, and these can happen in any order:
Uninstall the template from your environment.
Delete the application you created from the template.
Remove the Infermedica service from your environment.
Remove the Template from Your Environment
You might need to clean your environment and remove unused templates. The Unqork Library makes this easy. To uninstall a template from your environment:
At the top right of the Unqork Designer Platform, click Library.
Find the template to uninstall.
Click the ellipsis (...) in the template tile header.
Click Uninstall Template.
Click Yes, Uninstall in the confirmation modal.
You can visit the Marketplace and reinstall the template at any time.
What if you have an existing application built from this template and then uninstall the template from your environment? Your existing application remains unaffected. Also, it no longer has any ties to the template. So, let's say you reinstall a newer version of the template in the future. You can rest assured that the installation doesn't impact your existing application.
Delete Your Infermedica Application
If you no longer need the application you created from your template, you can delete it. To delete your application:
Navigate to the Apps tab from an open workspace.
Find the application to delete.
Click the ellipsis (...) in the app tile header.
Click Delete.
Retype the provided text.
Click Yes, Delete.
Remove the Infermedica Service from Your Environment
To remove your Infermedica service from your environment:
At the top right of the Unqork Designer Platform, click the Settings drop-down.
Click Administration.
Under Integration, select Services Administration.
From the Active Services list, select the service to delete.
Click the Delete link. You’ll find this above the Active Services list.
At the Delete message, click OK.
At the Success message, click OK.