About this Configuration Guide
This guide covers setting up the DocuSign workflow integration template. Using this guide, you'll explore how each module in this template works. You'll learn how to install the template to your environment and how to build an application from it.
There are 2 DocuSign integration templates. One is for a module-type application. This one is for a workflow-type application. Make sure to pick the DocuSign template that fits your preferred application type.
This template has a workflow with 4 modules and an API (application programming interface) integration. So, we'll also show you how to set up your external DocuSign service in Unqork. Then, powered by DocuSign's API, you can generate and send a PDF right from your application.
You must set up your DocuSign account first in DocuSign. When configuring your template in Unqork, you'll enter your DocuSign credentials to link your application with DocuSign. This grants your environment permission to use DocuSign.
All images used in this guide are for illustrative purposes only. Images are subject to change without notice. All images were correct at the time of publication.
Overview
With this template, end-users can create their own dynamic DocuSign PDF. Then, their envelope sends to the signers. In DocuSign, an envelope is a container for documents that you send to a recipient to sign. Have you ever received an email from DocuSign asking you to sign something? If so, you've received an envelope.
The workflow starts with a front-end module. This module is where the end-user enters information and adds signers. This information transfers to the second module, where a PDF generates with the end-user's inputs. The third module takes the PDF and creates the DocuSign envelope, which sends to the signers. The workflow ends with another front-end module confirming that DocuSign sent the envelope.
Features
With this template, you can:
Send PDFs for your end-users to sign, right from your application.
Use a transform to generate a dynamic document tailored to your recipients.
Requirements
To use this template, you must have a DocuSign demo developer account with valid API credentials.
Adding the Template
Before you can build an application from this template, you must install the template to your environment. Then, you can visit your Library and build an application from your new template.
Adding the Template to Your Environment
To add the template to your environment:
Click Marketplace at the top right of the Unqork Designer Platform.
You can also access the Marketplace at any time by visiting https://marketplace.unqork.io.
Enter DocuSign Workflow in the Search the Marketplace field.
Click on the DocuSign Workflow tile.
There are 2 DocuSign integration templates. One is for a module-type application. Make sure to click the DocuSign tile that says workflow integration.
Click Install to Environment.
Click Install Template.
If you aren't logged in, you'll see a field for Environment URL and a Login button. Enter your environment's URL where you want to install the template. For example: [environmentname.unqork.io]. Click the Login button. Then, return to step 4 and click Install to Environment again. Follow the remaining steps as listed.
Now, you can now use your newly installed template to create an application.
Creating an Application from the Template
After you've added the template to your environment from Marketplace, you can use it to create an application. This template creates a workflow-type application with a workflow, 4 modules, and an integration.
Click Library at the top right of the Unqork Designer Platform.
Find the DocuSign Workflow template tile.
Click Create App from Template.
Choose the destination workspace from the Workspace drop-down. This is where your application will live once created.
Enter your unique App Name. The App Path auto-fills as you type your App Name.
If you want a different App Path, enter it in the App Path field.
Select a preview style from the Style drop-down. A style specifies your application’s appearance in Express View. If left blank, your application uses your environment's default style.
You'll notice the App Type and App Entrypoint are grayed out. The template automatically takes care of these for you!
Click Create App.
The application opens in the workspace you specified. You'll land on the Workflows tab of your application, which shows the element tile for your new workflow.
Your Workflows tab should look something like this:

And here's how your Modules tab should look:
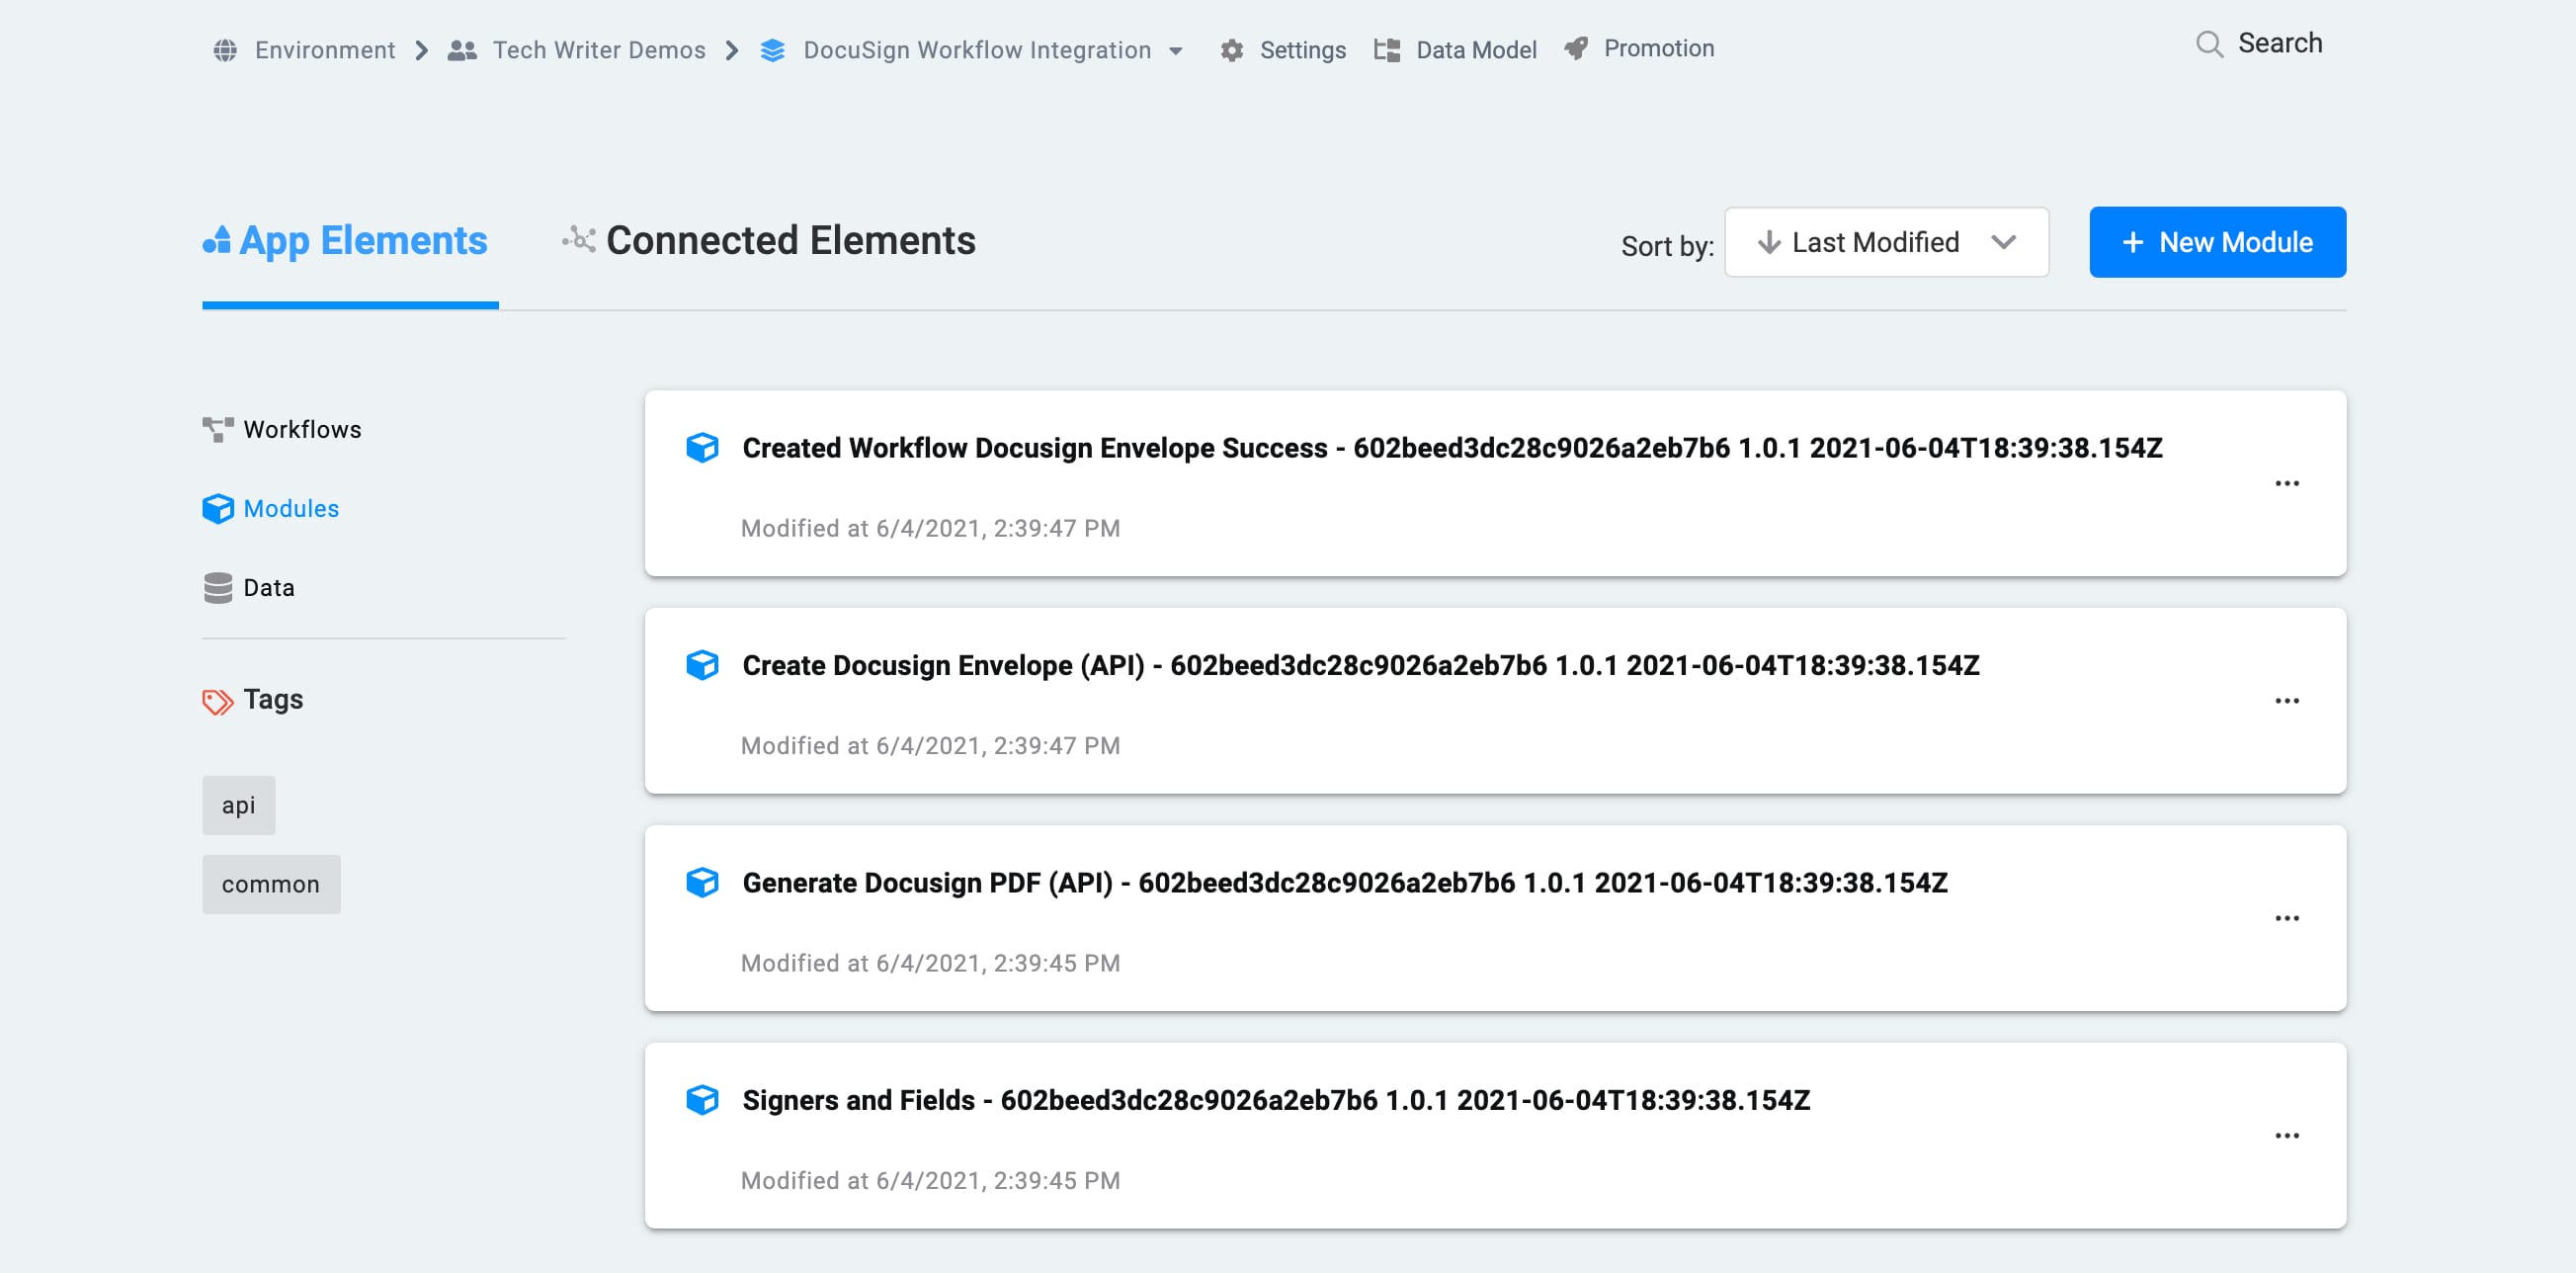
When you create an application from the template, your module names will also automatically include the template ID and a time stamp. This is to prevent any duplicate module paths. You're welcome to change module names and module paths at any time. Any service or workflow created with your template will also have a template ID and time stamp.
When you create an application from this template, you'll also see a new service added to your Services Administration. This service has the correct service protocol for DocuSign. You'll need to update it with your company's DocuSign account credentials. (You'll get those credentials when you set up your account directly through DocuSign.) We cover how to link your environment to DocuSign in the Configuring the Template section.
Here's an example of a DocuSign service in Services Administration:
.jpg)
How the Template Works
As the name suggests, a workflow integration template uses a workflow-type application. It also has modules and an integration. An integration is a service external to Unqork. Here, the service is a DocuSign API that generates and sends PDFs for your end-users to eSign. You'll set up your DocuSign account directly through DocuSign. Then, when you create an application from this template, you’ll get:
A new service in Services Administration with the correct service protocol and host for DocuSign.
A workflow-type application with 1 workflow and 4 modules.
Let's take a look at how the DocuSign service, workflow, and modules work.
How the DocuSign Service Works
DocuSign is a service that uses API calls to generate and send eSignature PDFs to your end-users. Here are some examples of when you might generate and send a PDF using DocuSign:
You want multiple people to sign sales contracts.
You want to have an invoice eSigned before you start on a project.
You need a same-day eSignature on an offer letter.
You'll set this service up directly through DocuSign. Then, you'll create an application from the DocuSign workflow integration template. The template automatically adds a service to your environment that has the correct setup for DocuSign. After you configure the service, your application connects with DocuSign to generate and send PDFs.
How the Template's Workflow Works
Now, let's cover how the workflow works. This workflow has 4 main steps. The Start node connects to the Signers and Fields Express View module in the Define Your Role Here lane. That module connects to the Generate Docusign PDF (API) module in the Automated lane. Next, the workflow moves to the Create Docusign Envelope (API) module. Then, the workflow ends with an End node in the top swimlane, which shows a success page in Express View.
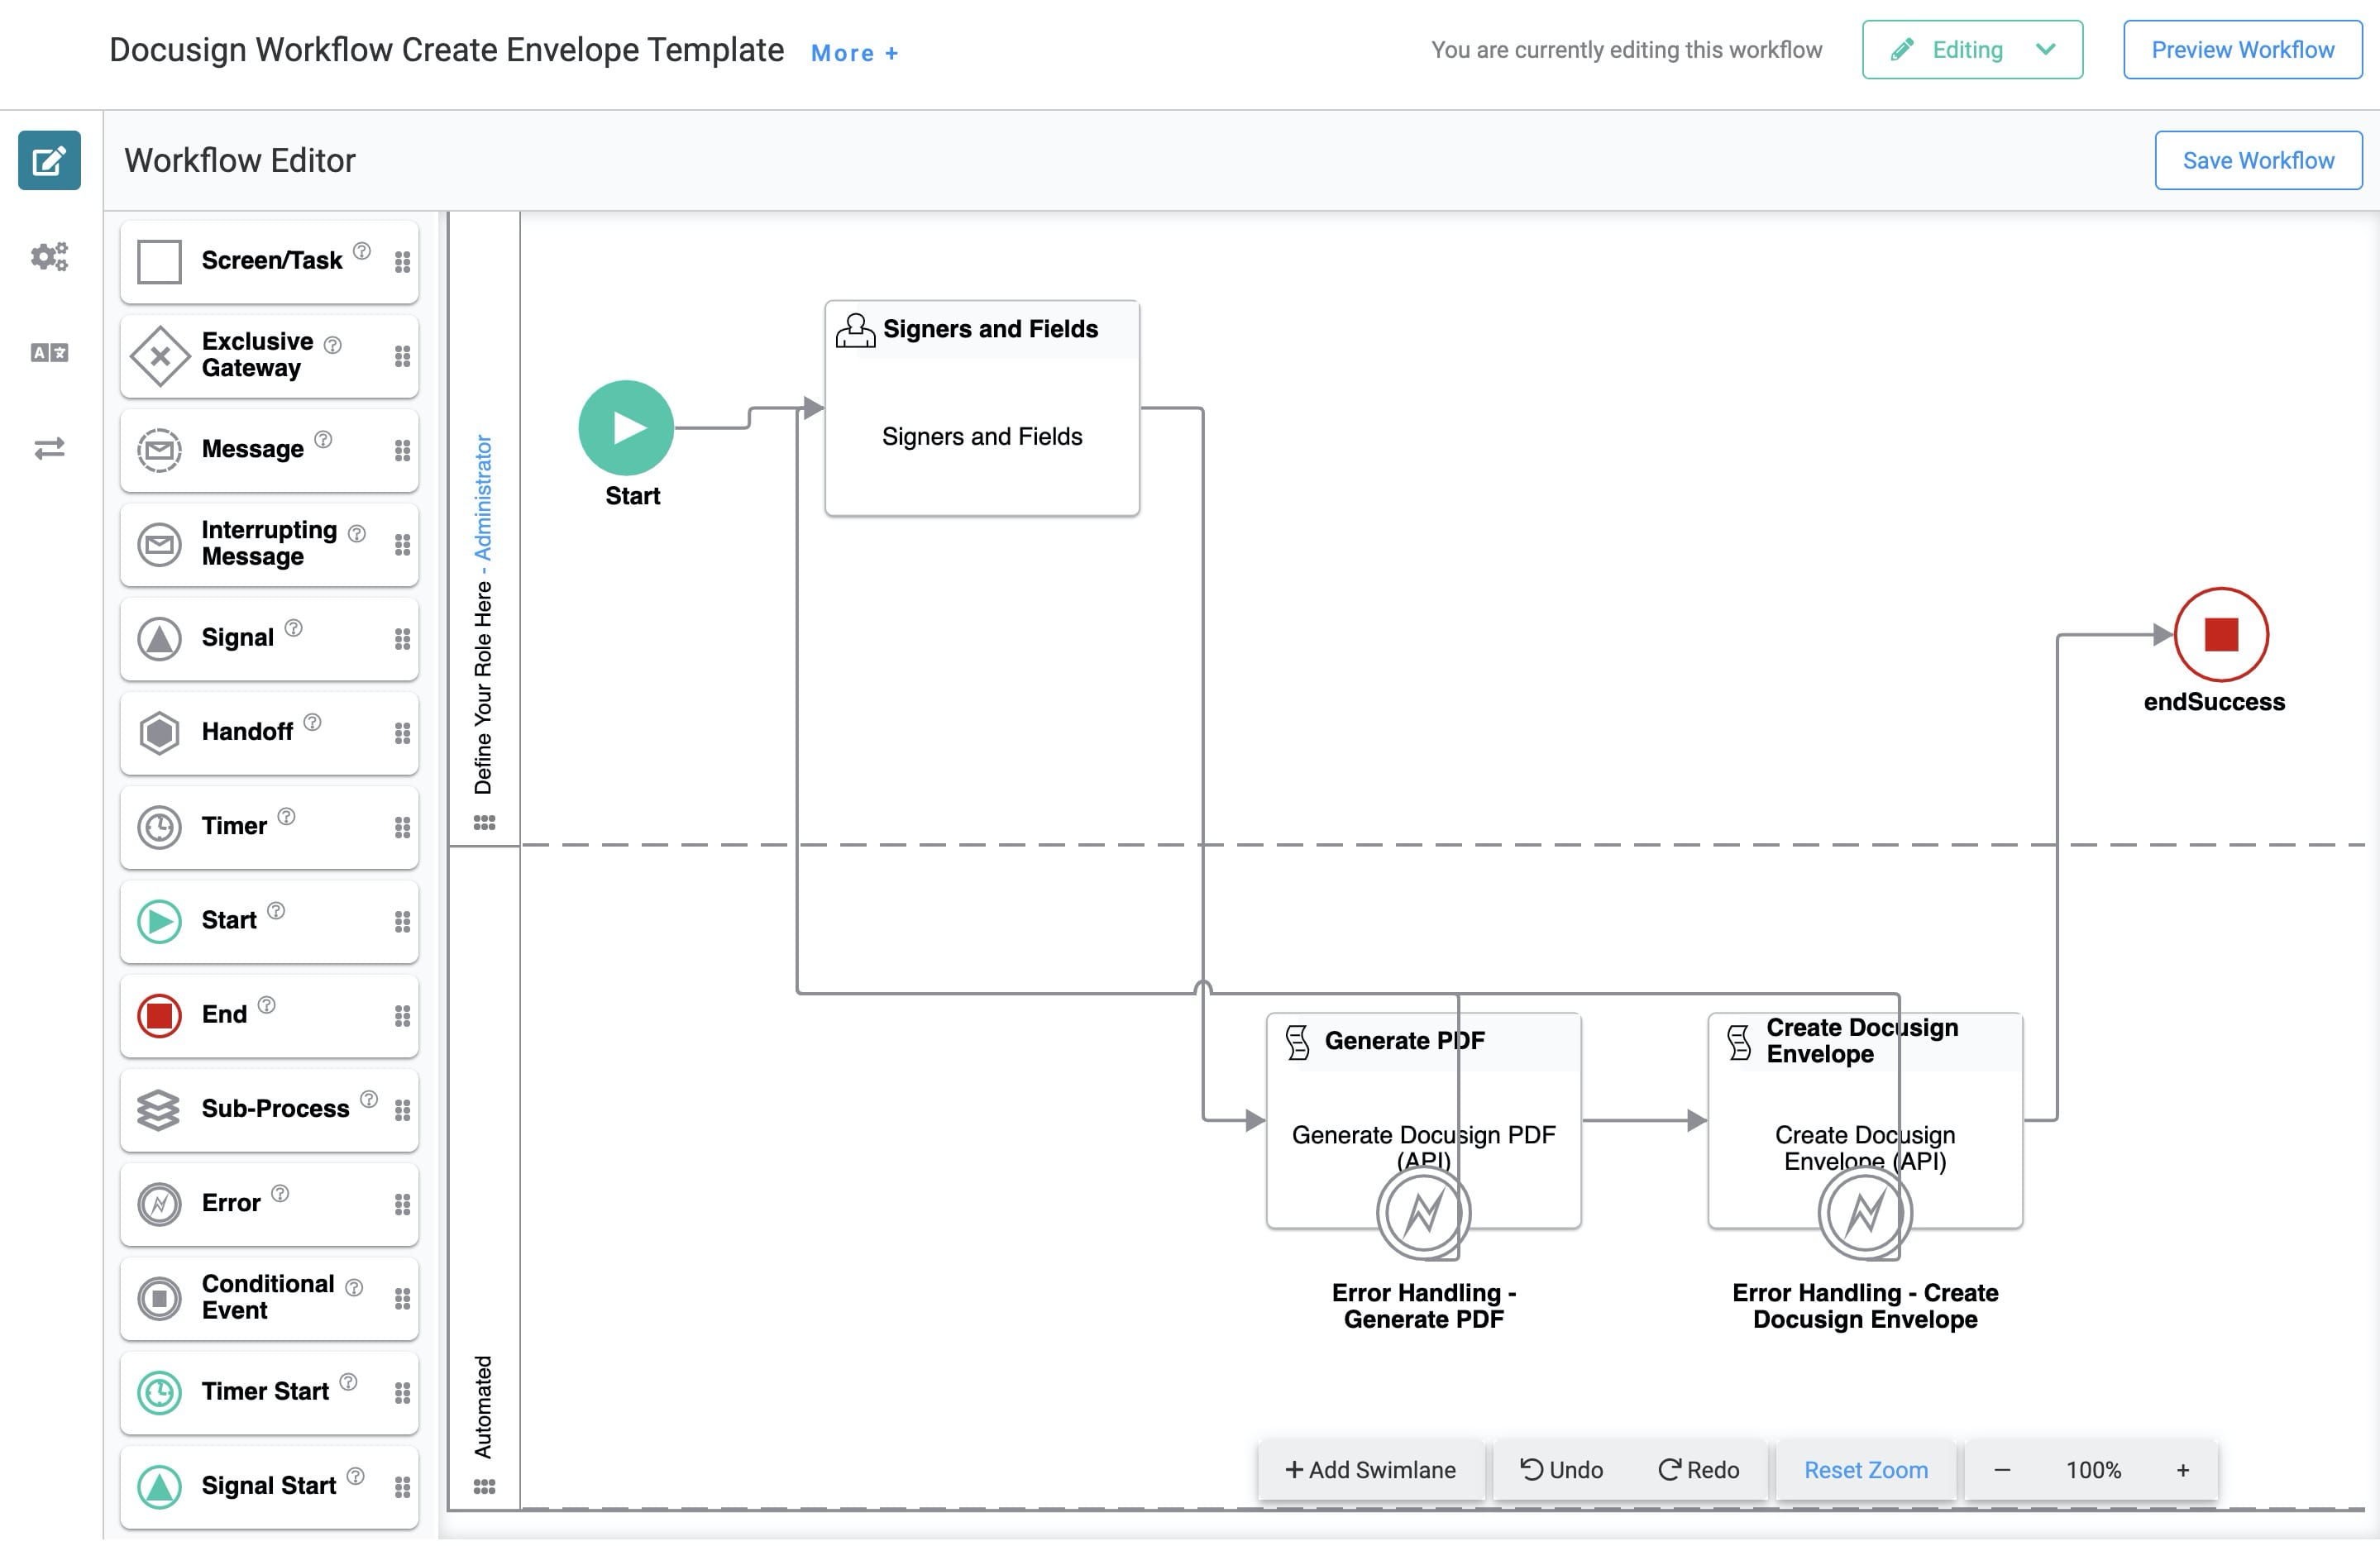
The workflow also has error handling built into it. The Error nodes show an error message in Express View if something goes wrong in the back-end modules.
How the Signers and Fields Module Works
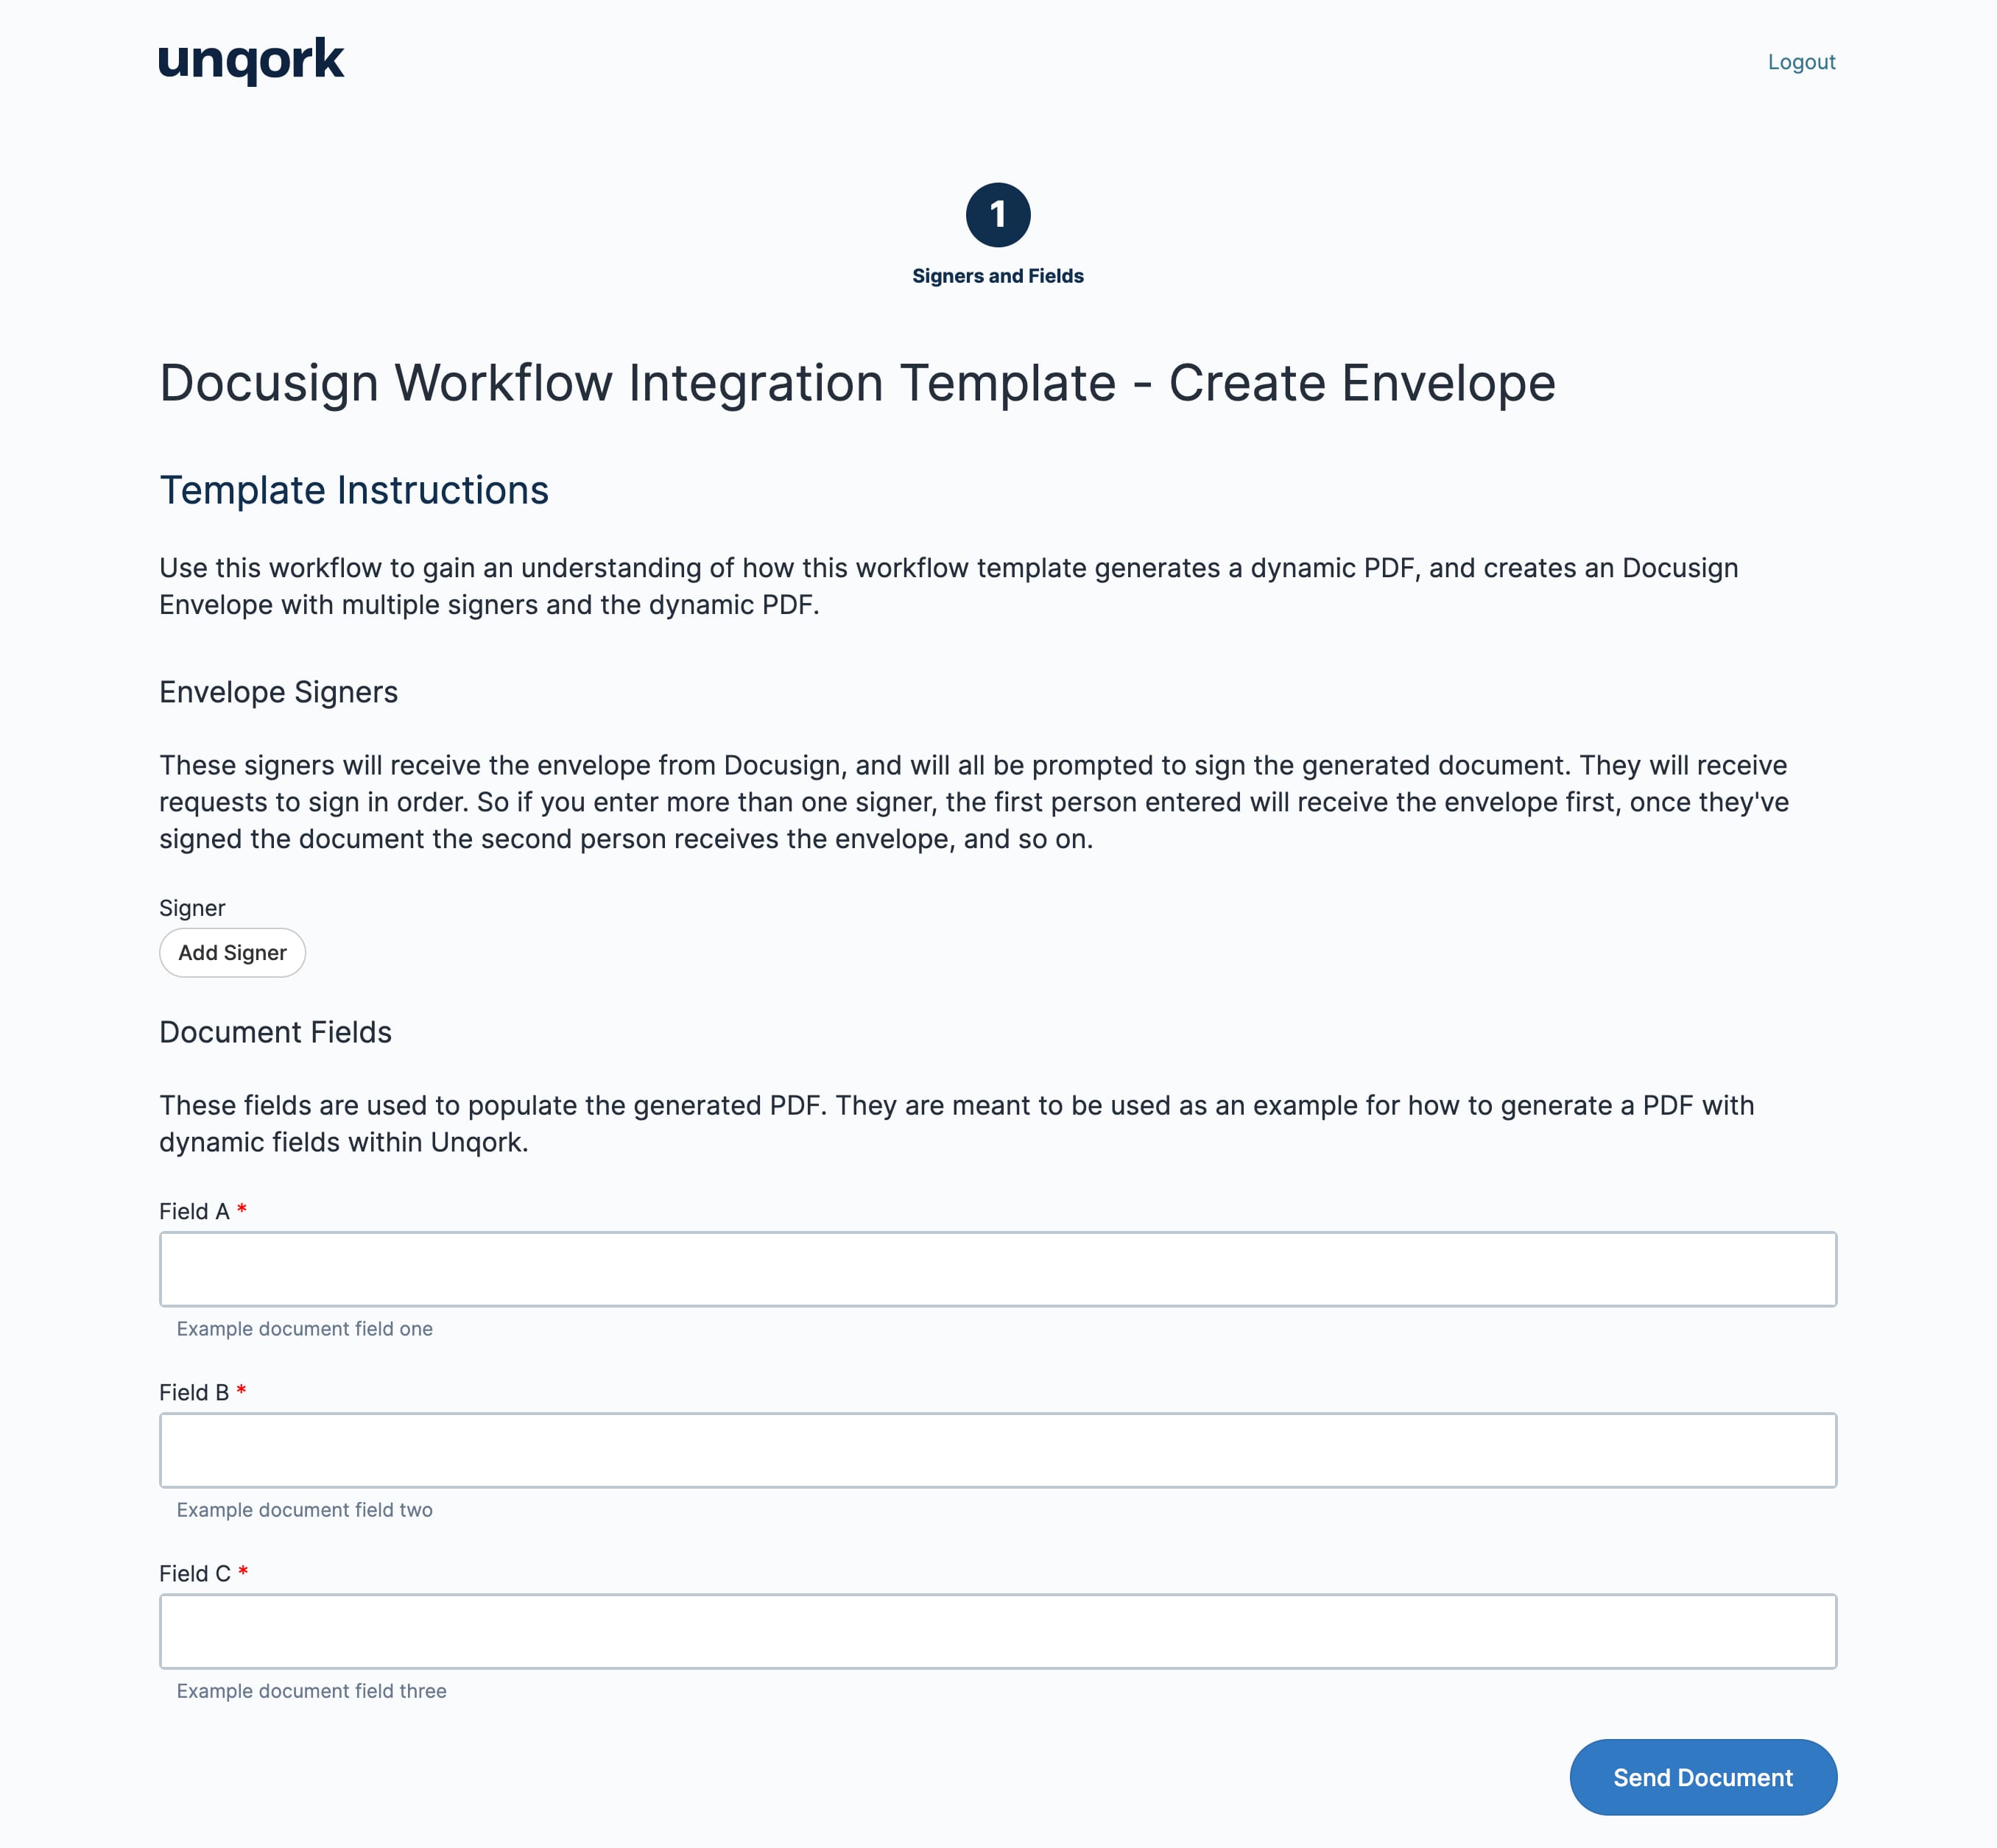
You'll use the Signers and Fields module on the front-end in Express View. It's where you'll fill in information about the document signers as well as some dynamic fields that'll populate the PDF. This module serves as somewhat of a placeholder. It gathers all the necessary information in one place so you can see how the template takes information and outputs it into a DocuSign envelope. In your actual application, you'll likely gather signer information elsewhere in the application.
Here's how the Signers and Fields module looks in Express View:
And here's how it looks in the Module Builder:
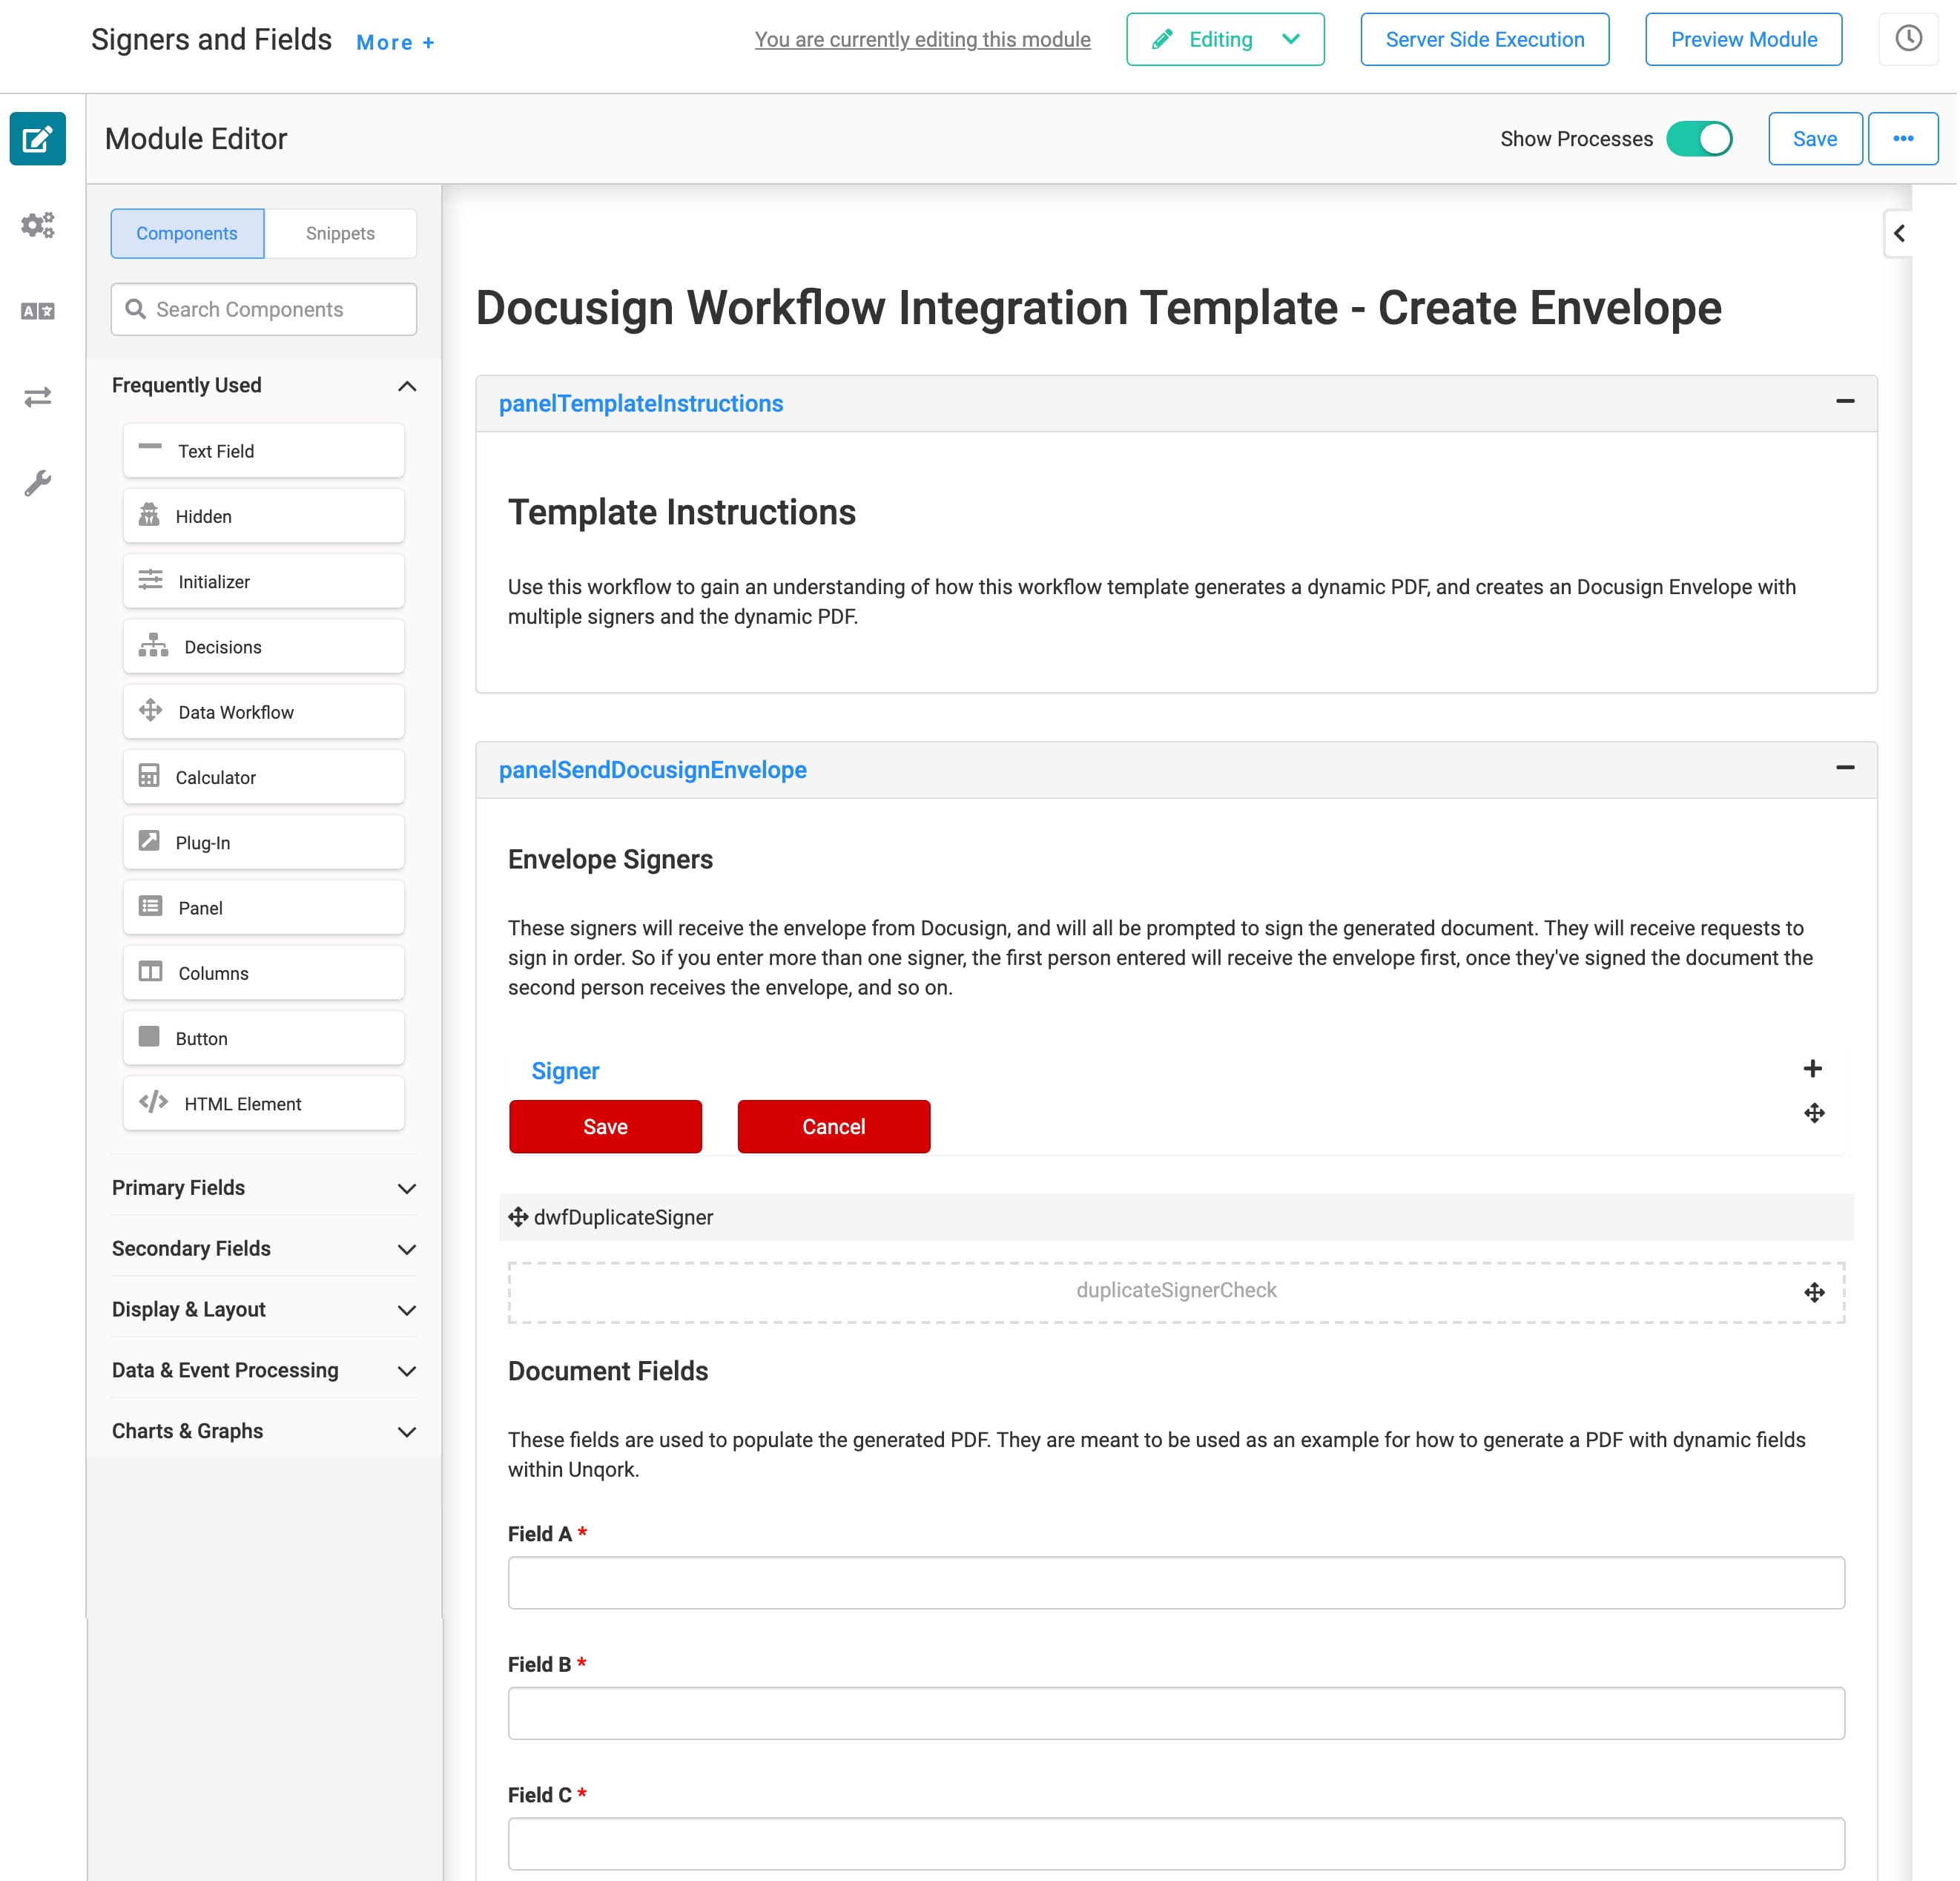
The signers entered in the Advanced Datagrid will receive the envelope from DocuSign. The values entered in the Text Fields dynamically populate the generated PDF. Again, these Text Fields are there as examples. You'll likely get your signer data from somewhere else in your application. For now, you can use the layout of this module to show you how these fields populate the PDF.
The dwfDuplicateSigner Data Workflow checks for duplicate signers. If there are duplicate signers, an Error node fires. It triggers a pop-up modal that prompts the end-user to remove the duplicate signer.
How the Generate Docusign PDF (API) Module Works
The next module is the Generate Docusign PDF (API) module. This module takes the information entered in the Signers and Fields module and builds a dynamic PDF. Let's look at a high-level overview of how this process works.
The Generate Docusign PDF (API) module calls a transform that has a simple HTML layout for the PDF. The template's default PDF layout includes mapping of the Text Fields. The layout also has a helpful explanation of how to best format the PDF for DocuSign’s standards. The transform outputs a Base64 version of the PDF to the pdfDoc Hidden component. From there, the Generate Docusign PDF (API) module passes the PDF to the next module in the workflow.
Here's how the Generate Docusign PDF (API) module looks in the Module Builder:
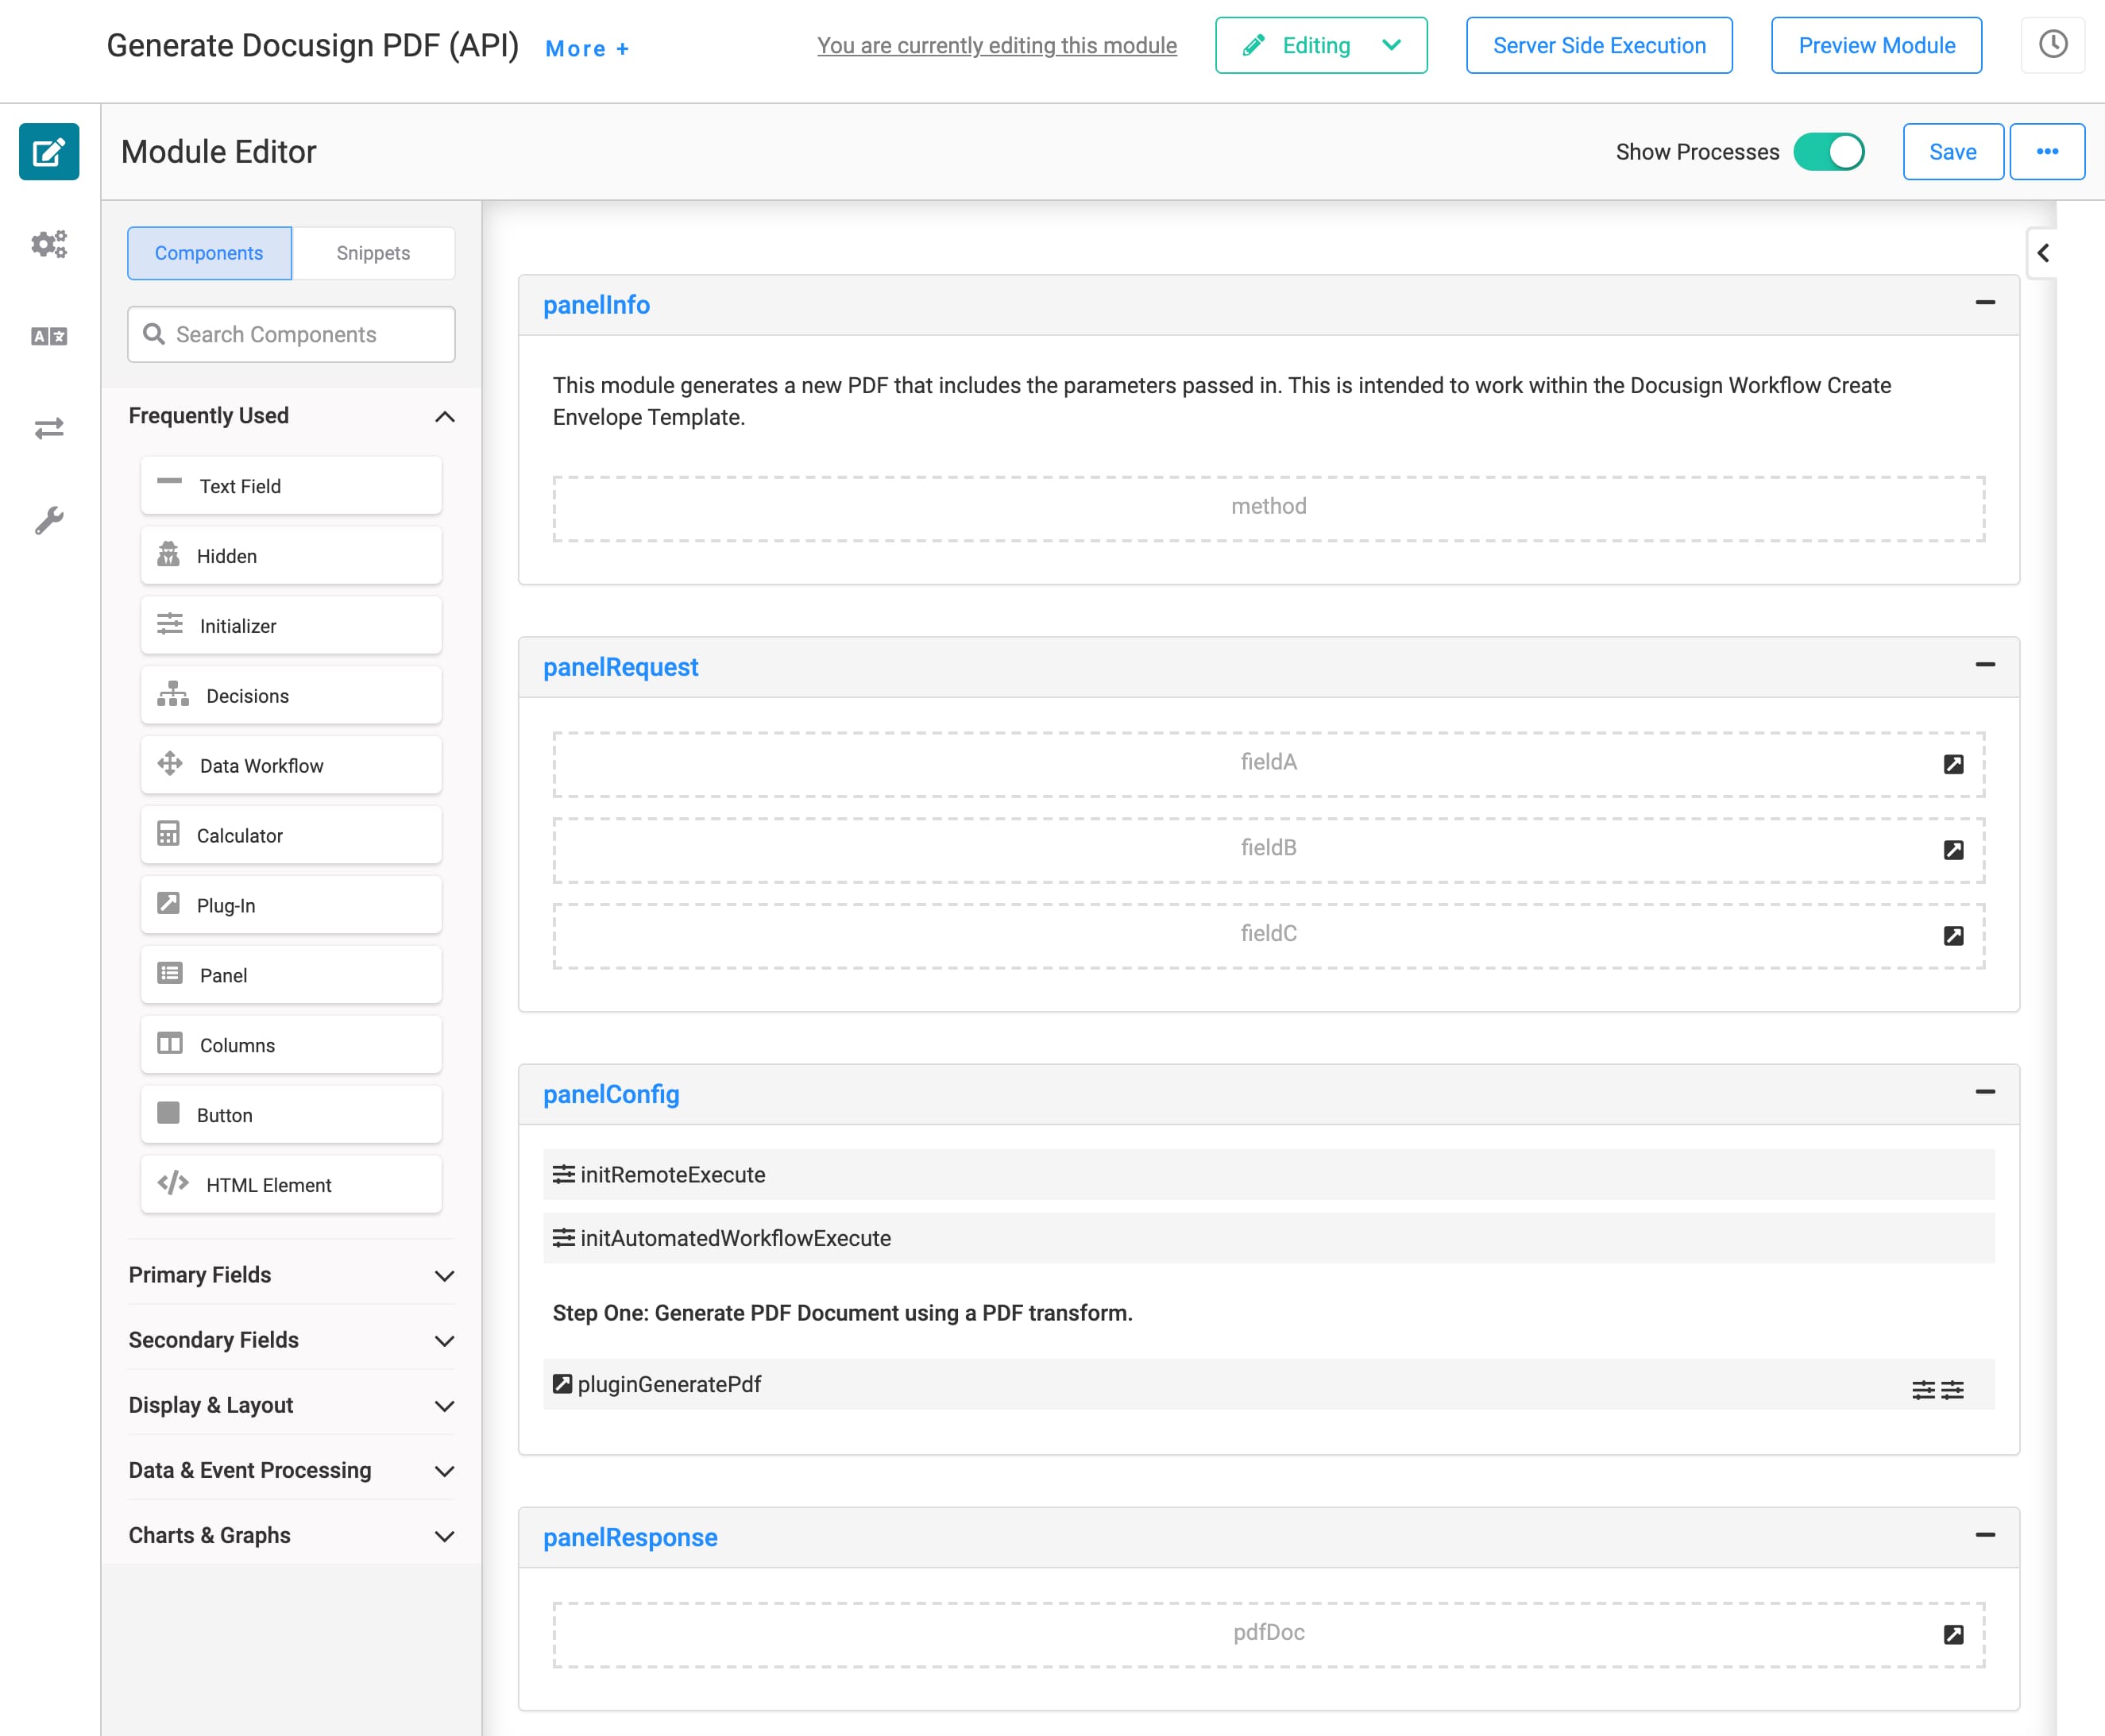
Let's look at how these different components interact with each other. First, there's the initRemoteExecute Initializer. This Initializer lets this API module trigger like a normal remote execute API module, even without a new submission ID. This Initializer will fire if you do a server-side execution of the module.
If you run your normal workflow, the initAutomatedWorkflowExecute Initializer fires instead.
So, one of the Initializers fires the pluginGeneratePdf Plug-In. That Plug-In calls the docusignPdf transform and maps the Text Fields to the fields in the transform. The transform outputs the generated PDF to the pdfDoc Hidden component. The generated PDF continues on to the Create Docusign Envelope (API) module.
To view the transform, click the
(Transforms) button in the left side menu bar. Then, click the docusignPdf tile under Active Transforms.
How the Create Docusign Envelope (API) Module Works
The Create Docusign Envelope (API) module receives the signer information and Base64 PDF. Then, the module uses a DocuSign API call to create the envelope and send it to the signers. The signers entered in the Signers and Fields (API) module in Express View receive the envelope from DocuSign. Each signer gets prompted to sign the generated document. If you've ever eSigned a PDF from DocuSign, you're likely familiar with this process. Let's take a look at how the components in the module work together to create this functionality.
Here's how to Create Docusign Envelope (API) module looks in the Module Builder:
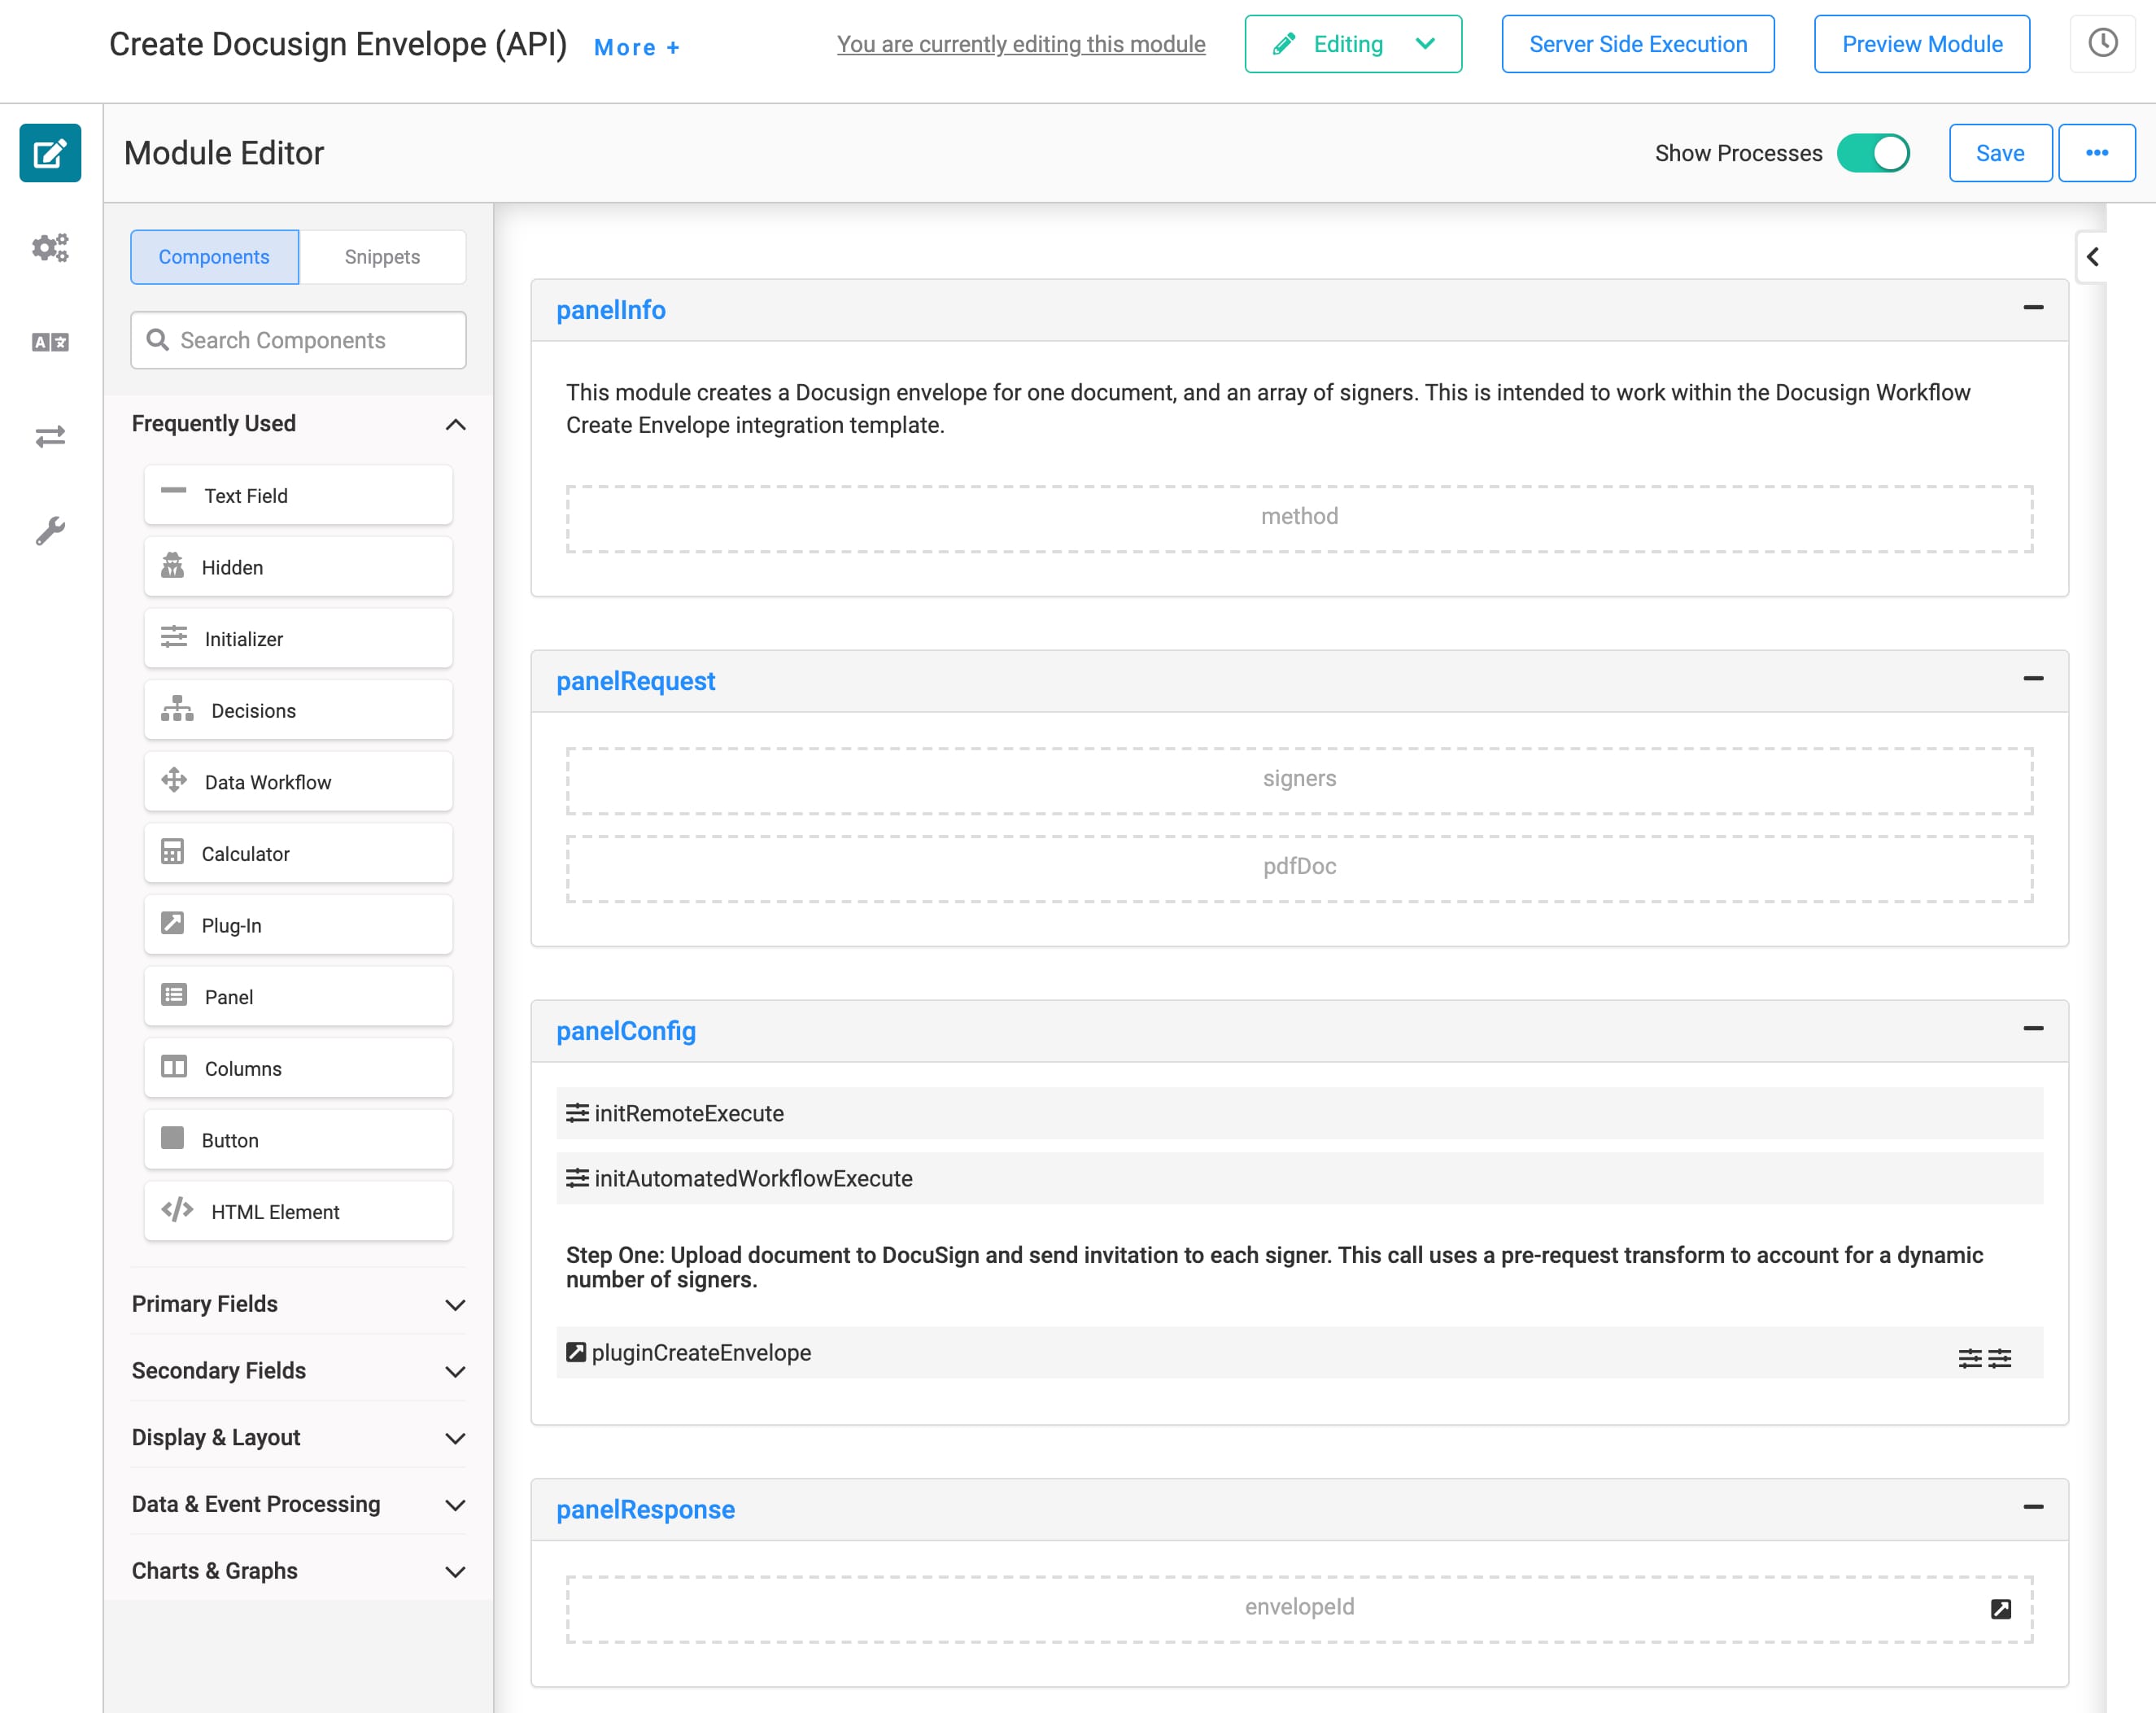
The signers Hidden component holds the signer information entered in the Signers and Fields module. The pdfDoc Hidden component holds the Base64 of the generated PDF. Next, let's look at the Initializers.
If you run your workflow normally, the initAutomatedWorkflowExecute Initializer fires. If you do a server-side execution of this module, the initRemoteExecute Initializer fires instead. So, one of these Initializers triggers the pluginCreateEnvelope Plug-In. This Plug-In uses the DocuSign service and createEnvelope pre-request transform to format your request for DocuSign.
Once your envelope sends to your signers, the DocuSign Envelope ID passes to the envelopeId Hidden field. This ID sends to the final module in the workflow, showing the Envelope ID to the end-user. The end-user can use this Envelope ID to check the status of the envelope or send reminders to the signers.
To view the pre-request transform, click the
(Transforms) button in the left side menu bar. Then, click the createEnvelope tile under Active Transforms.
How the Created Workflow Docusign Envelope Success Module Works
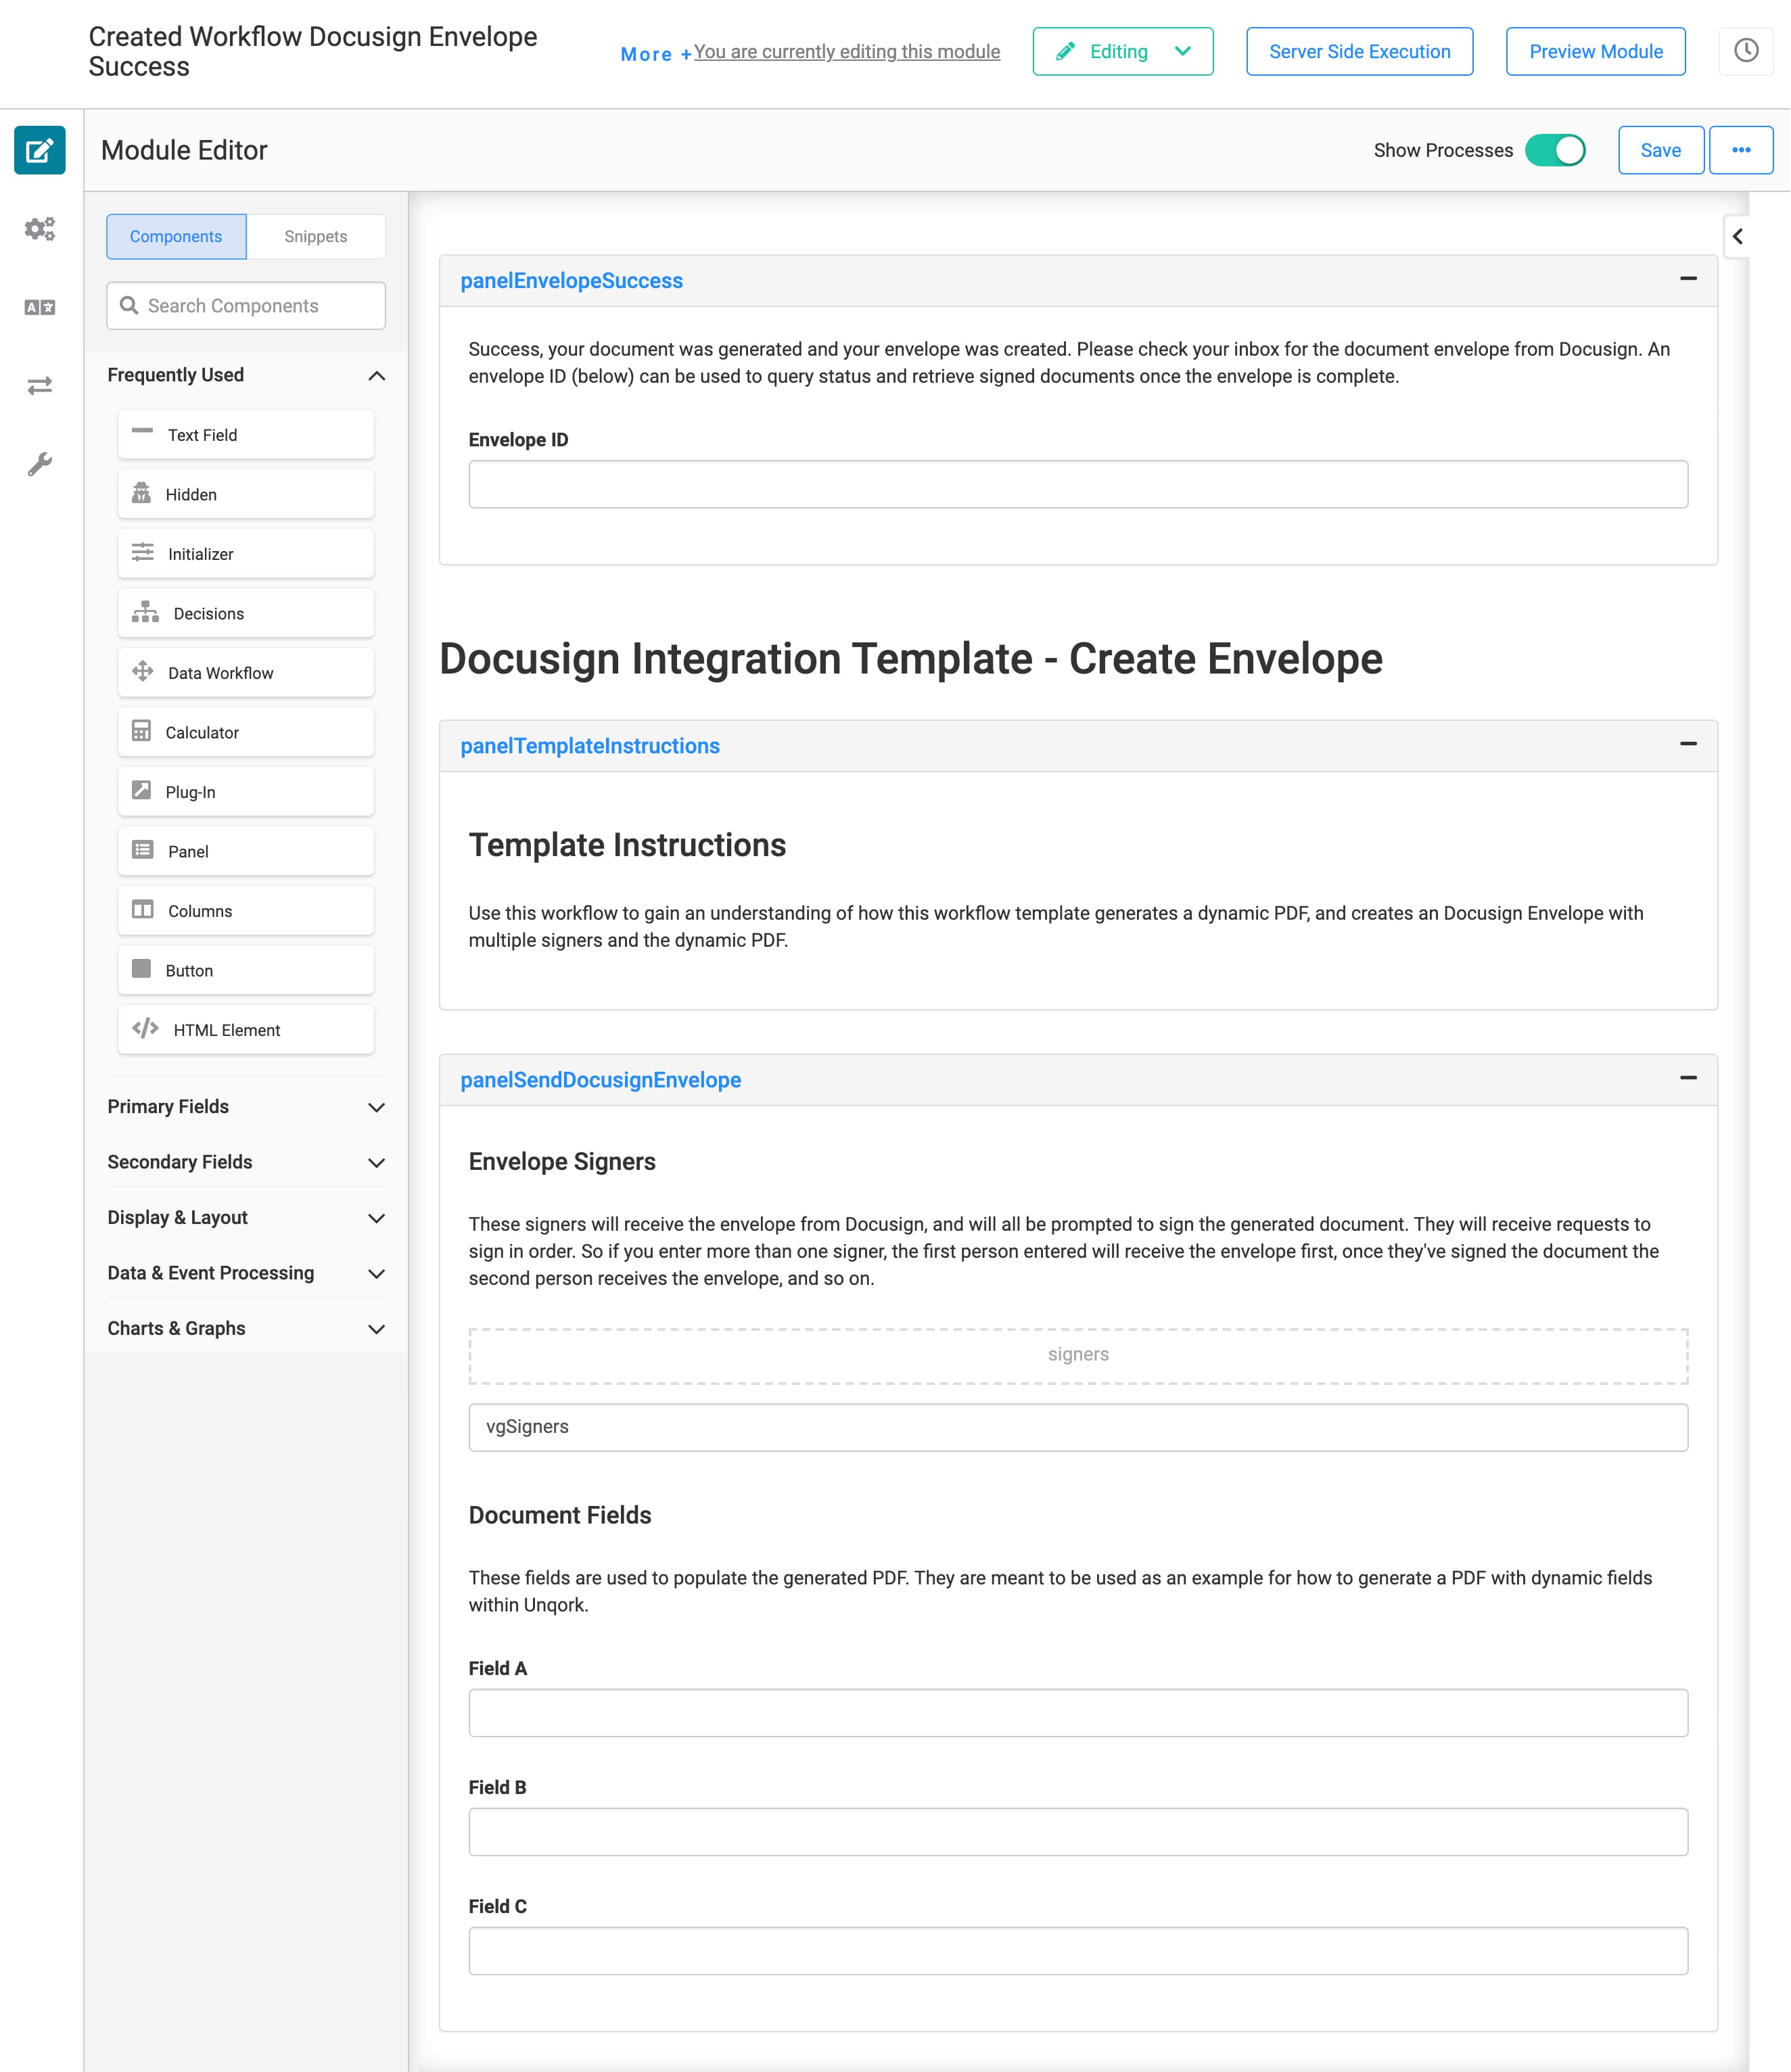
The Express View of this module is almost identical to the Signers and Fields module. The difference is that the fields are read-only, and there's a new section at the top of the page. This section populates with your DocuSign Envelope ID once your envelope successfully sends to the signers. Here's an example of what this section looks like:

Here's how the Created Workflow Docusign Envelope Success module looks in the Module Builder:
Configuring the Template
To get your application up and running, you must set up your DocuSign service in Services Administration. Setting up DocuSign is an involved process, and most of the work takes place in your DocuSign account. So, we'll walk you through what to do in your Unqork environment. Then, we'll give you handy links to help point you in the right direction for your DocuSign account.
Here are the basic steps you'll do in DocuSign:
Set up a DocuSign account.
Create an Integration App in DocuSign.
Set up a Keypair in that Integration App.
Add the entire base URL of your express environment to the DocuSign Redirect URIs (URLs).
Follow the authentication process covered here: https://developers.docusign.com/platform/auth/jwt/jwt-get-token/.
Use this site to learn more about getting an API key through DocuSign: https://developers.docusign.com/platform/configuring-app.
Configuring the DocuSign Service in Services Administration
To configure the DocuSign service, you'll first need your DocuSign Account ID. You'll also need to set up an Integration App in DocuSign to get a few other pieces of information. Then, you'll do a quick and easy update in Services Administration.
We've set up this template to work with the DocuSign Developer Environment (sandbox). If you want to connect your production environment to DocuSign, you'll need to update the service protocol and host, access token URL, and audience.
To access Services Administration:
Click the Settings drop-down at the top right of the Unqork Designer Platform.
Click Administration.
Under Integration, select Services Administration.
Next, you'll need to find and update the DocuSign service with your DocuSign credentials:
Scroll to the bottom of your Active Services list.
Click your DocuSign service.
The title should be something like this: Docusign - 5fe24aafc7b2bb0236d3a01a 1.0.0 2021-04-15T15:22:40.853Z. What if your environment has more than one DocuSign service? Here's a trick. Look for the service with the same template ID and time stamp as the template's modules.
Scroll to the top of the page.
In the Service Protocol + Host field, replace {{ENTER ACCOUNT ID HERE}} with your DocuSign Account ID.
In the Issuer field, replace ClientId with your Integration Key.
In the Subject field, replace Subject with your API Username.
Enter your entire RSA Private Keypair in the Shared/Private Key field.
You must also include the -----BEGIN RSA PRIVATE KEY----- text at the beginning of your Private Key, as well as the text at the end.
.jpg)
Click Save Changes.
Once you complete your DocuSign setup and link your application to DocuSign, you can move on.
Configuring the Workflow
When you open your workflow, you'll see a Welcome to your new Workflow! modal. Click Got it! to close the modal and view your workflow. Once inside your workflow, you'll see an exclamation point icon in the title of the Define Your Role Here swimlane. This icon shows you where the unresolved issue is. Hover over the icon for details:
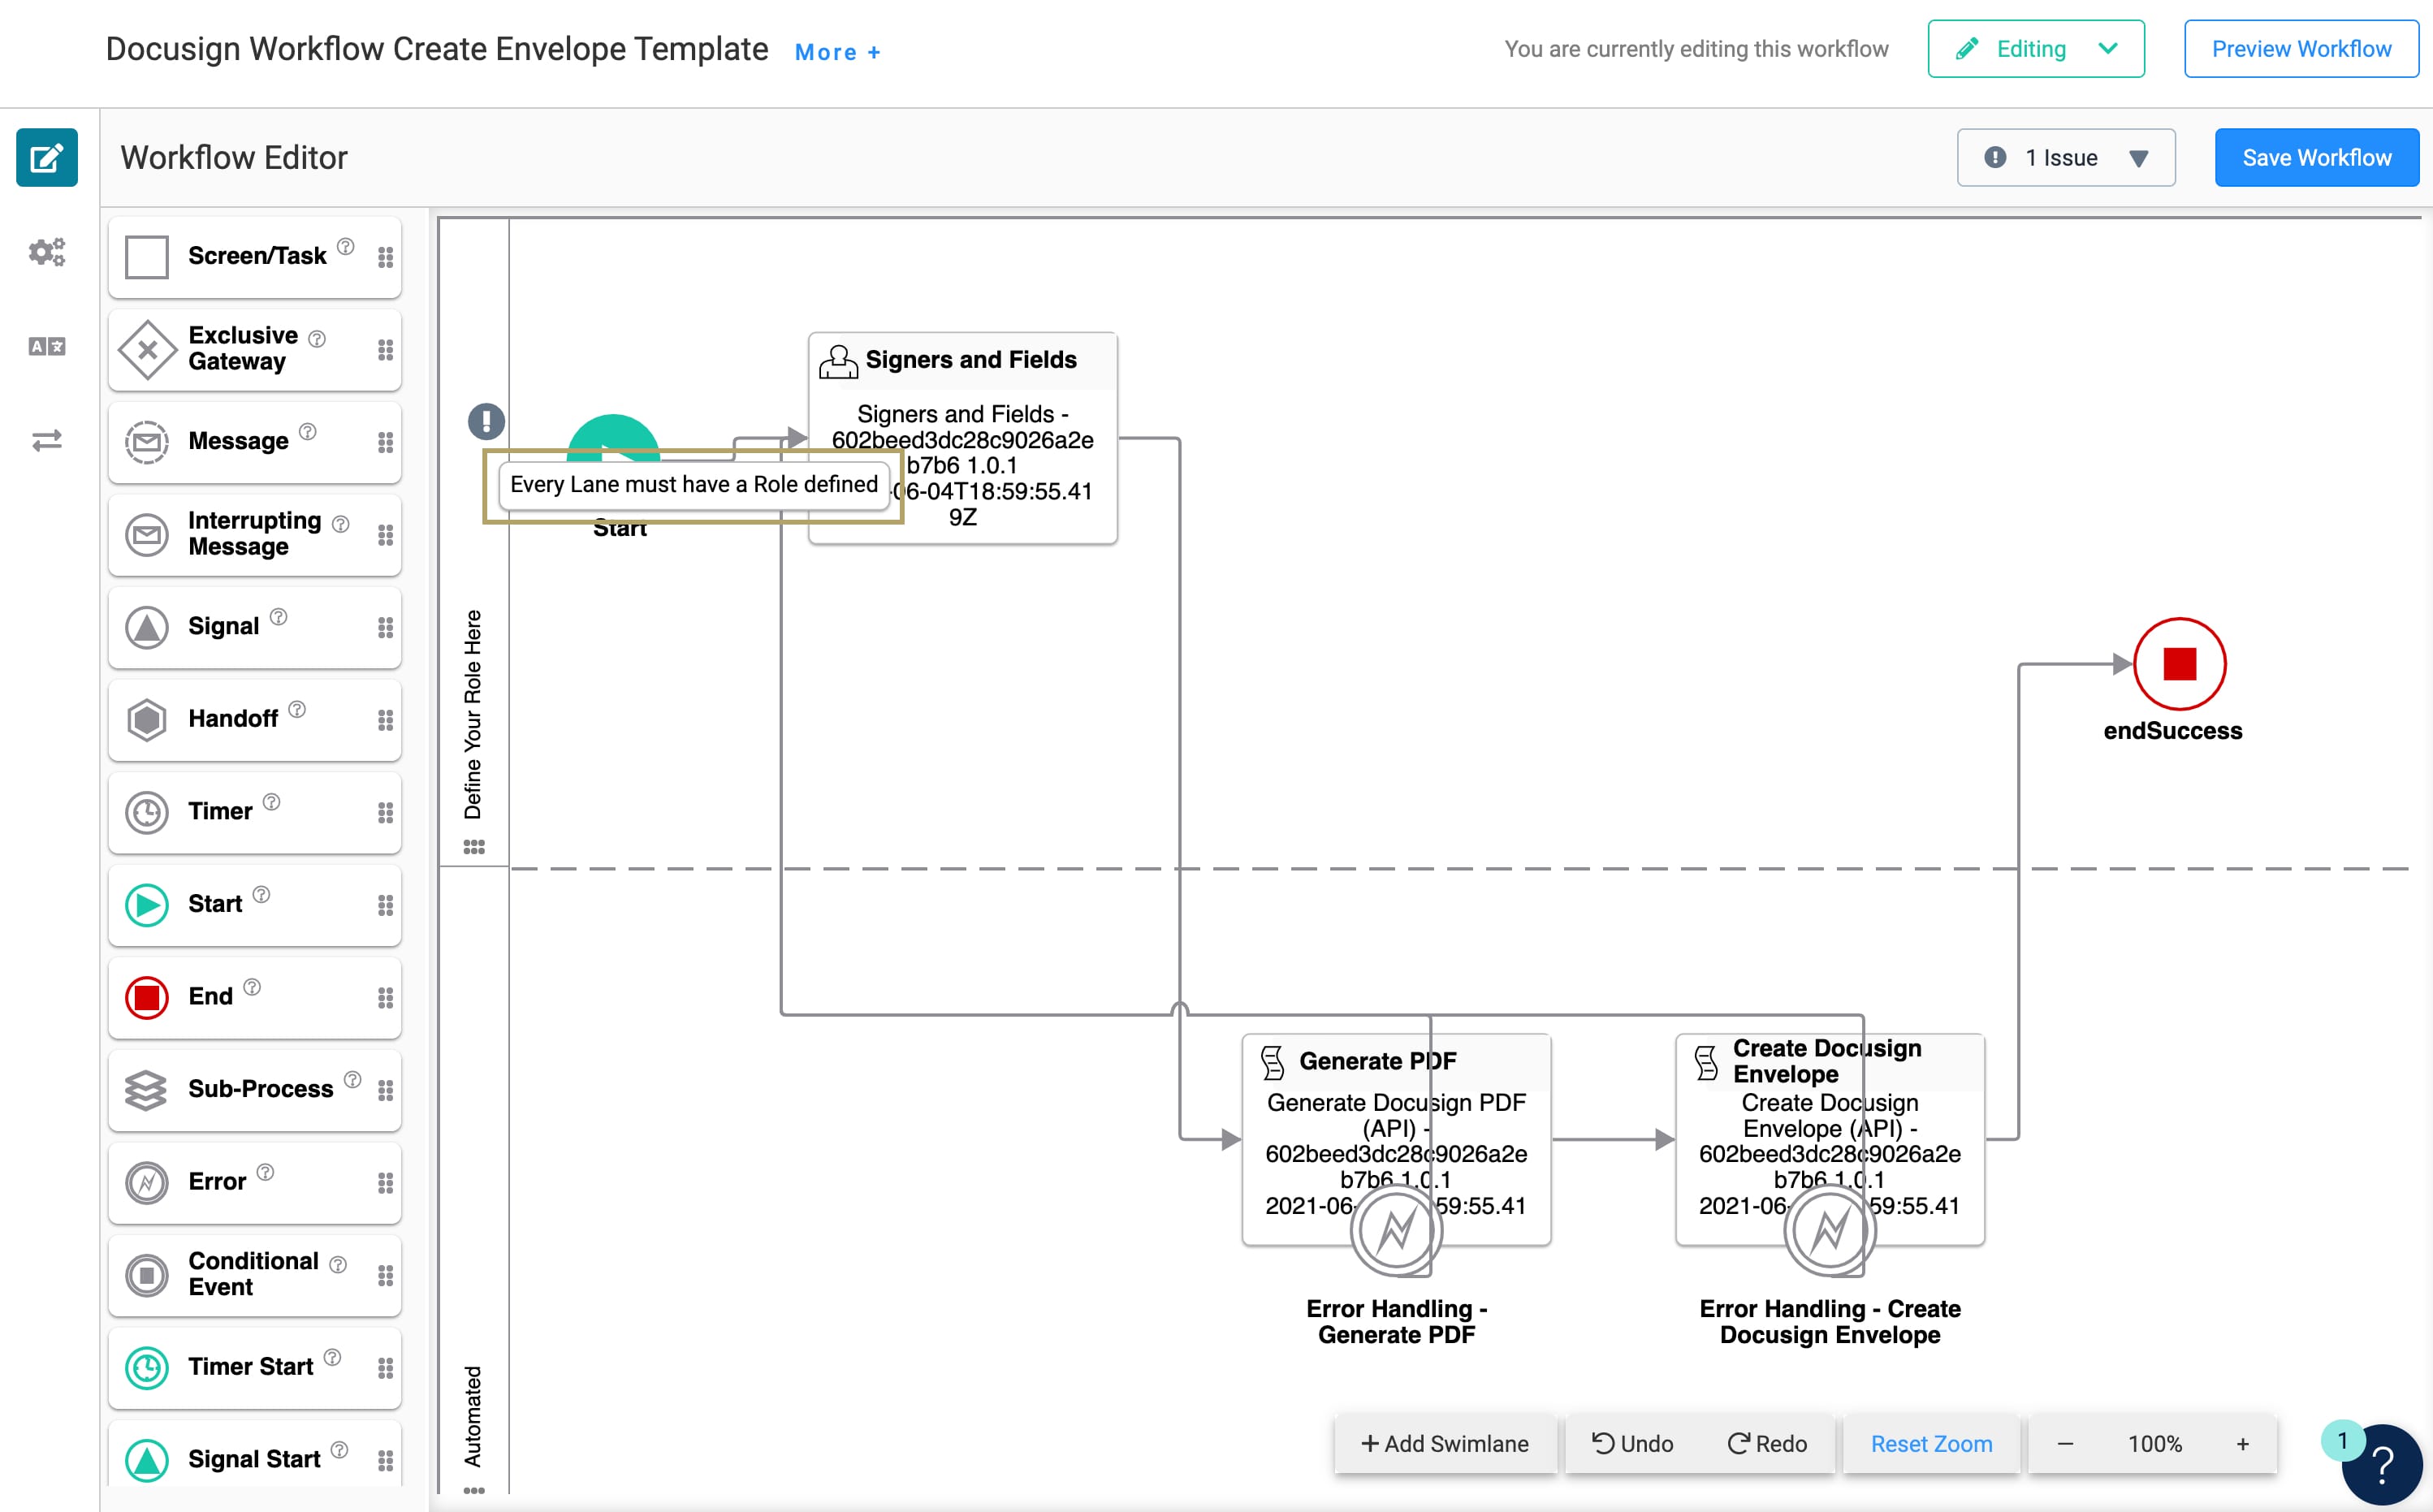
You can also click the Issue drop-down next to the Save Workflow button to see error details.
In this case, the error message says that every swimlane must have a defined Role. Templates don't include RBAC configurations. This is so you can set yours up in a way that works best for you. So, you'll need to define a Role for the Define Your Role Here swimlane.
Hover over the header of the Define Your Role Here swimlane.
Using the toolbar, click the
 (Edit) button.
Select a Role from the Assign a Role drop-down.
Click Close.
Save your workflow.
You'll see that the exclamation point icon and the Issue drop-down disappear.
Customizing the Template
You'll definitely want to make this template your own. Importantly, you'll want to customize the PDF for your DocuSign needs. By default, the template's PDF is a placeholder. The text in the PDF explains how a DocuSign PDF works. Also, the entry fields in the Create Envelope Template module are example fields. Here are some common customizations for the DocuSign template:
Change the text in the PDF.
Edit the fields you want end-users to fill out.
Update the subject line of the email to end-users.
You can also use this template to add a DocuSign integration to another, existing workflow. Simply share the Generate PDF module and Create Docusign Envelope module with your existing application. Add the modules to the Automated swimlane of your workflow, setting up Error nodes for both modules. Make sure to update your mapping so it's appropriate for your existing workflow. Also, double-check that you pass the signers and PDF information correctly from your workflow to these modules.
Editing the Text in the PDF
The text in the PDF transform is regular HTML with some limitations since it's a PDF page and not a webpage. You can customize your PDF using HTML and Nunjucks.
To change your PDF's text:
Open your Generate Docusign PDF (API) module in the Module Builder.
Click the
.jpg) (Transforms) button in the left side menu bar.
(Transforms) button in the left side menu bar.Click the docusignPdf tile under Active Transforms.
Make the changes to your PDF text.
Make sure to keep the DocuSign anchor tag indicating where you want the signature. By default, the transform uses Sign Below as the anchor tag showing DocuSign where the recipient needs to sign. You can learn more about DocuSign's anchor tagging here: https://developers.docusign.com/docs/esign-rest-api/esign101/concepts/tabs/auto-place/.
Click Save Changes.
Editing the Entry Fields
By default, your Express View modules have 3 Text Field components, fieldA, fieldB, and fieldC. When your end-user visits your application, they enter their information in those fields. Then, the PDF generates with the information they entered. You'll likely want to change these fields. For instance, say you want to change the fields to First Name, Last Name, and Job Title. You'll make this change in 4 modules and a transform.
In these steps, we'll walk you through changing the fields to First Name, Last Name, and Job Title. Obviously, you can change them to whatever works for you.
Updating the Fields in the Signers and Fields Module
First up is the Signers and Fields module. This is where you'll change the Property IDs and Label Texts of the 3 Text Field components.
To update each Text Field component:
Hover over the Text Field component.
A 5-button toolbar appears above the component on hover-over.
Using the toolbar, click the
.jpg) (Settings) button.
(Settings) button.Enter the Property ID and Label Text for each Field Text component as follows:
Property ID
Label Text
firstName
First Name
lastName
Last Name
jobTitle
Job Title
By default, each Text Field component has Helper Text that says Example document field one, Example document field two, and so on. This text shows under the entry field in Express View. When editing your Text Field components, you can change or delete this Helper text.
Save each component as you update it.
Save your module.
Updating the Mapping in the Generate Docusign PDF (API) Module
Next, you'll update the Generate Docusign PDF (API) module. First, you'll update the fieldA, fieldB, and fieldC Hidden components. Then, you'll update this module's pluginGeneratePdf Plug-In component.
To update each Hidden component:
Hover over the Hidden component.
Using the toolbar, click the
.jpg) (Settings) button.
(Settings) button.Enter the Property ID and Label Text for each Hidden component as follows:
Property ID
Label Text
firstName
First Name
lastName
Last Name
jobTitle
Job Title
Save each component as you update it.
To update the mapping in the pluginGeneratePdf Plug-In component:
Hover over the pluginGeneratePdf Plug-In component.
Using the toolbar, click the
.jpg) (Settings) button.
(Settings) button.Update the last 3 rows of the Inputs table as follows:
Property ID
Mapping
firstName
data.firstName
lastName
data.lastName
jobTitle
data.jobTitle
.jpg)
Click Save.
Save your module.
Updating the Created Workflow Docusign Envelope Success Module
Since this module mirrors the Signers and Fields module, you'll make the same updates. You'll change the Property IDs and Label Texts of the 3 Text Field components.
To update each Text Field component:
Hover over the Text Field component.
Using the toolbar, click the
.jpg) (Settings) button.
(Settings) button.Enter the Property ID and Label Text for each Field Text component as follows:
Property ID
Label Text
firstName
First Name
lastName
Last Name
jobTitle
Job Title
By default, each Text Field component has Helper Text that says Example document field one, Example document field two, and so on. This text shows under the entry field in Express View. When editing your Text Field components, you can change or delete this Helper text.
Save each component as you update it.
Save your module.
The next and final step is to update mapping in the docusignPdf transform.
Updating the Mapping in the Docusign PDF Transform
By default, the docusignPdf transform maps to the template's original placeholder fields. So, you'll need to update the transform so it maps to your updated fields.
Open the Generate PDF (API) module in the Module Builder.
Click the
.jpg) (Transforms) button in the left side menu bar.
(Transforms) button in the left side menu bar.Click the docusignPdf tile under Active Transforms.
Find lines 52-56 of the transform that reference the Field Text components.
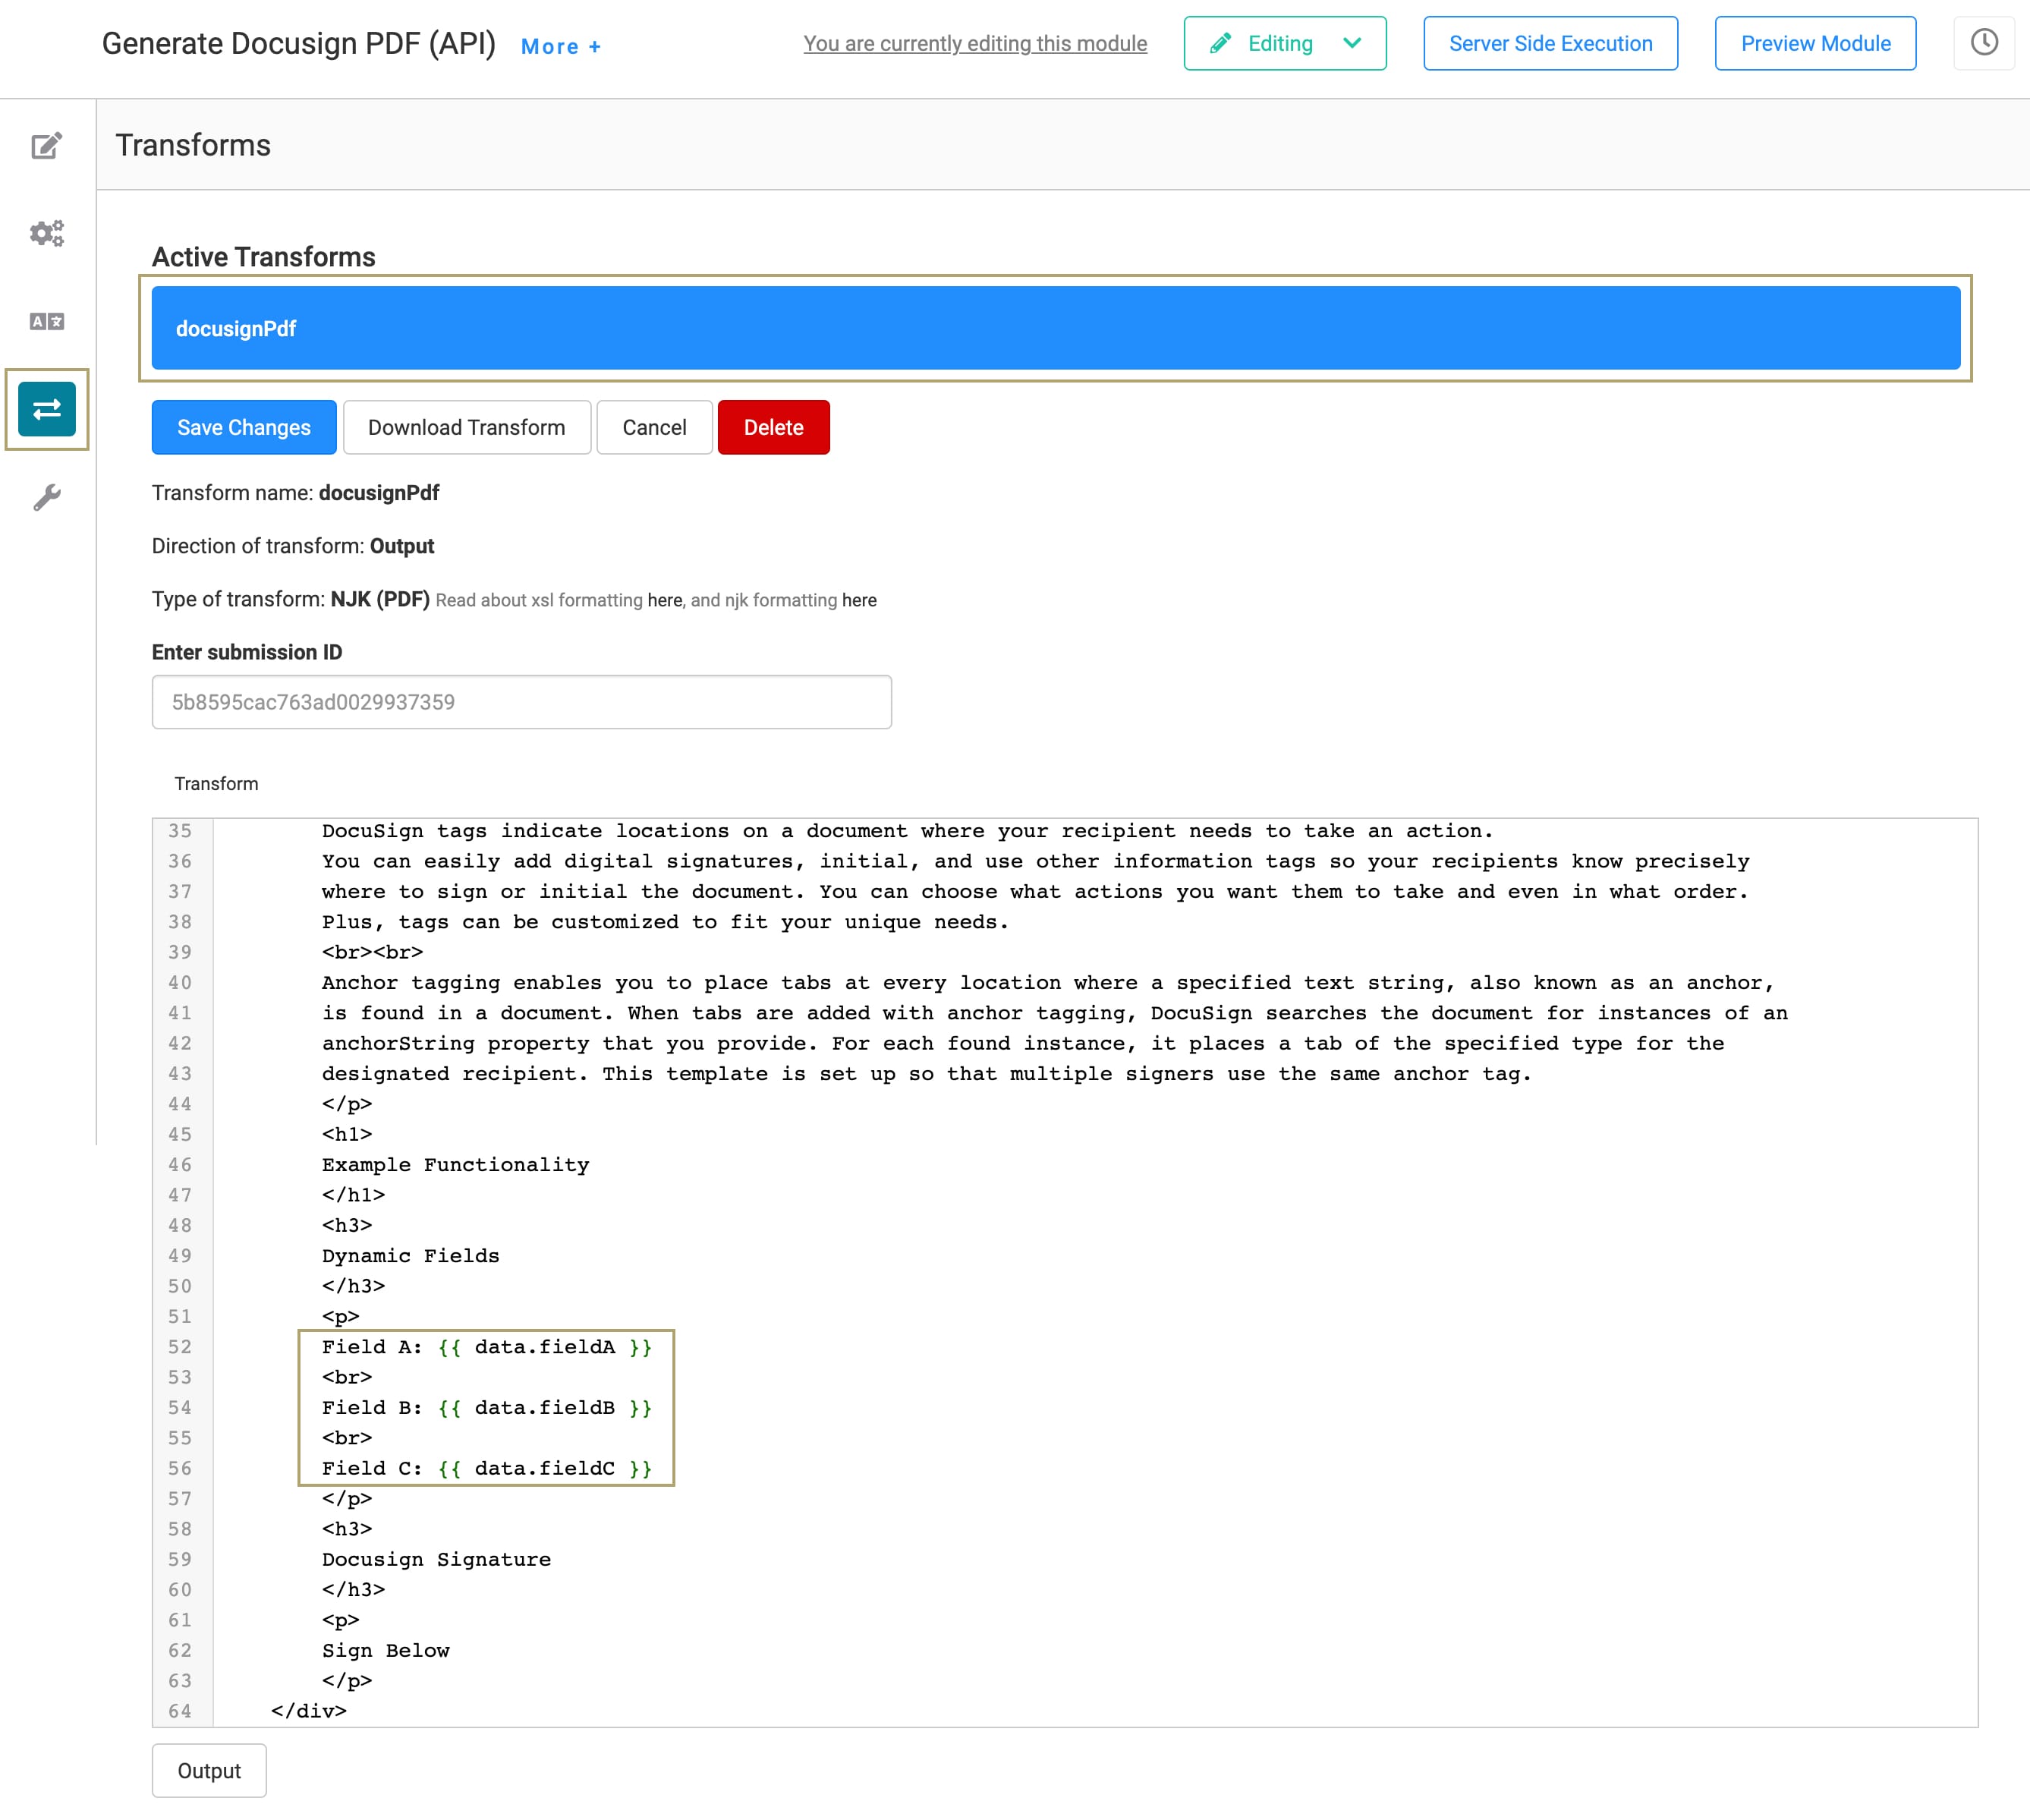
Replace lines 52-56 with the following:
First Name: {{ data.firstName }}
<br>
Last Name: {{ data.lastName }}
<br>
Job Title: {{ data.jobTitle }}
Click Save Changes.
Save the module.
Updating the Subject Line of the Email
By default, the subject line of the email that sends to signers is Your template document is ready for your signature. Changing that subject is easy. You'll adjust a single line of your createEnvelope transform.
Open the Create Docusign Envelope (API) module in the Module Builder.
Click the
.jpg) (Transforms) button in the left side menu bar.
(Transforms) button in the left side menu bar.Click the createEnvelope tile under Active Transforms.
Enter the email subject you want after "emailSubject": in the transform's body. Make sure to keep your text in quotation marks. For example, you could enter: "emailSubject": "Thanks for applying! Please sign this document."
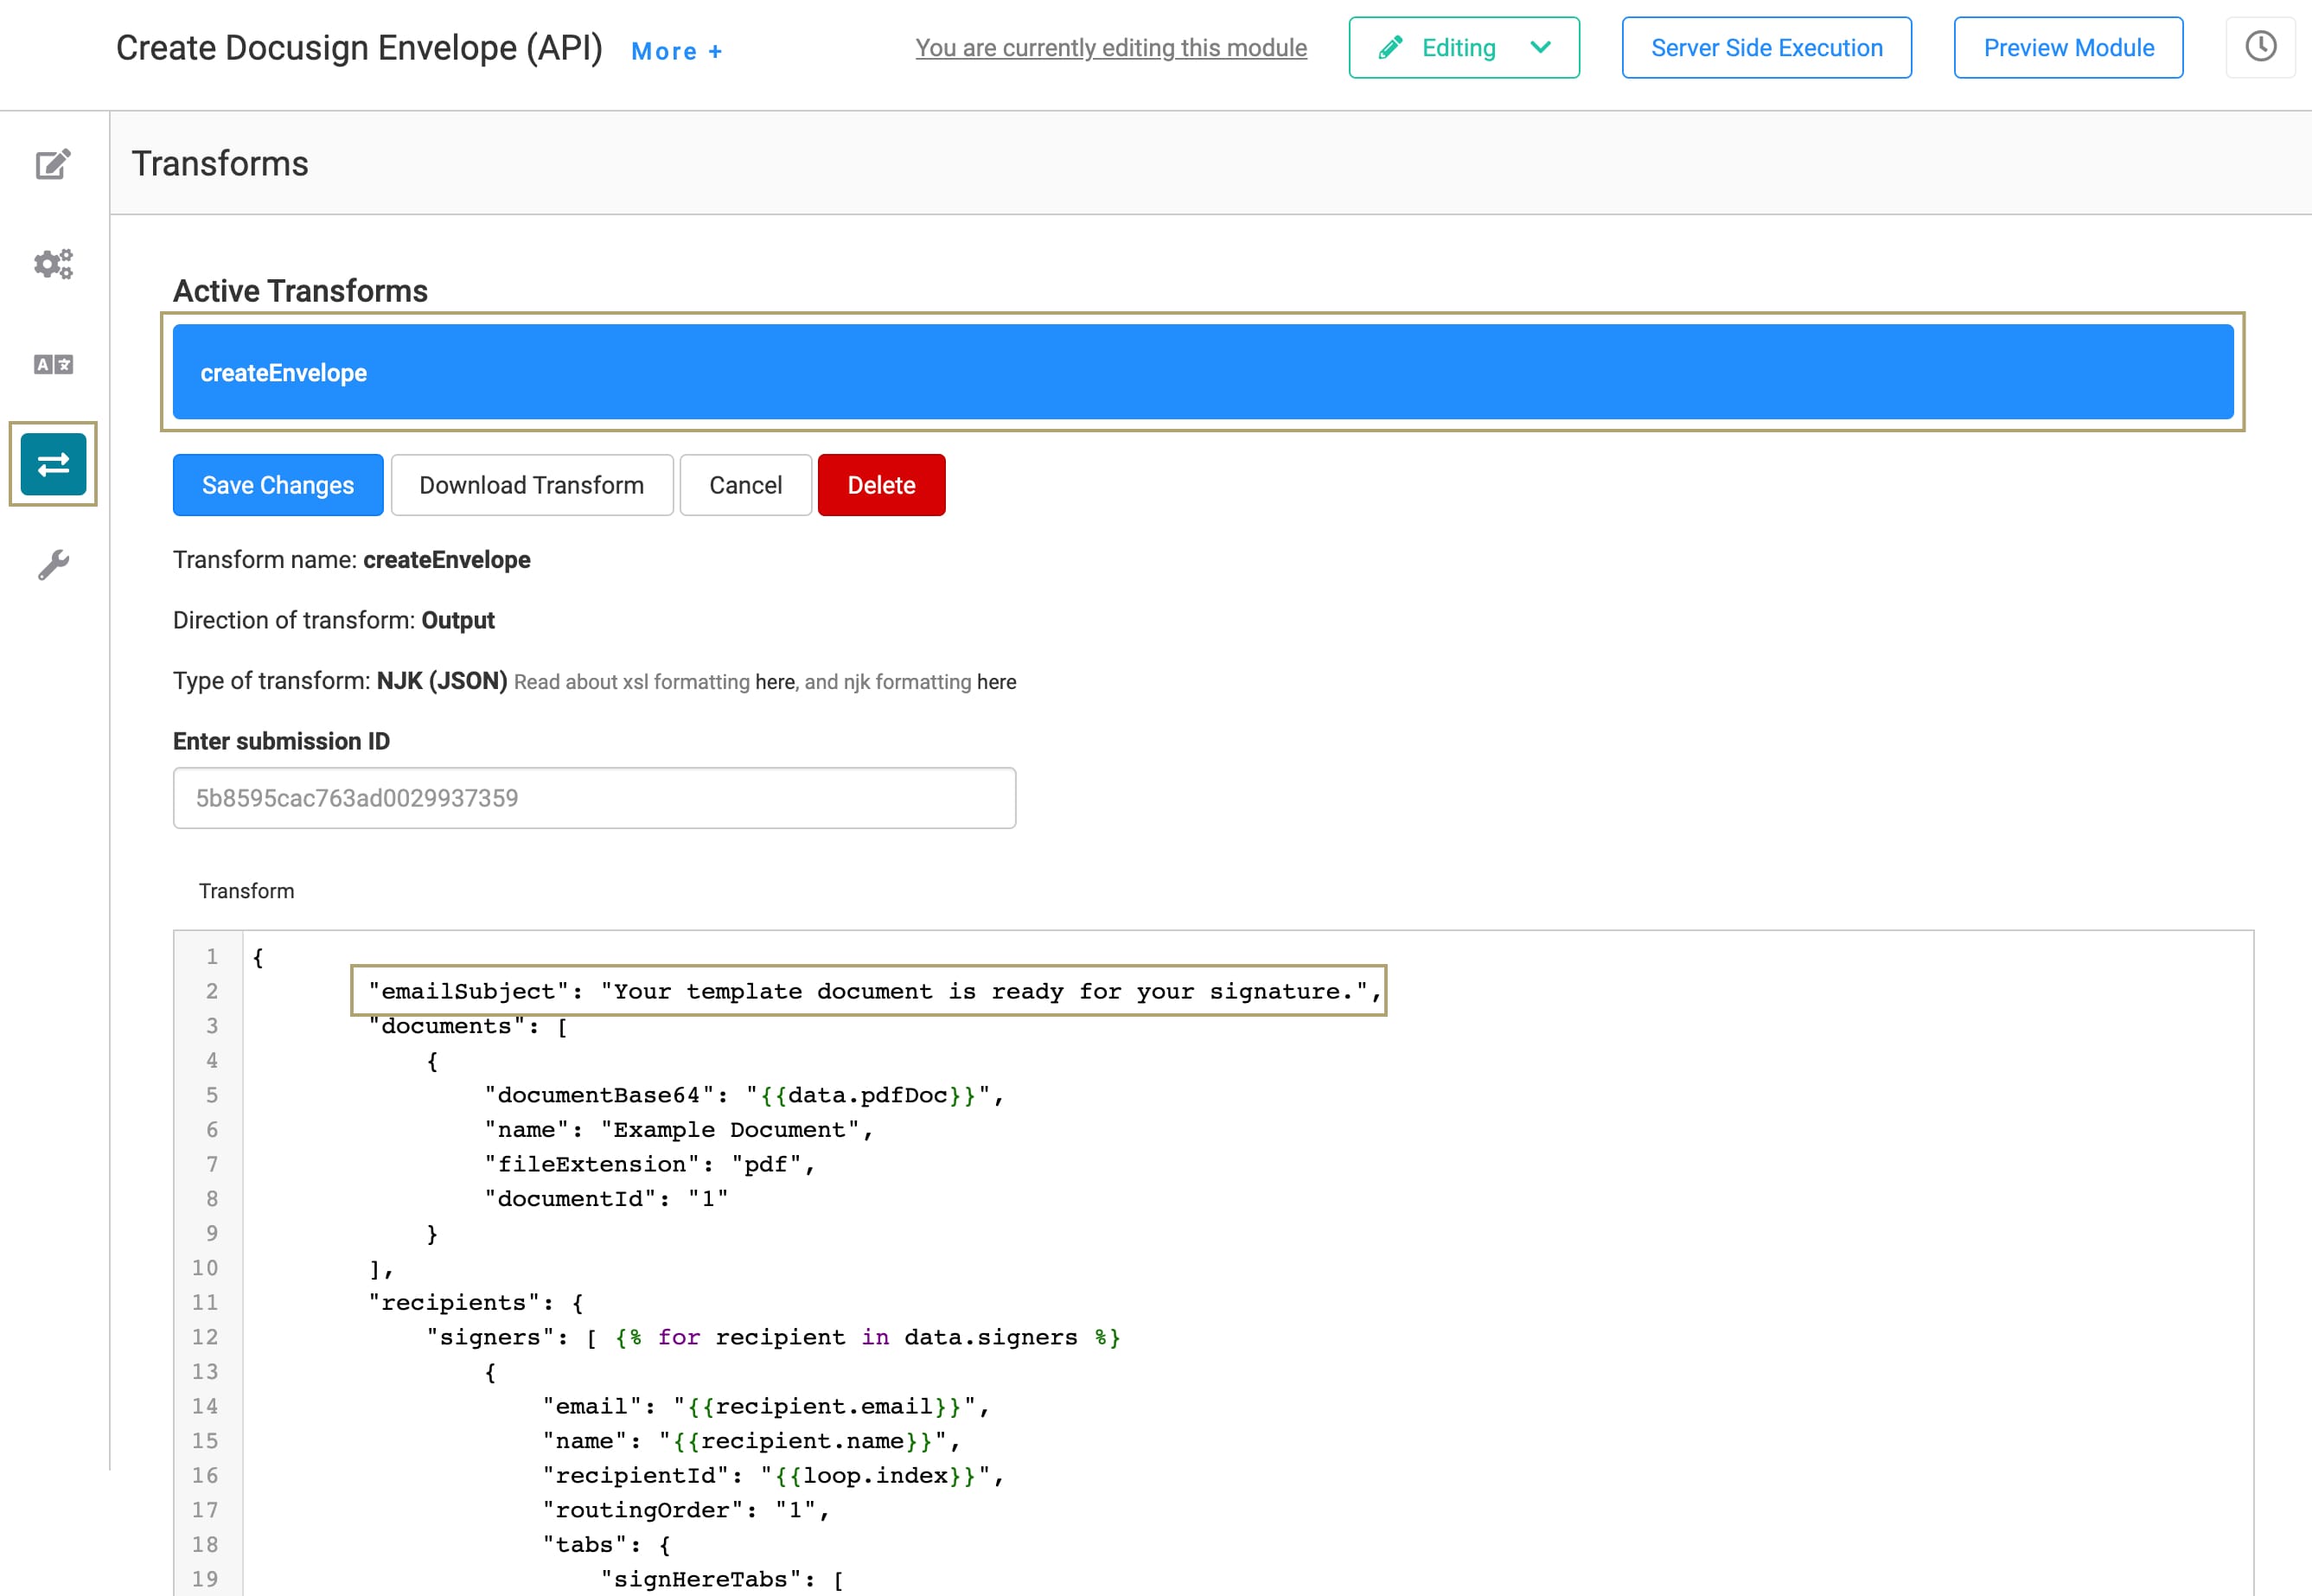
Click Save Changes.
Save the module.
Testing the Template
Have you configured your DocuSign service and made the necessary updates to your modules? If so, it's time for the fun part: trying it out! Open your workflow and click the Preview Workflow button. Add your name and email address as a signer and fill out the fields as if you're an end-user. Then, click Send Document at the bottom of the page. Check your inbox for your eSignature PDF.
Removing the Template
There are 3 steps to removing the template, and these can happen in any order:
Uninstall the template from your environment.
Delete the application you created from the template.
Remove the DocuSign service from your environment.
If you think you'll want to reference the DocuSign service in the future, you can leave it in your environment.
Removing the Template from Your Environment
You might need to clean your environment and remove unused templates. The Unqork Library makes this easy. To uninstall a template from your environment:
At the top right of the Unqork Designer Platform, click Library.
Find the template to uninstall.
Click the ellipsis (...) in the template tile header.
Click Uninstall Template.
Click Yes, Uninstall in the confirmation modal.
You can visit the Marketplace and reinstall the template at any time.
What if you have an existing application built from this template and then uninstall the template from your environment? Your existing application remains unaffected. Also, it no longer has any ties to the template. So, let's say you reinstall a newer version of the template in the future. You can rest assured that the installation doesn't impact your existing application.
Deleting Your Application
If you no longer need the application you created from your template, you can delete it. To delete your application:
Navigate to the Apps tab from an open workspace.
Find the application to delete.
Click the ellipsis (...) in the app tile header.
Click Delete.
Retype the provided text.
Click Yes, Delete.
Removing the DocuSign Service from Your Environment
To remove your DocuSign service from your environment:
Click the Settings drop-down at the top right of the Unqork Designer Platform.
Click Administration.
Under Integration, select Services Administration.
Scroll down and select the DocuSign service you want to delete from the Active Services list.
Click the Delete link. You’ll find this above the Active Services list.
At the Delete message, click OK.
At the Success message, click OK.