About this Configuration Guide
Using this guide, you'll explore how the Workflow Automated Import SFTP (secure file transfer protocol) template works. You'll learn how to install the template in your environment and how to build an application from it. Plus, we'll walk you through how to customize your application to fit your needs.
Here's a high-level overview of the elements involved in this template:
Title | Element Type | Description |
|---|---|---|
Workflow Automated Import File Create Submission SFTP | Workflow | The entire workflow takes place behind-the-scenes in the Automated swimlane. So, there aren't any front-facing modules in this application. This workflow starts with a Timer Start node, so you can run the process on a set schedule. The Timer Start node connects to the Import File From SFTP (API) module. That module connects to the Create Import File Submission (API) module, which saves a schema submission. Then, the workflow ends with an End node. |
SFTP Import: Import File From SFTP (API) | Module | This is the first modulein the workflow. Once you start the automated import SFTP process, this API (application programming interface) modulecalls your SFTP server. It then imports the file and turns it into a Base64 string. The Base64 encoding scheme preps the file for the next API module. |
SFTP Import: Create Import File Submission (API) | Module | This is a simple API module that takes the Base64 string of the file and creates a submission in the schema module. |
Import File Submission (Schema) | Module | This back-end module securely stores the submissions of your SFTP files. |
SFTP | Service | This is an external service that lets you interact with your SFTP server. |
All images used in this guide are for illustrative purposes only. Images are subject to change without notice. All images were correct at the time of publication.
Overview
The Workflow Automated Import SFTP Template is a great starting point for building an SFTP model. You'll use this model if you have a legacy integration that can only use files uploaded to an SFTP server. This template lets you import a file from an SFTP server and save it to Unqork, all on a set schedule. Once you set up the template and start your workflow, it'll continue on its set schedule until you pause or stop it. Simply put, the SFTP model takes CSV (comma-separated values) and pipe-delimited files and makes them Unqork-friendly.
This template is the foundation for the SFTP model. You can add on to it with the Create, Delete, and Update functions.
This is a workflow integration template. So, if you build an application from this template, you'll also see an SFTP service (integration) added to your environment. Even though there isn't an external integration partner, we still consider this an integration template. You'll set up your environment's new SFTP service to connect with your own SFTP server.
Features
With this template, you can:
Import files from your SFTP server.
Schedule and automate imports directly from your workflow.
Requirements
To use this template, you must have an SFTP server and credentials.
Adding the Template
Before you can build an application from this template, you must install the template to your environment. Then, you can visit your Library and build an application from your new template.
Adding the Template to Your Environment
To add the template to your environment:
Click Marketplace at the top right of the Unqork Designer Platform.
You can also access the Marketplace at any time by visiting https://marketplace.unqork.io/#/.
Enter Automated Import SFTP in the Search the Marketplace field.
Click on the Automated Import SFTP tile.
Click Add to Environment.
Click Install Template.
If you aren't logged in, you'll see a field for Environment URL and a Login button. Enter your environment's URL where you want to install the template. For example: [environmentname.unqork.io]. Then, click Login.
You can now use your newly installed template to create an application!
Creating an Application from the Template
After you've added the template to your environment from Marketplace, you can use it to create an application. This template creates a workflow-type application. It also adds an SFTP service to your environment. You'll configure that service later, under Configuring the Template.
To create an application from the template:
Click Library at the top right of the Unqork Designer Platform.
Find the Automated Import SFTP template tile.
If the template isn't listed, head over to the Marketplace to install it in your environment. You can access the Marketplace at any time by visiting https://marketplace.unqork.io.
Click Create App from Template.
Choose the destination workspace from the Workspace drop-down. This is where your application will live once you create it.
Enter your unique App Name. The App Path auto-fills as you type your App Name.
If you want a different App Path, enter it in the App Path field.
Select a preview style from the Style drop-down. A style specifies your application’s appearance in Express View. If left blank, your application uses your environment's default style.
You'll notice the App Type and App Entrypoint are grayed out. The template automatically takes care of these for you.
Click Create App.
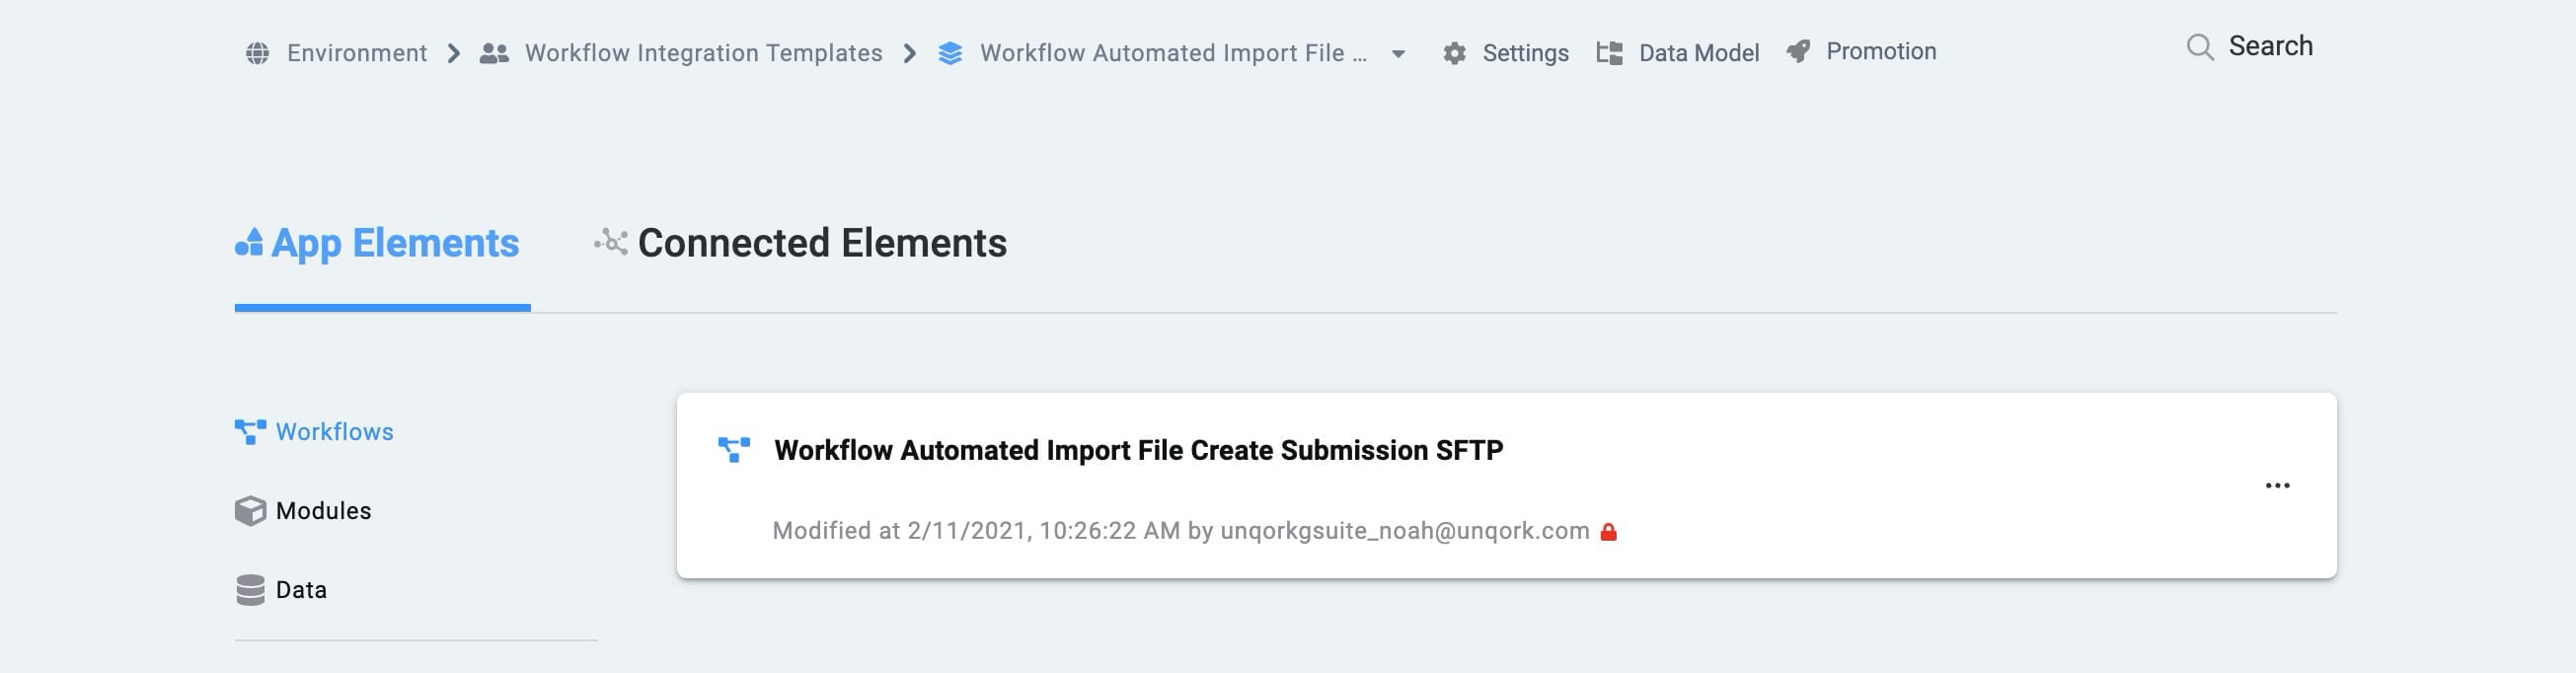
The application opens in the workspace you specified. You'll land on the Workflows tab of your application.
Your Workflows tab should look something like this:
And your Modules tab should look like this:
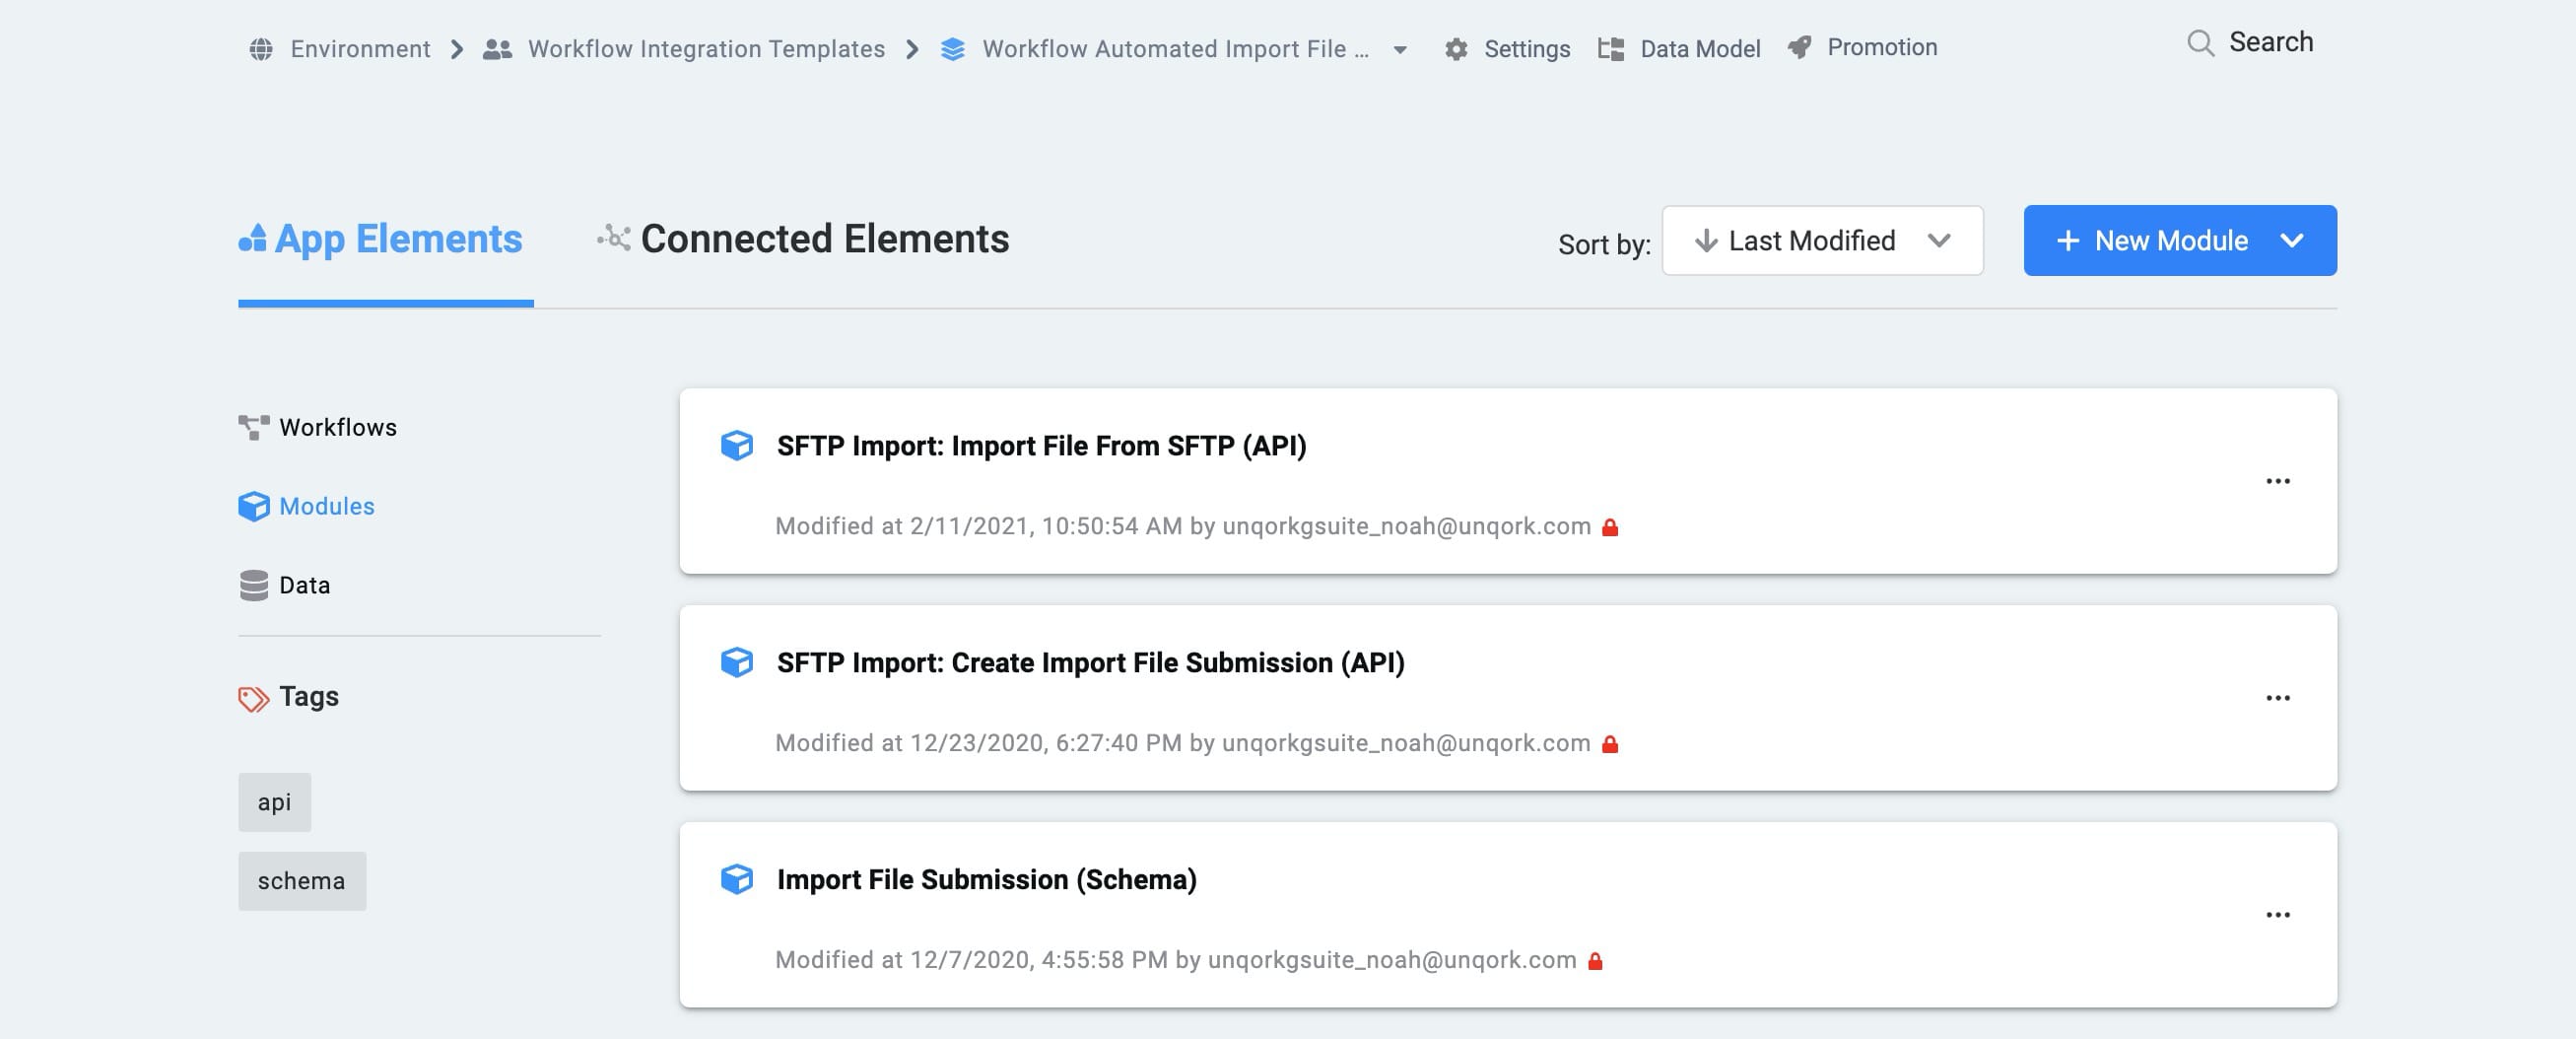
When you create an application from the template, your module names will also automatically include the template ID and a time stamp. This is to prevent any duplicate module paths. You're welcome to change module names and module paths at any time. Any service or workflow created with your template will also have a template ID and time stamp.
How the Template Works
First, let's chat about the SFTP model. Normally, it serves 4 functions: Import, Create, Delete, and Update. Here's an example of a fully working SFTP model. A client has a file with information they want Unqork to process. So, they upload it to their SFTP server. Unqork imports that file, then either moves or deletes it from the client's server. The server is the neutral ground, where files get uploaded, downloaded, imported, and exported. The client reaches in to update the file and Unqork reaches in to retrieve the updated file. With the SFTP model in place, this process happens on a set schedule. This way, we regularly have the most updated file. The Automated Import SFTP template handles the Import function of the SFTP model.
How this Template's Workflow Works
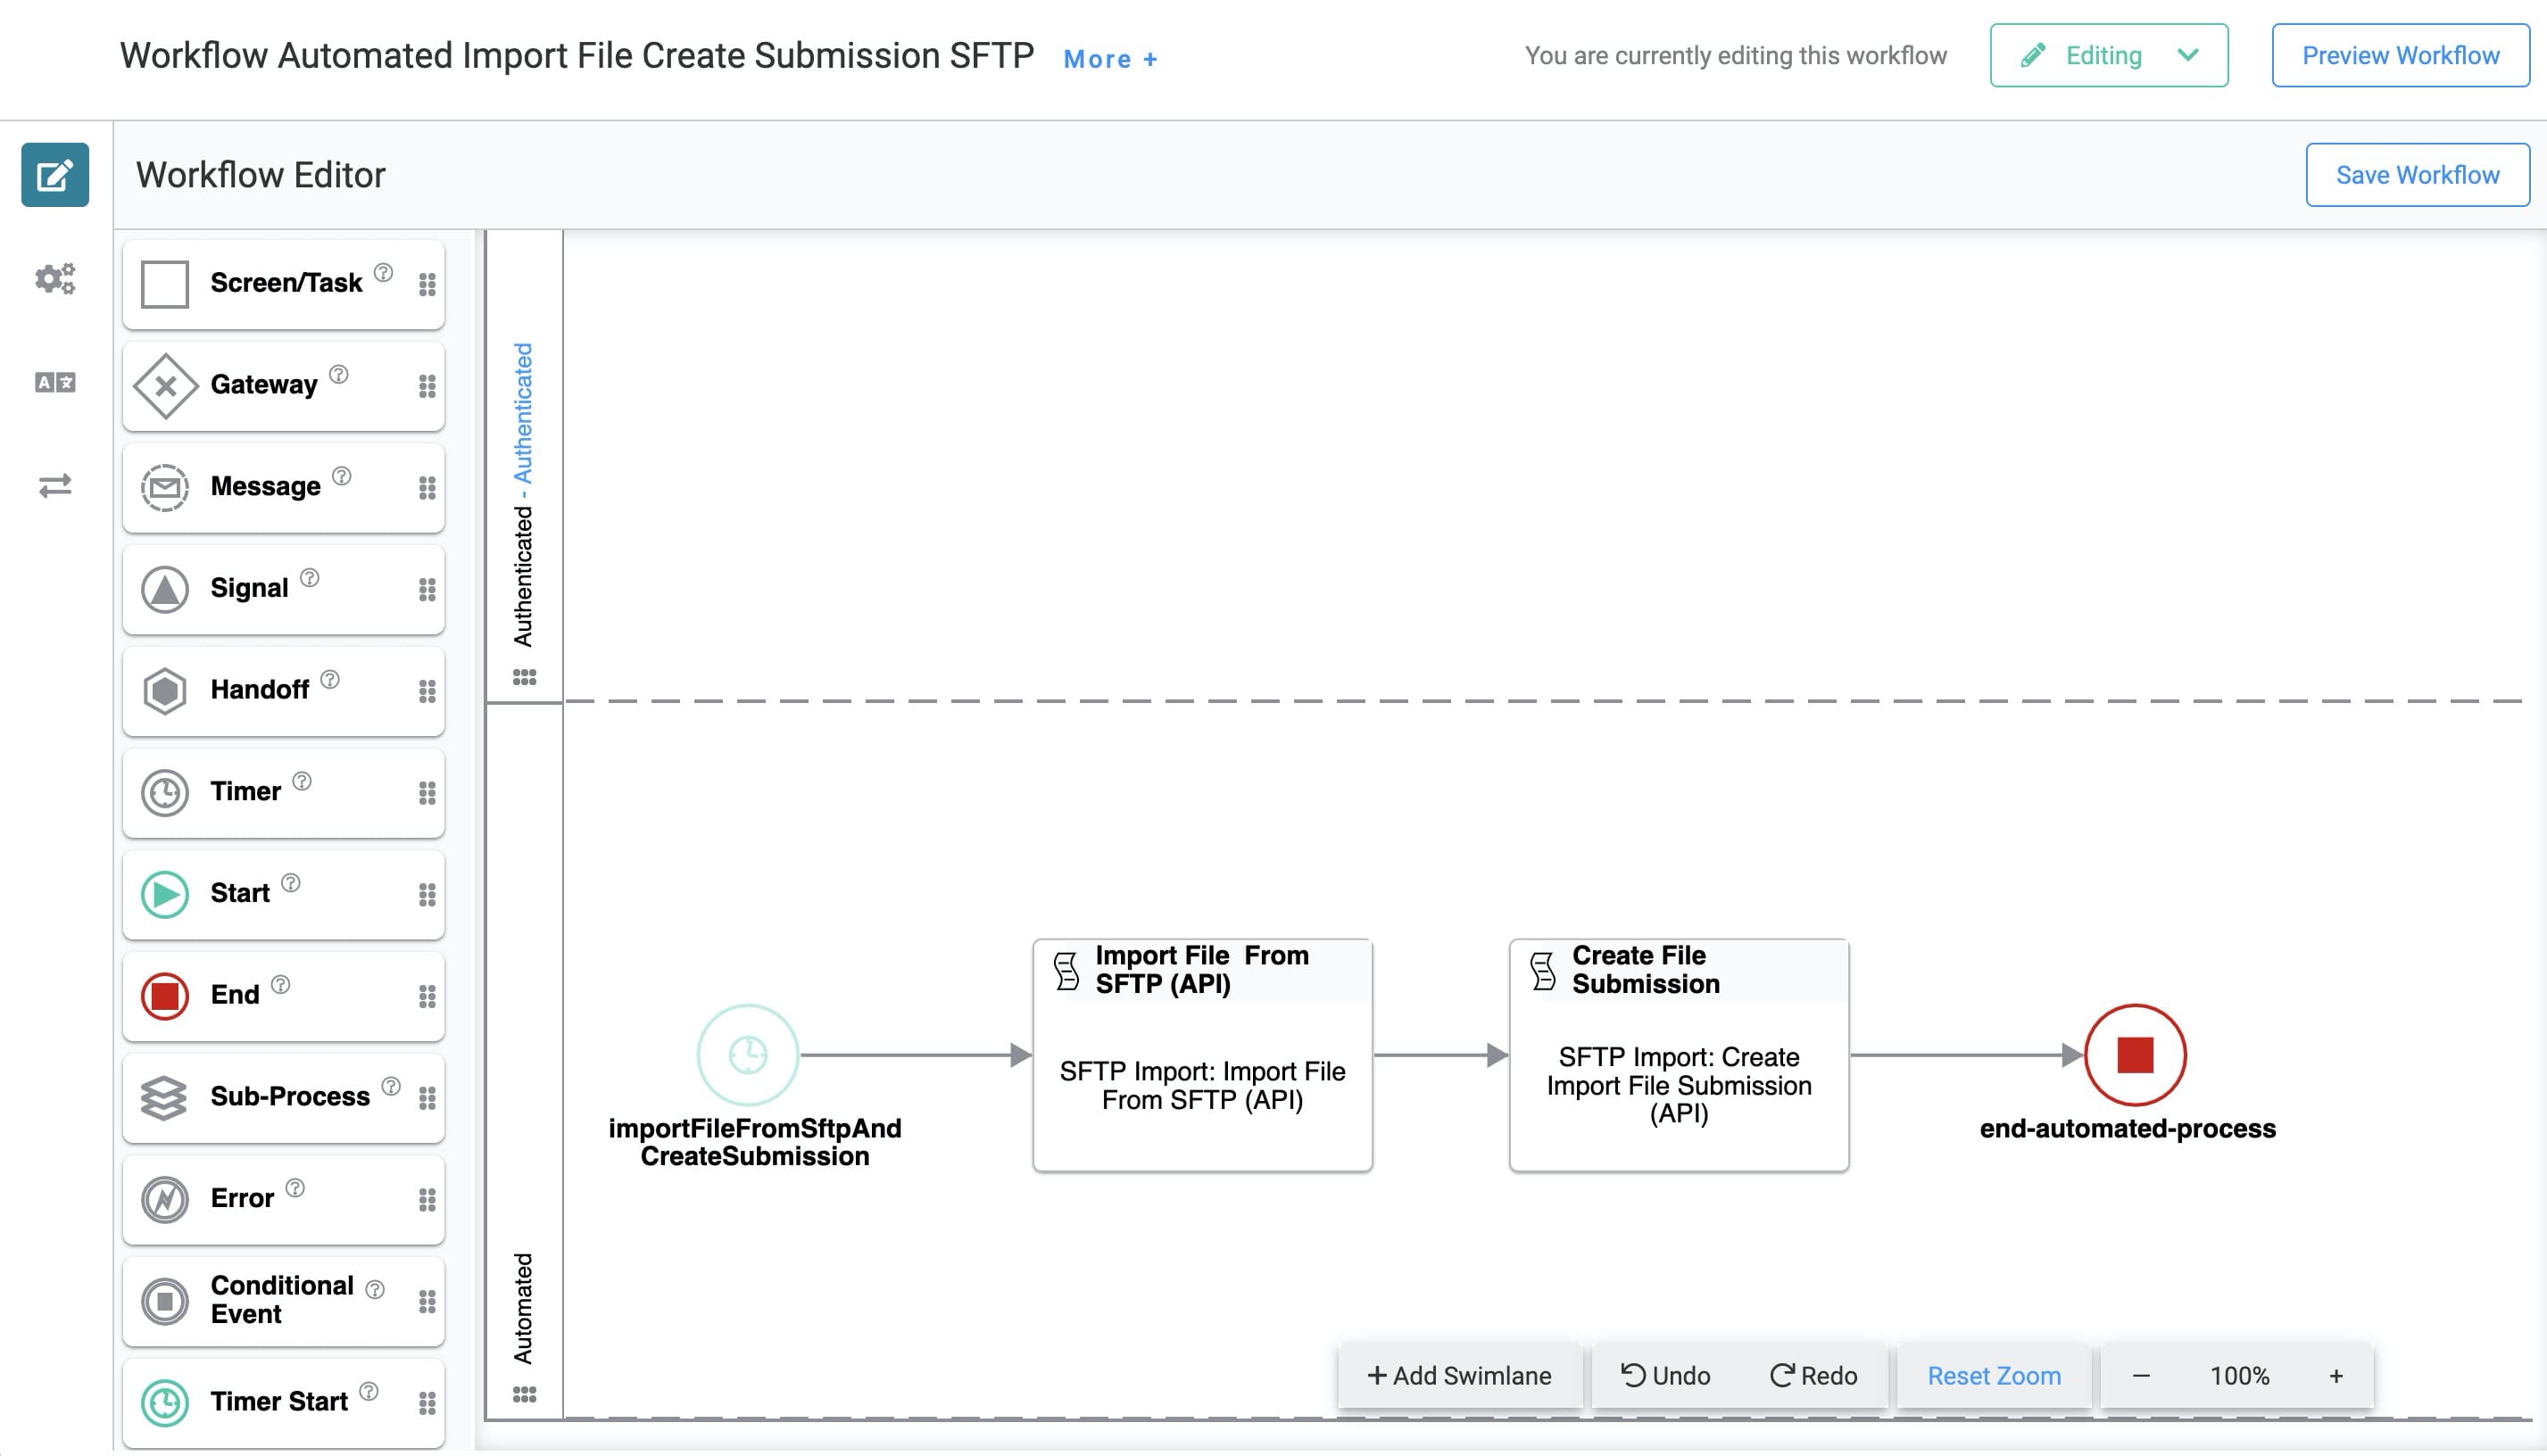
The entire workflow takes place behind-the-scenes in the Automated swimlane. So, there aren't any front-facing modules in this application. The goal is to do the basic setup and start your scheduled process. Then, the automation runs in the background on its set schedule.
This workflow starts with a Timer Start node, which lets you run a process on a set schedule. The Timer Start node connects to the Import File From SFTP (API) module. That module connects to the Create Import File Submission (API) module, which saves a schema submission. The workflow ends with an End node.
Here's how your workflow will look:
How the SFTP Service Works
The SFTP service is what allows Unqork to connect to your SFTP server. Think of it like a telephone line that lets Unqork communicate with your SFTP server.
How the Import File from SFTP (API) Module Works
This is the first module in the workflow. Once you start the automated import SFTP process, this API module calls your SFTP server. It then imports the file and turns it into a Base64 string. The Base64 encoding scheme preps the file for the next API module.
Here's how it looks in the Module Builder:
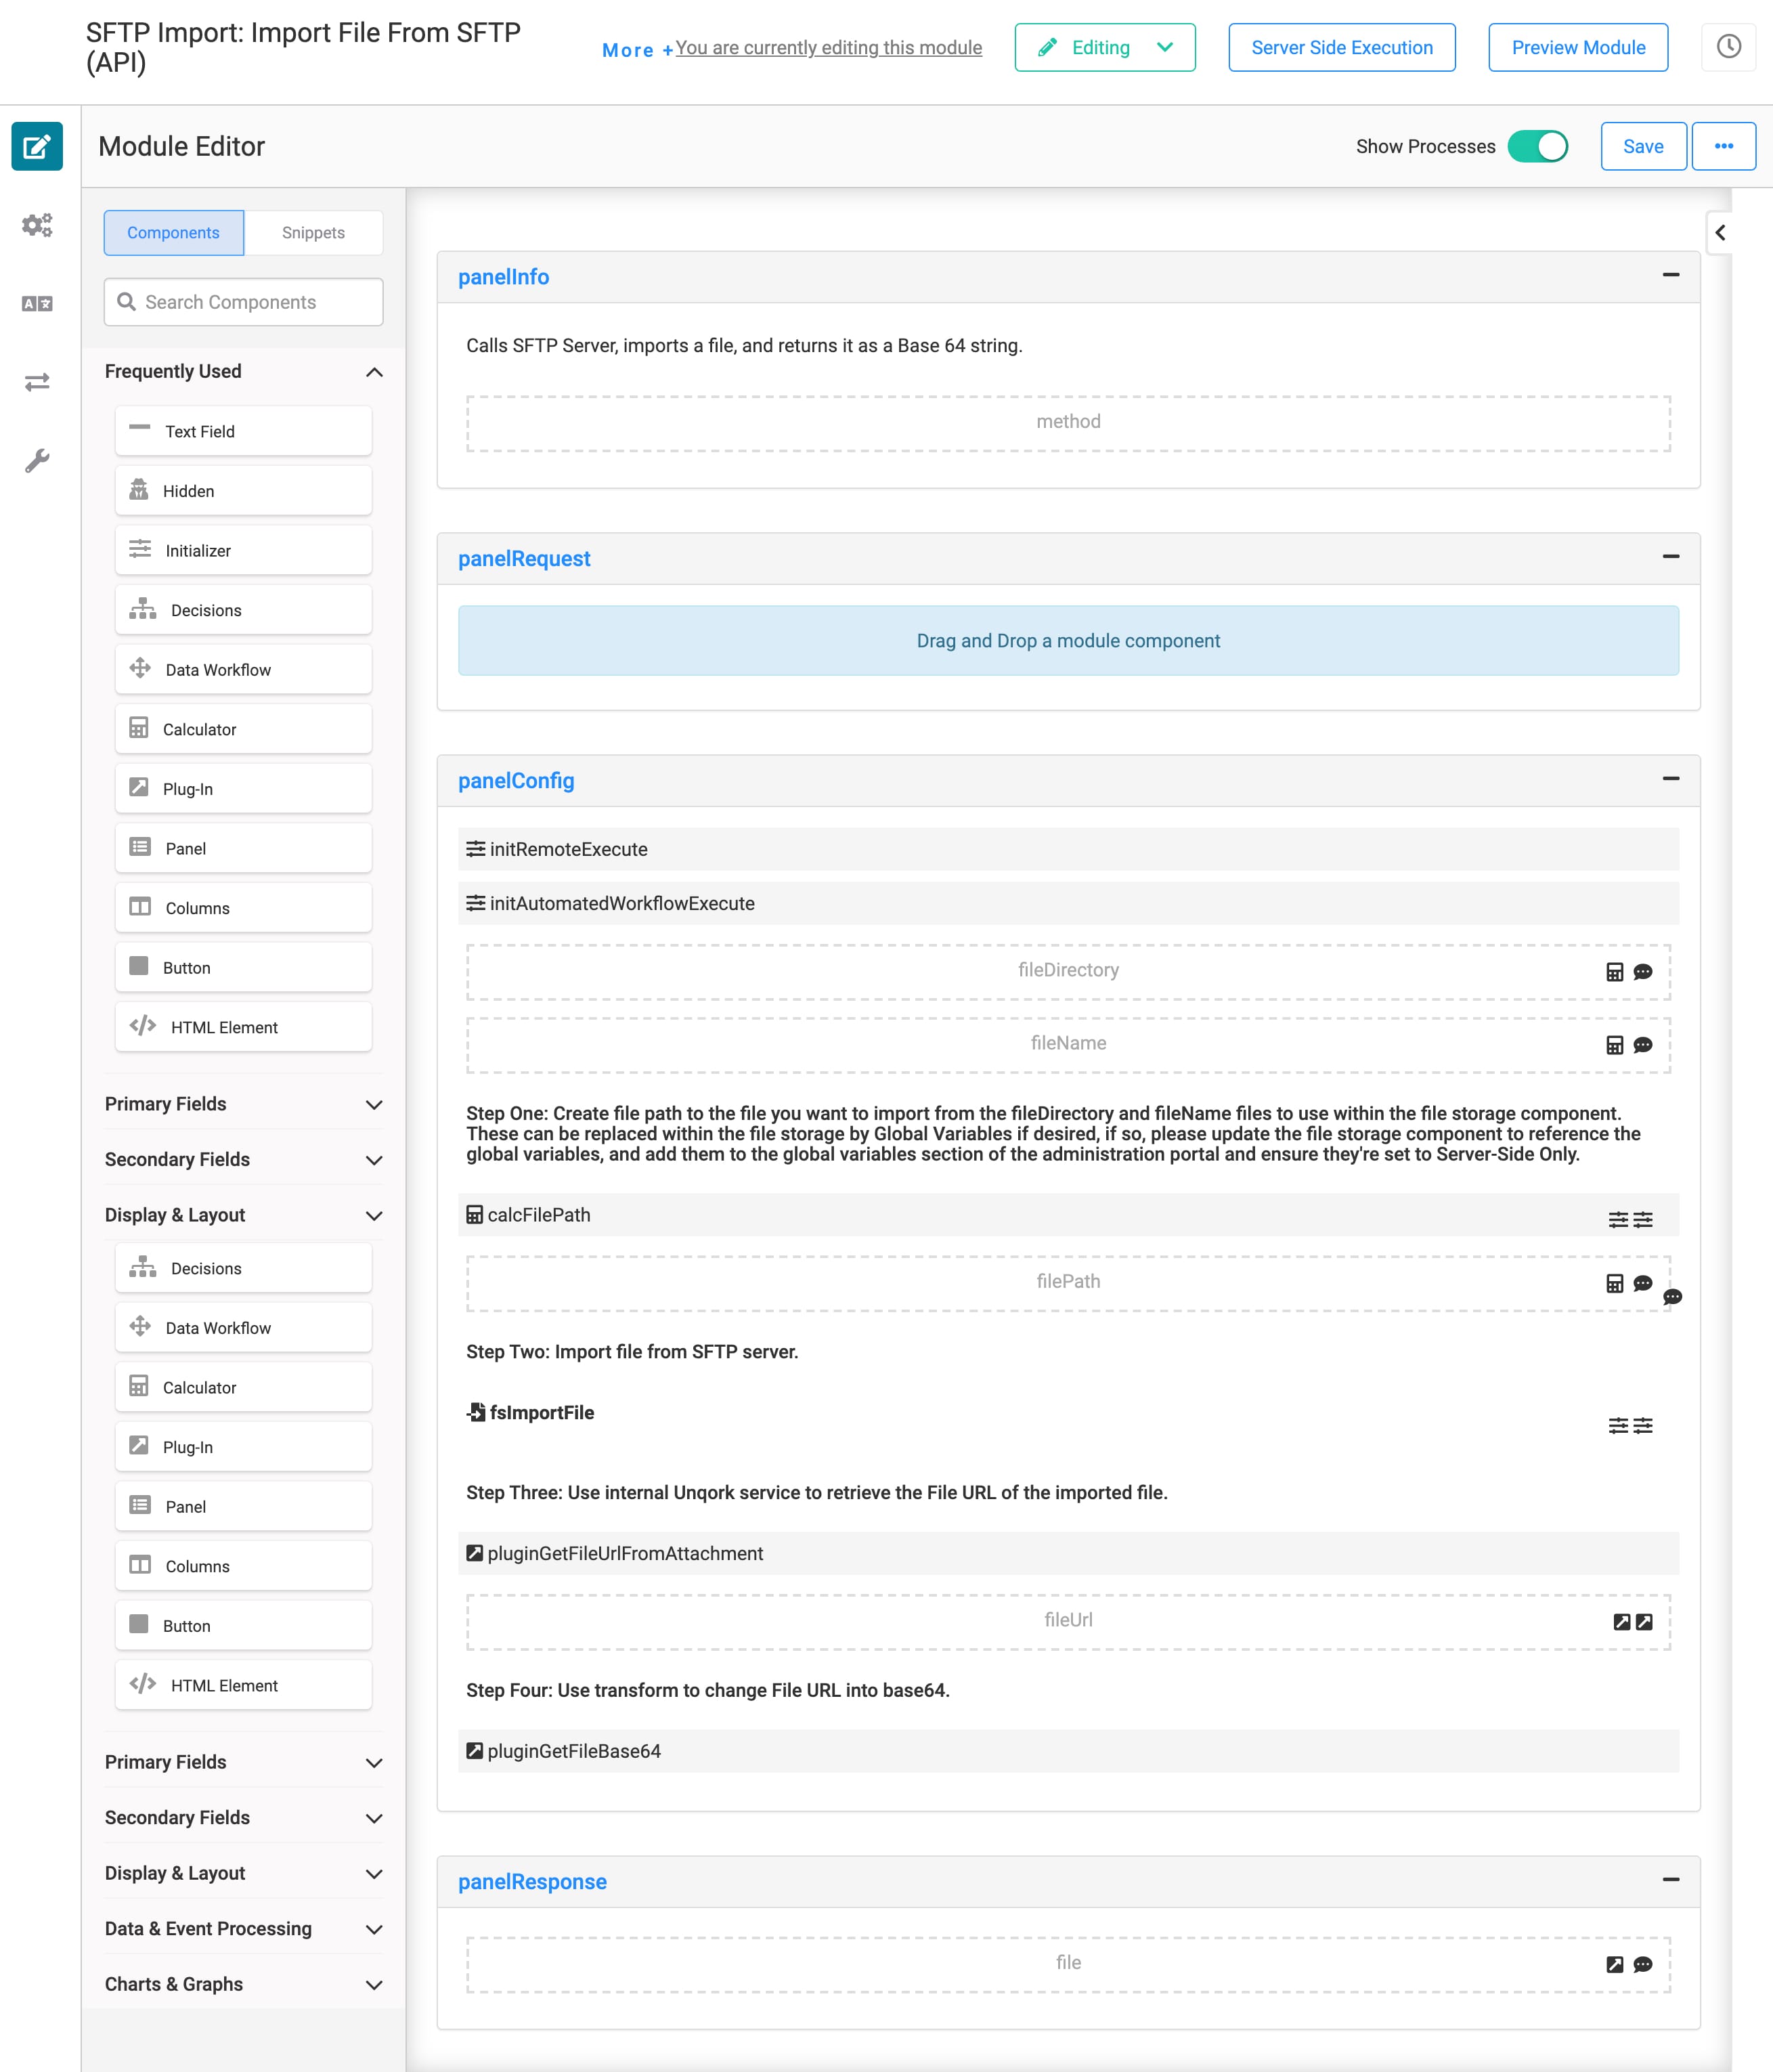
Let's look at how these different components interact with each other. First, there's the initRemoteExecute Initializer. This Initializer lets this API module trigger like a normal remote execute API module, even without a new submission ID. It tells the logic in the module, "there's no new submission ID, but go ahead and run."
If you run your normal workflow, the initAutomatedWorkflowExecute Initializer fires instead. This Initializer triggers the calcFilePath Calculator and fsImportFile File Storage component. The calcFilePath Calculator component concatenates the fileDirectory and fileName into a filePath. The fileDirectory specifies the folder you want to reach into. The fileName is the name of the file you want to retrieve from the fileDirectory folder.
The fsImportFile File Storage component uses the SFTP service in Services Administration to GET (import) the file. The File Storage component offers a URL reference to the file rather than the actual file itself. The pluginGetFileUrlFromAttachment Plug-In stores the file's URL in the fileUrl Hidden component.
So, the pluginGetFileBase64 Plug-In transforms the URL into a Base64 string using a transform. We now have the actual file, which saves to the file Hidden component. From here, the workflow moves on to the next module.
How the Create Import File Submission (API) Module Works
This module creates a schema submission of the Base64 string of the imported file.
Here's how it looks in the Module Builder:
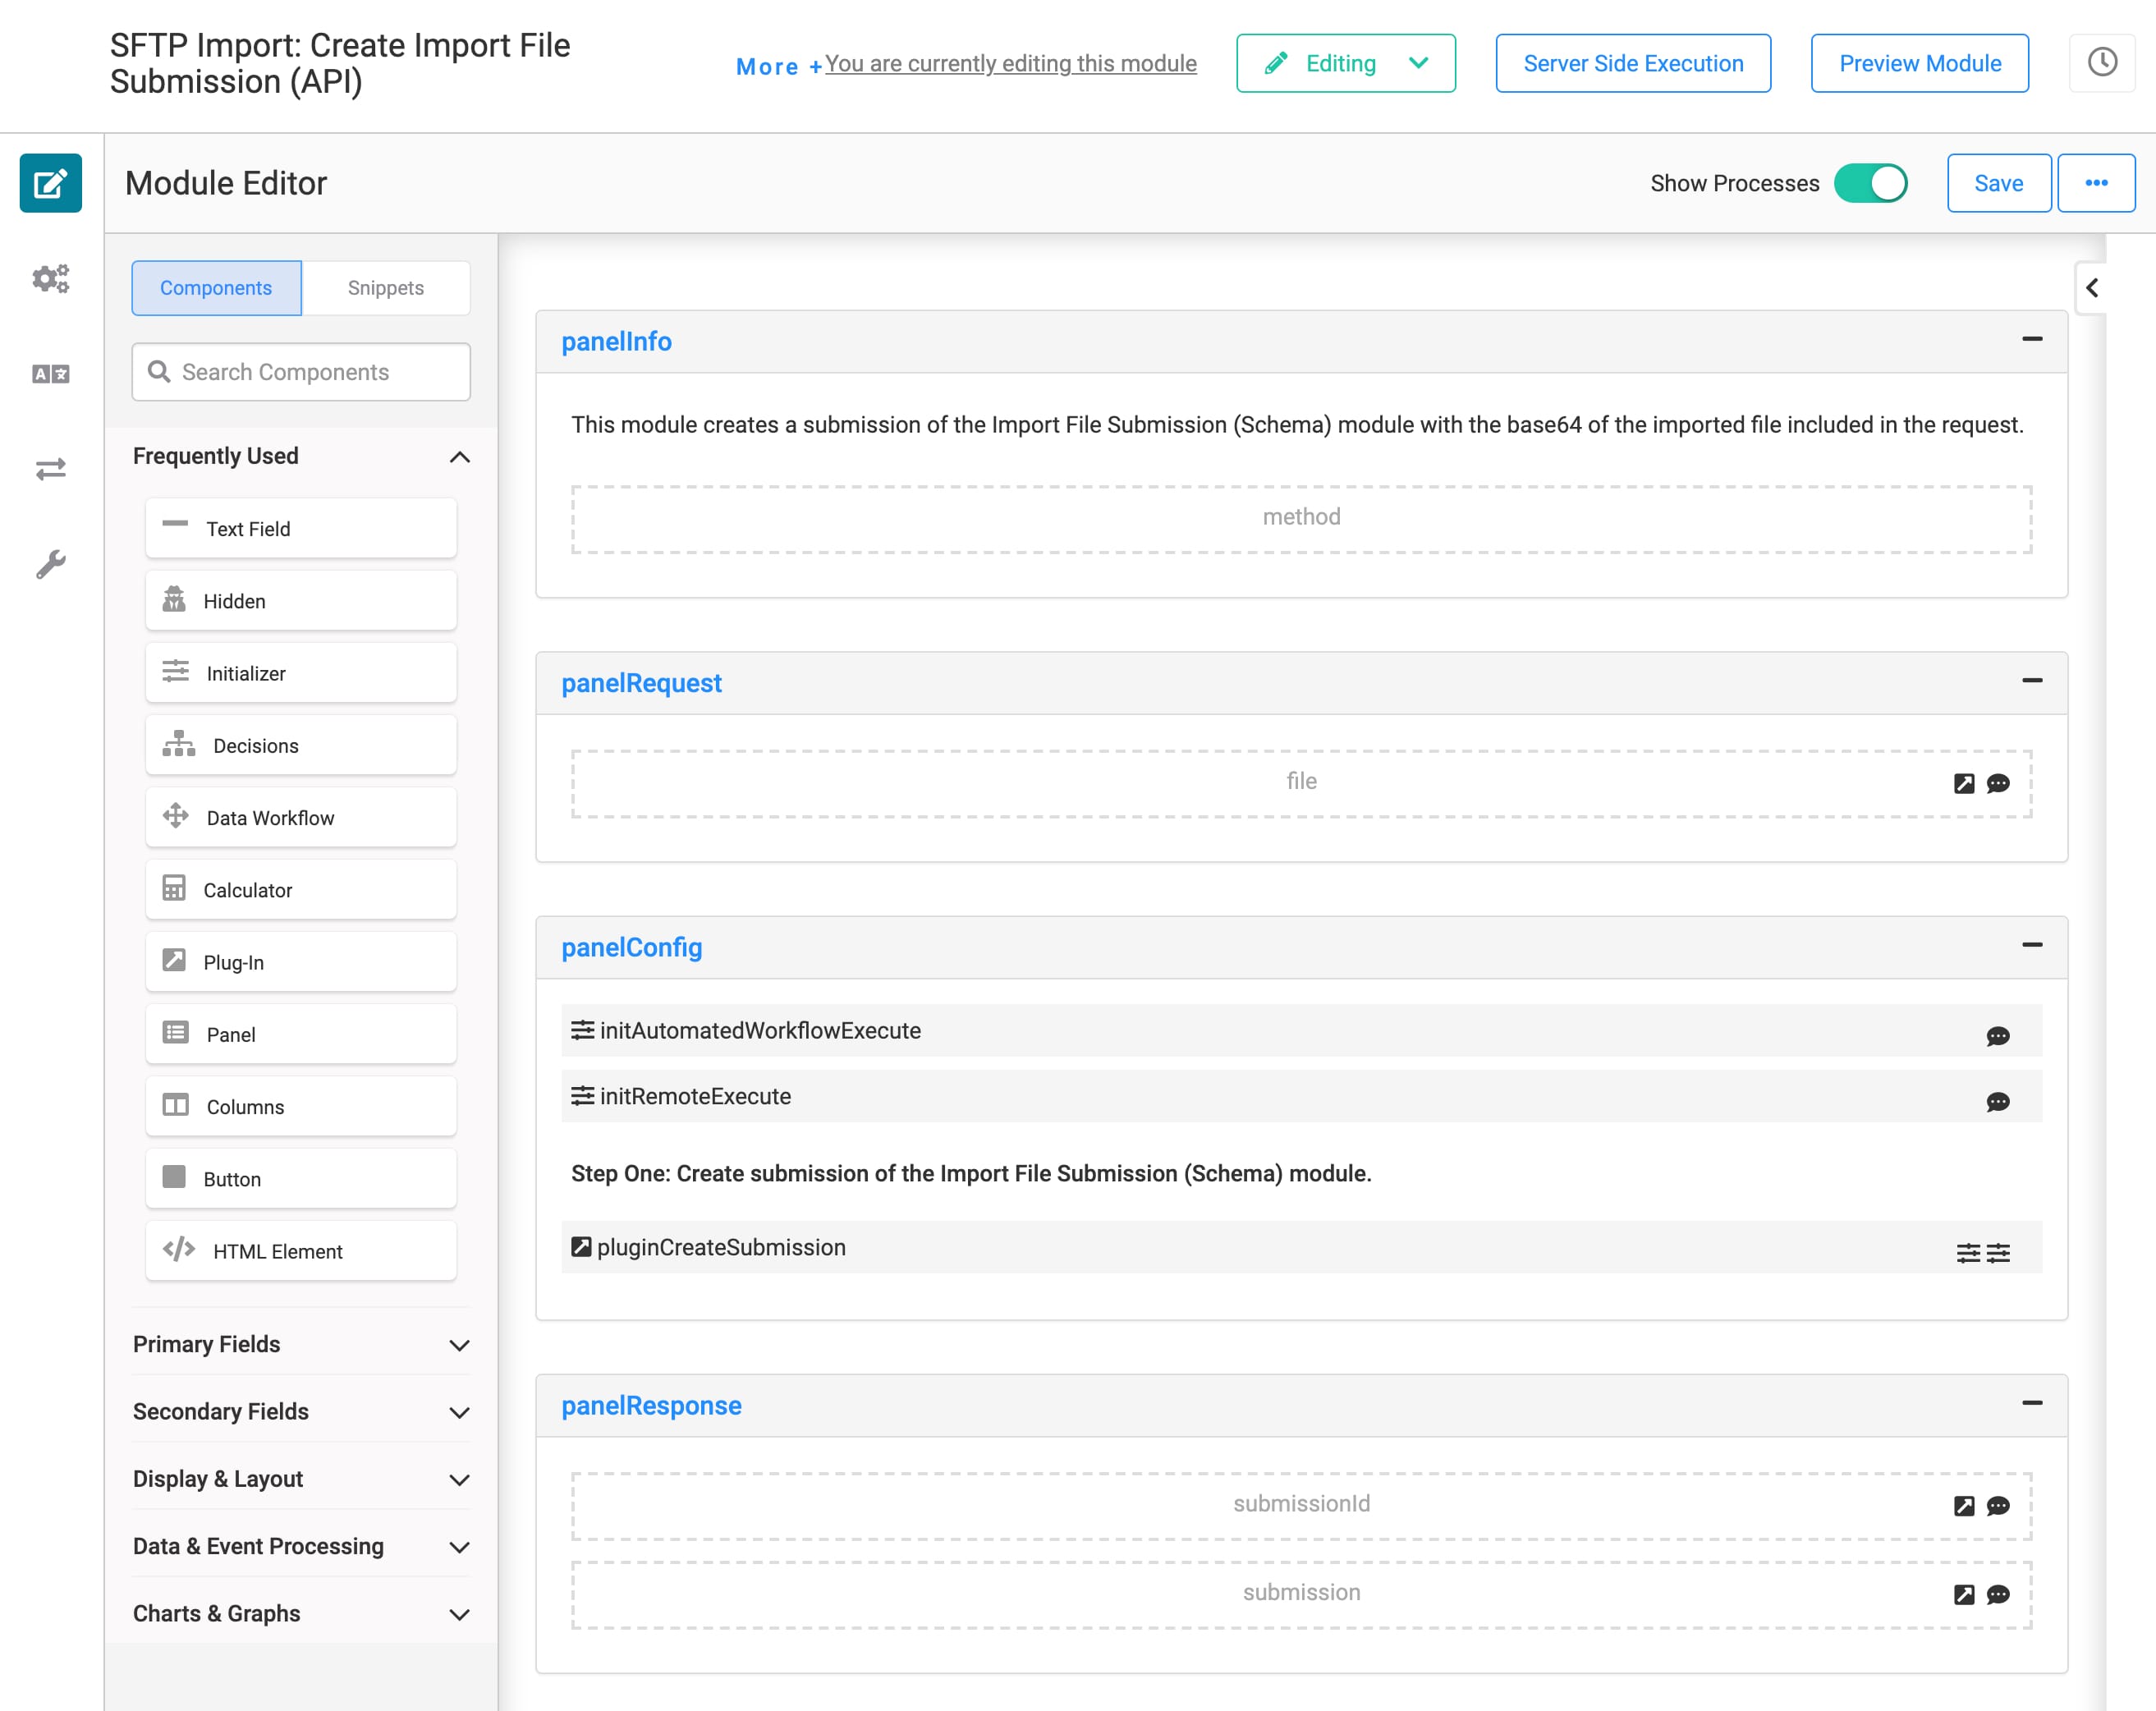
This module has 2 Initializer components, just like the Import File from SFTP (API) module. And they serve roughly the same purpose. They both trigger the pluginCreateSubmission Plug-In, depending on how you run your module.
The initRemoteExecute Initializer lets this API module operate like a normal remote execute API module. If you choose to do a server-side execution of your module, this Initializer triggers the pluginCreateSubmission Plug-In. If you run your normal workflow, the initAutomatedWorkflowExecute Initializer fires instead.
The Plug-In maps to the file Hidden component from the previous module. It outputs a new submission and submission ID to the submission and submissionId Hidden components. Then, the Plug-In uses an internal Unqork service to create a module submission in your schema module.
How the Import File Submission (Schema) Module Works
This back-end module securely stores your SFTP file submissions. The Create Import File Submission (API) module creates a submission in this schema module.
Here's how it looks in the Module Builder: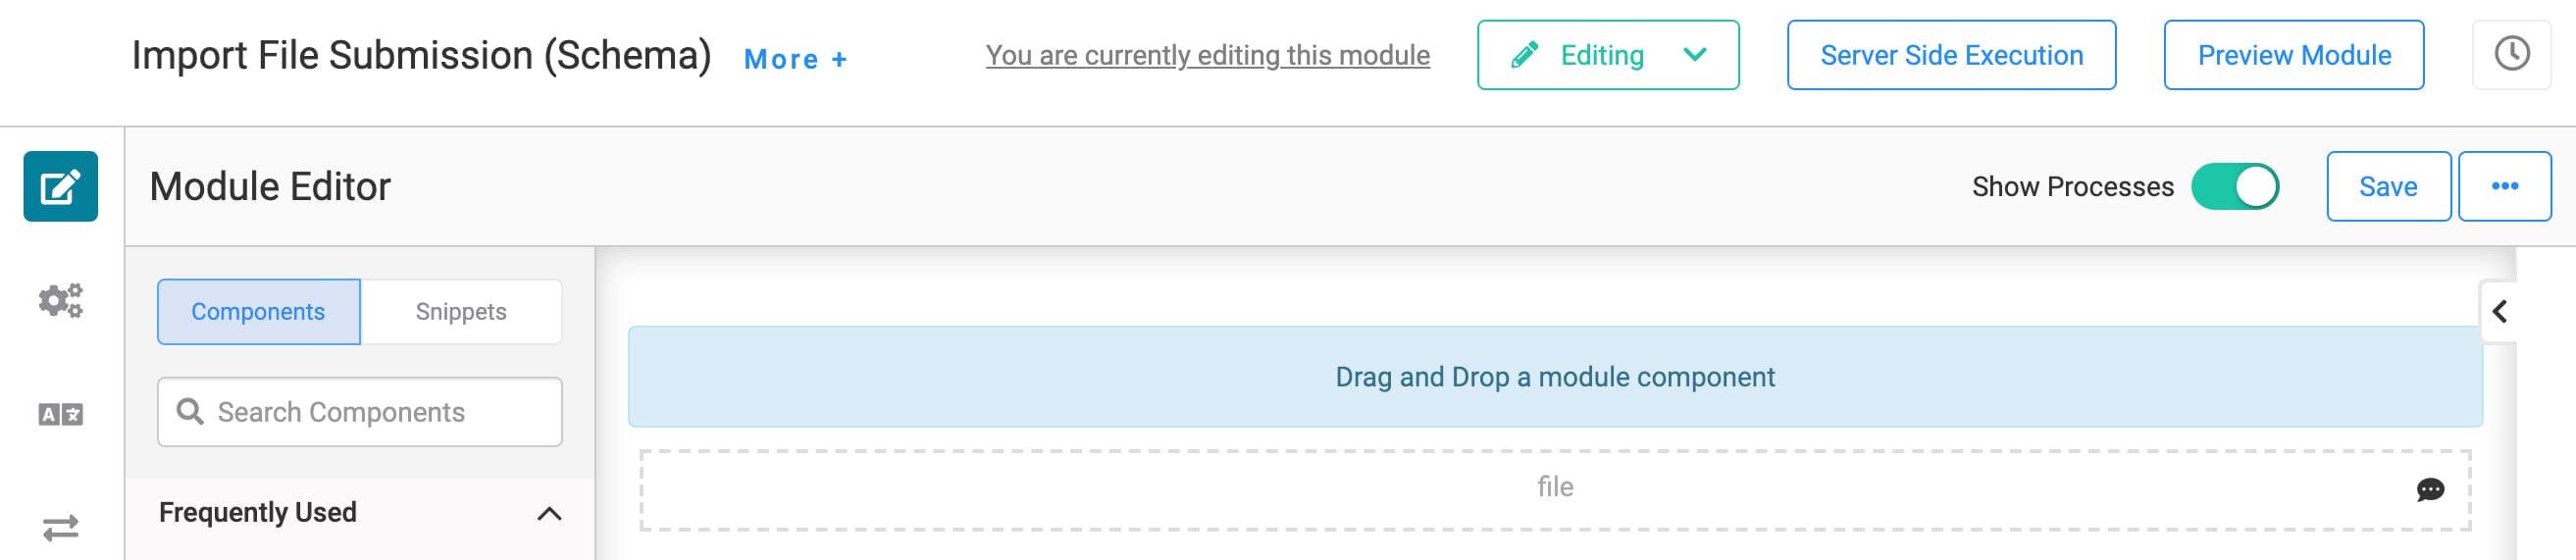
Configuring the Template
There are 3 steps you'll have to take to get your integration template working as expected. First, you'll set up your SFTP service in Services Administration. Then, you'll update 2 Hidden components in Import File from SFTP (API) module. Finally, you'll start the automated process.
Configuring the SFTP Service in Services Administration
First, you'll need to update the SFTP service with your SFTP server's credentials.
To access Services Administration:
Click the Settings drop-down at the top right of the Unqork Designer Platform.
Click Administration.
Under Integration, select Services Administration.
Next, you'll need to find and update the SFTP service with your Host, Username, and Password information:
Scroll to the bottom of your Active Services list.
Click your SFTP service.
The title should be something like this: SFTP - 6010a38832f428025f42a2a7 1.0.2 2021-02-21T18:07:08.252Z. What if your environment has more than one SFTP service? Here's a trick. Look for the service with the same template ID and time stamp as your template's modules.
Scroll to the top of the page.
Enter your Host.
Enter your Username.
Enter your Password.
Enter your Private Key.
Click the Capture request & response bodies checkbox if you want to capture this information.
Enabling this box logs the details (bodies) of the call's request and response. If you have a failed API call, the log's request body and response body give you information on why the call failed. Or, maybe the API request was successful, but the data sent wasn't handled correctly. The request body and response body show you the details of your calls. The service logs save to Unqork's database. You can query the logs at any time.
Click Save Changes.
Changing the fileDirectory and fileName Hidden Components
The final update takes place in the Import File from SFTP (API) module. You'll make quick changes to 2 Hidden components: fileDirectory and fileName. The fileDirectory specifies the folder you want to reach into. The fileName is the name of the file you want to retrieve from the fileDirectory. So, you need to update these for your specific folder and file name. This information tells your API module what file to look for and where to find it.
These updates take place in the Import File From SFTP (API) module.
To update the fileDirectory Hidden component:
From your open workflow, click the module's Import File From SFTP (API) node.
Click Open.
Hover over the fileDirectory Hidden component.
A 5-button toolbar appears above the component on hover-over.
Using the toolbar, click the
.jpg) (Settings) button.
(Settings) button.Enter the folder name for your file directory in the Property ID field.
Make sure to use Camel Case, stylized as camelCase, for your Property ID.
Click Save.
Follow the same steps to update the fileName Hidden component. The only difference is you'll enter your file name as the Property ID. Once you've updated and saved both Hidden components, Save your module.
Starting the Automated Process
Now that you've configured your service and updated your Hidden components, it's time to start the automation! By default, the automated process will run once every hour. We cover how to update this in our Customizing the Template section. There are 2 ways you can start or stop the automated process:
Click Run in the Timer Start node directly from your workflow.
Click Start in the Actions column in Start Nodes Administration.
Your process continues to run until you stop it. To stop the automated process, you can do one of the following:
Click Stop in the Timer Start node directly from your workflow.
Click Stop in the Actions column in Start Nodes Administration.
Customizing the Template
When you create an application from this template, you’ll have the foundation of an SFTP model. To make the application work for your use case, there are a few ways to personalize it. Here are the most common customizations:
Change when and how often your workflow will run.
Use a global variable instead of storing the fileName and filePath directly in the module.
Changing When and How Often to Run Workflow
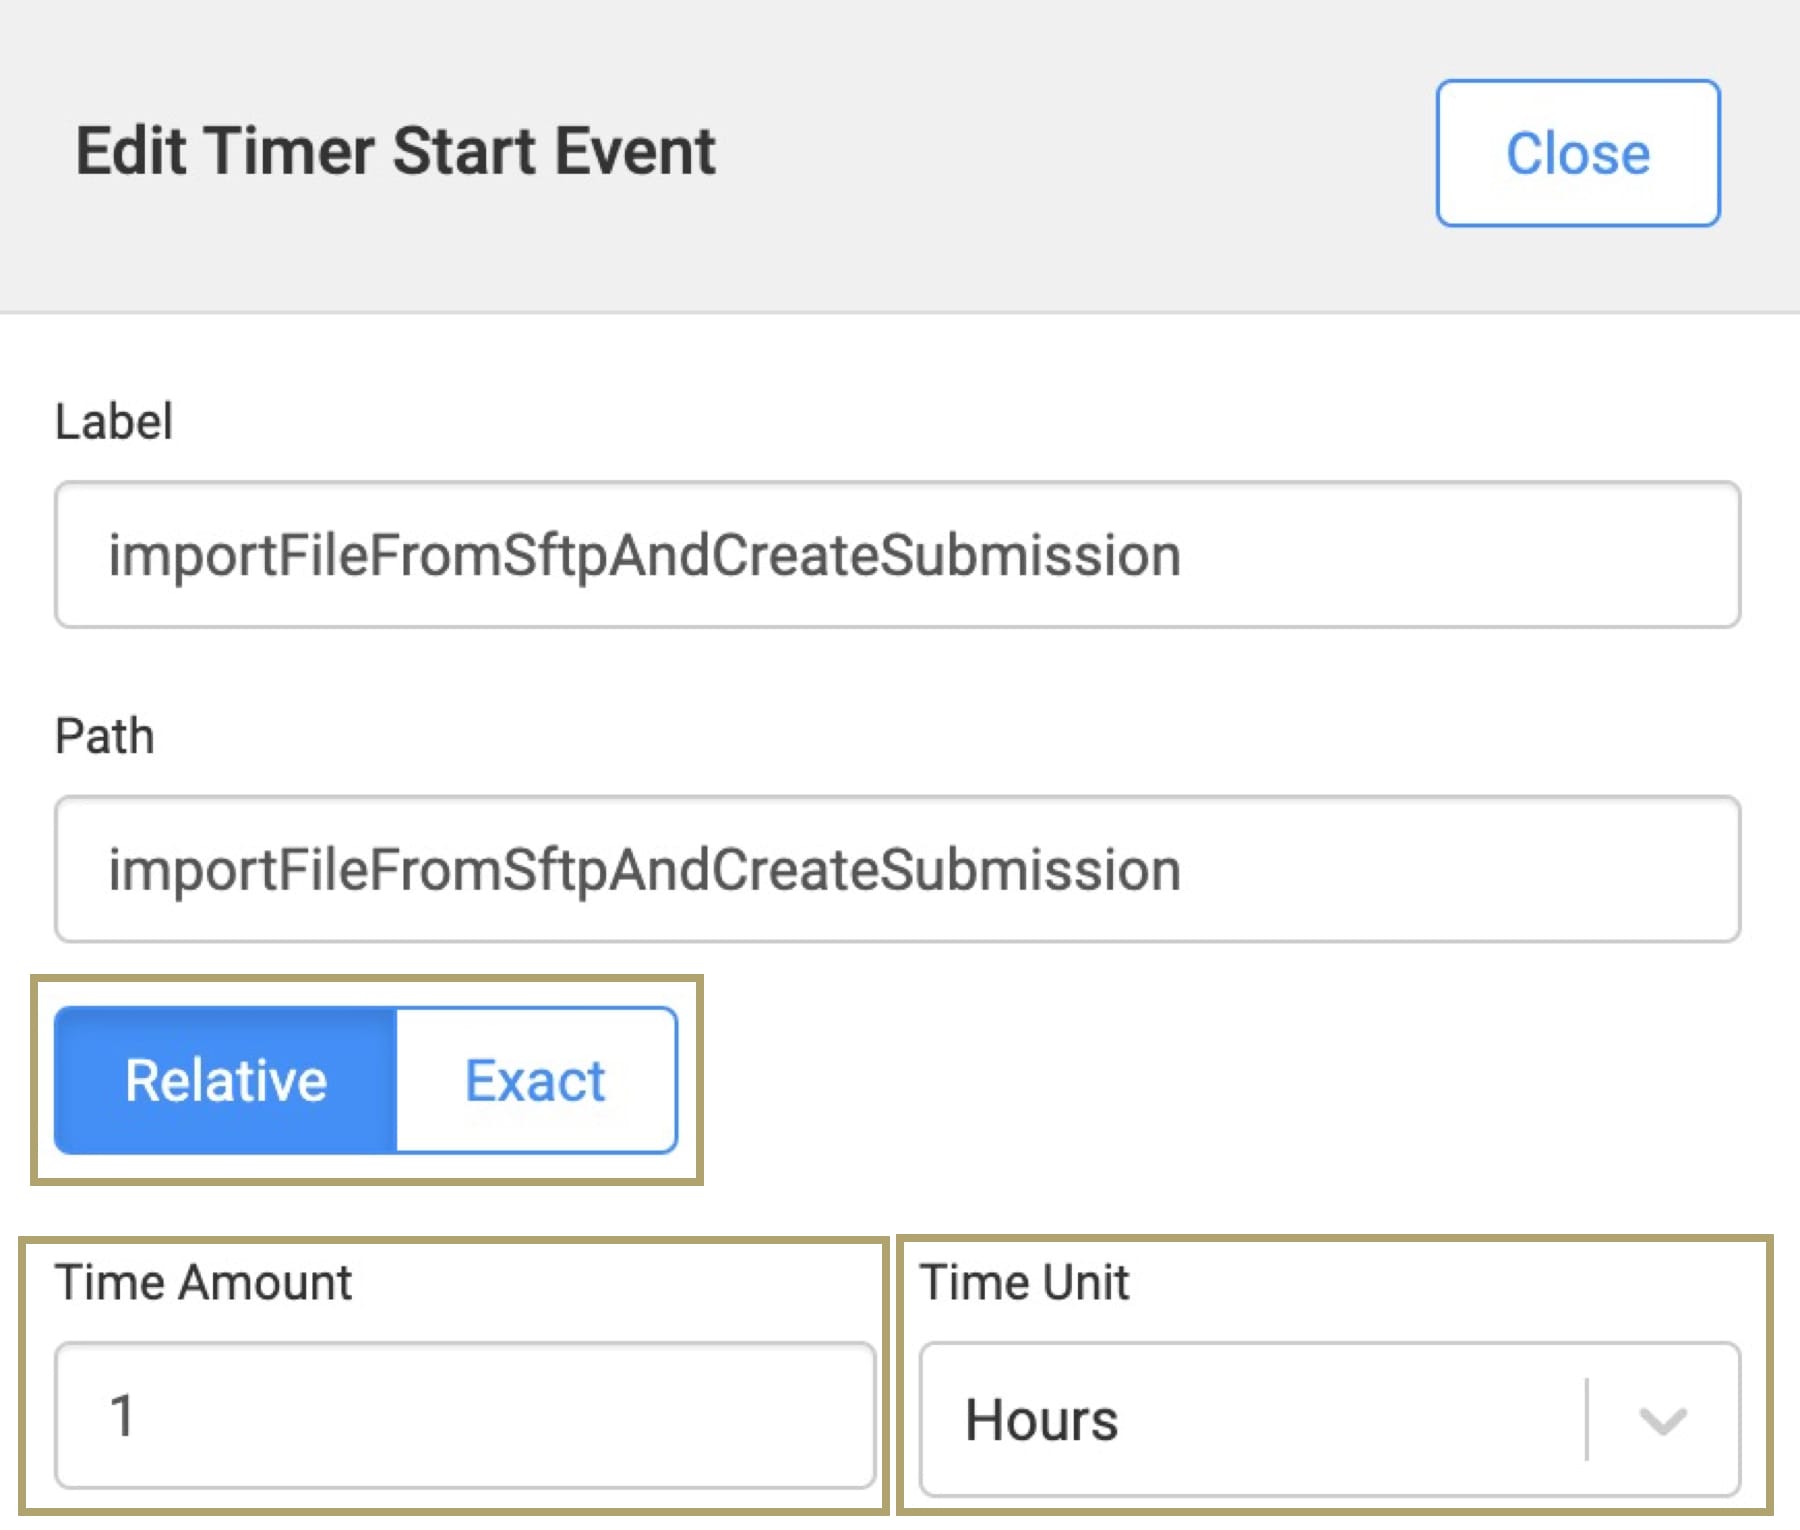
Right out of the gate, your workflow's Timer Start node is set to run every hour. What if you want to run it more or less often? A quick update to the Timer Start node takes care of this. The Timer Start node can trigger at an exact time (Tuesdays at 15:30) or a relative time (every 11 hours). The Timer Start node uses UTC (Coordinated Universal Time).
You can control this process directly from your workflow:
Click the Timer Start node from your open workflow.
Click Edit.
Set to Relative or Exact.
If you choose Relative, enter the Time Amount and choose the Time Unit.
If you choose Exact, enter the Frequency, Day of Month, and Time.
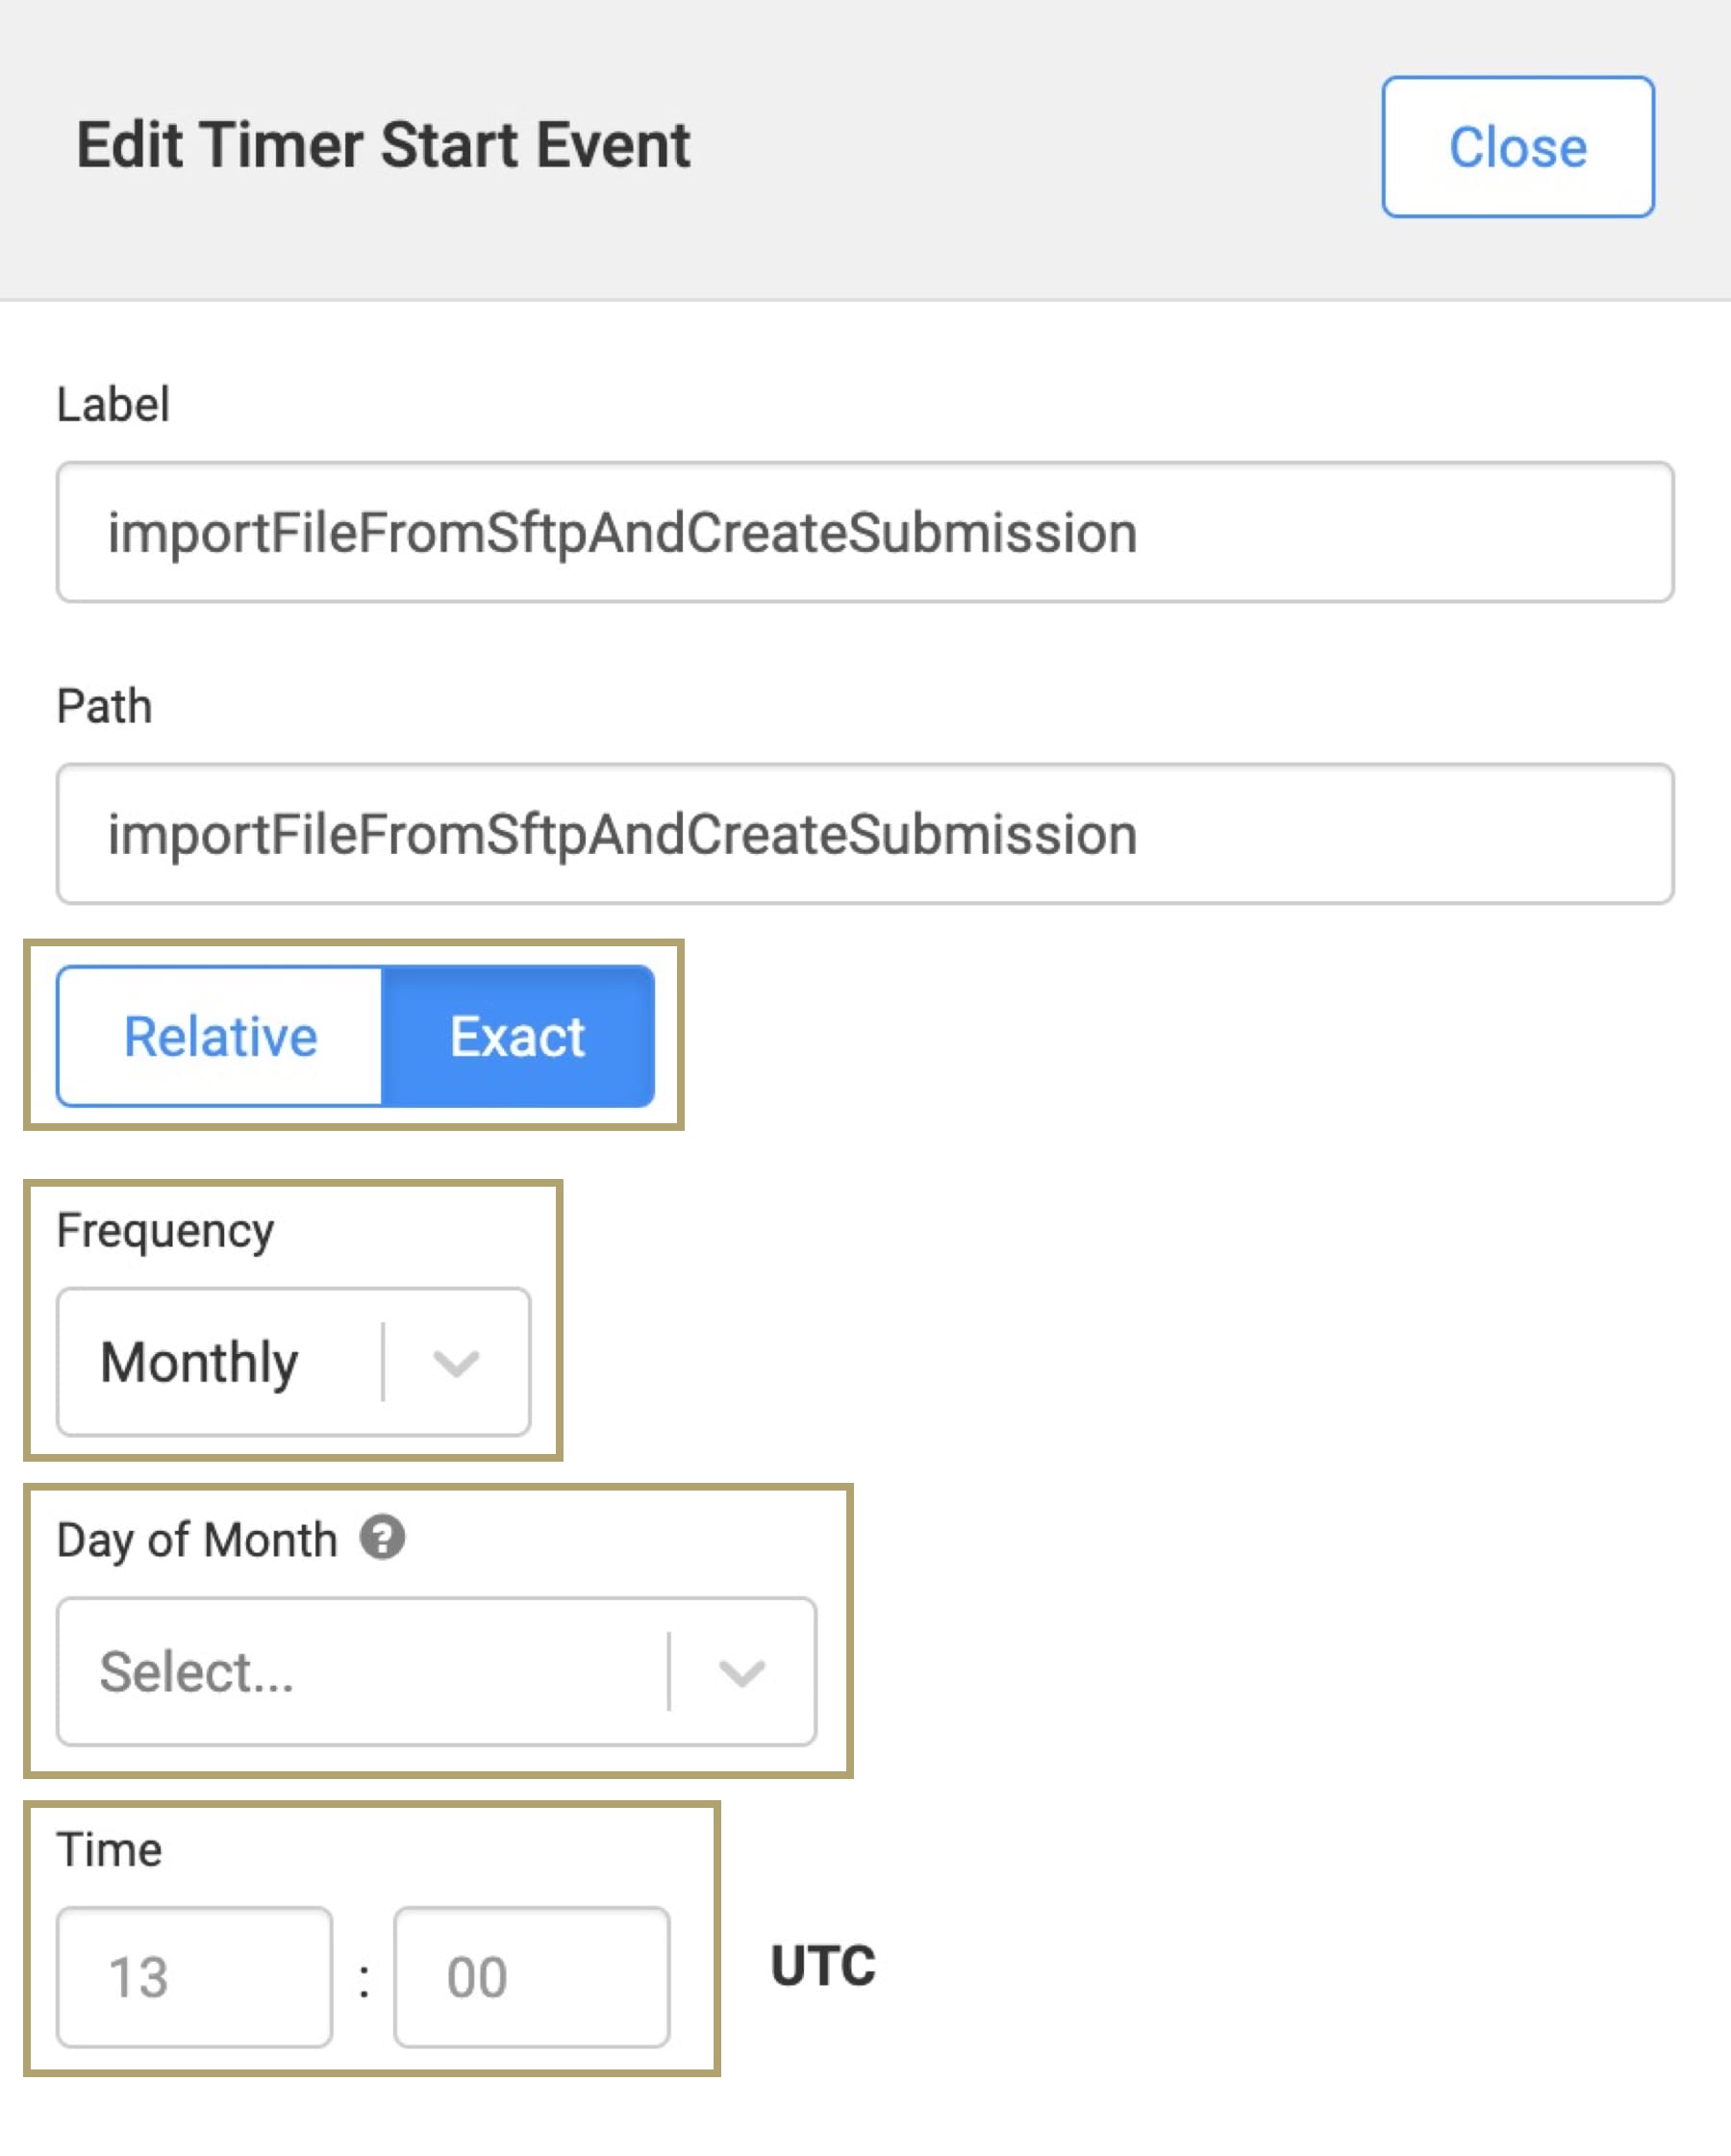
Click Close.
Save your workflow.
Using a Global Variable
In this template, you may want to update the calcFilePath Calculator component in the Import File from SFTP (API) module. As it stands, this Calculator concatenates the fileDirectory and fileName Hidden components and turns them into a filePath. Instead, you could update it to reference a global variable. A global variable is an identifier (or key) paired to a stored value. We also call this a key/value pair. An example would be using the word "email" as the key to reference an email address as its value. Once paired, you can reference the key anywhere in your application.
What's the benefit of this customization? Global variables are a single source of truth you can use anywhere in your environment. The import, create, delete, and update SFTP functions can all run off of one global variable. So rather than having to change each individual variable, you have this consistent value at the environment level.
First, you must create your global variable. Then, you'll update the Calculator component to reference this global variable.
Adding a Global Variable to Your Environment
Once you create a global variable, you can reference it anywhere in your environment.
To add a global variable:
Click the Settings drop-down at the top right corner of the Unqork Designer Platform.
Click Administration.
Under Environment, click Global Variables.
Enter a unique Key for your variable. For example, you could enter fileDirectory.
Remember that the Import File From SFTP (API) module has a Hidden component with a Property ID of fileDirectory. If you want, you can change that Property ID to fileDirectoryOld. This change can make your life easier as you set up logic in your modules.
Enter a Description for your variable.
Leave the Server-Side Only checkbox checked to keep your variable available to available to Server Side Execute Only modules.
Enter a unique Value for your variable. This is where you'll enter the name of the folder where your file will live. For example, upload.
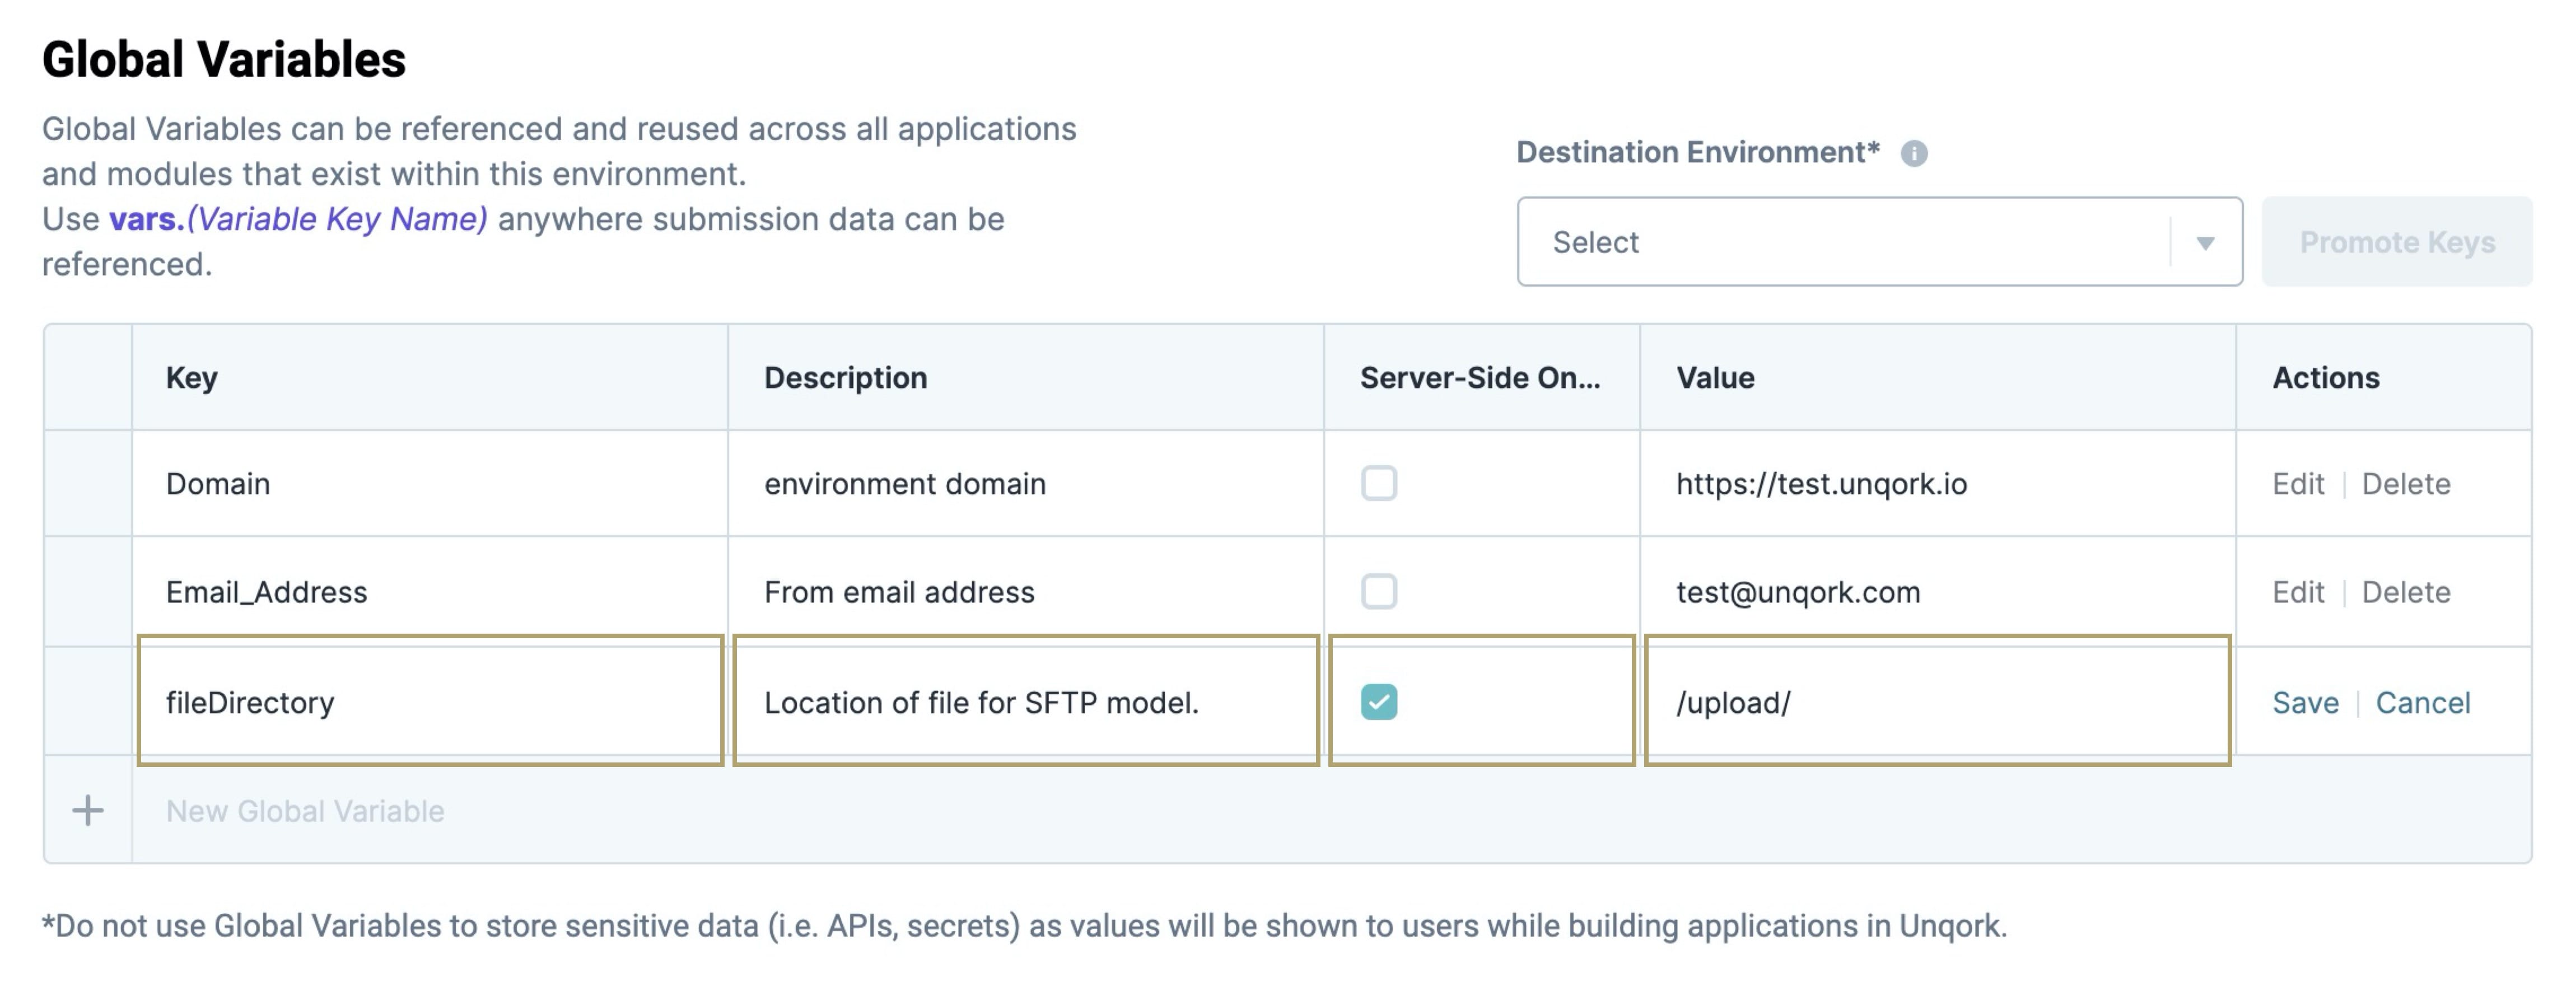
Click Save, under the Actions column, at the far right of your row.
Updating the calcFilePath Calculator Component
Now, you'll update the Calculator component so it references your global variable. This update takes place in the Import File From SFTP (API) module.
From your open workflow, click the module's Import File From SFTP (API) node.
Click Open.
Hover over the calcFilePath Calculator component.
A 5-button toolbar appears above the component on hover-over.
Using the toolbar, click the
(Settings) button.In the Inputs table, change fileDirectory to vars.fileDirectory.
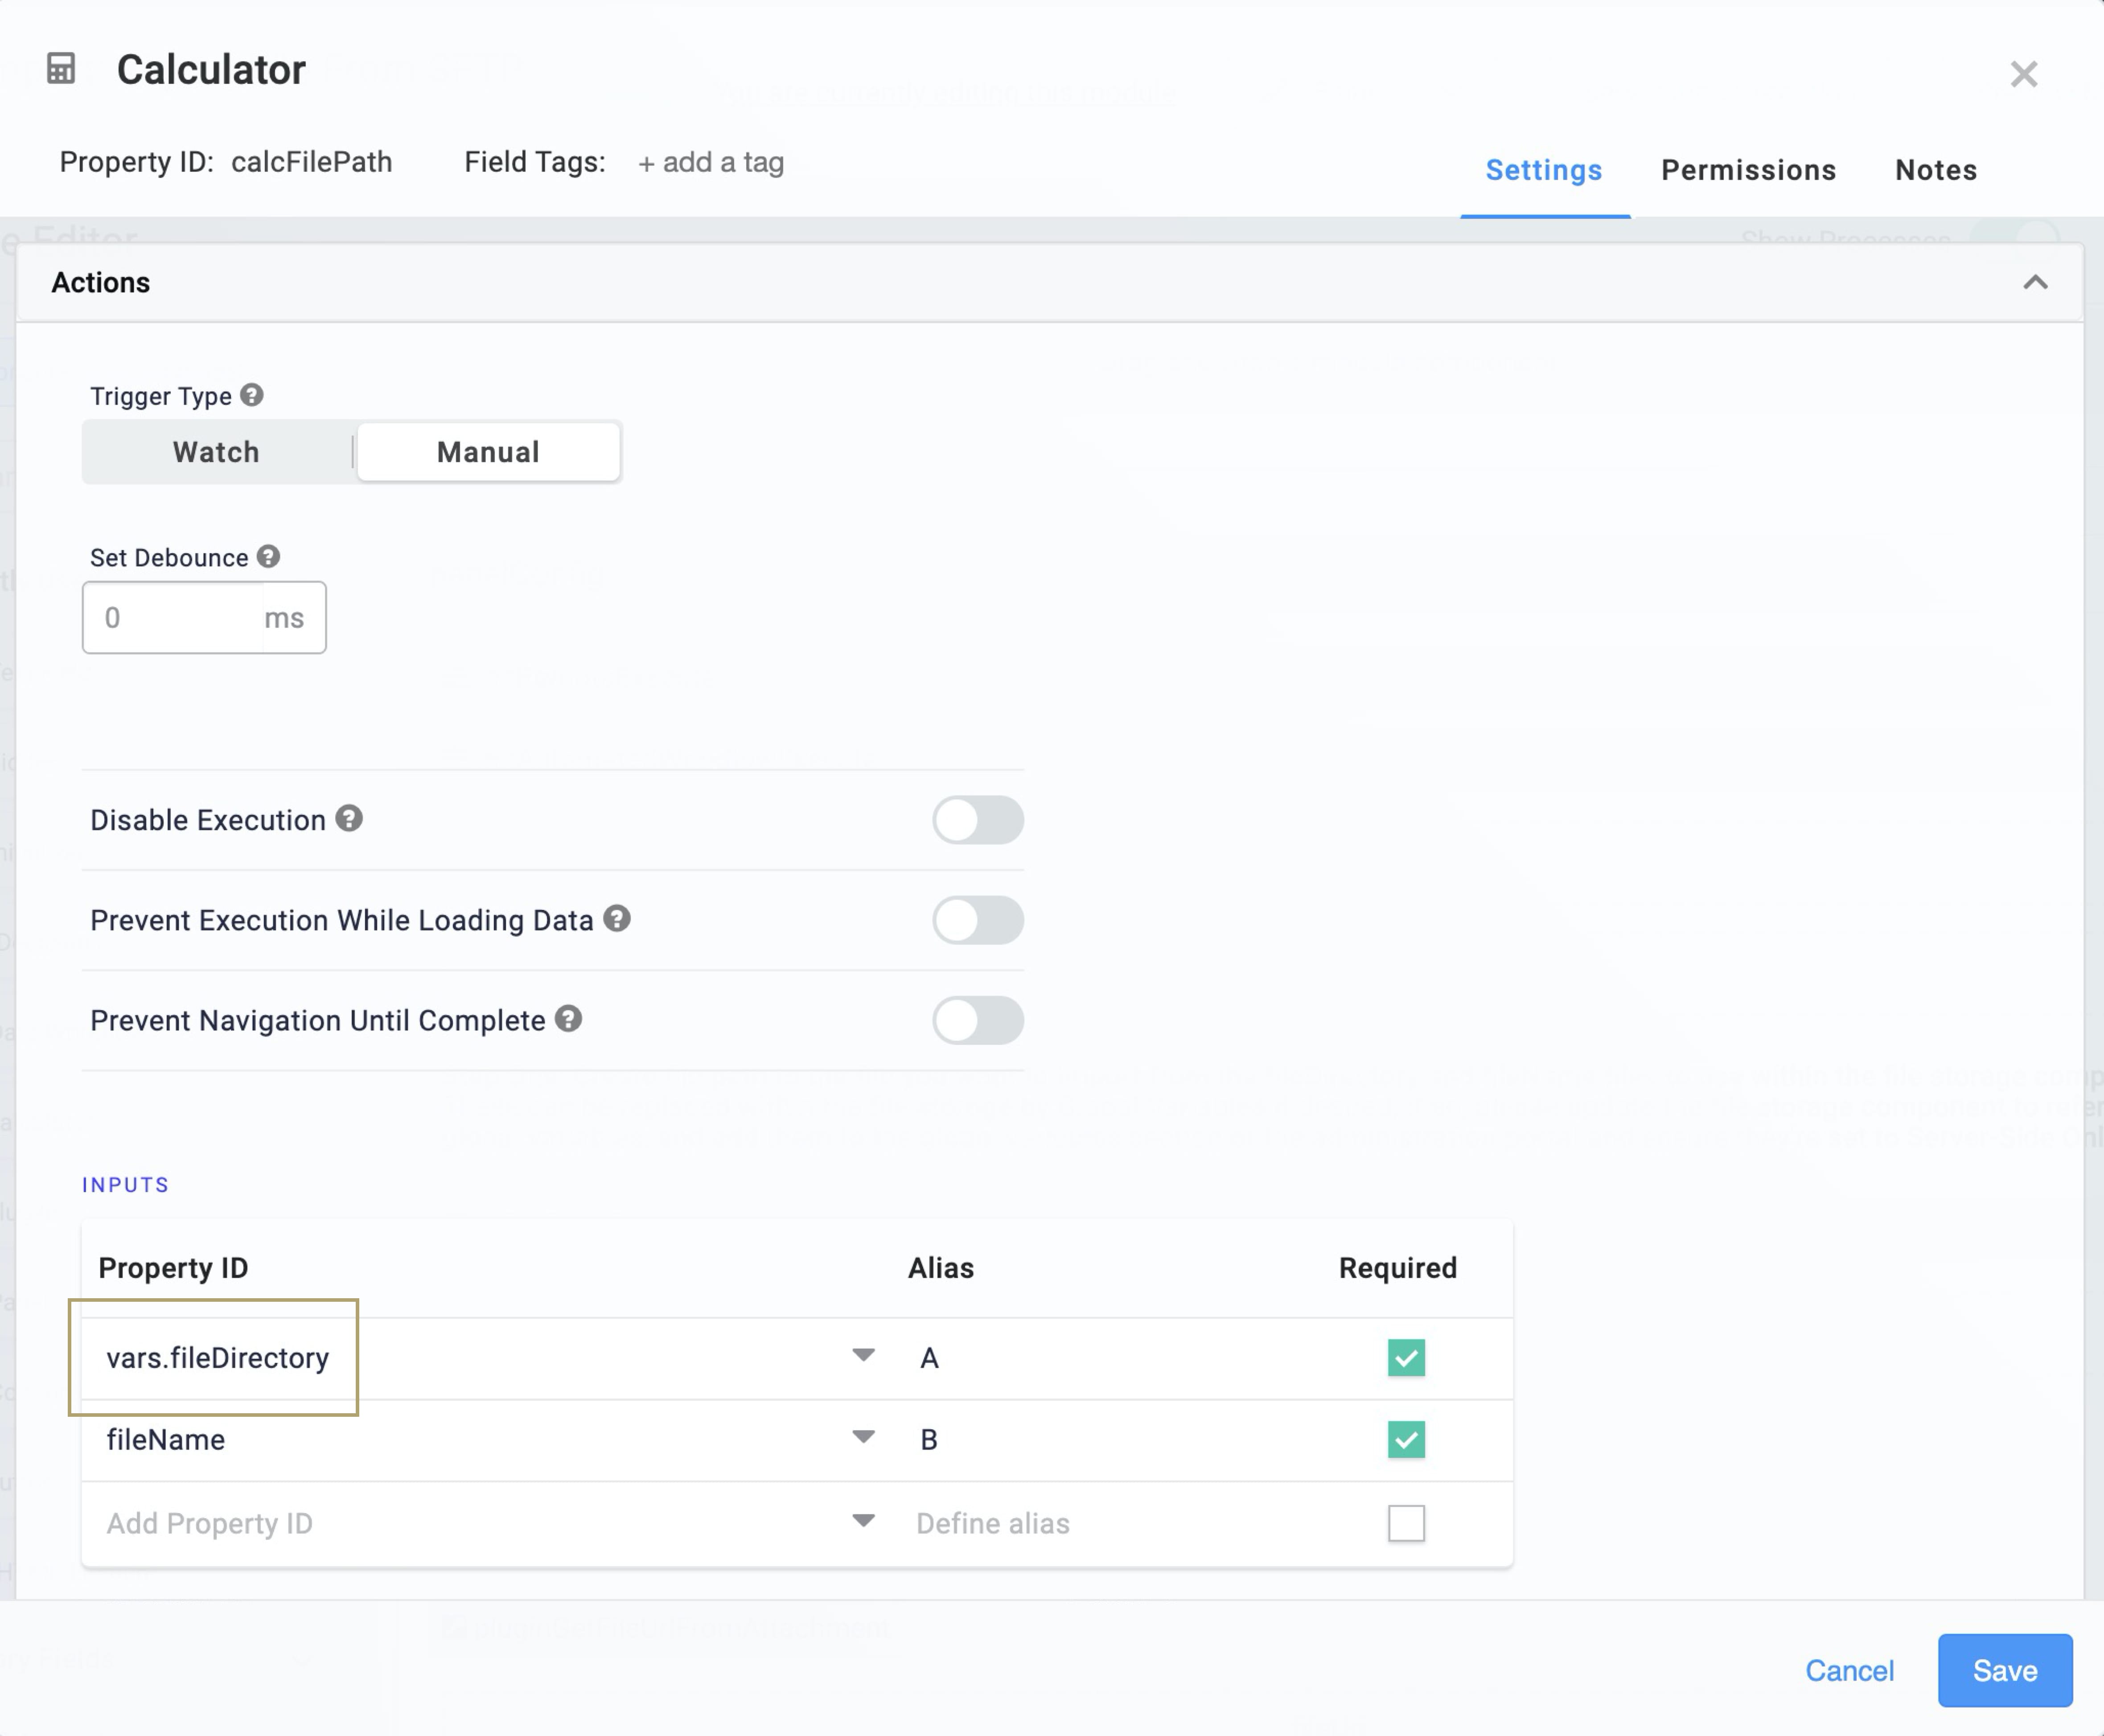
Click Save.
Save your module.
Now, if you build out the rest of your SFTP model, you can reference this same global variable. It's a single source of truth that works across your entire environment.
Testing the Automated SFTP Import
Have you configured your SFTP service and made the necessary updates to your modules? If so, it's time for the fun part: try it out! Once you've configured and customized your application, you can test to see if it works as expected. Here are a few ways you can test your automated import SFTP process:
Test Run the Timer Start node.
Execute it remotely using the Server Side Execute tool.
Build a schema dashboard to list all your SFTP file submissions.
We'll walk you through the most common testing method: performing a Test Run on the Timer Start node.
Test Run the Timer Start Node
A Test Run is a great way to quickly test a workflow without waiting for the scheduled process to start. To perform a Test Run of your automated import SFTP process:
Click the Timer Start node from your open workflow.
Click Test Run.
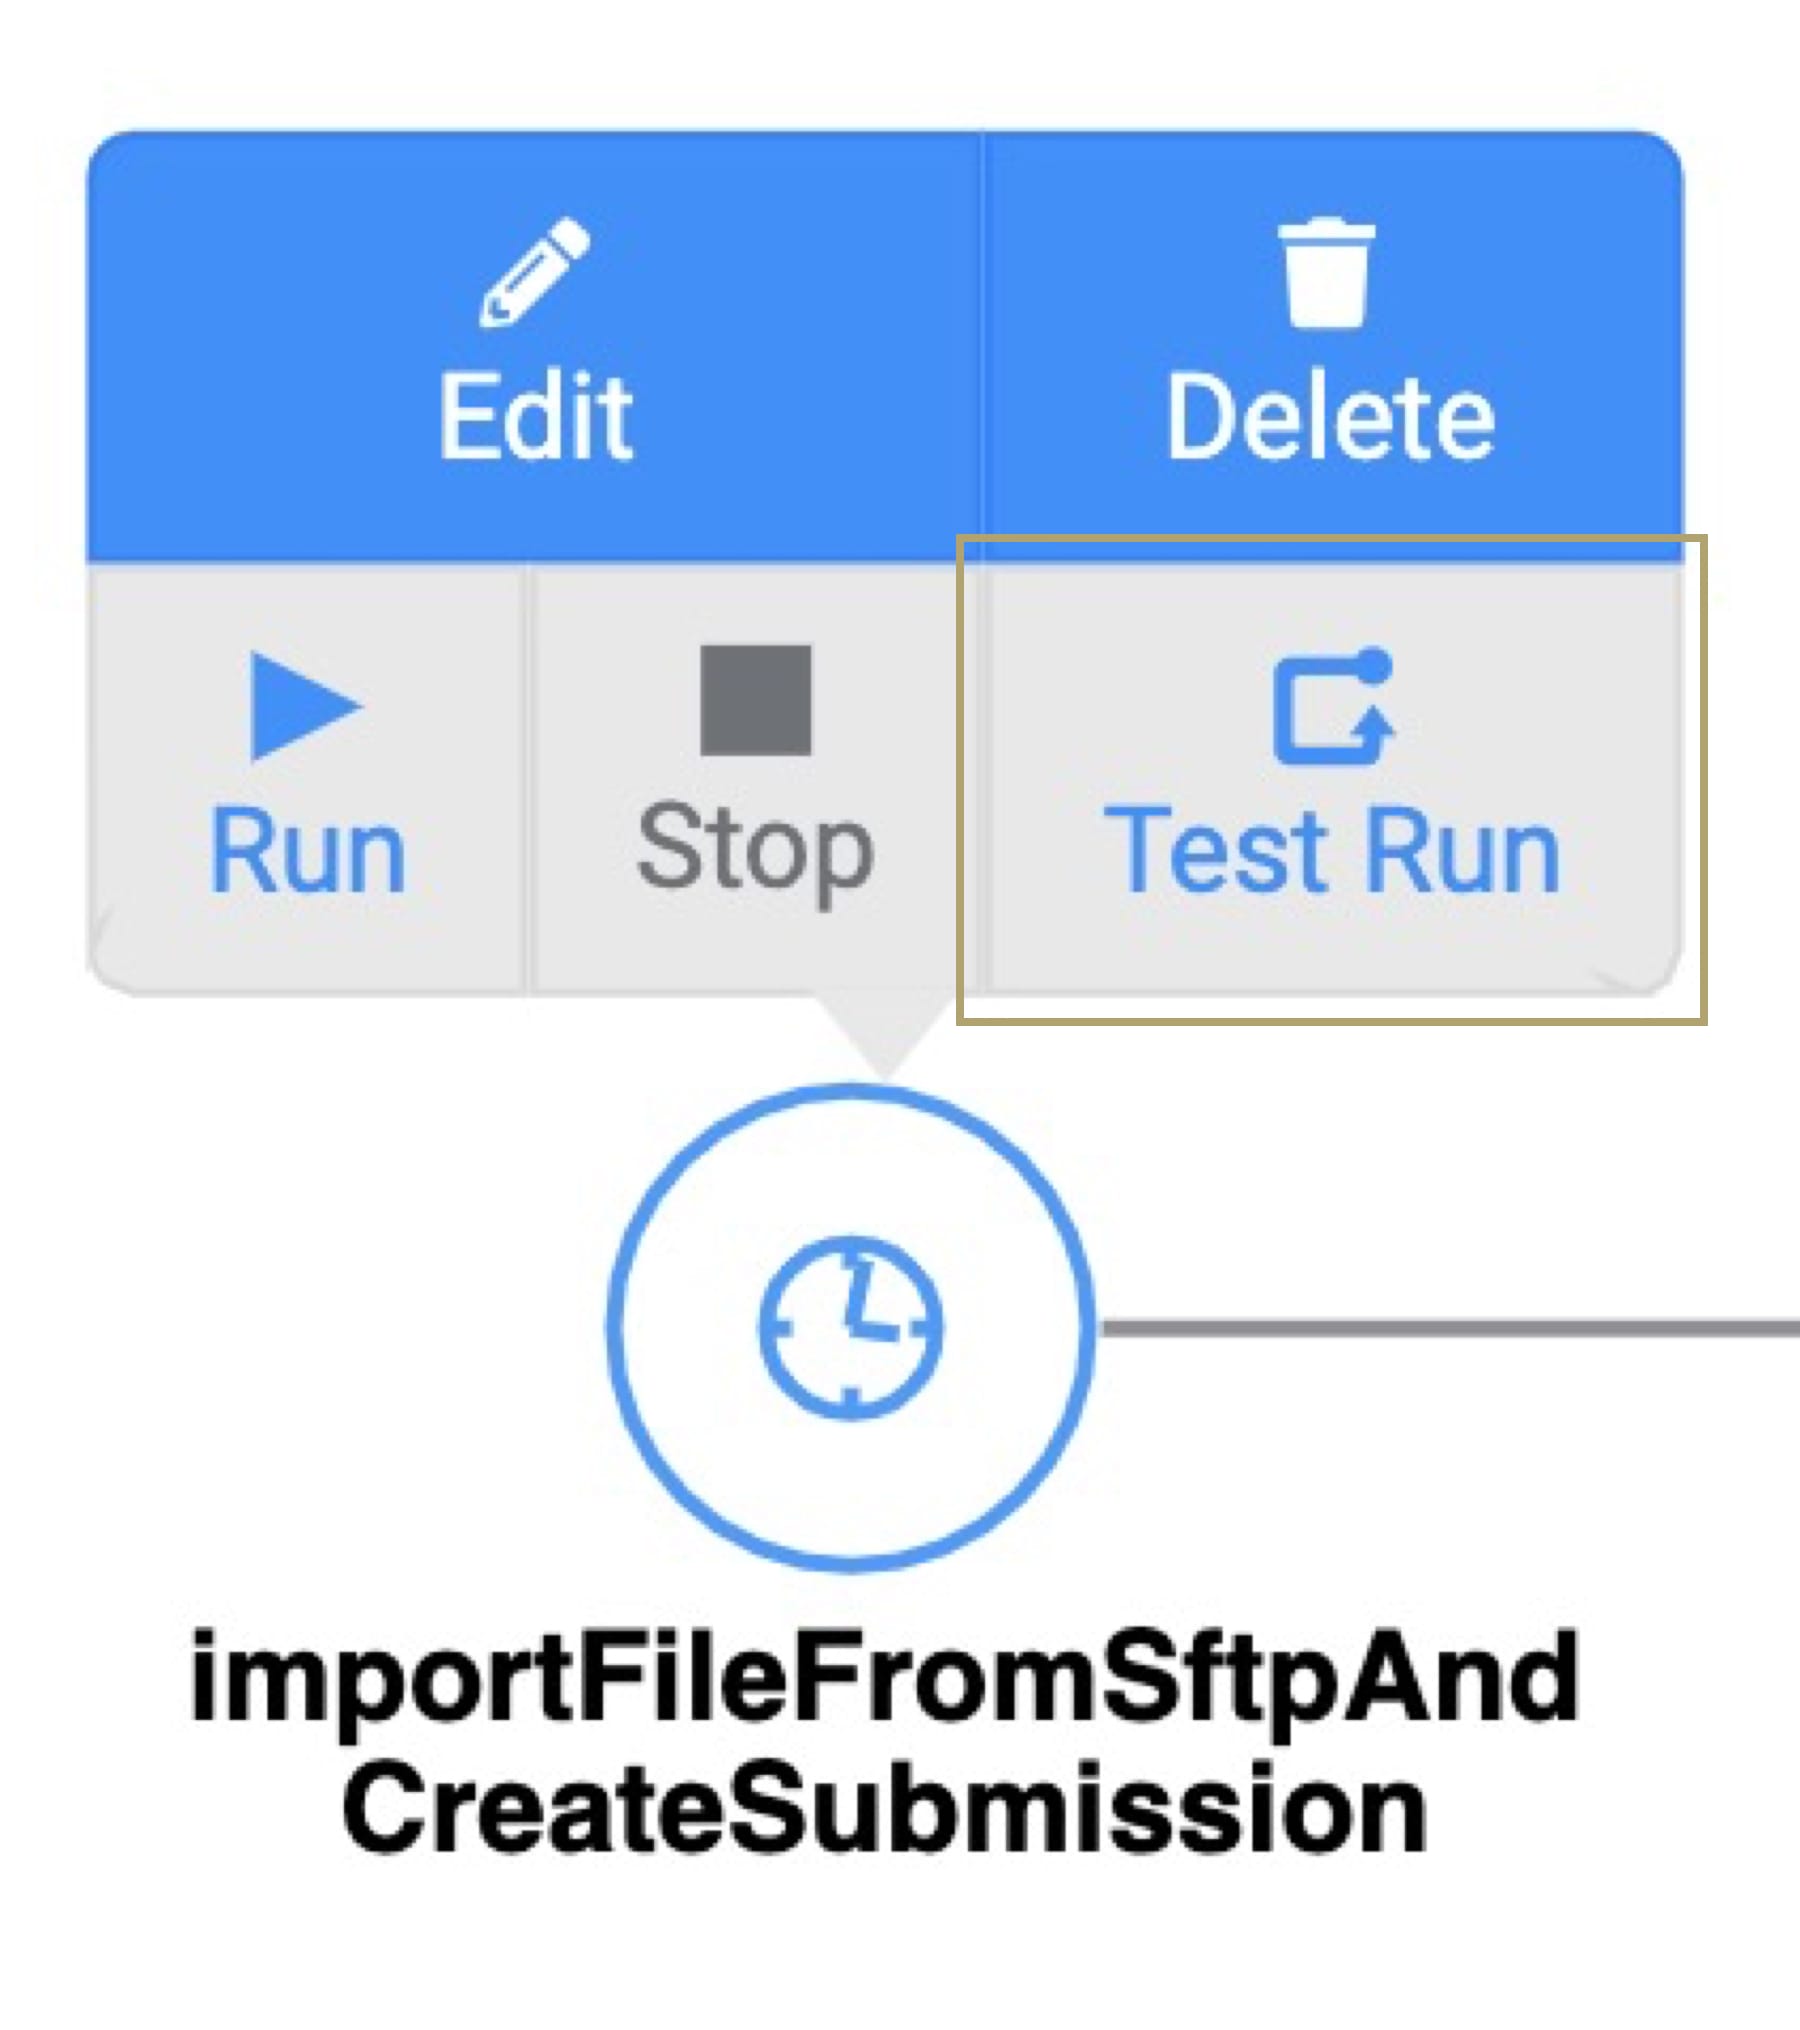
And, that's it! The workflow runs through a test run. From there, you can confirm that your workflow behaves the way you want it to.
Removing the Template
What if you no longer need this template or the application you built from it? There are 3 parts to removing this template. First, you'll uninstall it from your environment. Then you'll delete the application you created from the template. Lastly, if you no longer need your SFTP service, you'll delete it from your environment. These steps are easy, and you can do them in any order.
Removing the Template from Your Environment
You might need to clean your environment and remove unused templates. The Unqork Library makes this easy. To uninstall a template from your environment:
At the top right of the Unqork Designer Platform, click Library.
Find the template to uninstall.
Click the ellipsis (...) in the template tile header.
Click Uninstall Template.
Click Yes, Uninstall in the confirmation modal.
You can visit the Marketplace and reinstall the template at any time.
What if you have an existing application built from this template and then uninstall the template from your environment? Your existing application remains unaffected. Also, it no longer has any ties to the template. So, let's say you reinstall a newer version of the template in the future. You can rest assured that the installation doesn't impact your existing application.
Deleting Your Application
If you no longer need the application you created from your template, you can delete it. To delete your application:
Navigate to the Apps tab from an open workspace.
Find the application to delete.
Click the ellipsis (...) in the app tile header.
Click Delete.
Retype the provided text.
Click Yes, Delete.
Removing the SFTP Service from Your Environment
To remove your SFTP service from your environment:
Click the Settings drop-down at the top right of the Unqork Designer Platform.
Click Administration.
Under Integration, select Services Administration.
Scroll down and select the SFTP service you want to delete from the Active Services list.
Click the Delete link. You’ll find this above the Active Services list.
Click OK at the Delete message.
Click OK at the Success message.