About this Configuration Guide
This guide covers setting up the Workflow Single Email integration template. Using this guide, you'll explore how this workflow integration template works. You'll learn how to install the template in your environment and how to build an application from it. Plus, we'll walk you through how to customize your application to fit your needs.
Here's a high-level overview of the elements involved in this template:
Title | Element Type | Description |
|---|---|---|
Send Single Email Workflow Template | Workflow | This workflow starts your end-user at the Express View module. Once the end-user enters their information and presses Send Single Email, the workflow fires a Message node. This uses Unqork's native email functionality to email the end-user. |
Send Single Email Workflow Template | Module | This module is a placeholder showing ways to configure your own Express View module. It also lets you test your Message node and workflow. |
All images used in this guide are for illustrative purposes only. Images are subject to change without notice. All images were correct at the time of publication.
Overview
This template offers a quick and easy way to send emails to your end-users from your workflow. With this template, you can send emails to your end-users at any point during their journey. And it all happens behind-the-scenes. All your end-users do is click a button.
You can think of this template as an example configuration for how to use the Message node. The email process uses the Message node and Unqork's native email functionality. With the Message node, all you'll need is a recipient and an email message to send an email from your workflow.
This is a workflow integration template. So, let's say you build an application from this template. Your application will have a module and a workflow. And your workflow will already connect to Unqork's email functionality. Unqork integrates with an external email service, which is why we call this an integration template. But, you won't have a service in Services Administration like you would with some other integration templates.
Features
With this workflow integration template, you can send an email to your end-user directly from your workflow.
Requirements
To use this workflow integration template, you must define the RBAC (role-based access control) for your application.
Adding the Template
Before you can build an application from this template, you'll need to install the template to your environment. Then, you can visit your Library and build an application from your new template.
Adding the Template to Your Environment
To add the template to your environment:
Click Marketplace at the top right of the Unqork Designer Platform.
You can also access the Marketplace at any time by visiting https://marketplace.unqork.io.
Enter Workflow Single Email in the Search the Marketplace field.
Click on the Workflow Single Email tile.
Click Add to Environment.
Click Install Template.
If you aren't logged in, you'll see a field for Environment URL and a Login button. Enter your environment's URL where you want to install the template. For example: [environmentname.unqork.io]. Then, click Login.
Now you can now use your newly installed template to create an application!
Creating an Application from the Template
After you've added the template to your environment, you can use it to create an application. This template creates a workflow-type application.
Click Library at the top right of the Unqork Designer Platform.
Find the Workflow Single Email template tile.
If the template isn't listed, head over to the Marketplace to install it in your environment. You can access the Marketplace at any time by visiting https://marketplace.unqork.io.
Click Create App from Template.
Choose the destination workspace from the Workspace drop-down. This is where your application will live once created.
Enter a unique App Name. The App Path auto-fills as you type your App Name.
If you want a different App Path, enter it in the App Path field.
Select a preview style from the Style drop-down. A style specifies your application’s appearance in Express View. If left blank, your application uses your environment's default style.
You'll notice the App Type and App Entrypoint are grayed out. The template automatically takes care of these for you.
Click Create App.
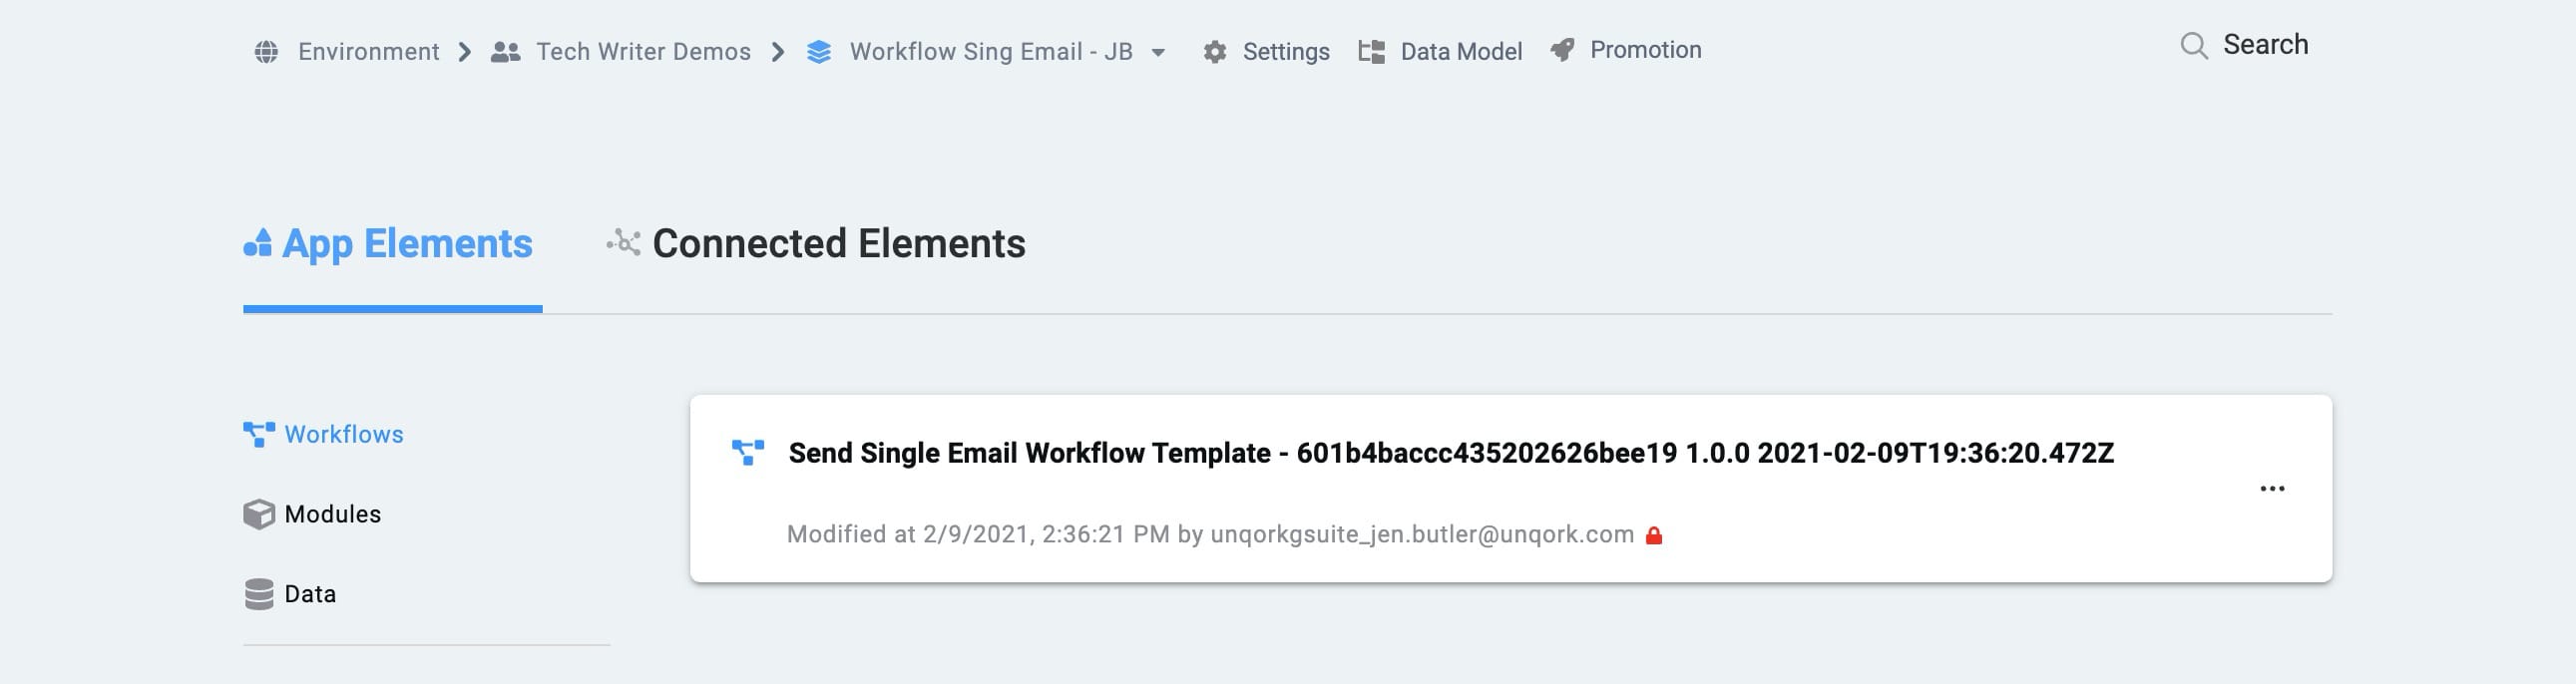
The application opens in the workspace you specified. You'll land on the Workflows tab of your application, which shows your new workflow.
Your Workflows tab should look something like this:
And your Modules tab should look like this: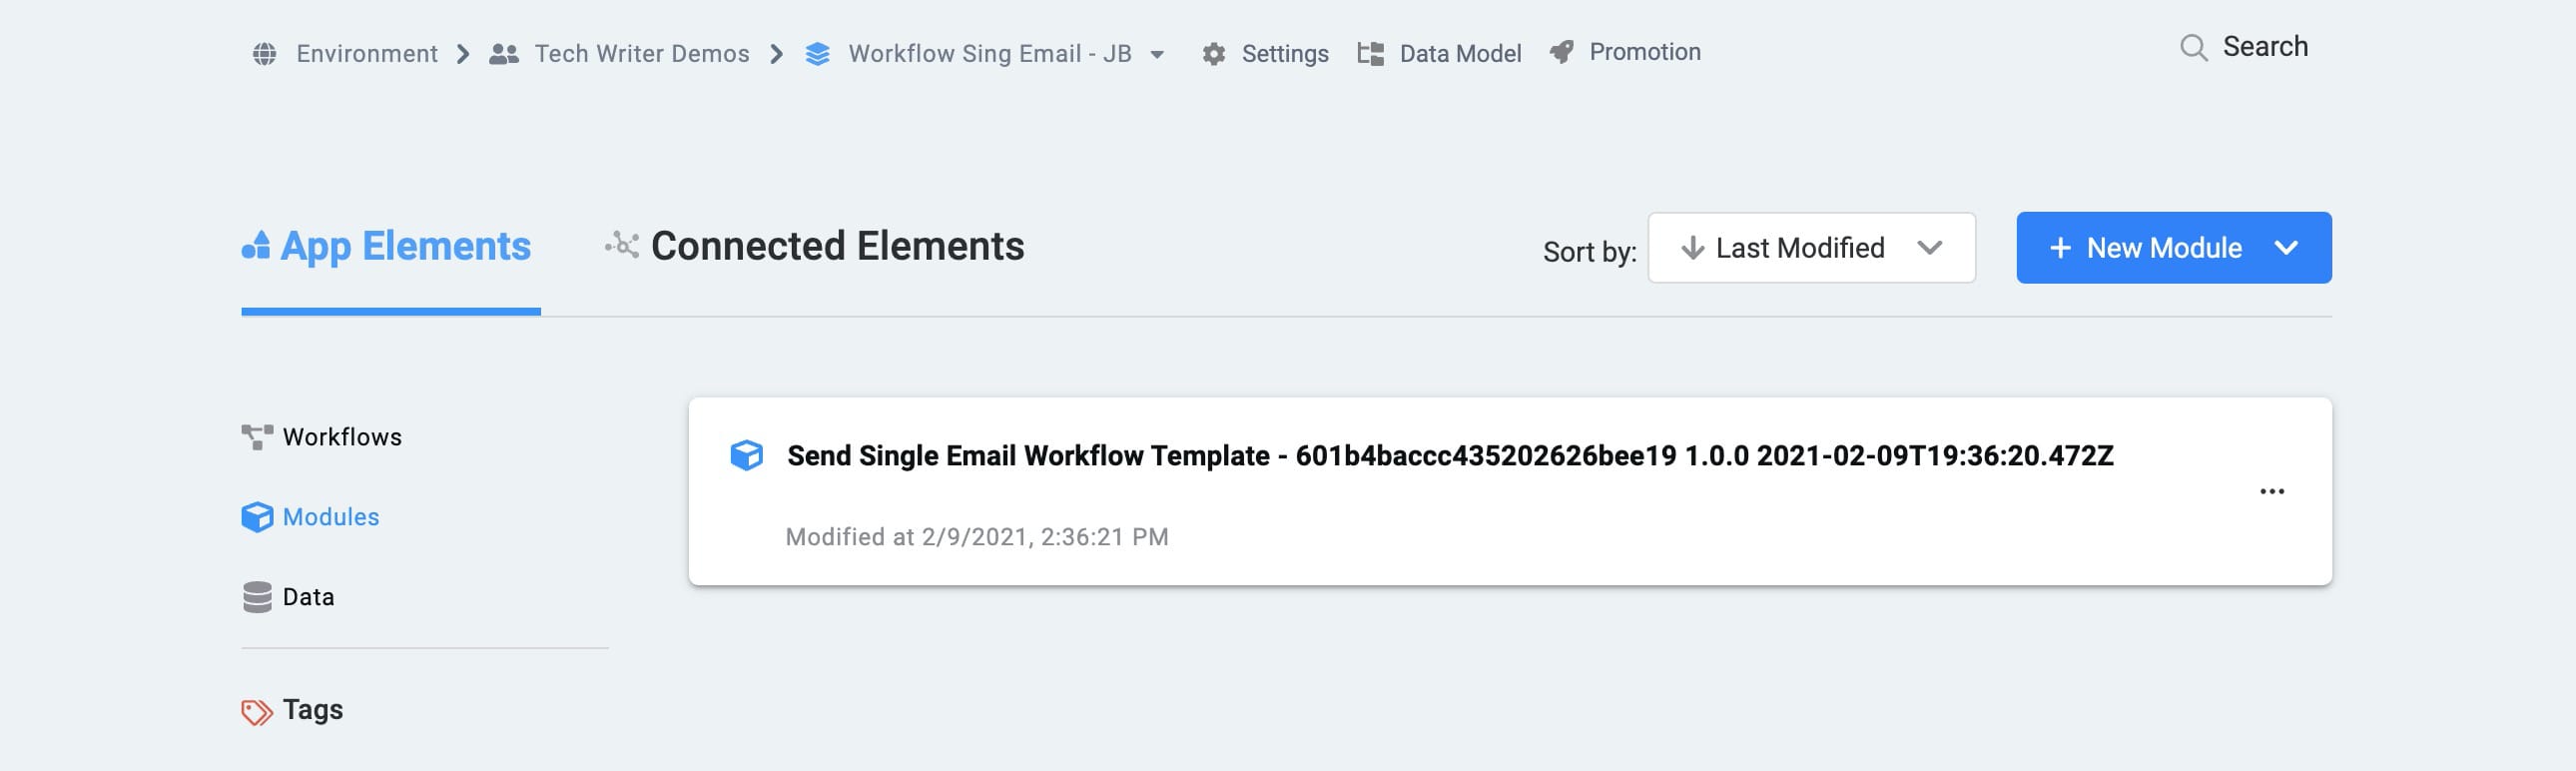
When you create an application from the template, your module name(s) will also automatically include the template ID and a time stamp. This is to prevent any duplicate module paths. You're welcome to change module names and module paths at any time. The workflow created with your template will also have a template ID and time stamp.
How the Template Works
Think of this template as an example configuration for how to use and test the Message node. The template has 1 workflow and 1 module.
How this Template's Workflow Works
The workflow has 2 main parts. The Start node connects to the Express View module in the Authenticated lane. That module connects to a Message node in the Automated lane. Then, the workflow ends with an End node. The driving force of this workflow is the Message node. Let's take a closer look at it. To open your Message node, click the node. Then, click Edit.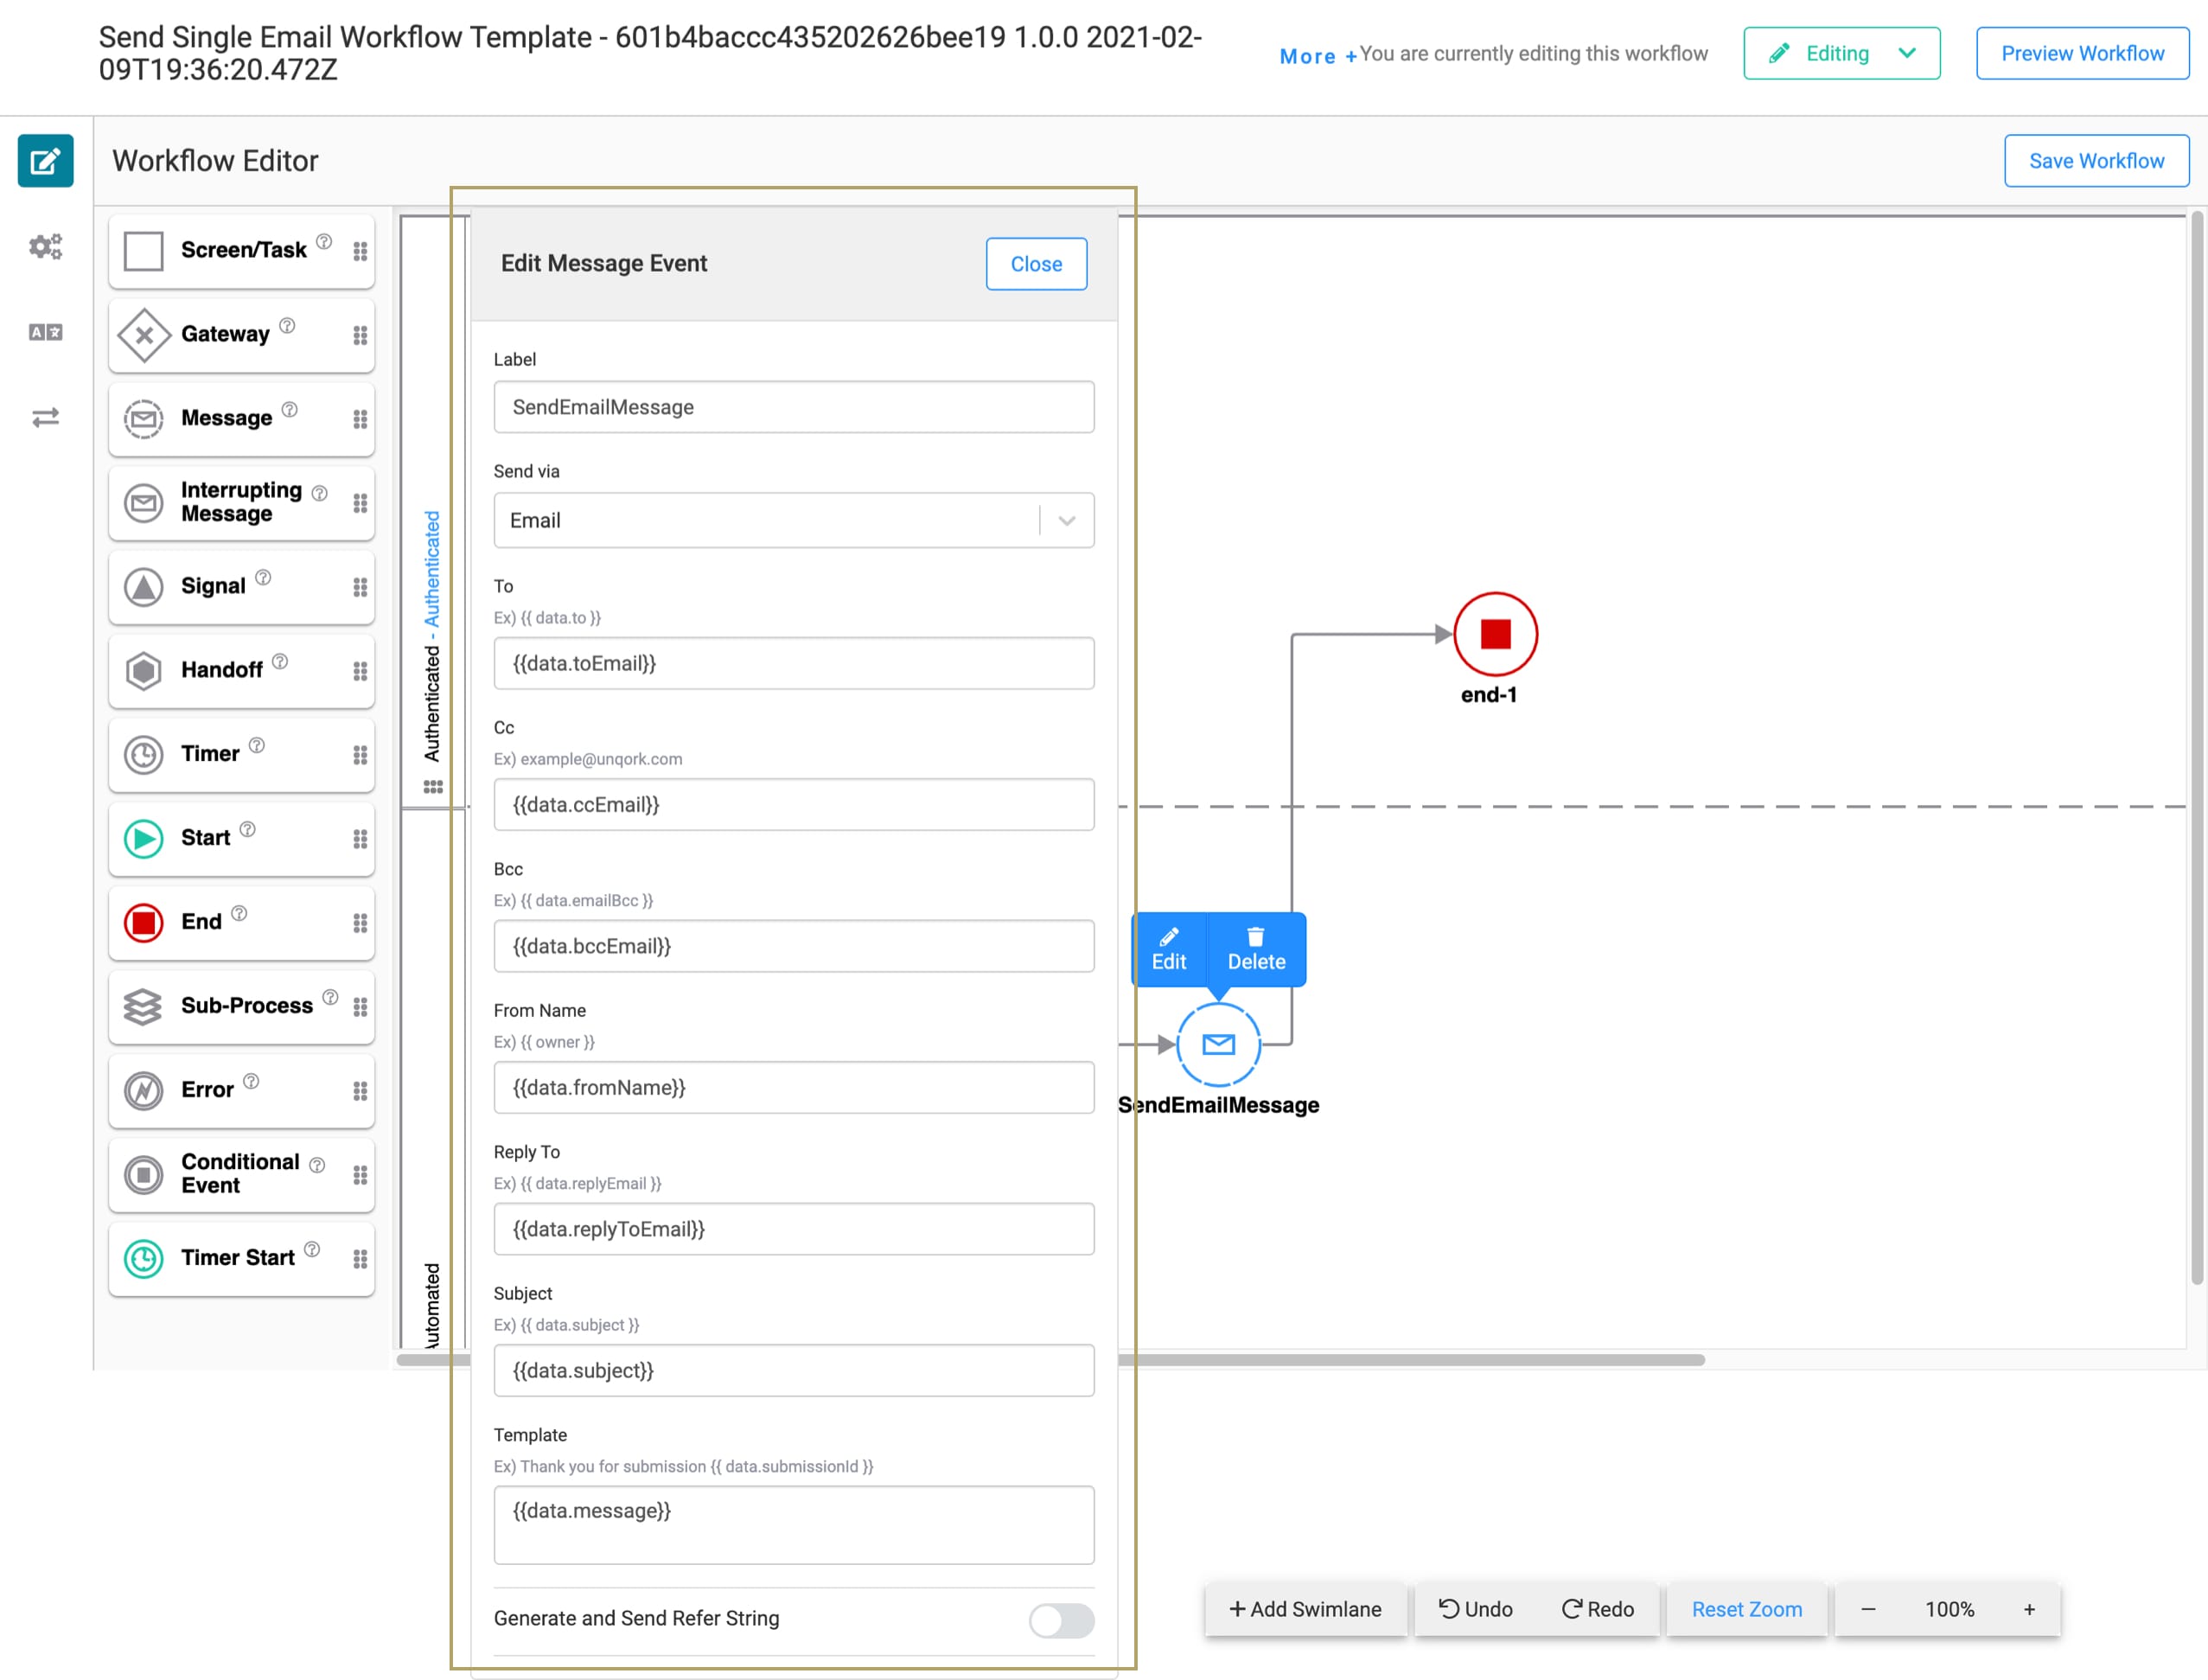
The Send via drop-down defaults to Email. You'll see that the rest of the fields have curly braces {{ }} with data. and a Property ID. These entries map to the fields in the Express View module. So, your end-user fills out the entry fields in the module. Then, that module communicates the information to the Message node. The Message node then uses that data to send the email to your end-user.
You can adjust these Message node fields to better fit your use case. You'll learn more about this in the Customizing the Template section.
The Message node's Generate and Send Refer String toggle defaults to OFF. If your end-user is communicating over SMS or email, there's a chance they're not logged in to your application. When you switch this toggle ON, you can send a link to your end-user. Using this link, your end-user can access your application.
How this Template's Module Works
This module shows how this workflow template interacts with the Message node to send an email. You’ll interact with this module in Express View. But you likely won’t use it in your actual application. So, what’s its purpose? Here are some helpful ways to use this Express View module:
As a frame of reference for how to configure in your own application. For example, each field's Property ID maps to the corresponding field in the Message node. You can use this as a basis to build out your own module.
Check that your Message node behaves the way it should.
Here's how the module looks in the Module Builder:
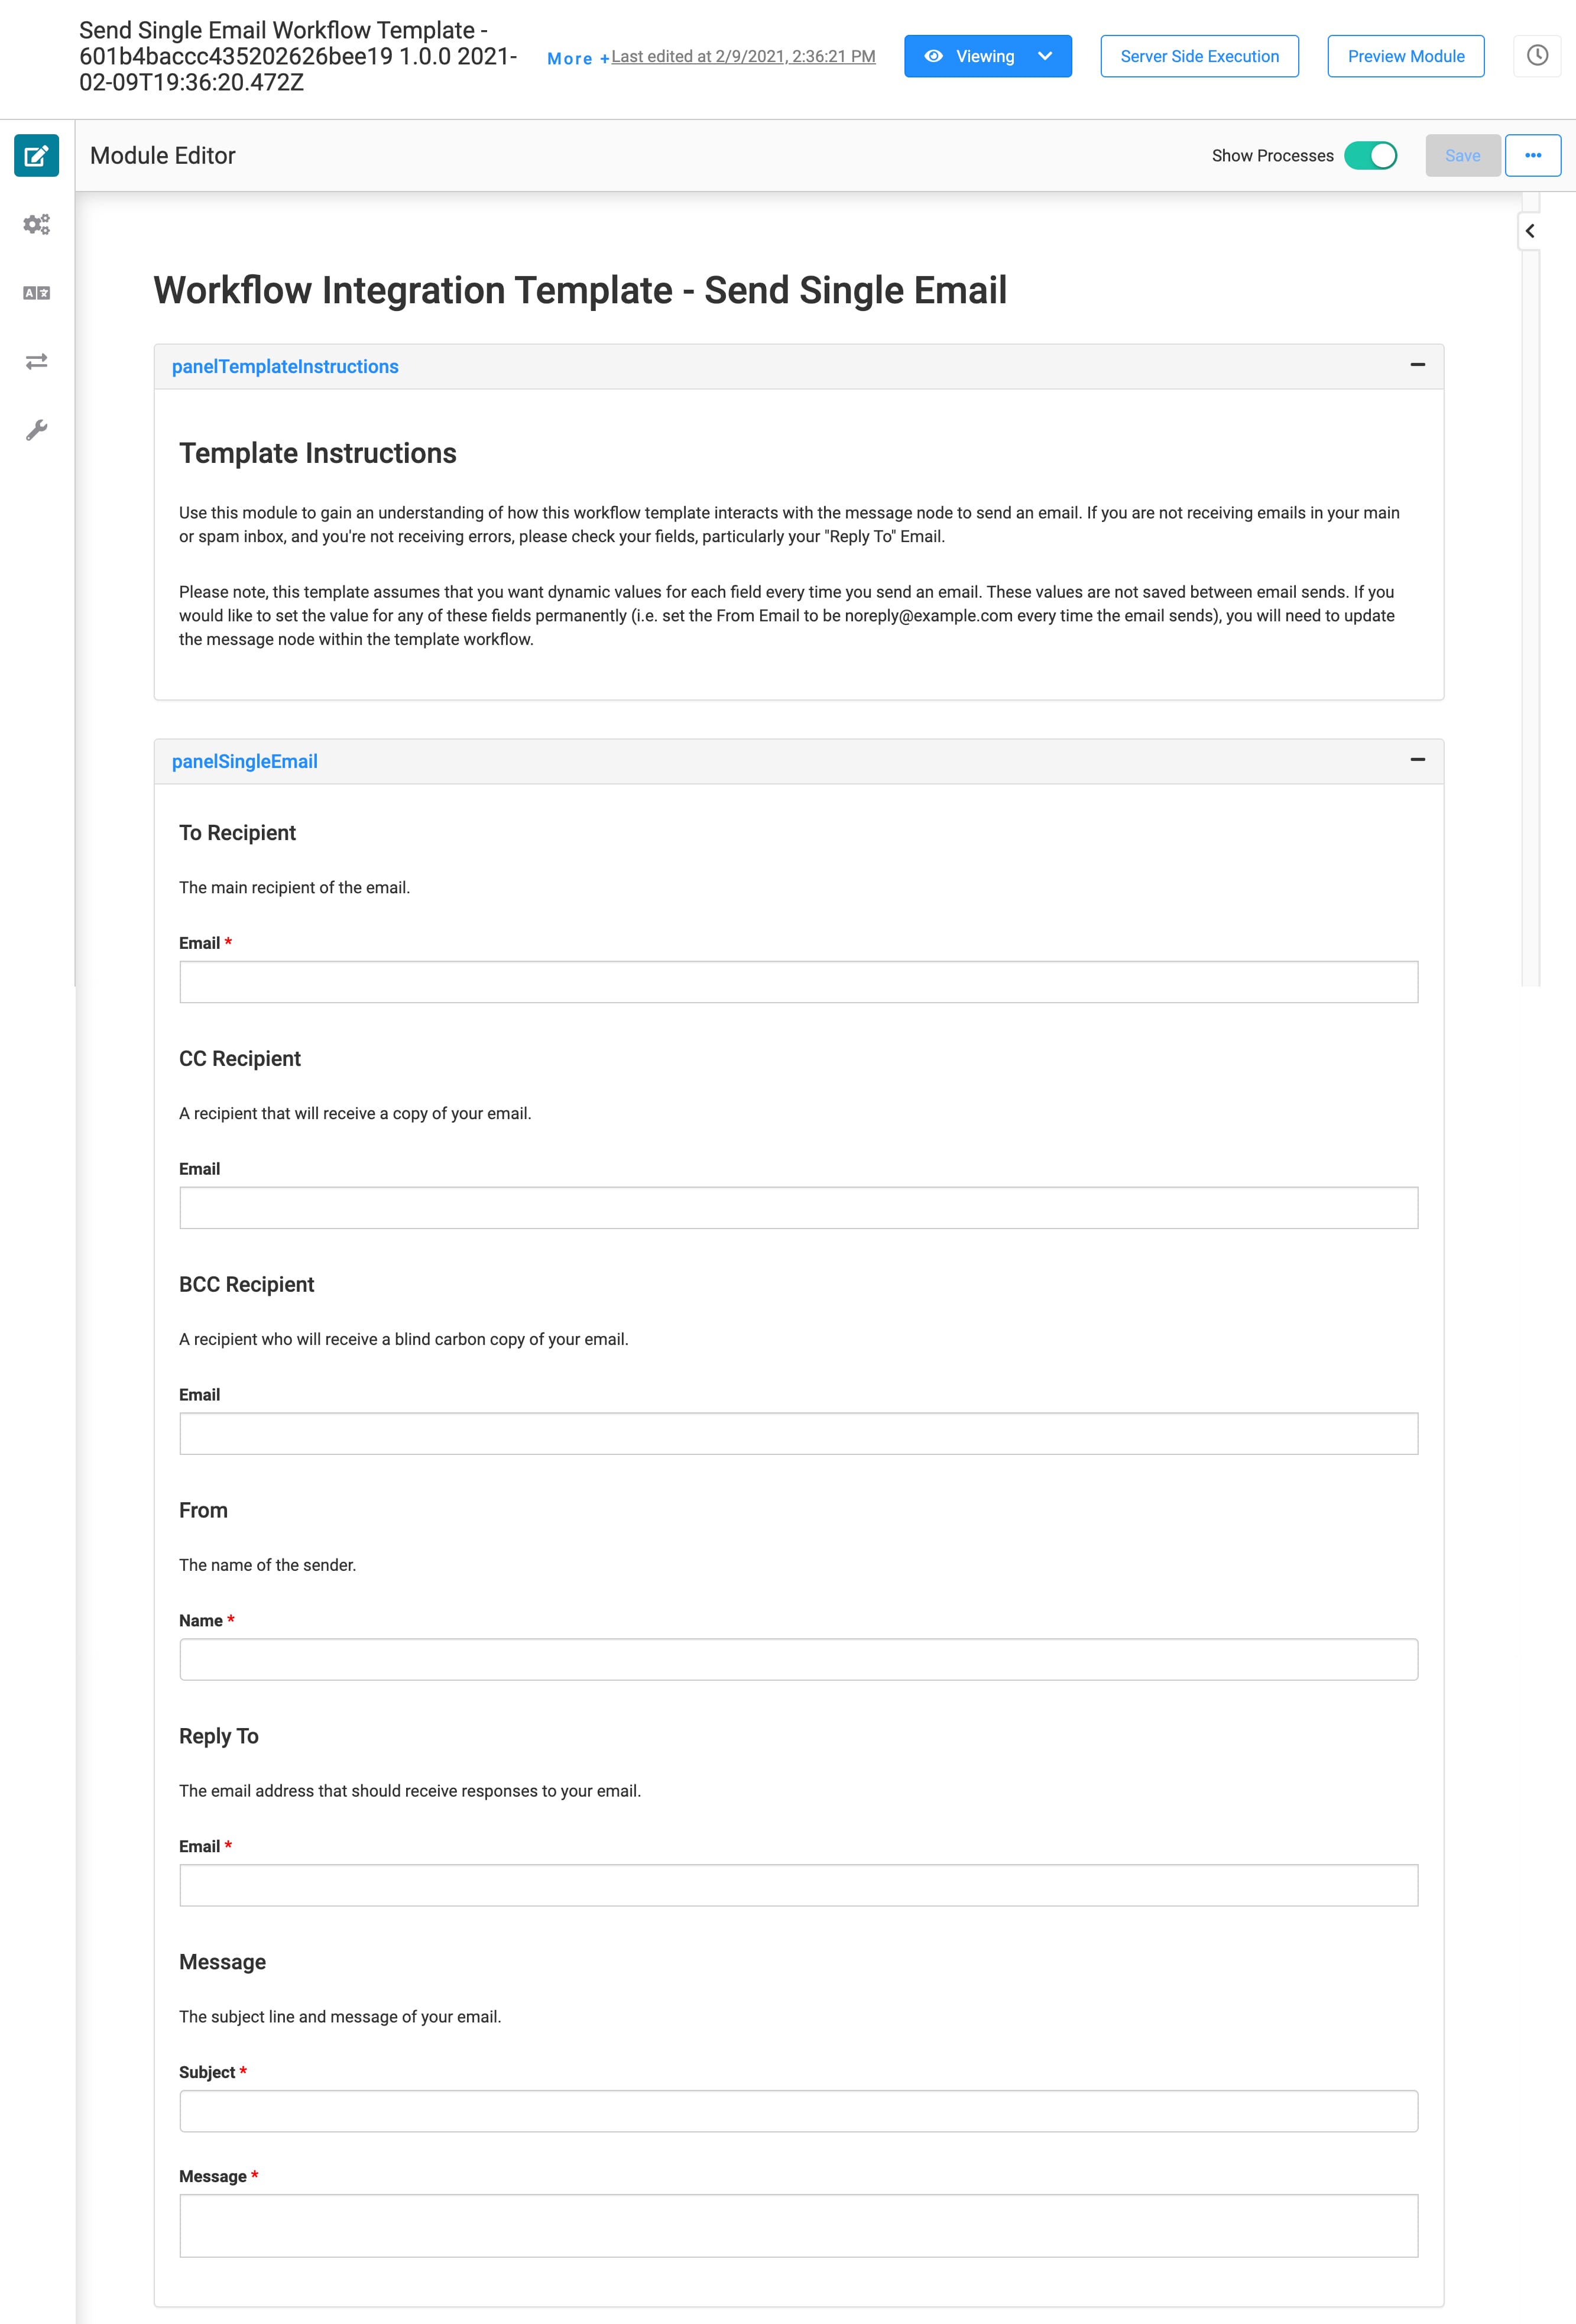
And here's how the module looks in Express View:
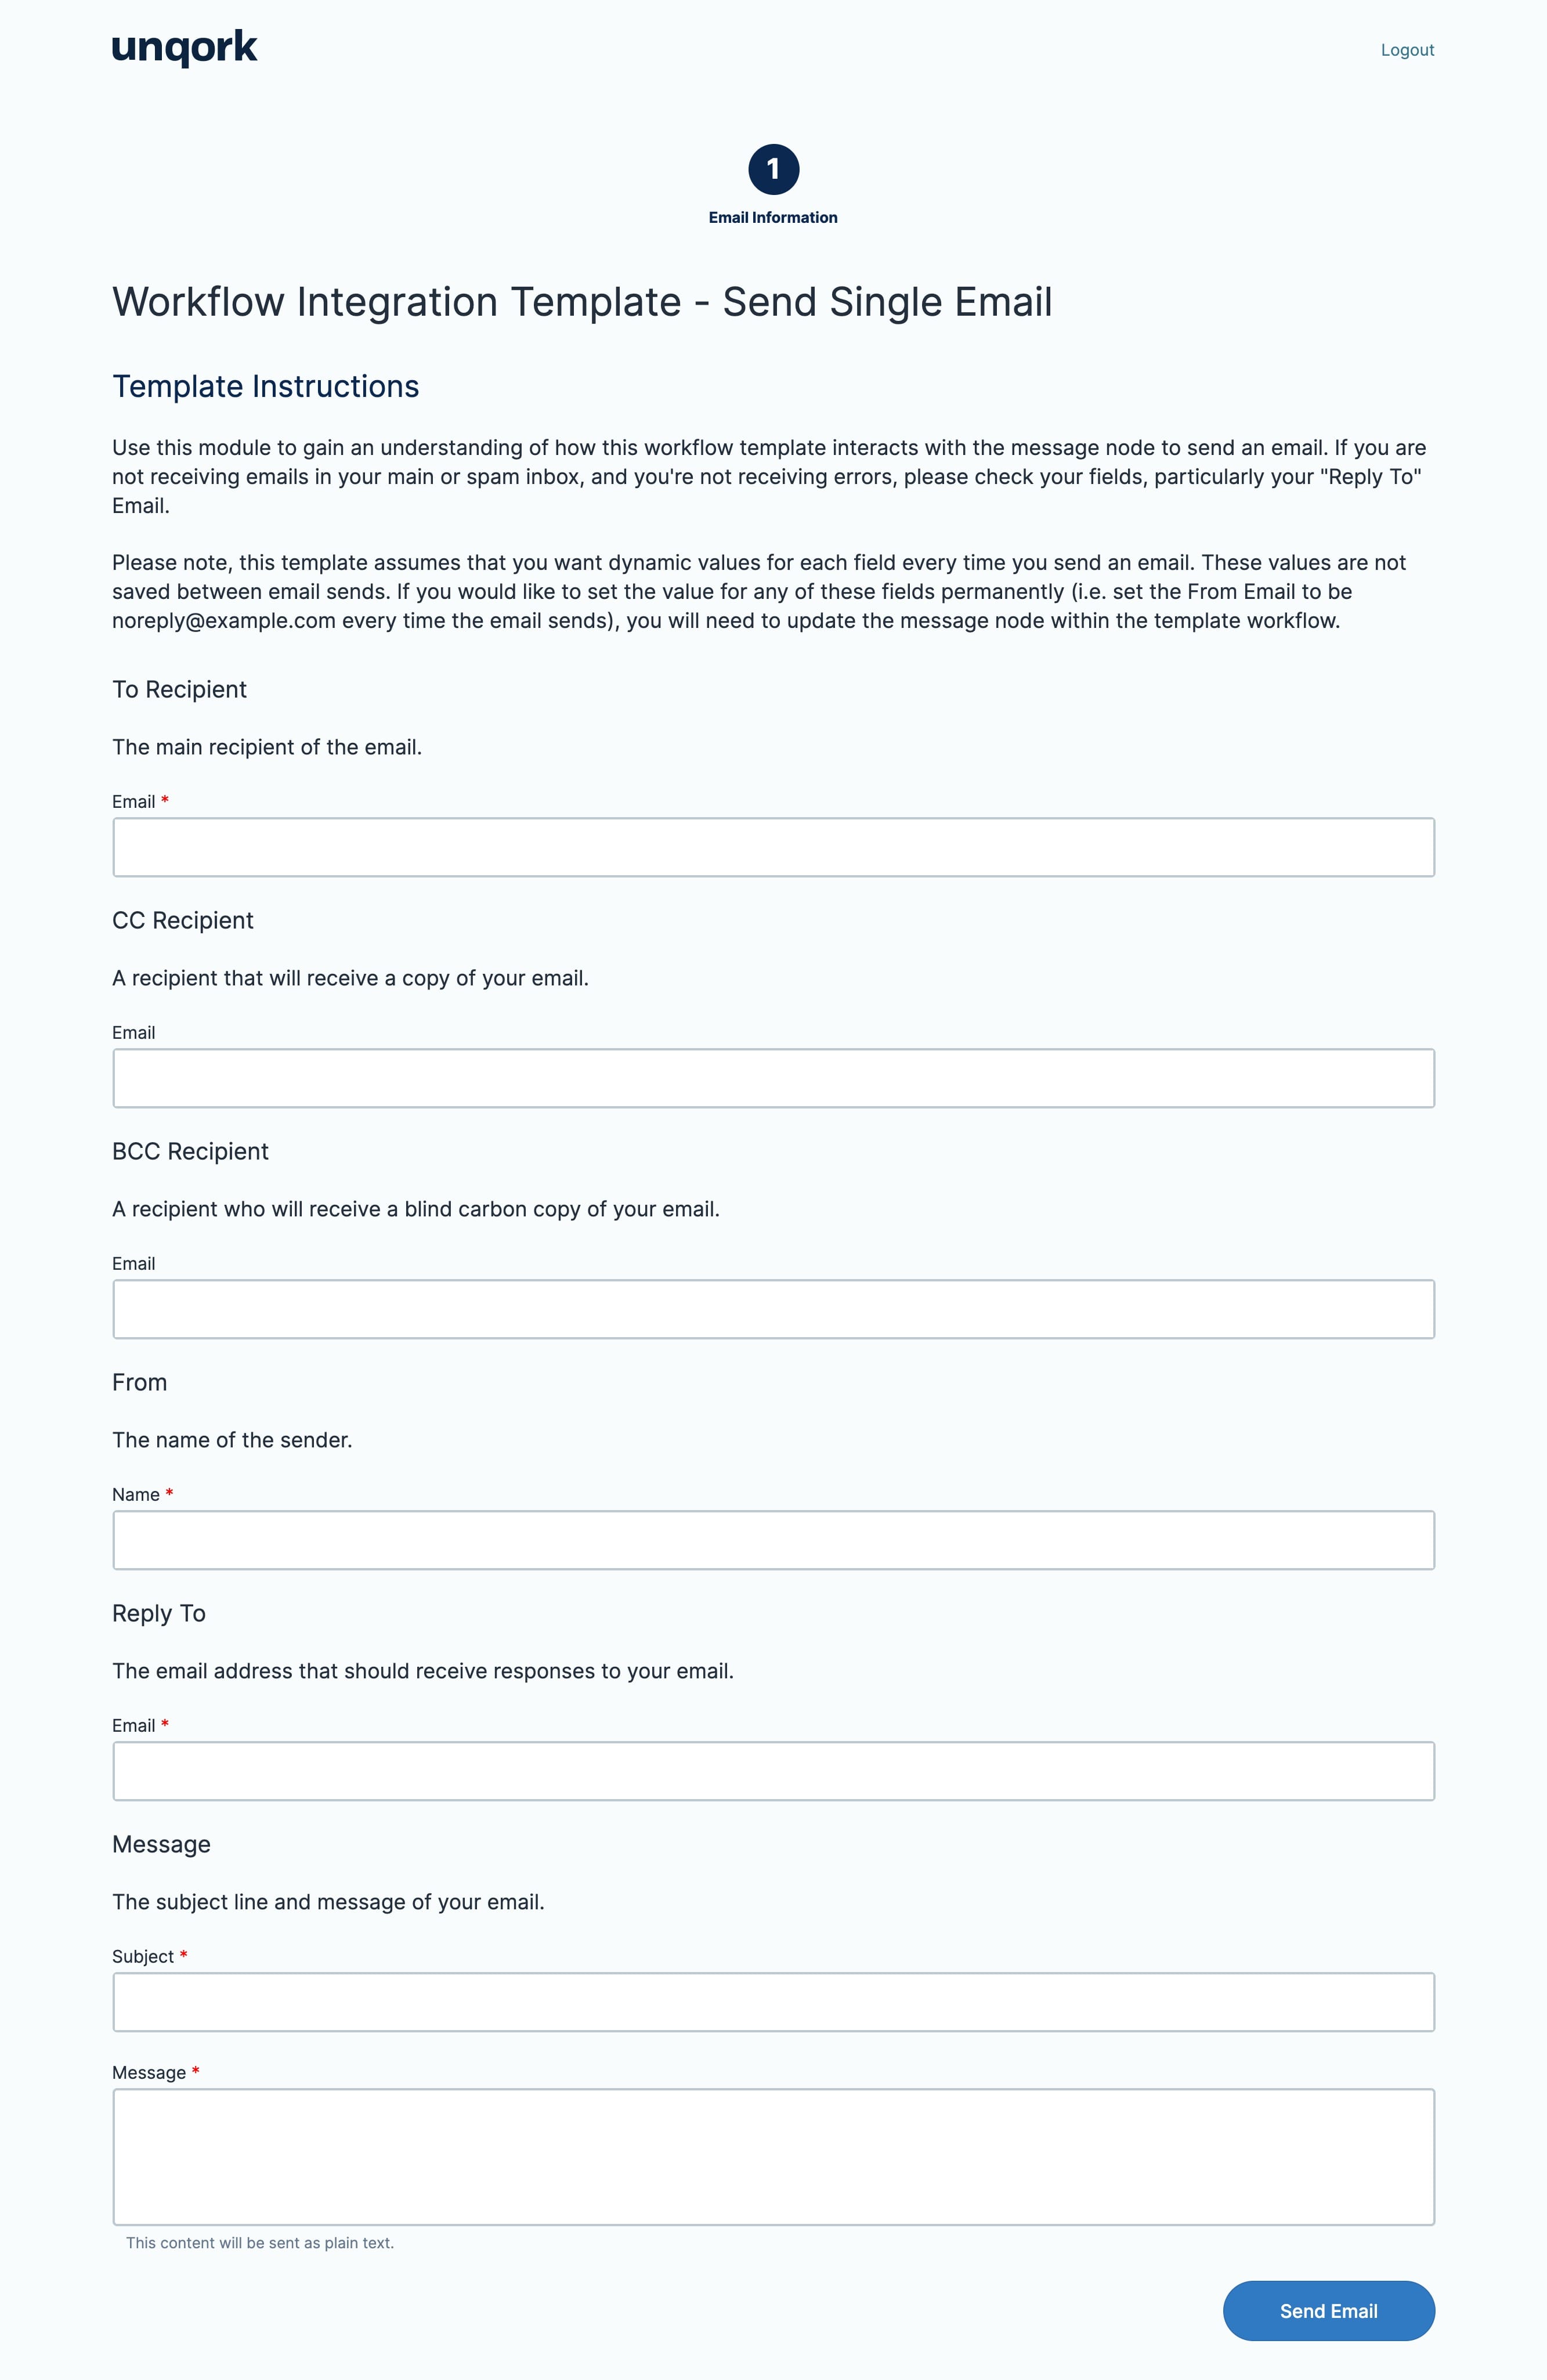
You'll notice the From field only has 1 entry field for Name. This is because the From Email already sends from no-reply@unqork.com. So, all you need to do enter your preferred From Name.
Configuring the Template
There's only 1 step to get your application fully functional. All you'll do is choose the Role for your workflow's Authenticated swimlane. Then, you're up and running.
Configuring the Workflow
When you open your workflow, you'll see a Welcome to your new Workflow! modal. Click Got it! to close the modal and view your workflow. Once inside your workflow, you'll see an exclamation point icon in the title of the Authenticated swimlane. This icon shows you where the unresolved issue is. Hover over the icon for details:
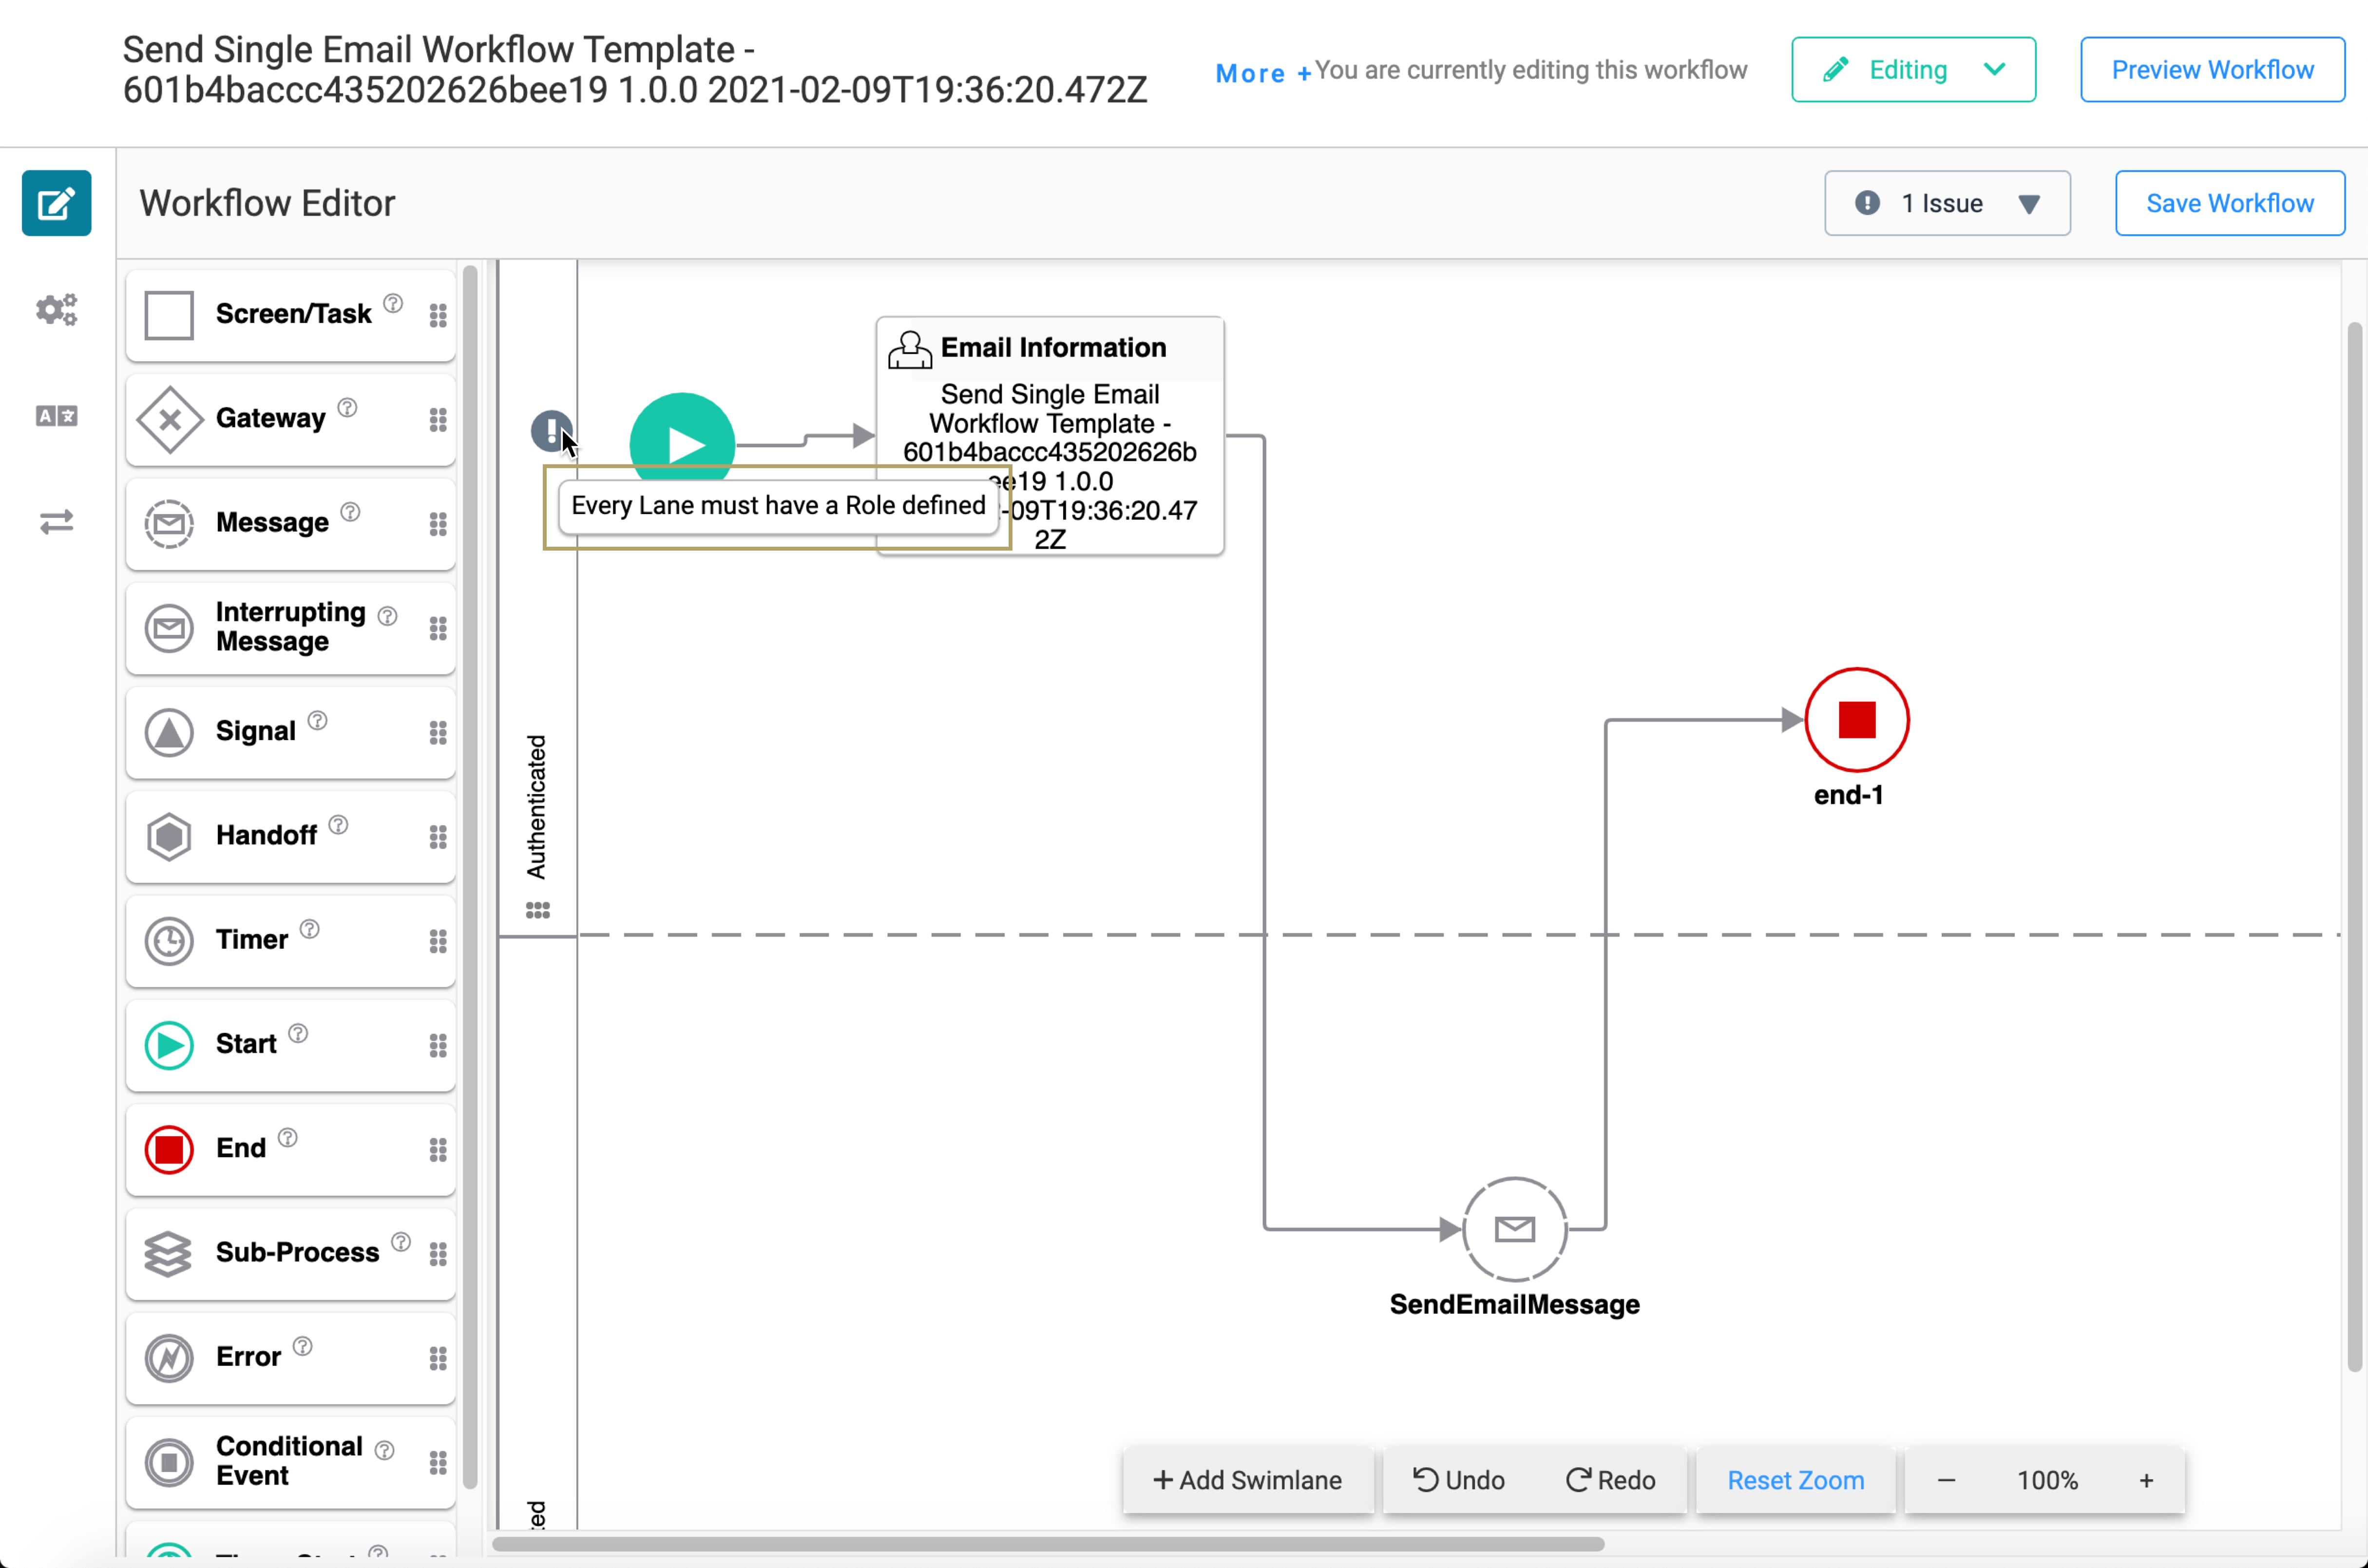
You can also click the Issue drop-down next to the Save Workflow button to see error details.
In this case, the error message says that every swimlane must have a defined Role. Templates don't include RBAC configurations. This is so you can set it up in a way that works best for you. So, you'll need to define a Role for the Authenticated swimlane.
Hover over the header of the Authenticated swimlane.
A 3-button toolbar appears above the swimlane on hover-over.
Using the toolbar, click the
.jpg) (Edit) button.
(Edit) button.Select a Role from the Assign a Role drop-down.
Click Close.
Save your workflow.
You'll see that the exclamation point icon and the Issue drop-down disappear. You can now preview your workflow. Click Preview Workflow, fill out the fields, and click Send Email. Then, check your inbox to see the email message.
You can only enter 1 email address per recipient field. So, To, CC, and BCC can have only 1 email address each.
Customizing the Template
The customizations available with this template have to do with the email itself. This template assumes that you want dynamic values for each field every time you send an email. These values reset each time an email sends. But what if you want to set a permanent value for any of these fields? For example, let's say you want the From Name to always be Unqork. No problem. All you'll do is update the Message node in your workflow. Below, we'll cover some common customizations, such as:
Linking the workflow to your own Express View module.
Changing the Message node to have static fields.
Adding a dynamic Name field so you can send personalized emails.
Linking the Workflow to Your Own Module
The module included with this template is a great reference point when building out your own module. So, how do you direct your end-users to the module you built? Open your workflow and follow these steps:
Click the module's Email Information node.
Click Edit.
Select your module from the Add a Module drop-down.
Click Close.
Save your workflow.
Now, when you preview your workflow in Express View, it'll start on the specified module.
Remember to align your components' Property IDs with those mapped in the Message node. You can use the components from the Send Single Email Template module as a reference.
Changing the Message Node to Have Static Fields
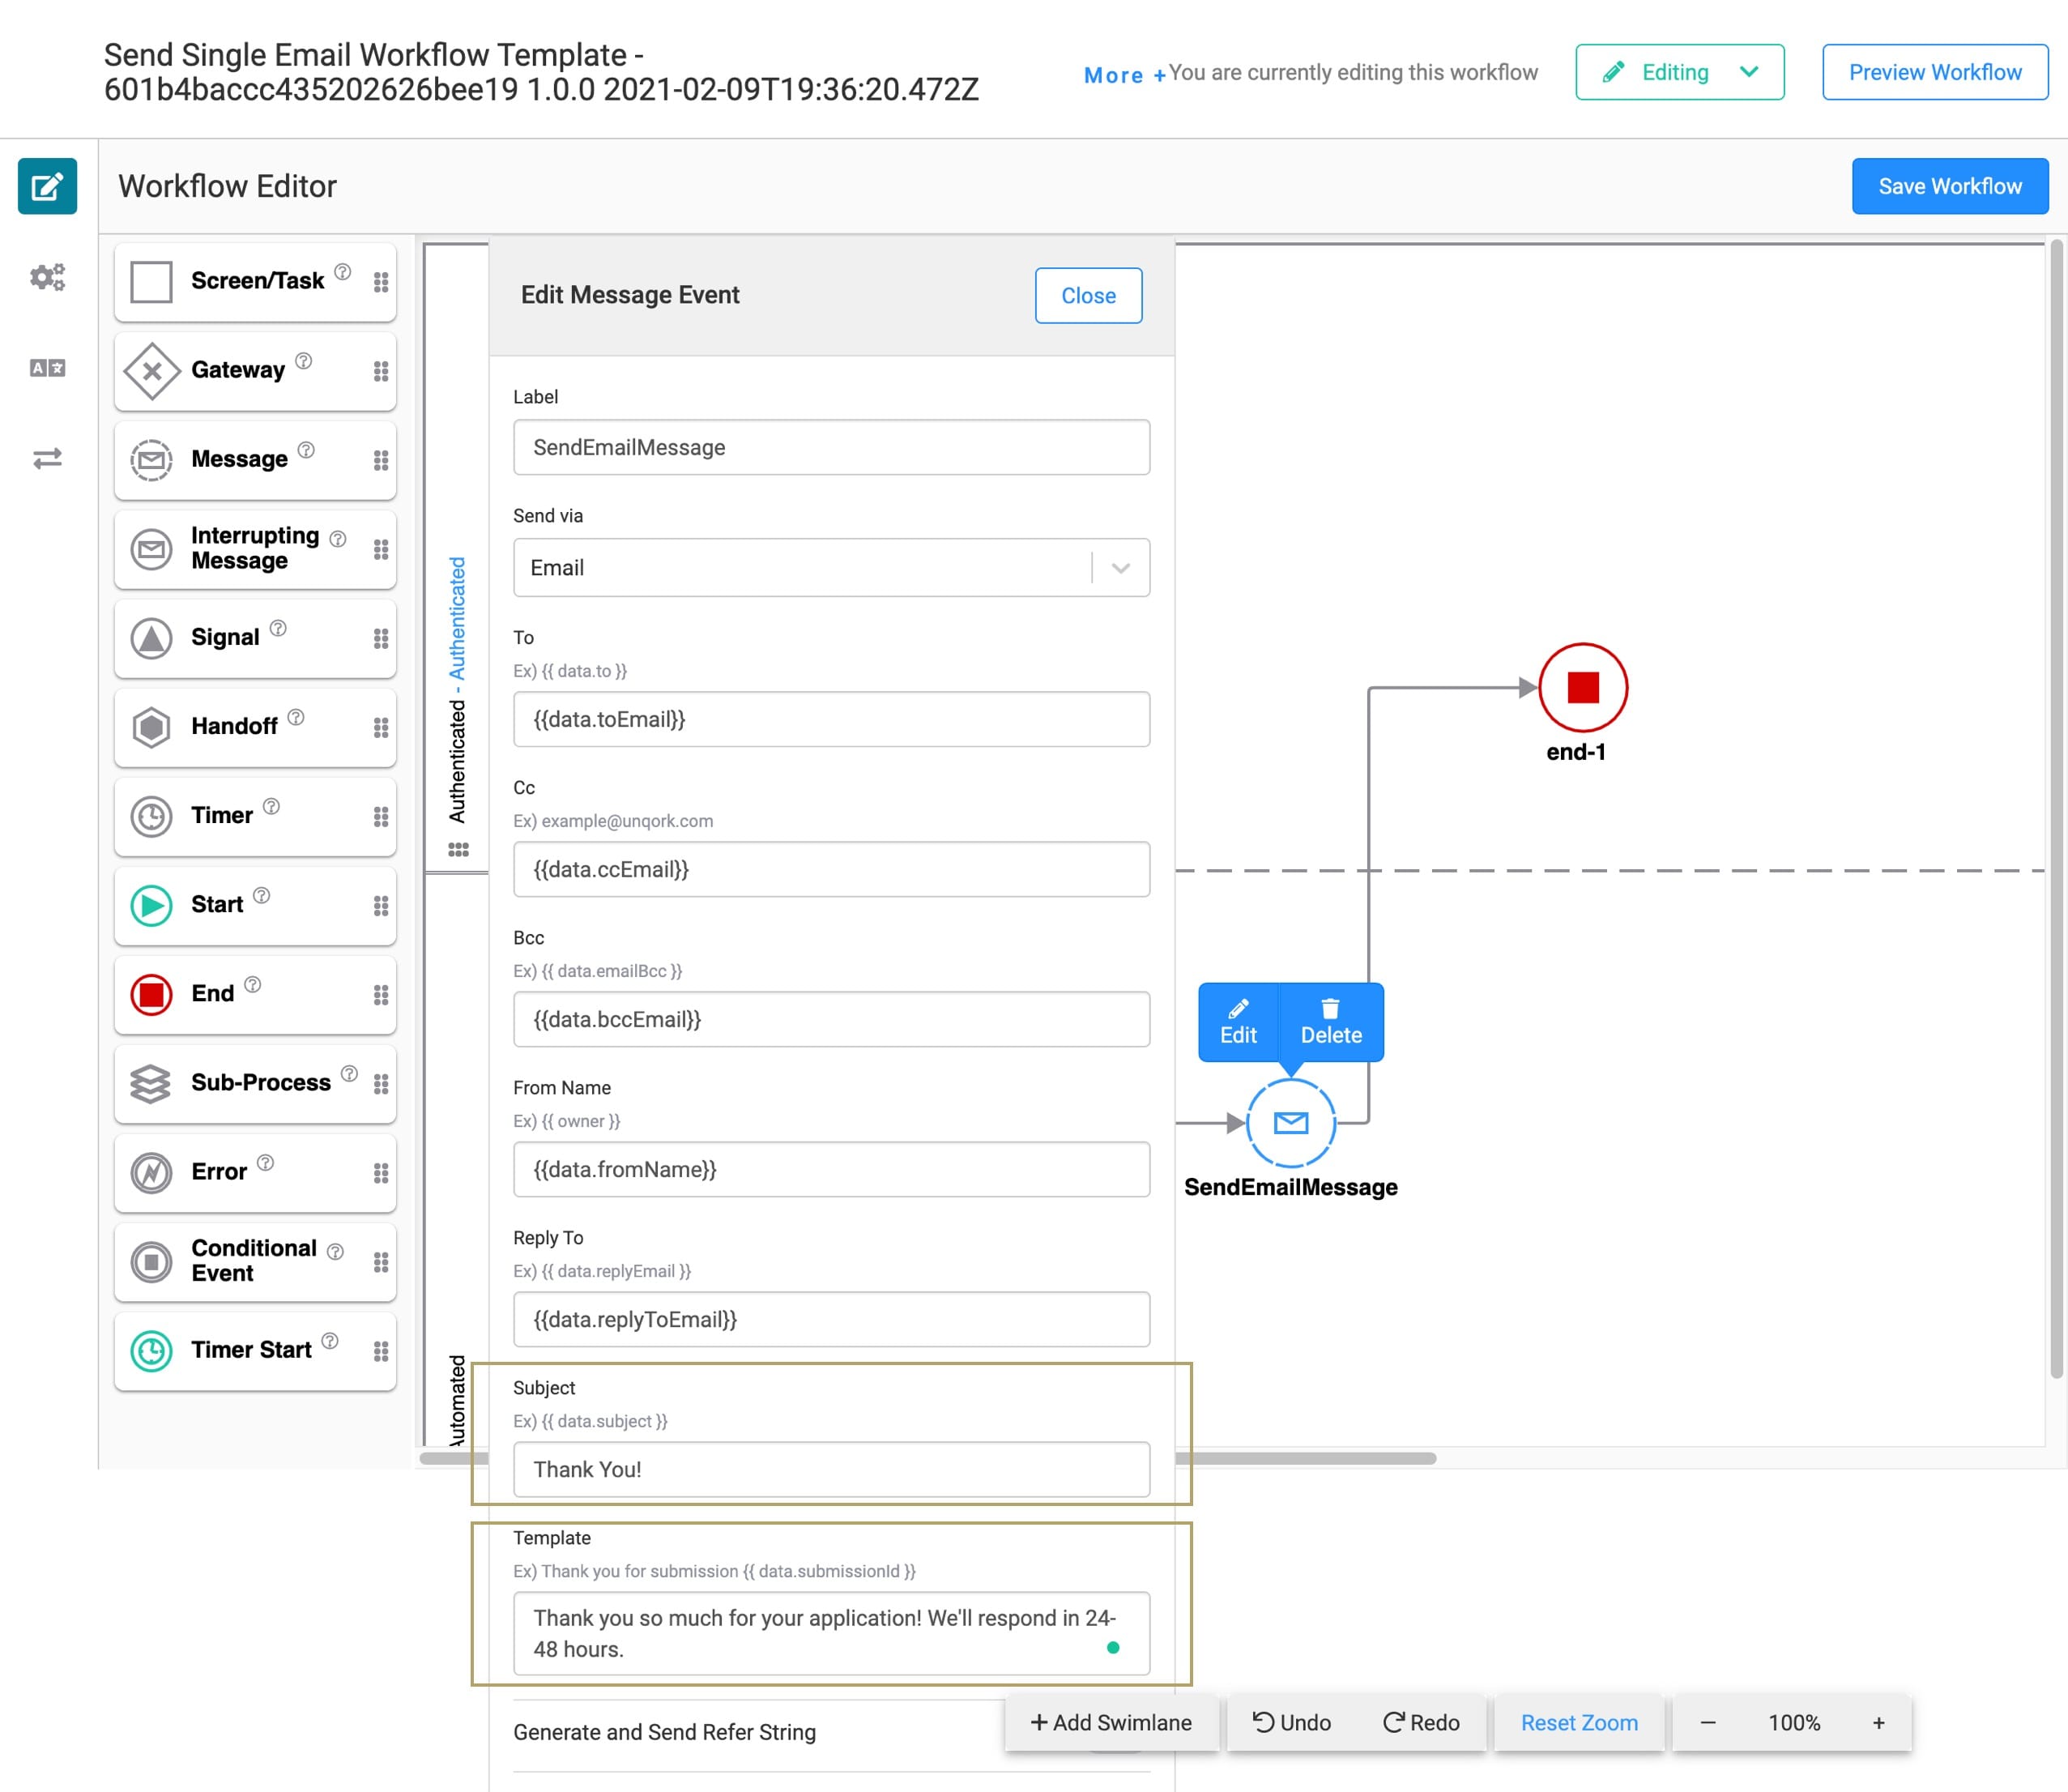
What if you want to set a permanent value for some of the email fields? You'll make 2 adjustments. First, update the Message node. Then, update the module. Let's say, for example, that you want a static email message. You want the Subject to be Thank You! And you want the email message to say, Thank you so much for your application! We'll respond in 24-48 hours. Here's what you'll do:
Update the Message Node
You'll make this update from your open workflow.
Click the SendEmailMessage Message node.
Click Edit.
Replace {{data.subject}} with Thank You! in the Subject field.
In the Template field, replace {{data.message}} with the static message you want.
The email message defaults to plain text, but also works with basic HTML. So, if you want more than plain text in your email message, you can customize it with HTML. We'll show you an example of that in a bit.
Click Close.
Save your workflow.
Update the Module
Now, you'll remove the corresponding Message section of your module. This section has 4 fields to delete:
htmlMessage HTML Element component
htmlReplyToExplanation HTML Element component
subject Text Field component
message Text Field component
Here are the steps you'll take to delete each component:
From your open workflow, click the module's Email Information node.
Click Open.
Hover over the component you want to delete.
A 5-button toolbar appears above the component on hover-over.
Click the
.jpg) (Remove) button.
(Remove) button.
Once you've deleted all 4 components, save your module.
Now, when you preview your workflow, you'll no longer see a Message section with entry fields for Subject and Message. And, the email you receive should have the static Subject and Template you specified in the Message node.
Adding a Name Field for Personalized Emails
Let's continue from the previous step where you created a static Subject and Message. Say you want to add a personalized sentence to the beginning of your email message. And, you want it to populate with the end-user's first name for each email sent. Also, since the Message node supports HTML, let's have a little fun and use HTML with your personalized message. Here's how you'll do it.
Update the Message Node
You'll make this update from your open workflow.
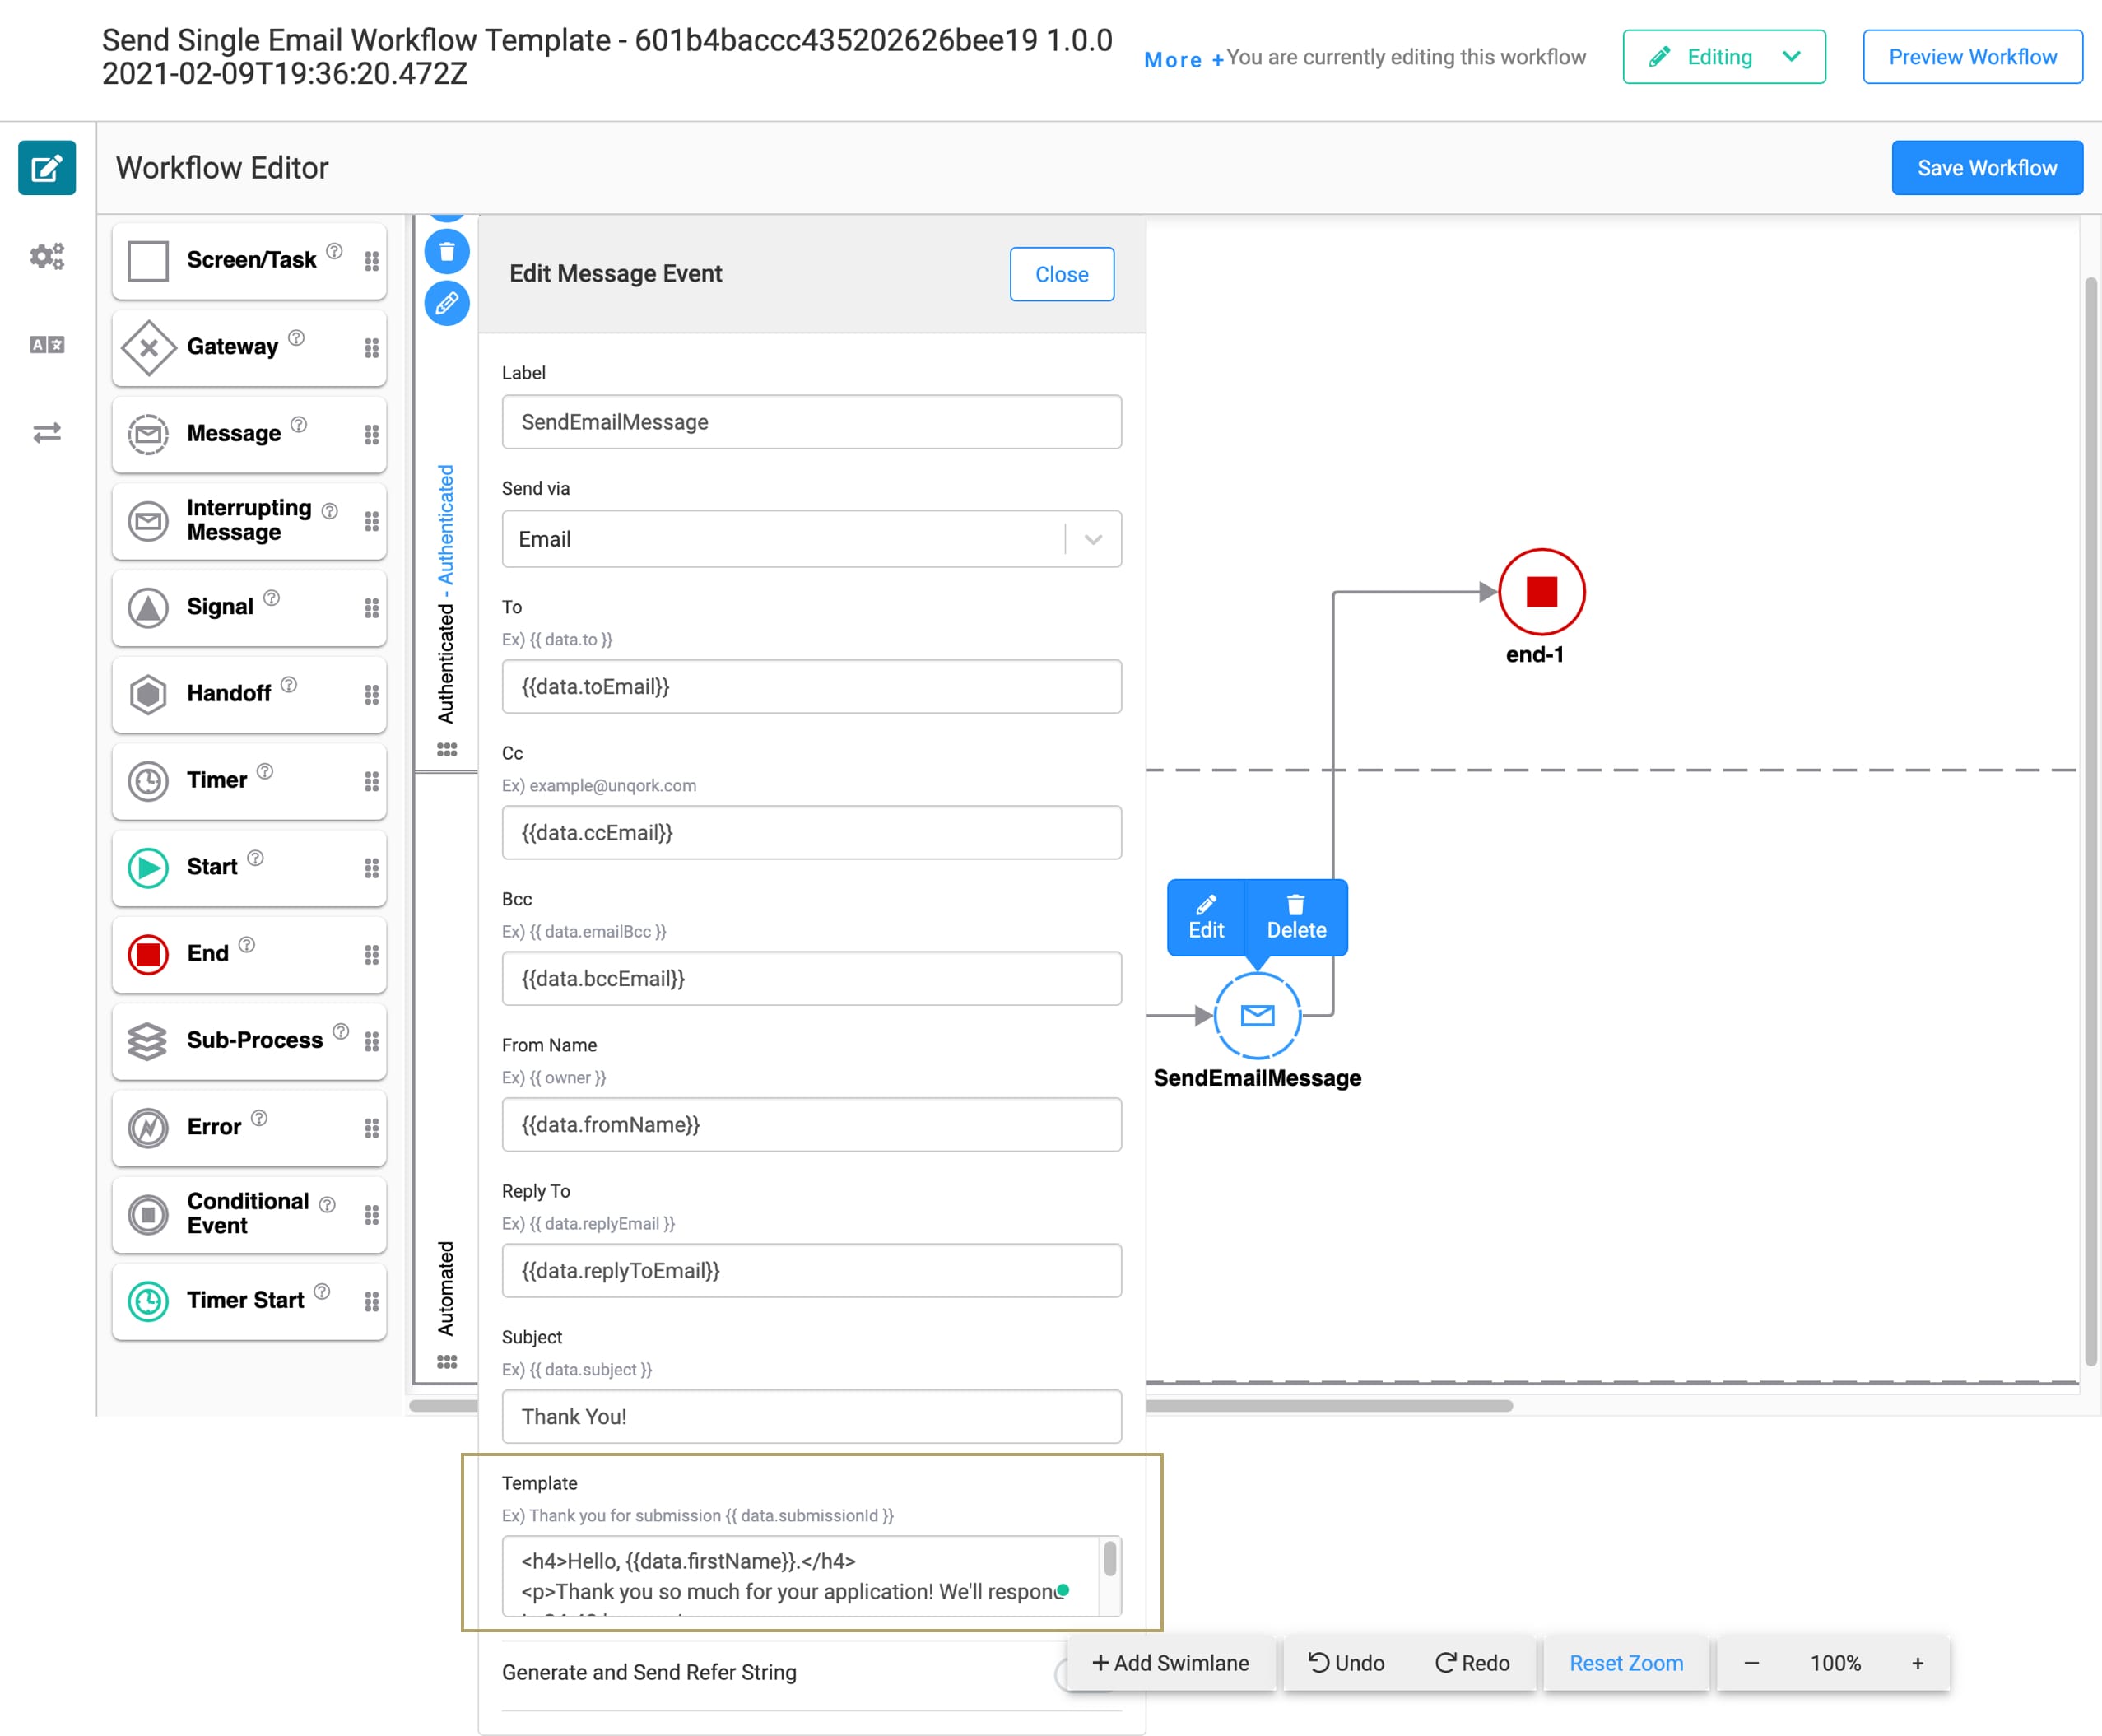
Click the SendEmailMessage Message node.
Click Edit.
In the Template field, enter the following:
<h4>Hello, {{data.firstName}}.</h4>
<p>Thank you so much for your application! We'll respond in 24-48 hours.</p>
<p>Unqork</p>
{{data.firstName}} maps to the Text Field component you'll add in the next step.
Click Close.
Save your workflow.
When entering a message in Express View, your end-user can include HTML formatting. To preserve that HTML, you must use Nunjucks in your Message node. To do so, add | safe to your entry in the Message node's Template field. For example, to reference a field called emailContent, you'd enter {{data.emailContent | safe}}. This preserves any HTML your end-user enters in the emailContent field. The same process applies when generating an HTML-formatted email using a transform. Just set up your transform to output to a component. Then, map to that component in the Message node's Template field, making sure to add | safe.
To learn more about the safe Nunjucks template, visit https://mozilla.github.io/nunjucks/templating.html#safe.
Update the Module
Now you'll add 2 Text Fields to your module, 1 for First Name and 1 for Last Name. You'll match the Property ID of the First Name Text Field to what you used in the Message node's Template field.
From your open workflow, click the module's Email Information node.
Click Open.
Drag and drop 2 Text Field components onto your canvas. Place them above the toEmail Email component.
Complete the Text Fields as follows:
Property ID
Label Text
Required
firstName
First Name
Yes (toggle to ON)
lastName
Last Name
No
Save each component as you add it.
Save your module.
Now, preview and move through your workflow. You should receive a personalized email that looks like this:

Removing the Template
What if you no longer need this template or the application you built from it? There are 2 parts to removing this template. First, you'll uninstall it from your environment. Then you'll delete the application you created from the template. These steps are easy, and you can do them in any order.
Removing the Template from Your Environment
You might need to clean your environment and remove unused templates. The Unqork Library makes this easy. To uninstall a template from your environment:
At the top right of the Unqork Designer Platform, click Library.
Find the template to uninstall.
Click the ellipsis (...) in the template tile header.
Click Uninstall Template.
Click Yes, Uninstall in the confirmation modal.
You can visit the Marketplace and reinstall the template at any time.
What if you have an existing application built from this template and then uninstall the template from your environment? Your existing application remains unaffected. Also, it no longer has any ties to the template. So, let's say you reinstall a newer version of the template in the future. You can rest assured that the installation doesn't impact your existing application.
Deleting Your Application
If you no longer need the application you created from your template, you can delete it. To delete your application:
Navigate to the Apps tab from an open workspace.
Find the application to delete.
Click the ellipsis (...) in the app tile header.
Click Delete.
Retype the provided text.
Click Yes, Delete.