Overview
In this article, you'll learn how to use Okta as an SSO (single sign-on) provider, using the OIDC (OpenID Connect) authentication method. Okta acts as the OP (OpenID Provider) and Unqork is the RP (Relying Party). You'll set up your OIDC configuration on Unqork's Single Sign-On (SSO) Management page.
You can set up SSO configurations for:
Express View access: For authentication into the front-end of an application in your environment.
Designer access: For authentication in your Unqork environment, known as Designer.
This article shows you how to set up a OIDC configuration using Okta as the SSO provider in Express View.
To connect Okta to your Unqork application as an SSO provider, your Okta administrator needs to set up a new Okta app integration. To learn more, see Okta's Create an OIDC app integration using AIW article here: https://help.okta.com/en/prod/Content/Topics/Apps/Apps_App_Integration_Wizard_OIDC.htm. The app integration should follow the instructions for configuring OIDC settings for a web app. While your Unqork application might sometimes resemble a single-page app, it isn't. So, you don't need to use PKCE (Proof Key for Code Exchange) Client Authentication in your configuration.
How Settings Map Between Okta and Unqork
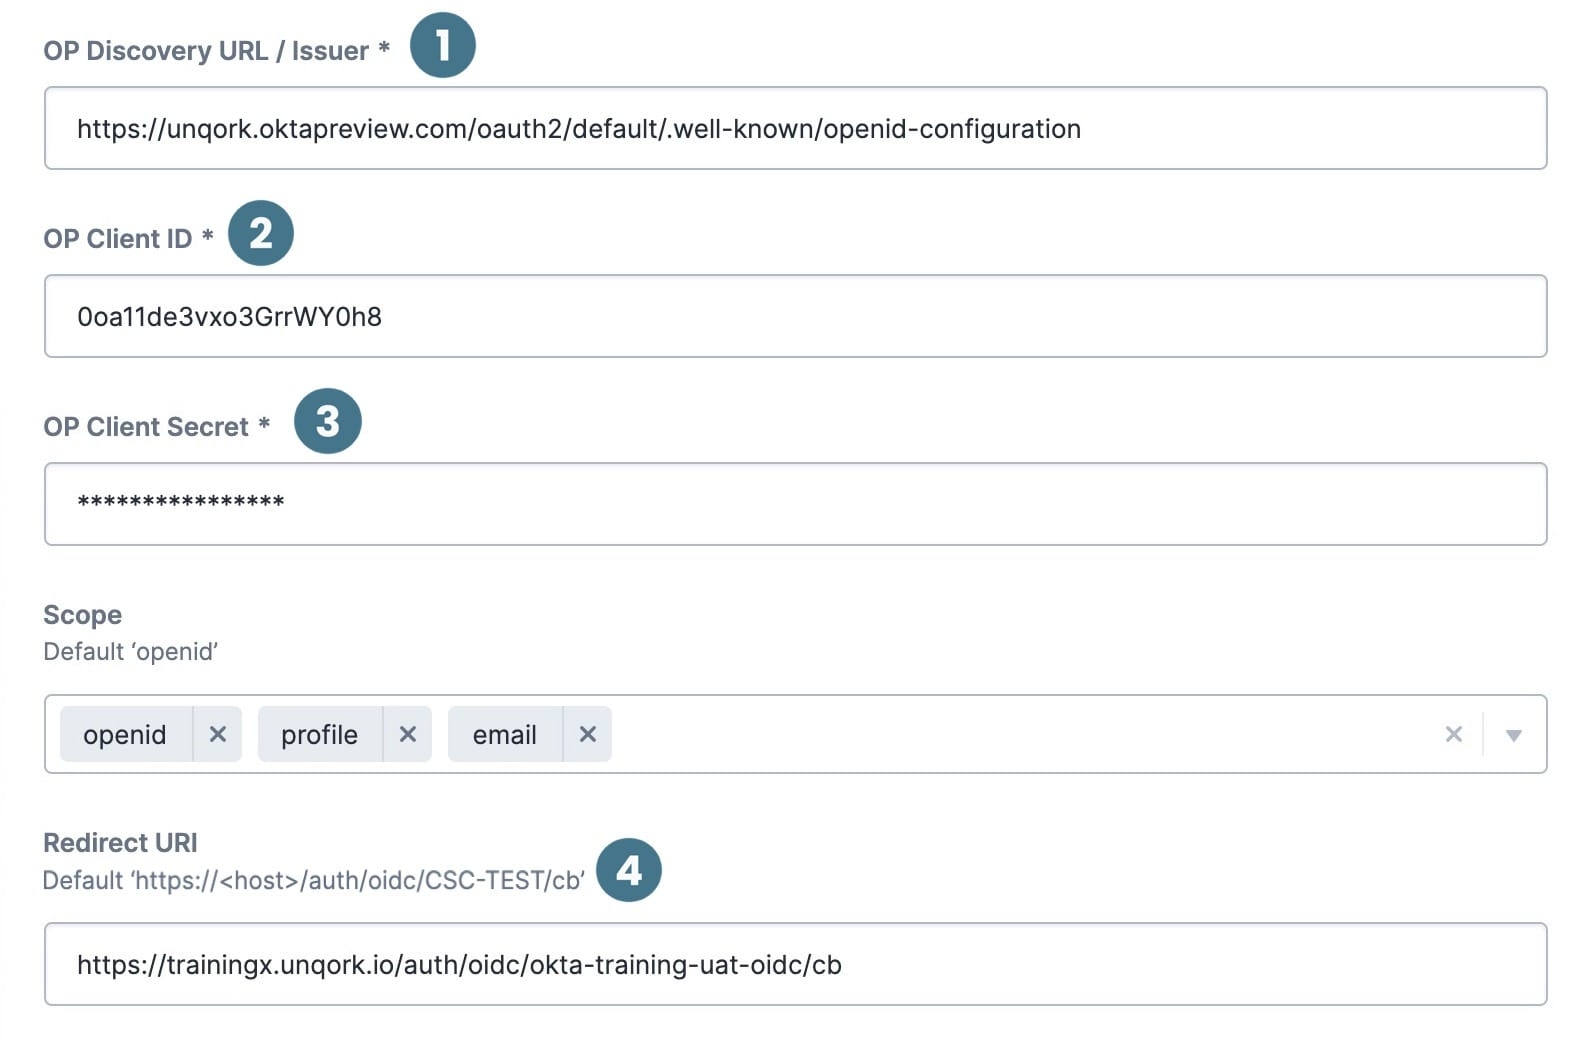
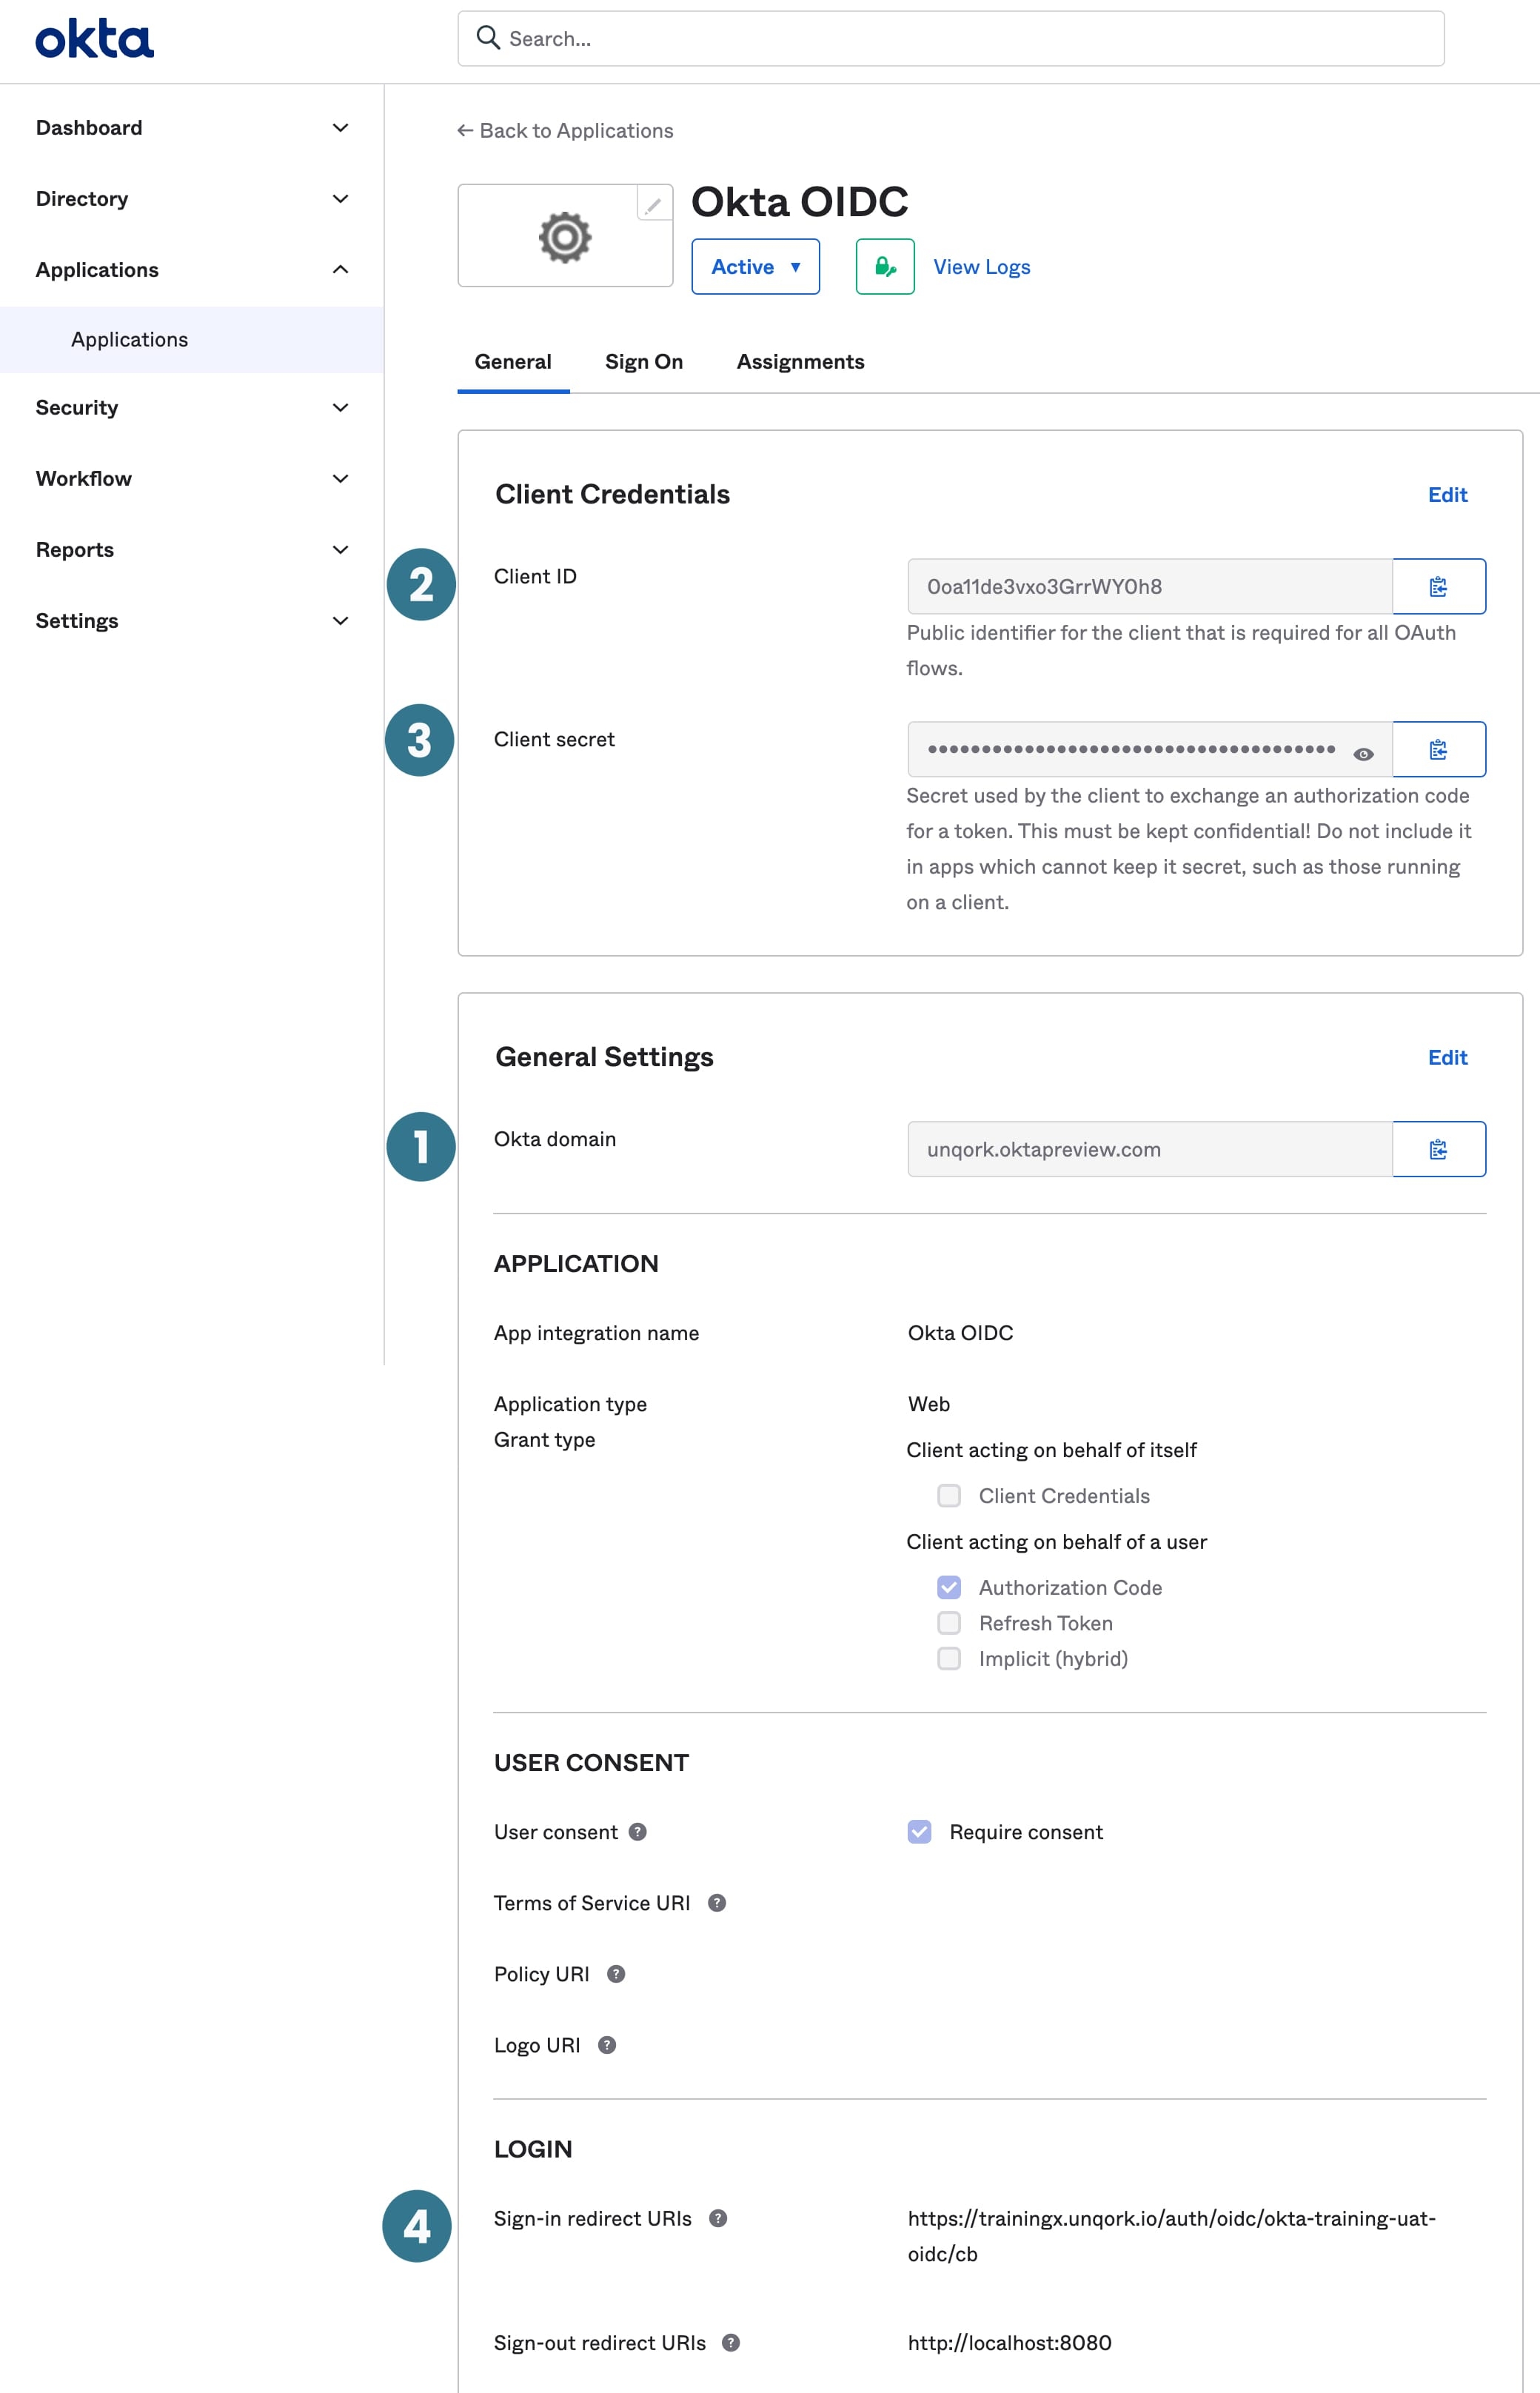
In the following table and images, you can see how key OIDC configuration settings in Okta map to the OIDC configuration fields in Unqork.
# | Unqork Setting | Related Okta Setting |
|---|---|---|
1 | OIDC OP Discovery URL/Issuer | Okta Domain
|
2 | OIDC OP Client ID | Client ID |
3 | OIDC OP Client Secret | Client Secret |
4 | Redirect URI | Sign-In Redirect URIs |
Setting Up Okta as an OIDC Configuration in Administration
This is a step-by-step walkthrough of how to set up Okta as an OIDC configuration. This is just one example of how you might configure Okta for SSO in Express View. This approach ensures Okta is the single source of truth for your end-user's permissions.
To learn more about all the OIDC configuration settings in Environment Administration, visit our OpenID Connect (OIDC) article. To learn more about using the Single Sign-On (SSO) Management dashboard, view our Single Sign-On (SSO) Management article.
What You Need
For this sample configuration, you need the following information:
The Okta Domain.
The Client ID.
The Client Secret.
A list of scopes to request access to.
A list of claims to map to Unqork attributes.
Your specific values for each setting vary based on your use case. Work with the Okta administrator to ensure both sides are clear on what information your application needs to access.
To add an OIDC configuration to your environment:
Start the Configuration
At the top right of the Unqork Designer Platform, click the Administration.
Under Environment, select Single Sign-On (SSO).
Click + New SSO.
From the + New SSO drop-down, select Express.
Basic Information Tab
The Basic Information tab is the first tab you see when the New Express SSO configuration modal opens. In this tab, you name your configuration and assign end-user permissions.
To add basic information to your OIDC configuration:
In the SSO Name field, enter a unique name for your configuration.
From the Default Role drop-down, select a role.
When setting up SSO for Express View, select a default role with the lowest-level permissions. This lets you rely on the value stored in Okta to determine higher-level permissions.
From the Default Groups list, select one or more groups.
Adding Default Groups is optional. By default, no groups are selected.
Click Next.
You progress from the Basic Information tab to the Configure Protocol tab.
Configure Protocol Tab
Now, select the OIDC protocol from the Configure Protocol tab and set up the OIDC configuration. These settings are fairly standard and tend to have predictable values regardless of your use case. However, be mindful of listing the appropriate scopes to give you access to the necessary claims in the JWT.
Select OIDC as the Protocol.
In the OP Discovery URL / Issuer field, enter https://<host>/oauth2/default/.well-known/openid-configuration.
To learn more about the well-known/openid-configuration endpoint in Okta, see the Okta developer documentation here: https://developer.okta.com/docs/reference/api/oidc/#well-known-openid-configuration.
In the OP Discovery URL / Issuer field, replace <host> with your Okta Domain.
In the OP Client ID field, enter your Client ID.
In the OP Client Secret field, enter your Client Secret.
From the Scope field, select or enter a scope. If the scope you want isn't in the default drop-down, type the scope in the Scope field and press Enter/Return or select Create {scope name}. You can add as many scopes as you want.
The default scope value is openid. But, it's best practice to still select openid in the Scope field.
The profile scope typically acts as the Okta profile, and contains associated key information. By default, the profile scope contains basic information about the user. But, the profile scope can include a more complex list of custom claims as well.
In the Redirect URI field, enter your environment-specific Redirect URI. In most cases, your value looks like this: https://<host>/auth/oidc/<OIDCname>/cb, where <host> is the domain of your environment and <OIDCname> is the name of your OIDC configuration.
The Redirect URI in Unqork must match the Sign-In Redirect URI in Okta.
Be sure to use the Express View-specific host value. For example unqork-uatx.unqork.io, not unqork-uat.unqork.io.×
Click Next.
You progress from the Configure Protocol tab to the Attribute Mapping tab.
The Configure Protocol tab has several advanced settings you can enable. To access these settings, click Show Advanced Settings. Whether or not you need to adjust these settings depends on your use case. For this Okta configuration, using any Advanced Settings is not required. Visit the OpenID Connect (OIDC) article for more information.
Attribute Mapping Tab
Next, map claims in the JWT sent by the OP to Unqork attributes in the session's currentUser object. For example, mapping the OP-provided email address to the Unqork attribute email.
You can create dynamic, conditional, or static attribute mappings. See the Creating Attribute Mappings section in our OpenID Connect (OIDC) article for more information and detailed examples.
To add an attribute mapping:
By default, the Attribute Mapping tab includes the mapping {{sub}} to userId. Do not delete this mapping or your SSO configuration can fail.
Click + Add Attribute Mapping.
Complete the OIDC Claim side of the mapping.
From the Unqork Attribute drop-down, select a default Unqork attribute. Or, enter the attribute's name in the Unqork Attribute field then press Enter/Return or select Create {scope name}.
Repeat the above steps as needed.
User Management
These user management settings are more variable and highly dependent on your unique use case. However, in this configuration Okta is the single source of truth for authentication. Which means the user doesn't need to exist in Unqork, as Unqork isn't acting as the user management system. So, consider the following settings:
Click Show User Management.
Verify Disable New User Creation is selected.
Click Create SSO.
Verify the SSO configuration in Environment Administration matches the SSO configuration in Single Sign-On (SSO) Management. If you are encountering issues, visit the Troubleshooting Tips section below.
Your SSO configuration is now complete. The configuration modal closes and returns your focus to the Single Sign-On (SSO) Management dashboard.
Testing Your Configuration
You're ready to test your configuration.
You need a set of test credentials from the Okta administrator. The test user must be assigned to the app integration in Okta, under the Assignments tab.
At the top right of the Unqork Designer Platform, click Administration.
Under Environment, select Single Sign-On (SSO).
In the SSO dashboard, find the SSO configuration to preview.
Under the Actions column, click Manage.
From the Manage drop-down, right-click Preview.
Click Open Link in Incognito Window.
By default, the Unqork entrypoint URL uses 123 as the module ID. To test access to an actual module in your application, replace 123 at the end of the URL with your module's module ID.
Log in using your test credentials.
If you see an error page, there are issues with your configuration. If you can successfully log in to Unqork, your OIDC configuration of Okta as SSO provider is complete.
Troubleshooting Tips
Understanding what's causing an error is one of the most frustrating parts of creating a new configuration. One of the most common sources of error is not using the Express View-specific host value in the OIDC Redirect URI field.