Overview
For this how-to guide, you need to configure an application to consume a DocuSign Connect webhook. This example consists of 3 items:
A Submission Schema module that creates submissions using a webhook. This module is already built-out here: https://training.unqork.io/#/form/5f134166c96ba3020cfa4c73/edit. This module creates webhook submissions.
A Listener module that connects to the DocuSign Connect webhook.
A DocuSign demo developer account with valid API credentials.
You'll build the Listener modules in this how-to guide.
To learn more about integrating DocuSign at Unqork, search DocuSign Module Integration Template in our In-Product Help.
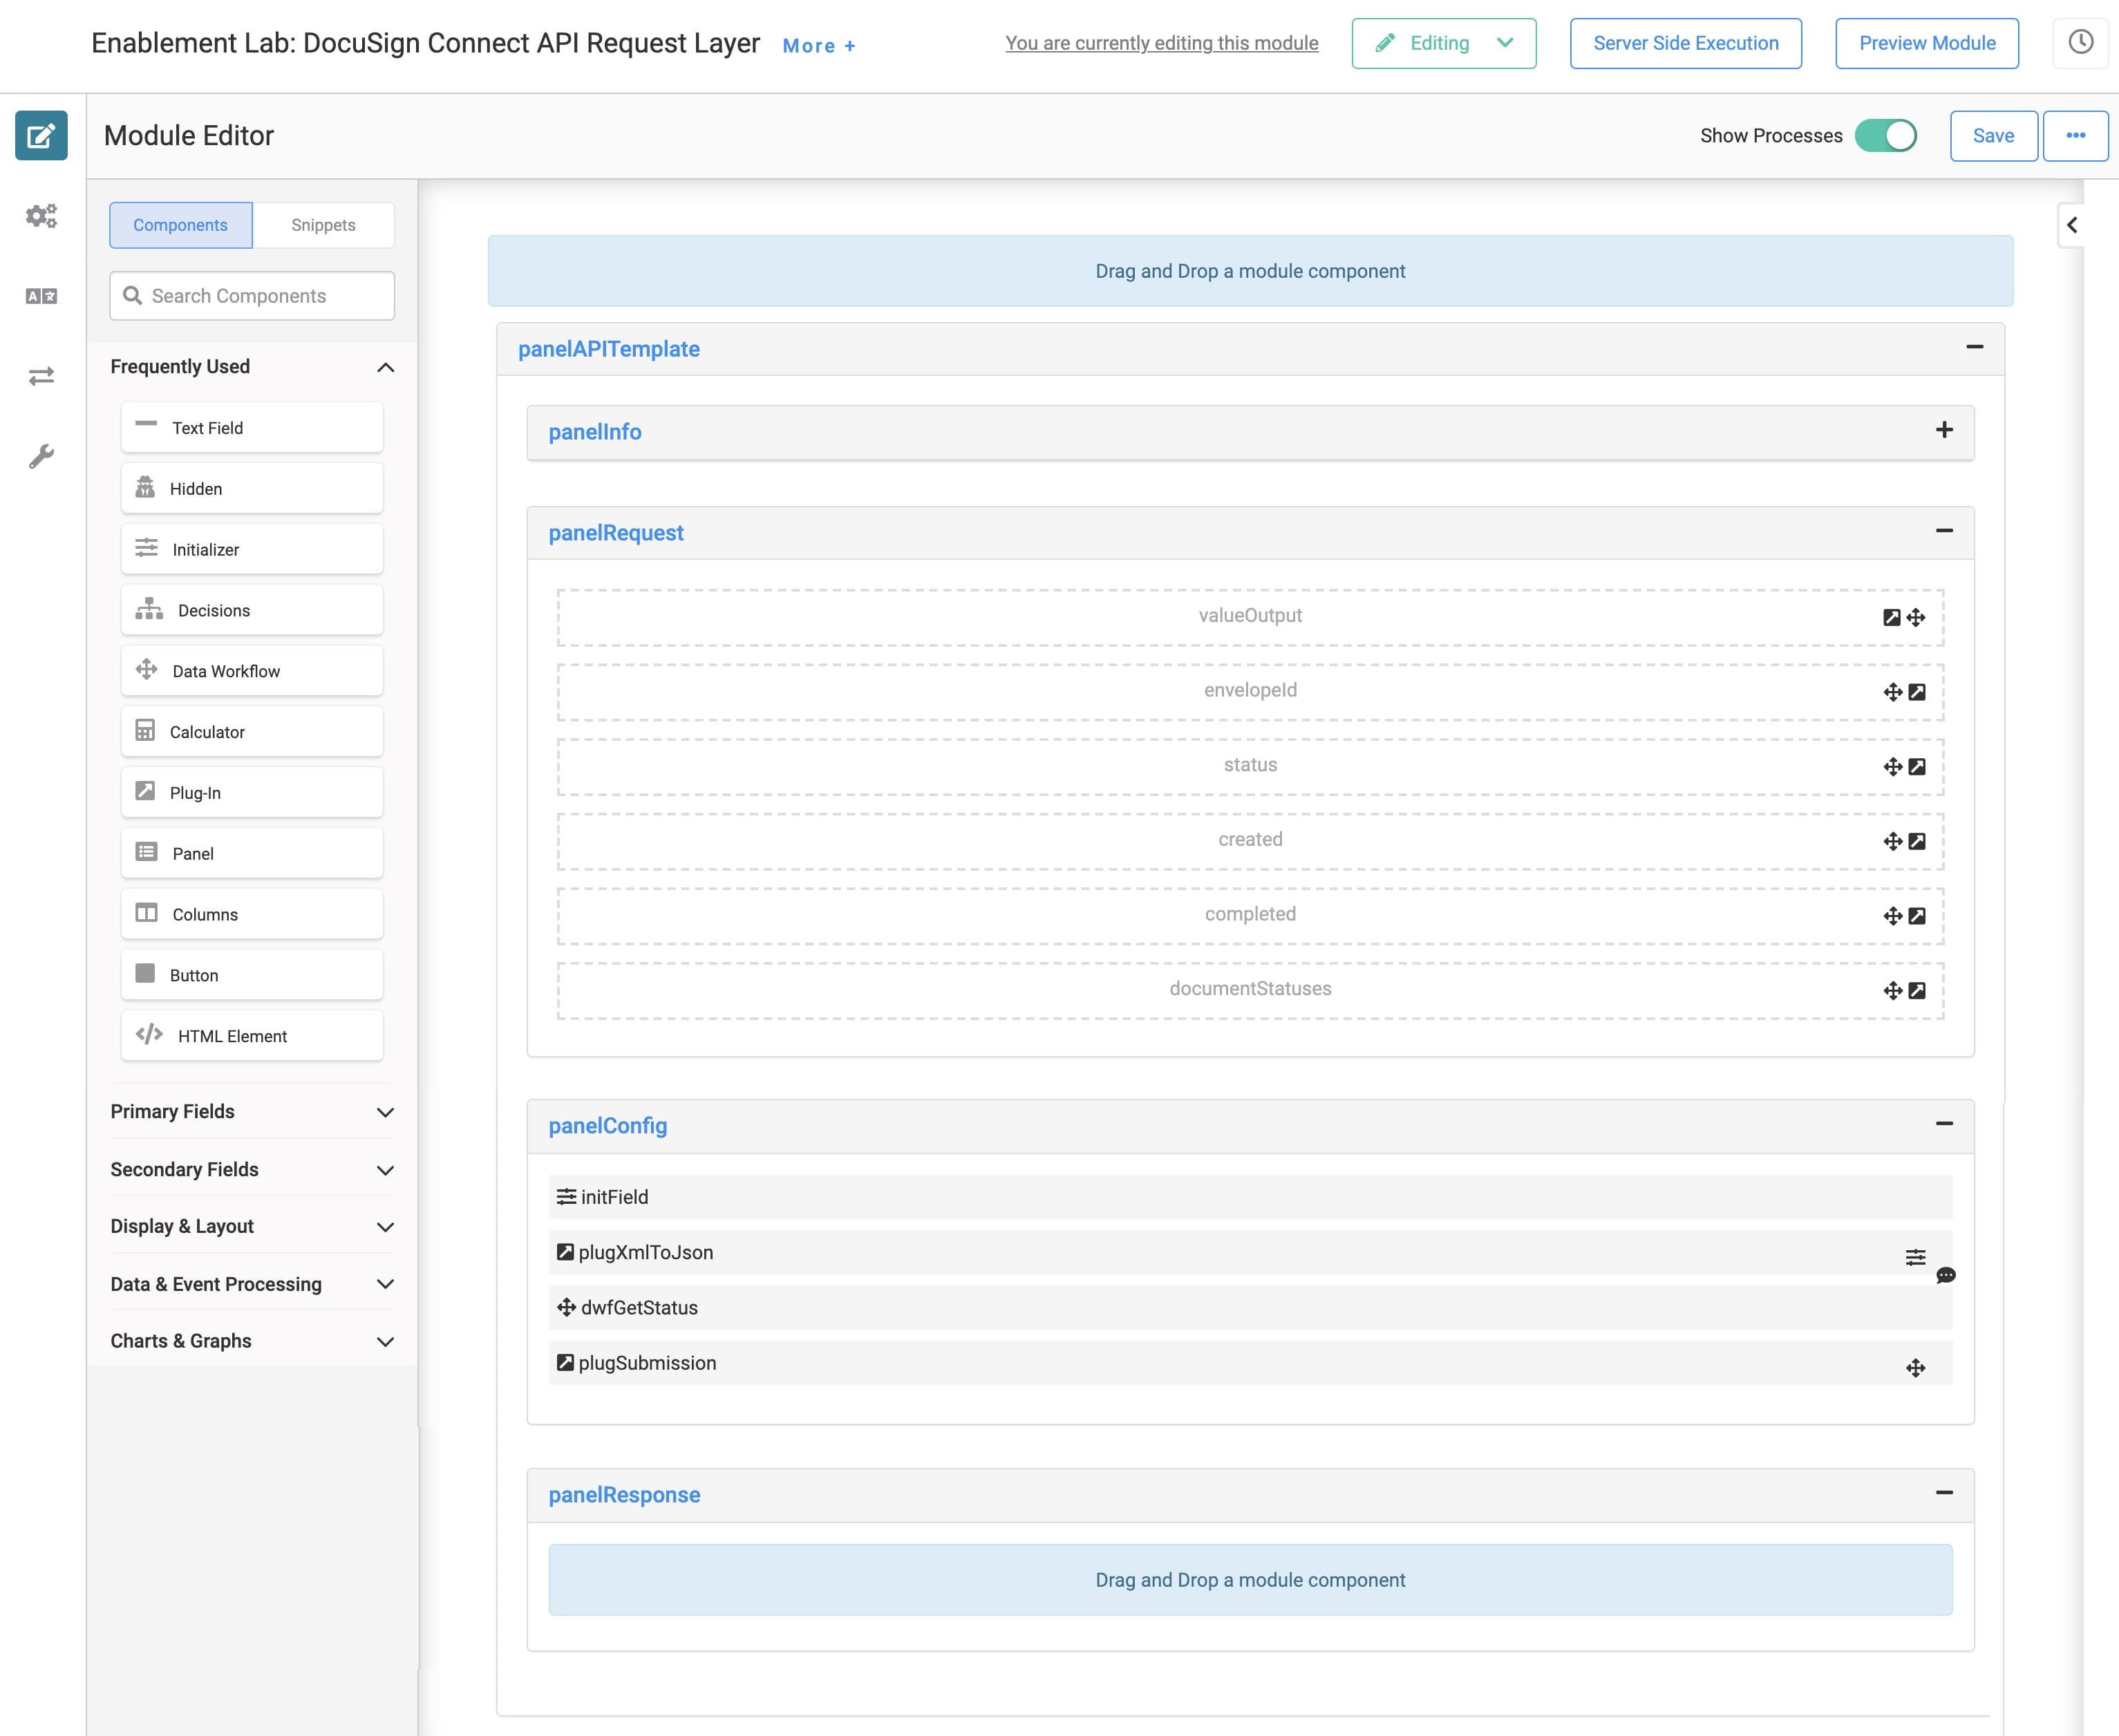
Here's how the completed Listener module looks in the Module Builder:
What You'll Learn
In this how-to guide, you'll create a module that accepts a DocuSign Connect webhook.
What You Need
To set up the Listener module, you need:
1 API (application programming interface) Specification snippet
6 Hidden components
2 Plug-In components
1 Initializer component
1 Data Workflow component
To set up the Listener module's Data Workflow, you need:
1 Input operator
6 Get operators
6 Output operators
1 Create Value operator
Configuration
Configure the Listener Module
First, you need to create the Listener module to connect with the DocuSign Connect webhook. When the Listener module receives the webhook request, the module runs. To build the Listener module using API best practices, begin with the API Specification snippet.
These instructions assume you have a workspace open, saved, and with a title.
To create the Listener module:
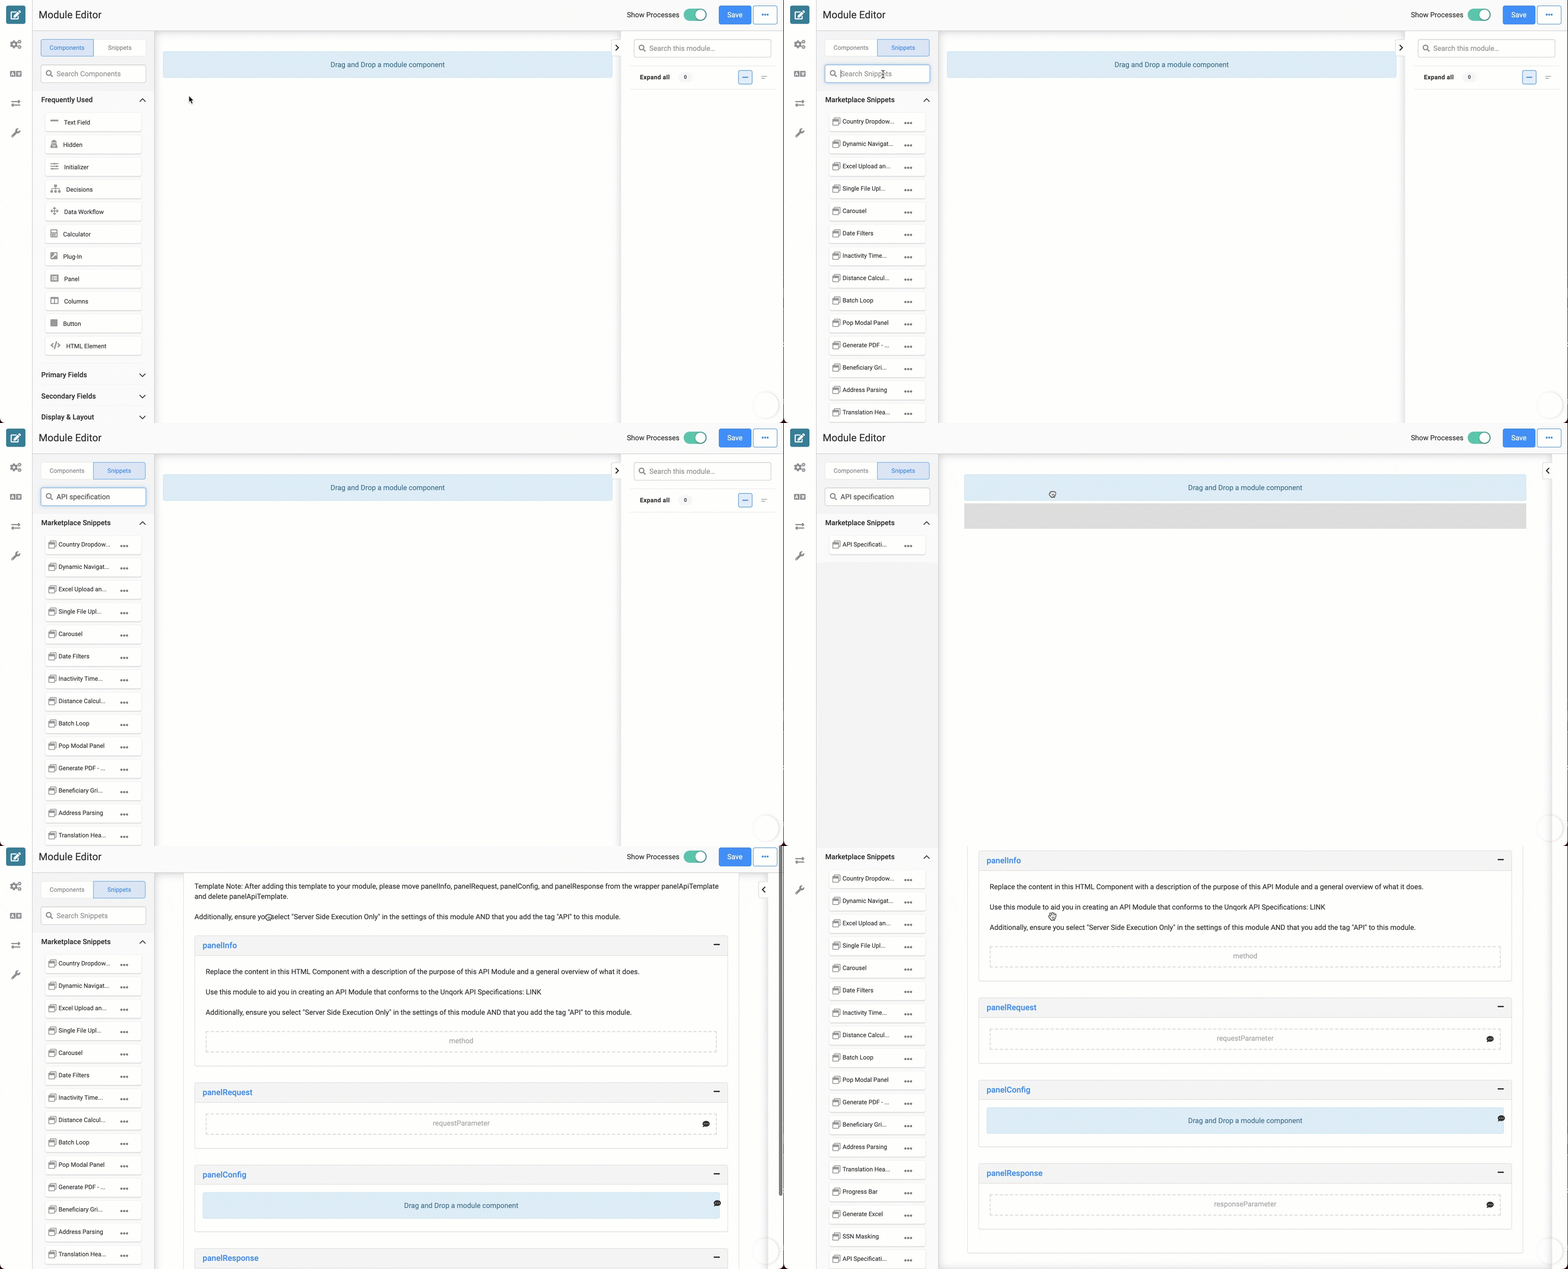
In the left sidebar of Module Builder, click the Snippets button.
In the Search Snippets field, enter API Specification.
Drag and drop the API Specification snippet onto your canvas.
Save your module.
Enable Execute via Proxy
Now you need to access the Module Settings to enable the Execute via Proxy endpoint for the webhook. You'll also set up Anonymous role permissions to Write. Once enabled, you can receive requests from your webhook service.
Avoid toggling the Act as Super-user when Server Side Executing to ON. This setting lets you use webhooks, but it weakens the security of your application.
In the Module Builder, hover over the left menu bar.
Click Settings.
Set the Server Side Execution Only toggle to ON.
Set Allow Access to Anonymous Users toggle to ON.
From the Anonymous role's Permission drop-down, select Write.
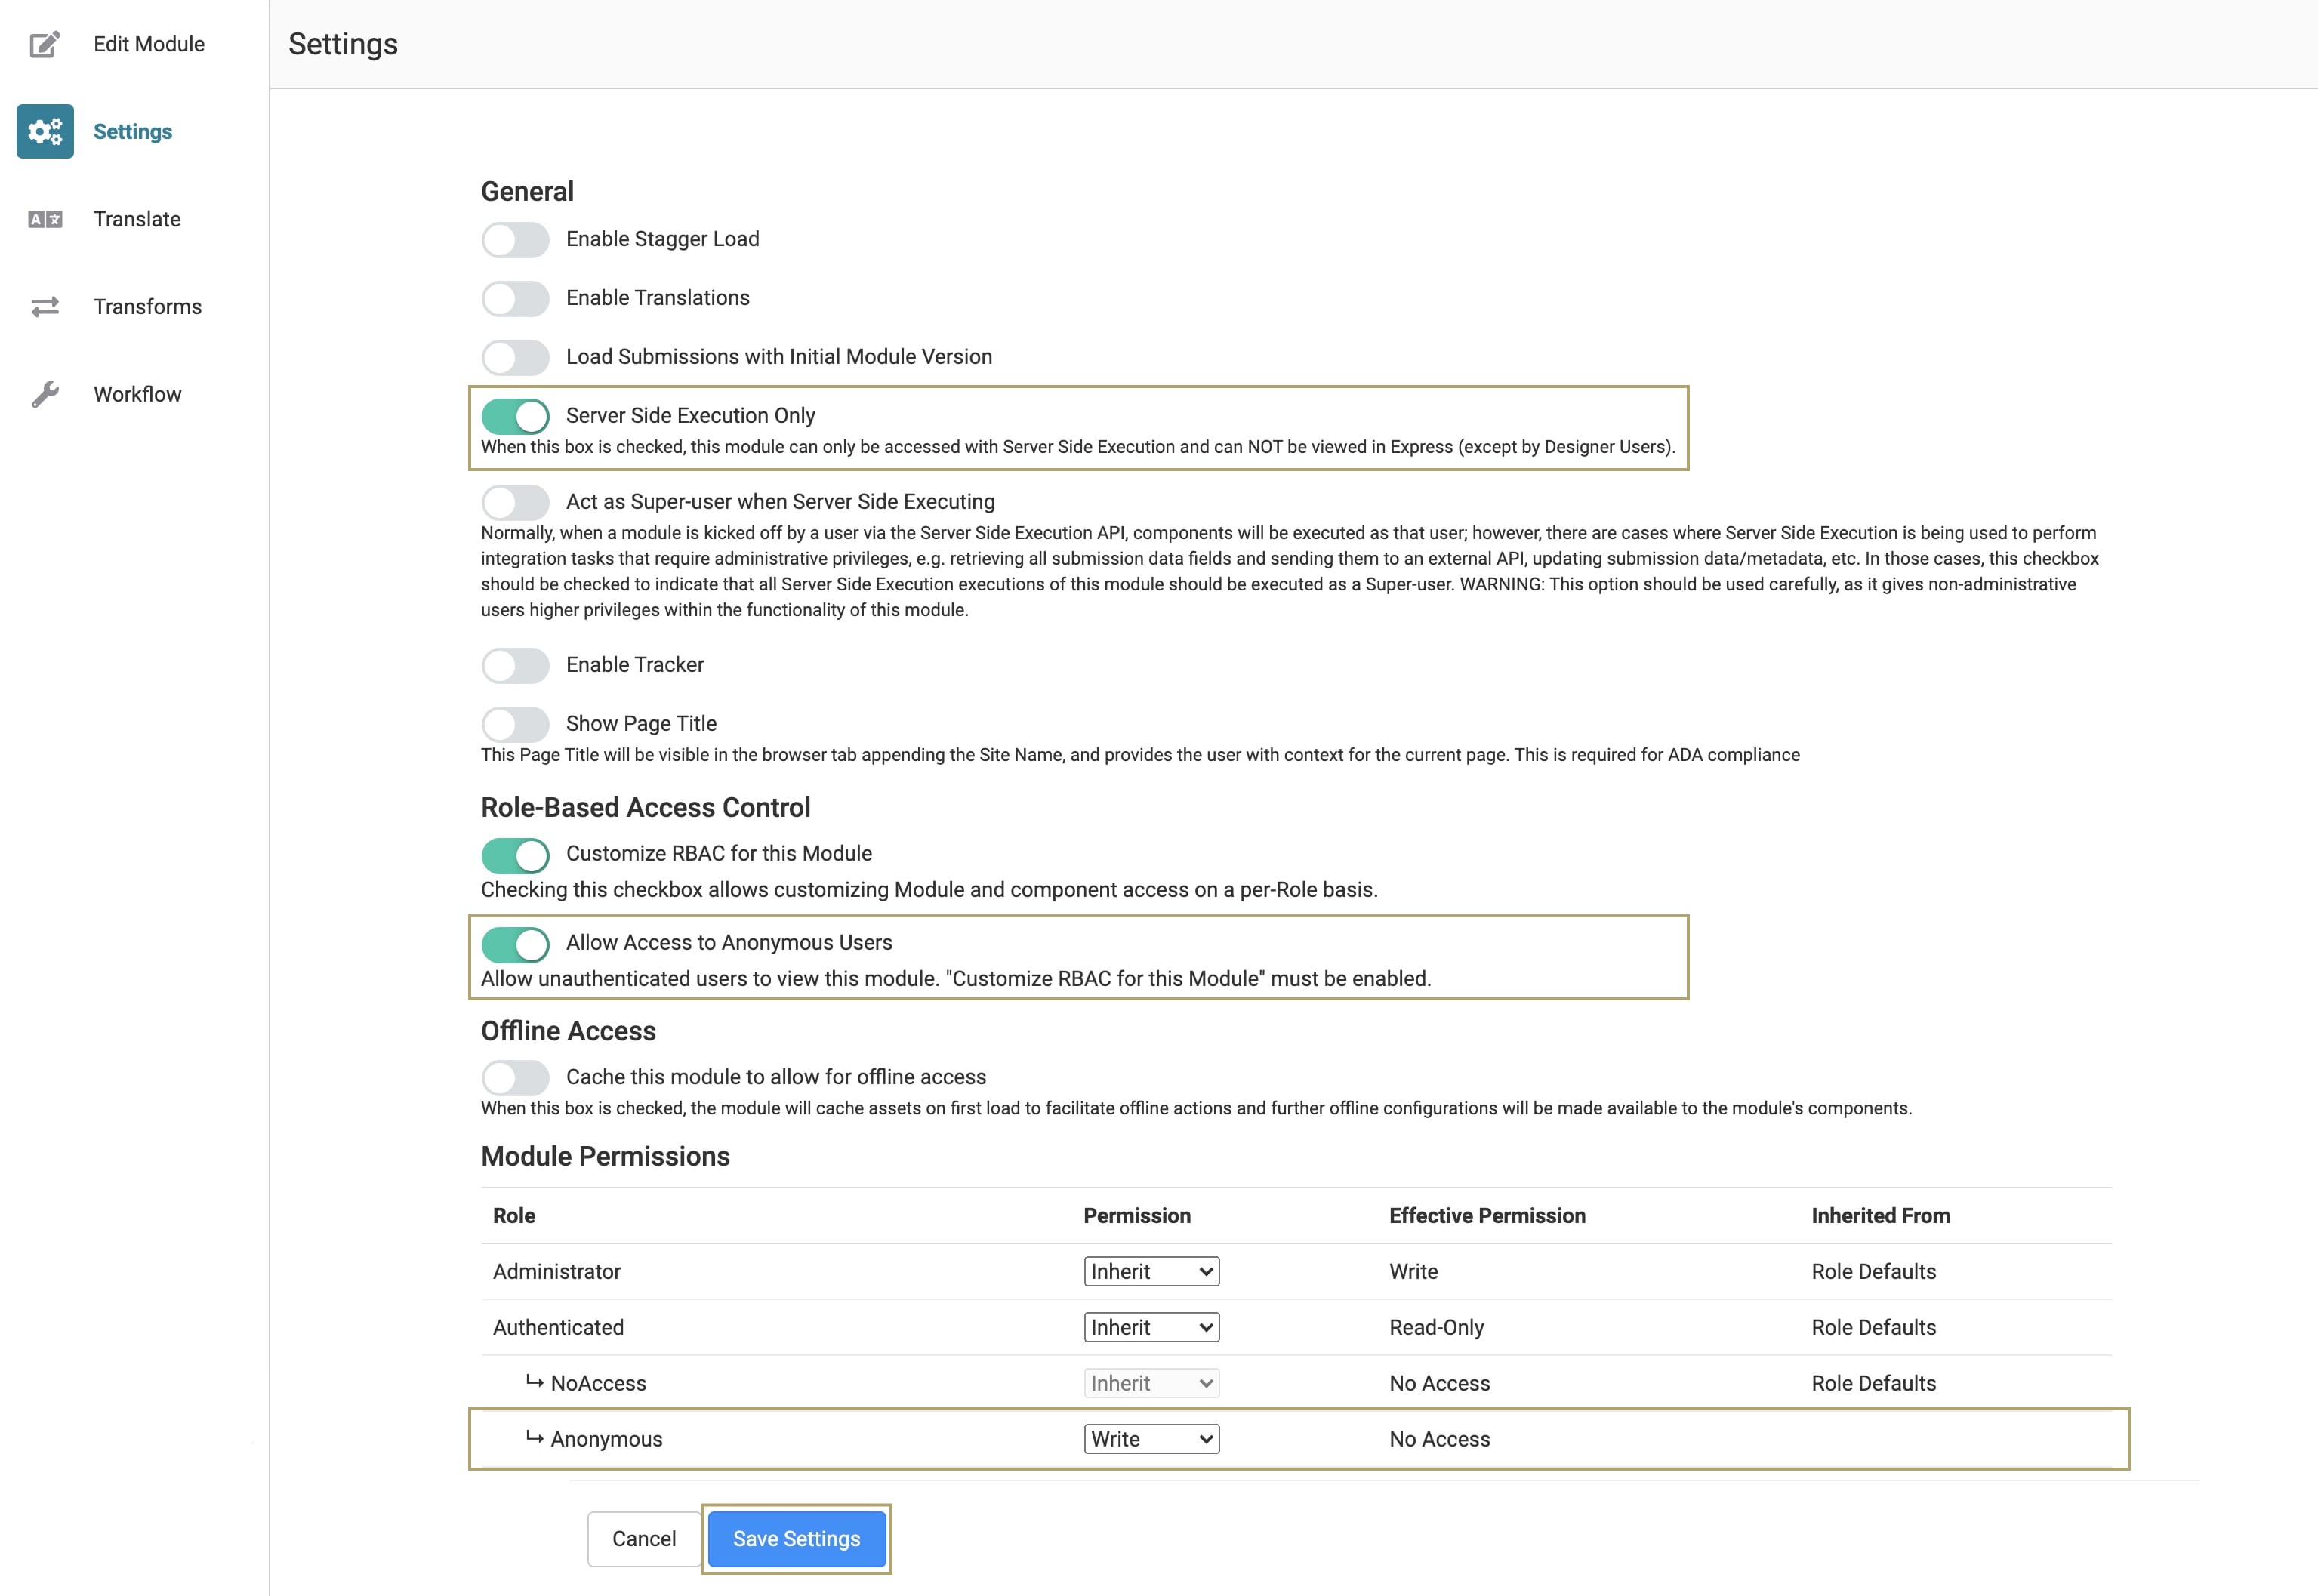
Click Save Settings.
Save your module.
Update the description HTML Element Component
The API Specification snippet contains an HTML Element component that describes the snippet's purpose. You can change this to display any information you want when building or using the webhook.
Hover over the description HTML Element component. You'll find this component in the panelInfo Panel component.
A 5-button toolbar displays above the component on hover-over.
In the toolbar, click the (Settings) button.
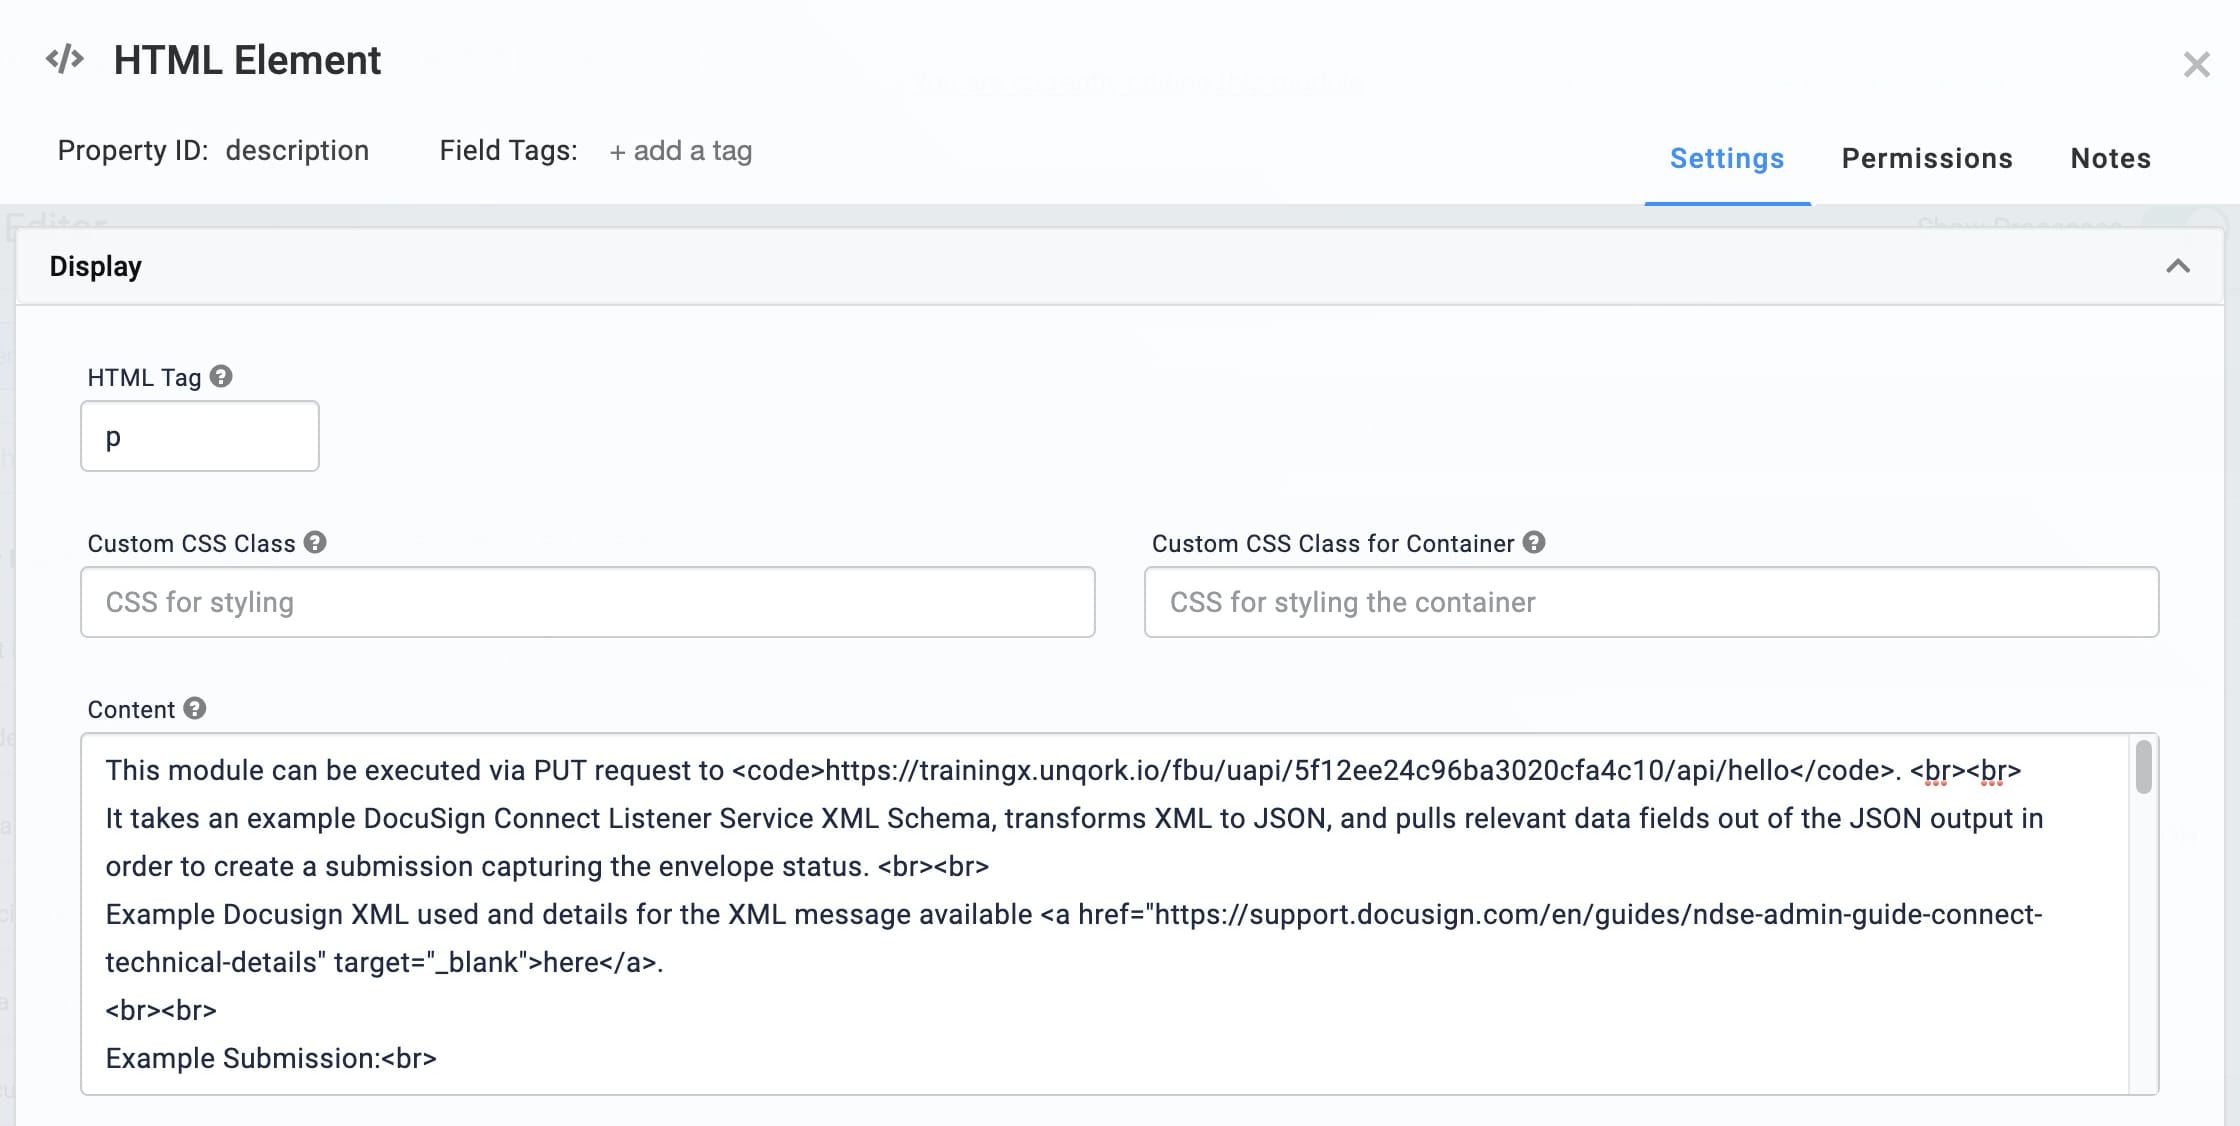
In the Display panel, enter a description in the webhook Content field. The image below shows an example of what that description looks like:
Click Save.
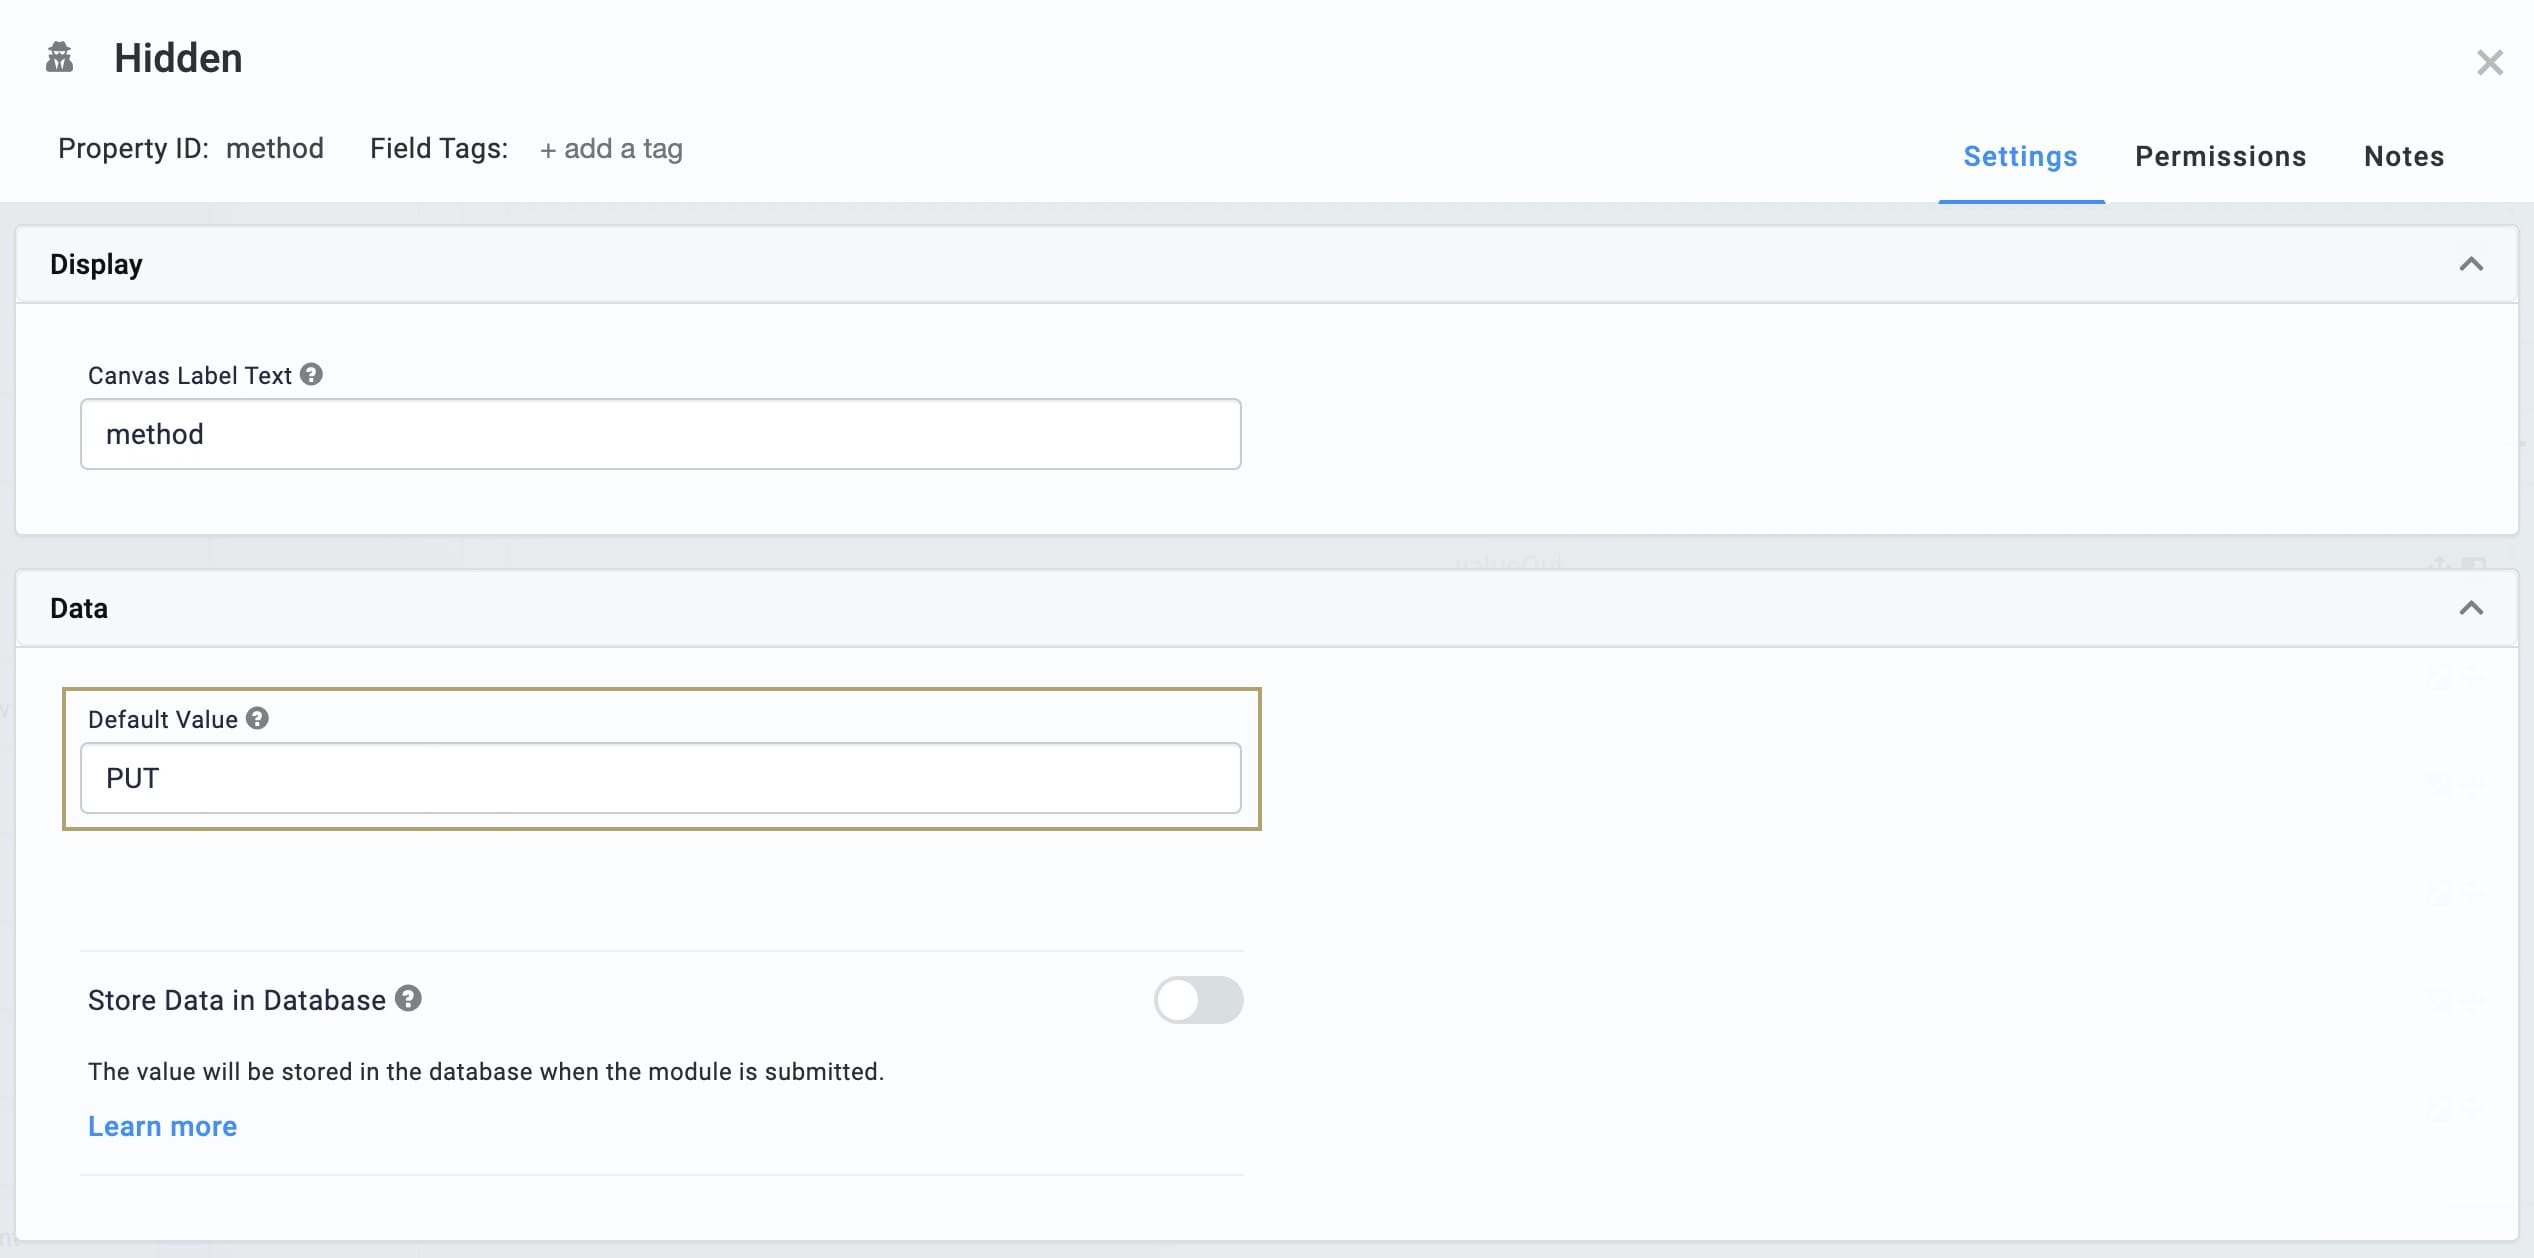
Update the method Hidden Component
Hover over the method Hidden component. You'll find this component in the panelInfo Panel component.
In the toolbar, click the (Settings) button.
In the Default Value field, enter PUT.
Click Save.
Configure the panelRequest Hidden Components
Next, add 6 Hidden components. The first holds the output from your pluginSubmission Plug-In component. The remaining Hidden components store the DocuSign envelope attributes. For this example, the attributes are envelope ID, status, created, completed, and document statuses.
Drag and drop 6 Hidden components onto the canvas. Place the Hidden components in the panelRequest Panel.
In the Property ID and Canvas Label Text fields, enter the following:
Property ID
Canvas Label Text
valueOut
valueOut
envelopeID
envelopeId
status
status
created
created
completed
completed
documentStatuses
documentStatuses
Save each component as you add it.
Configure the Initializer Component
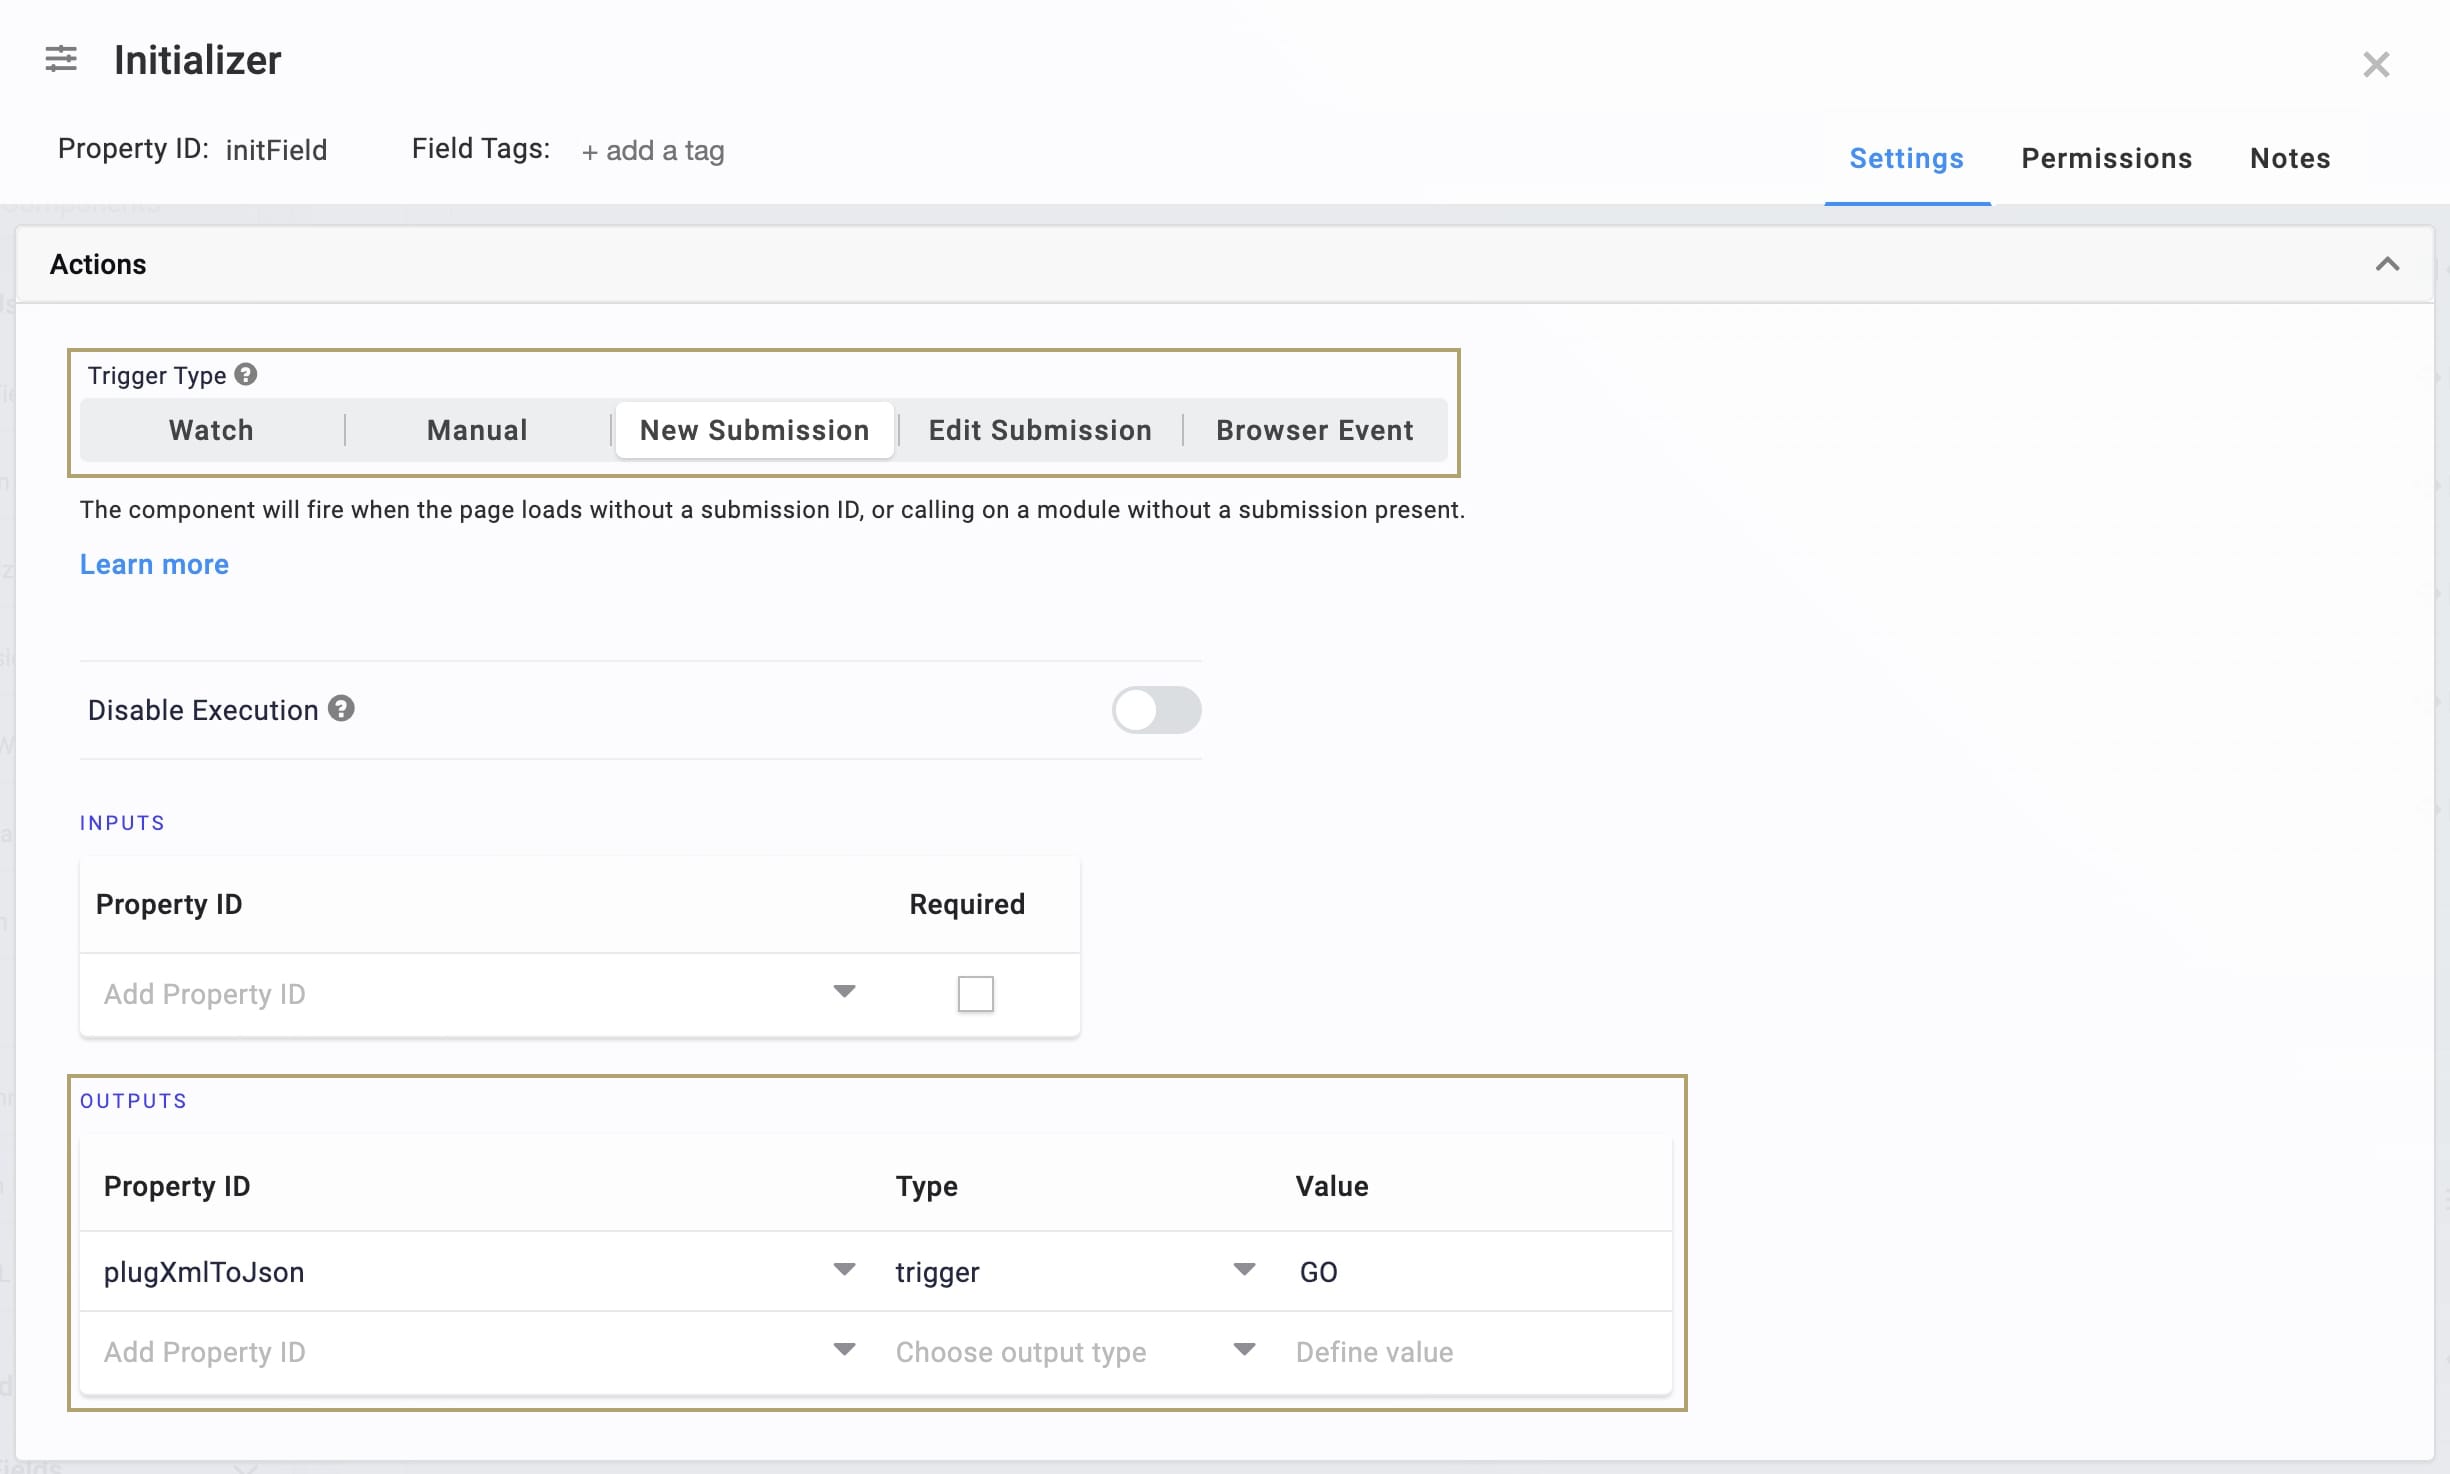
This Initializer component triggers the pluginXmlToJson Plug-In component. You'll set up this component next.
Drag and drop an Initializer component onto the canvas. Place the Initializer in the panelRequest panel.
In the Property ID and Canvas Label Text fields, enter initField.
Set the Trigger Type as New Submission.
In the Outputs table, enter the following:
Property ID
Type
Value
pluginXmlToJson
trigger
GO
Click Save.
Configure the pluginXmlToJson Plug-In Component
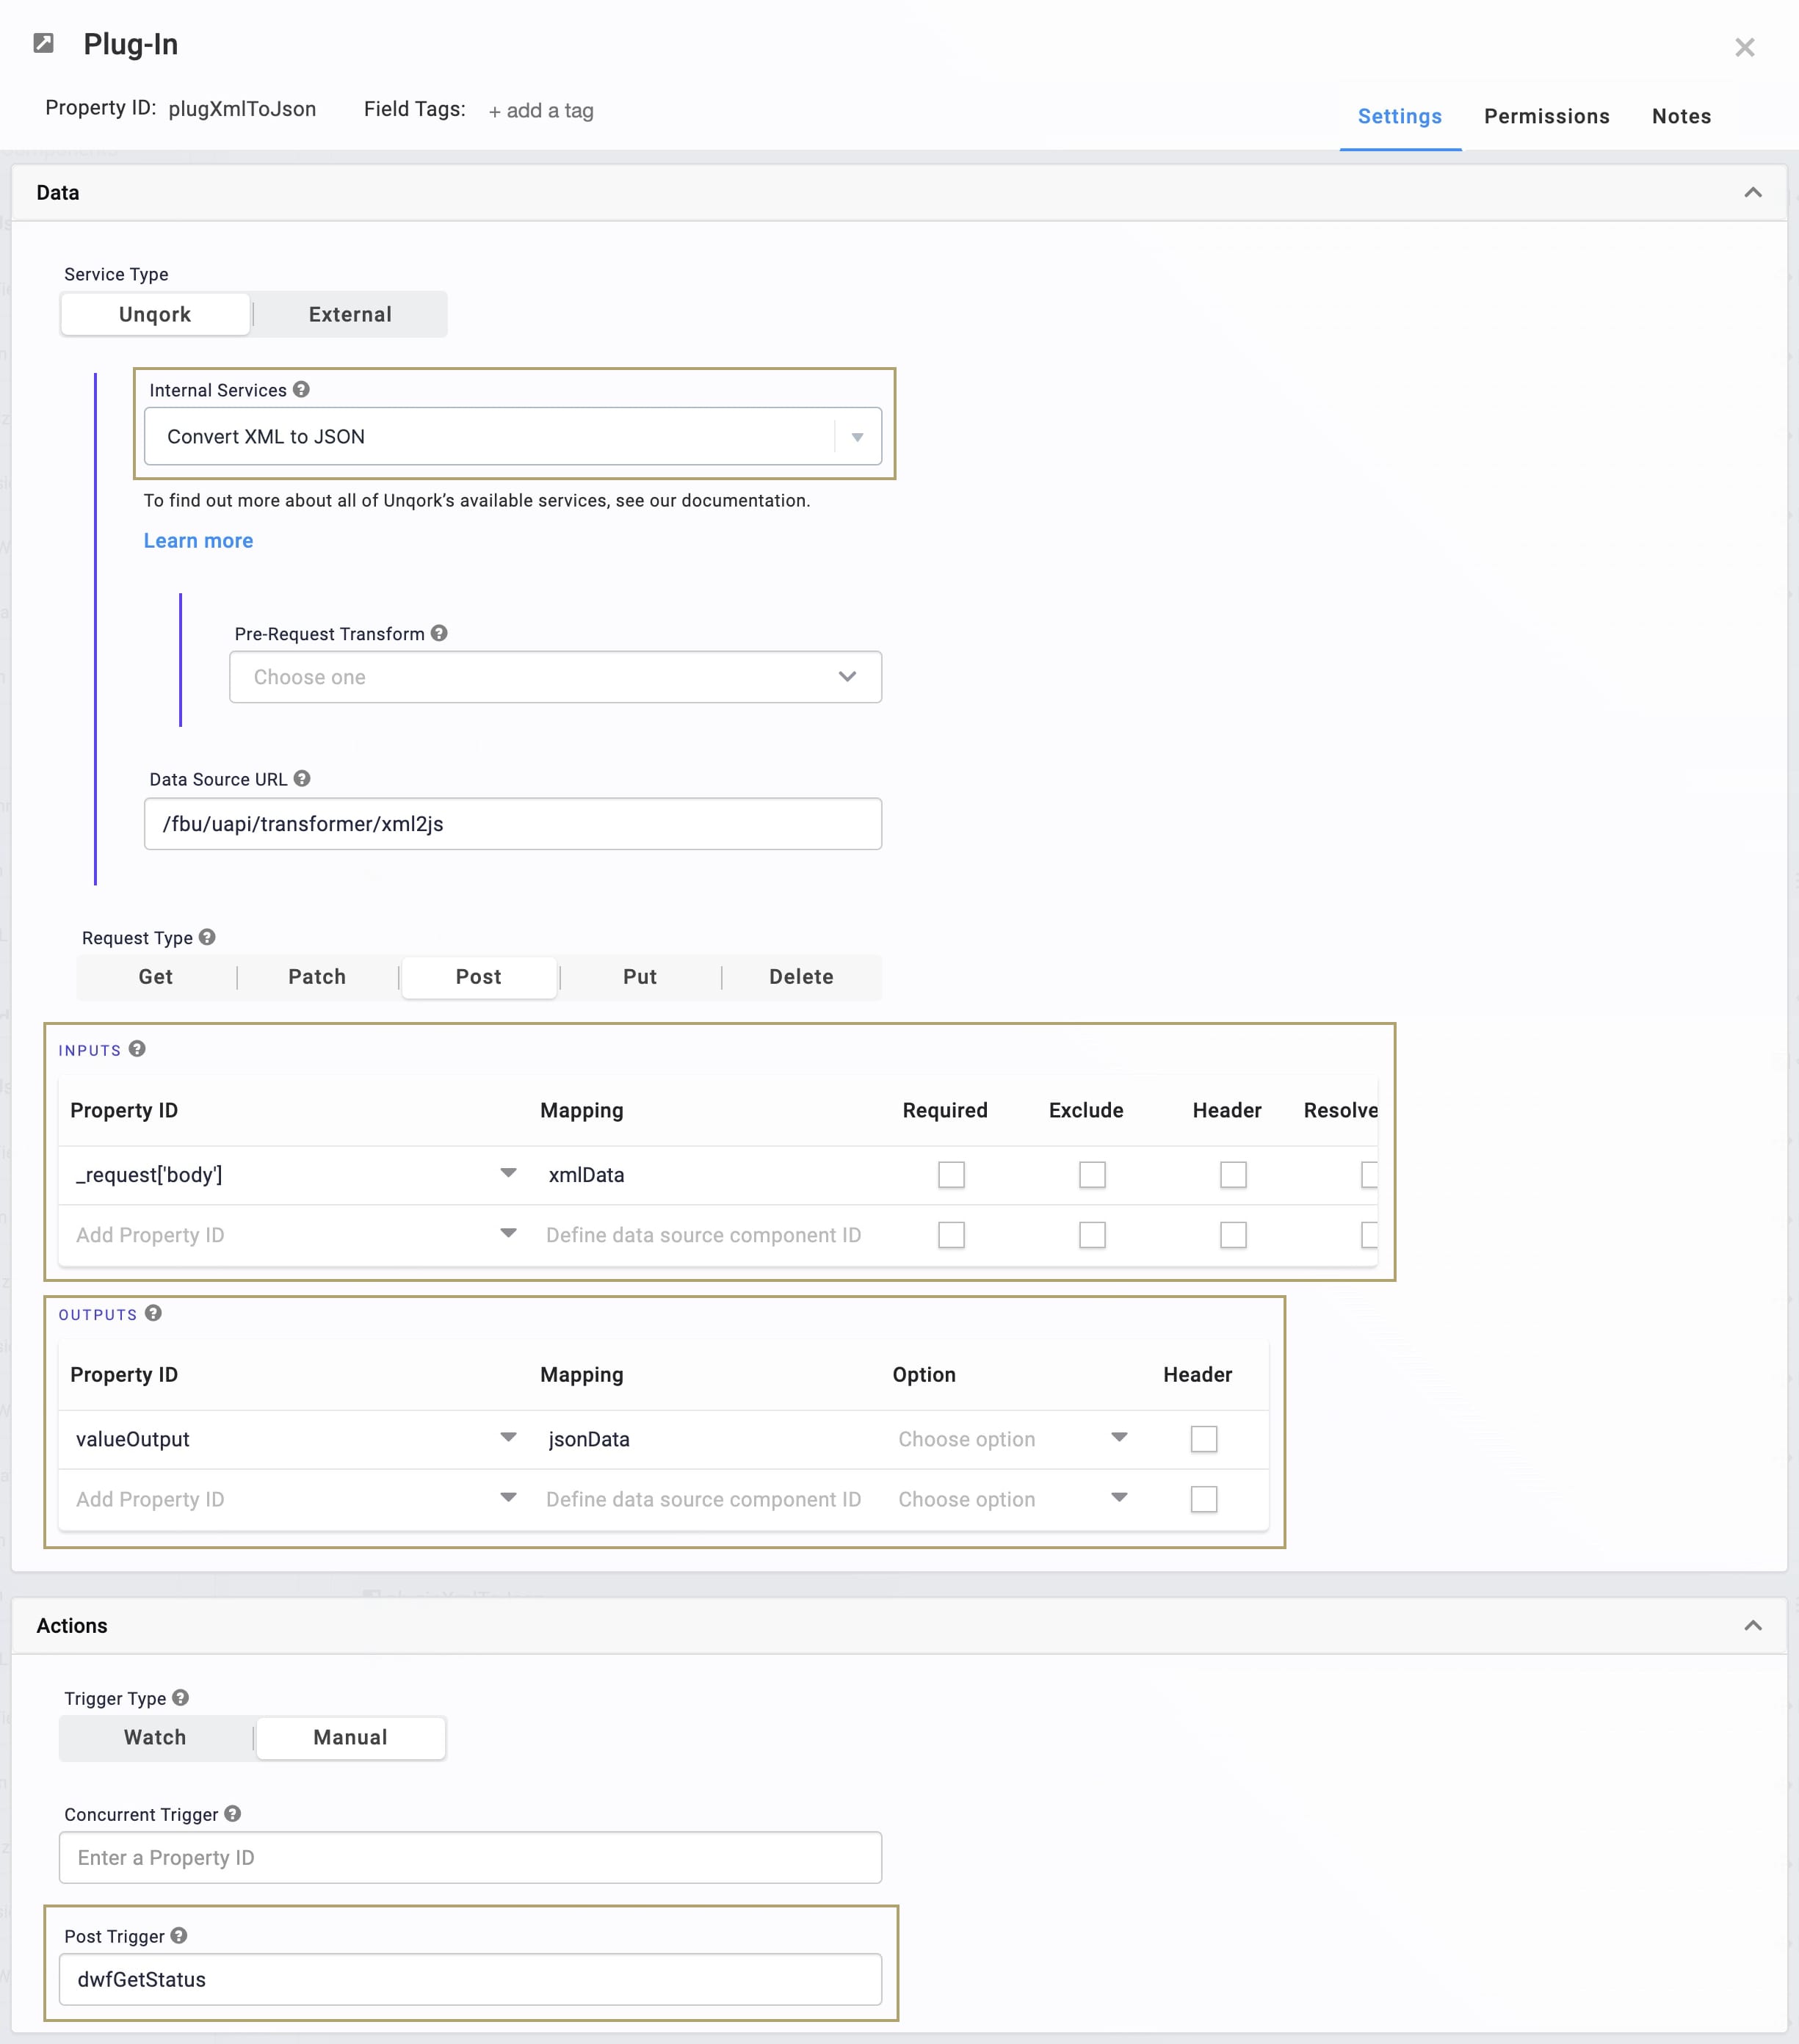
Now, add a Plug-In that imports XML data, converts it to JSON, and triggers the Data Workflow.
Drag and drop a Plug-In component onto the canvas. Place your Plug-In in the panelRequest panel, below the Initializer component.
In the Property ID and Canvas Label Text fields, enter plugXmlToJson.
From the Internal Services drop-down, select Convert XML to JSON.
In the Inputs table, enter the following:
Property ID
Mapping
_request['body']
xmlData
In the Outputs table, enter the following:
Property ID
Mapping
valueOut
jsonData
In the Post Trigger field, enter dwfGetStatus.
Click Save.
Configure the Data Workflow Component
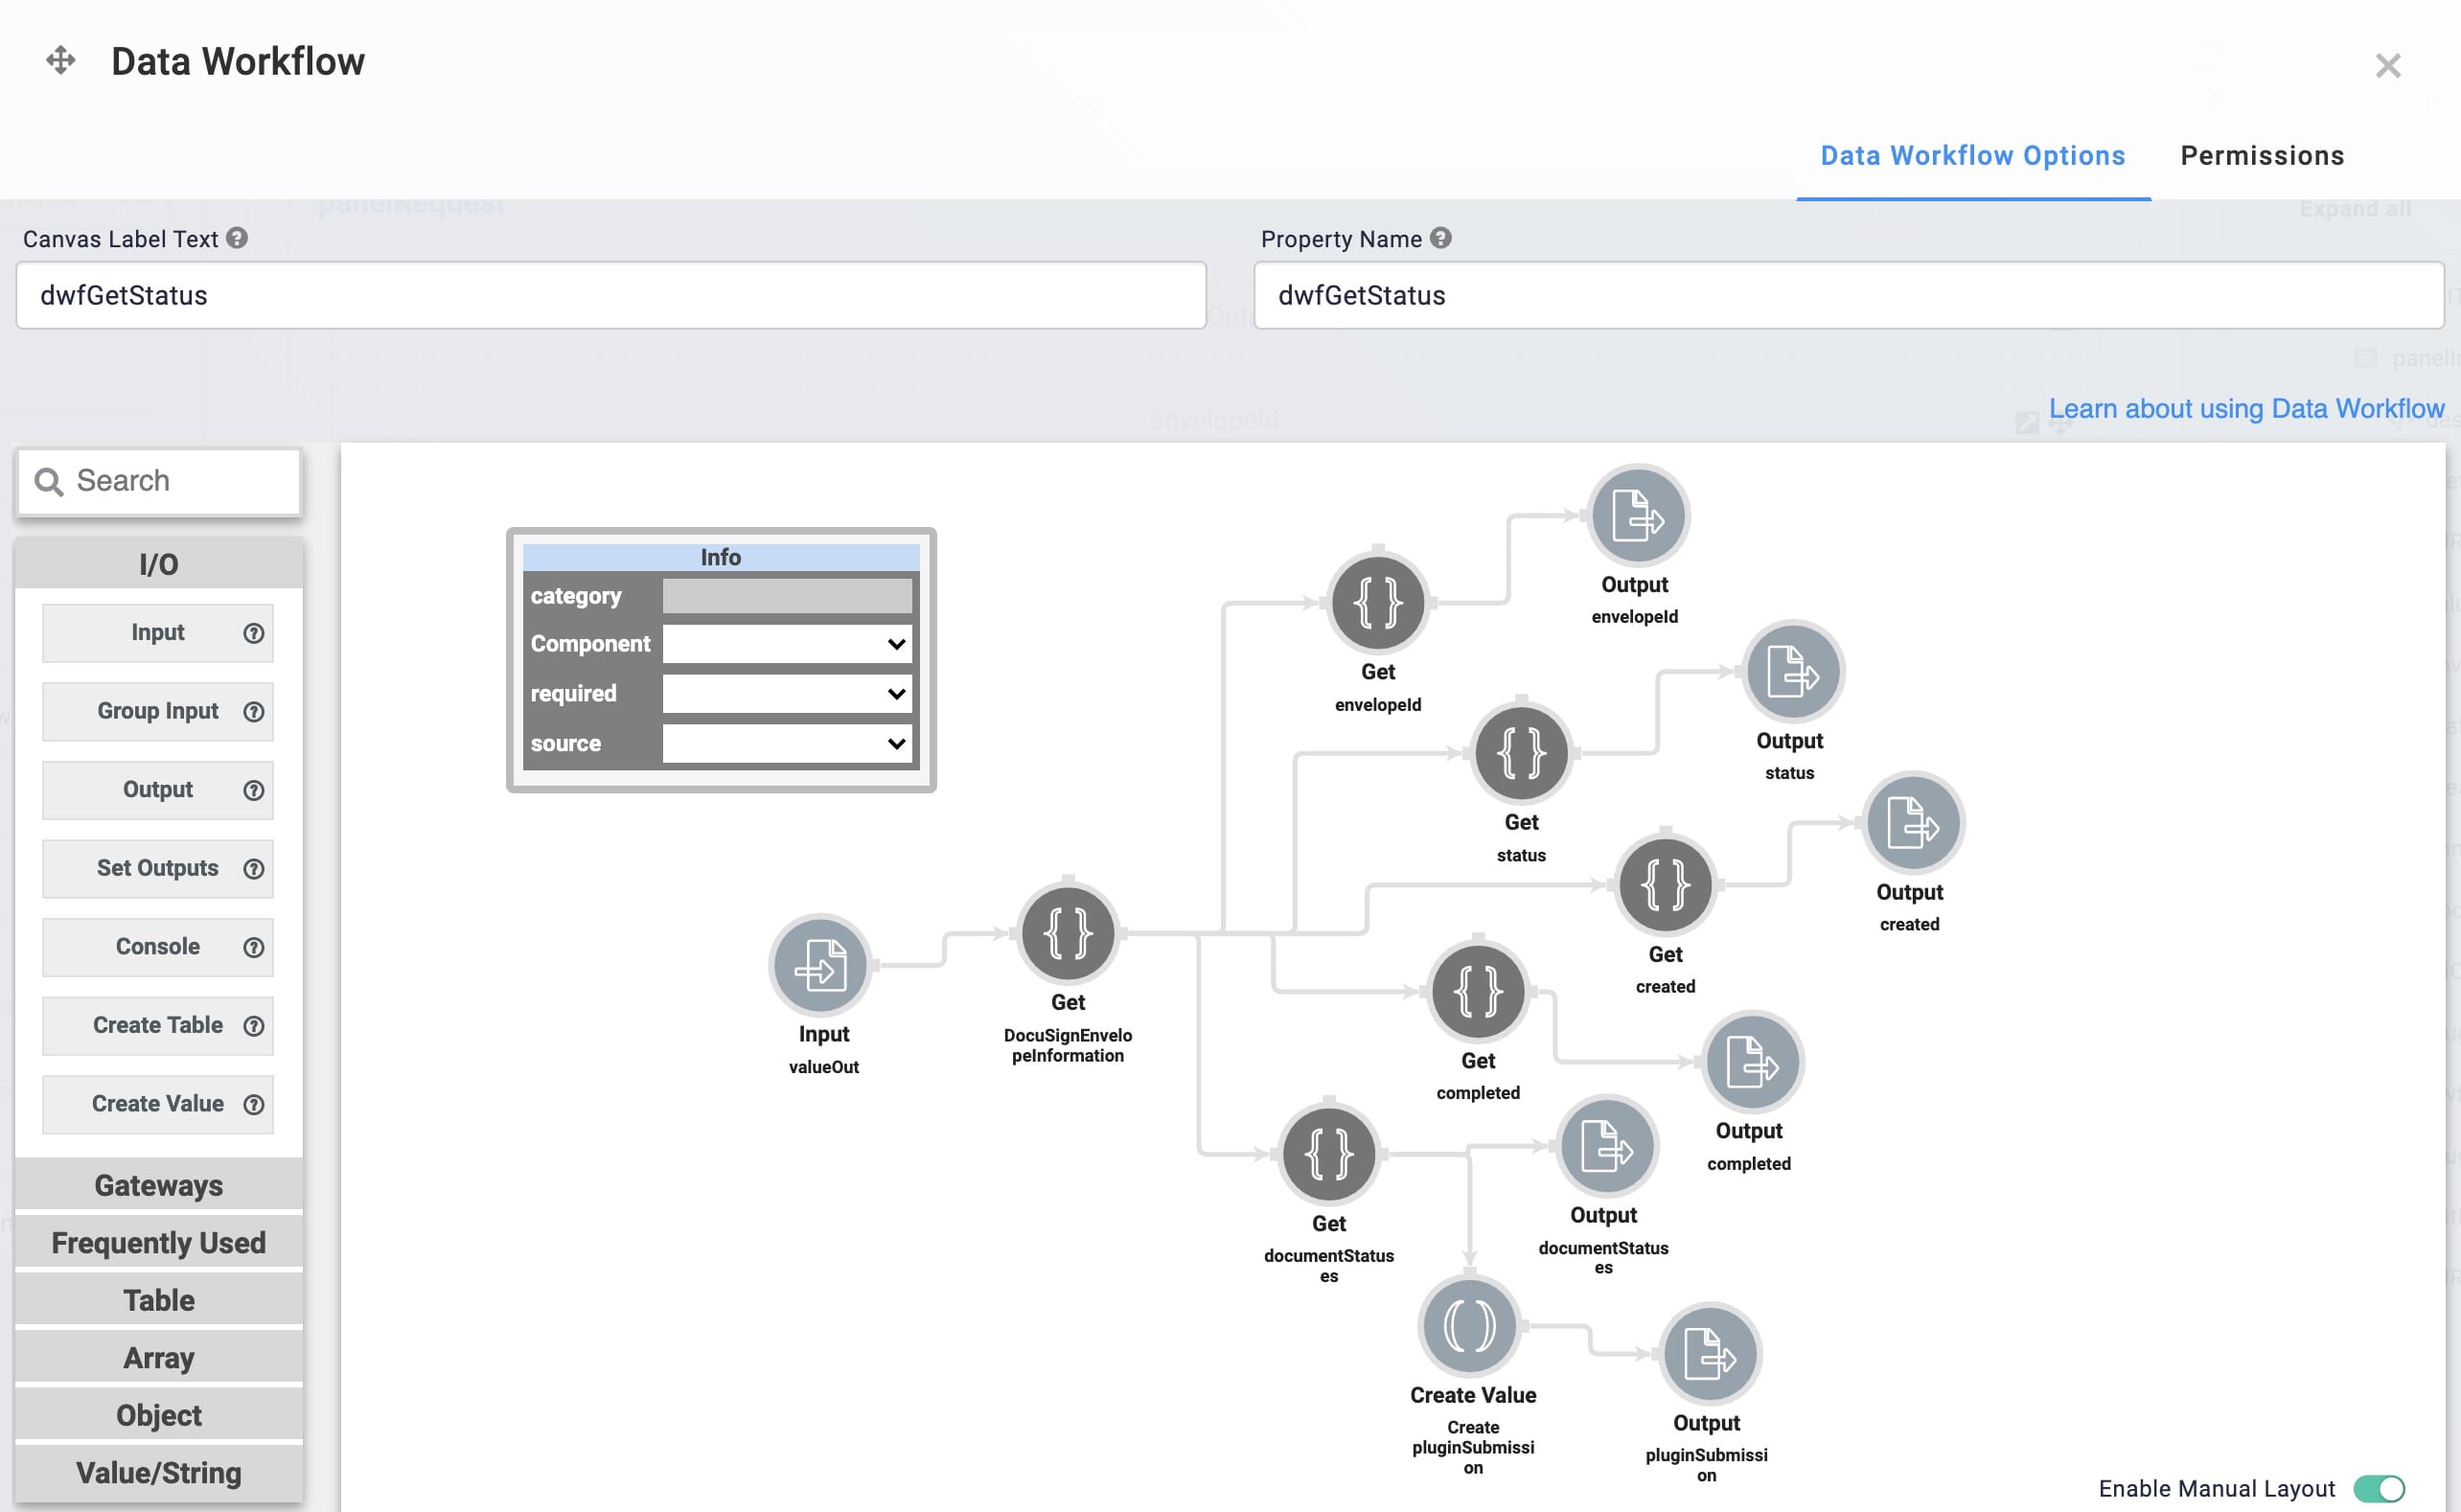
Next, add your Data Workflow component. This data workflow transforms XML to JSON and triggers your pluginSubmission Plug-In component. You'll add this Plug-In component next.
Drag and drop a Data Workflow component onto the canvas, placing it in the panelRequest panel, below the pluginXmlToJson Plug-In component.
In the Canvas Label Text and Property Name fields, enter dwfGetStatus.
Configure the Input Operator
Drag and drop an Input operator onto your Data Workflow canvas.
Configure the Input operator's Info window as follows:
Setting
Value
Category
Input
Component
valueOut
Required
Yes
Source
Default
Configure the DocuSignEnvelopeInformation Get Operator
Drag and drop a Get operator onto your Data Workflow canvas.
Configure the Get operator's Info window as follows:
Setting
Value
Category
Get
Label
DocuSignEnvelopeInformation
Path
DocuSignEnvelopeInformation
DocuSignEnvelopeInformation is the first tag you expect in a DocuSign call.
Connect the output port (right) of the Input operator to the input port (left) of the Get operator.
Configure the envelopeId Get Operator
Now, configure Get and Output operators for each attribute in your envelope.
Drag and drop a Get operator onto your Data Workflow canvas.
Configure the Get operator's Info window as follows:
Setting
Value
Category
Get
Label
envelopeId
Path
EnvelopeID[0]
Connect the output port (right) of the DocuSignEnvelopeInformation Get operator to the input port (left) of the envelopeId Get operator.
Configure the envelopeId Output Operator
Drag and drop an Output operator onto your Data Workflow canvas.
Configure the Output operator's Info window as follows:
Setting
Value
Category
Output
Component
envelopeId
Action
value
Connect the output port (right) of the envelopeId Get operator to the input port (left) of the envelopeId Output operator.
Configure the status Get Operator
Drag and drop another Get operator onto your Data Workflow canvas.
Configure the Get operator's Info window as follows:
Setting
Value
Category
Get
Label
status
Path
Status[0]
Connect the output port (right) of the DocuSignEnvelopeInformation Get operator to the input port (left) of the status Get operator.
Configure the status Output Operator
Drag and drop another Output operator onto your Data Workflow canvas.
Configure the Output operator's Info window as follows:
Setting
Value
Category
Output
Component
status
Action
value
Connect the output port (right) of the status Get operator to the input port (left) of the status Output operator.
Configure the created Get Operator
Drag and drop another Get operator onto your Data Workflow canvas.
Configure the Get operator's Info window as follows:
Setting
Value
Category
Get
Label
created
Path
Created[0]
Connect the output port (right) of the DocuSignEnvelopeInformation Get operator to the input port (left) of the created Get operator.
Configure the created Output Operator
Drag and drop another Output operator onto your Data Workflow canvas.
Configure the Output operator's Info window as follows:
Setting
Value
Category
Output
Component
created
Action
value
Connect the output port (right) of the created Get operator to the input port (left) of the created Output operator.
Configure the completed Get Operator
Drag and drop another Get operator onto your Data Workflow canvas.
Configure the Get operator's Info window as follows:
Setting
Value
Category
Get
Label
completed
Path
Completed[0]
Connect the output port (right) of the DocuSignEnvelopeInformation Get operator to the input port (left) of the completed Get operator.
Configure the completed Output Operator
Drag and drop another Output operator onto your Data Workflow canvas.
Configure the Output operator's Info window as follows:
Setting
Value
Category
Output
Component
completed
Action
value
Connect the output port (right) of the completed Get operator to the input port (left) of the completed Output operator.
Configure the documentationStatuses Get Operator
Drag and drop another Get operator onto your Data Workflow canvas.
Configure the Get operator's Info window as follows:
Setting
Value
Category
Get
Label
documentationStatuses
Path
DocumentationStatuses[0]
Connect the output port (right) of the DocuSignEnvelopeInformation Get operator to the input port (left) of the documentationStatuses Get operator.
Configure the documentationStatuses Output Operator
Drag and drop another Output operator onto your Data Workflow canvas.
Configure the Output operator's Info window as follows:
Setting
Value
Category
Output
Component
documentationStatuses
Action
value
Connect the output port (right) of the documentationStatuses Get operator to the input port (left) of the documentationStatuses Output operator.
Configure the Create Value Operator
Drag and drop a Create Value operator onto your Data Workflow canvas.
Configure the Create Value operator's Info window as follows:
Setting
Value
Category
Create Value
Label
Create plugSubmission
Expression/Value
='GO'
Connect the output port (right) of the documentationStatuses Get operator to the argument port (top) of the Create Value operator.
Configure the plugSubmission Output Operator
Drag and drop an Output operator onto your Data Workflow canvas.
Configure the Output operator's Info window as follows:
Component
Action
Category
Output
Component
plugSubmission
Action
trigger
Connect the output port (right) of the Create Value operator to the input port (left) of the plugSubmission Output operator.
Click Save.
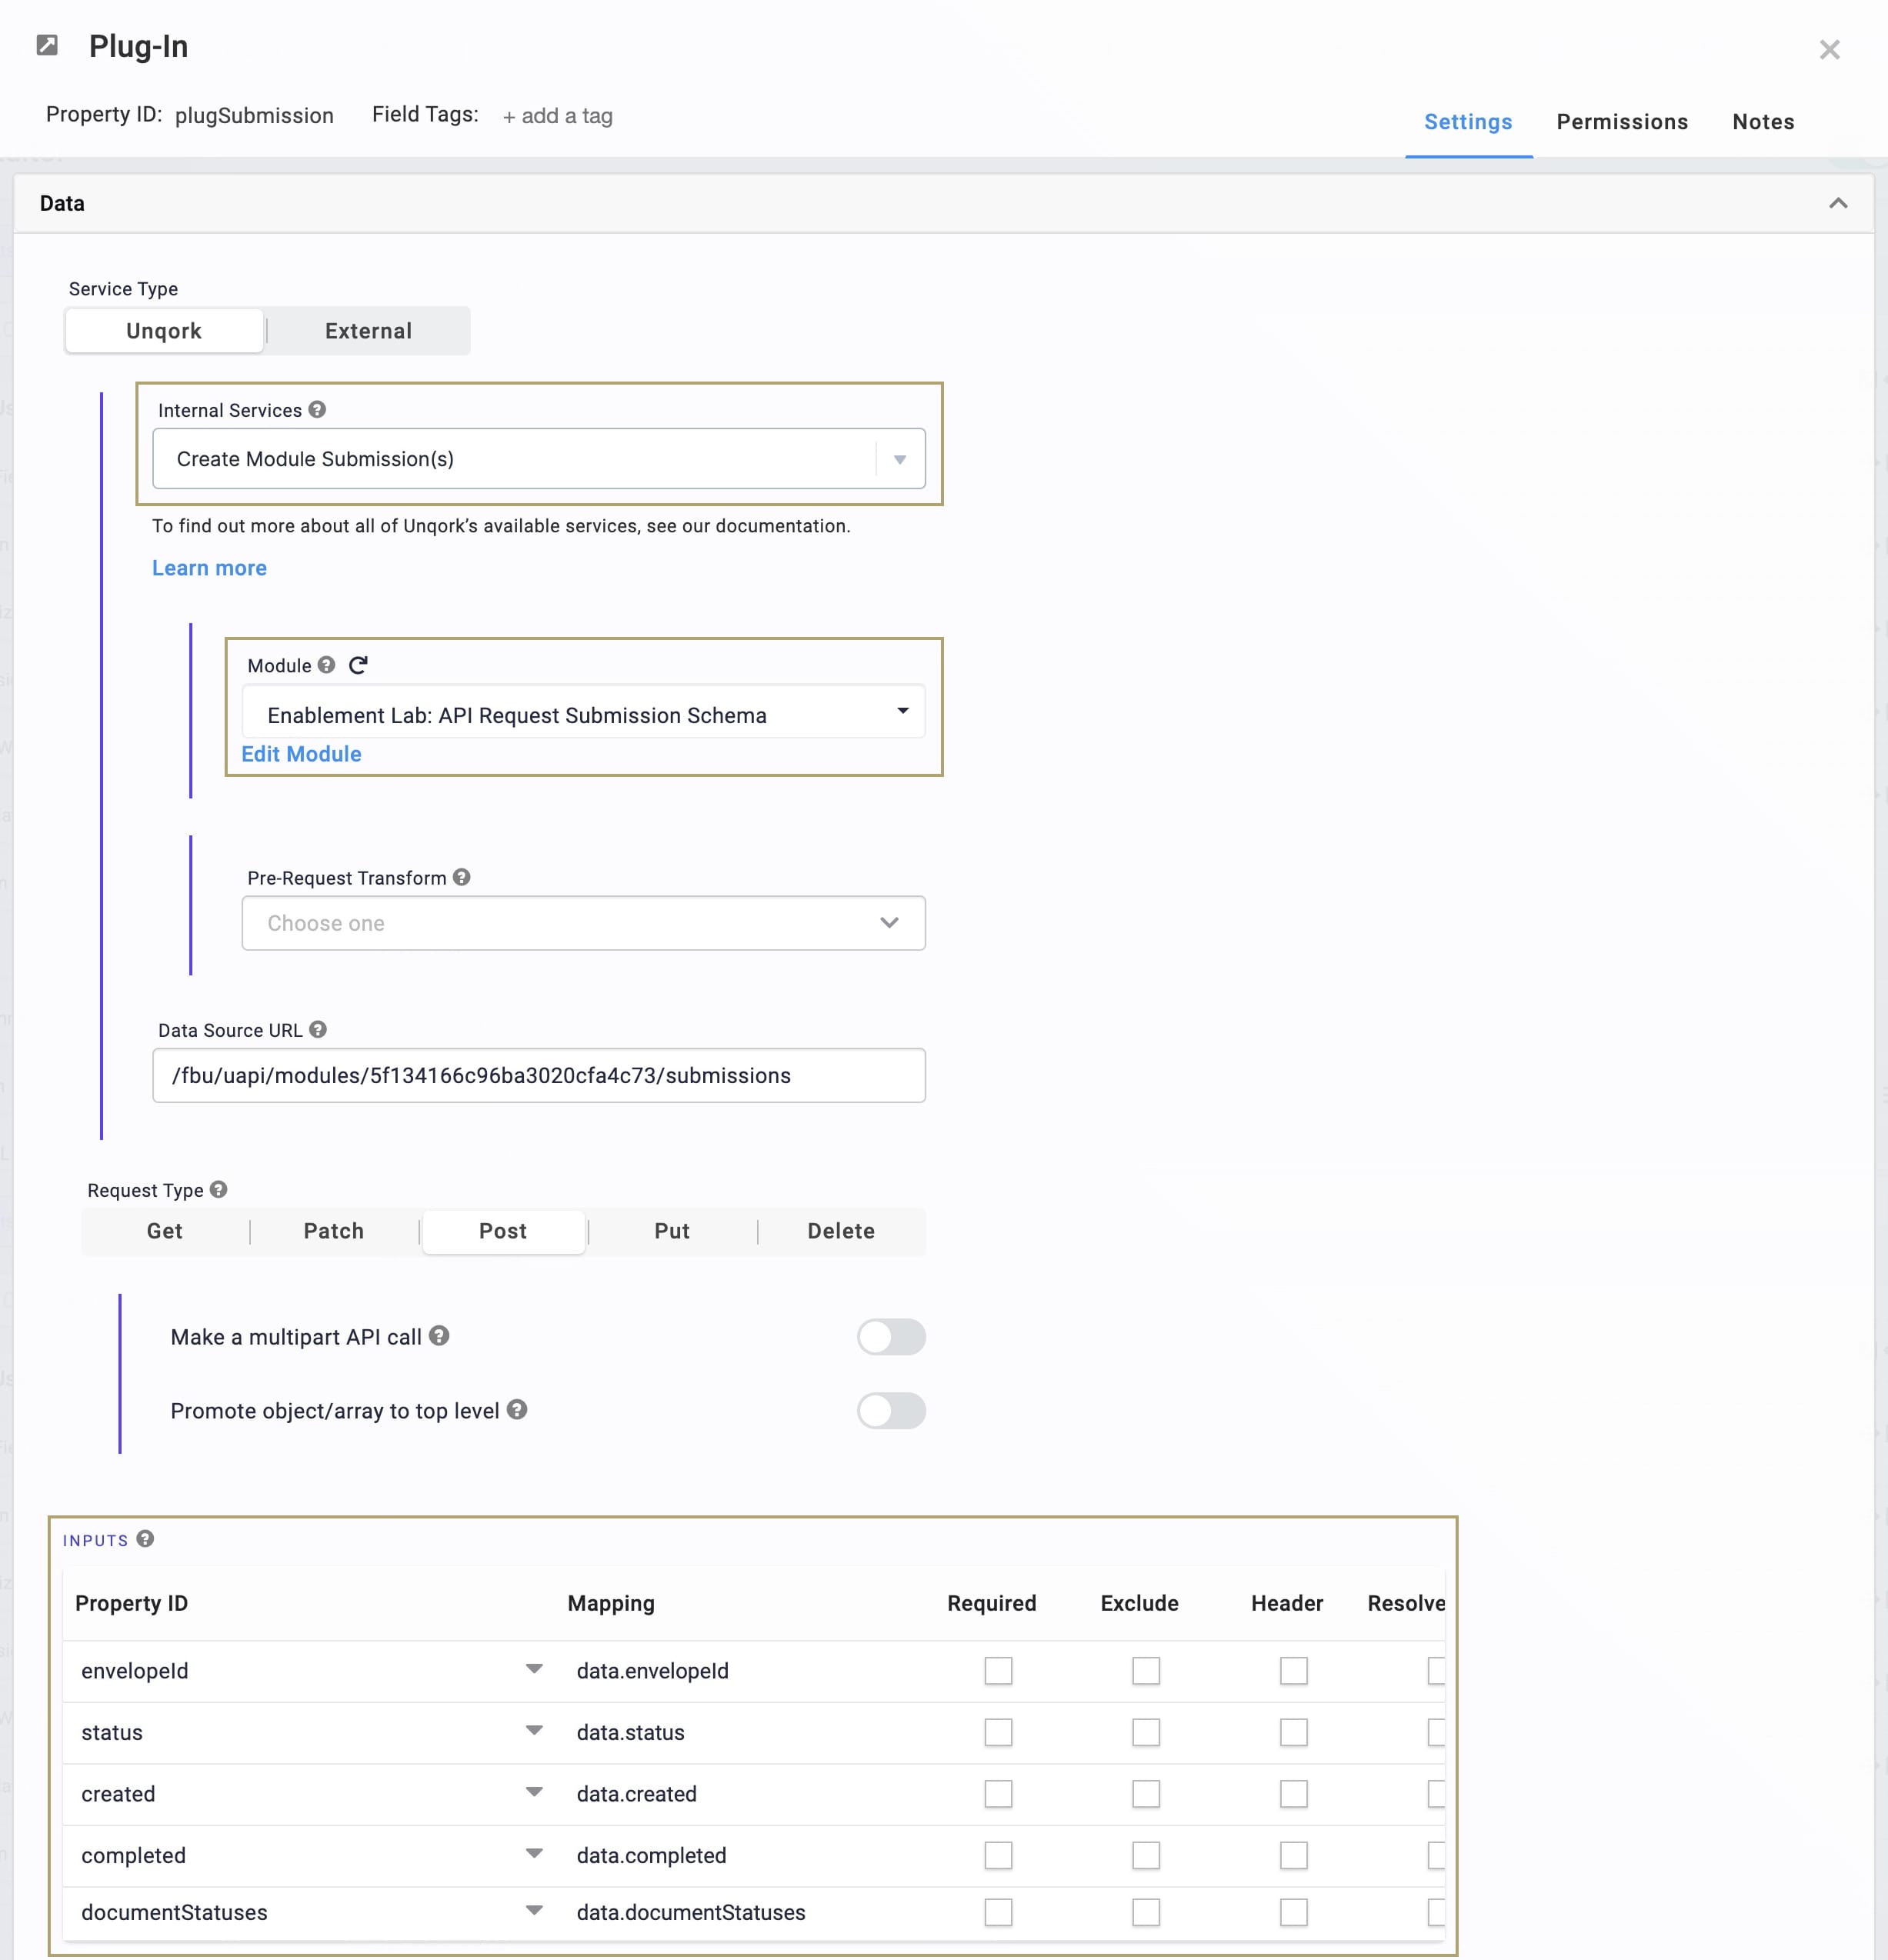
Configure the plugSubmission Plug-In Component
This Plug-In component takes the JSON fields pulled from the transformed XML envelope data and creates a submission.
Drag and drop a Plug-In component onto the canvas. Place the Plug-In inside the panelConfig Panel, below the Data Workflow component.
In the Property ID and Canvas Label Text fields, enter plugSubmission.
From the Internal Services drop-down, select Create Module Submissions(s).
From the Module drop-down, select Enablement Lab: API Request Submission Schema. This is the prebuilt Submission Schema module.
In the Inputs table, enter the following:
Property ID
Mapping
envelopeId
data.envelopeId
status
data.status
created
data.created
completed
data.completed
documentStatuses
data.documentStatuses
This data maps back to the Submission Schema module's Hidden components.
Click Save.
Save your module.
It's important to note that your Listener module must link to DocuSign Connect to work. If you test your module before linking to DocuSign, your webhooks won't work.