How to: Consume Payloads Using Webhooks
Overview
In this how-to guide, you'll learn how to configure your application to consume a Google Forms webhook and use SendGrid to send an email when the Google Form is complete. You'll need a Postback module that listens for the Google Forms webhook. We cover Postback modules in this article.
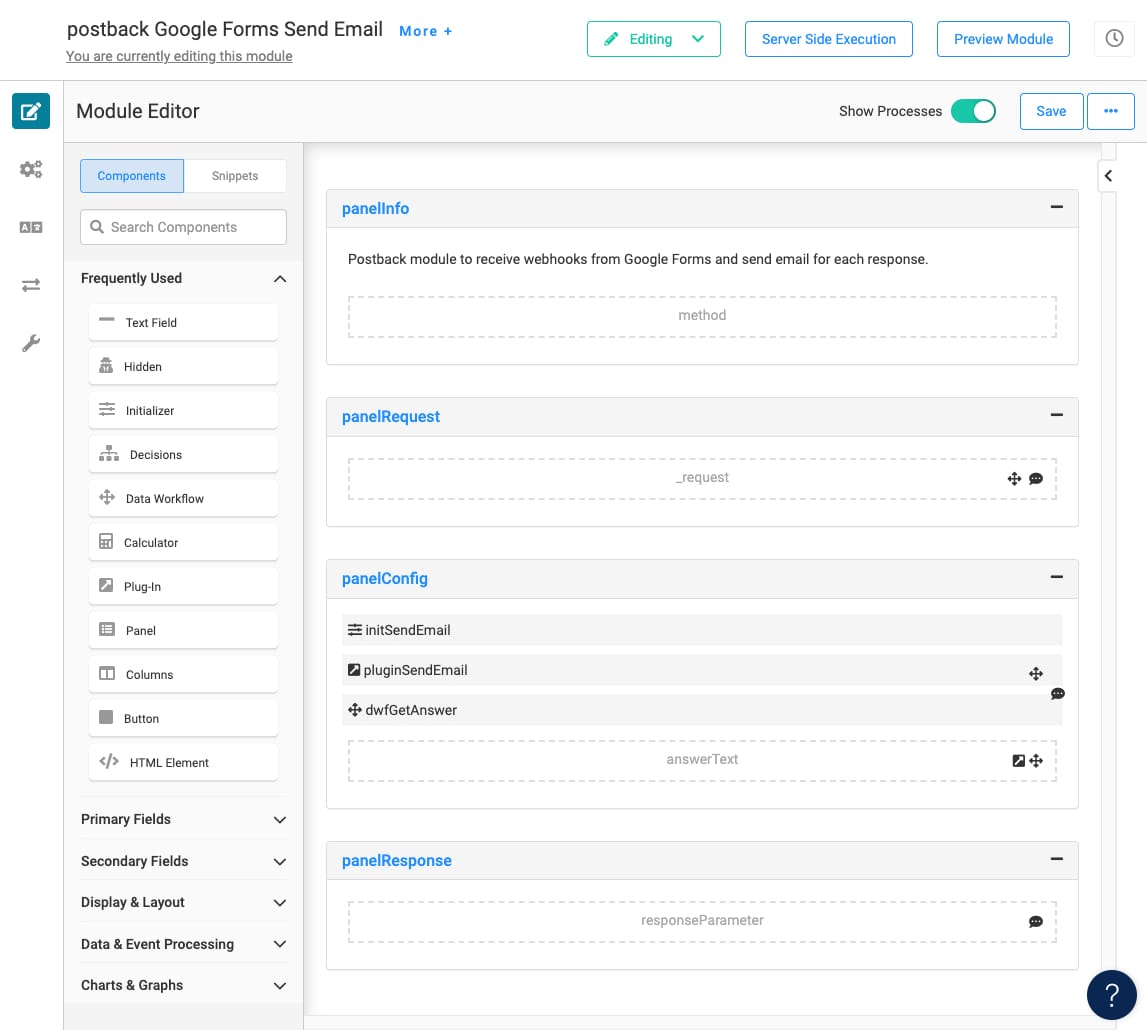
Here's how the completed Postback module looks in the Module Builder:
What You'll Learn
In this how-to guide, you'll learn how to create a module that accepts a Google Forms webhook.
What You Need
To set up the Postback module in this use case, you need:
- 1 API (application programming interface) Specification snippet
- 1 Hidden component
- 1 Plug-In component
- 1 Initializer component
- 1 Data Workflow component
To set up the Postback module's Data Workflow, you need:
-
1 Input operator
-
1 Get operator
-
1 Output operator
Configure the Postback Module
Start by creating a Postback module that listens for the Google Forms webhook. The module runs when it receives the webhook request. When finished, it sends an email with the contents of the Google Form. To kick off your Postback module, you'll bring in the API Specification snippet. This ensures you use Unqork's best practices in your configuration.
These instructions assume you have a workspace open, saved, and with a title.
To create a module in your application:
|
1.
|
From the left sidebar menus, select the Modules tab. |
|
2.
|
Click the + Create New button. |
|
3.
|
In the Module Name field, enter postback Google Forms Send Email. |
|
4.
|
Click the Create button. |
|
6.
|
In the left sidebar of Module Builder, click the Snippets button. |
|
7.
|
In the search bar, enter API Specification. |
|
8.
|
Drag and drop the API Specification snippet onto your canvas. |
|
9.
|
Drag and drop each panel outside of the panelApiTemplate wrapper. |
|
10.
|
Delete the panelApiTemplate wrapper. |
Configure the panelInfo Panel
Here you'll configure the panelInfo Panel.
Update the description HTML Element Component
The API Specification snippet contains an HTML Element component that describes the snippet's purpose. You can change this to display any information you want when building or using the webhook.
|
1.
|
In the panelInfo Panel component, hover over the description HTML Element component. |
A 5-button toolbar displays above the component on hover-over.
|
2.
|
Using the toolbar, click the  (Settings) button. (Settings) button. |
|
3.
|
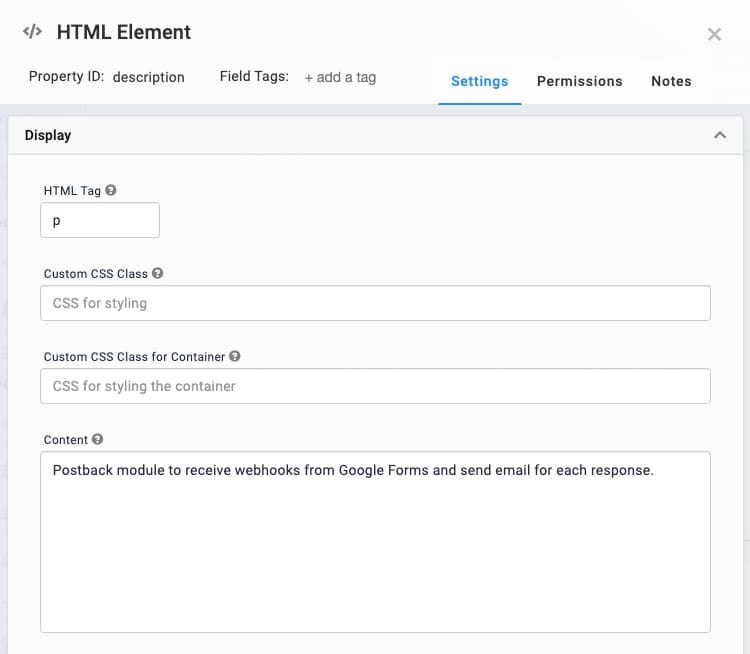
In the Display panel, enter a description in the webhook Content field. The image below shows an example of what that description looks like. |
|
4.
|
Click the Save button. |
Update the method Hidden Component
|
1.
|
In the panelInfo Panel component, hover over the method Hidden component. |
A 5-button toolbar displays above the component on hover-over.
|
2.
|
Using the toolbar, click the (Settings) button. |
|
3.
|
In the Data section, in the Default Value field, enter POST. |
Configure the panelRequest Panel
|
1.
|
In the panelRequest Panel component, hover over the requestParameter Hidden component. |
A 5-button toolbar displays above the component on hover-over.
|
2.
|
Using the toolbar, click the (Settings) button. |
|
3.
|
In the Property ID and Canvas Label Text fields, enter _request. |
|
4.
|
In the Field Tags field, remove all tags except the type:object tag. |
|
5.
|
Set the Store Data in Database toggle to ON. |
Configure the Hidden Component
Next, you'll add a Hidden component.
|
1.
|
Drag and drop a Hidden component onto the canvas, placing it in the panelConfig panel. |
|
2.
|
Configure the Property ID and Canvas Label Text fields as follows: |
|
Property ID
|
answerText
|
|
Canvas Label Text
|
answerText
|
|
Default Value
|
default
|
Configure the Data Workflow Component
Next, add your Data Workflow component. This data workflow receives the request from your Google Form and outputs it into a Hidden component.
|
1.
|
Drag and drop a Data Workflow component onto the canvas, placing it in the panelConfig Panel, under your Hidden component. |
|
2.
|
In the Canvas Label Text and Property Name fields, enter dwfGetAnswer. |
Configure the Input Operator
|
1.
|
Drag and drop an Input operator onto your Data Workflow canvas. |
|
2.
|
Configure the Input operator's Info window as follows: |
|
Category
|
Input
|
|
Component
|
_request
|
|
Required
|
Yes
|
|
Source
|
Default
|
Configure the Get Operator
|
1.
|
Drag and drop a Get operator onto your Data Workflow canvas. |
|
2.
|
Configure the Get operator's Info window as follows: |
|
Category
|
Get
|
|
Label
|
|
|
Path
|
body.body
|
|
3.
|
Connect the output port (right) of the _request Input operator to the input port (left) of the Get operator. |
Configure the Output Operator
|
1.
|
Drag and drop an Output operator onto your Data Workflow canvas. |
|
2.
|
Configure the Output operator's Info window as follows: |
|
Category
|
Output
|
|
Component
|
answerText
|
|
Action
|
value
|
|
3.
|
Connect the output port (right) of the Get operator to the input port (left) of the Output operator. |
Here's what the completed Data workflow looks like:

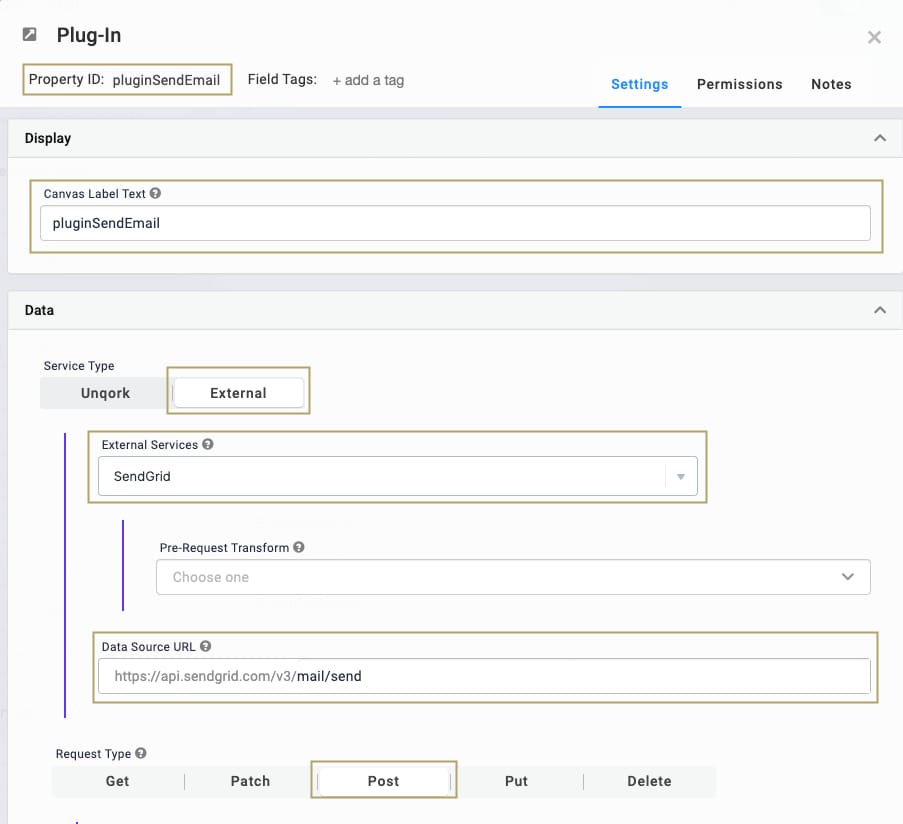
Configure the pluginSubmission Plug-In Component
This Plug-In component takes the text pulled from your Google Form and sends an email using Sendgrid.
|
1.
|
Drag and drop a Plug-In component onto the canvas. Place the Plug-In inside the panelConfig Panel, below the answerText Hidden component. |
|
2.
|
In the Property ID and Canvas Label Text fields, enter pluginSendEmail |
|
3.
|
In the Data section, select External. |
|
4.
|
From the External Service drop-down, select SendGrid. |
|
5.
|
In the Data Source URL field, enter mail/send. |
|
6.
|
In the Request Type section, select Post. |
|
7.
|
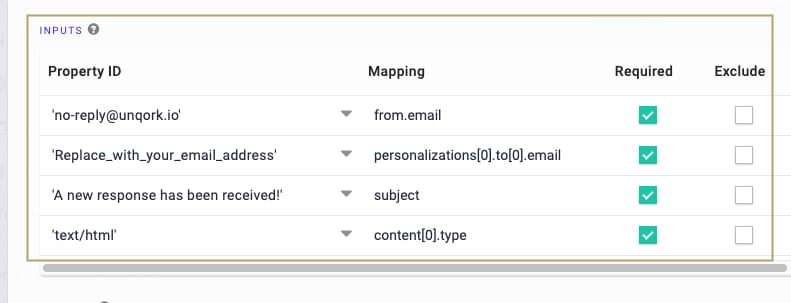
Complete the Inputs table as follows: |
|
'no-reply@unqork.io'
|
from.email
|
checked
|
|
'<enter your email address>'
|
personalizations[0].to[0].email
|
checked
|
|
'A new response has been received!'
|
subject
|
checked
|
|
'text/html'
|
content[0].type
|
checked
|
|
answerText
|
content[0].value
|
checked
|
Here's what your completed Inputs table looks like:
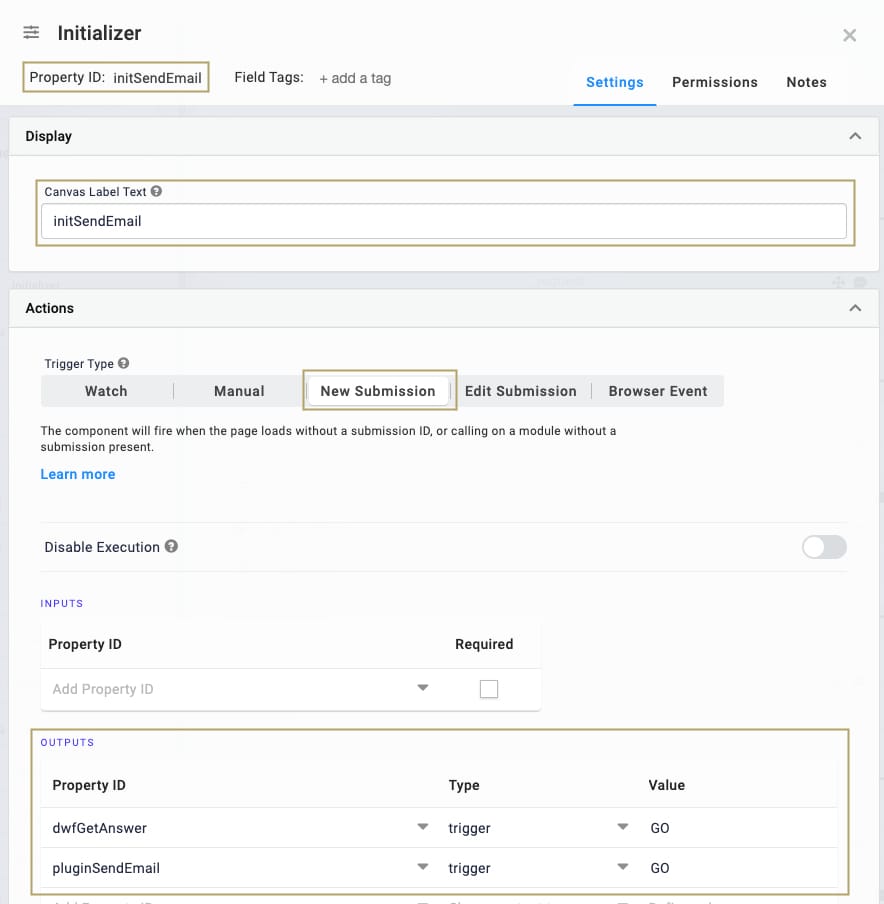
Configure the Initializer Component
This Initializer component triggers the pluginSendEmail Plug-In and dwfGetAnswer Data Workflow components that you set up.
|
1.
|
Drag and drop an Initializer component onto the canvas. Place the initializer in the panelConfig panel, above the Plug-in component. |
|
2.
|
In the Property ID and Canvas Label Text fields, enter initSendEmail. |
|
3.
|
Set the Trigger Type as New Submission. |
|
4.
|
In the Outputs table, enter the following: |
|
dwfGetAnswer
|
trigger
|
GO
|
|
pluginSendEmail
|
trigger
|
GO
|
Your completed Initializer component looks like this:
Enable Execute via Proxy
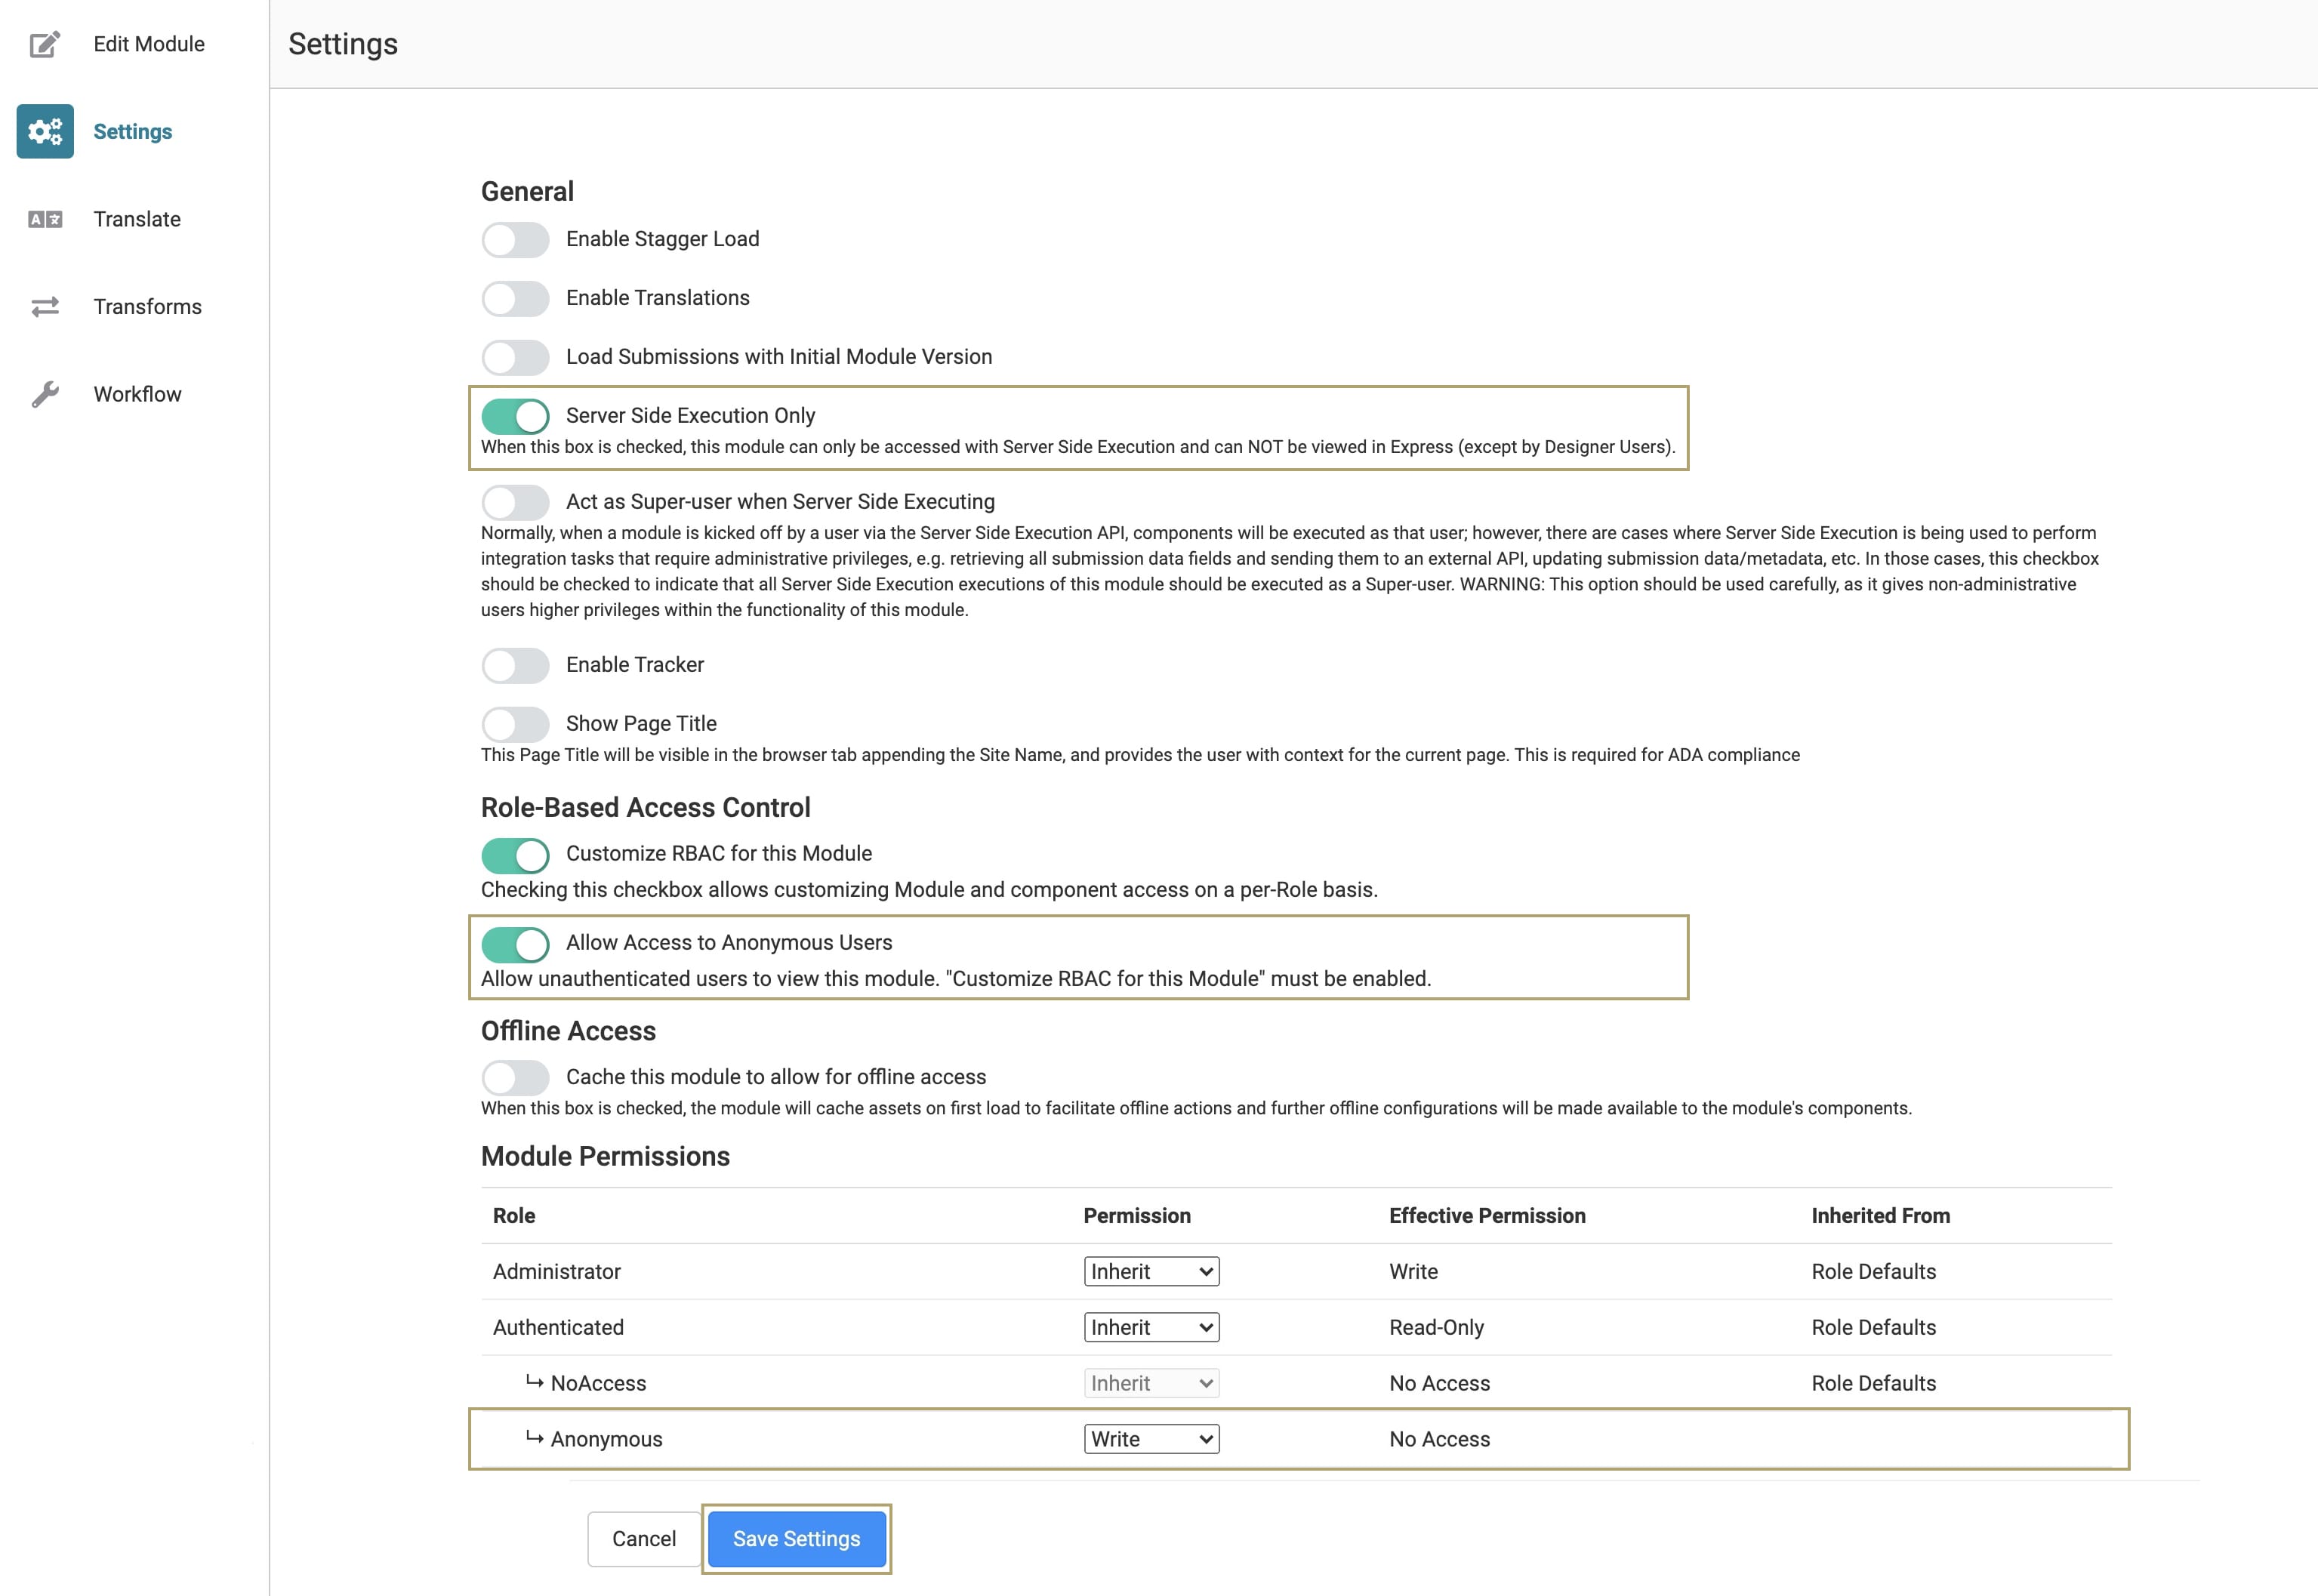
Now you'll access the Settings to configure your new module. The point of these setting changes is to enable the Execute via Proxy endpoint for the webhook. This includes setting up the Anonymous role's permissions to Write. Once enabled, you can receive requests from your webhook service.
|
1.
|
In the Module Builder, hover over the left menu bar. |
|
3.
|
Set the Server Side Execution Only toggle to ON. |
|
4.
|
Set the Act as Super-user when Server Side Executing toggle to ON. |
Avoid toggling the Act as Super-user when Server Side Executing to ON. This setting also lets you use webhooks, but, it weakens the security of your application. The Act as Super-user when Server Side Executing toggle is set to ON in this use case for demonstration purposes only.
|
5.
|
Set the Customize RBAC for this Module toggle to ON. |
|
6.
|
Set Allow Access to Anonymous Users toggle to ON. |
|
7.
|
From the Anonymous role's Permission drop-down, select Write. |
Copy the Unqork Environment and Module ID
You need a couple of things from Unqork to set up the Google Form. Copy the environment name and the module ID from the address bar and save them to use in the next steps.

Configure the Google Form
Now, create and configure the Google Form.
Create the Google Form
|
2.
|
In the top-left, type Unqork Webhook Test. |
|
3.
|
Replace Untitled Question with Test Question. |
|
4.
|
From the question type drop-down, select Paragraph. |
Configure the Google Form Apps Script
|
1.
|
In the top-right, click the More button (the three dots), then select Script Editor. |
|
2.
|
In the top-left, in the Project title field, rename the Project to Unqork Webhook Test. |
|
3.
|
Copy the following code: |
Copy
function onFormSubmit(e) {
                    var url = "https://{environment}x.unqork.io/fbu/uapi/modules/{moduleId}/api/{path}";
                    var form = FormApp.openById('{form Id}');
                    var formResponses = form.getResponses();
                    var formResponse = formResponses[formResponses.length - 1];
                    var itemResponses = formResponse.getItemResponses();
                    var answerText = itemResponses[0].getResponse();
                    var data = {
                    "body": answerText
                    }
                    var options = {
                    "method": "post",
                    "headers": {
                    "Content-Type": "application/json"
                    },
                    "payload": JSON.stringify(data)
                    };
                    var response = UrlFetchApp.fetch(url, options);
                }
|
4.
|
Paste the code to the script editor. |
| {environment} |
Enter your environment name. |
| {moduleId} |
Enter your module ID. |
|
{path}
|
Enter a path.
This can be anything you want. This should be descriptive based on what the webhook accomplishes.
|
|
6.
|
In the var form line, replace the following: |
| {form ID} |
Enter your form ID. The form ID is the string of characters in the Google Form URL between the dand edit. |
|
7.
|
Click the Save project button. |
|
8.
|
Click the Deploy drop-down. |
|
9.
|
Select New deployment. |
|
10.
|
In the Description field, enter Unqork webhook test. |
|
11.
|
Click the Deploy drop-down, then select New Deployment. |
|
12.
|
Click the gear icon, then select Web app. |
|
13.
|
In the Description field, enter Webhook test. If a pop-up displays asking you to authorize access, click Authorize access, then click Done. |
Configure the Google Form Apps Script Triggers
|
1.
|
From the left sidebar menu, select Triggers (the clock icon). |
|
2.
|
Click + Add Trigger. A pop-up displays. |
| Choose which function to run |
onFormSubmit |
| Choose which deployment should run |
Head |
|
Select event source
|
From form
|
|
Select event type
|
On form submit
|
Resources