Workflow Automated Delete Submissions Template
About this Configuration Guide
Using this guide, you'll explore how the Automated Delete Submissions template works. You'll learn how to install the template to your environment and how to build an application from it. Plus, we'll walk you through how to customize your application to fit your needs.
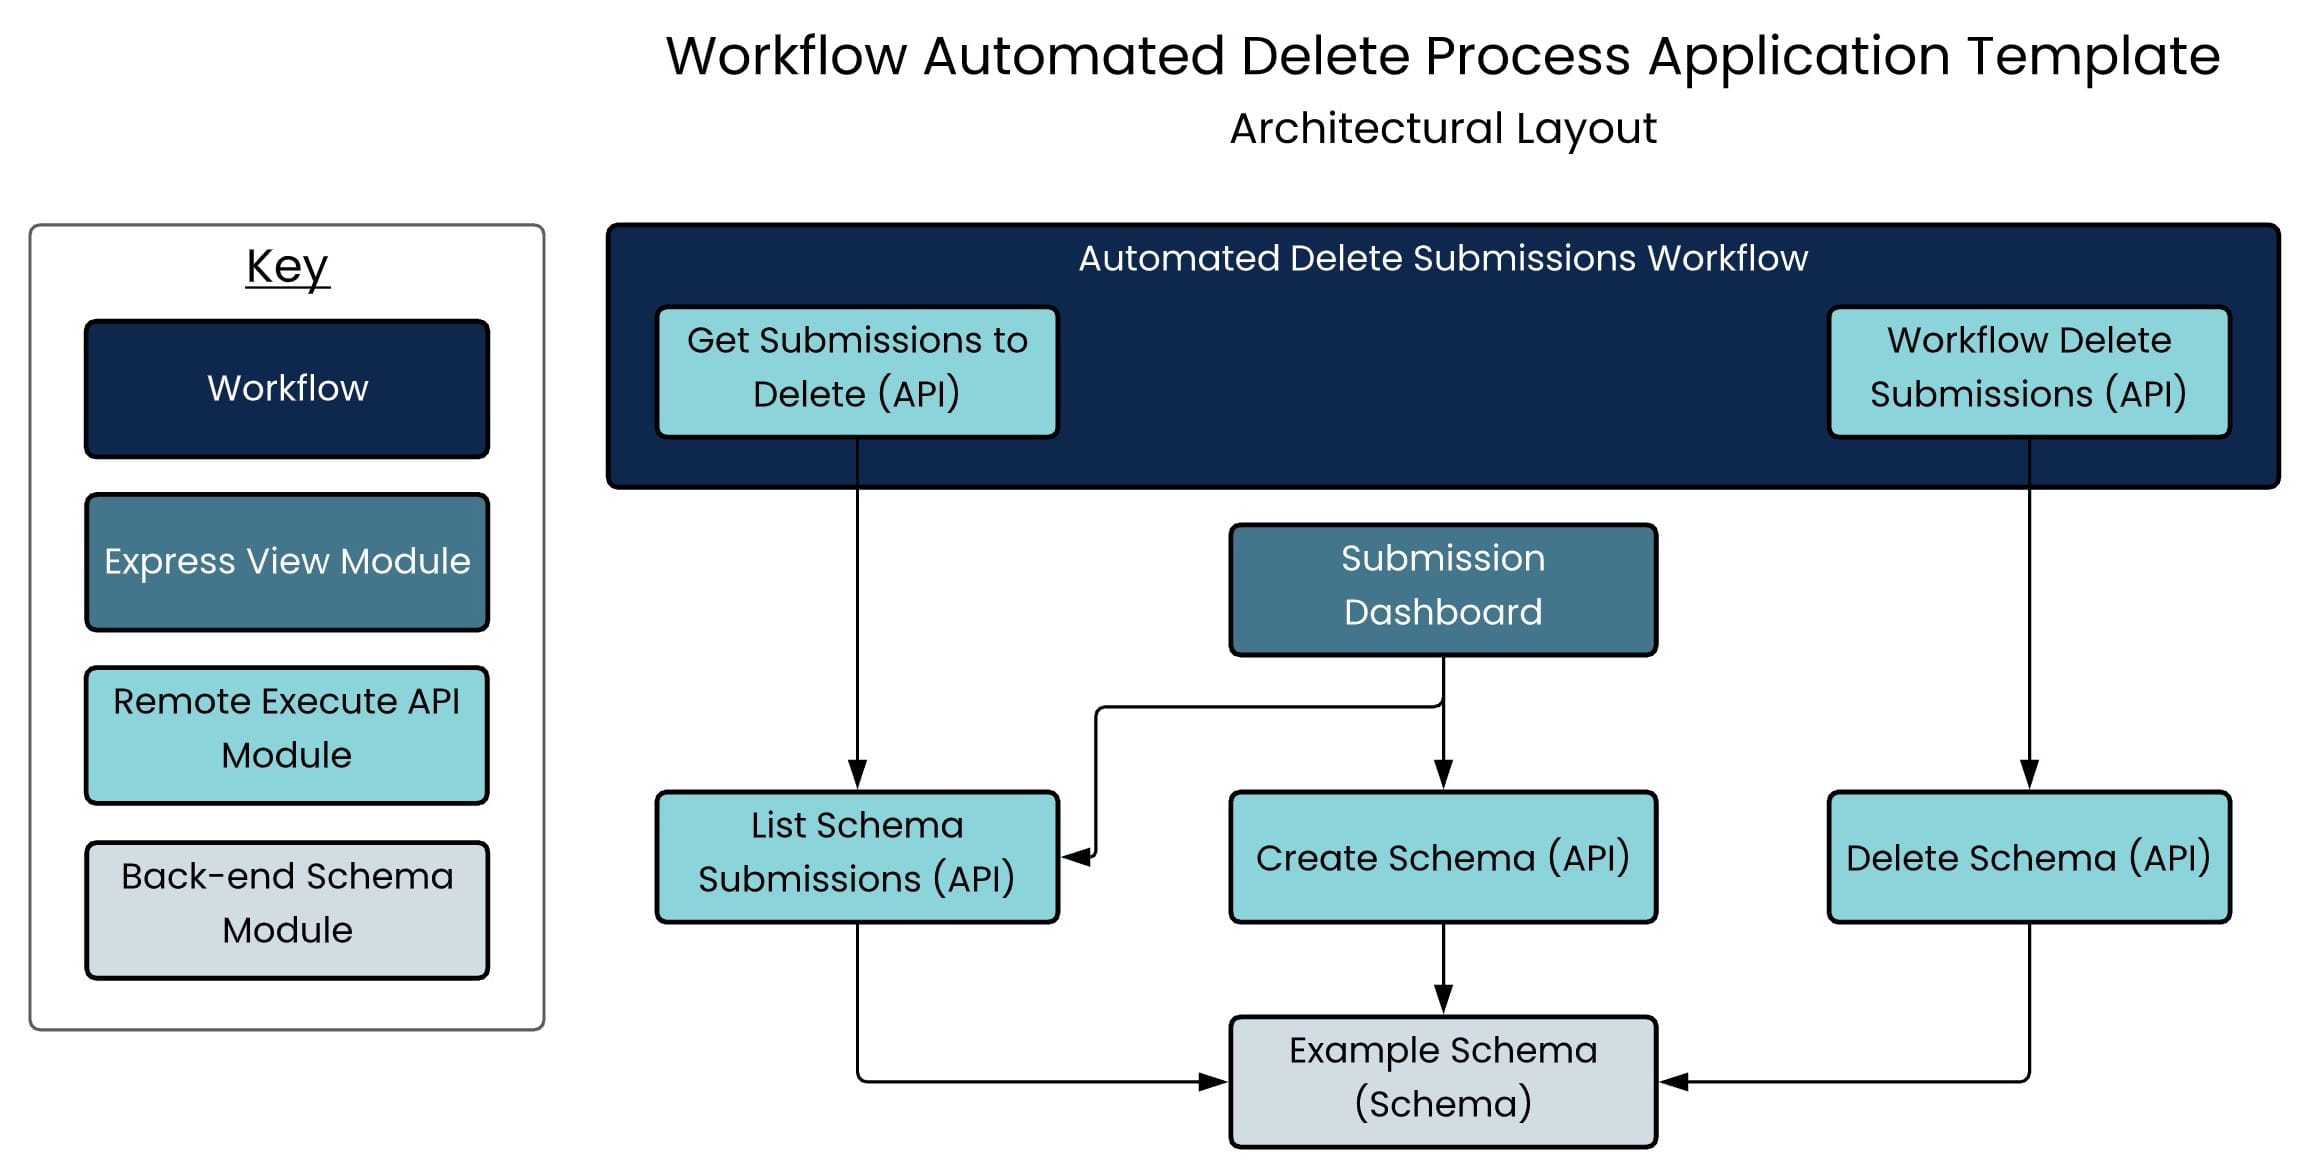
In total, this application template has 1 workflow and 7 modules. First, the workflow lets you organize and automate the entire process. There's an example schema module that stores submissions. Then, there are 5 back-end API (application programming interface) modules. These work behind the scenes to create, list, and delete your schema submissions. On the front-end, there's an example dashboard module that lets you test your automated process. We'll go into each of the template's elements in more detail. For now, here's a chart with the architectural layout of this template:
And here's a high-level overview of the elements in this application template:
| Title | Element Type | Description |
|---|---|---|
|
Workflow Automated Delete Submissions |
Workflow |
The entire workflow takes place behind the scenes in the Automated swimlane. This workflow starts with a Timer Start node so you can run the process on a set schedule. The Timer Start node connects to the Get Submissions to Delete (API) module. That module retrieves the submissions you want to delete. It connects to the Workflow Delete Submissions (API) module, which deletes the selected submissions. |
|
Get Submissions to Delete (API) |
Module |
This API module is the first step of the workflow. It calls the List Schema Submissions (API) module and retrieves only the submissions with a value of Delete in the field deleteCriteria. |
|
List Schema Submissions (API) |
Module |
If there's a query, this API module returns matching submissions. If there's no query, the API module returns all active submissions. |
|
Workflow Delete Submissions (API) |
Module |
This API module is the second step of the workflow. It takes the submissions retrieved from the Get Submissions to Delete (API) module. Then, it loops through and deletes the submissions in batches of 25 using the Delete Schema (API). |
|
Delete Schema (API) |
Module |
This API module deletes the submissions of the schema module specified in the request. |
|
Example Schema (Schema) |
Module |
This module is a placeholder showing how to configure your own schema module. |
|
Create Schema (API) |
Module |
This API module lets you create submissions that store to your schema module. You'll access the Create option on the schema submission dashboard. You'll set the value for the deleteCriteria field of each new submission to Delete or Save. |
|
Submission Dashboard |
Module |
The final part of this application template is a simple dashboard that offers an Express View of your schema module's submissions. You can use the dashboard to see and test the functionality of the automated delete process. Think of this module as a placeholder that shows how to configure your own schema dashboard. From the dashboard, you can also create new schema submissions. This is the only module you'll work with in Express View. The other 6 modules are back-end modules that execute server-side. |
All images used in this guide are for illustrative purposes only. Images are subject to change without notice. All images were correct at the time of publication.
Overview
With the Automated Delete Submissions application template, you can automate deleting submissions from your application. Maybe you need to delete submissions to meet regulatory requirements. Or you might want to keep your application up-to-date and clean of older submissions. This template shows you how to use workflow to retrieve and delete submissions. And, you can do this on a set schedule. So, once you've set it up, you can sit back and relax.
The automated delete process is great for environments in development. Often when you're developing in staging environments, you'll create many submissions to test. Using this template will help keep your environment clean. Or, what if you want to delete submissions once they've reached a certain status or age? The Automated Delete Submission template is a great framework for that use case.
This is a workflow application template. So, if you build an application from this template, you'll see a workflow and supporting modules added to your environment.
Features
With this template, you can schedule and automate retrieving and deleting submissions. And you can do this directly from your workflow.
Requirements
To use this template, you must have your own schema module and delete criteria.
Be mindful when setting up your automated delete process. If you accidentally promote your application, you could delete submissions you don't mean to. Remember, you're deleting submissions in batches. If your application isn't set up correctly, you run the risk of deleting the wrong submissions in bulk.
What You'll Learn
In this article, you'll learn:
Adding the Template
Before you can build an application from this template, you must install the template to your environment. Then, you can visit your Library and build an application from your new template.
Adding the Template to Your Environment
To add the template to your environment:
| 1. | Click Marketplace at the top right of the Unqork Designer Platform. |
You can also access the Marketplace at any time by visiting https://marketplace.unqork.io.
| 2. | Enter Automated Delete Submissions in the Search the Marketplace field. |
| 3. | Click on the Automated Delete Submissions tile. |
| 4. | Click Install to Environment. |
| 5. | Click Install Template. |
If you aren't logged in, you'll see a field for Environment URL and a Login button. Enter your environment's URL where you want to install the template. For example: [environmentname.unqork.io]. Then, click Login.
Now, you can now use your newly installed template to create an application!
Creating an Application from the Template
After you've added the template to your environment, you can use it to create an application. This template creates a workflow-type application with 1 workflow and 7 modules.
| 1. | Click Library at the top right of the Unqork Designer Platform. |
| 2. | Find the Automated Delete Submissions template tile. |
| 3. | Click Create App from Template. |
| 4. | Choose the destination workspace from the Workspace drop-down. This is where your application will live once created. |
| 5. | Enter your unique App Name. The App Path auto-fills as you type your App Name. |
| 6. | If you want a different App Path, enter it in the App Path field. |
| 7. | Select a preview style from the Style drop-down. A style specifies your application’s appearance in Express View. If left blank, your application uses your environment's default style. |
You'll notice the App Type and App Entrypoint are grayed out. The template automatically takes care of these for you!
| 8. | Click Create App. |
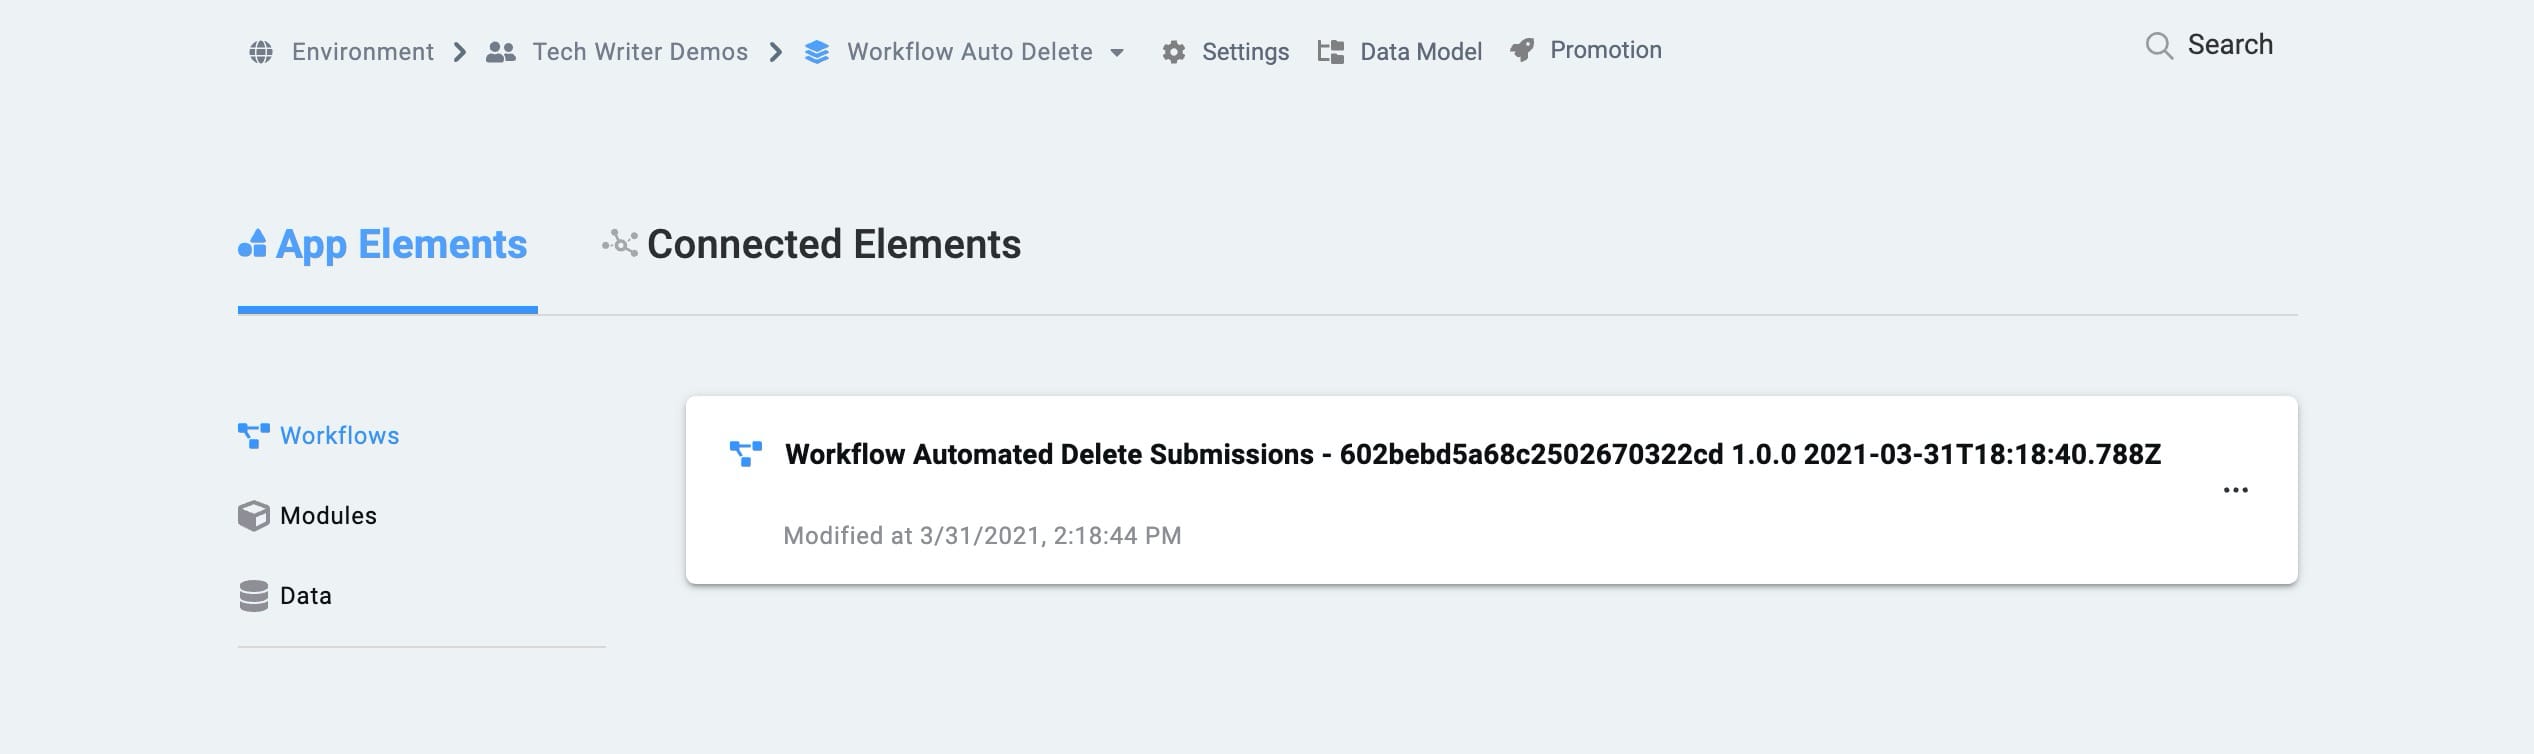
The application opens in the workspace you specified. You'll land on the Workflows tab of your application, which lists your workflow.
Your Workflows tab should look something like this:
And here's how your Modules tab should look:
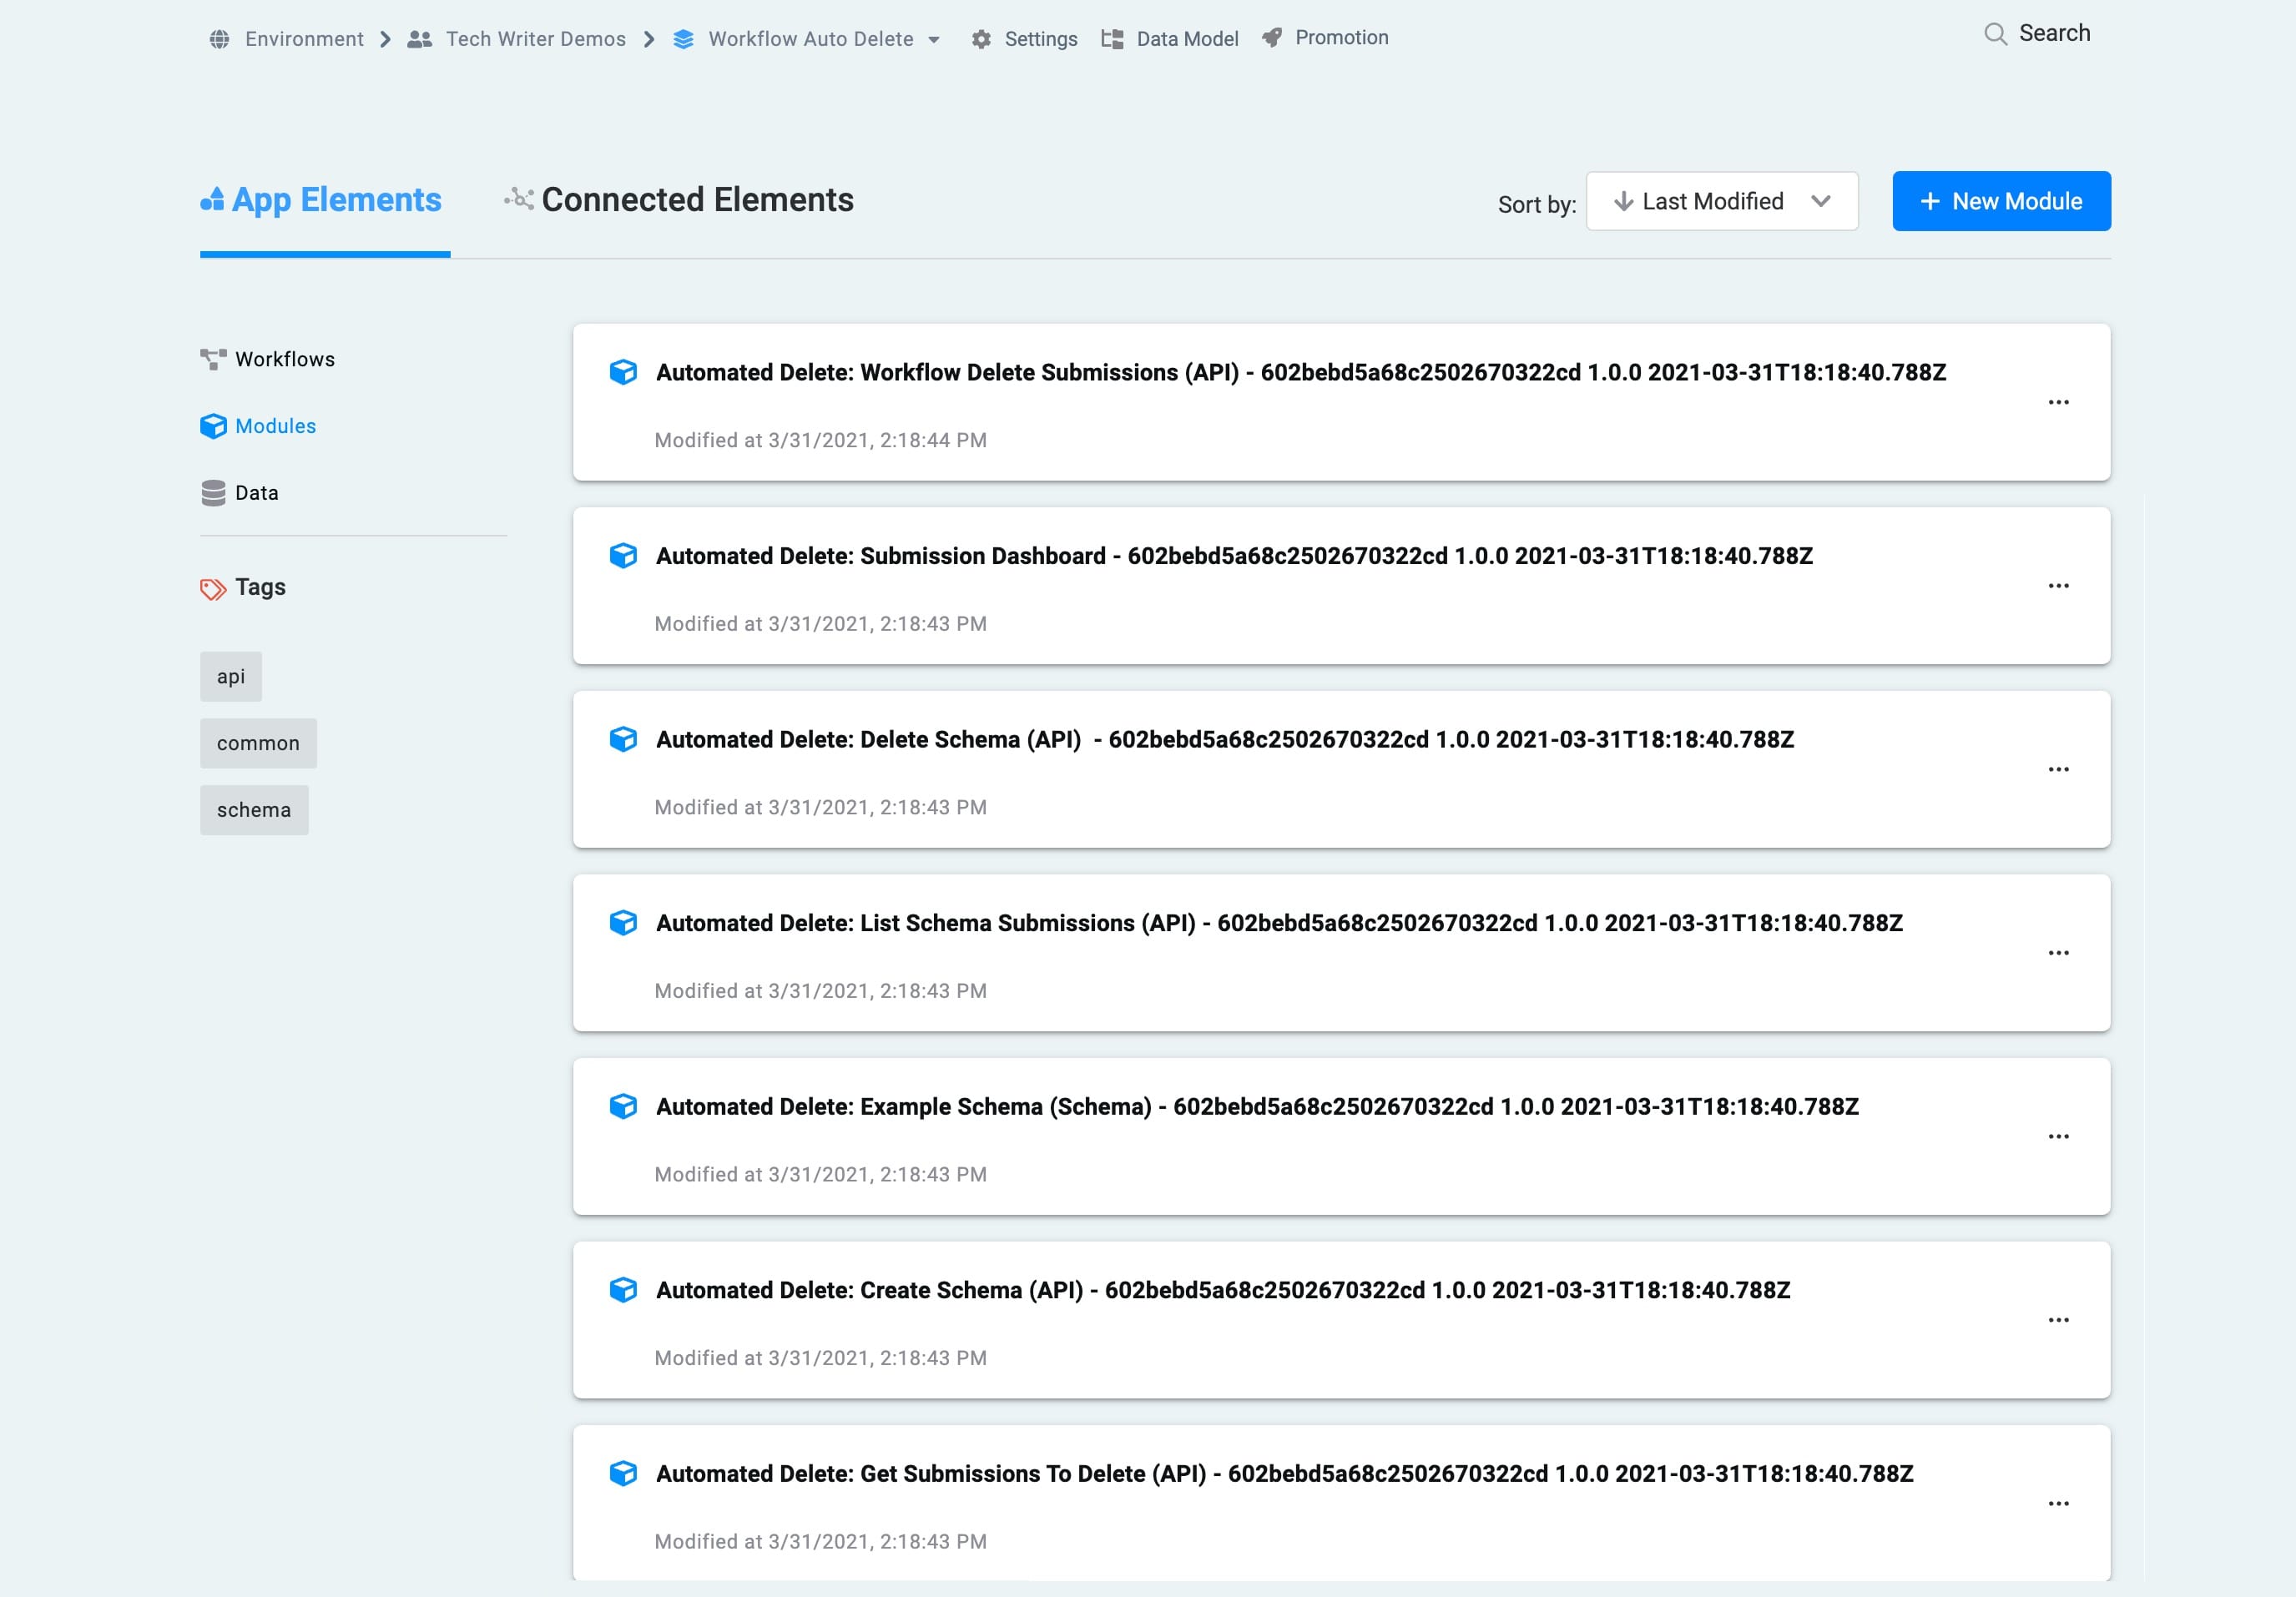
When you create an application from the template, your workflow and module names automatically include the template ID and a time stamp. This is to prevent any duplicate module paths. You're welcome to change module names and module paths at any time.
How the Template Works
Using this template, you can schedule and automate the process of deleting submissions. The template has 1 workflow and 7 modules.
How this Template's Workflow Works
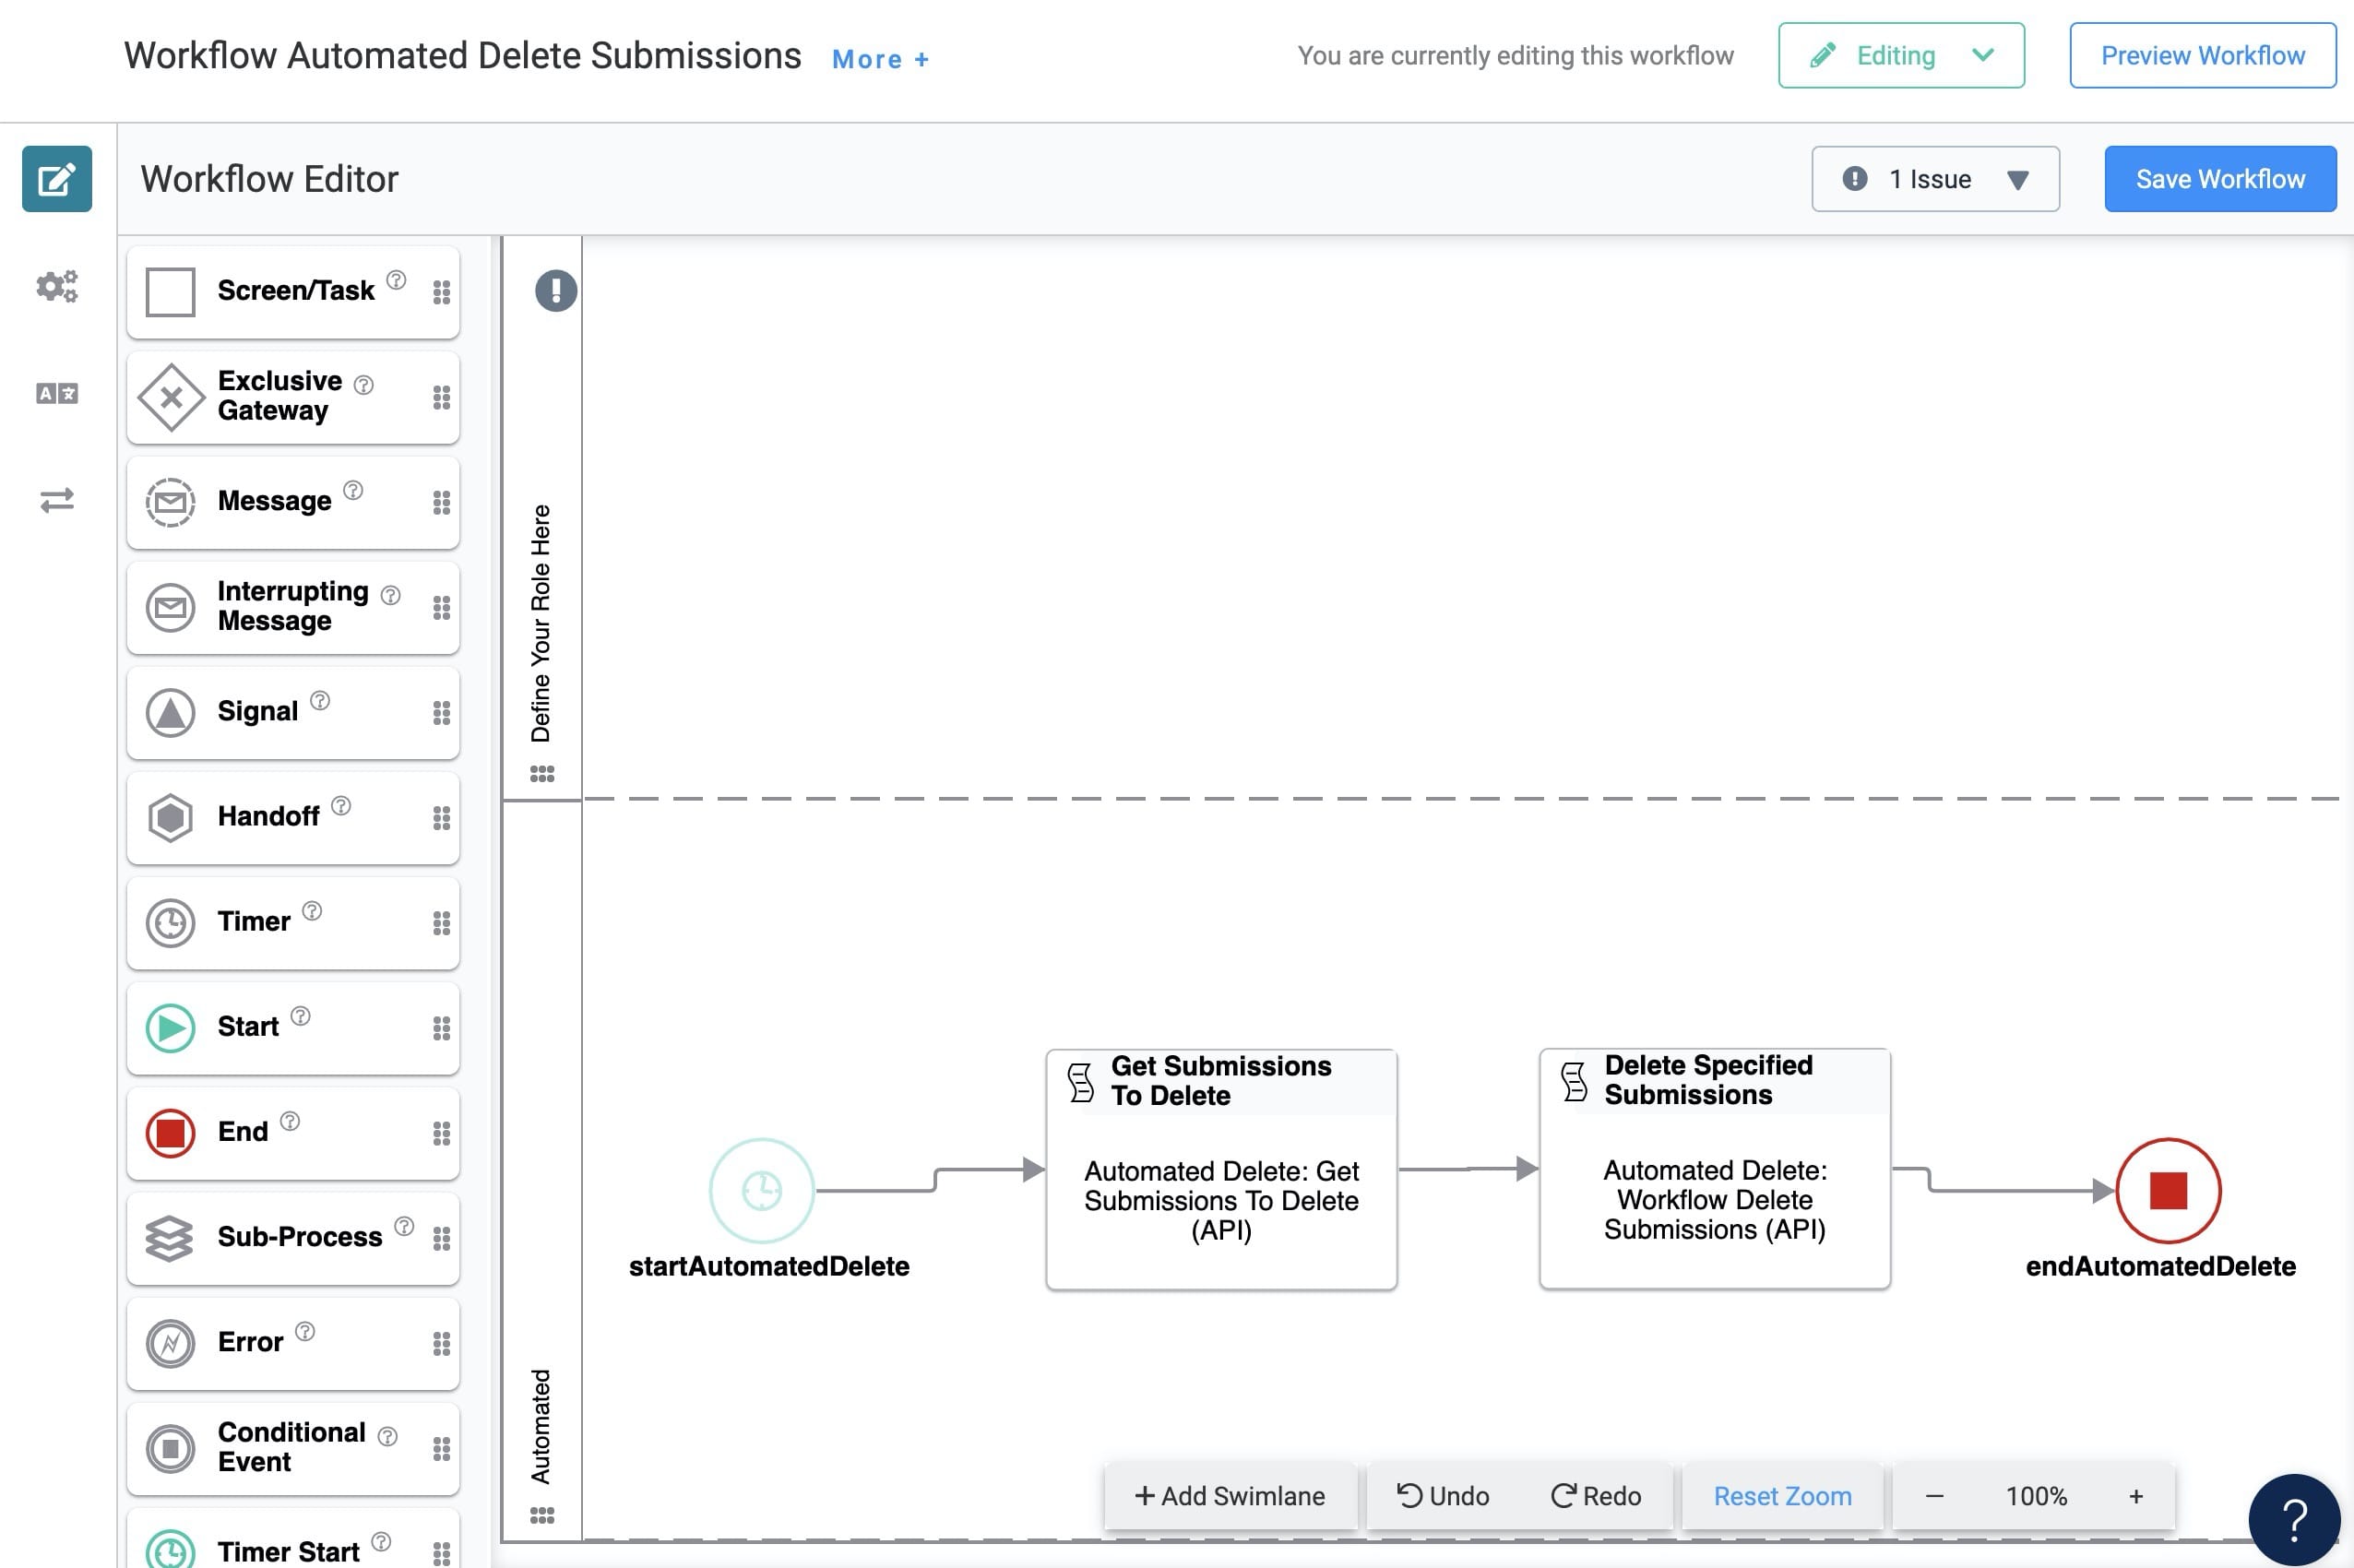
You might notice that the workflow's process lives in the Automated swimlane. This means your workflow can delete submissions in a hands-off, fully-automated way. The workflow kicks off with a Timer Start node, which lets you delete submissions on a set schedule. For example, you can set up the workflow to run every Friday or on the last day of every month. The Timer Start node connects to the Get Submissions to Delete (API) module. That module's job is to get the submissions you want to delete. The Get Submissions to Delete (API) module connects to the Workflow Delete Submissions (API) module. As the title suggests, this module is what deletes the submissions. Finally, the workflow wraps up with an End node.
Here's how your workflow will look:
How the Get Submissions to Delete (API) Module Works
The first step in your workflow is the Get Submissions to Delete (API) module. It calls the List Schema Submissions (API) module and retrieves only the submissions with a value of Delete in the deleteCriteria field. Then, the Get Submissions to Delete (API) module hands off to the next step of your workflow. The next step is the Workflow Delete Submissions (API) module. We'll cover that module in a bit.
For now, here's how the Get Submissions to Delete (API) module looks in the Module Builder:
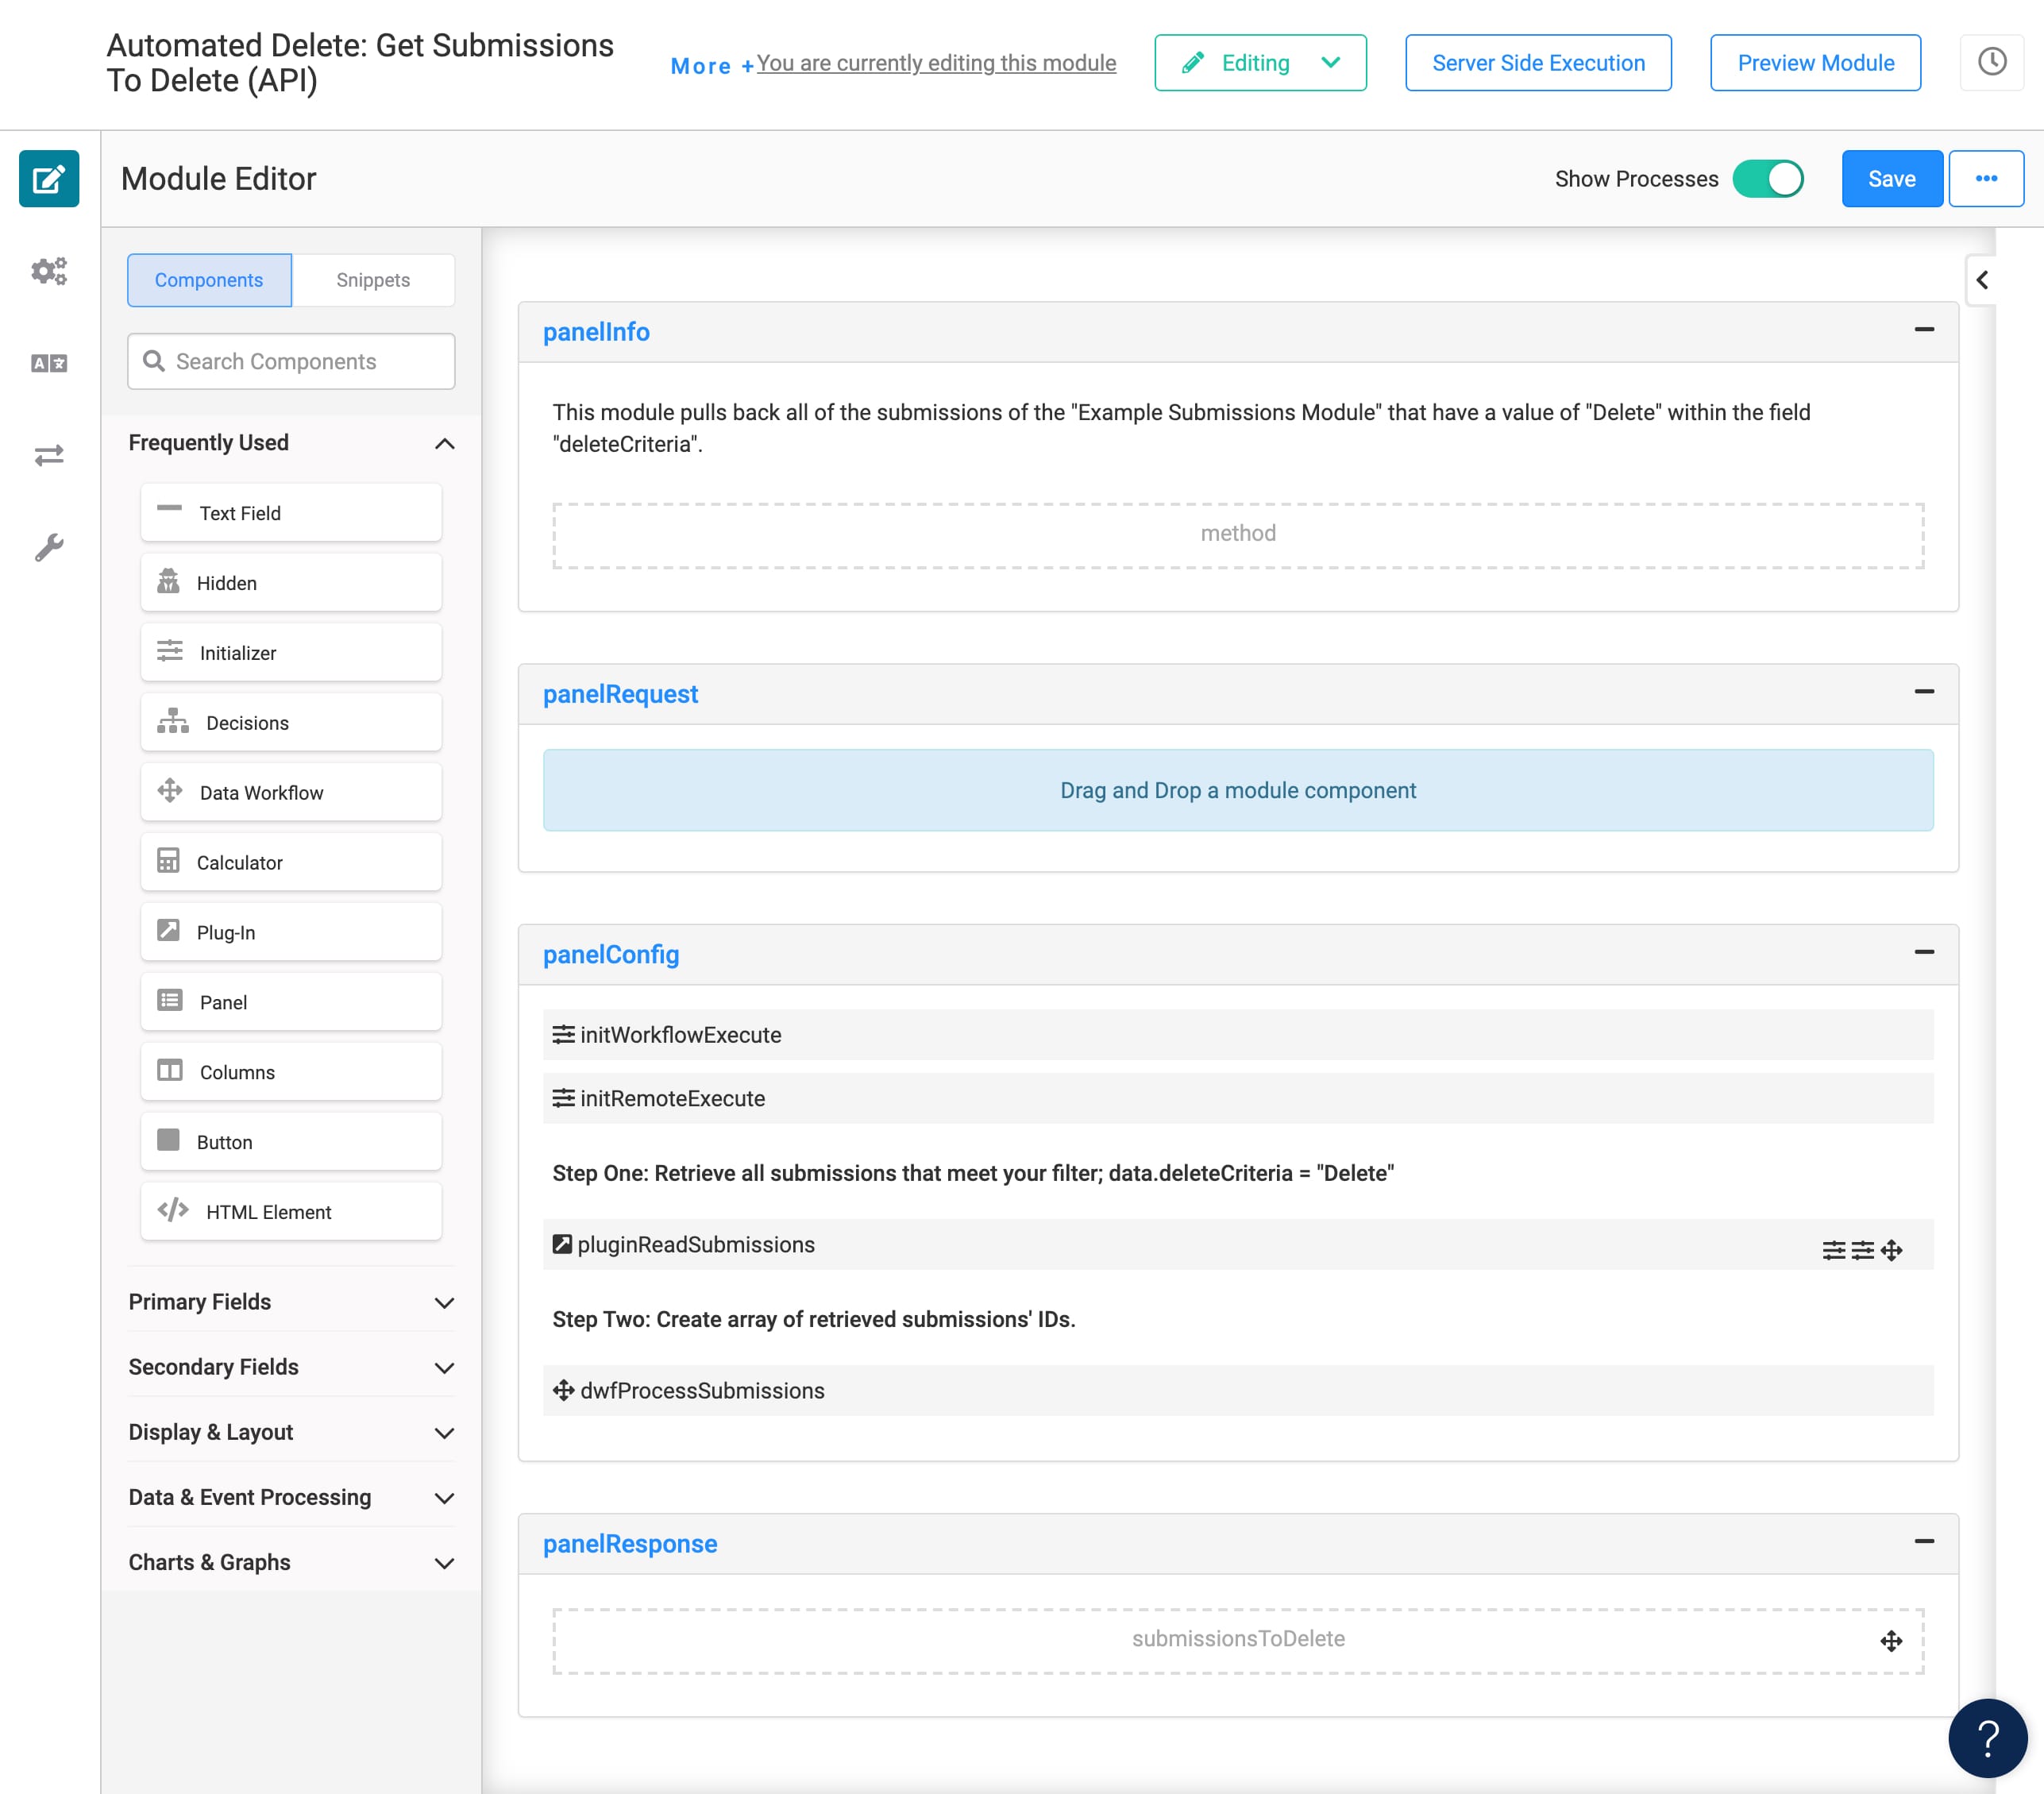
Let's look at how these different components interact with each other. You'll notice there are 2 Initializer components. They both trigger the pluginReadSubmissions Plug-In component. If you run your normal workflow, the initAutomatedWorkflowExecute Initializer fires. There's also the initRemoteExecute Initializer. This Initializer lets this API module trigger like a normal remote execute API module, even without a new submission ID. It tells the logic in the module, "There's no new submission ID, but go ahead and run." So, if you do a server-side execution of your module, the initRemoteExecute fires.
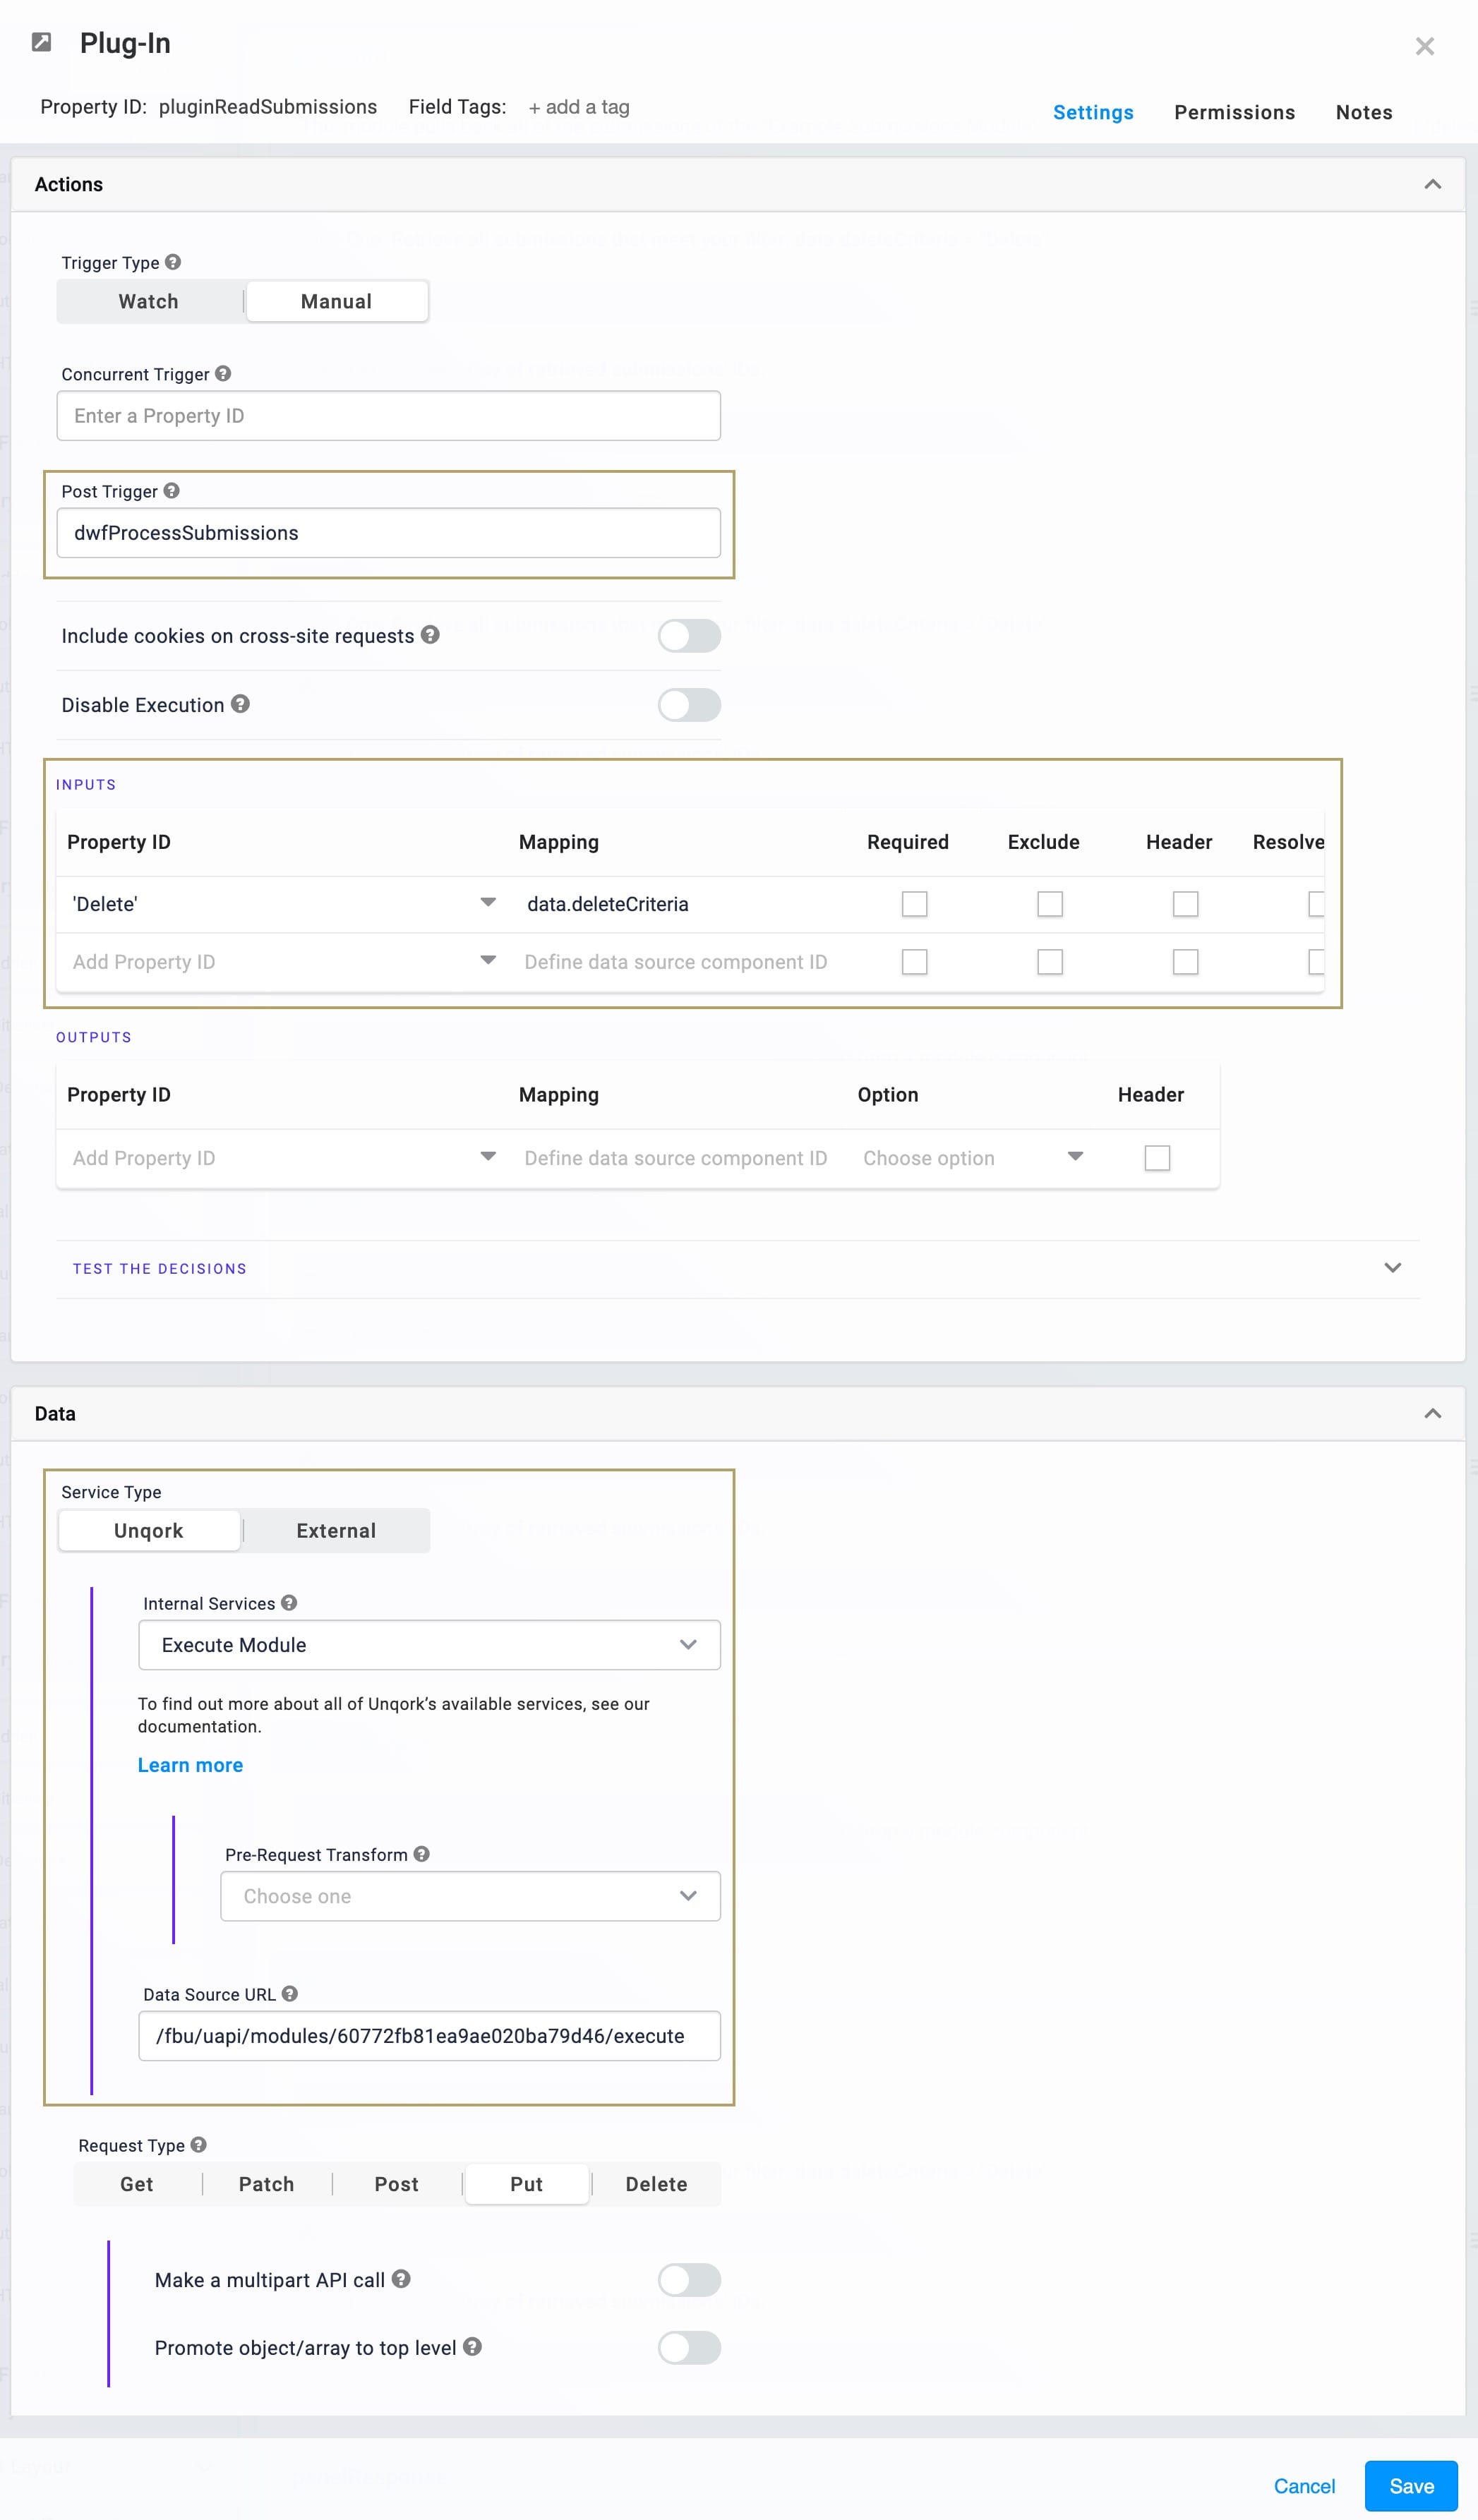
The pluginReadSubmissions Plug-In does 2 things. First, it executes the List Submissions (API) module, telling it to only return submissions with a deleteCriteria of Delete. Then, it triggers the dwfProcessSubmissions Data Workflow component. Here's a sneak peek at the configuration of the pluginReadSubmissions Plug-In component.
The dwfProcessSubmissions extracts only the submission IDs from the response. It then creates an array of the submission IDs and outputs that array to the submissionsToDelete Hidden component.
How the List Submissions (API) Module Works
The List Submissions (API) module retrieves all active schema submissions in your application. This module also populates the example schema dashboard. If you specify search criteria for your submissions, the API module will only return filtered results. Let's look at an example by revisiting the Get Submissions to Delete (API) call. If you remember, the Plug-In in that module calls this List Submissions (API) module. And it asks for only the submissions with Delete as the deleteCriteria. The List Submissions (API) module then returns only the specified submissions.
Here's how the List Submissions (API) module looks in the Module Builder:
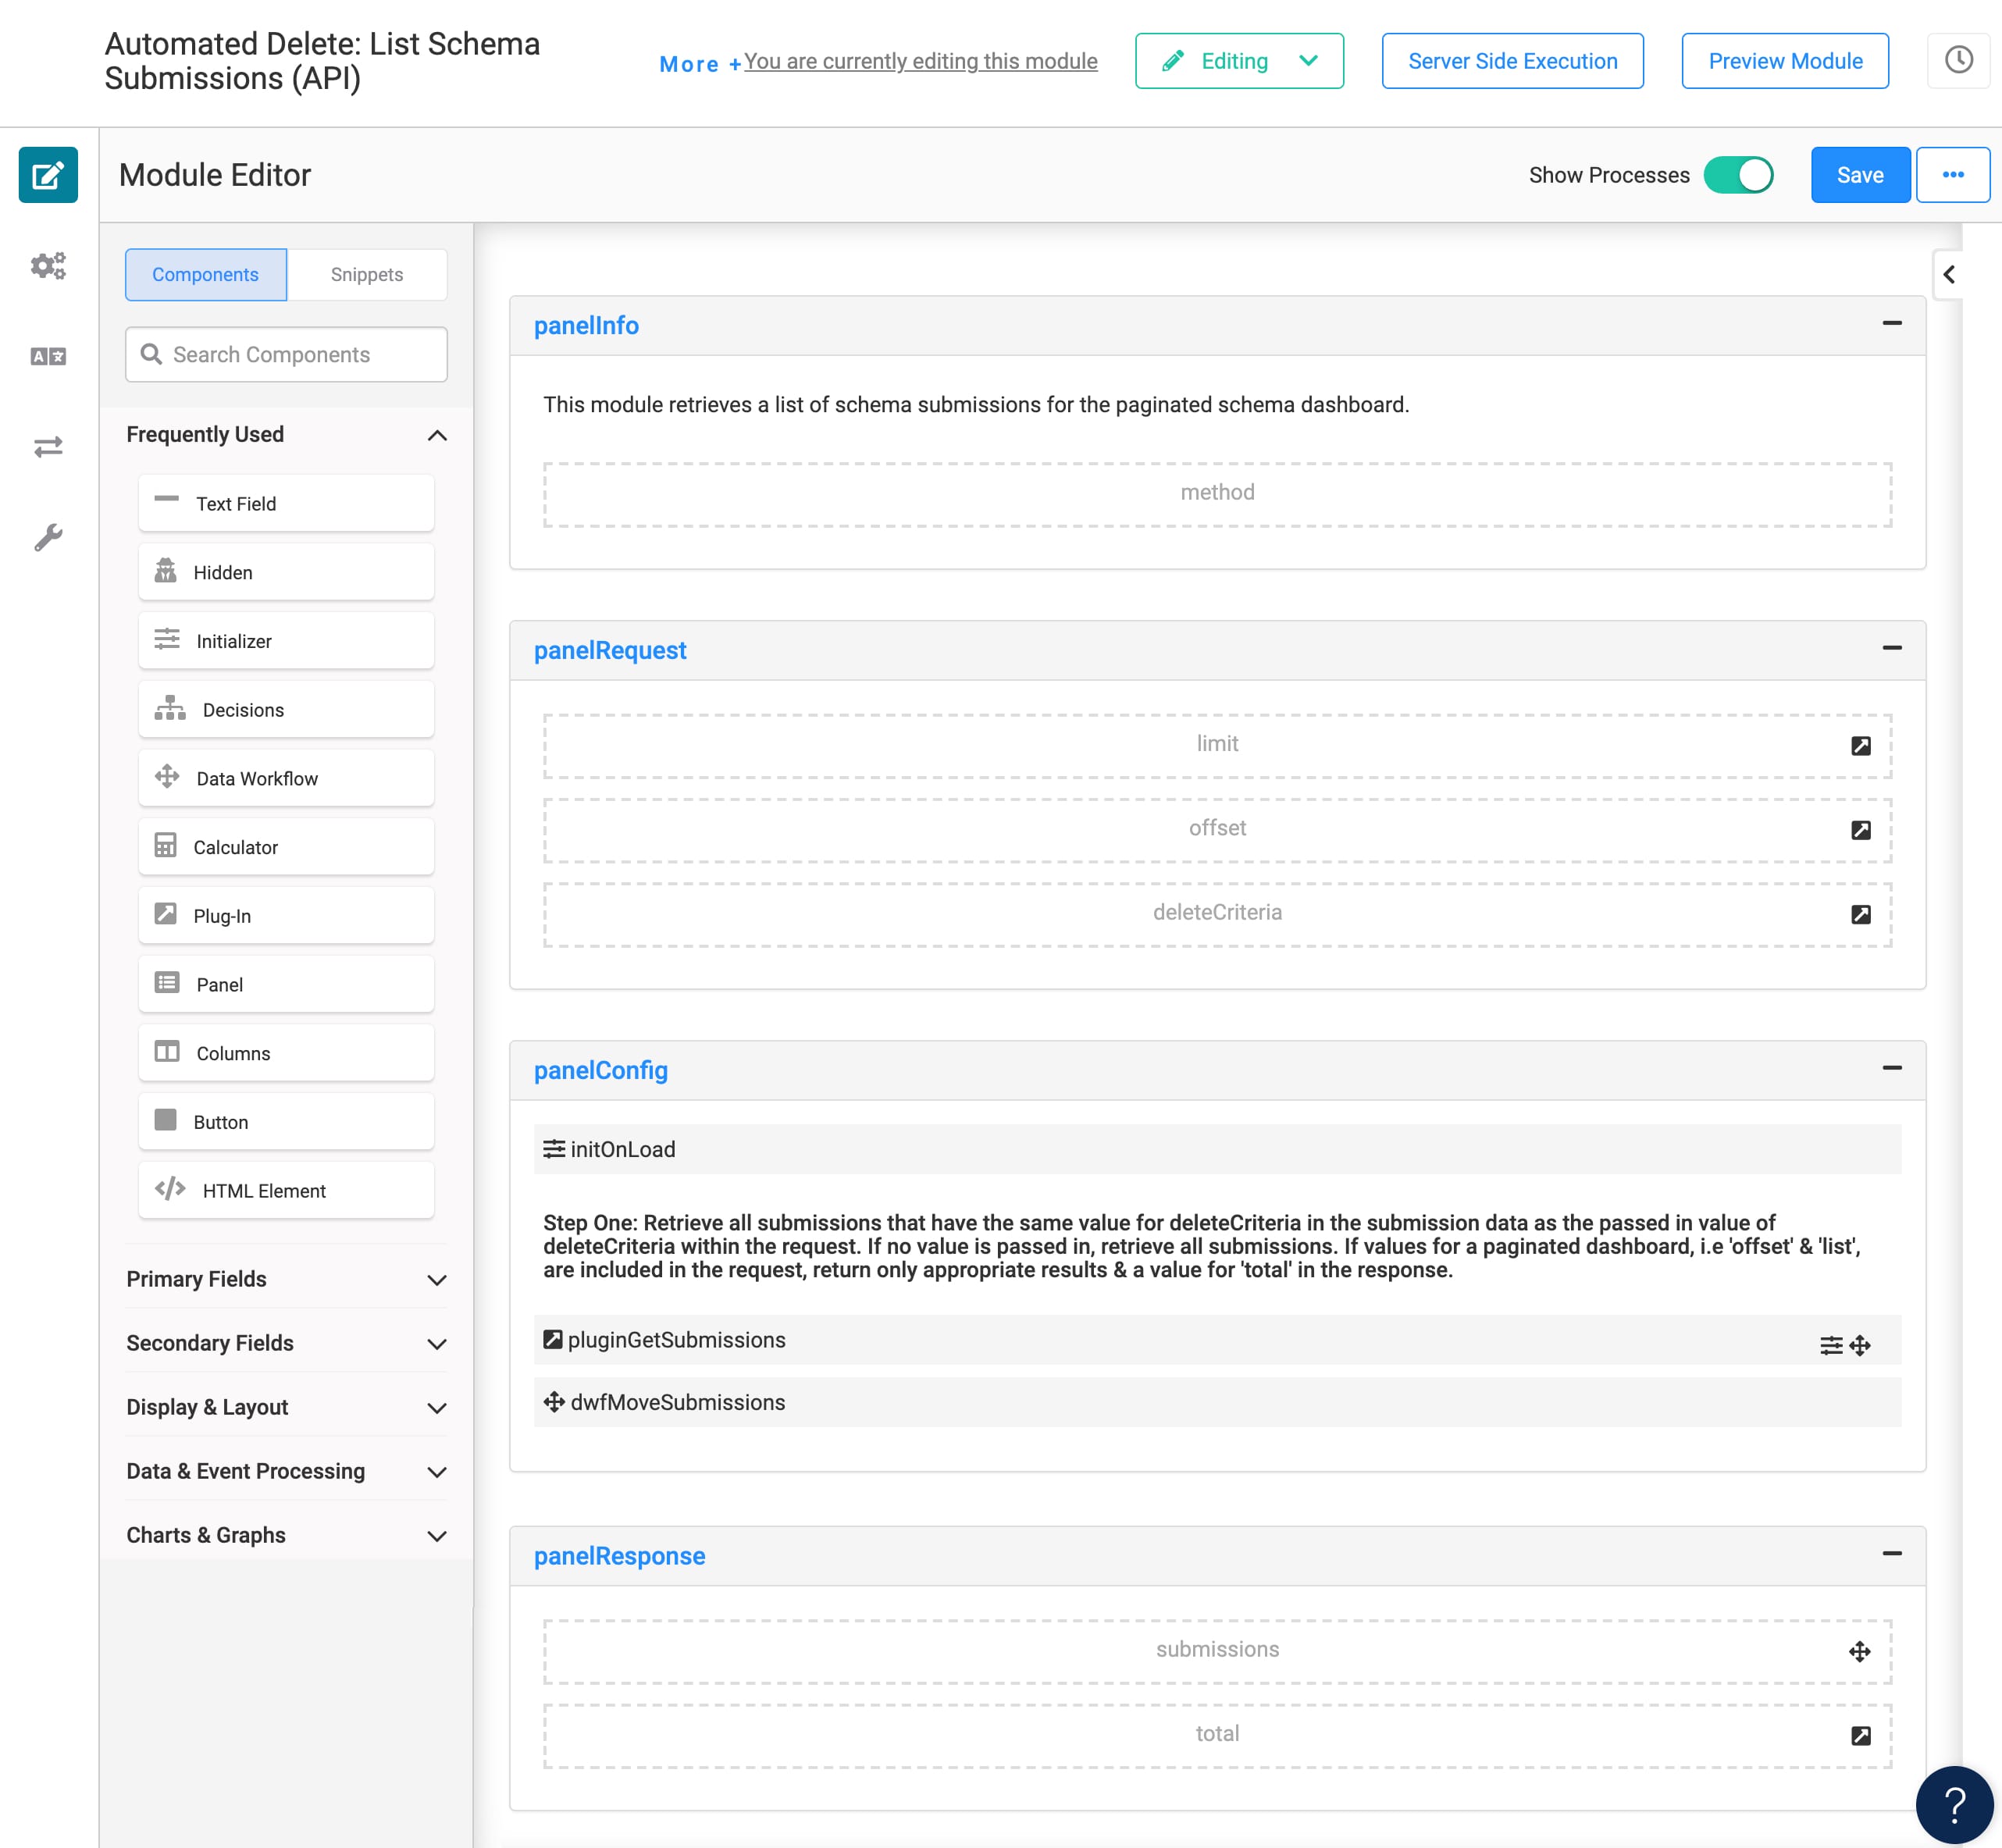
When called, this module triggers the initOnLoad Initializer. This Initializer fires the pluginGetSubmissions Plug-In, which retrieves submissions from the schema module. The dwfMoveSubmissions brings the submissions into the submissions Hidden component, which maps to the dashboard.
You'll notice Hidden components in the panelRequest Panel named limit and offset. These fields work with your dashboard to limit how many submissions come back at a time. This is called server-side pagination, and we've already set up the configuration for you.
How the Workflow Delete Submissions (API) Module Works
The Workflow Delete Submissions (API) module is the second step of the workflow. This API module takes the submissions retrieved from the Get Submissions to Delete (API) module. Then, it loops through and deletes the submissions in batches of 25 using the Delete Schema (API) call. The looping continues until the Delete Submissions (API) call deletes all specified submissions.
Here's how the Workflow Delete Submissions (API) module looks in the Module Builder:
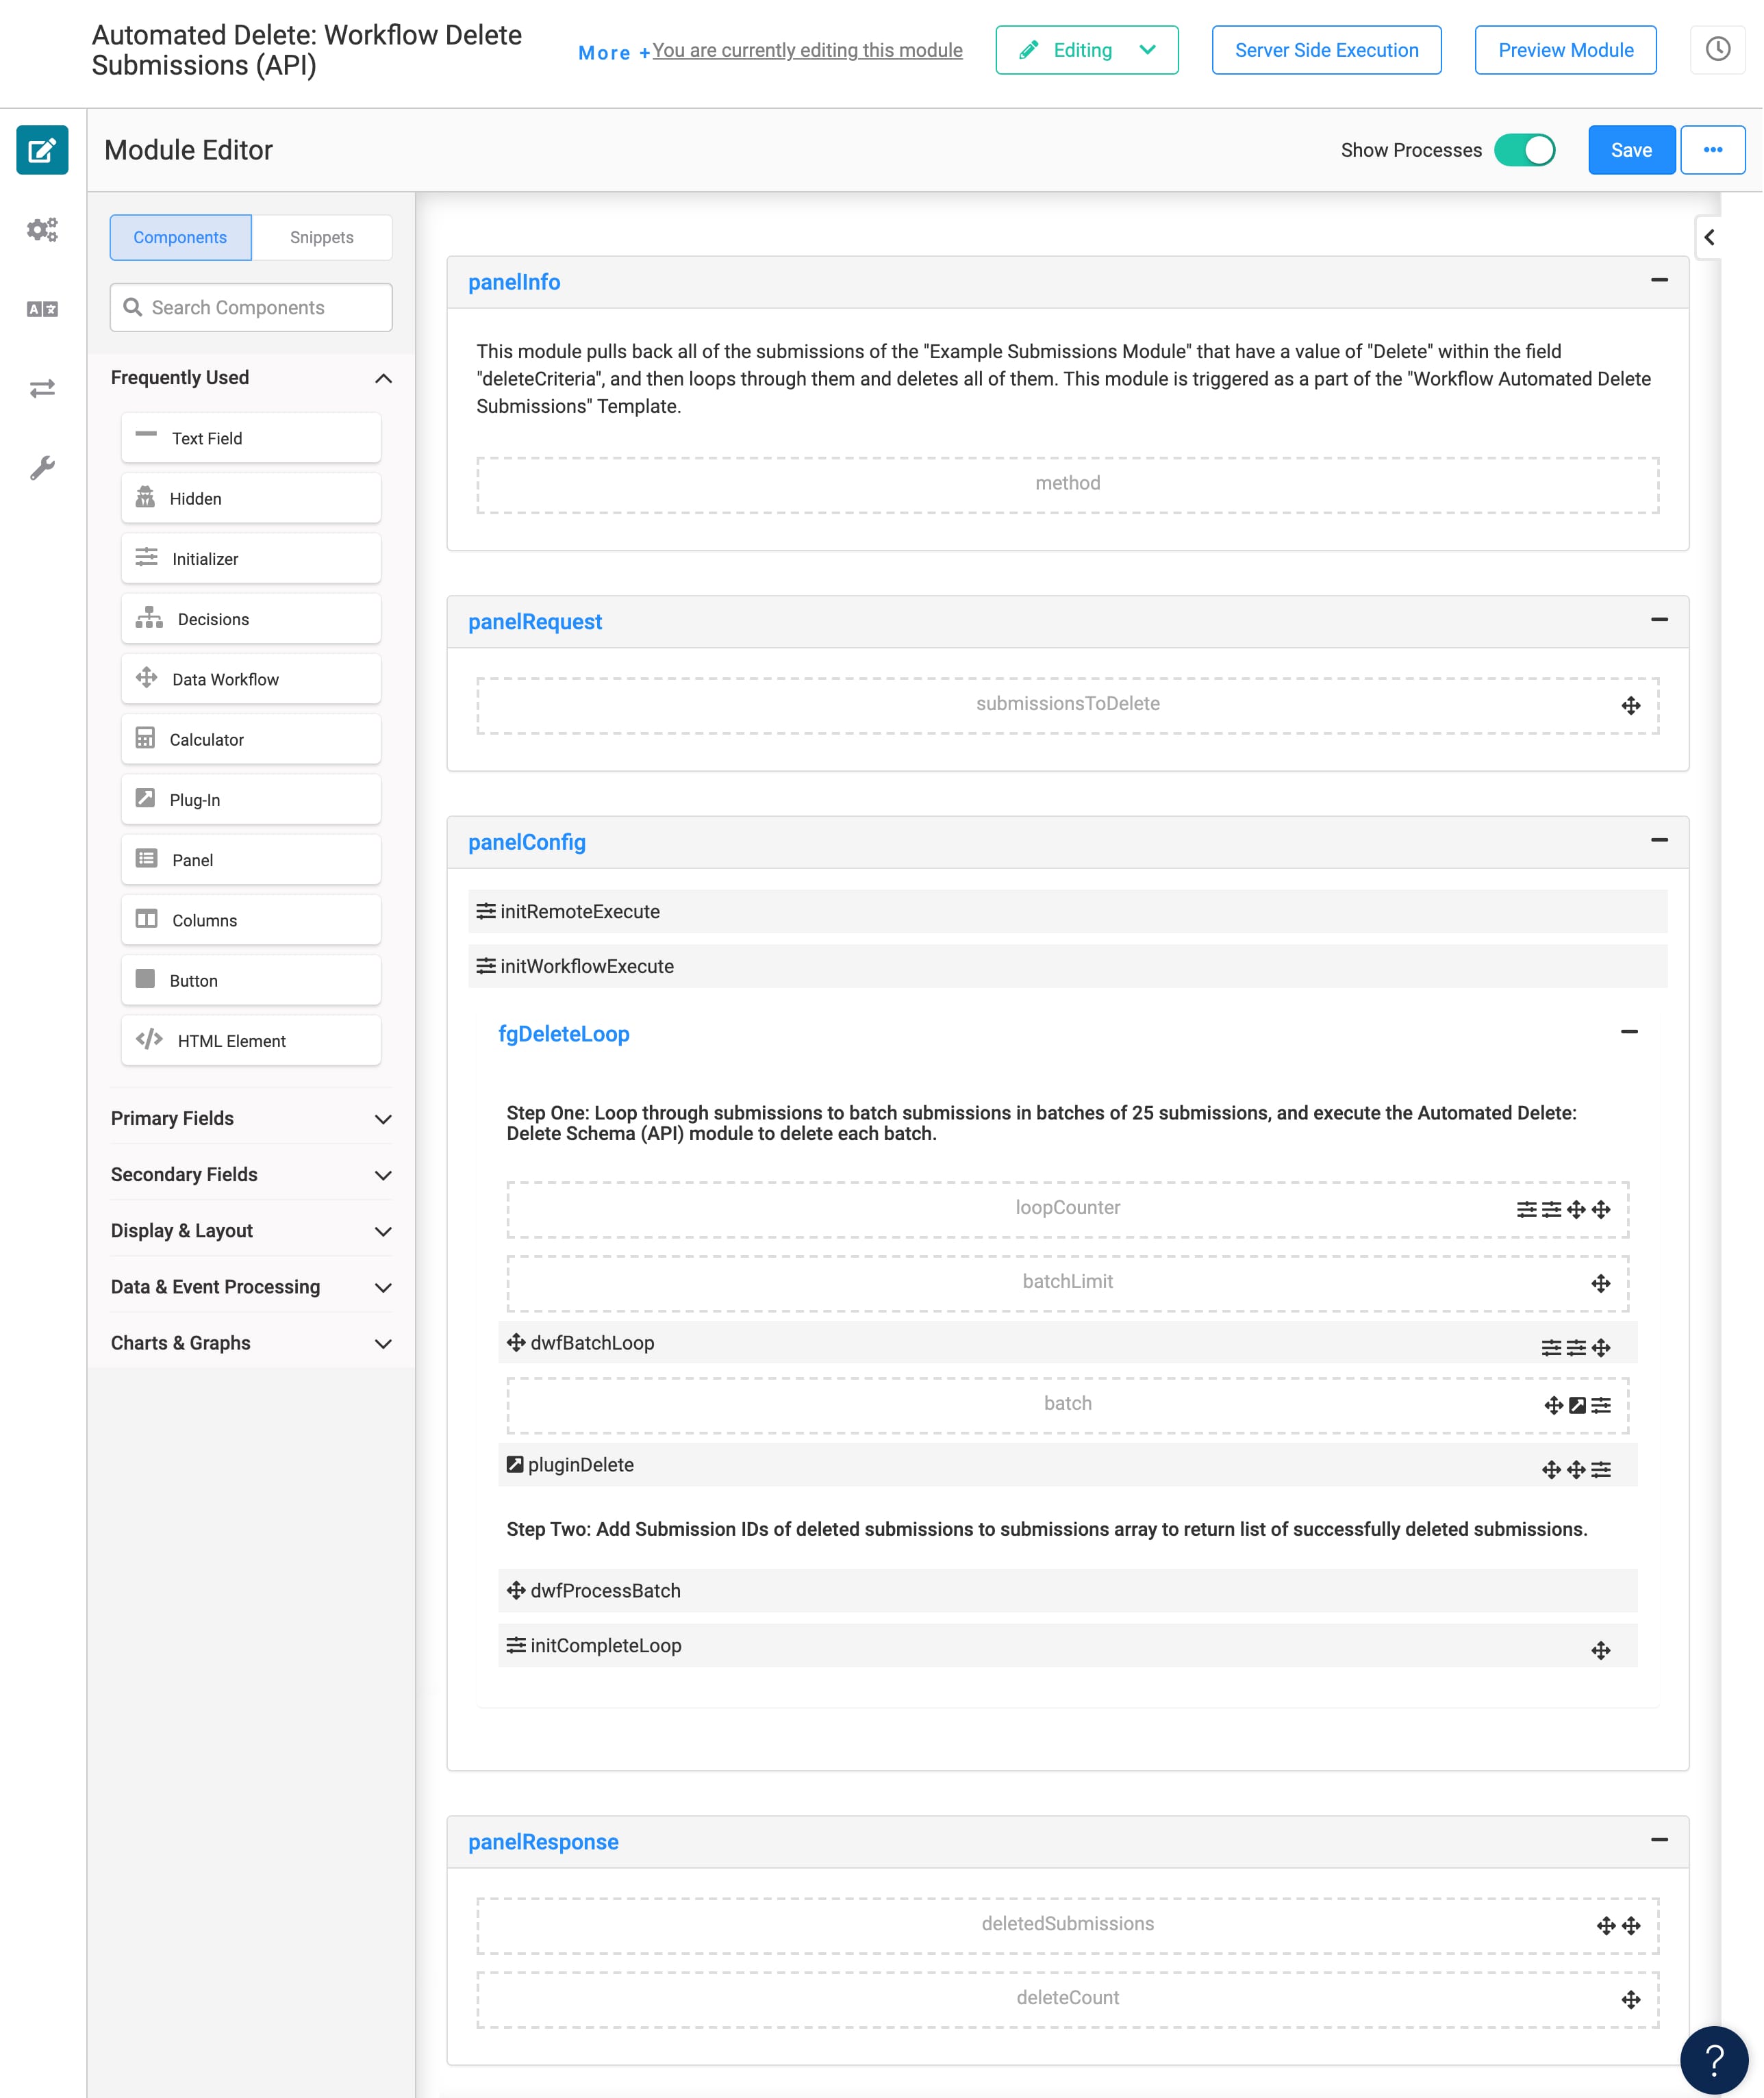
This module uses Unqork's Batch Loop snippet as its foundation. The module also has 2 Initializer components, just like the List Submissions (API) module. Both Initializers trigger the pluginDelete Plug-In, depending on how you run your module.
The max limit for deleting submissions is 25 at a time. So, if you have lots of submissions, the automated delete process must happen in batches. The submissionsToDelete Hidden component has a list of all the submissions to delete. The dwfBatchLoop Data Workflow component loops over this data and turns it into array of submission IDs. So, the data is no longer in key/value pairs. Instead, you'll have values of the submission IDs to delete. Your dwfBatchLoop then joins those values with a comma. Rather than an array, you'll now have one long comma-separated string of up to 25 submission IDs. This string outputs to the batch Hidden component.
Once you have that string, it passes to the pluginDelete Plug-In, which calls the Delete Schema (API) module.
The loopCounter Hidden component makes sure the process stops when you're out of data. Say you had 35 submissions to delete. The first batch will delete 25. The next batch will delete the remaining 10. The loop continues until you no longer have submissions to delete. And the dwfProcessBatch outputs a list of deleted submission IDs to the deletedSubmissions Hidden component. The Data Workflow also outputs the total count of deleted submissions to the deleteCount Hidden component.
The initCompleteLoop Initializer clears the batch Hidden component and stops the automated process.
The basis of this loop comes from the Batch Loop snippet. To learn more about looping in Unqork, search Batch Loop snippet in our In-Product Help.
How the Delete Schema (API) Module Works
This API module deletes submissions of the schema module relating to the submission IDs in the request. The request comes from the Workflow Delete Submissions (API) module.
Here's how the Delete Schema (API) module looks in the Module Builder:
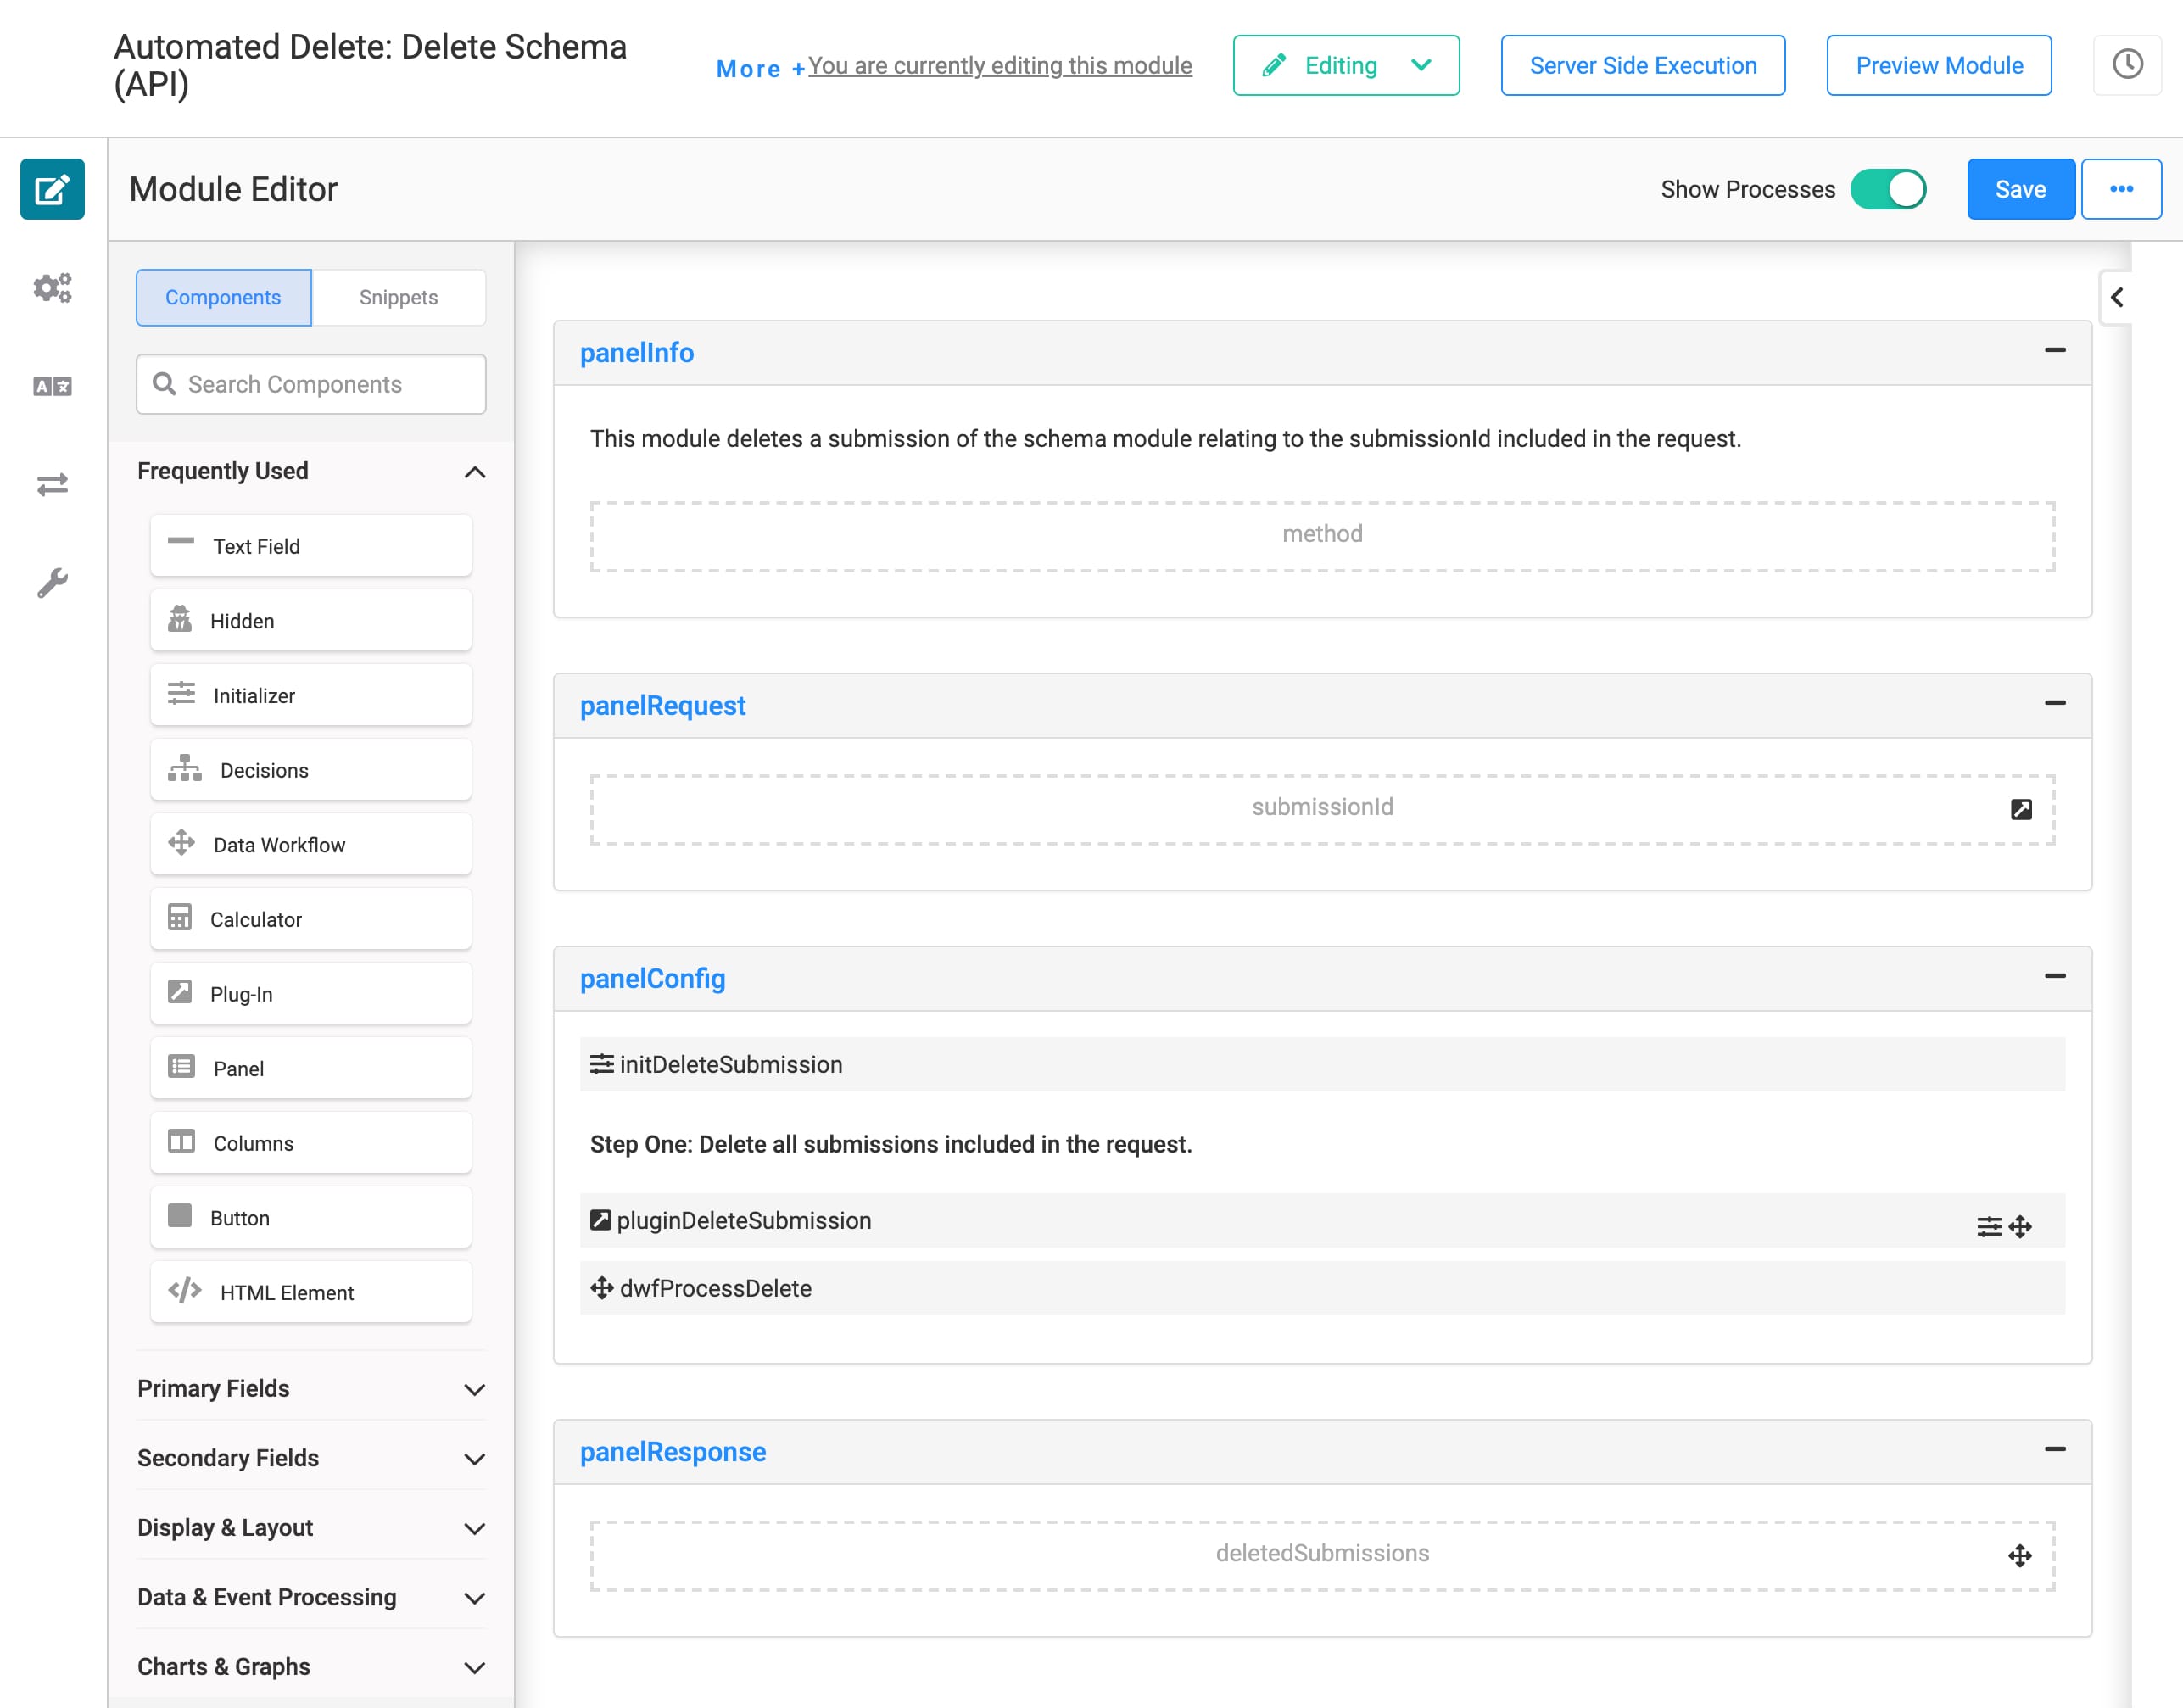
The initDeleteSubmission Initializer fires the pluginDeleteSubmission Plug-In. The Plug-In deletes submissions from your schema module. Then, the Plug-In triggers the dwfProcessDelete Data Workflow component. The Data Workflow uses the Pick operator to extract just the IDs of the deleted submissions. From there, it returns that information to the deletedSubmissions field in the Workflow Delete Submissions (API) module. This information saves to the database as a part of that Workflow Delete Submissions (API) module.
So, what happens the next time your automated delete process runs? The stored list of deleted submissions rebuilds with the new deleted submissions. So, you'll always have an up-to-date list of your deleted submissions.
How the Schema Module Works
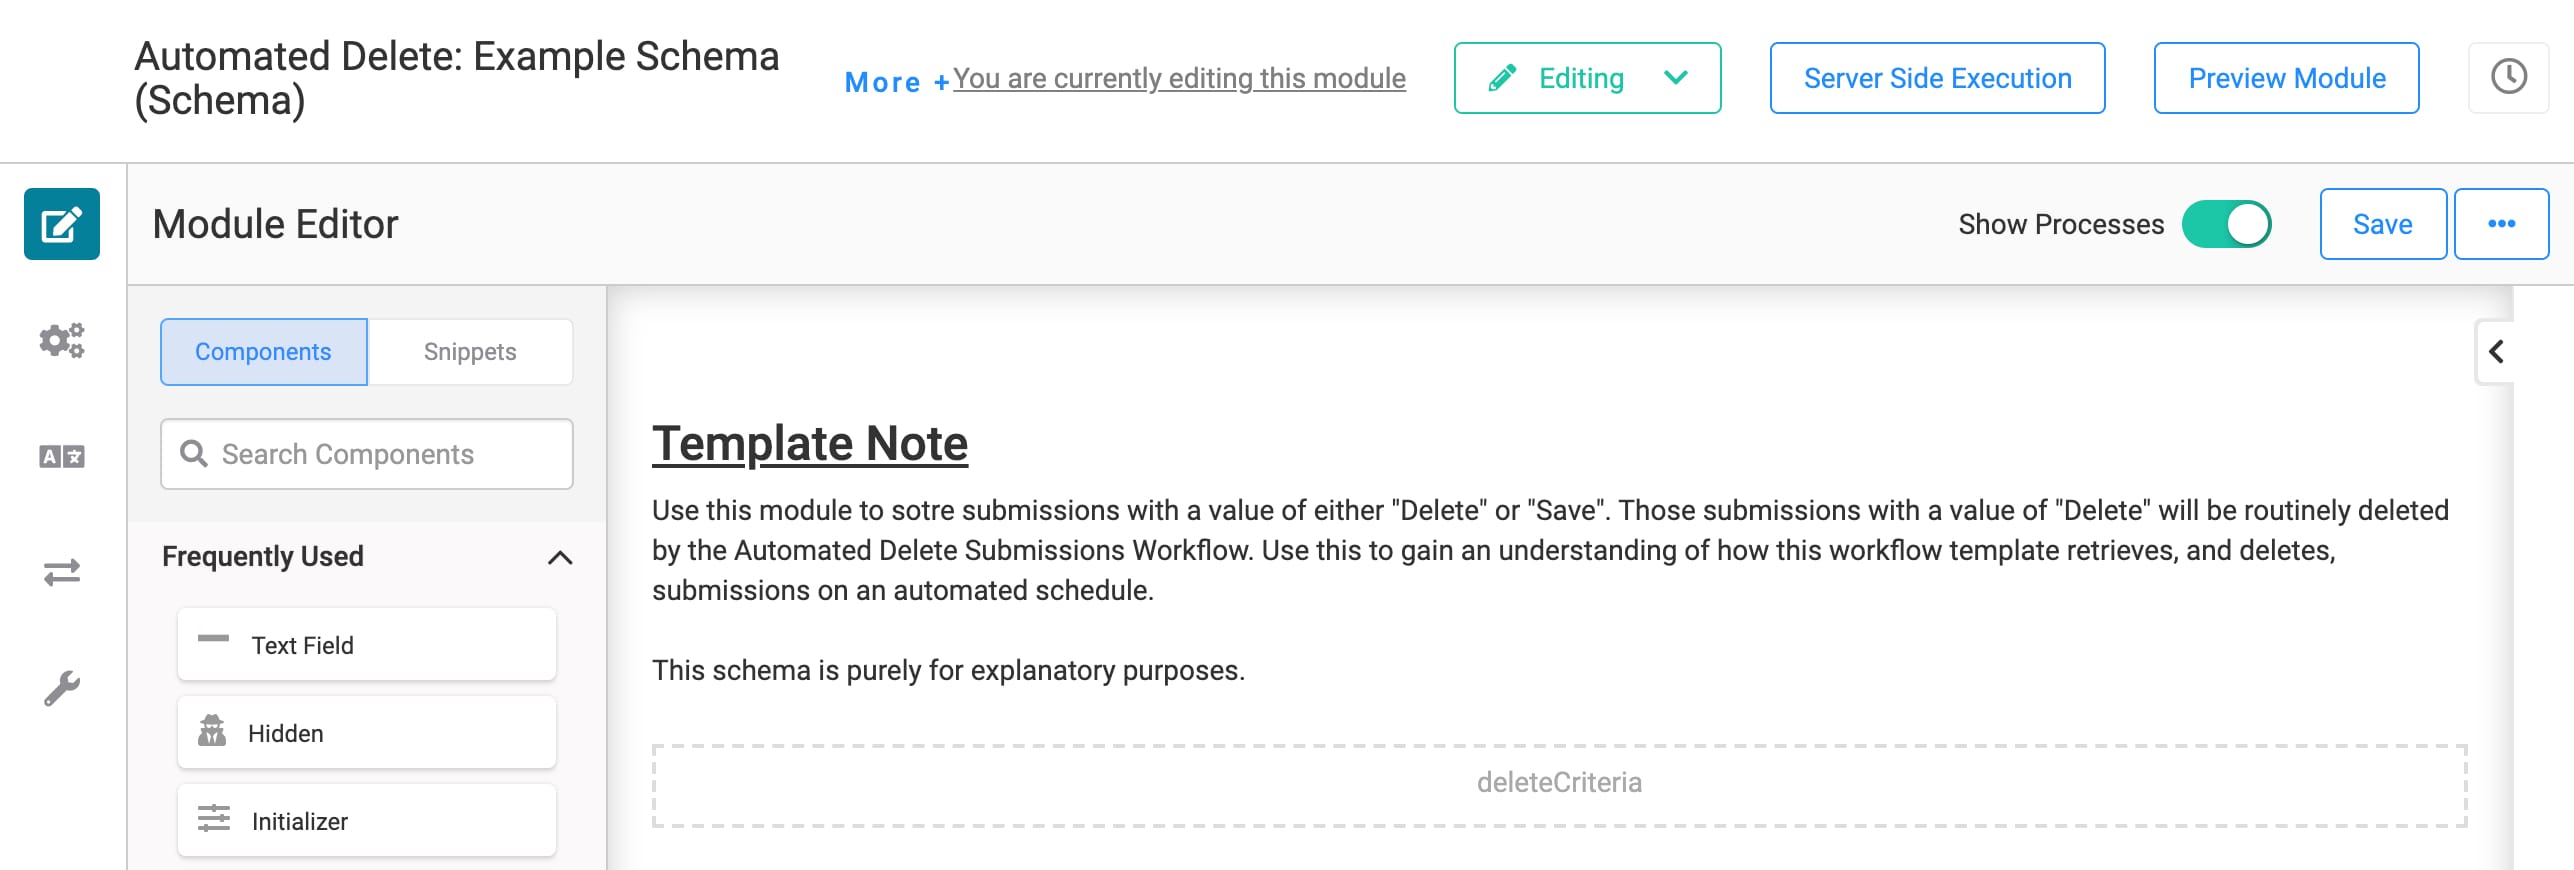
This back-end module securely stores your schema submissions. The other API modules all interact with this module. Keep in mind that this is an example schema module. You'll want to replace it with your own schema module. We'll cover that in the Customizing the Template section. When you build your application from this template, the schema module will have 1 Hidden component called deleteCriteria. It stores submissions with either Delete or Save as the value.
Here's how the example schema module looks in the Module Builder:
How the Create Schema (API) Module Works
This API module lets you create and store submissions to your schema module. You'll access the Create option on the schema submission dashboard. You'll set the value of each new submission to Delete or Save. Look at this module as a placeholder that lets you test the functionality of this template.
Here's how the Create Schema (API) module looks in the Module Builder:
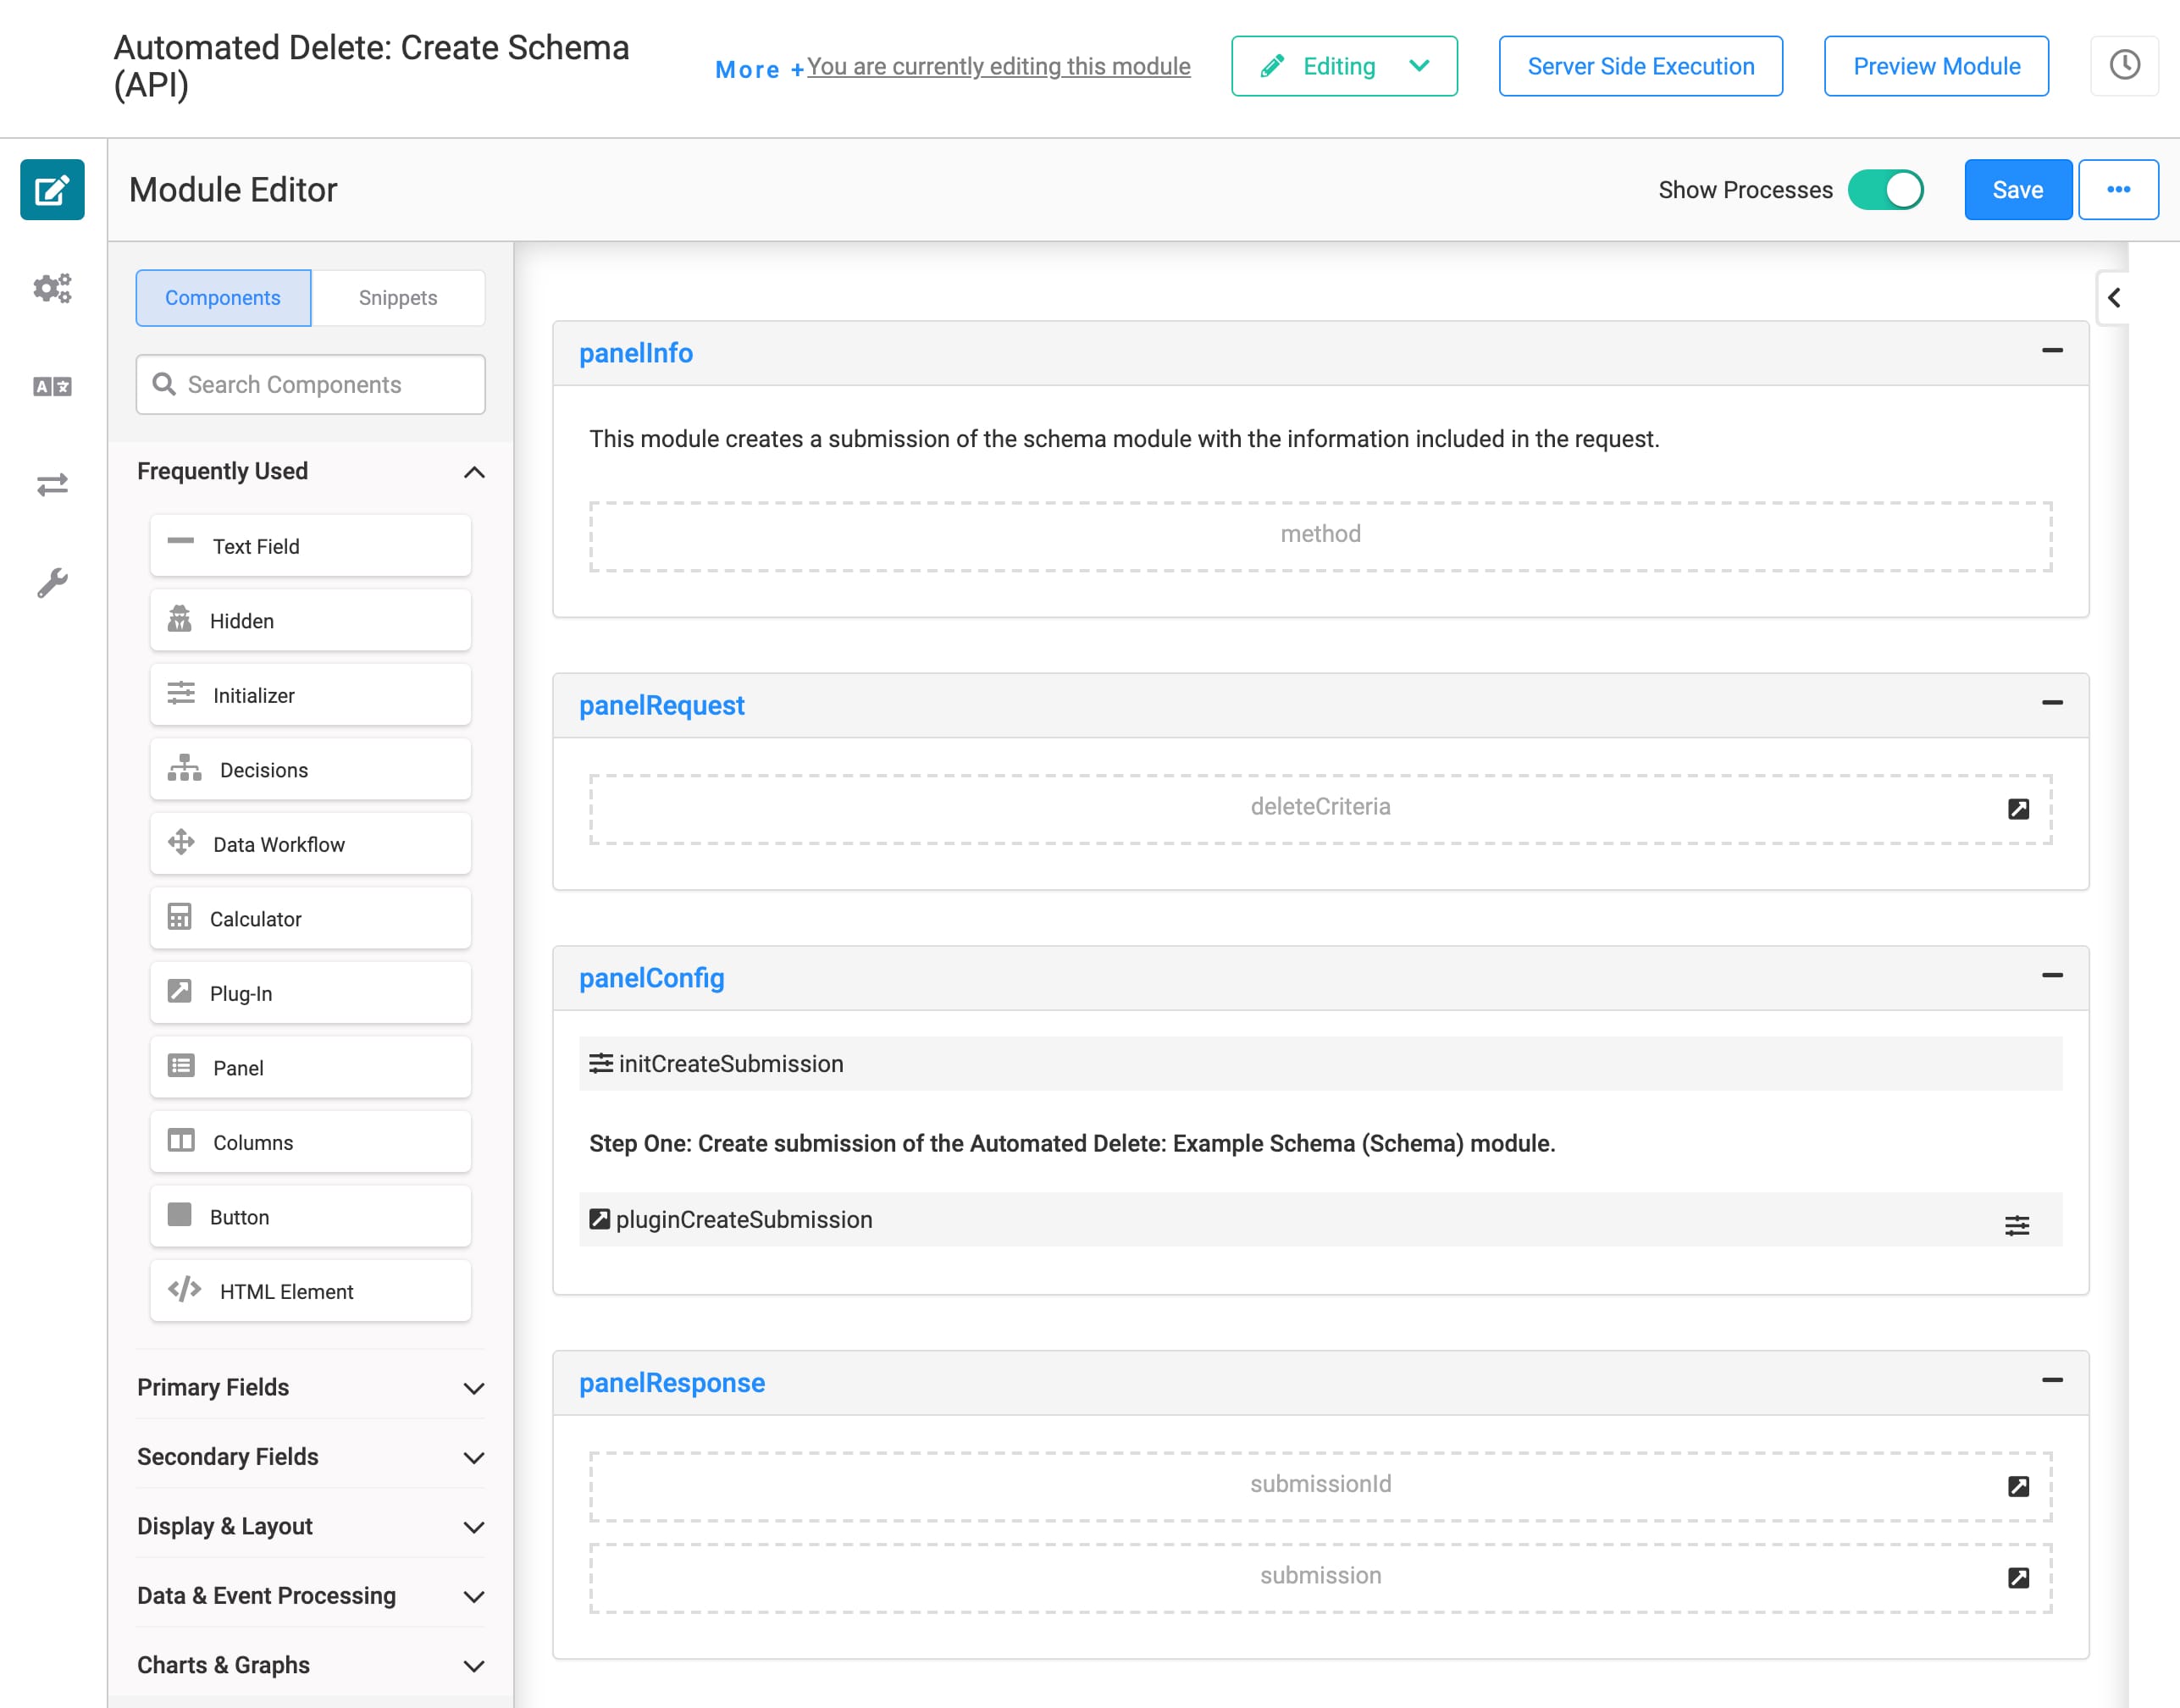
You'll access the Create option on your schema submission dashboard. When you click Create New Submission on the dashboard, a Create Submission modal opens. Then, you'll select either Delete or Save and click Create Submission. The Create Submission button has logic that calls this Create Schema (API) module. The initCreateSubmission Initializer fires, which then triggers the pluginCreateSubmission Plug-In. This Plug-In takes the information you entered and creates a new submission in your schema module. If you refresh your dashboard in Express View, you'll see your new submission listed.
How the Schema Dashboard Module Works
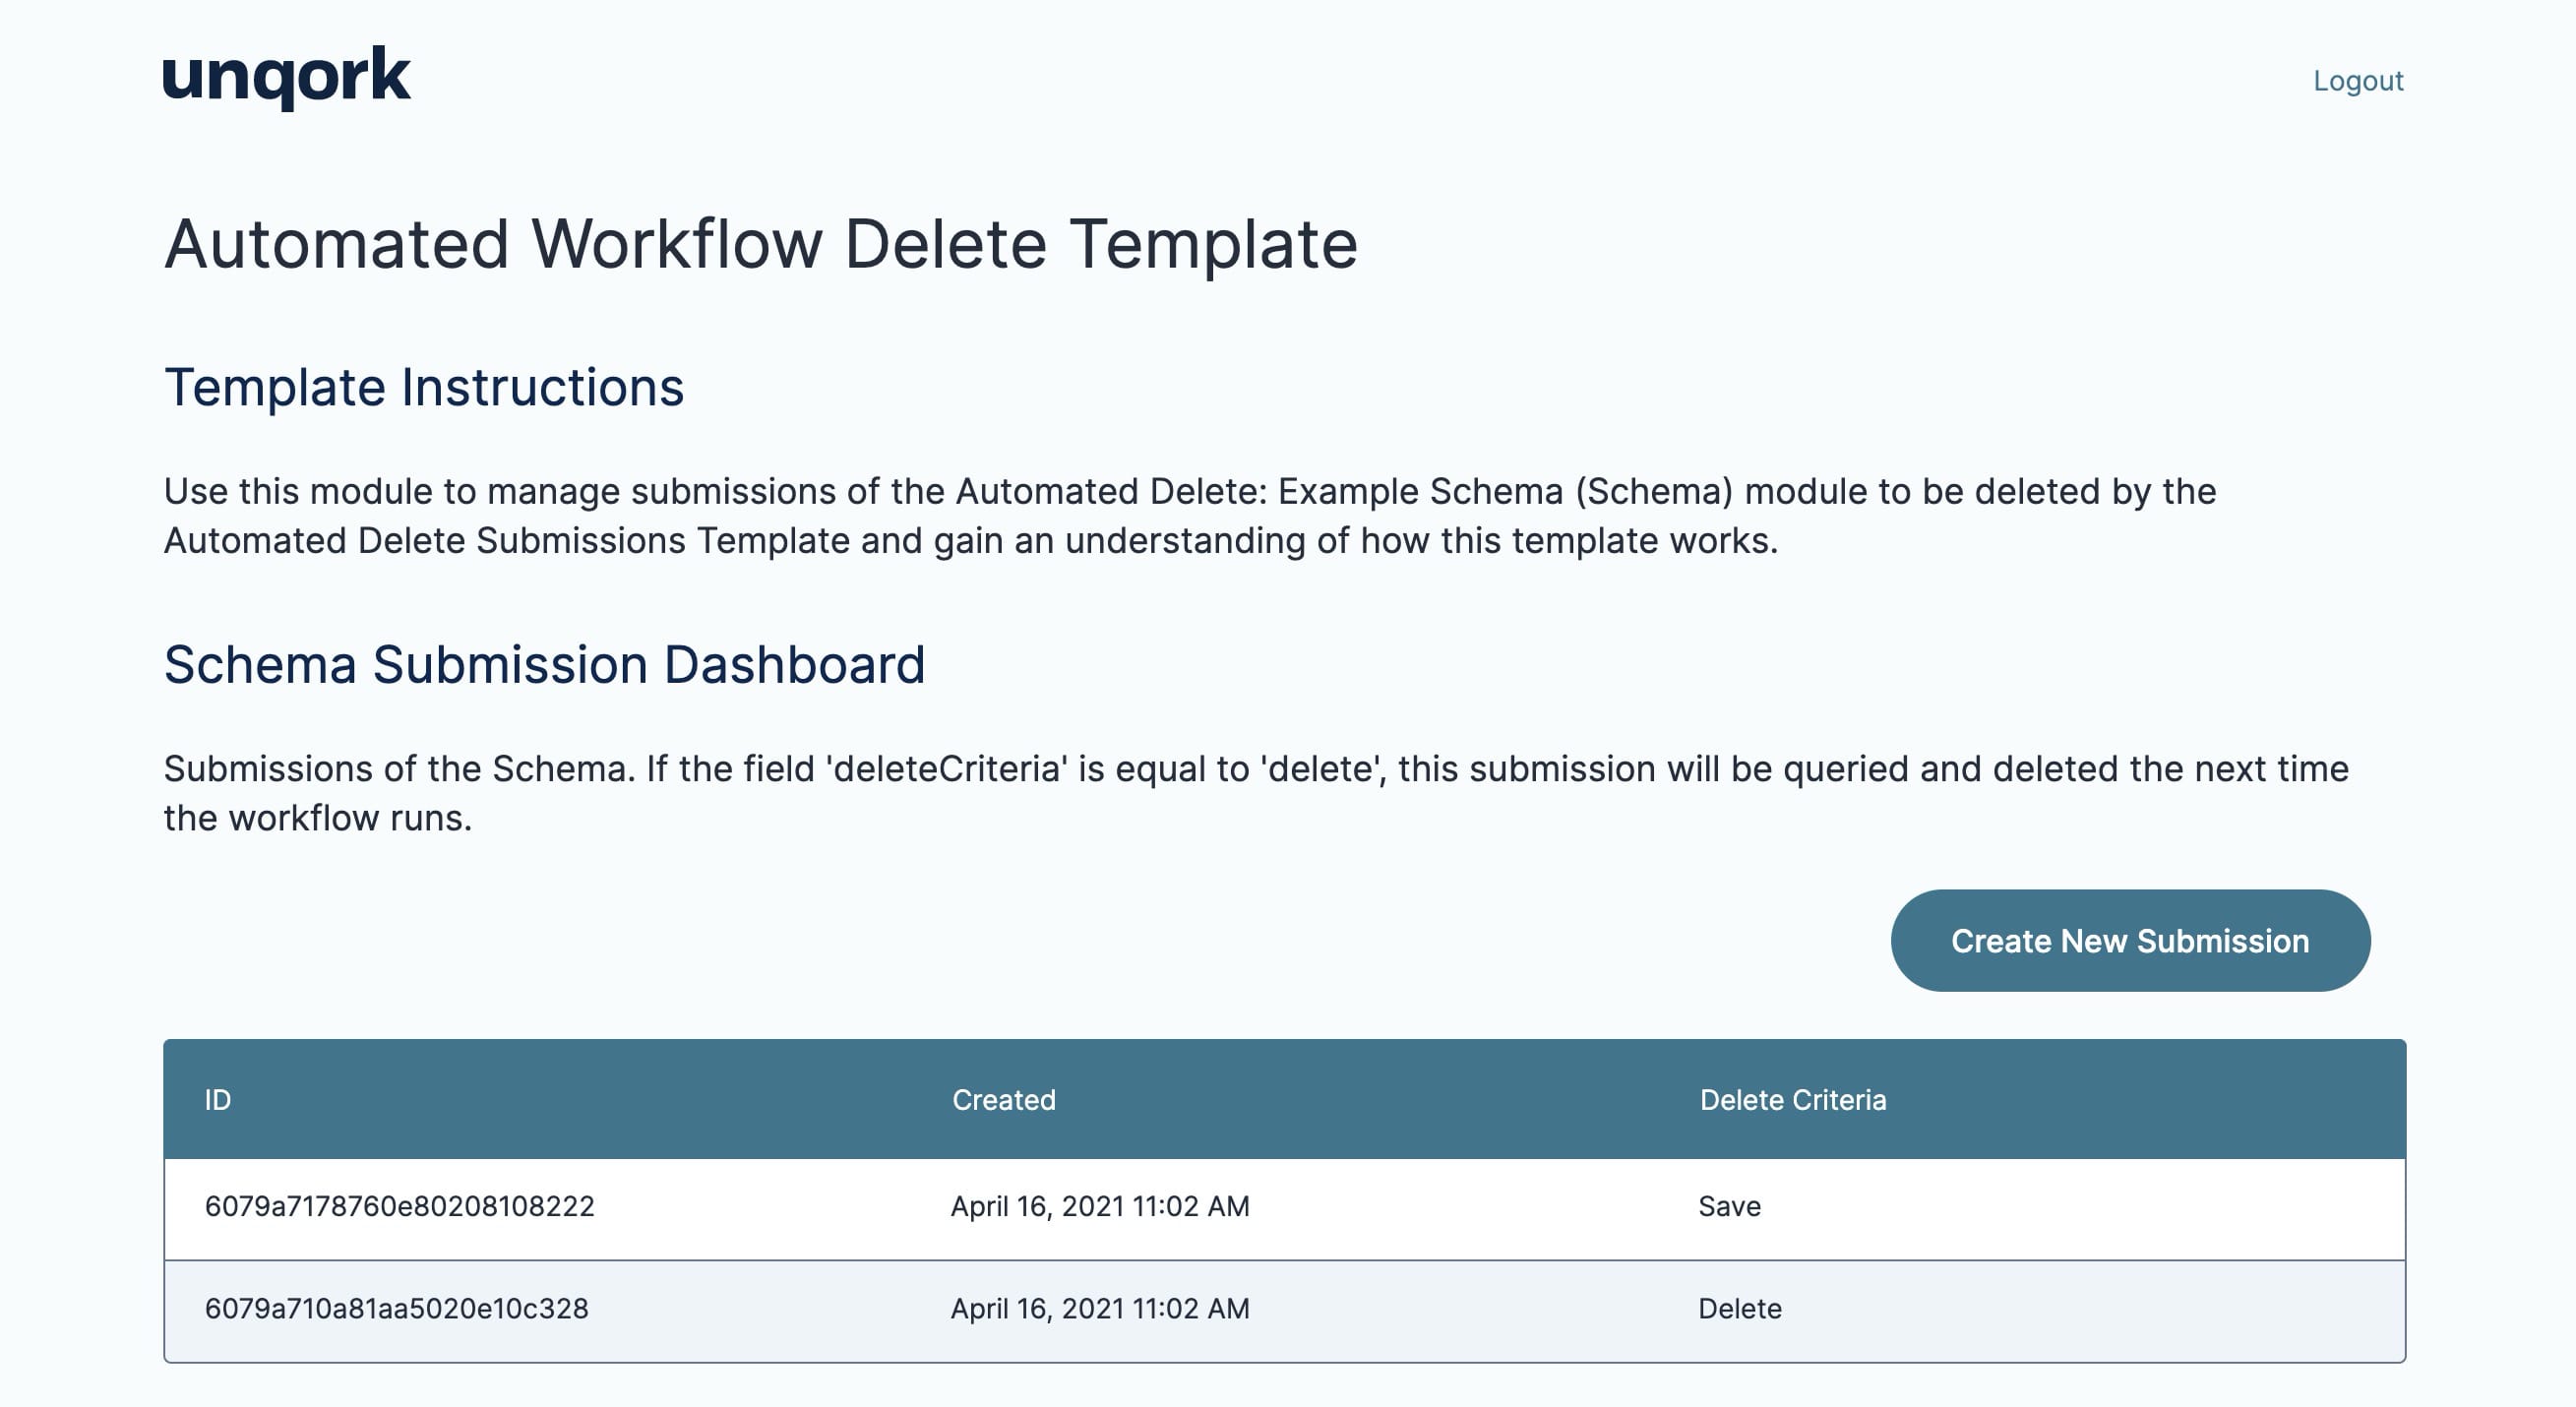
The final part of this application template is a simple dashboard. It offers a view of your schema module's submissions. This is the only module you'll use in Express View. The dashboard lets you easily test the template's automated delete process. When you use this template, we recommend connecting to your own dashboard.
Here's how the Schema Dashboard module looks in Express View:
And here's how it looks in the Module Builder:
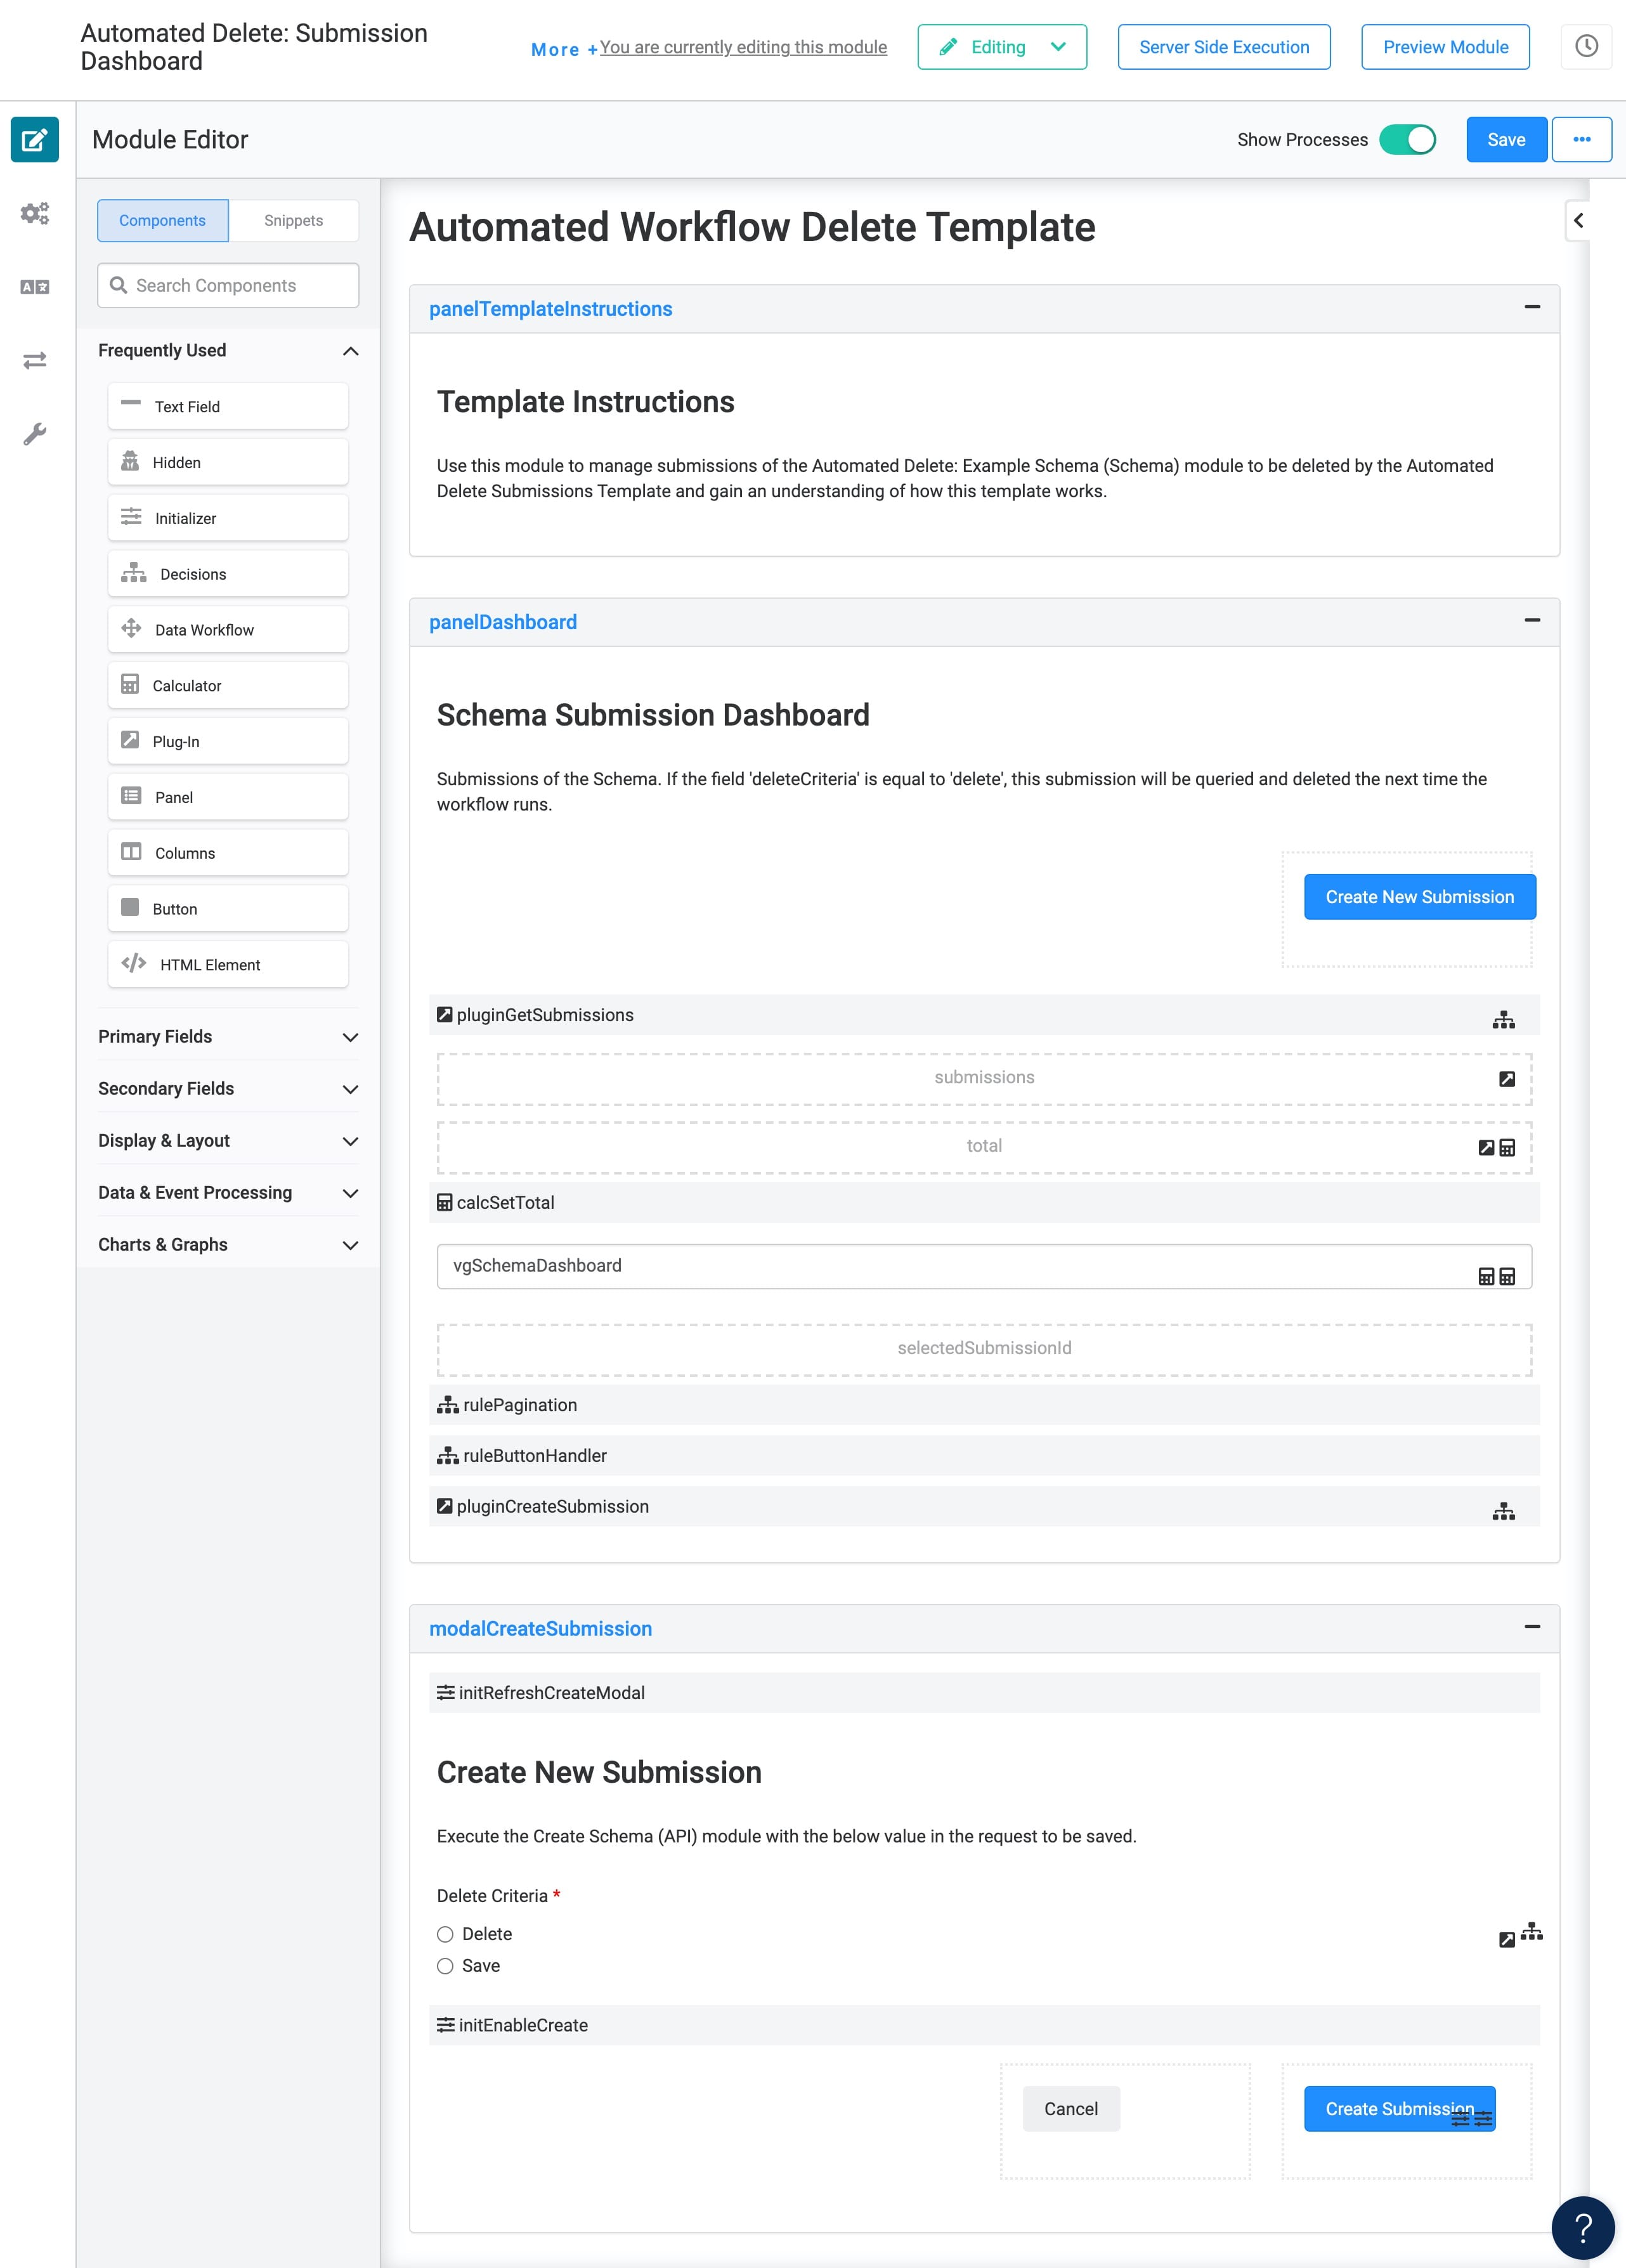
The dashboard lists all active submissions of the schema module. From this page, you can also create a new submission with a value of either Delete or Save.
When you click the Create Submission button on your dashboard in Express View, you'll see a pop-up modal. In that modal, you can select the value for the data you want to save with your new submission. From there, the pop-up modal's Create Submission button fires the ruleButtonHandler Decisions component. This Decisions component fires the pluginCreateSubmission Plug-In. This Plug-In calls the Create Schema (API) module, which stores the new submission to your schema module.
Once you add new submissions, refresh your dashboard in Express View. You'll see your new submissions listed. And, when you run your automated process, you can come back and check your dashboard. All submissions with a value of Delete in the deleteCriteria field should be gone!
Configuring the Template
There are 2 basic steps to getting this template up and running. Remember that this template has modules that are placeholders. They show the functionality of the automated delete process and let you test the template. You'll want to replace those with your own modules. Specifically, you must connect the application to your own schema module. We'll cover that in the next section.
Configuring the Workflow
When you open your workflow, you'll see a Welcome to your new Workflow! modal. Click Got it! to close the modal and view your workflow. Once in your workflow, you'll see an exclamation point icon in the title of the top Define Your Role Here swimlane. This icon shows you where the unresolved issue is. Hover over the icon for details. You can also click the Issue drop-down next to the Save Workflow button to see error details.
In this case, the error message says that every swimlane must have a defined Role. Templates don't include RBAC (role-based access control) configurations. This is so you can set yours up in a way that works best for you. So, you'll need to define a Role for the top swimlane.
| 1. | Hover over the header of the Define Your Role Here swimlane. |
A 3-button toolbar appears above the swimlane on hover-over.
| 2. | Using the toolbar, click the  (Edit) button. (Edit) button. |
| 3. | Enter your title for this swimlane in the Label field. |
| 4. | Select a Role from the Assign a Role drop-down. |
| 5. | Click Close. |
| 6. | Save your workflow. |
You'll see that the exclamation point icon and the Issue drop-down disappear. And, you'll see that the swimlane's name now matches the Label you entered.
Starting the Automated Process
Now, it's time to start the automation! By default, the automated process will run once every minute. We cover how to update this in our Customizing the Template section. There are 2 ways you can start or stop the automated process:
-
Click Run in the Timer Start node directly from your workflow.
-
Click Start in the Actions column in Start Nodes Administration.
Your process continues to run until you stop it. To stop the automated process, you can do one of the following:
-
Click Stop in the Timer Start node directly from your workflow.
-
Click Stop in the Actions column in Start Nodes Administration.
Customizing the Template
This template works right off the shelf. But remember, it's attached to an example schema module. It also works with sample criteria called deleteCriteria. It's important to customize the template so it works for you.
Here are the most common customizations:
-
Replace the example schema module and sample criteria with your own.
-
Change when and how often your workflow runs.
Connecting to Your Own Schema Module
This template comes with an example schema module. The module is just that: an example. You'll need to update the template to use your own schema module instead.
You can also change the value used to mark the submissions you want to delete. As it stands, the template uses a Hidden component called deleteCriteria. The workflow looks for a criteria (value) of Delete before it deletes a submission. More than likely, you'll have different criteria you want to use. For example, you may want to delete submissions with a value of Expired. No problem. We'll show you how to set that up.
These 2 customizations are easy. In total, you'll update 3 modules:
-
List Schema Submissions (API)
-
Get Submissions to Delete (API)
-
Delete Schema (API)
You likely already have your own way to create schema submissions. If you want to use the Create Schema (API) module from this template, you'll need to update that module so it works with your schema model.
Updating the List Schema Submissions (API) Module
First, you'll adjust your List Schema Submissions (API) module. There are 2 easy parts to this update. First, you'll delete the deleteCriteria Hidden component and add your own. For this use case, we'll call this Hidden component status. Then, you'll update the pluginGetSubmission Plug-In's Inputs table to reference your schema module ID.
To delete the deleteCriteria Hidden component:
| 1. | Hover over the deleteCriteria Hidden component. |
A 5-button toolbar appears above the component on hover-over.
| 2. | Click the  (Remove) button. (Remove) button. |
To add your own Hidden component:
| 1. | Drag and drop a Hidden component onto your canvas. Place it in the panelRequest Panel under the other 2 Hidden components. |
| 2. | Enter status in the Property ID and Canvas Label Text fields. |
| 3. | Enter the Field Tag that fits your criteria. In this case, you'll enter type:string. |
Ensure that the field tag on the component represents the data you want to store. You can choose type:string, type:array, type:boolean, type:number, type:object, or type:objectId. To add a new field tag, simply type the word and hit enter or return on your keyboard.
| 4. | Click the Notes tab. |
| 5. | Enter a description of this Hidden component. For example, you could enter: The status of submissions to return. |
| 6. | Save your note. |
| 7. | Click Save. |
Here's the last step! To update your Plug-In component:
| 1. | Hover over the pluginGetSubmissions Plug-In component. |
A 5-button toolbar appears above the component on hover-over.
| 2. | Using the toolbar, click the  (Settings) button. (Settings) button. |
| 3. | Replace the module ID in the Inputs table with your schema module's ID. |
| 4. | Update the rest of the Inputs table as follows: |
| Property ID | Mapping |
|---|---|
|
limit |
limit |
|
offset |
skip |
|
'-created' |
sort |
|
'status' |
fields |
|
status |
data.status |
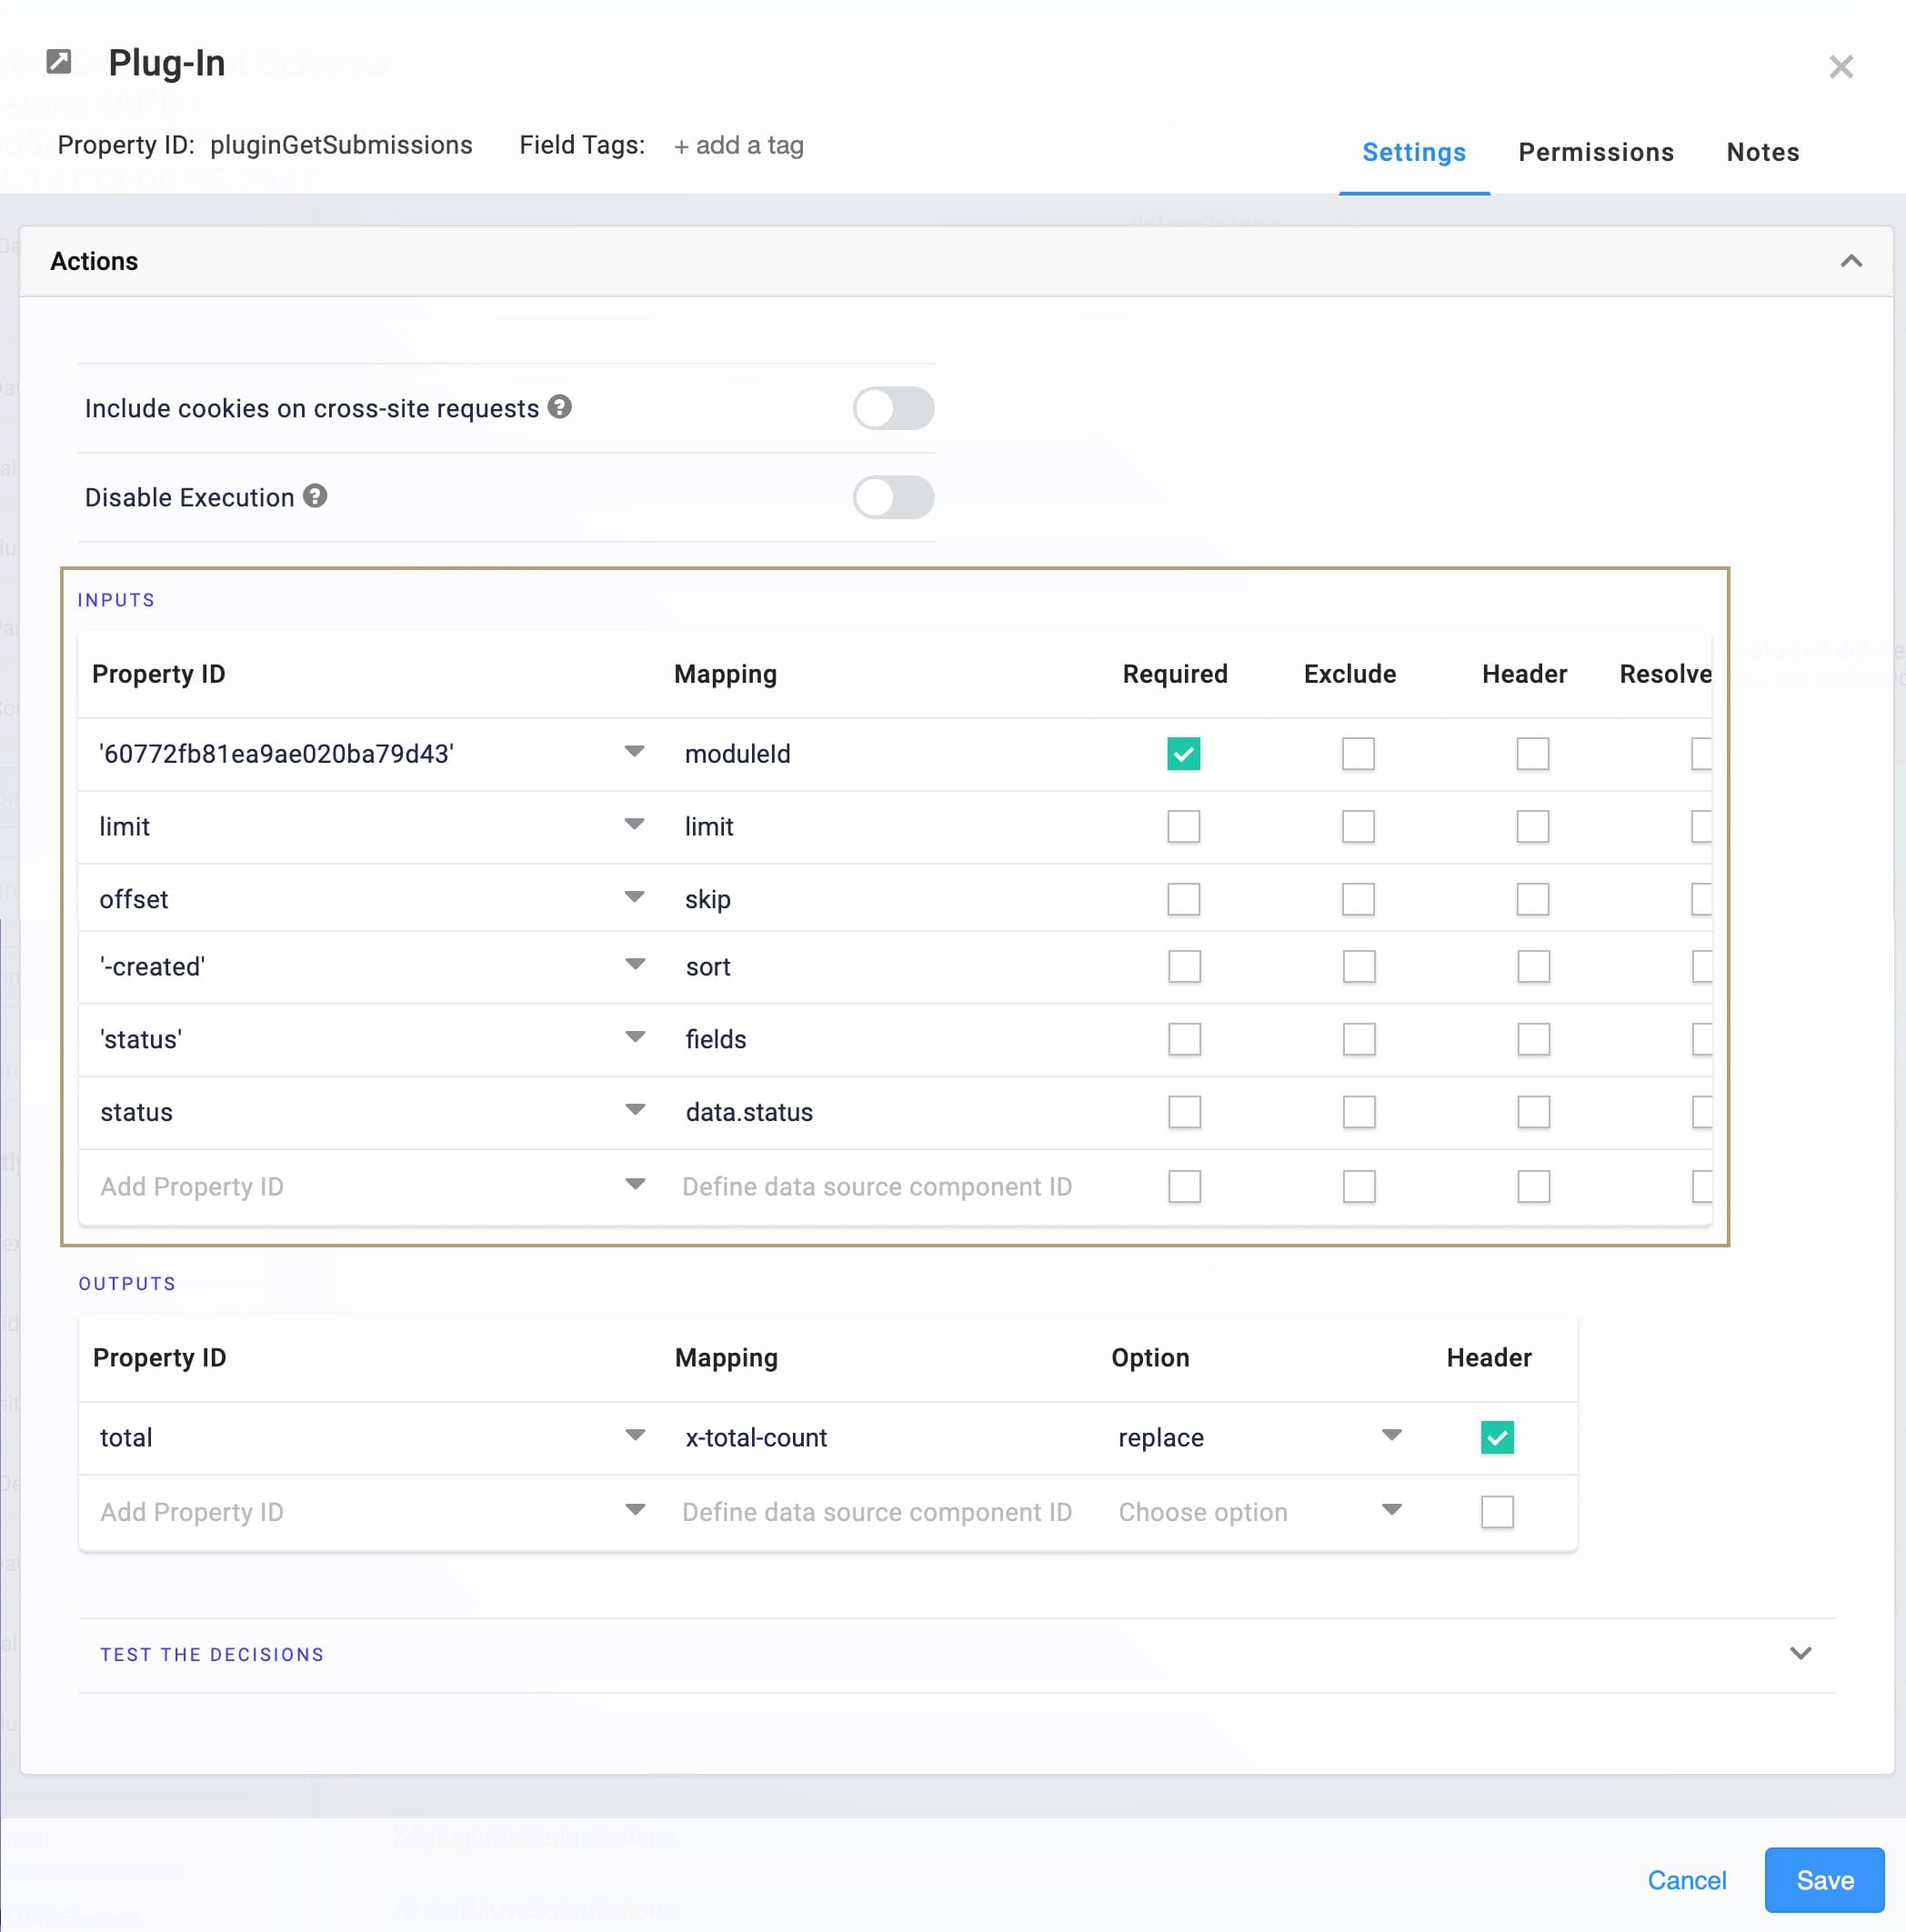
Make sure to keep the single quotes around your module ID.
| 5. | Click Save. |
| 6. | Save your module. |
Updating the Get Submissions to Delete (API) Module
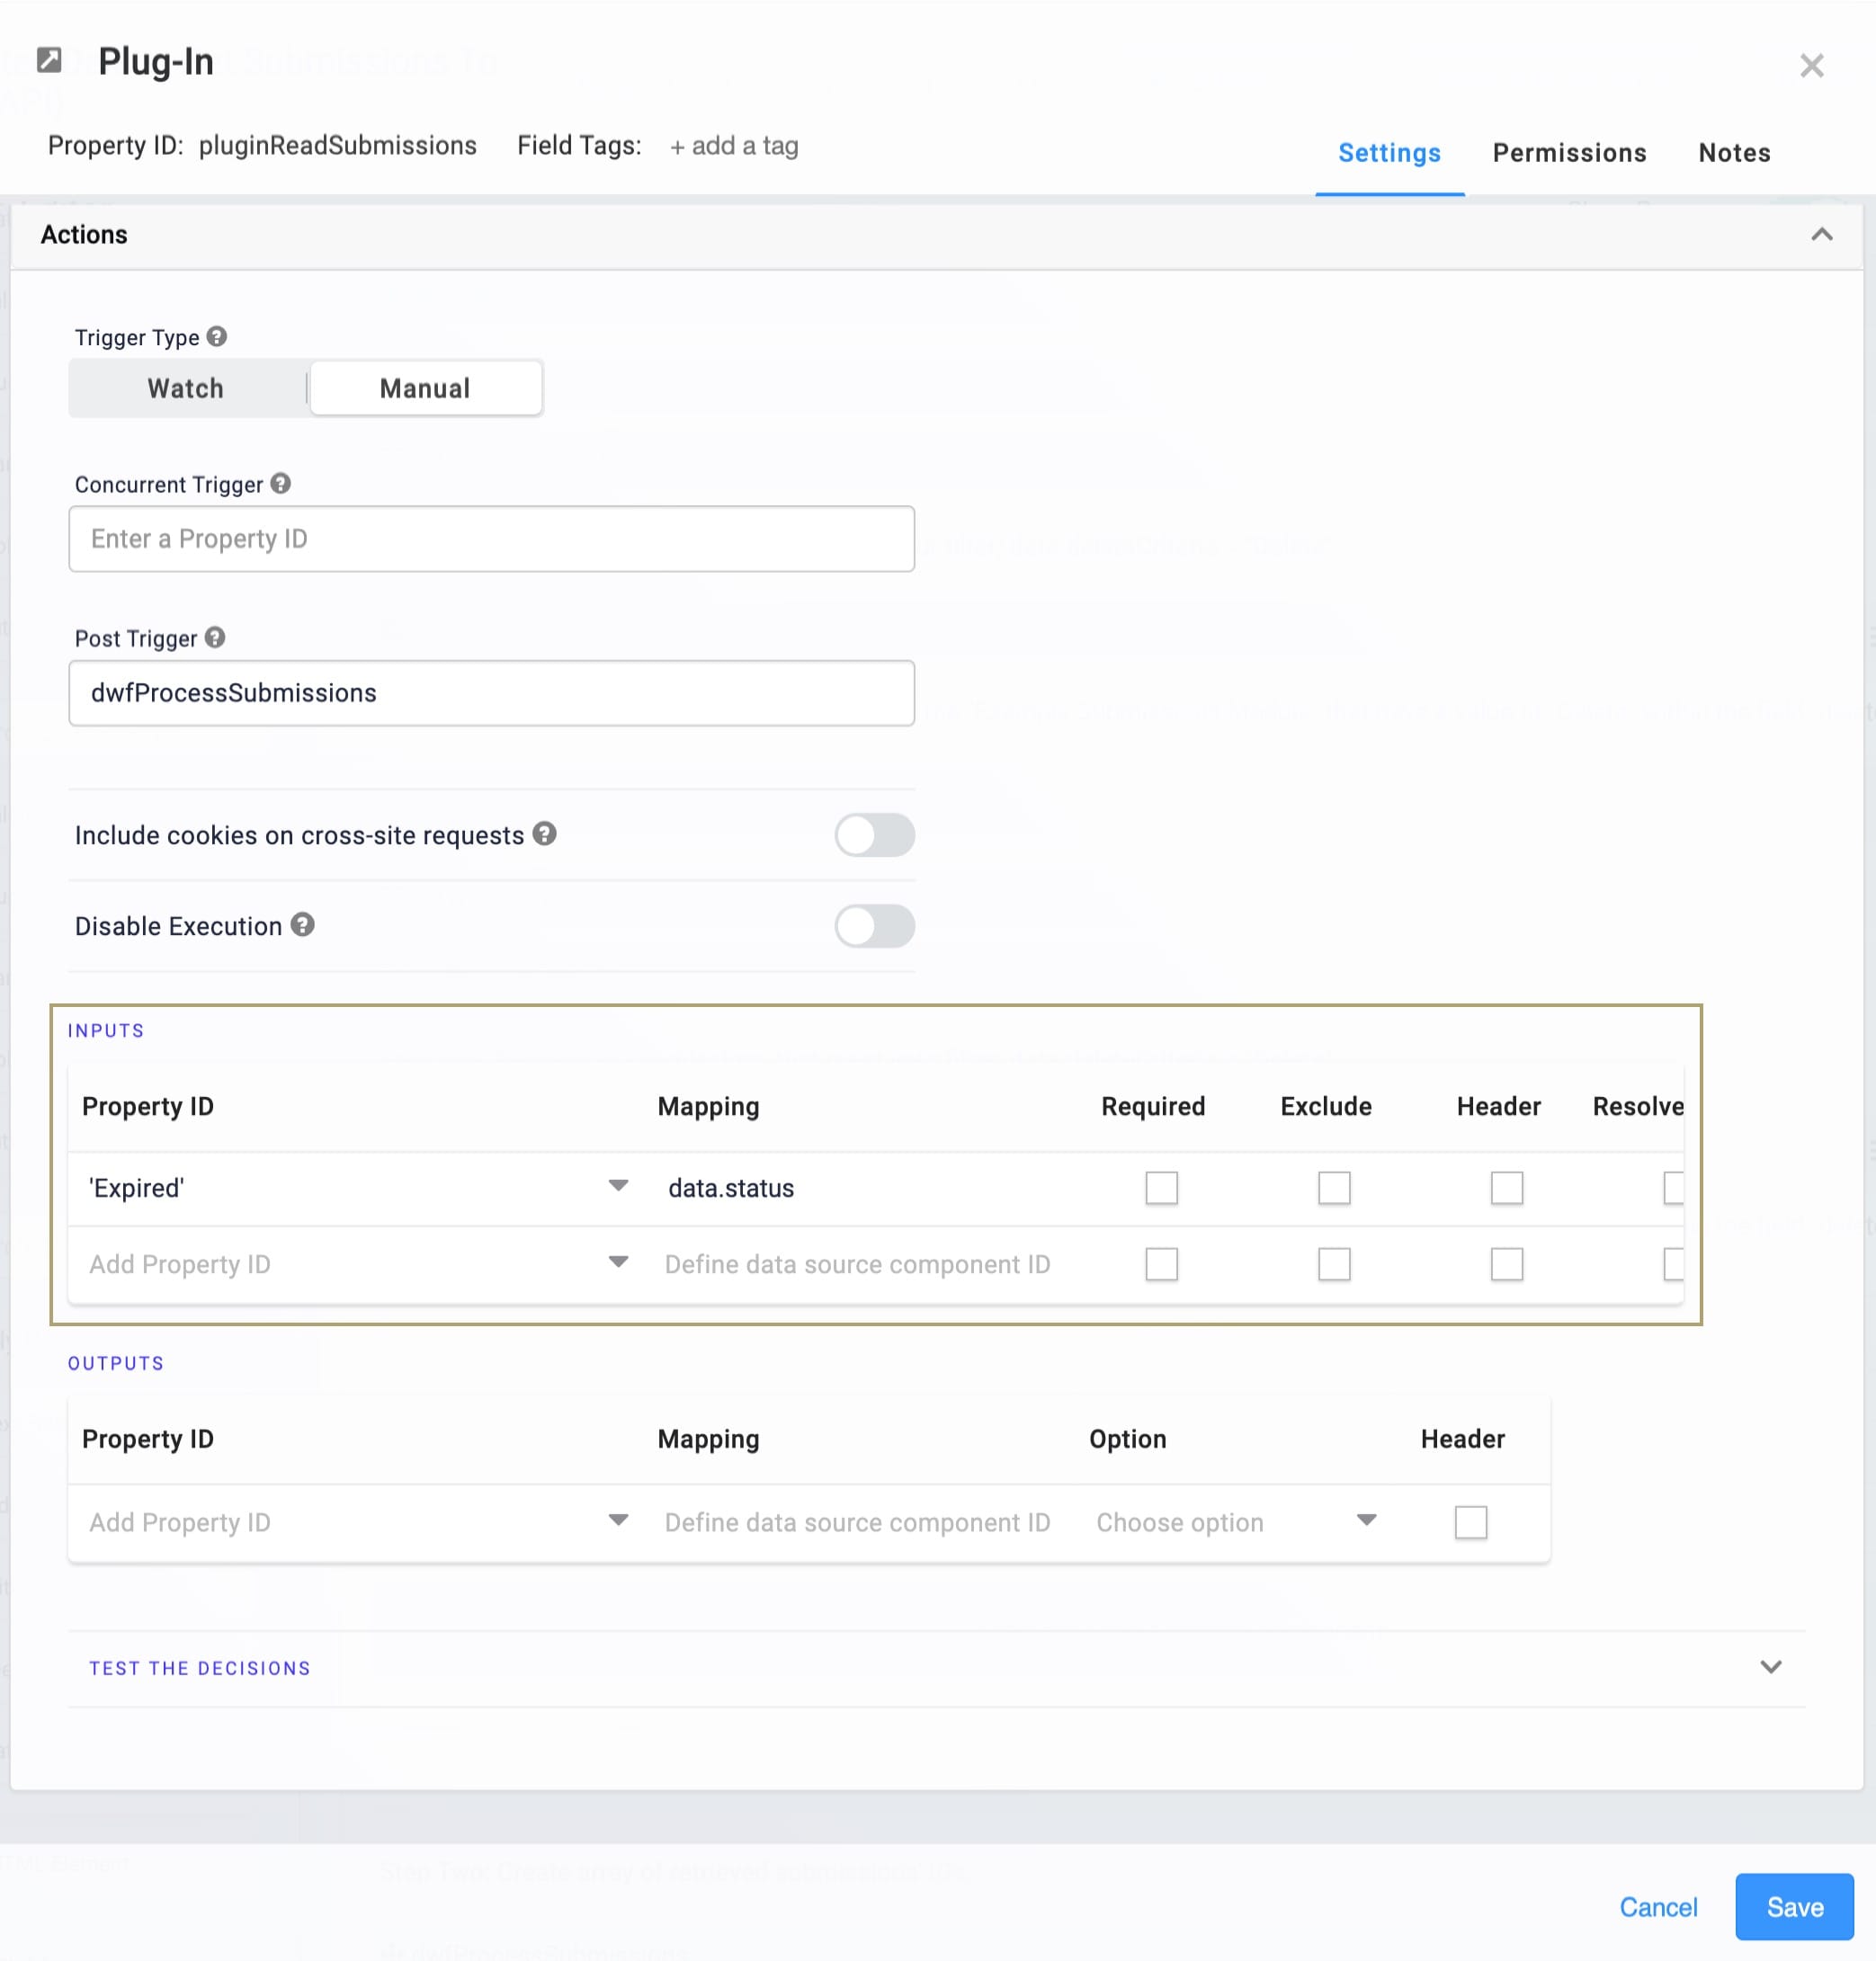
Now, you'll update the pluginReadSubmission Plug-In component in the Get Submissions to Delete (API) module. Since you want to delete schema submissions with a status of Expired, you'll make that update here.
| 1. | Hover over the pluginReadSubmissions Plug-In component. |
A 5-button toolbar appears above the component on hover-over.
| 2. | Using the toolbar, click the (Settings) button. |
| 3. | Update the Inputs table as follows: |
| Property ID | Mapping |
|---|---|
|
'Expired' |
data.status |
| 4. | Click Save. |
| 5. | Save your module. |
Updating the Delete Schema (API) Module
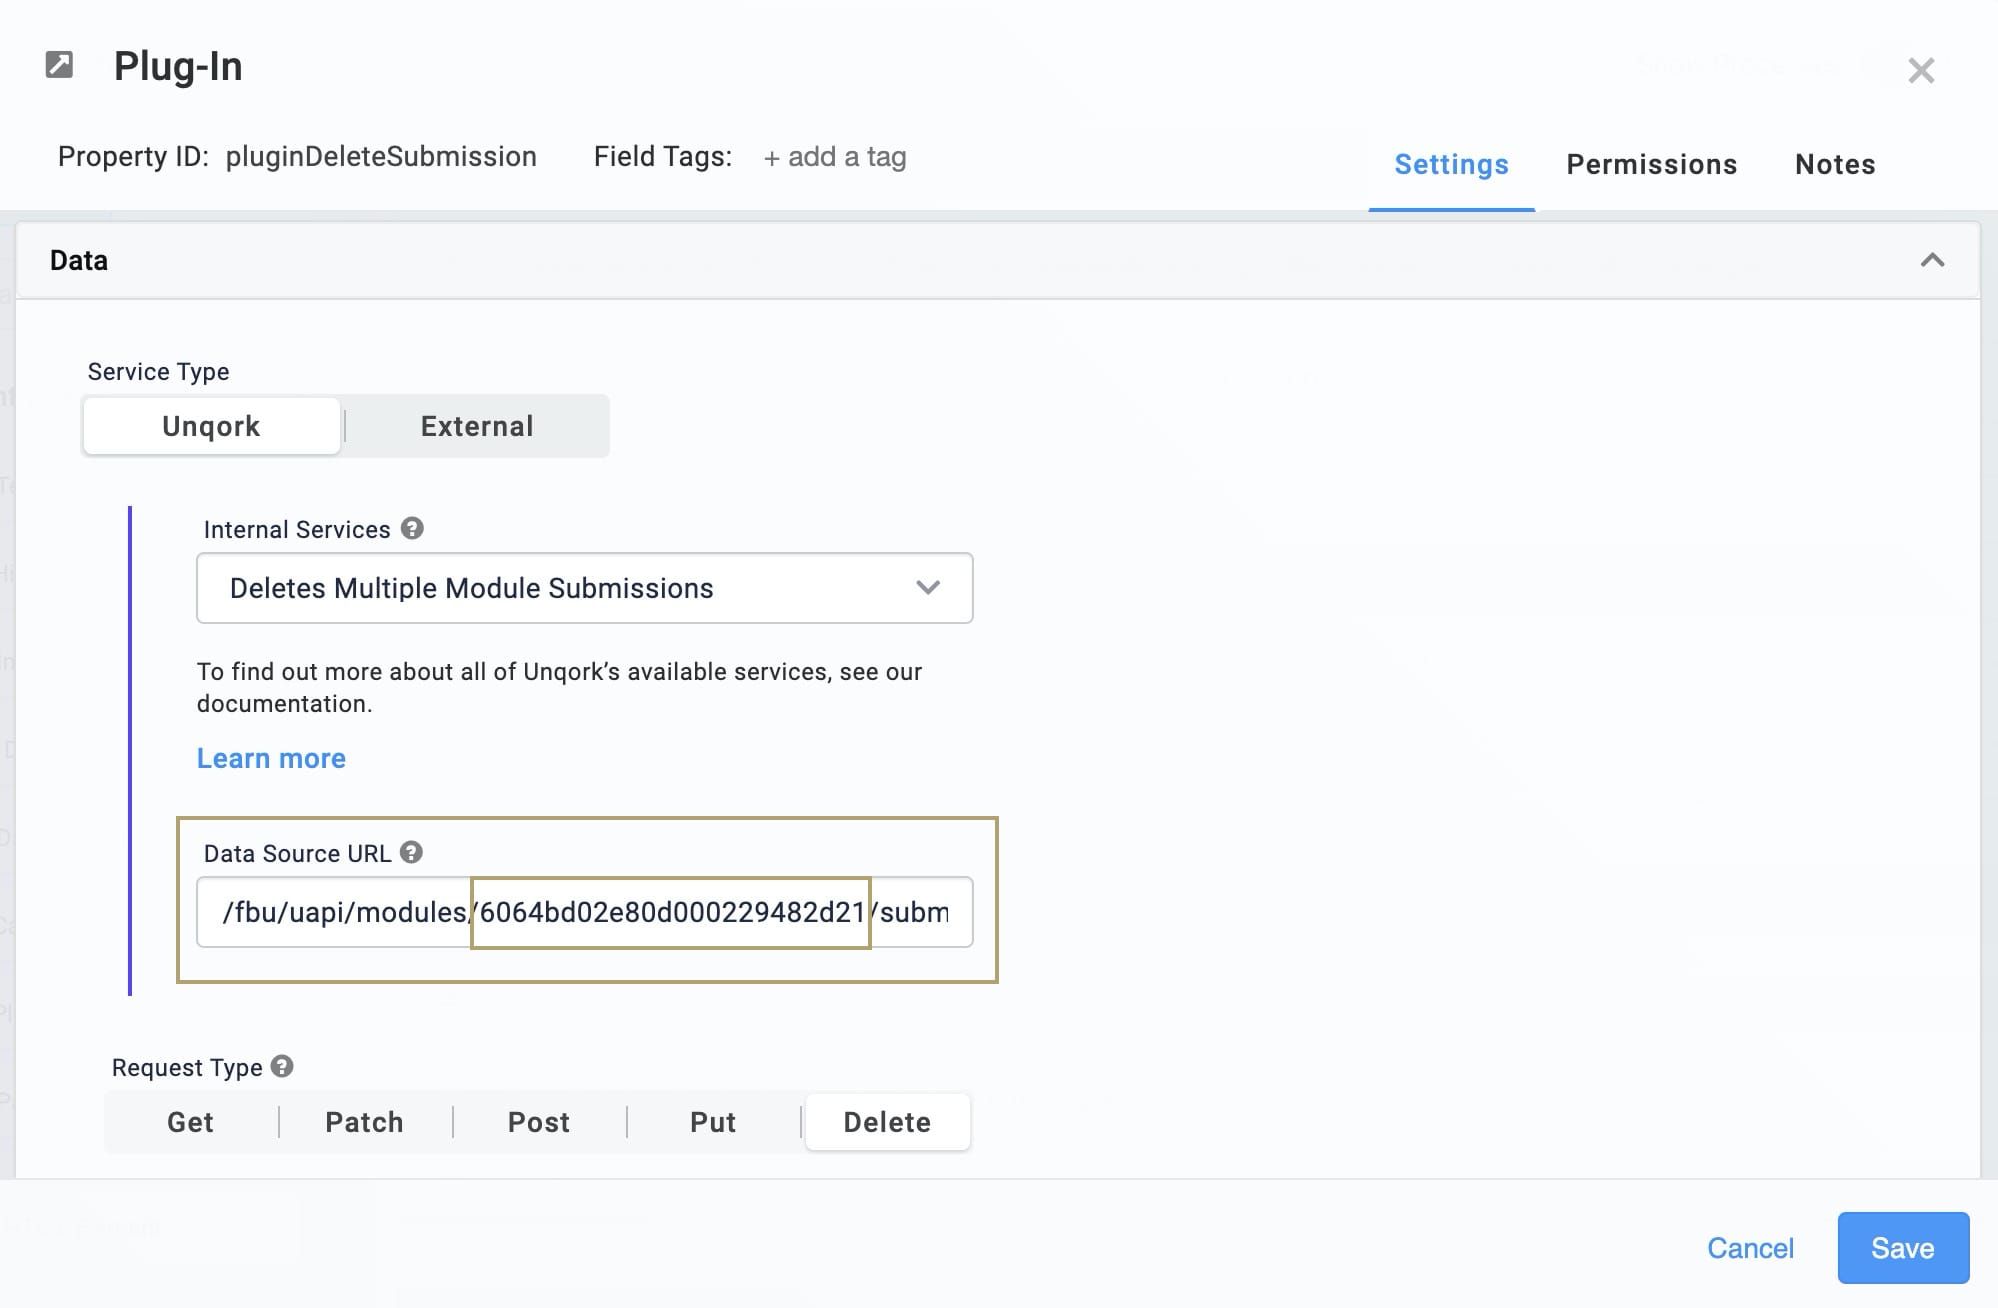
Next, you'll update the pluginDeleteSubmission Plug-In so it deletes entries from your own schema module.
| 1. | Hover over the pluginDeleteSubmissions Plug-In component. |
A 5-button toolbar appears above the component on hover-over.
| 2. | Using the toolbar, click the (Settings) button. |
| 3. | Update the Data Source URL with your schema module's ID. |
| 4. | Click Save. |
| 5. | Save your module. |
Changing When and How Often to Run Workflow
Right out of the gate, your workflow's Timer Start node's settings make it run every minute. What if you want to run it less often or on a different schedule? A quick update to the Timer Start node takes care of this. The Timer Start node can trigger at an exact time (Tuesdays at 15:30) or a relative time (every 12 hours). The Timer Start node uses UTC (Coordinated Universal Time). You can choose to schedule your deletes once a day, or on a repeating schedule in intervals up to once a minute.
You can control this process directly from your workflow:
| 1. | Click the Timer Start node from your open workflow. |
| 2. | Click Edit. |
| 3. | Set to Relative or Exact. |
| a. | If you choose Relative, enter the Time Amount and choose the Time Unit. |
| b. | If you choose Exact, enter the Frequency, Day of Month, and Time. |
| 4. | Click Close. |
| 5. | Save your workflow. |
Testing the Automated Delete Process
The template makes it easy to test your automated process. Head to your submissions dashboard in Express View and create a few new submissions. Choose Delete as the value for some and Save for the others. Then, you'll do a Test Run of your workflow.
Test Run the Timer Start Node
A Test Run is a great way to quickly test a workflow without waiting for the scheduled process to start. To perform a Test Run of your automated delete process:
| 1. | Click the Timer Start node from your open workflow. |
| 2. | Click Test Run. |
And, that's it! The workflow runs through a test run. From there, you can check your dashboard to make sure the process deleted the correct submissions.
Removing the Template
What if you no longer need this template or the application you built from it? There are 2 parts to removing this template. First, you'll uninstall it from your environment. Then you'll delete the application you created from the template. These steps are easy, and you can do them in any order.
Removing the Template from Your Environment
You might need to clean your environment and remove unused templates. The Unqork Library makes this easy. To uninstall a template from your environment:
| 1. | At the top right of the Unqork Designer Platform, click Library. |
| 2. | Find the template to uninstall. |
| 3. | Click the ellipsis (...) in the template tile header. |
| 4. | Click Uninstall Template. |
| 5. | Click Yes, Uninstall in the confirmation modal. |
You can visit the Marketplace and reinstall the template at any time.
What if you have an existing application built from this template and then uninstall the template from your environment? Your existing application remains unaffected. Also, it no longer has any ties to the template. So, let's say you reinstall a newer version of the template in the future. You can rest assured that the installation doesn't impact your existing application.
Deleting Your Application
If you no longer need the application you created from your template, you can delete it. To delete your application:
| 1. | Navigate to the Apps tab from an open workspace. |
| 2. | Find the application to delete. |
| 3. | Click the ellipsis (...) in the app tile header. |
| 4. | Click Delete. |
| 5. | Retype the provided text. |
| 6. | Click Yes, Delete. |
