Dynamic Grid: Using Logic With Dynamic Index
Overview
Dynamic Index is one of the most powerful features for using complex logic with a Dynamic Grid component. In this
In this use case, the Dynamic Grid displays several rows of submission IDs. You'll import these submission IDs from a data collection then inject them into your grid using logic components. You'll configure triggers and logic so that whenever any row's submission ID is clicked, that submission opens in a new tab. This functionality is useful if you're using your Dynamic Grid to review submissions. But you can also extend this type of logic to other situations where you want to trigger an event when clicking an individual cell. For example, creating a Google query in a new tab with the cell's value as the search query.
In this configuration, there are actually two ways to open the submission on click:
-
Clicking the submission ID value itself, in the submission ID column of the grid.
-
Clicking a button in the same row as the submission ID.
In practice, you likely wouldn't need both options, but the goal is to show both approaches.
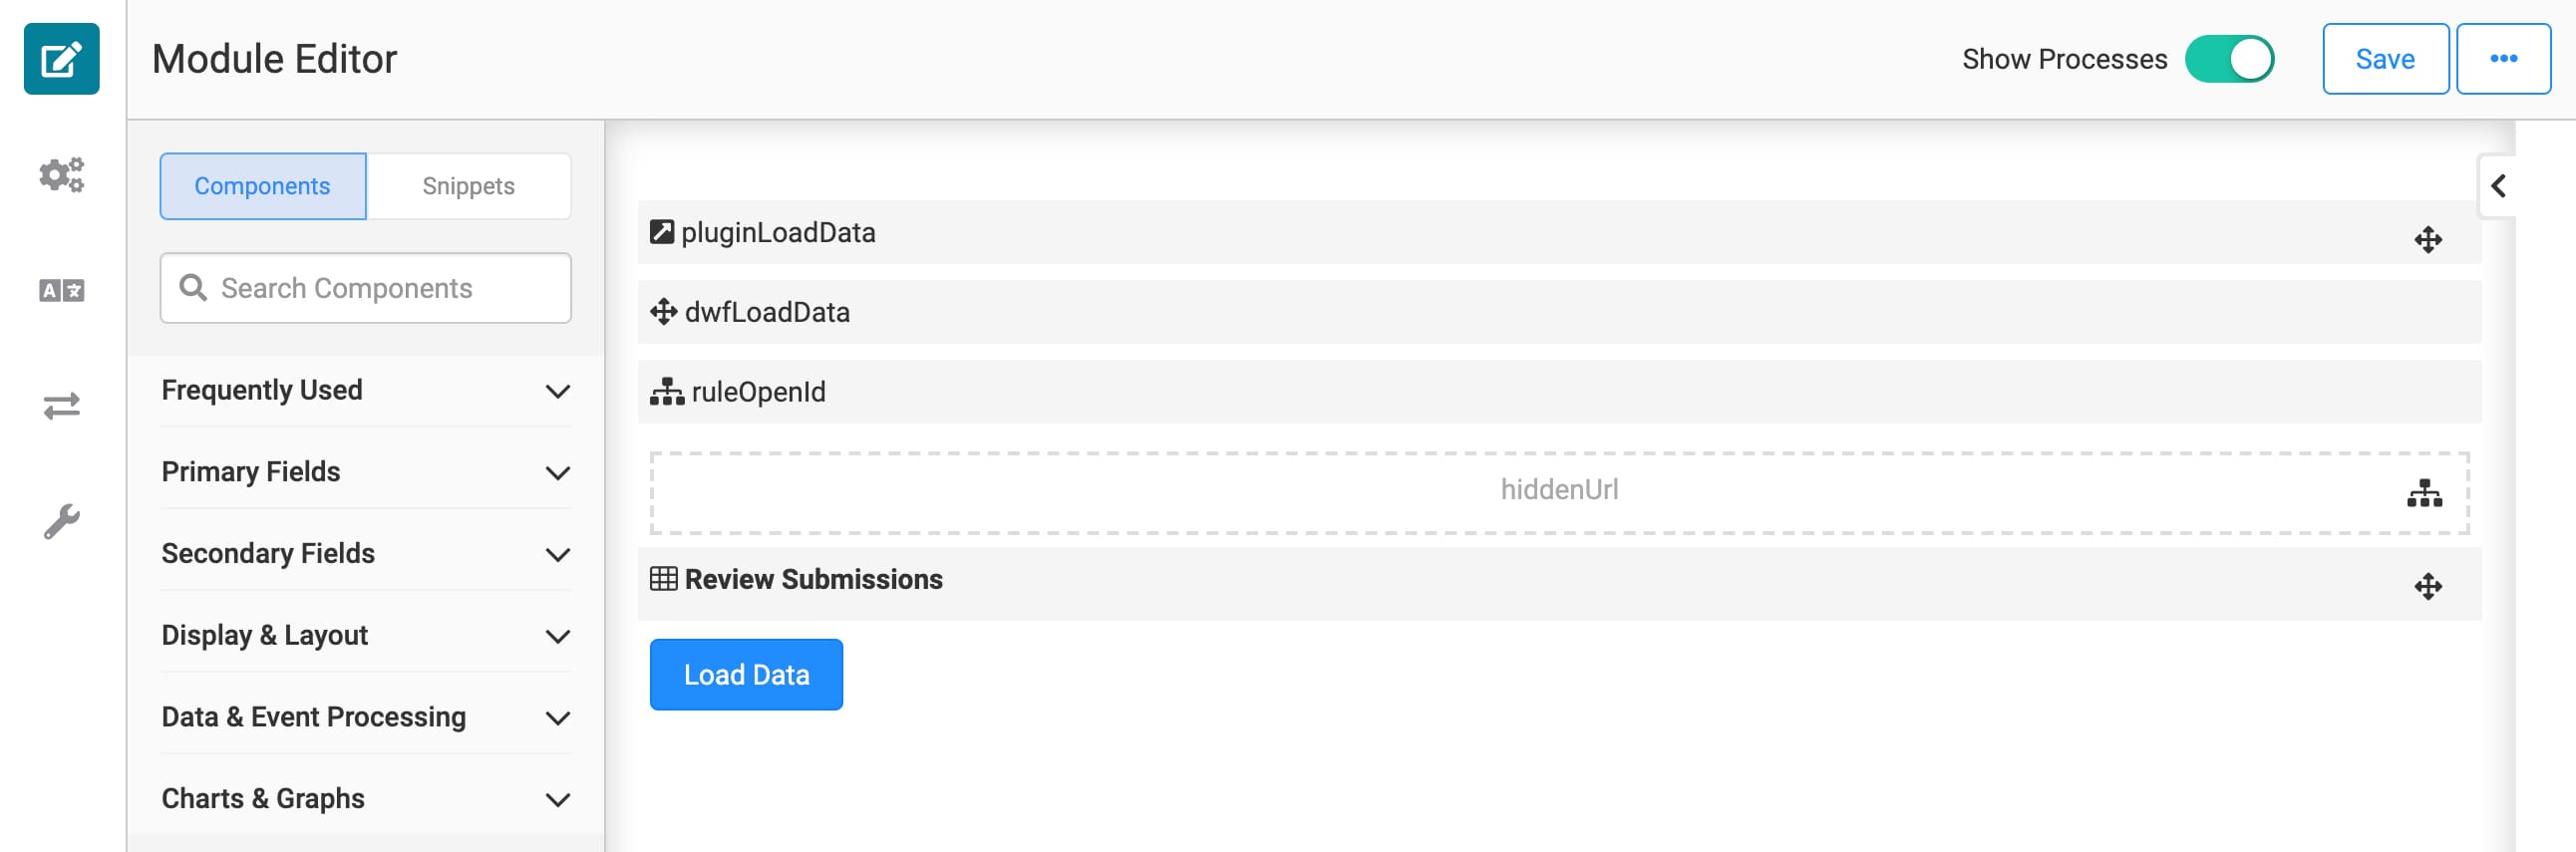
Here's how the completed module looks in the Module Builder:
And here's how the completed use case looks in Express View:
What You'll Learn
In this use case, you'll learn how to:
-
Inject data into a Dynamic Grid component using logic components.
-
Use Dynamic Index with logic components and triggers.
What You'll Need
For this configuration, you'll need:
-
1 Plug-In component
-
1 Data Workflow component
-
1 Button component
-
1 Dynamic Grid component
-
1 Hidden component
-
1 Decisions component
NOTE The Plug-In, Button, and Data Workflow components all work together to import reference data into the Dynamic Grid. The data collection contains a list of submission IDs to display in the Dynamic Grid. This configuration doesn't include steps for creating a reference data collection or for configuring the module where those submissions were created.
Configure the Plug-In Component
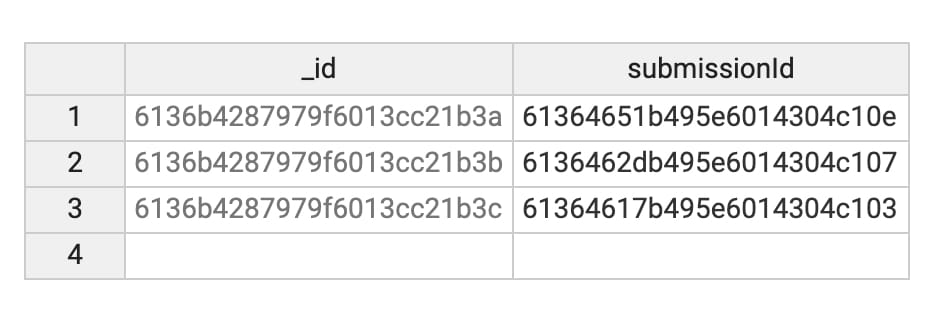
To start, let's get some data that the Dynamic Grid can display. This Plug-In uses the Get Rows from Reference Data call to import a simple three-row data collection. The following image shows that the data collection only contains a few submission IDs, which is enough for this example.
| 1. | Drag and drop a Plug-In component onto your canvas. |
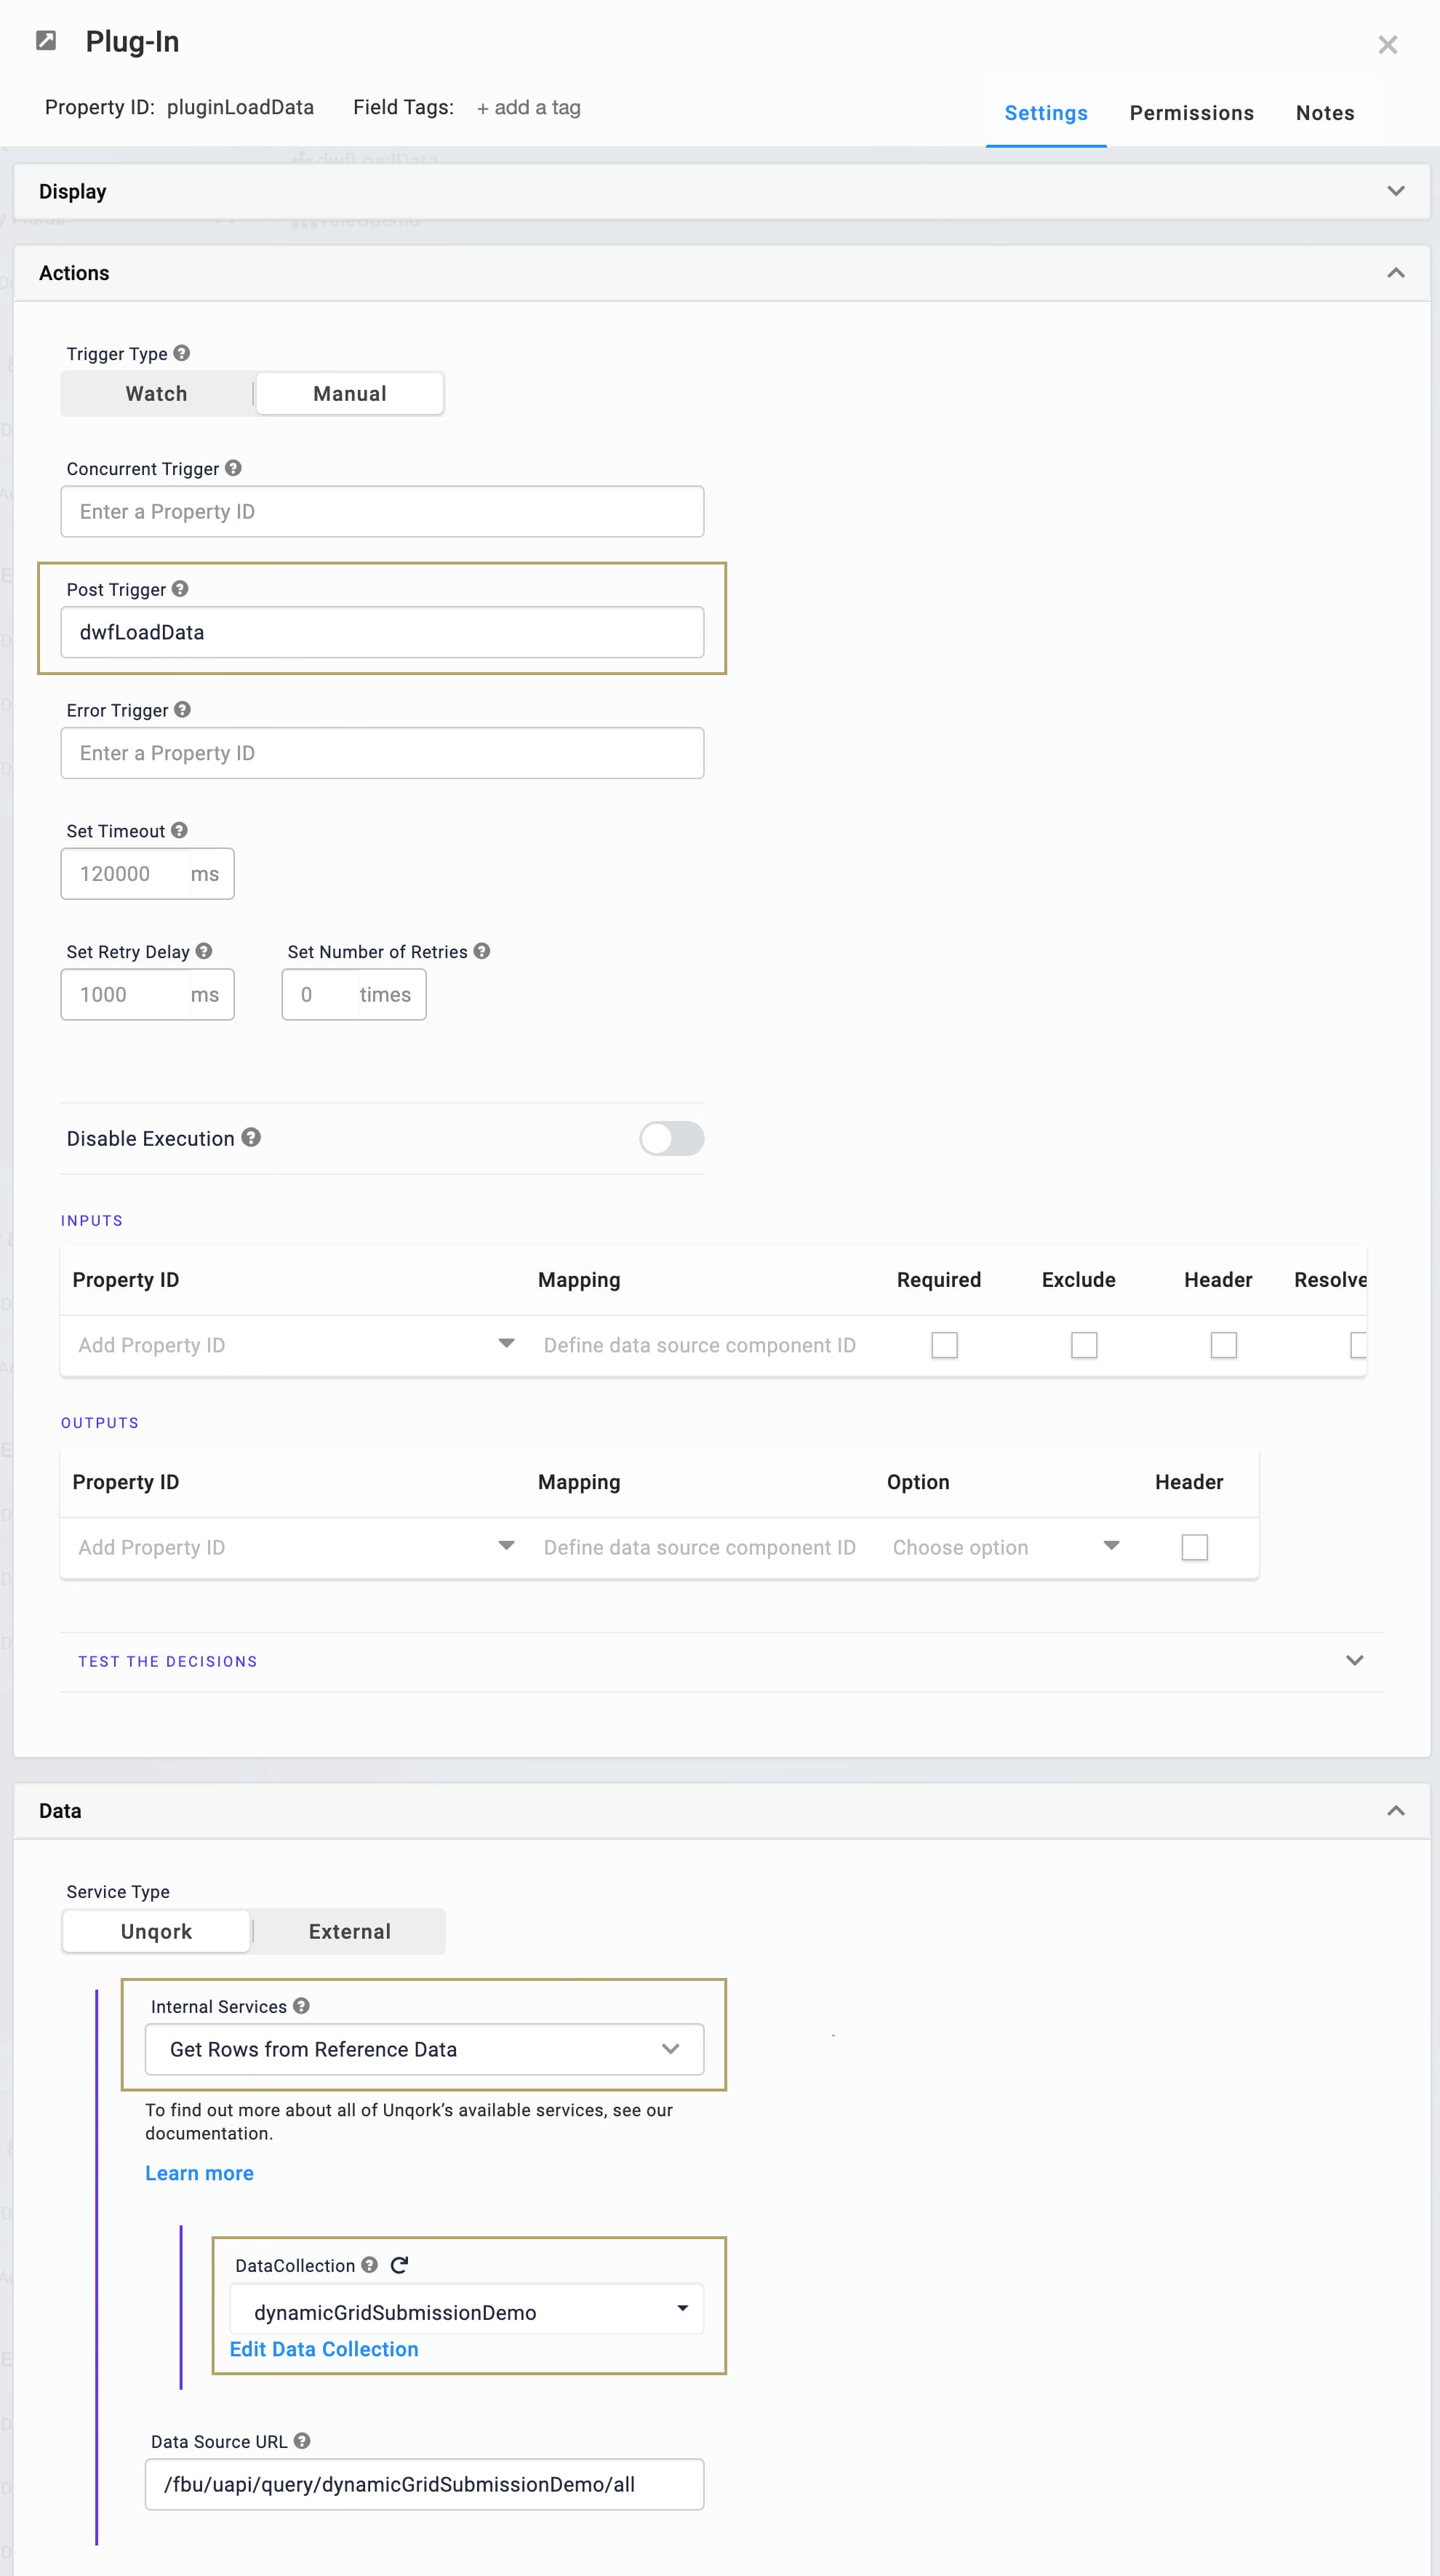
| 2. | Enter pluginLoadData in the Property ID and Canvas Label Text fields. |
| 3. | Enter dwfLoadData in the Post Trigger field. |
NOTE dwfLoadData is the Property ID of the Data Workflow component you'll add later.
| 4. | Select Get Rows from Reference Data from the Internal Services drop-down. |
| 5. | Select dynamicGridSubmissionDemo from the Data Collection drop-down. |
NOTE dynamicGridSubmissionDemo is the title of the reference data collection shown above.
| 6. | Click Save. |
Configure the Button Component
Next, you'll use a Button component to trigger the Plug-In and load the data collection.
| 1. | Drag and drop a Button component onto your canvas. |
| 2. | Enter btnLoadData in the Property ID field. |
| 3. | Enter Load Data in the Label Text field. |
| 4. | Select Event as the Button Action Type. |
| 5. | Enter pluginLoadData in the Trigger on Click field. |
| 6. | Click Save. |
Configure the Dynamic Grid Component
Let's set up the Dynamic Grid component next. You'll keep it simple with only two columns: one to display the clickable submission IDs and another with buttons that, when clicked, also open the submission in a new tab.
| 1. | Drag and drop a Dynamic Grid component onto your canvas. |
| 2. | Enter dynamicGrid in the Property ID field. |
| 3. | Enter Review Submissions in the Title field. |
| 4. | In the Column Setup table, click + Add New Column twice. This adds two rows to the Column Setup table. |
| 5. | Complete the Column Setup table as follows: |
| Header Label | Property ID | Column Type |
|---|---|---|
|
Submission ID |
submissionId |
Text Field |
|
View Submission |
btnView |
Button |
NOTE The Property ID of the Submission ID column in the Column Setup table matches the header of the submission ID column in the data collection. These two values must match for the data to load in the Dynamic Grid.
TIP To change the column type, select the row-specific cell under the Column Type header. From the drop-down, select a column type.

Configure the Text Field Column Type
Next, let's set up the Submission ID column so that clicking a submission ID opens that submission in a new tab. Or rather, clicking the submission ID triggers a Decisions component that opens the submission in a new tab. You'll set up the Decisions component later but reference its Property ID, ruleOpenId, here.
| 1. | In the Submission ID row of your Column Setup table, click the |
| 2. | Click Add Trigger. |
| 3. | Select Value is Clicked from the When... drop-down. |
| 4. | Enter ruleOpenId in the Then... field. |
| 5. | Click Back to Table to return to the main configuration window. |
Configure the Button Column Type
Now you'll set up a similar trigger for the Button column. Instead of clicking the submission ID value, though, the end-user can click the View Submission button in the same row. Clicking the button again triggers the ruleOpenId Decisions component.
| 1. | In the View Submission row of your Column Setup table, click the |
| 2. | Click Add Trigger. |
| 3. | Select Custom Action from the Then... drop-down. |
| 4. | Enter ruleOpenId in the Custom Action field. |
| 5. | Click Back to Table to return to the main configuration window. |
| 6. | Click Save. |
Configure the Hidden Component
This Hidden component stores the concatenated URL the Decisions component creates. You'll reference the Hidden component's Property ID when configuring the Decisions component, so let's set it up now.
| 1. | Drag and drop a Hidden component onto your canvas. |
| 2. | Enter hiddenUrl in the Property ID and Canvas Label Text fields. |
| 3. | Click Save. |
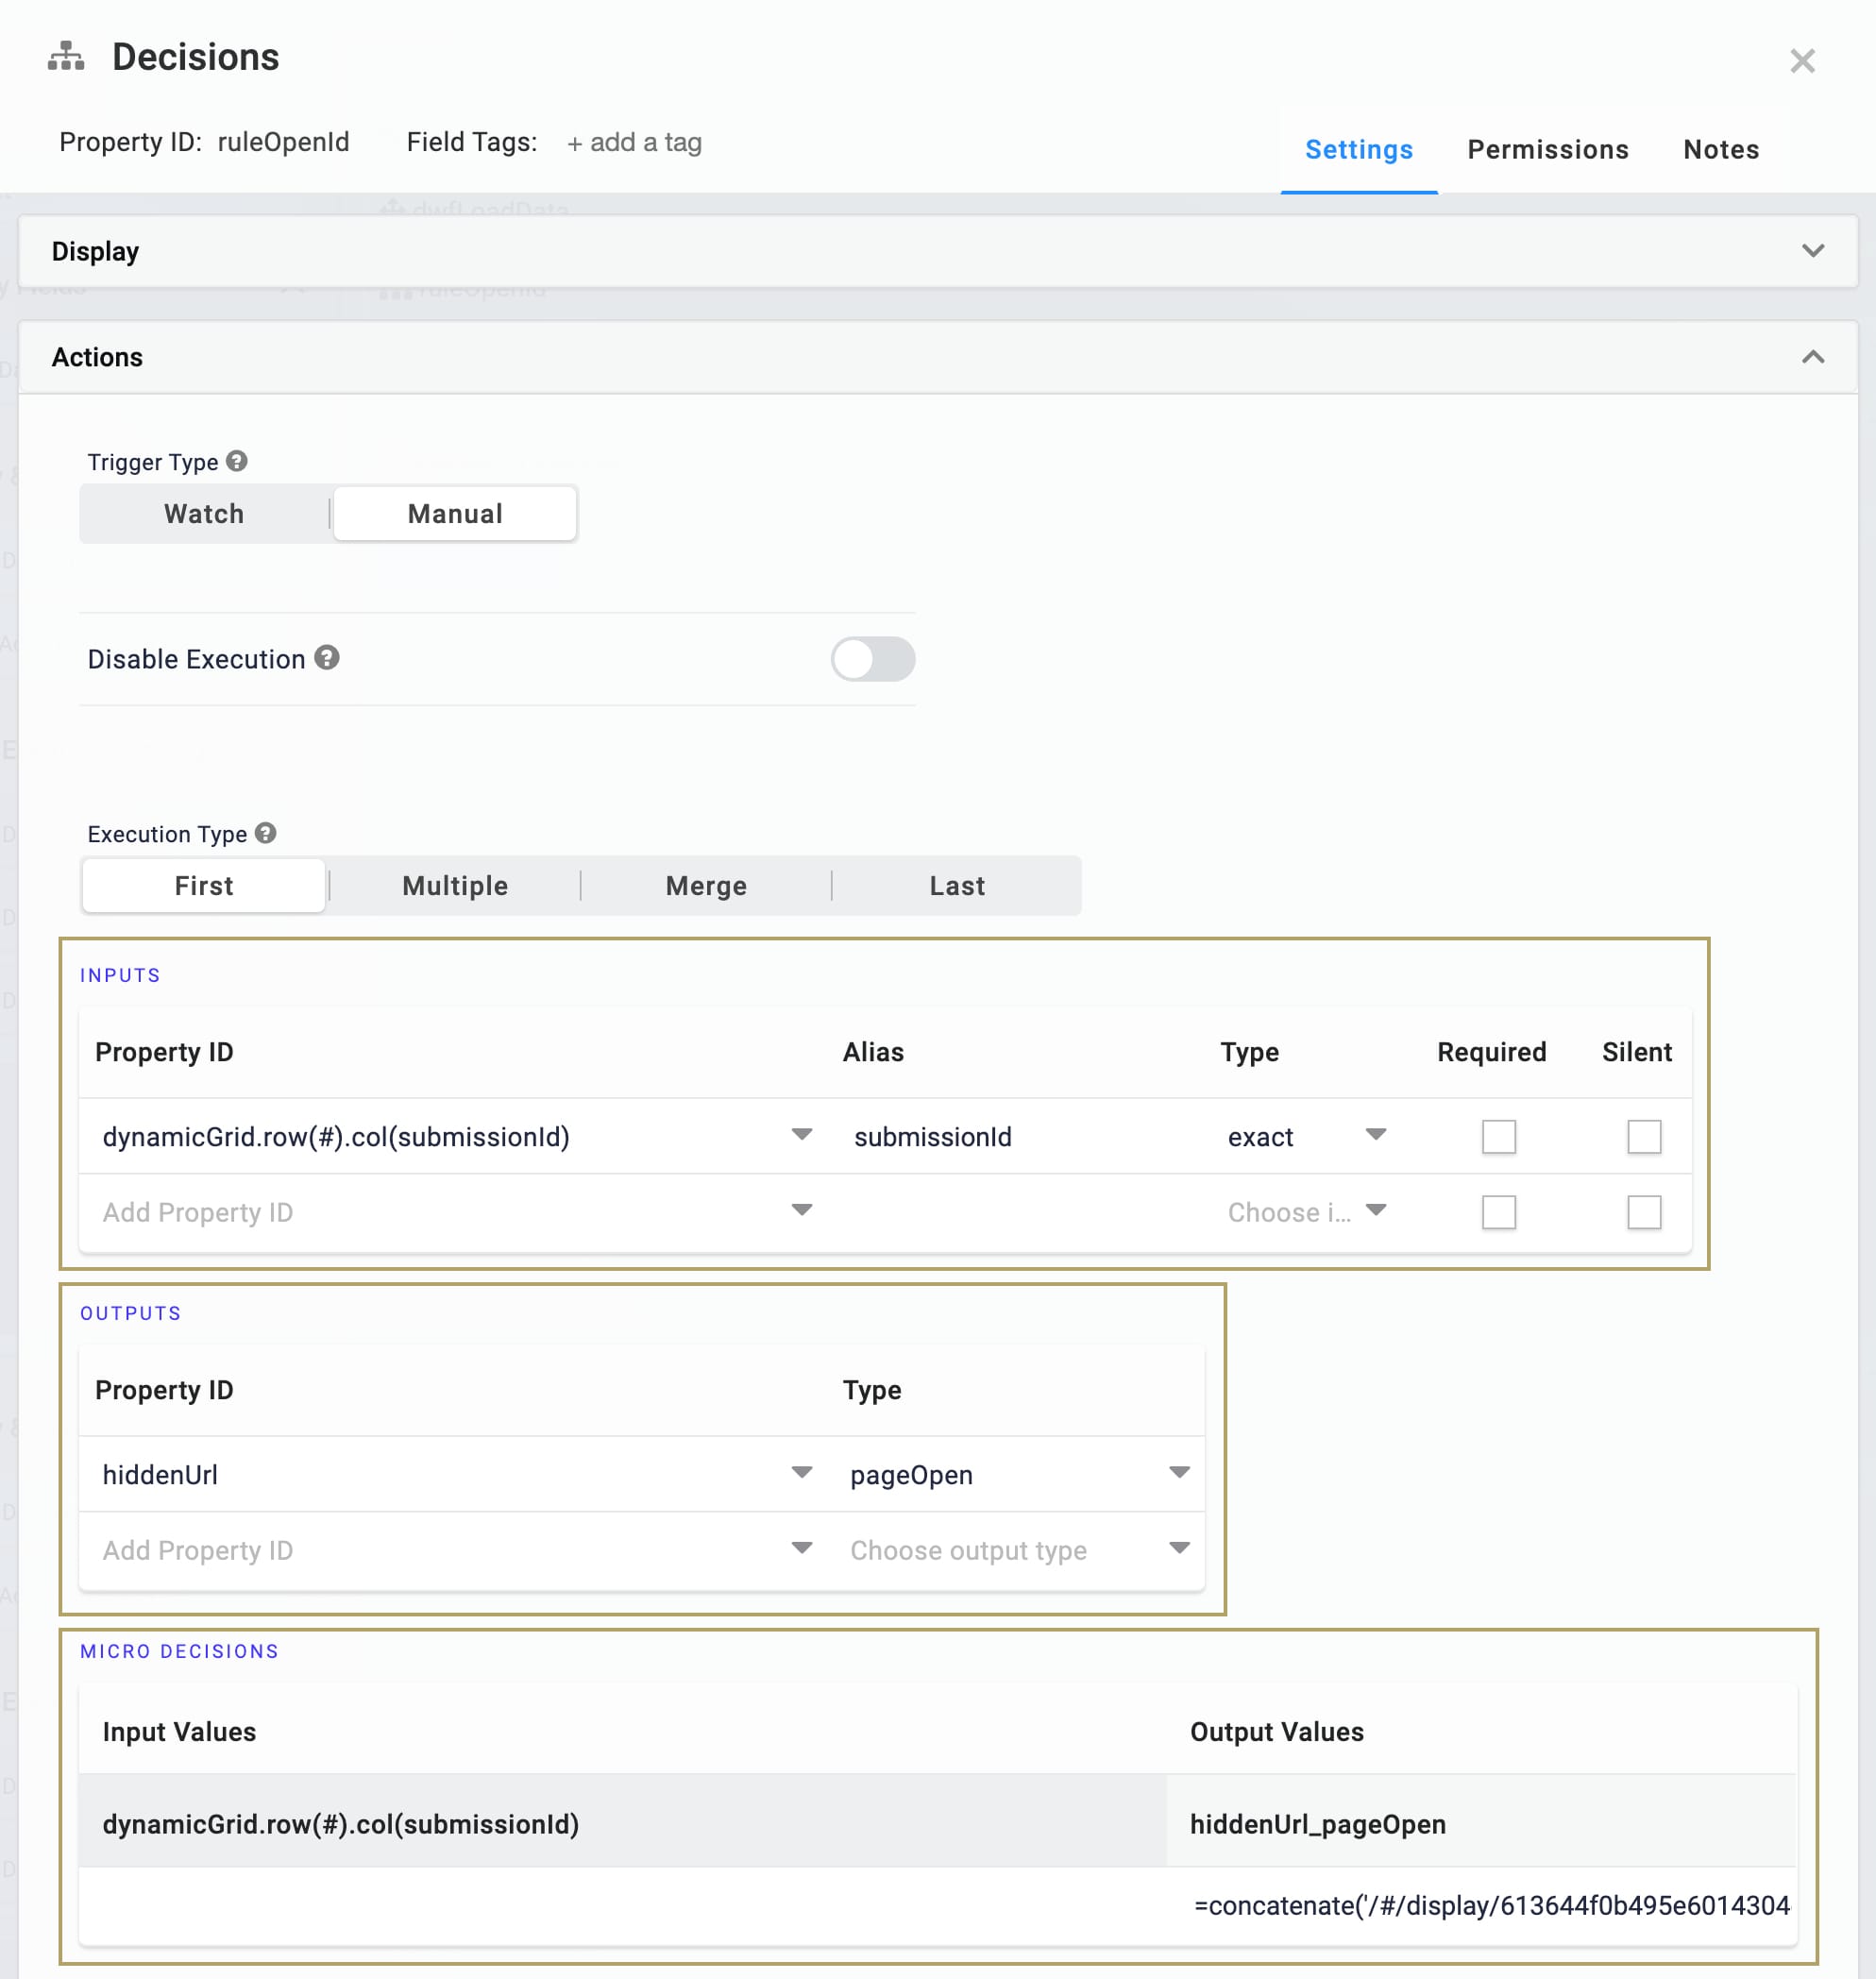
Configure the Decisions Component
Now for the Decisions component, which does the work of actually generating and opening the URL of the selected submission in a new tab. There are two things to note about how this Decisions component works:
-
The Property ID value of the Inputs table uses the Dynamic Index feature, instead of specifying a row. By using Dynamic Index, the row index value dynamically populates based on which row the end-user clicks.
-
The concatenated URL has a hard-coded module ID because the submission IDs all come from the same module. So, only the submission ID needs to dynamically populate in the URL.
| 1. | Drag and drop a Decisions component onto your canvas. |
| 2. | Enter ruleOpenId in the Property ID and Canvas Label Text fields. |
| 3. | Complete the Inputs table as follows: |
| Property ID | Alias | Type |
|---|---|---|
|
dynamicGrid.row(#).col(submissionId) |
submissionId |
exact |
| 4. | Complete the Outputs table as follows: |
| Property ID | Type |
|---|---|
|
hiddenUrl |
pageOpen |
| 5. | Complete the Micro Decisions table as follows: |
| dynamicGrid.row(#).col(submissionId) | hiddenUrl_pageOpen |
|---|---|
|
=concatenate('/#/display/613644f0b495e6014304c0f9/', submissionId , '/613644f0b495e6014304c0f9') |
| 6. | Click Save. |
Configure the Data Workflow Component
There's one last step before you're done. Once the Plug-In gets the data from the reference data collection, the data still needs to move to the Dynamic Grid component. You'll use a Data Workflow to move the data from one component to another. All you need is one Input operator and one Output operator.
| 1. | Drag and drop a Data Workflow component onto your canvas. |
| 2. | Enter dwfLoadData in the Canvas Label Text and Property Name fields. |
Configure the Input Operator
| 1. | Drag and drop an Input operator onto your Data Workflow canvas. |
| 2. | Configure the operator's Info window as follows: |
|
Setting |
Value |
|---|---|
|
Category |
Input |
|
Component |
pluginLoadData |
|
Required |
Yes |
|
Source |
Default |
Configure the Output Operator
| 1. | Drag and drop an Output operator onto your Data Workflow canvas. |
| 2. | Configure the operator's Info window as follows: |
|
Setting |
Value |
|---|---|
|
Category |
Output |
|
Component |
dynamicGrid |
|
Action |
Value |
| 3. | Connect the output port (right) of the Input operator to the input port (left) of the Output operator. |
| 4. | Click Save. |
| 5. | Save your module. |
Now you're ready to test out your configuration. Preview your module then click Load Data. Once the submission IDs load, select a submission ID or the View Submission button. A new tab opens, displaying the relevant submission. Here's how that looks in Express View:
