Overview
In this how-to guide, you'll learn how to build an API API module using the SendGrid API service for sending emails. The API module uses SSE to increase security and prevent malicious actors from compromising application data. You'll also build a Front-End module where end-users can craft an email message and choose where to send it.
Configuring the SendGrid Email API Module
First, create and configure an API API module that sends the email. In this API API module, you'll update and configure components to make the API call. Later, you'll build a FE Front-End module that lets end-users enter a title and message to send using the API call.
Configure the Initializer Component
This Initializer component receives the Execute Module call from the FE Front-End module you'll configure later. Then, it triggers the Plug-In component you'll set up next.
Create a new API API module and open it in the Module Builder.
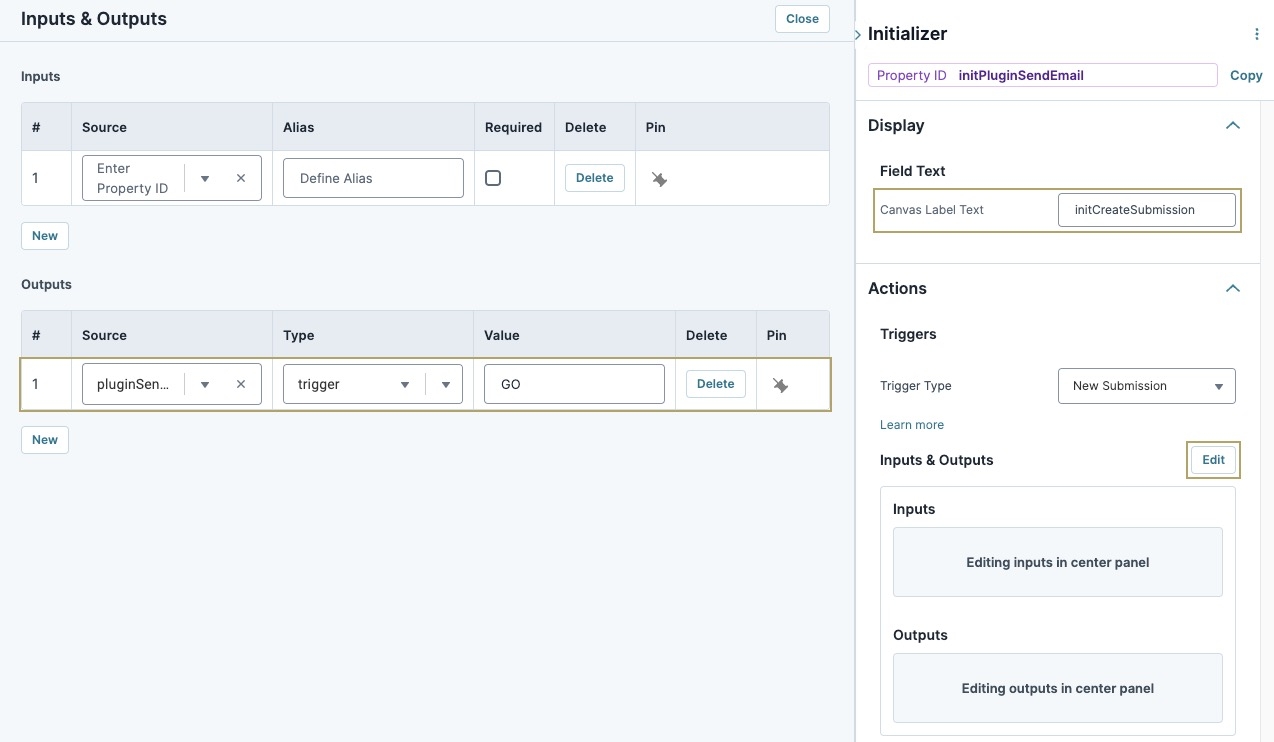
Hover over the initCreateSubmission Initializer component and click (Edit Component).
In the Property ID and Label Text fields, update the values to
initPluginSendEmail.Navigate to the Actions settings.
To the right of Inputs & Outputs, click Edit.
In the Outputs table, enter the following:
#
Source
Type
Value
1
pluginSendEmail
trigger
GO
You'll set up the pluginSendEmail Plug-In component in the next section.

Click Save Component.
Configure the Plug-In Component
This Plug-In component executes the SendGrid API. In the Inputs table, you'll reference the emailAddress and emailMessage Hidden components from the Front-End module you'll set up later.
Hover over the pluginCreateSubmission Plug-In component and click (Edit Component).
In the Property ID and Label Text fields, update the values to
pluginSendEmail.From the Service Type drop-down, select External.
From the External Services drop-down, select SendGrid.
Non-Training environments require their own SendGrid service. Learn how to set up SendGrid in Unqork with our SendGrid in Unqork article.
In the pre-populated Data Source URL field, add mail/send to the end of
https://api.sendgrid.com/v3/. The value becomeshttps://api.sendgrid.com/v3/mail/send.To the right of Inputs & Outputs, click Edit.
In the Inputs table, enter the following:
Feel free to enter your own email address and subject in these sections for testing.
.jpg)
Property ID
Mapping
emailAddress
personalizations[0].to[0].email
emailMessage
content[0].value
'youremail@email.com'
from.email
'Hello Subject'
subject
'text/html'
content[0].type
Navigate to the Actions settings.
In the Error Trigger field, enter
initError. This value triggers the initError Initializer component.Click Save Component.
Configure the Second Initializer Component
This Initializer component triggers an error message if the SendGrid API fails.
Drag and drop an Initializer component onto your canvas, placing it inside the panelConfig Panel component.
In the Property ID and Label Text fields, enter
initError.Navigate to the Actions settings.
To the right of Inputs & Outputs, click Edit.
In the Outputs table, enter the following:
#
Source
Type
Value
1
sendGridResponseError
value
There was an error sending the SendGrid email
Click Save Component.
Update the First Hidden Component
Next, you'll update the requestParameter Hidden component to store the emailAddress data.
Hover over the requestParameter Hidden component and click (Edit Component).
In the Property ID and Label Text fields, update the values to
emailAddress.Click Save Component.
Configure the Second Hidden Component
The second Hidden component stores the emailMessage data.
Drag and drop a Hidden component onto your canvas, placing it inside the panelRequest Panel component, and below the emailAddress Hidden component.
In the Property ID and Label Text fields, enter
emailMessage.Click Save Component.
Update the Third Hidden Component
Lastly, you'll update the responseParameter Hidden component to store the error response for the API call. When the API call fails, the initError Initializer component fires. The Initializer component then outputs an error response to this Hidden component.
Hover over the responseParameter Hidden component and click (Edit Component).
In the Property ID and Label Text fields, update the values to
sendGridResponseError.Click Save Component.
The SendGrid API module is now configured. Next, build the FE Front-End module where end-users can send email messages using the SendGrid API.
Configuring the Front-End Module
The FE Front-End module is where you'll remotely execute the API API module. This module is also where the end-user enters the email information.
Configure the Field Group Component
This component enables you to organize your module.
Create a new Front-End module and open it in the Module Builder.
Drag and drop a Field Group component onto the canvas.
In the Property ID field, enter fgExecuteModule.
Click Save Component.
Configure the Text Field Component
This component acts as the field where your end-user will enter the recipient's email address.
Drag and drop a Text Field component onto the canvas, placing it inside the fgExecuteModule Field Group component.
In the Property ID field, enter emailAddress.
In the Label Text field, enter
Email Address.Navigate to the Validation settings.
Under User Input, set Required to (ON).
Click Save Component.
Configure the Text Area Component
In this field, the end-user enters a message to send as part of the email.
Drag and drop a Text Area component onto your canvas, placing it inside the fgExecuteModule Field Group component and below the emailAddress Text Field component.
In the Property ID field, enter emailMessage.
In the Label Text field, enter
Email Message.Navigate to the Validation settings.
Under User Input, set Required to (ON).
Click Save Component.
Configure the Plug-In Component
This Plug-In component executes the SendGrid API API module.
Drag and drop a Plug-In component onto your canvas, placing it inside the fgExecuteModule Field Group component and below the emailMessage Text Area component.
In the Property ID and Label Text fields, enter
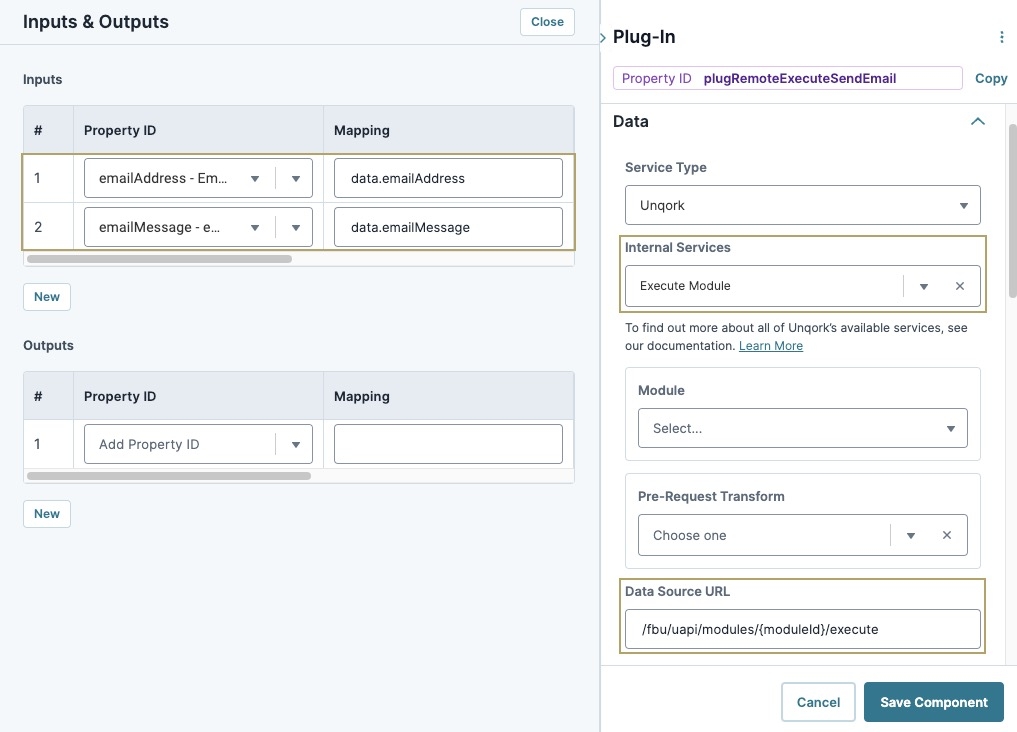
pluginRemoteExecuteSendEmail.Navigate to the Data settings.
From the Internal Services drop-down, enter or select Execute Module.
In the Data Source URL field, you'll see /fbu/uapi/modules/{moduleId}/execute. Replace {moduleID} with the module ID of the Send Email API API module.
To the right of Inputs & Outputs, click Edit.
In the Inputs table, enter the following:
#
Property ID
Mapping
1
emailAddress
data.emailAddress
2
emailMessage
data.emailMessage

In the Outputs table, enter the following:
#
Property ID
Mapping
1
responseAPIError
data.resolved.responseError
Click Save Component.
Configure the Button Component
This component triggers the pluginRemoteExecuteSendEmail Plug-In component.
Drag and drop a Button component onto your canvas, placing it inside the fgExecuteModule Field Group component and below the pluginRemoteExecuteSendEmail Plug-In component.
In the Property ID field, enter btnExecuteEmailAPI.
In the Label Text field, enter
Execute Send Email API.Navigate to the Actions settings.
From the Action Type drop-down, enter or select Event.
In the On Click field, enter or select
pluginRemoteExecuteSendEmail.Click Save Component.
Configure the Hidden Component
Lastly, configure a Hidden component to store the error response if the API call fails.
Drag and drop a Hidden component onto your canvas, placing it inside the fgExecuteModule Field Group component and below the btnExecuteEmailAPI Button component.
In the Property ID and Label Text fields, enter
responseApiError.Click Save Component.
Preview your FE Front-End module in Express View. Test the SendGrid API API module by entering your email address and a message in the Express View fields. Click Execute Send Email API button to receive an email. If you do not receive the email, check your email's spam folder.