How to: Create a Status Blueprint
Overview
This how-to guide explains creating a new status blueprint using the Status Blueprint Accelerator template. Blueprints determine the structure and flow of your case statuses. The blueprint lets you connect statuses so cases can move seamlessly through your process.
The flow chart below is an example of how statuses work in a case management application. The statuses move between each other until they eventually reach Approved, Denied, or Canceled. This chart also includes action names for the end-user to see, as well as a checklist. The Status Blueprint Accelerator lets you build out all of these features.
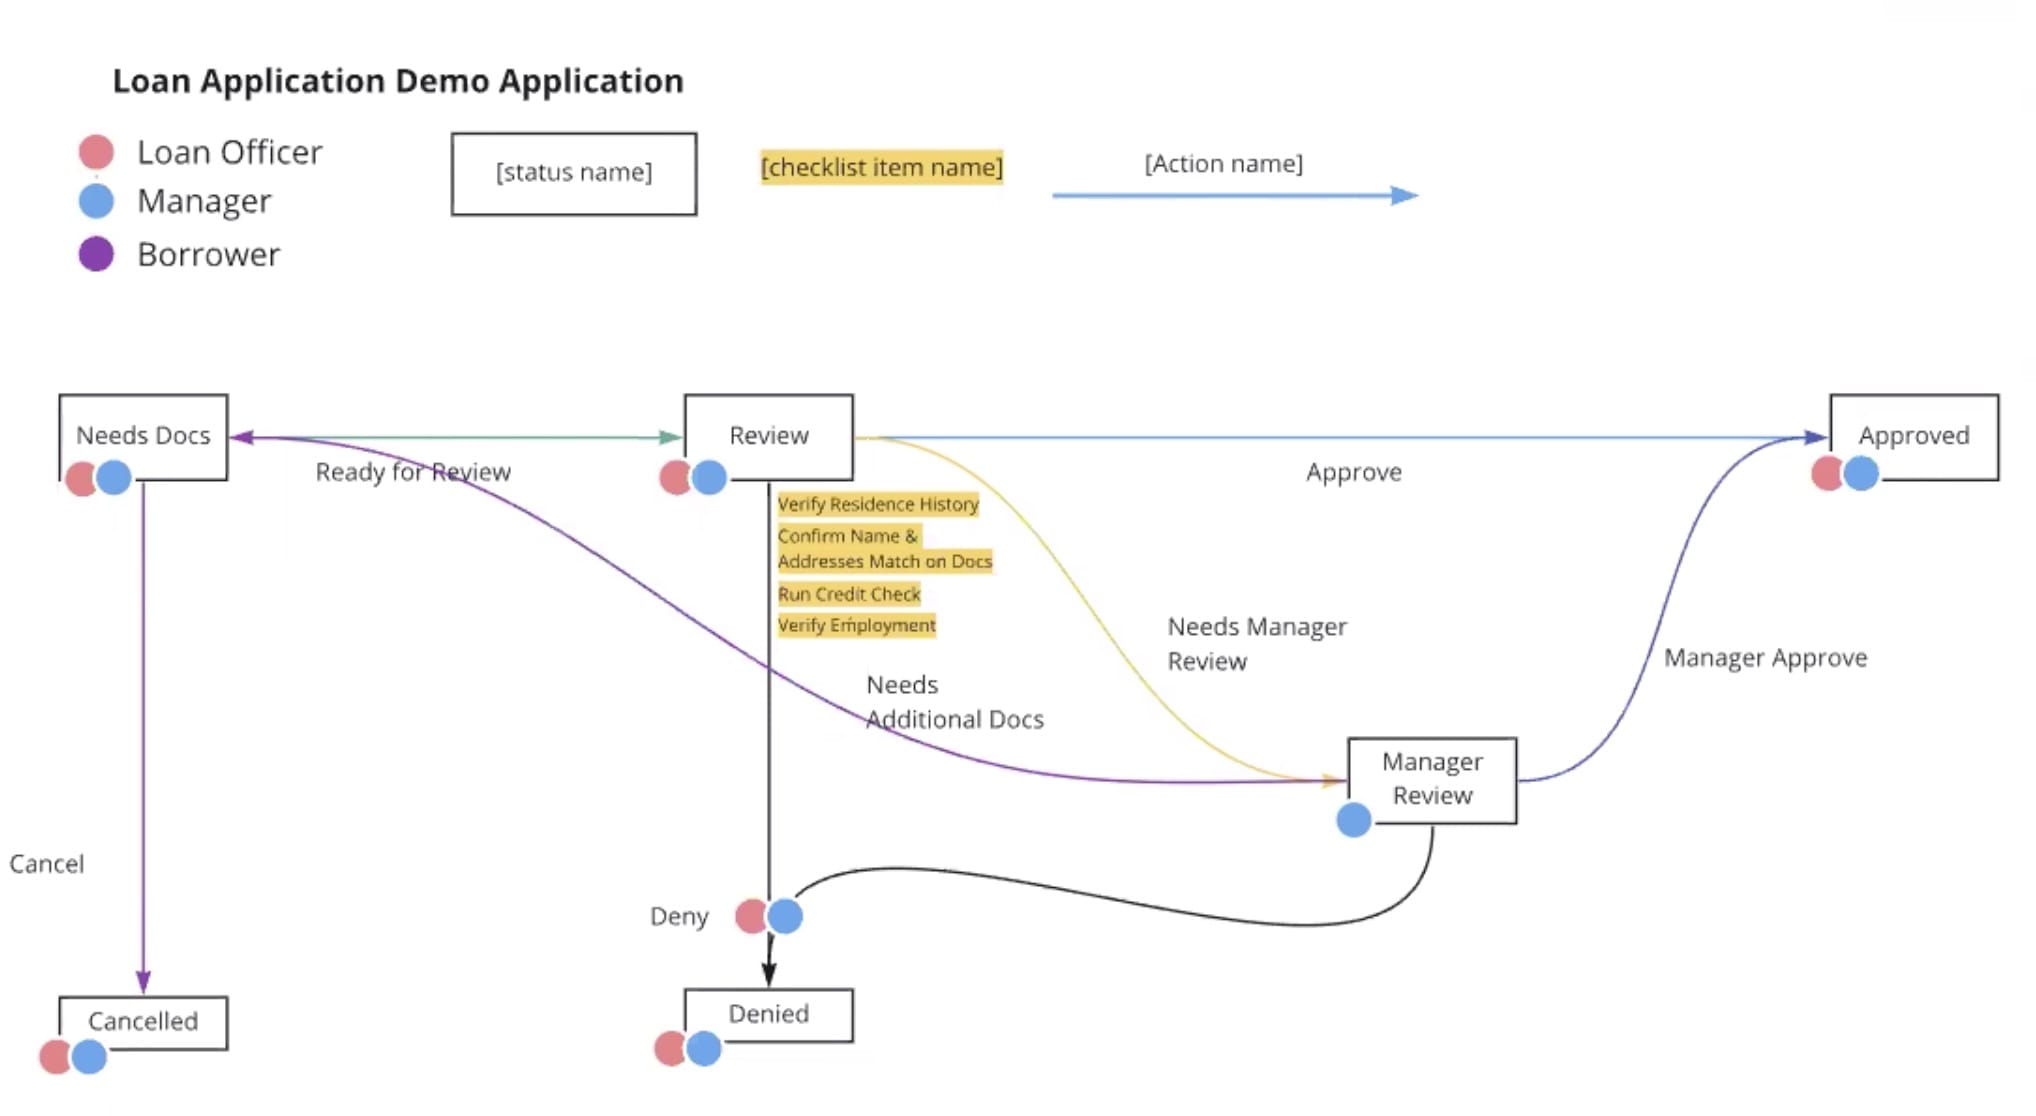
In this article, you'll build out a status blueprint for a simpler flow than the one above. It contains includes three statuses: In Review, Approved, and Denied.
What You'll Learn
In this how-to guide, you'll learn how to create a status blueprint using the Status Blueprint Accelerator template.
How to Add the Status Blueprint Accelerator Template
Before you can use the Status Blueprint Accelerator, you must install the template to your environment. Then, you can visit your Library and build an application from the template. See the Resources section of this article for more information.
How to Create the Associated Schema
Before you create a blueprint, you need to have a schema module ready. The associated schema module stores your submission data. Your associated schema module might be a server-side, front-end intake module. This module might have a few input fields, a Submit button, and a Plug-In that calls an API module.
NOTE You can create a placeholder schema module if you choose. Create the module and add the tag schema. Then, the module is available for you to select. You can always complete its configuration at a later date.
To create this schema module:
| 1. | In your application, click the + Create New button. |
| 2. | In the Module Name and Module Path fields, enter a Module Name and Module Path. |
| 3. | In the Tags field, enter schema. |
| 4. | Click Create. |
Configure the Schema Module
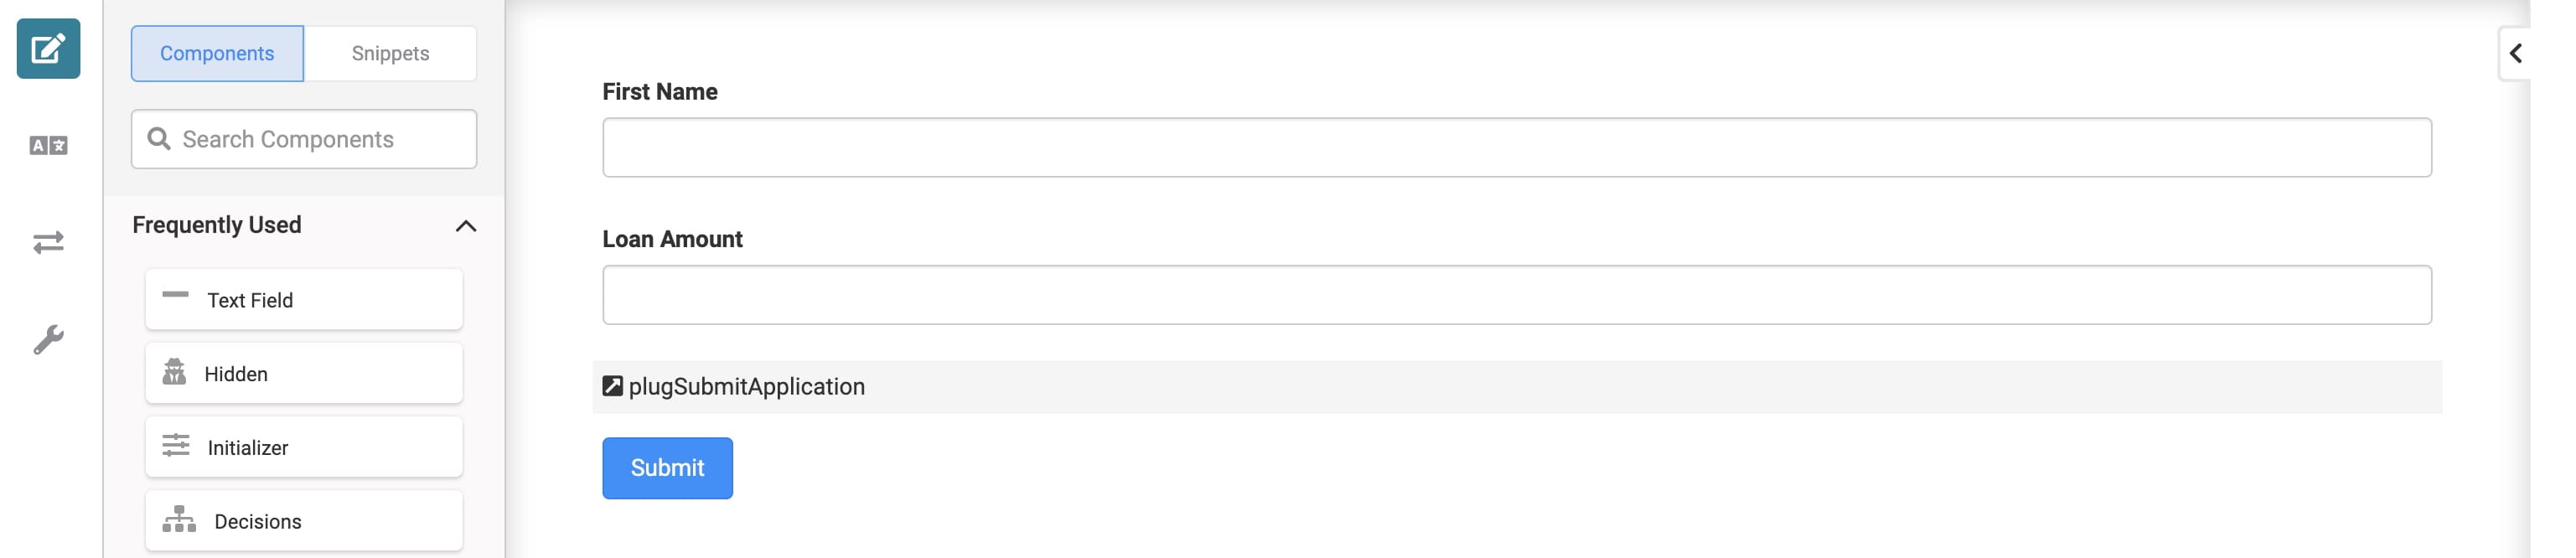
Because the objective of this how-to guide is to test the Status Blueprint Accelerator, you must configure this module as simply as possible.
| 1. | In the Module Builder, drag and drop a Text Field component onto the canvas. |
| a. | In the Property ID and Label Text fields, enter the following: |
|
Property ID |
Label Text |
|---|---|
|
firstName |
First Name |
| 2. | Drag and drop a Number component onto the canvas, placing it below your Text Field component. |
| a. | In the Property ID and Label Text fields, enter the following: |
|
Property ID |
Label Text |
|---|---|
|
loanAmount |
Loan Amount |
| 3. | Drag and drop a Plug-In component onto the canvas, placing it below your Number component. |
| a. | In the Property ID and Canvas Label Text fields, enter plugSubmitApplication. |
| 4. | Drag and drop a Button component onto the canvas, placing it below your Plug-In component. |
| a. | In the Property ID and Label Text fields, enter the following: |
|
Property ID |
Label Text |
|---|---|
|
btnSubmit |
Submit |
| b. | In the Trigger on Click field, enter plugSubmitApplication. |
| 5. | Save each module as you build it. |
| 6. | Save your module |
Your module looks something like this:
How to Create a Status Blueprint
To create a new status blueprint:
| 1. | In the Status Blueprint Accelerator workspace, find the Blueprint: Dashboard module. |
| 2. | To view the dashboard in Express View, click Preview. |
| 3. | Click Create New Blueprint. |
| 4. | In the Blueprint Name field, enter Loan Application. |
| 5. | From the Associated Schema drop-down, select your schema module. |
| 6. | Click Save and Continue. |
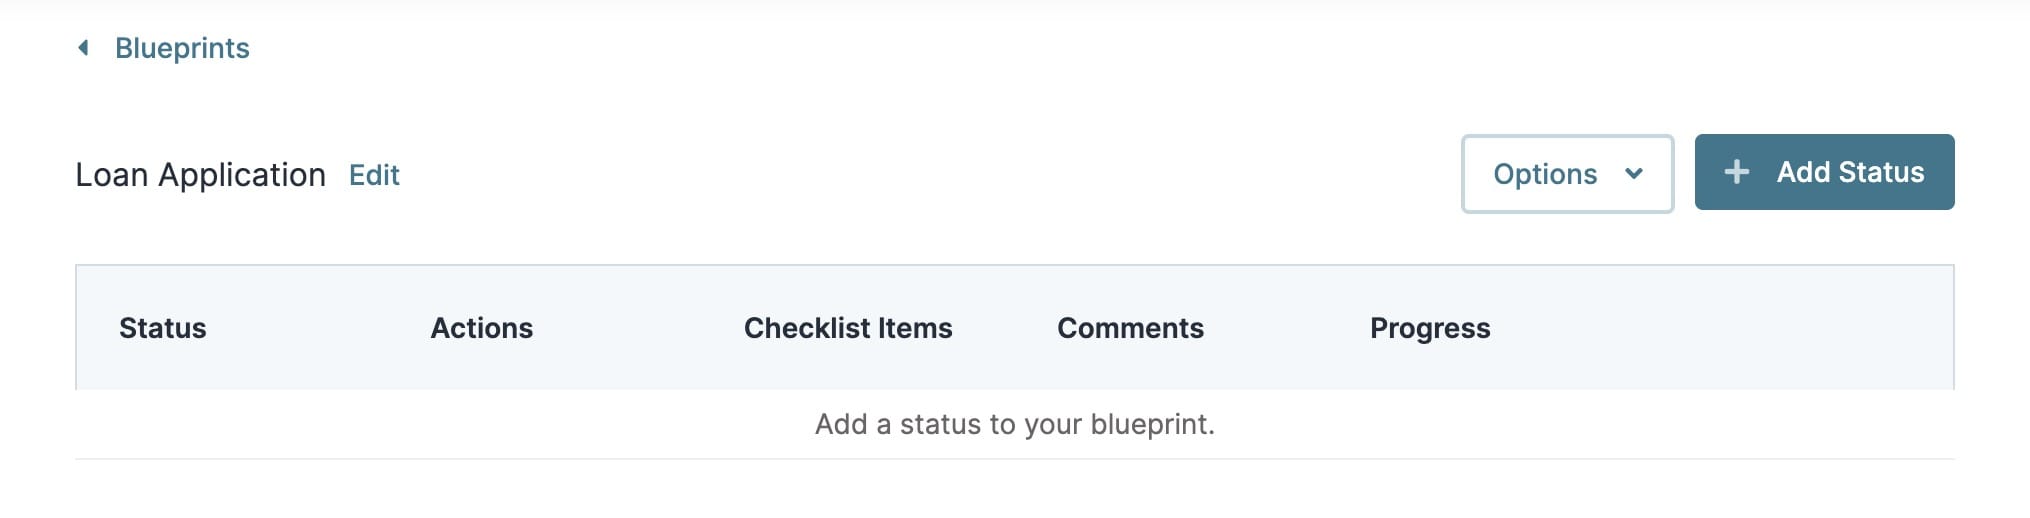
You now have a blank blueprint where you can build out the status flow.
NOTE When creating a new blueprint, there is an option to use imported JSON. This is helpful when you promote an application, as the blueprint's submissions don't get promoted with it. This feature is covered thoroughly in our How to: Promote an Application's Status Blueprint article.
How to Add Statuses to the Blueprint
After you create the new blueprint, you can add the statuses. You'll then connect the statuses with actions so a case moves between statuses. For this use case, add 3 statuses: In Review, Approved, and Denied.
To add the statuses:
| 1. | From your empty blueprint screen, click Add Status. |
| 2. | In the Name field, enter In Review. |
| 3. | From the Assign Roles drop-down, select Administrator (or your environment's equivalent role). |
| 4. | Click Save Changes. |
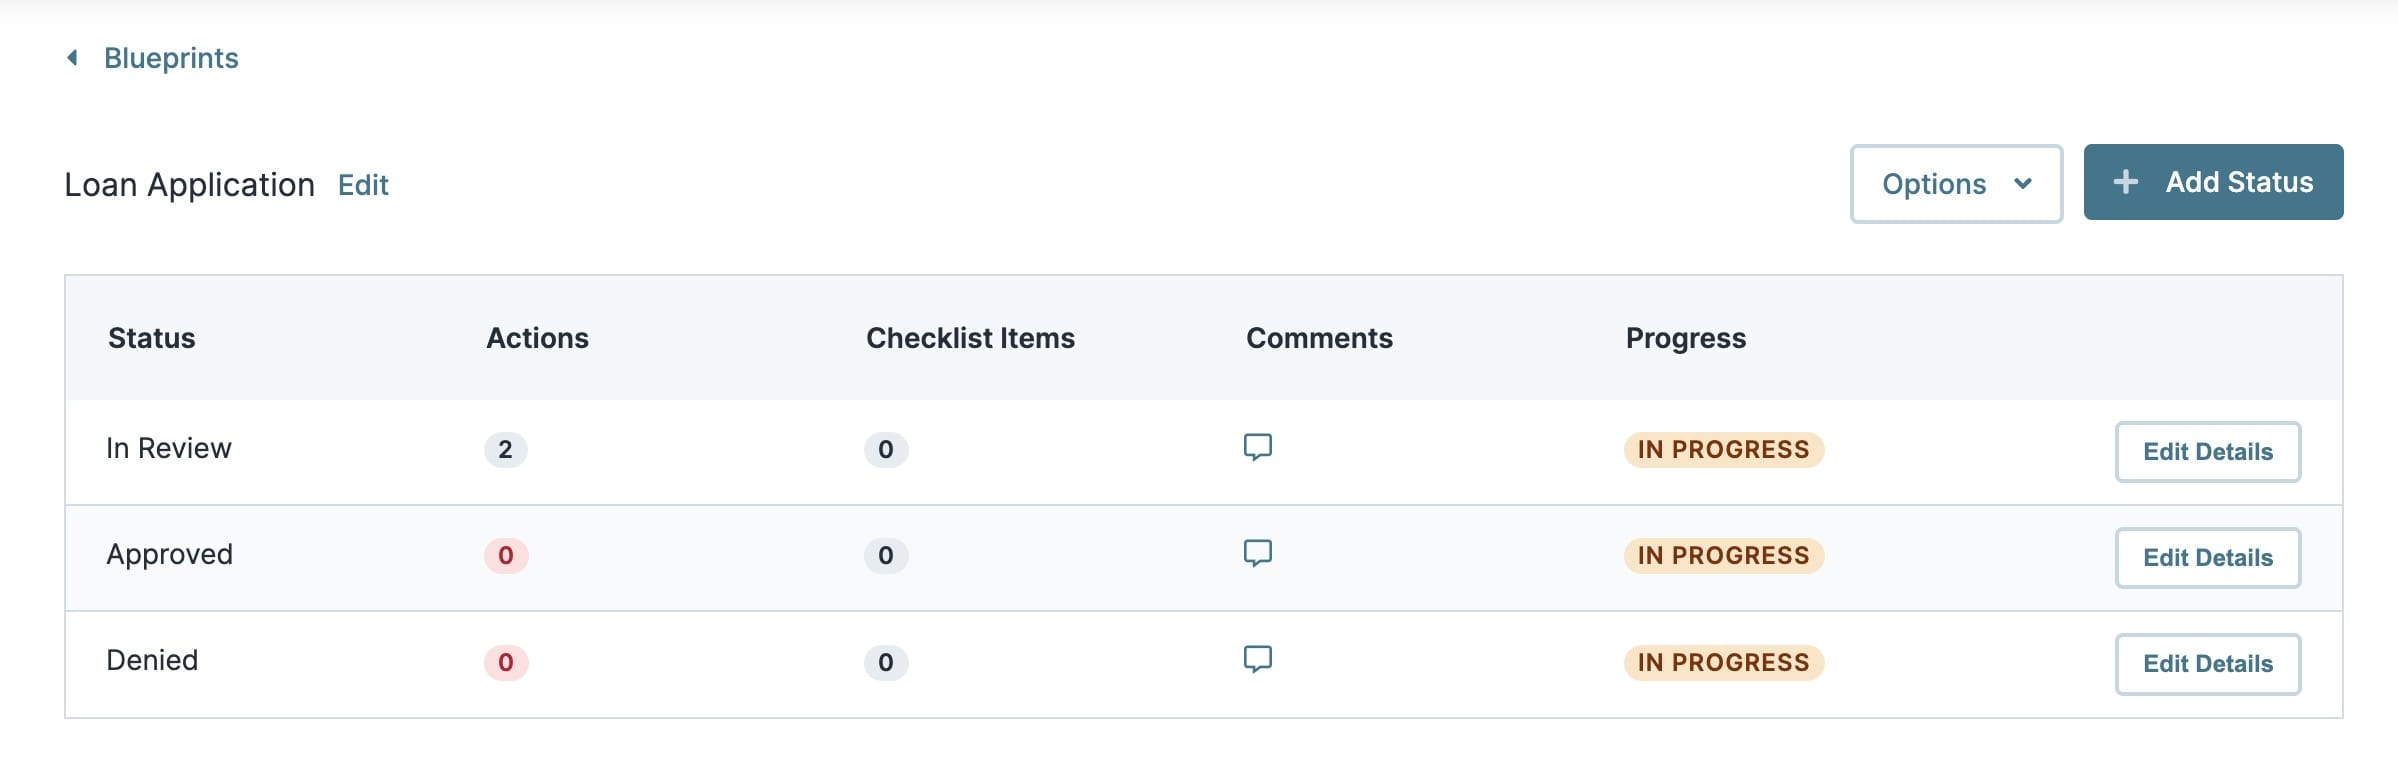
| 5. | Repeat the first four steps, adding a status of Approved and another called Denied. |
| 6. | On your blueprint screen, find the In Review status and click Edit Details |
| 7. | Click the Actions tab. |
| 8. | In the Action Name field, enter Approve. |
| 9. | Click Save Changes. |
| 10. | From the Target Status drop-down, select Approved. |
| 11. | Add another action with the name Deny and a Target Status of Denied. |
| 12. | Click Save Changes. |
You've now filled out the basics of a status blueprint. Your blueprint looks like this:
Status Settings
There are three sections of settings you can use to customize statuses. These are Overview, Actions, and Checklists. Below are descriptions and instructions for each section.
Overview
The Overview tab lets you set the status name, select which roles have access to the status, and add any attributes.
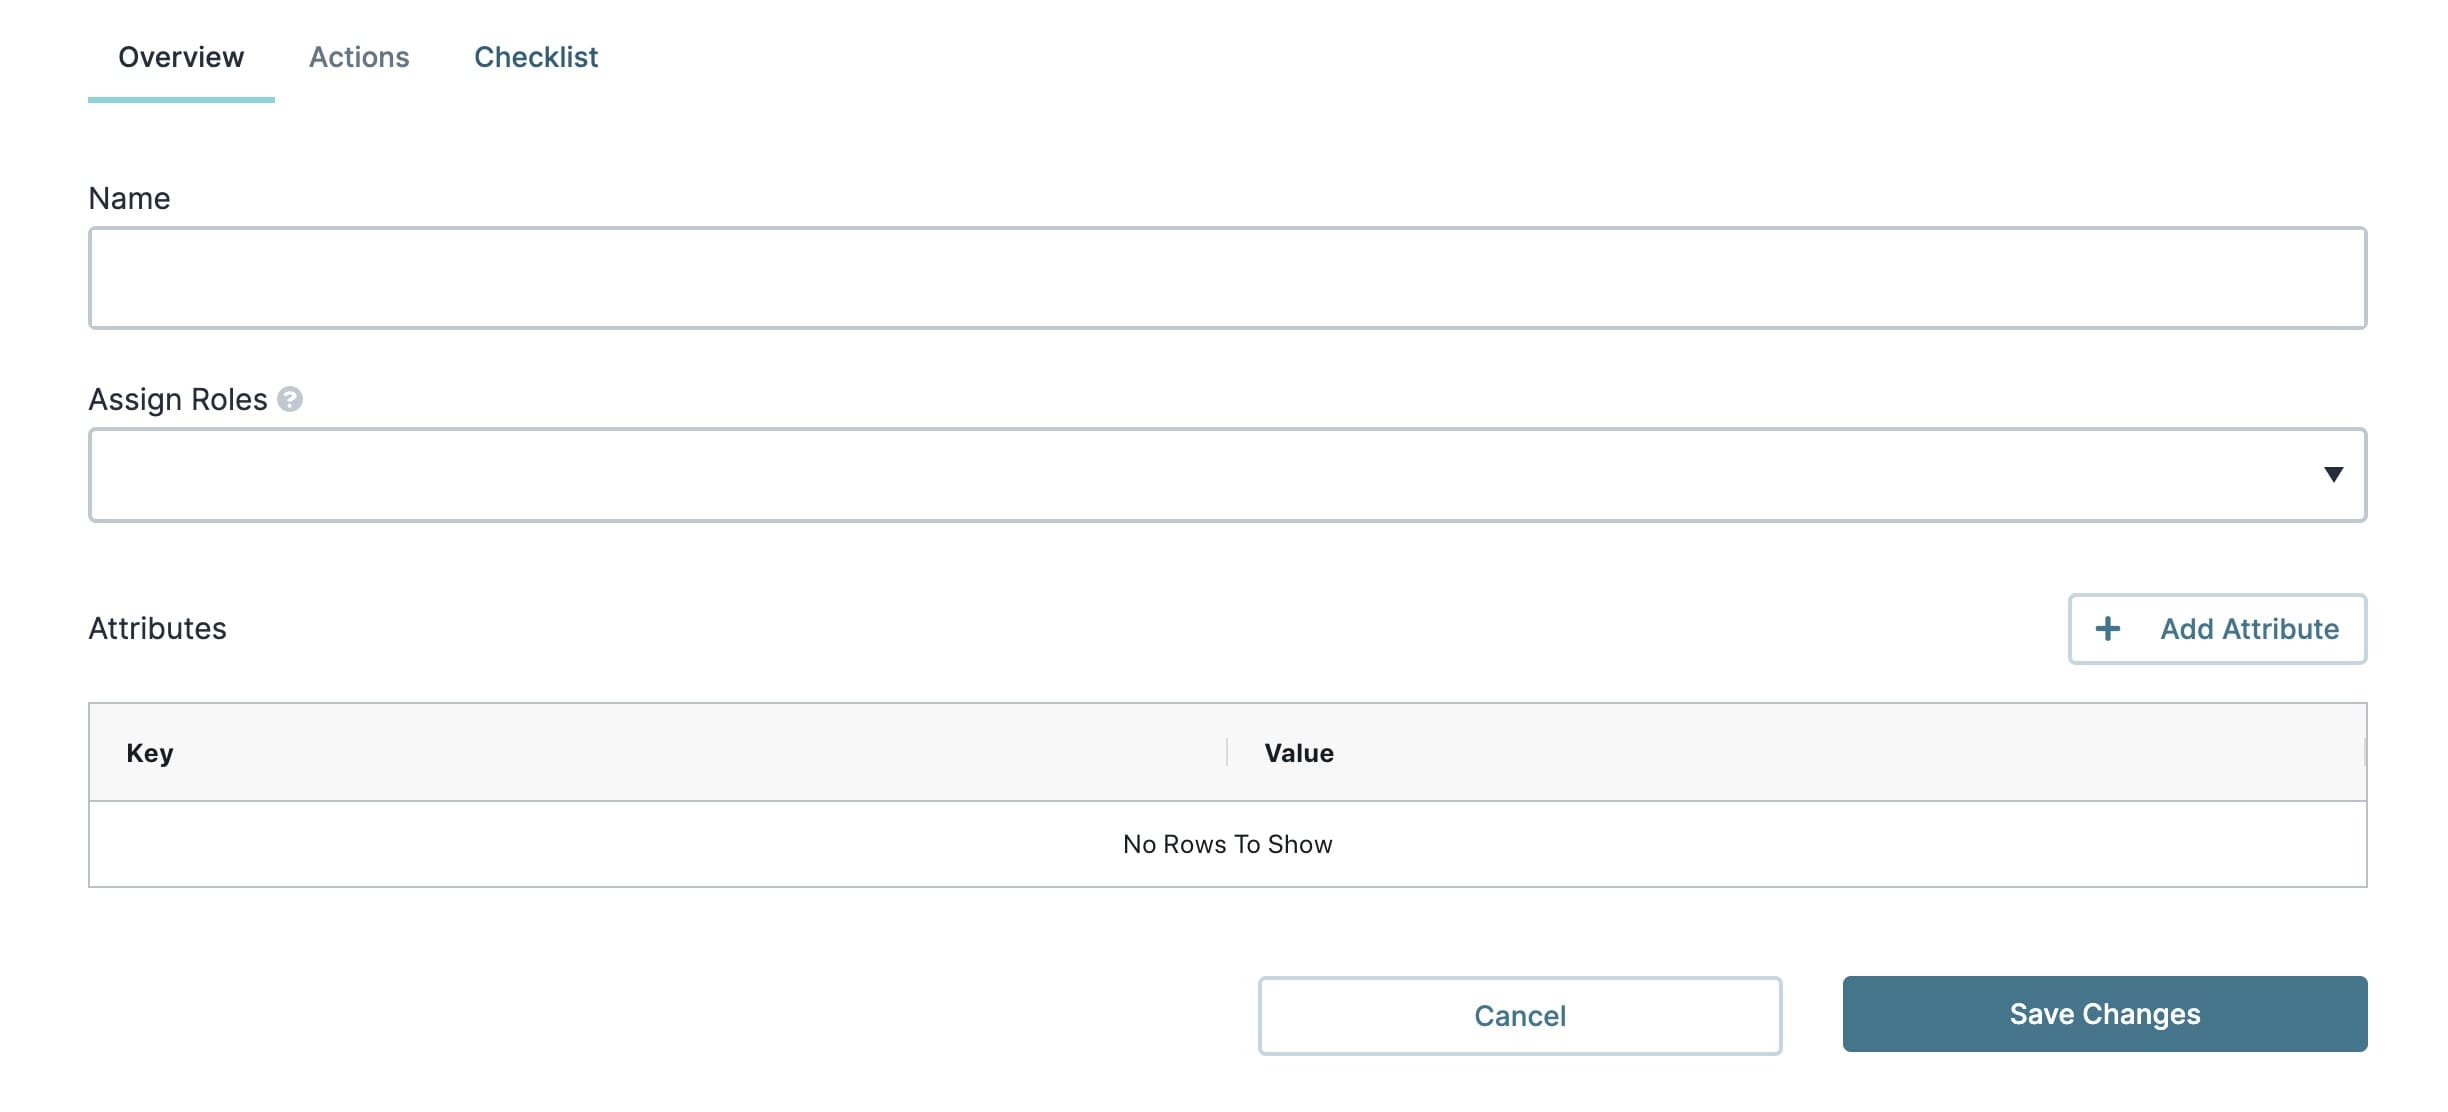
| Setting | Description |
|---|---|
|
Name |
The name of the status. |
|
Assign Roles |
A drop-down where you can select which roles can take action on a case with this status. For example, a case with the status of Supervisor Review shouldn't be available to roles that aren't supervisors. |
|
Attributes |
A grid that lets you add any HTML attributes to the action button. For this feature to work, you must also configure your front-end module to accommodate the attribute. |
Actions
The Actions tab is where you add the actions available to the end-user from the current status. For example, a status of In Review might need actions of Approve and Reject. You can add as many Actions to a status as you need.
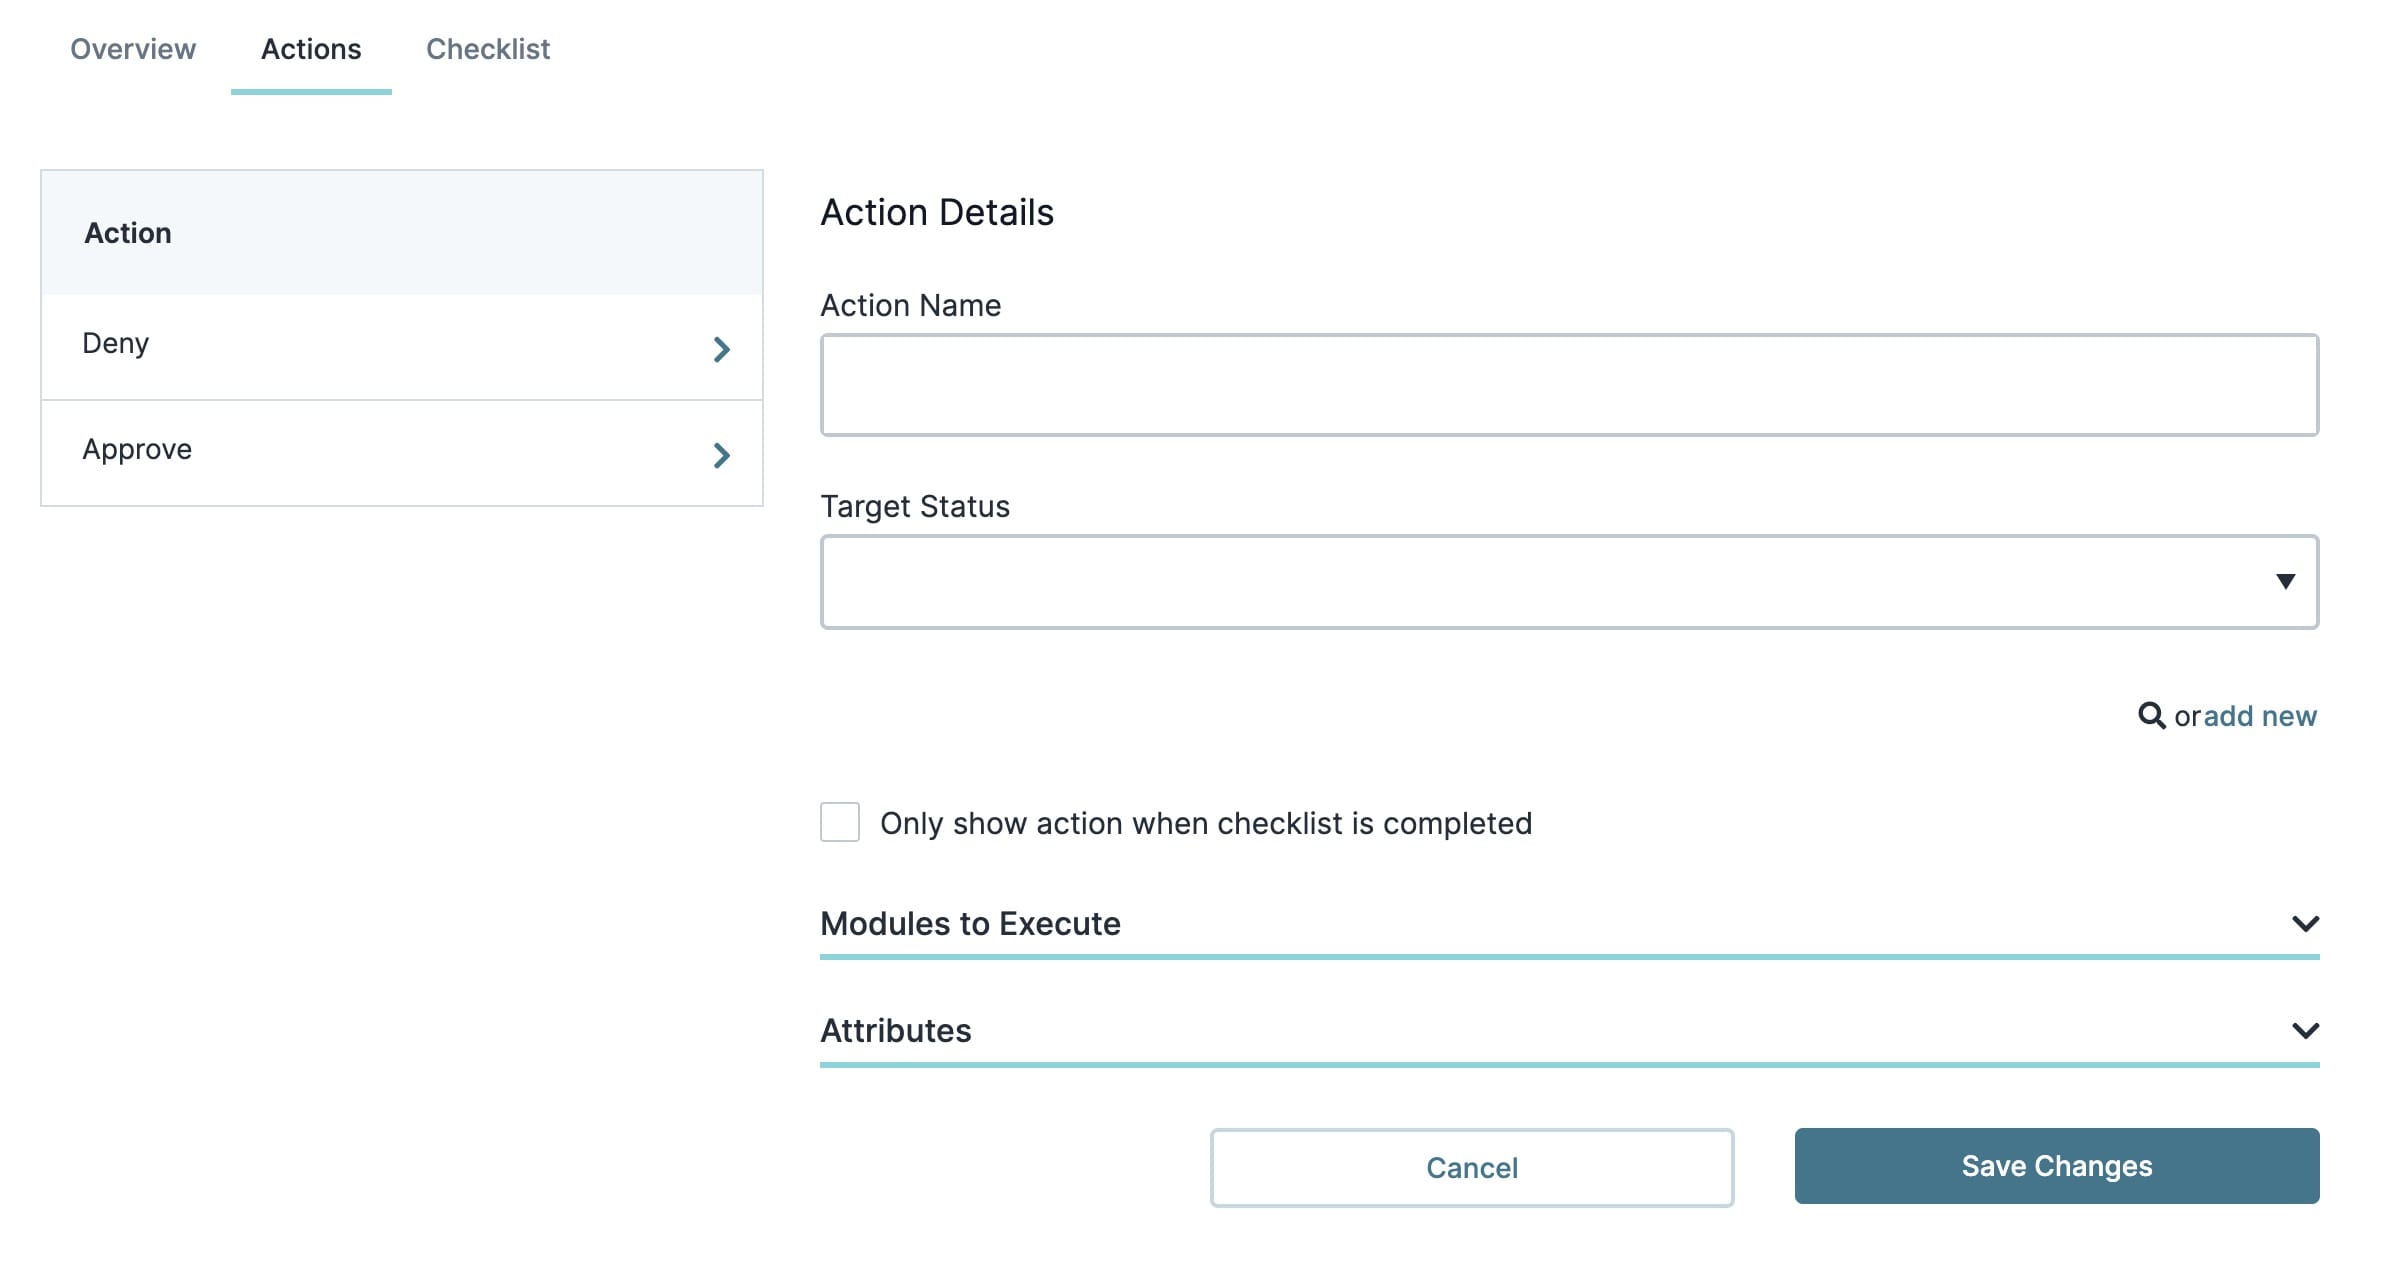
| Setting | Description |
|---|---|
|
Action Name |
The label of the action button. For example, use Reject as the action name if you want a target status of Rejected. |
|
Target Status |
A drop-down of all the statuses in the blueprint. This is what the status changes to when the end-user takes the action. |
|
Modules to Execute |
An option to execute a module when the end-user takes an action. For example, if a reviewer clicks Reject on a case, a module executes and sends an email to the applicant to let them know. |
|
Attributes |
A grid that lets you add any HTML attributes to the action button. For this feature to work, you must also configure your review screen to accommodate the attribute. |
TIP Since the Target Status drop-down only includes statuses currently added to your blueprint, you might want to add placeholders for all your statuses (only filling out the names). Once you add all the statuses, you can go back and build out the actions.
Checklist
The Checklist tab lets you add a checklist to a status. You can make a checklist required or optional for the end-user. If you make it required, the end-user can't proceed to the next action until they complete all the checklist items.
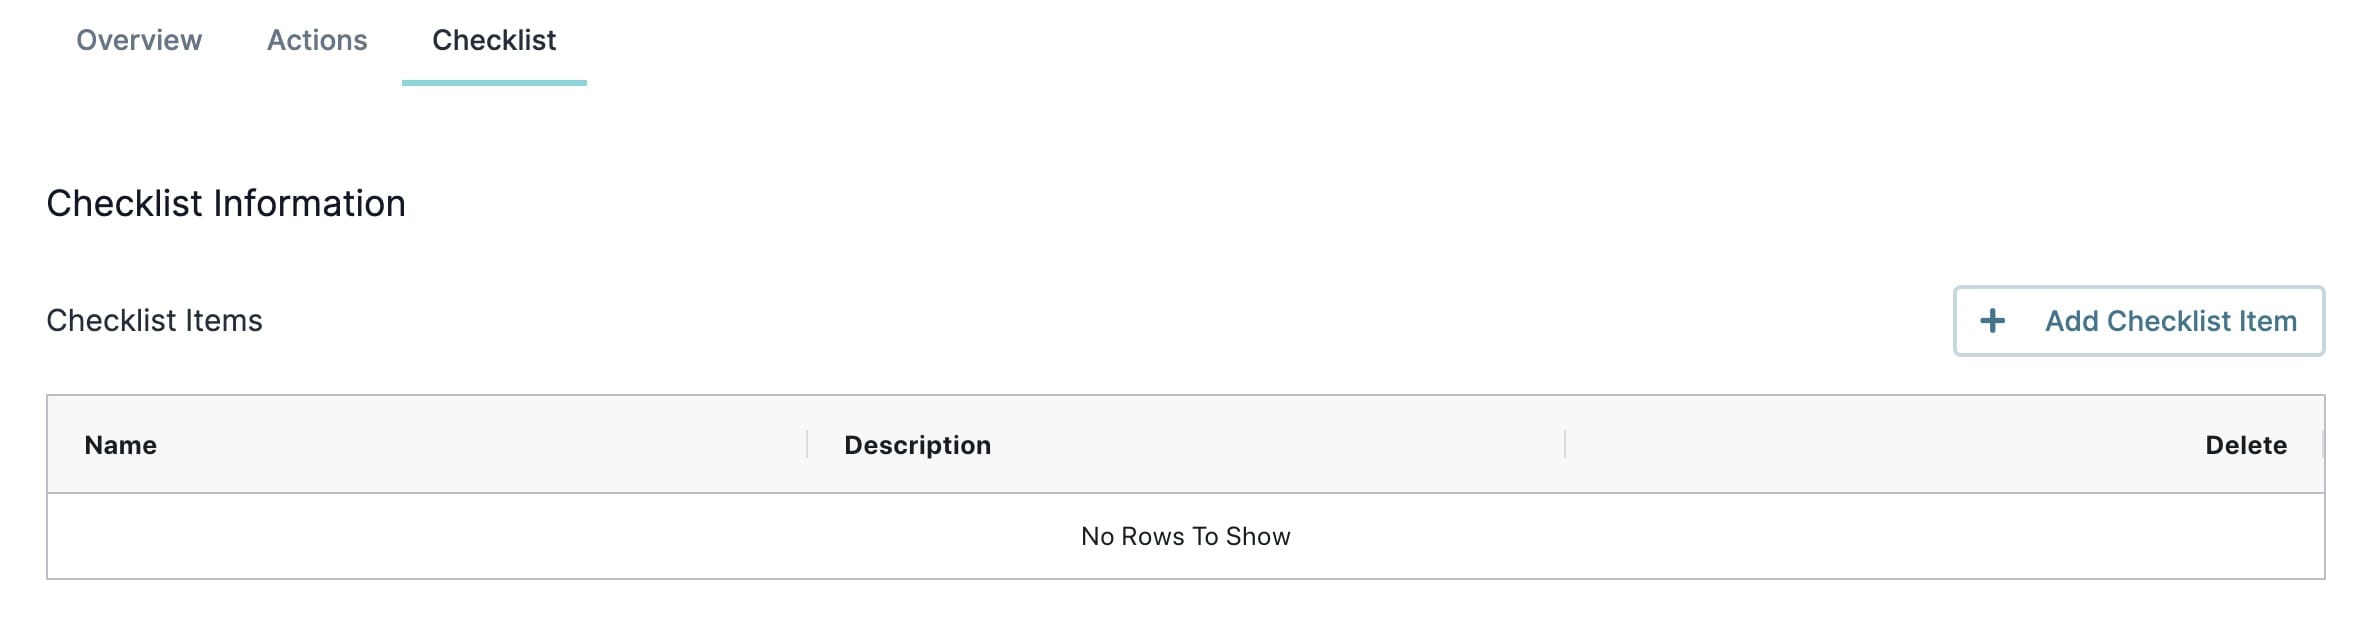
To add a checklist:
| 1. | From the Checklist tab, click Add Checklist Item. |
| 2. | Enter a Name for the checklist item. |
| 3. | Enter a Description for the checklist item. This displays in a column next to the checklist item name. |
| 4. | Click Save Changes. |
How to Use the Blueprint Dashboard Features
The blueprint dashboard has other features you can access using the Options drop-down.
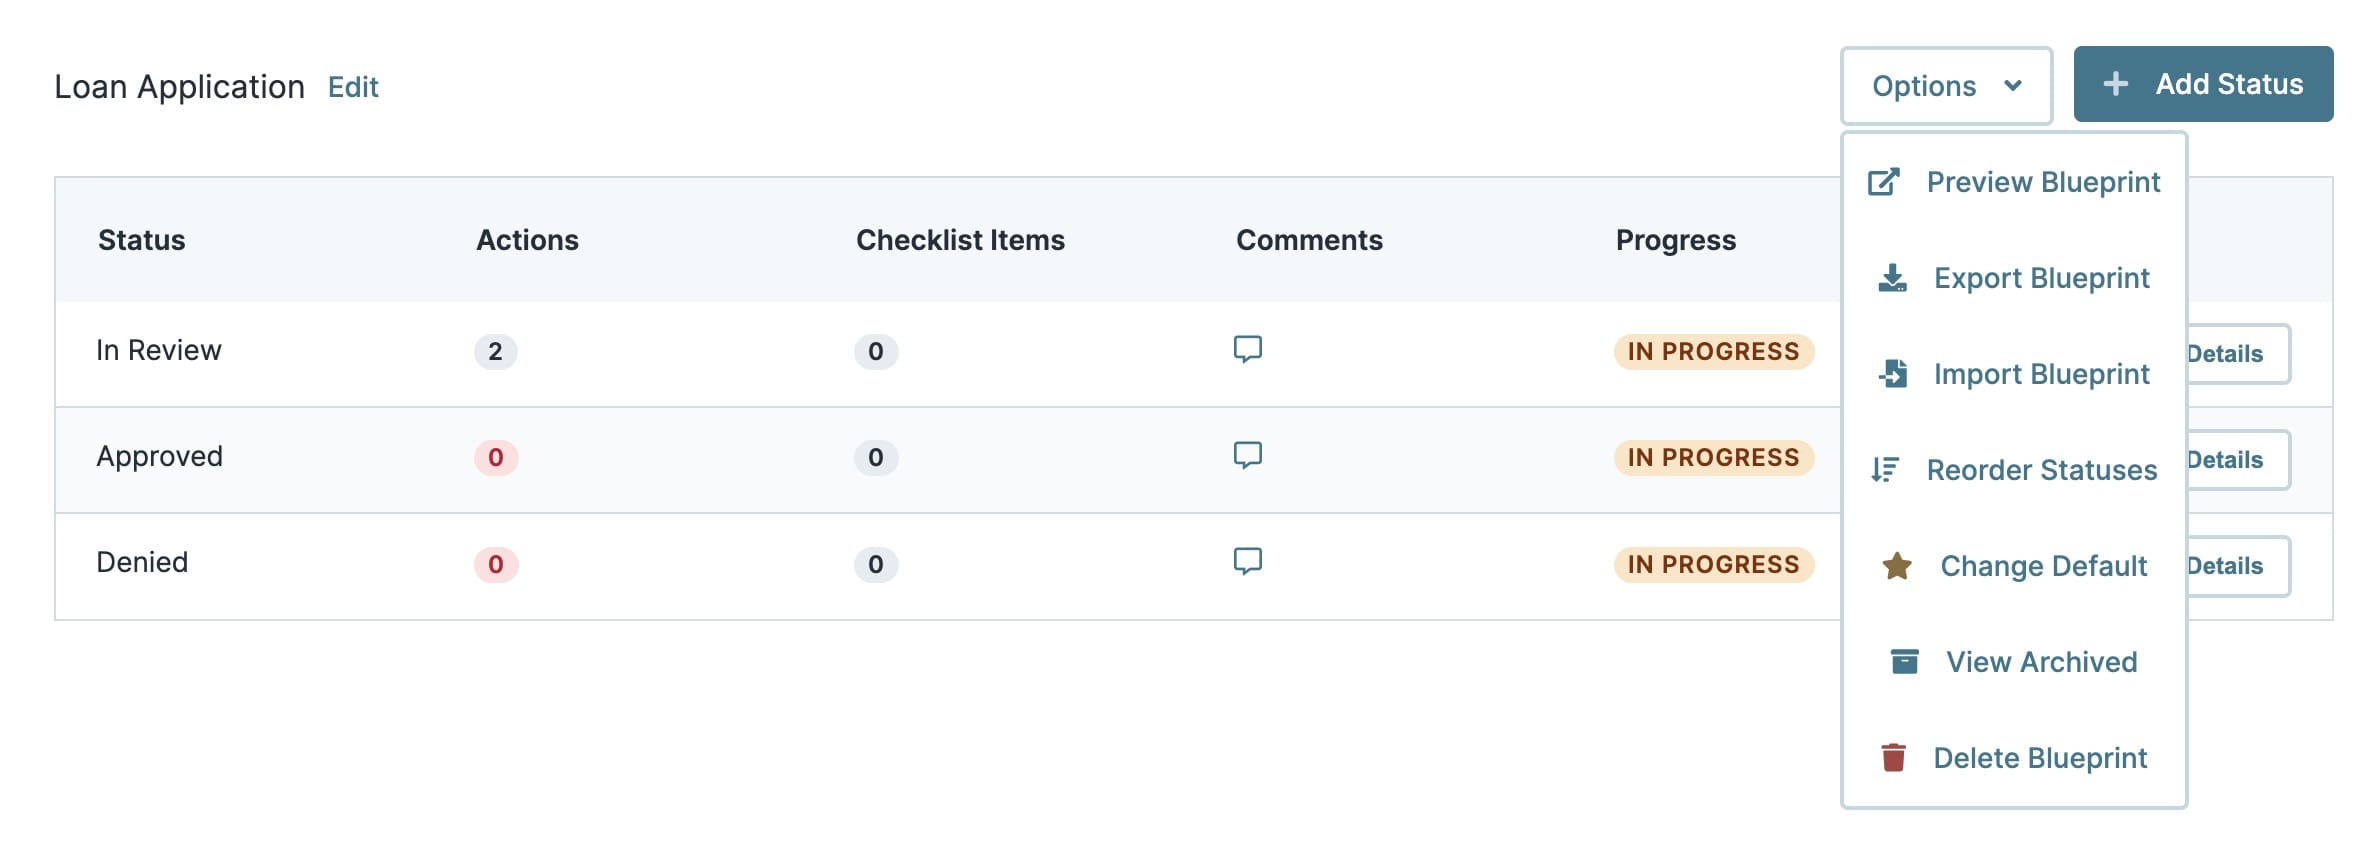
| Feature | Description |
|---|---|
|
Preview Blueprint |
Shows you a mock-up review screen where you can test the functionality of your statuses. This preview retrieves submissions from your associated schema. If you don't see any submissions, make sure your schema is properly connected. |
|
Export Blueprint |
Exports the blueprint as a .json file. Use this feature when you promote an application to a new environment. |
|
Import Blueprint |
Lets you import a .json file of a blueprint. Use this feature when adding a blueprint for a promoted application. |
|
Reorder Statuses |
Lets you set the order in which you see the statuses in your dashboard. Reordering statuses doesn't affect the logic behind the blueprint, only how they display in the dashboard. |
|
Change Default |
Sets a default status. This is the status cases are automatically assigned when they are first submitted. For your blueprint to work, there must be a default status. Without an assigned default status, your application doesn't know how to process a new submission and the end-user can't take any action on it. |
|
View Archived |
Shows you any archived statuses in this blueprint. You can also remove archive statuses using this feature. |
|
Delete Blueprint |
Permanently deletes the blueprint. |
Resources
