Use the Convert Value operator to change a single data type into another. Data types include strings, integers, and numbers. In this article, you'll learn how to convert individual number values into strings. The easiest way to tell if your number converted to a string is the quotation marks around your output. You'll set up a Number component for this example and enter and submit a number in Express View.
Before you begin, consider the following when converting numbers to strings:
Decimal points in your number also appear in your string output.
Numbers with commas display as text to the Number component, and the component does not accept them. An example would be
1,000,000.Succeeding zeros in your number disappear after the conversion. For instance, the number 125.500 converts to the string
"125.5".
Configuration
Configuring the Convert Value operator involves selecting the appropriate conversion type, defining input and output values, and specifying any additional transformation logic, depending on the data type being handled. This operator is essential for maintaining smooth data flow and ensuring that data is correctly formatted for various use cases in the Unqork platform.
Configure the Number Component
First, you'll set up a Number component so your end-user can enter a number to convert to a string.
In the Module Builder, drag and drop a Number component onto your canvas.
In the Property ID field, enter
numberInput.In the Label Text field, enter
Number Input.In the Helper Text field, enter
Enter a Number.Click Save Component.
Configure the Hidden Component
Next, you'll configure a Hidden component to store your Data Workflow's output.
Drag and a Hidden component onto your canvas, placing it below your
numberInputNumber component.In the Property ID and Label Text fields, enter
stringOutput.Click Save Component.
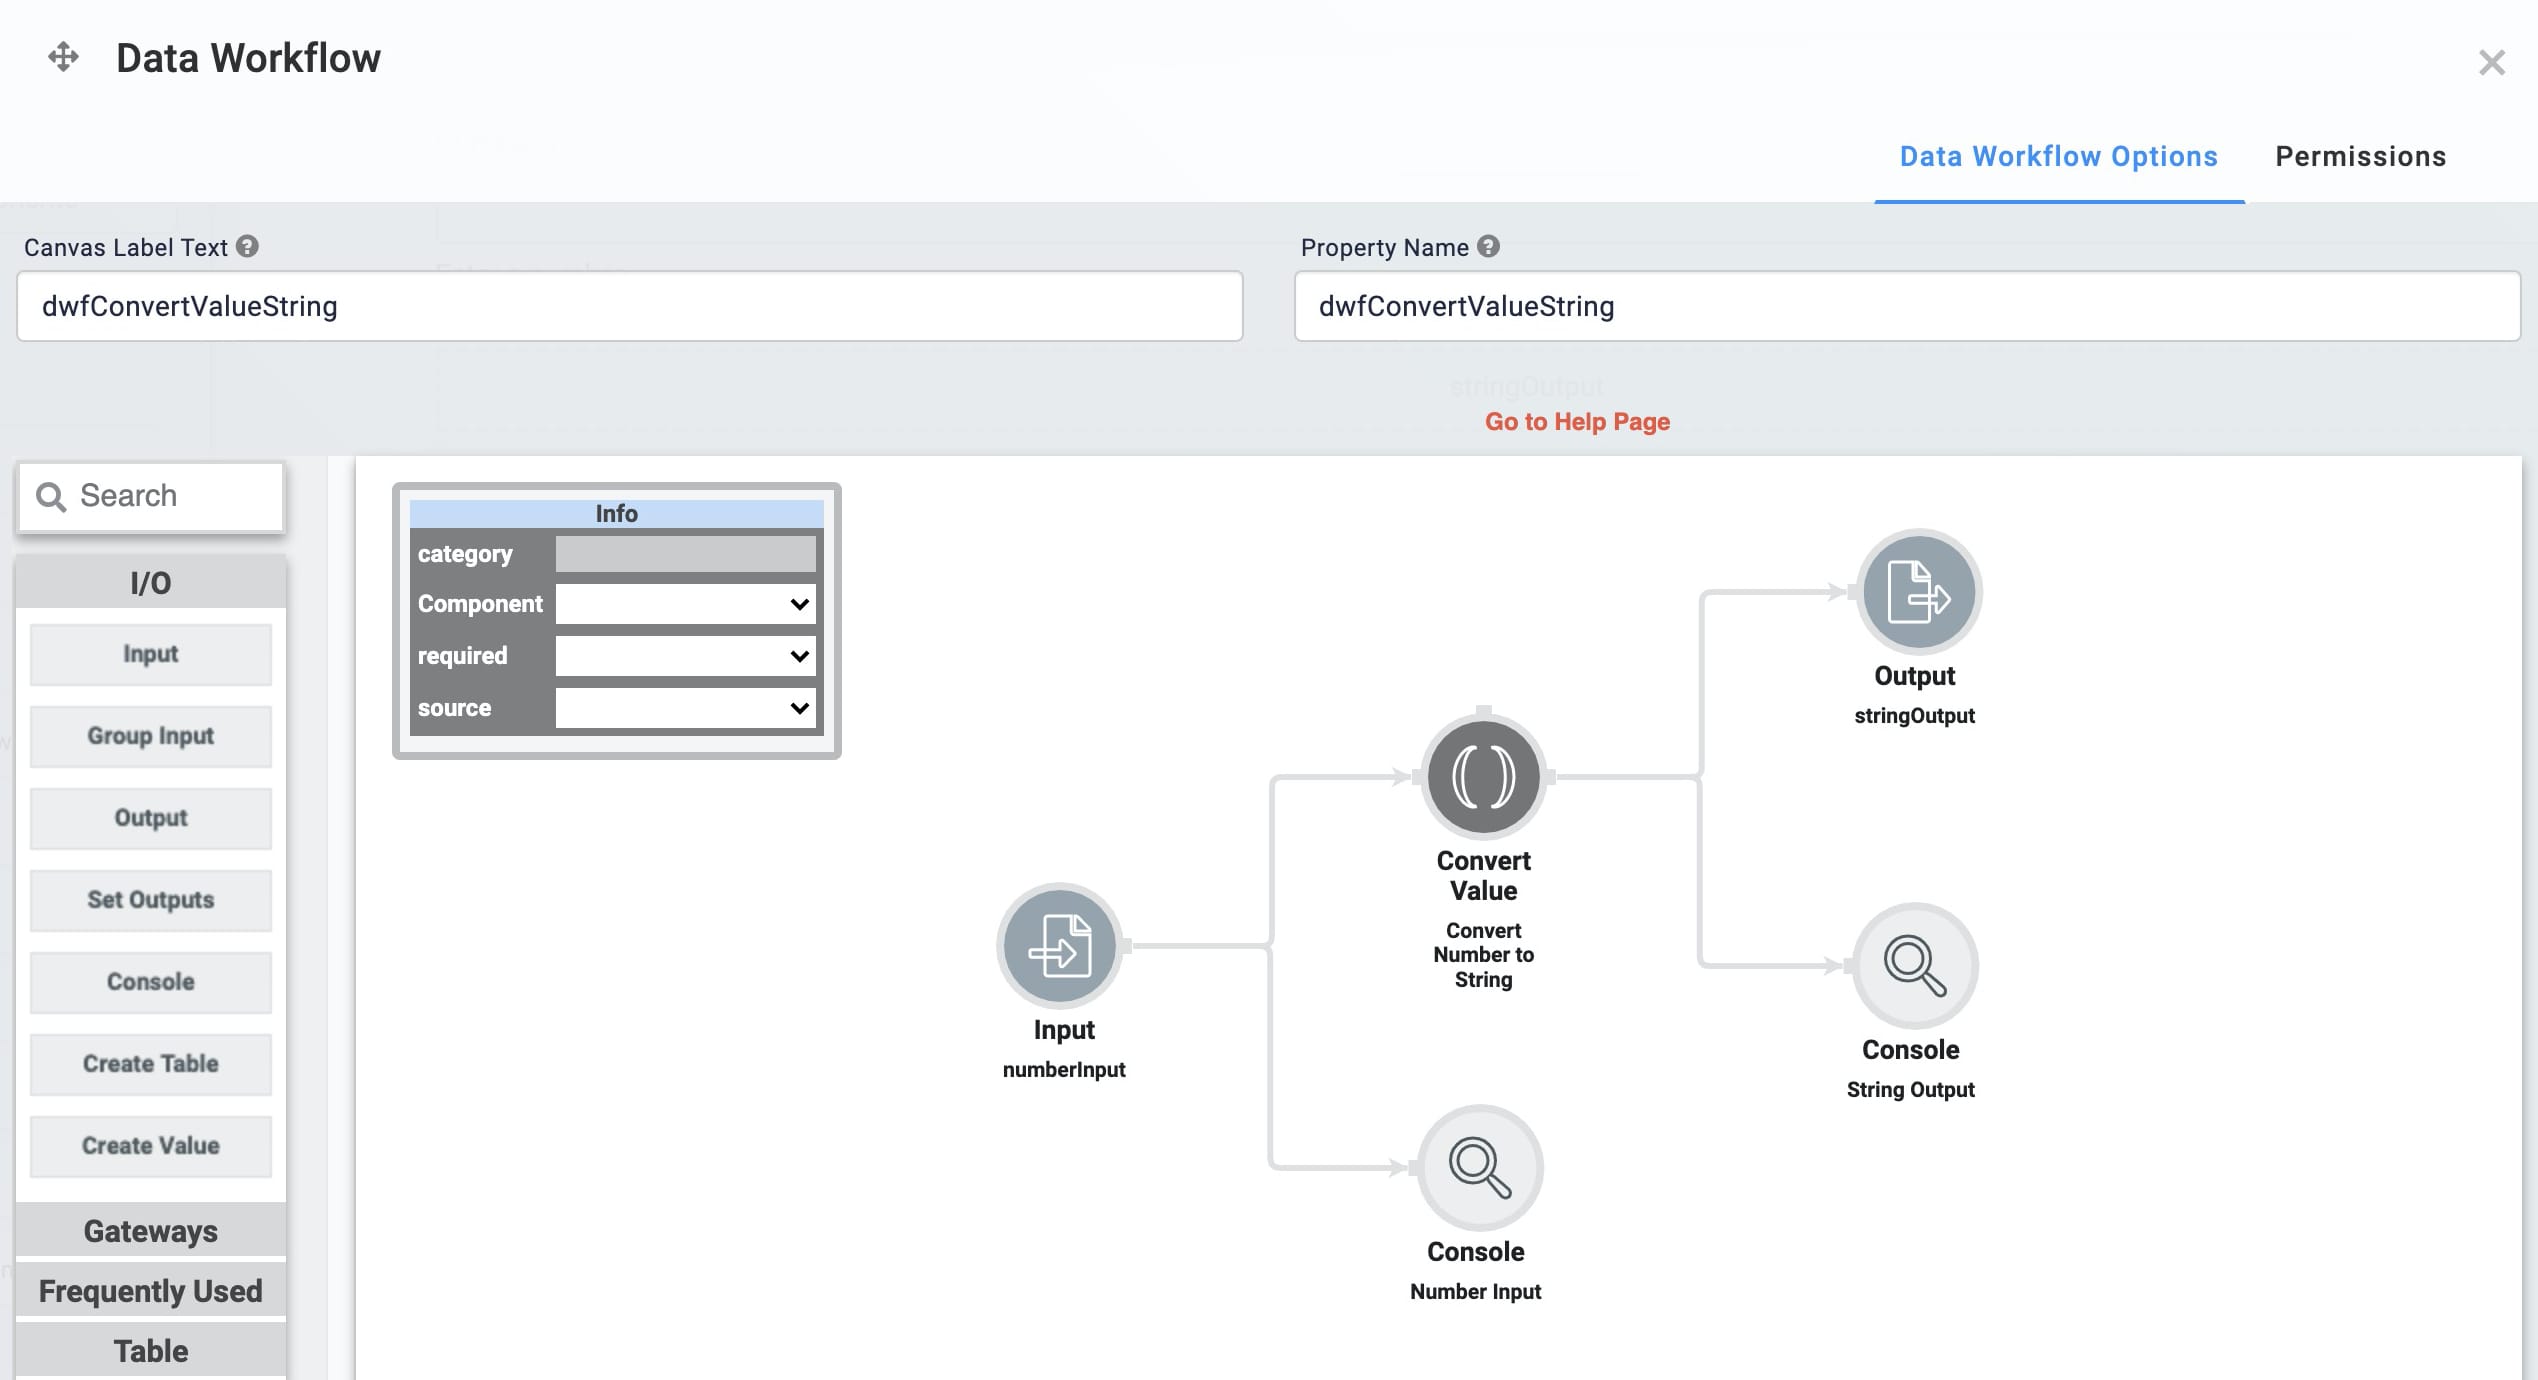
Configure the Data Workflow Component
Now, it's time to set up your Data Workflow. First, you'll input your Number component into a Convert Value operator. Then you'll cast any number entered in the Number component field to a string. This new string then outputs to your Hidden component. To watch your Data Workflow's progress, you'll also configure two Console operators.
Drag and drop a Data Workflow component onto your canvas, placing it below your Hidden component.
In the Property ID and Canvas Label Text fields, enter
dwfConvertValueString.
Configure the Input Operator
Drag and drop an Input operator onto your Data Workflow canvas.
Configure the operator's Info window as follows:
Setting
Value
Category
Input
Component
numberInput
Required
No
Source
Default
Configure the Convert Value Operator
Drag and drop a Convert Value operator onto your Data Workflow canvas.
Configure the operator's Info window as follows:
Setting
Value
Category
Convert To Value
Label
Convert to String
Cast To
String
Connect the output port (right) of the
numberInputInput operator to the input port (left) of theConvert to StringConvert Value operator.
Configure the Output Operator
Drag and drop an Output operator onto your Data Workflow canvas.
Configure the operator's Info window as follows:
Setting
Value
Category
Output
Component
stringOutput
Action
value
Connect the output port (right) of the
Convert to StringConvert Value operator to the input port (left) of thestringOutputOutput operator.
Configure the First Console Operator
Drag and drop a Console operator onto your Data Workflow canvas.
Configure the operator's Info window as follows:
Setting
Value
Category
Console
Label
Number Input
Connect the output port (right) of the
numberInputInput operator to the input port (left) of theNumber InputConsole operator.
Configure the Second Console Operator
Drag and drop another Console operator onto your Data Workflow canvas.
Configure the operator's Info window as follows:
Setting
Value
Category
Console
Label
String Output
Connect the output port (right) of the
Convert to StringConvert Value operator to the input port (left) of theString OutputConsole operator.Click Save Component.
.png)
Configure the Button Component
Now, let's add a Button component to trigger your Data Workflow.
Drag and drop a Button component onto your canvas, placing it below your Data Workflow.
In the Property ID field, enter
btnConvertToString.In the Label Text field, enter
Convert Number to String.From the Action Type drop-down, select Event.
In the Trigger on Click field, enter
dwfConvertValueString.Click Save.
.png)
Save your module.
This is how the completed configuration looks in the Module Builder:
.png)
Preview your module in Express View. Enter a number, like 325.50, into the Number Input field and click the Convert Number to String button. The Number Input Console displays your number as you entered it. After passing through the Convert Value operator, the String Output Console displays the converted string. You'll see that the operator added quotation marks around your string "325.5".

Use the Convert Value operator to change a single data type into another. Data types include strings, integers, and numbers. In this article, you'll learn how to convert individual number values into strings. The easiest way to tell if your number converted to a string is the quotation marks around your output. You'll set up a Number component for this example and enter and submit a number in Express View.
Before you begin, consider the following when converting numbers to strings:
Decimal points in your number also appear in your string output.
Numbers with commas display as text to the Number component, and the component does not accept them. An example would be
1,000,000.Succeeding zeros in your number disappear after the conversion. For instance, the number 125.500 converts to the string
"125.5".
Configuration
Configuring the Convert Value operator involves selecting the appropriate conversion type, defining input and output values, and specifying any additional transformation logic, depending on the data type being handled. This operator is essential for maintaining smooth data flow and ensuring that data is correctly formatted for various use cases in the Unqork platform.
Configure the Number Component
First, you'll set up a Number component so your end-user can enter a number to convert to a string.
In the Module Builder, drag and drop a Number component onto your canvas.
In the Property ID field, enter
numberInput.In the Label Text field, enter
Number Input.In the Helper Text field, enter
Enter a Number.Click Save.
Configure the Hidden Component
Next, you'll configure a Hidden component to store your Data Workflow's output.
Drag and a Hidden component onto your canvas, placing it below your
numberInputNumber component.In the Property ID and Canvas Label Text fields, enter
stringOutput.Click Save.
Configure the Data Workflow Component
Now, it's time to set up your Data Workflow. First, you'll input your Number component into a Convert Value operator. Then you'll cast any number entered in the Number component field to a string. This new string then outputs to your Hidden component. To watch your Data Workflow's progress, you'll also configure two Console operators.
Drag and drop a Data Workflow component onto your canvas, placing it below your Hidden component.
In the Canvas Label Text and Property Name fields, enter
dwfConvertValueString.
Configure the Input Operator
Drag and drop an Input operator onto your Data Workflow canvas.
Configure the operator's Info window as follows:
Setting
Value
Category
Input
Component
numberInput
Required
No
Source
Default
Configure the Convert Value Operator
Drag and drop a Convert Value operator onto your Data Workflow canvas.
Configure the operator's Info window as follows:
Setting
Value
Category
Convert To Value
Label
Convert to String
Cast To
String
Connect the output port (right) of the
numberInputInput operator to the input port (left) of theConvert to StringConvert Value operator.
Configure the Output Operator
Drag and drop an Output operator onto your Data Workflow canvas.
Configure the operator's Info window as follows:
Setting
Value
Category
Output
Component
stringOutput
Action
value
Connect the output port (right) of the
Convert to StringConvert Value operator to the input port (left) of thestringOutputOutput operator.
Configure the First Console Operator
Drag and drop a Console operator onto your Data Workflow canvas.
Configure the Console operator's Info window as follows:
Setting
Value
Category
Console
Label
Number Input
Connect the output port (right) of the
numberInputInput operator to the input port (left) of theNumber InputConsole operator.
Configure the Second Console Operator
Drag and drop another Console operator onto your Data Workflow canvas.
Configure the operator's Info window as follows:
Setting
Value
Category
Console
Label
String Output
Connect the output port (right) of the
Convert to StringConvert Value operator to the input port (left) of theString OutputConsole operator.Click Save.
Configure the Button Component
Now, let's add a Button component to trigger your Data Workflow.
Drag and drop a Button component onto your canvas, placing it below your Data Workflow.
In the Property ID field, enter
btnConvertToString.In the Label field, enter
Convert Number to String.Set the Action Type as Event.
In the Trigger on Click field, enter
dwfConvertValueString.Click Save.
Save your module.
The completed configuration looks like the following in the Module Builder:
.png)
Preview your module in Express View. Enter a number, like 325.50, into the Number Input field and click the Convert Number to String button. The Number Input Console displays your number as you entered it. After passing through the Convert Value operator, the String Output Console displays the converted string. You'll see that the operator added quotation marks around your string "325.5".