The Input Switch operator lets you configure a single Data Workflow path with two inputs. The operator determines which input to use based on a condition.
Configuration
In this how-to guide, you’ll use the Input Switch operator to create an array of received comments in your application. Doing so requires a Create Table operator and an Input operator to add new comments to those already received. To switch between these inputs, you'll add an Input Switch operator.
Configure the Text Area Component
Begin by adding a Text Area component where end-users can enter comments.
In the Module Builder, drag and drop a Text Area component onto your canvas.
In the Property ID field, enter
comment.In the Label Text field, enter
Comment.Click Save Component.
Configure the Initializer Component
Next, configure an Initializer component to clear your Text Area component after each comment. You’ll trigger this Initializer component using a Data Workflow you’ll configure in later steps.
Drag and drop an Initializer component onto your canvas, placing it above your
commentText Area component.In the Property ID and Canvas Label Text fields, enter
initClear.In the Outputs table, enter the following:
#
Source
Type
Value
1
comment
clear
yes
.jpg)
Click Save Component.
Configure the Hidden Component
Next, configure a Hidden component to store the output of your Data Workflow.
Drag and drop a Hidden component onto your canvas, placing it below your
commentText Area component.In the Property ID and Label Text fields, enter
commentsTable.Click Save Component.
Configure the Data Workflow Component
Now configure your Data Workflow. In this example, you'll use many operators to collect your end-user's information and append it. The Input Switch operator plays a crucial role in this configuration. You'll connect a Create Table operator to fire when you receive your first comment. Later, you'll connect an Input operator to reference your commentsTable Hidden component. Then, you'll use a Size operator to determine if your Hidden component stores any comments or if it's empty. This Size operator serves as the argument for your Input Switch operator. So, if your Hidden component has a size greater than 0, the Input Switch chooses that as the input. Doing so lets you keep all your comments in one place. If your Hidden component is empty, the Input Switch chooses your Create Table operator instead.
Your Input Switch uses your Create Table operator only for the first comment. For every comment that follows, the Input Switch chooses your Hidden component.
Drag and drop a Data Workflow component onto your canvas, placing it between your
commentText Area andcommentsTableHidden components.In the Property ID and Canvas Label Text fields, enter
dwfAddComment.
Configure the First Input Operator
Drag and drop an Input operator onto your Data Workflow canvas.
Configure the operator's Info window as follows:
Setting
Value
Category
Input
Component
comment
Required
No
Source
Default
Configure the First Create Table Operator
Drag and drop a Create Table operator onto your Data Workflow canvas.
Configure the operator's Info window as follows:
Setting
Value
Category
Create Table
Label
New Comment
Create Index
No
Number of Rows
1
Configure the First Create Field Operator
Drag and drop a Create Field operator onto your Data Workflow canvas.
Configure the operator's Info window as follows:
Setting
Value
Category
Formula
Label
Add Comment
Do Not Sanitize Formula
.png) (unchecked)
(unchecked)Preserve Argument Type
.png) (unchecked)
(unchecked)Field 1
comment=_arg
Field 2
Field 3
Field 4
Field 5
Connect the output port (right) of the
commentInput operator to the argument port (top) of theAdd CommentCreate Field operator.Connect the output port (right) of the
New CommentCreate Table operator to the input port (left) of theAdd CommentCreate Field operator.
Configure the Second Input Operator
Drag and drop a second Input operator onto your Data Workflow canvas.
Configure the operator's Info window as follows:
Setting
Value
Category
Input
Component
currentUser
Required
No
Source
Default
Configure the Get Operator
Drag and drop a Get operator onto your Data Workflow canvas.
Configure the operator's Info window as follows:
Setting
Value
Category
Get
Label
Get Name
Path
name
Connect the output port (right) of the
currentUserInput operator to the input port (left) of theGet NameGet operator.
Configure the Second Create Field Operator
Drag and drop a second Create Field operator onto your Data Workflow canvas.
Configure the operator's Info window as follows:
Setting
Value
Category
Formula
Label
Add Name
Do Not Sanitize Formula
.png) (unchecked)
(unchecked)Preserve Argument Type
.png) (unchecked)
(unchecked)Field 1
writtenBy=_arg
Field 2
date = moment(moment(),'format', 'MM/DD/YYYY')
Field 3
Field 4
Field 5
Connect the output port (right) of the
Add CommentCreate Field operator to the input port (left) of theAdd NameCreate Field operator.Connect the output port (right) of the
Get NameGet operator to the argument port (top) of theAdd NameCreate Field operator.
Configure the Third Input Operator
This Input operator serves as the first input for your Input Switch operator. It brings in any existing comments in your array. If you do not have any comments, then the Input Switch operator chooses a different input.
Drag and drop a third Input operator onto your Data Workflow canvas.
Configure the operator's Info window as follows:
Setting
Value
Category
Input
Component
commentsTable
Required
No
Source
Default
Configure the Size Operator
This Size operator determines whether your commentsTable Hidden component stores any data. This serves as the argument for the Input Switch operator.
Drag and drop a Size operator onto your Data Workflow canvas.
Configure the operator's Info window as follows:
Setting
Value
Category
Size
Label
Number of Comments
Connect the output port (right) of the
commentsTableInput operator to the input port (left) of theNumber of CommentsSize operator.
Configure the Second Create Table Operator
This Create Table operator serves as the second input for your Input Switch operator. If you do not have any existing comments in your array, the Input Switch operator chooses this input.
Drag and drop a second Create Table operator onto your Data Workflow canvas.
Configure the operator's Info window as follows:
Setting
Value
Category
Create Table
Label
First Comment
Create Index
Number of Rows
Configure the Input Switch Operator
The Input Switch operator determines whether you have an existing array of comments or if you're starting with your very first comment. It uses the Size operator as an argument, choosing between your commentsTable Input or First Comment Create Table operators.
Drag and drop an Input Switch operator onto your Data Workflow canvas.
Configure the operator's Info window as follows:
Setting
Value
Category
Input Switch
Label
If Comments Exist
Do Not Sanitize Formula
.png) (unchecked)
(unchecked)Condition
_arg > 0
Connect the output port (right) of the
commentsTableInput operator to the upper input port (left) of theIf Comments ExistInput Switch operator.Connect the output port (right) of the
First CommentCreate Table operator to the lower input port (left) of theIf Comments ExistInput Switch operator.Connect the output port (right) of the
Number of CommentsSize operator to the argument port (top) of theIf Comments ExistInput Switch operator.
Configure the Append Operator
Drag and drop an Append operator onto your Data Workflow canvas.
Configure the operator's Info window as follows:
Setting
Value
Category
Append
Label
Append Tables
Connect the output port (right) of the
If Comments ExistInput Switch operator to the upper input port (left) of theAppend TablesAppend operator.Connect the output port (right) of the
Add NameCreate Field operator to the lower input port (left) of theAppend TablesAppend operator.
Configure the First Output Operator
Drag and drop an Output operator onto your Data Workflow canvas.
Configure the operator's Info window as follows:
Setting
Value
Category
Output
Component
commentsTable
Action
value
Connect the output port (right) of the
Append TablesAppend operator to the input port (left) of thecommentsTableOutput operator.
Configure the Second Output Operator
Drag and drop a second Output operator onto your Data Workflow canvas.
Configure the operator's Info window as follows:
Setting
Value
Category
Output
Component
initClear
Action
trigger
Connect the output port (right) of the
Append TablesAppend operator to the input port (left) of theinitClearOutput operator.
Configure the Console Operator
Drag and drop a Console operator onto your Data Workflow canvas.
Configure the operator's Info window as follows:
Setting
Value
Category
Console
Label
Final Table
Connect the output port (right) of the
Append TablesAppend operator to the input port (left) of theFinal TableConsole operator.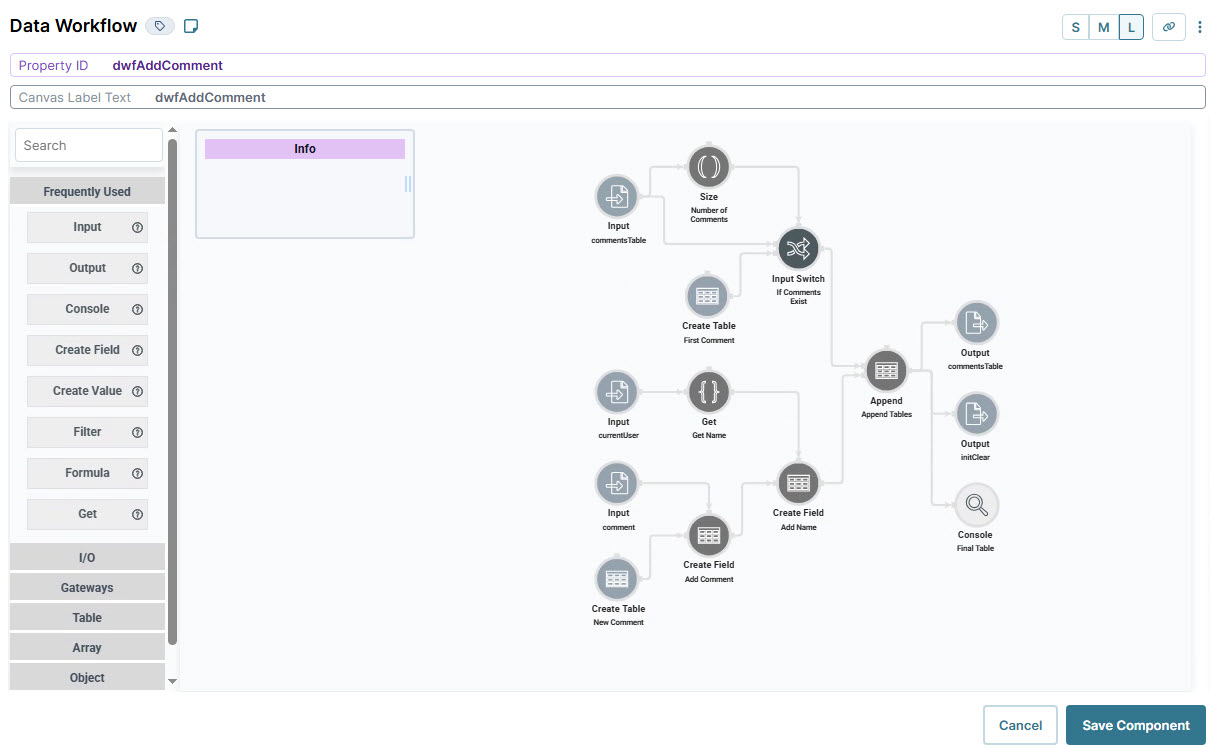
Click Save Component.
Configure the Button Component
Lastly, configure a Button component to trigger your Data Workflow.
Drag and drop a Button component onto your canvas, placing it between your
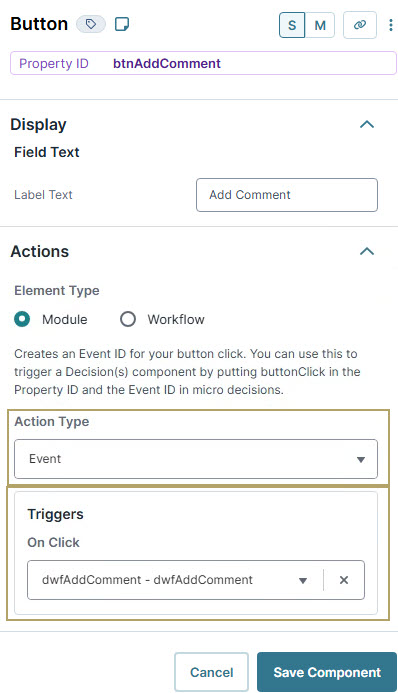
commentText Area anddwfAddCommentData Workflow components.In the Property ID field, enter
btnAddComment.In the Label Text field, enter
Add Comment.From the Action Type drop-down, select Event.
From the On Click drop-down, select dwfAddComment.
Click Save Component.
Save your module.
Here's how your completed module looks in the Module Builder:
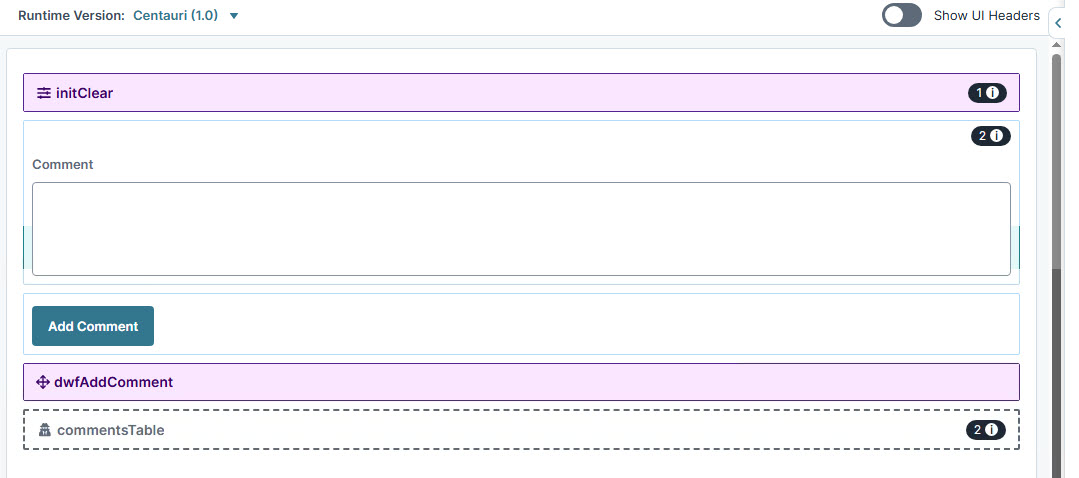
Preview your module in Express View and open the DevTools Console. Enter a comment to view it in the Console. Then, enter another comment and click Add Comment. You'll see your new comment added to the same array as your first comment. That way, all your comments exist in one place so you can reference them later.

The Input Switch operator lets you configure a single Data Workflow path with two inputs. The operator determines which input to use based on a condition.
Configuration
In this how-to guide, you’ll use the Input Switch operator to create an array of received comments in your application. Doing so requires a Create Table operator and an Input operator to add new comments to those already received. To switch between these inputs, you'll add an Input Switch operator.
Configure the Text Area Component
Begin by adding a Text Area component where end-users can enter comments.
In the Module Builder, drag and drop a Text Area component onto your canvas.
In the Property ID field, enter
comment.In the Label Text field, enter
Comment.Click Save & Close.
Configure the Initializer Component
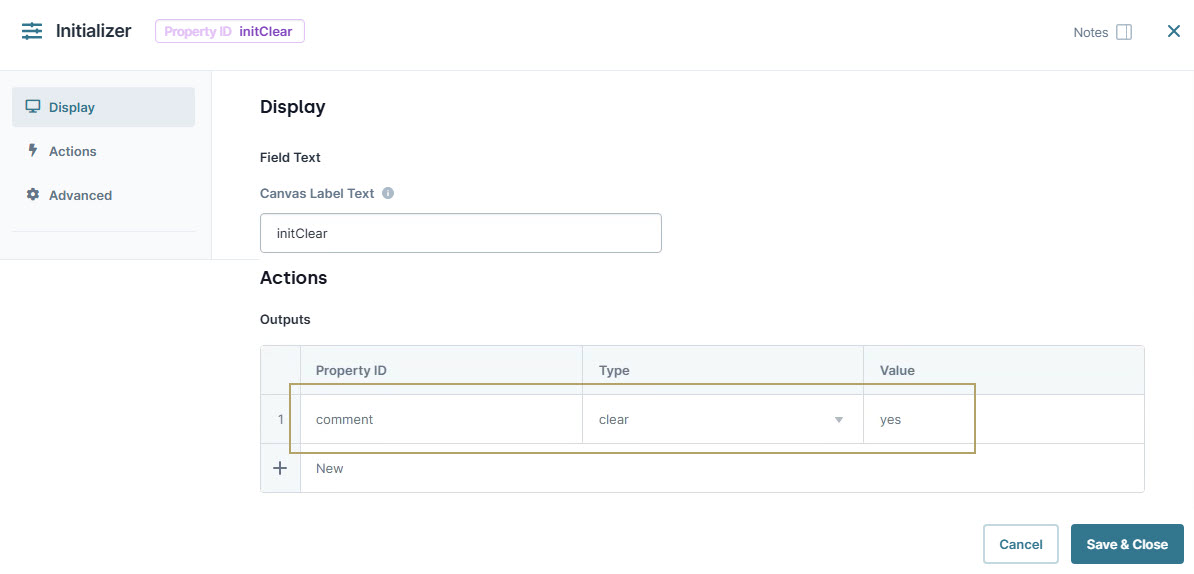
Next, configure an Initializer component to clear your Text Area after each comment. To do so, you must trigger this Initializer in your Data Workflow in the later steps.
Drag and drop an Initializer component onto your canvas, placing it above your
commentText Area component.In the Property ID and Canvas Label Text fields, enter
initClear.In the Outputs table, enter the following:
Property ID
Type
Value
comment
clear
yes
Click Save & Close.
Configure the Hidden Component
Next, configure a Hidden component to store the output of your Data Workflow.
Drag and drop a Hidden component onto your canvas, placing it below your
commentText Area component.In the Property ID and Canvas Label Text fields, enter
commentsTable.Click Save.
Configure the Data Workflow Component
Now configure your Data Workflow. In this example, you'll use many operators to collect your end-user's information and append it. The Input Switch operator plays a crucial role in this configuration. You'll connect a Create Table operator to fire when you receive your first comment. Later, you'll connect an Input operator to reference your commentsTable Hidden component. Then, you'll use a Size operator to determine if your Hidden component stores any comments or if it's empty. This Size operator serves as the argument for your Input Switch operator. So, if your Hidden component has a size greater than 0, the Input Switch chooses that as the input. Doing so lets you keep all your comments in one place. If your Hidden component is empty, the Input Switch chooses your Create Table operator instead.
Your Input Switch uses your Create Table operator only for the first comment. For every comment that follows, the Input Switch chooses your Hidden component.
Drag and drop a Data Workflow component onto your canvas, placing it between your
commentText Area andcommentsTableHidden components.In the Canvas Label Text and Property Name fields, enter
dwfAddComment.
Configure the First Input Operator
Drag and drop an Input operator onto your Data Workflow canvas.
Configure the operator's Info window as follows:
Setting
Value
Category
Input
Component
comment
Required
No
Source
Default
Configure the First Create Table Operator
Drag and drop a Create Table operator onto your Data Workflow canvas.
Configure the operator's Info window as follows:
Setting
Value
Category
Create Table
Label
New Comment
Create Index
No
Number of Rows
1
Configure the First Create Field Operator
Drag and drop a Create Field operator onto your Data Workflow canvas.
Configure the operator's Info window as follows:
Setting
Value
Category
Formula
Label
Add Comment
Do Not Sanitize Formula
.png) (unchecked)
(unchecked)Preserve Argument Type
.png) (unchecked)
(unchecked)Field 1
comment=_arg
Field 2
Field 3
Field 4
Field 5
Connect the output port (right) of the
commentInput operator to the argument port (top) of theAdd CommentCreate Field operator.Connect the output port (right) of the
New CommentCreate Table operator to the input port (left) of theAdd CommentCreate Field operator.
Configure the Second Input Operator
Drag and drop a second Input operator onto your Data Workflow canvas.
Configure the operator's Info window as follows:
Setting
Value
Category
Input
Component
currentUser
Required
No
Source
Default
Configure the Get Operator
Drag and drop a Get operator onto your Data Workflow canvas.
Configure the operator's Info window as follows:
Setting
Value
Category
Get
Label
Get Name
Path
name
Connect the output port (right) of the
currentUserInput operator to the input port (left) of theGet NameGet operator.
Configure the Second Create Field Operator
Drag and drop a second Create Field operator onto your Data Workflow canvas.
Configure the operator's Info window as follows:
Setting
Value
Category
Formula
Label
Add Name
Do Not Sanitize Formula
.png) (unchecked)
(unchecked)Preserve Argument Type
.png) (unchecked)
(unchecked)Field 1
writtenBy=_arg
Field 2
date = moment(moment(),'format', 'MM/DD/YYYY')
Field 3
Field 4
Field 5
Connect the output port (right) of the
Add CommentCreate Field operator to the input port (left) of theAdd NameCreate Field operator.Connect the output port (right) of the
Get NameGet operator to the argument port (top) of theAdd NameCreate Field operator.
Configure the Third Input Operator
This Input operator serves as the first input for your Input Switch operator. It brings in any existing comments in your array. If you do not have any comments, then the Input Switch operator chooses a different input.
Drag and drop a third Input operator onto your Data Workflow canvas.
Configure the operator's Info window as follows:
Setting
Value
Category
Input
Component
commentsTable
Required
No
Source
Default
Configure the Size Operator
This Size operator determines whether your commentsTable Hidden component stores any data. This serves as the argument for the Input Switch operator.
Drag and drop a Size operator onto your Data Workflow canvas.
Configure the operator's Info window as follows:
Setting
Value
Category
Size
Label
Number of Comments
Connect the output port (right) of the
commentsTableInput operator to the input port (left) of theNumber of CommentsSize operator.
Configure the Second Create Table Operator
This Create Table operator serves as the second input for your Input Switch operator. If you do not have any existing comments in your array, the Input Switch operator chooses this input.
Drag and drop a second Create Table operator onto your Data Workflow canvas.
Configure the operator's Info window as follows:
Setting
Value
Category
Create Table
Label
First Comment
Create Index
Number of Rows
Configure the Input Switch Operator
The Input Switch operator determines whether you have an existing array of comments or if you're starting with your very first comment. It uses the Size operator as an argument, choosing between your commentsTable Input or First Comment Create Table operators.
Drag and drop an Input Switch operator onto your Data Workflow canvas.
Configure the operator's Info window as follows:
Setting
Value
Category
Input Switch
Label
If Comments Exist
Do Not Sanitize Formula
.png) (unchecked)
(unchecked)Condition
_arg > 0
Connect the output port (right) of the
commentsTableInput operator to the upper input port (left) of theIf Comments ExistInput Switch operator.Connect the output port (right) of the
First CommentCreate Table operator to the lower input port (left) of theIf Comments ExistInput Switch operator.Connect the output port (right) of the
Number of CommentsSize operator to the argument port (top) of theIf Comments ExistInput Switch operator.
Configure the Append Operator
Drag and drop an Append operator onto your Data Workflow canvas.
Configure the operator's Info window as follows:
Setting
Value
Category
Append
Label
Append Tables
Connect the output port (right) of the
If Comments ExistInput Switch operator to the upper input port (left) of theAppend TablesAppend operator.Connect the output port (right) of the
Add NameCreate Field operator to the lower input port (left) of theAppend TablesAppend operator.
Configure the First Output Operator
Drag and drop an Output operator onto your Data Workflow canvas.
Configure the operator's Info window as follows:
Setting
Value
Category
Output
Component
commentsTable
Action
value
Connect the output port (right) of the
Append TablesAppend operator to the input port (left) of thecommentsTableOutput operator.
Configure the Second Output Operator
Drag and drop a second Output operator onto your Data Workflow canvas.
Configure the operator's Info window as follows:
Setting
Value
Category
Output
Component
initClear
Action
trigger
Connect the output port (right) of the
Append TablesAppend operator to the input port (left) of theinitClearOutput operator.
Configure the Console Operator
Drag and drop a Console operator onto your Data Workflow canvas.
Configure the operator's Info window as follows:
Setting
Value
Category
Console
Label
Final Table
Connect the output port (right) of the
Append TablesAppend operator to the input port (left) of theFinal TableConsole operator.
Click Save.
Configure the Button Component
Lastly, configure a Button component to trigger your Data Workflow.
Drag and drop a Button component onto your canvas, placing it between your
commentText Area anddwfAddCommentData Workflow components.In the Property ID field, enter
btnAddComment.In the Label Text field, enter
Add Comment.Set the Action Type as Event.
From the On Click drop-down, select dwfAddComment.
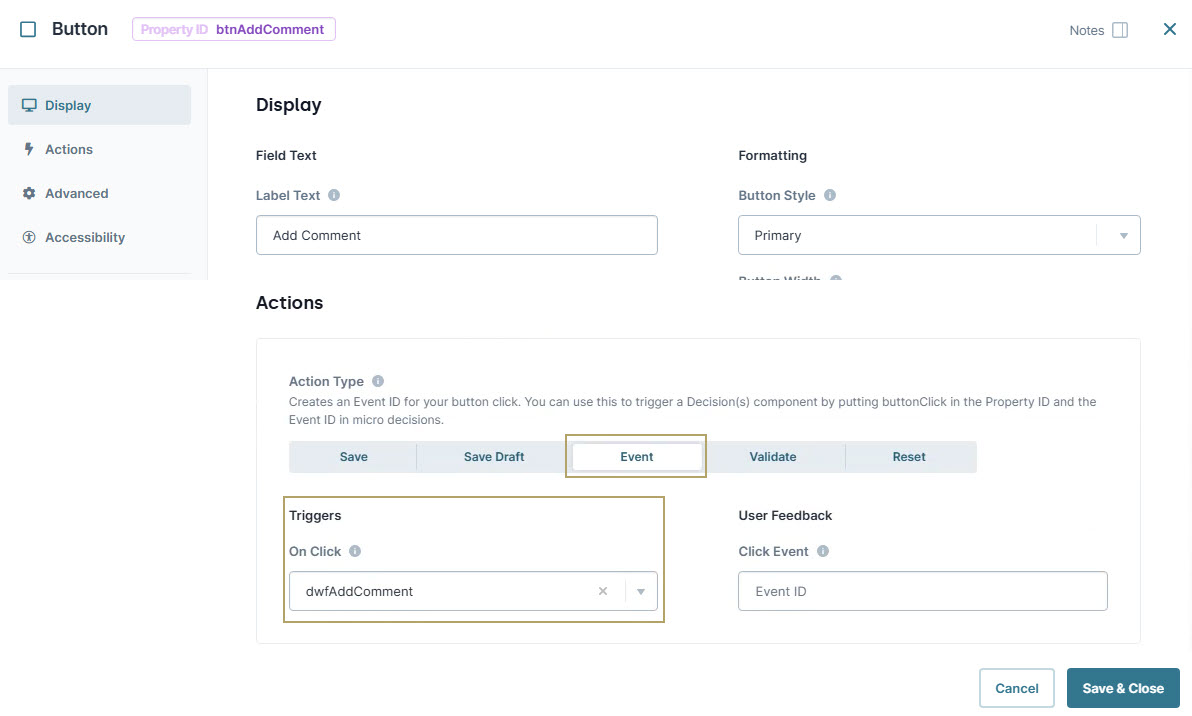
Click Save & Close.
Save your module.
Here's how your module looks in the Module Builder:
.jpg)
Preview your module in Express View and open the DevTools Console. Enter a comment to view it in the Console. Then, enter another comment and click Add Comment. You'll see your new comment added to the same array as your first comment. That way, all your comments exist in one place so you can reference them later.
