The Gate operator blocks the progress of data in a Data Workflow unless it meets your criteria. If the data does not match, it stops the progress. For example, if you have a data set with company account names and values, you can use the Gate operator to display only the value for the name the end-user selects. Any values that do not exist in the data set are blocked, which prevents a circular reference error.
For more information on troubleshooting circular reference errors, view to Troubleshooting: Circular Reference Errors in Data Workflow article.
Configuration
In this how-to guide, you’ll create a Data Workflow that uses Filter and Gate operators to block values that are missing or are less than one. Then, it’ll display the account value that meets your criteria.
Configure the Data Table Component
First, you'll set up a Data Table component with sample data you’ll bring into your Data Workflow.
In the Module Builder, drag and drop a Data Table component onto your canvas.
In the Property ID and Label Text fields, enter
dtCompanies.In the data table, enter the following:
accountName
accountValue
Unqork
100000
Johnson & Johnson
400000
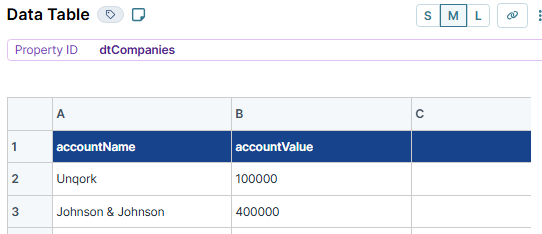
Click Save Component.
Configure the Radio Buttons Component
Next, you'll add a Radio Buttons component so the end-user can select an option to pass to the Data Workflow component.
Drag and drop the Radio Buttons component onto your canvas, placing it below the
dtCompaniesData Table component.In the Property ID field, type
filter.In the Label Text field, enter
Filter by Company.Set your Label and Value as shown below:
Option Label
Value to Store in Submission Data
Unqork
Unqork
Johnson & Johnson
Johnson & Johnson
Other
Other
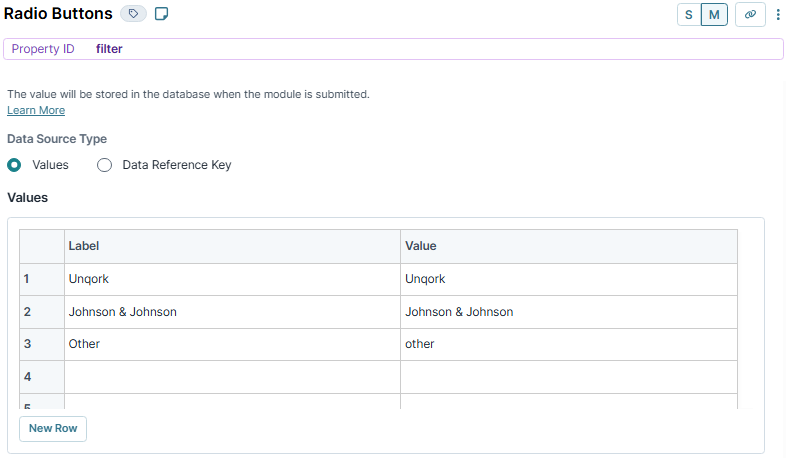
Click Save Component.
Configure the Button Component
Next, add a Button component to trigger an Initializer component you’ll set up in a later step.
Drag and drop a Button component onto your canvas, placing it below the
Filter by CompanyRadio Buttons component.In the Property ID field, enter
btnGetAccountValue.In the Label Text field, enter
Get Account Value.Set the Action Type as Event.
From the On Click drop-down, select initOnClick.
Navigate to the component’s Advanced settings.
Set Disable on Invalid Forms to
.png) (ON).
(ON).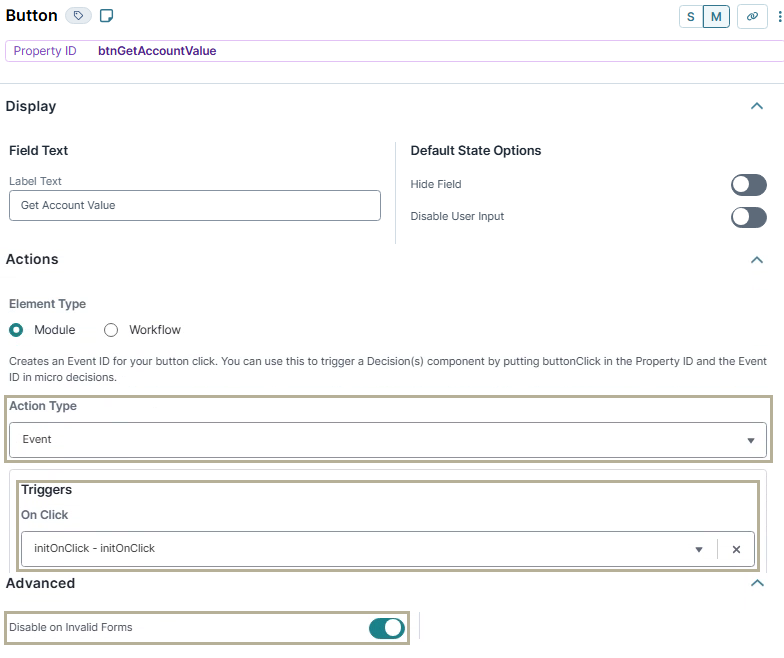
Click Save Component.
Configure the Number Component
Now, you'll display the account value associated with its account name. You'll add a Number component to display unblocked data.
Drag and drop a Number component onto your canvas, placing it below the
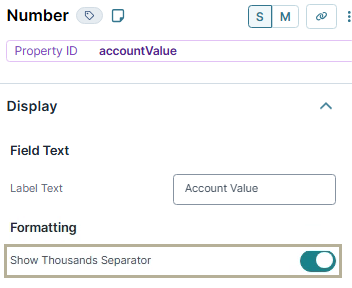
btnGetAccountValueButton component.In the Property ID field, enter
accountValue.In the Label Text field, enter
Account Value.Set Show Thousands Separator to
.png) (ON).
(ON).Click Save Component.
Configure the Initializer Component
Then you'll want to add an Initializer component to run the application every time the end-user clicks the button. That way, the application returns different results without refreshing the page.
Drag and drop an Initializer component onto your canvas, placing it below the
btnGetAccountValueButton component.In the Property ID and Canvas Label Text fields, enter
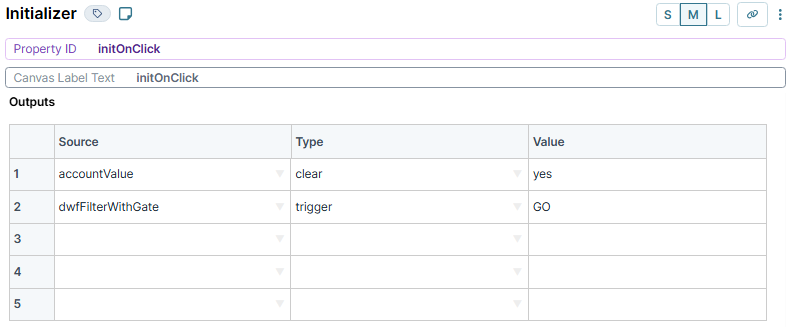
initOnClick.In the Outputs table, enter the following:
Property ID
Type
Value
accountValue
clear
yes
dwfFilterWithGate
trigger
GO
Click Save Component.
Configure the Data Workflow Component
Next, you'll add a Data Workflow component to retrieve data from the dtCompanies Data Table component and filter it through your Filter and Gate operators. The results will display in the accountValue Number component.
Drag and drop a Data Workflow component onto your canvas, placing it below the
initOnClickInitializer component.In the Property ID and Canvas Label Text fields, enter
dwfFilterWithGate.
Configure the First Input Operator
Drag and drop an Input operator onto your Data Workflow canvas.
Configure the operator's Info window as follows:
Setting
Value
Category
Input
Component
filter
Required
Yes
Source
Default
Configure the Second Input Operator
Drag and drop another Input operator onto your Data Workflow canvas.
Configure the operator's Info window as follows:
Setting
Value
Category
Input
Component
dtCompanies
Required
Yes
Source
Default
Configure the Filter Operator
Next, you'll add a Filter operator so that when the input matches the Filter operator's expression, it passes through the true output port. For this example, the input is the data from the dtCompanies Data Table component and the expression is the end-user's Radio Buttons component selection.
Drag and drop a Filter operator onto your Data Workflow canvas.
Configure the operator's Info window as follows:
Setting
Value
Category
Filter
Label
Account Name
Do Not Sanitize Formula
.png) (checked)
(checked)Expression
accountName = _arg
Connect the output port (right) of the
filterInput operator to the argument port (top) of theAccount NameFilter operator.Connect the output port (right) of the
dtCompaniesInput operator to the input port (left) of theAccount NameFilter operator.
Configure the First Console Operator
This Console operator displays the Data Workflow's progress after your data passes through the Account Name Filter operator.
Drag and drop a Console operator onto your Data Workflow canvas.
Configure the operator's Info window as follows:
Setting
Value
Category
Console
Label
Filter True
Connect the upper output port (right) of the
Account NameFilter operator to the input port (left) of theFilter TrueConsole operator.
Configure the Second Console Operator
This Console operator lets you determine if your data returns false as it passes through the Account Name Filter operator.
Drag and drop a Console operator onto your Data Workflow canvas.
Configure the operator's Info window as follows:
Setting
Value
Category
Console
Label
Filter False
Connect the lower output port (right) of the
Account NameFilter operator to the input port (left) of theFilter FalseConsole operator.
Configure the Size Operator
You’ll use a Size operator to convert your data into a number value. The dtCompanies Data Table component stores your data as an array. A Size operator measures the length of an array and assigns it a number value. For this module, the data stores one data set, so the size is 1. If the data does not exist, the operator returns a 0. You’ll use the Size number value as the argument for the Gate operator you’ll add later.
Drag and drop a Size operator onto your Data Workflow canvas.
Configure the operator's Info window as follows:
Setting
Value
Category
Size
Label
Convert Number Value
Connect the upper output port (right) of the
Account NameFilter operator to the input port (left) of theConvert Number ValueSize operator.
Configure the Gate Operator
Next, you'll add a Gate operator to block all values that are 0 or that do not exist.
Drag and drop a Gate operator onto your Data Workflow canvas.
Configure the operator's Info window as follows:
Setting
Value
Category
Gate
Label
_arg > 0
Do Not Sanitize Formula
.png) (checked)
(checked)Condition
_arg > 0
Connect the upper output port (right) of the
Account NameFilter operator to the input port (left) of the_arg > 0Gate operator.Connect the output port (right) of the
Size of ResultSize operator to the argument port (top) of the_arg > 0Gate operator.
Configure the Third Console Operator
Then, you'll add another Console operator to view your data's progress after passing through the Gate operator.
Drag and drop a Console operator onto your Data Workflow canvas.
Configure the operator's Info window as follows:
Setting
Value
Category
Console
Label
Gate Output
Connect the output port (right) of the
_arg > 0Gate operator to the input port (left) of theGate OutputConsole operator.
Configure the Get Operator
At this point, your data consists of the account name and value. You only want to output the account value for the end-user to view. You'll use the Get operator to separate the account value from the data and then pass it to the output.
Drag and drop a Get operator onto your Data Workflow canvas.
Configure the operator's Info window as follows:
Setting
Value
Category
Get
Label
accountValue
Path
[0].accountValue
Connect the output port (right) of the
_arg > 0Gate operator to the input port (left) of theaccountValueGet operator.
Configure the Fourth Console Operator
You'll add one more Console operator to view your data's progress after passing through the Get operator.
Drag and drop a Console operator onto your Data Workflow canvas.
Configure the operator's Info window as follows:
Setting
Value
Category
Console
Label
Get [0] accountValue
Connect the lower output port (right) of the
accountValueGet operator to the input port (left) of theGet [0] accountValueConsole operator.
Configure the Output Operator
Drag and drop an Output operator onto your Data Workflow canvas.
Configure the operator's Info window as follows:
Setting
Value
Category
Output
Component
accountValue
Action
value
Connect the output port (right) of the
accountValueGet operator to the input port (left) of theaccountValueOutput operator.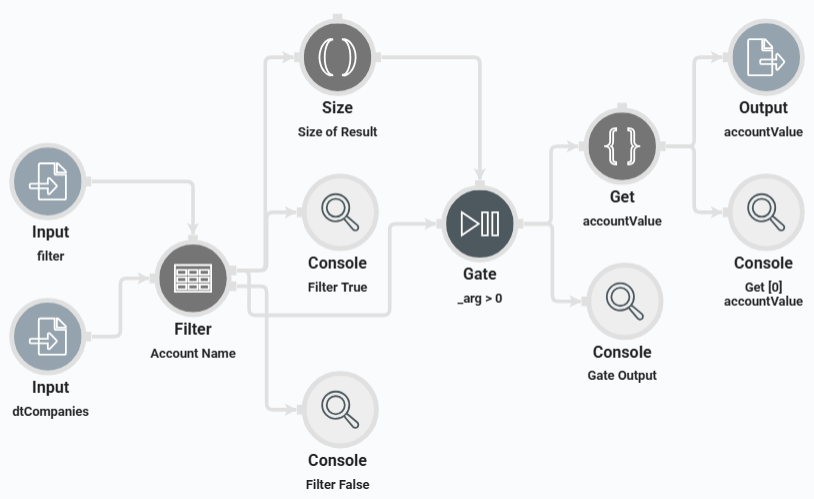
Click Save Component.
Save the module.
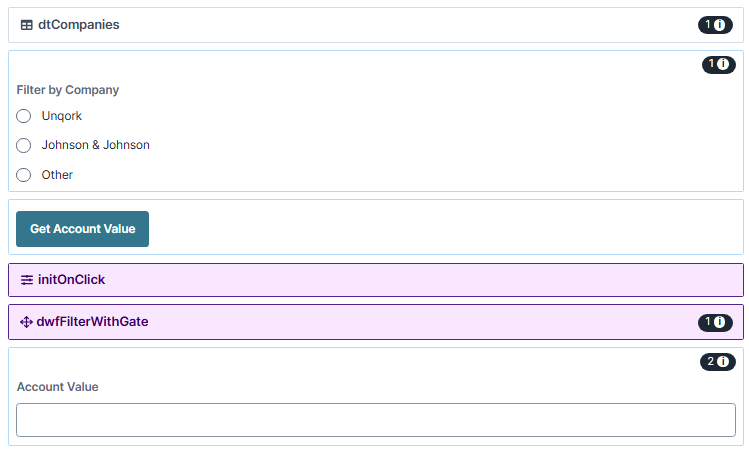
Here's how the completed example looks in the Module Builder:
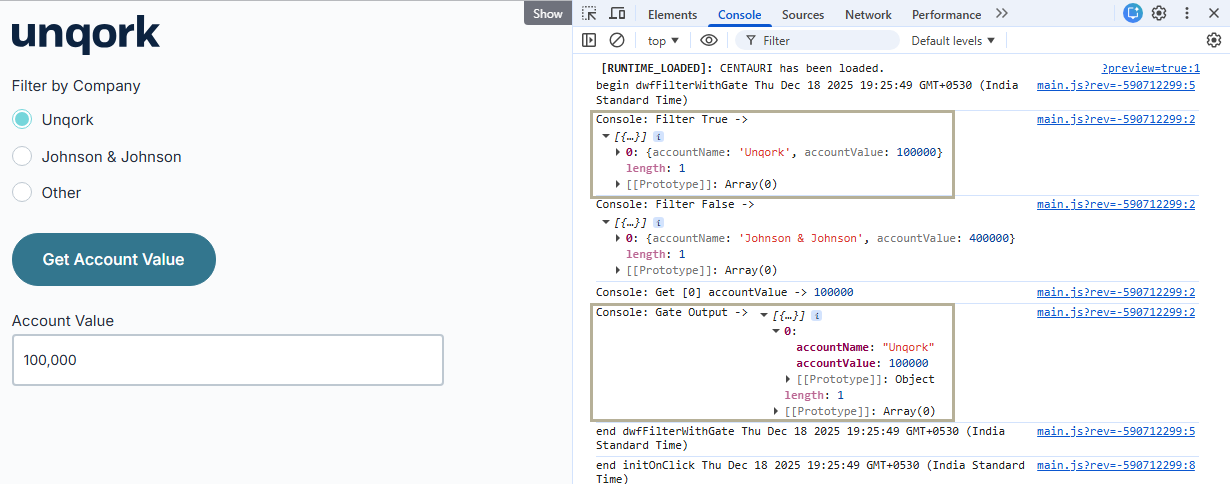
Preview the module in Express View and open the DevTools Console. Begin by selecting the Unqork radio button. Then, click the Get Account Value button to see the account value display in the Account Value field.
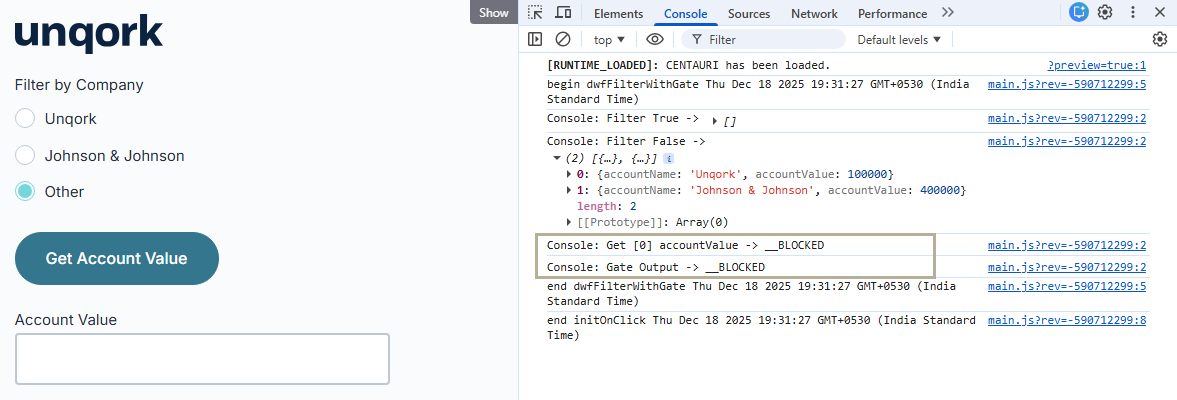
Now, try using the criteria that do not exist in the data set. Select the Other radio button and click the Get Account Value button. Now, you'll see that no value displays in the Account Value field.
The Gate operator blocks the progress of data in a Data Workflow unless it meets your criteria. If the data does not match, it stops the progress. For example, if you have a data set with company account names and values, you can use the Gate operator to display only the value for the name the end-user selects. Any values that do not exist in the data set are blocked, which prevents a circular reference error.
For more information on troubleshooting circular reference errors, view to Troubleshooting: Circular Reference Errors in Data Workflow article.
Configuration
In this how-to guide, you’ll create a Data Workflow that uses Filter and Gate operators to block values that are missing or are less than one. Then, it’ll display the account value that meets your criteria.
Configure the Data Table Component
First, you'll set up a Data Table component with sample data you’ll bring into your Data Workflow.
In the Module Builder, drag and drop a Data Table component onto your canvas.
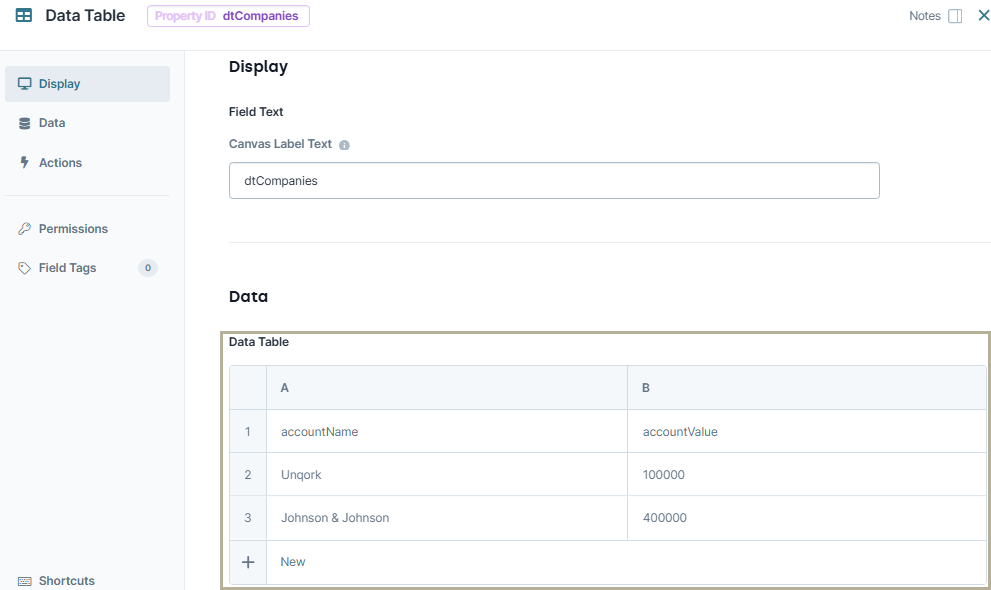
In the Property ID and Canvas Label Text fields, enter
dtCompanies.In the data table, enter the following:
accountName
accountValue
Unqork
100000
Johnson & Johnson
400000
Click Save & Close.
Configure the Radio Buttons Component
Next, you'll add a Radio Buttons component so the end-user can select an option to pass to the Data Workflow component.
Drag and drop the Radio Buttons component onto your canvas,placing it below the
dtCompaniesData Table component.In the Property ID field, type
filter.In the Label Text field, enter
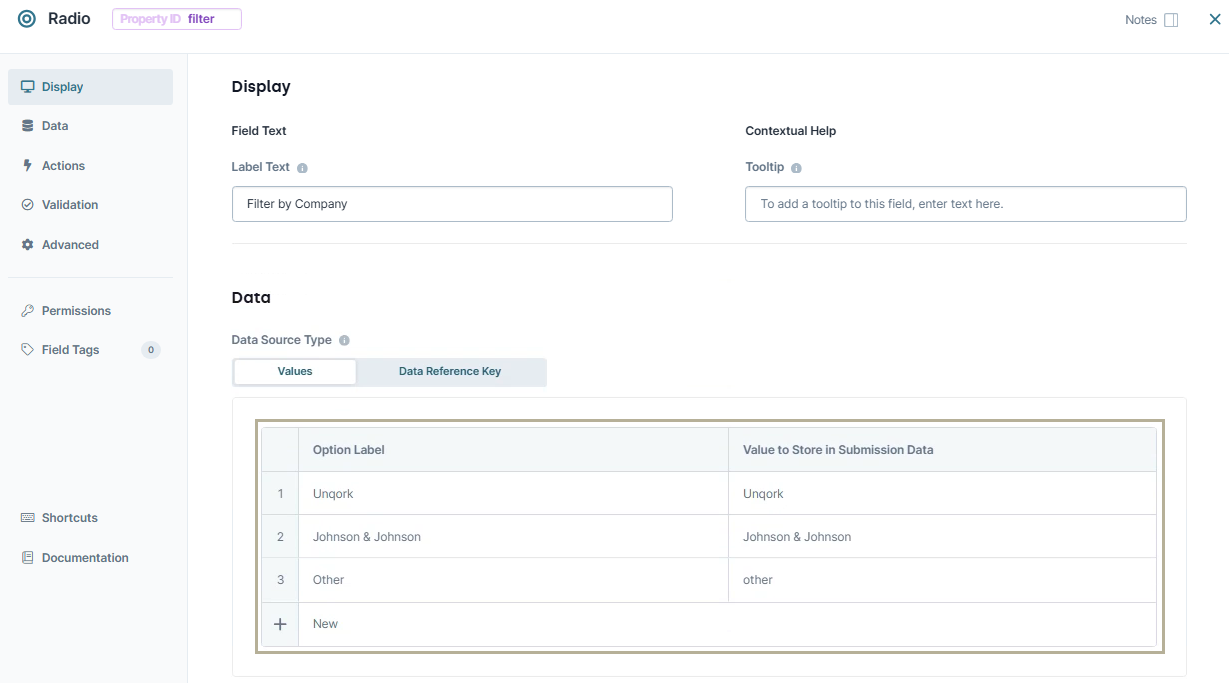
Filter by Company.Set your Option Label and Value to Store in Submission Data as shown below:
Option Label
Value to Store in Submission Data
Unqork
Unqork
Johnson & Johnson
Johnson & Johnson
Other
Other
Click Save & Close.
Configure the Button Component
Next, add a Button component to trigger an Initializer component you’ll set up in a later step.
Drag and drop a Button component onto your canvas, placing it below the
Filter by CompanyRadio Buttons component.In the Property ID field, enter
btnGetAccountValue.In the Label Text field, enter
Get Account Value.Select Event as the Action Type.
In the Trigger on Click field, type
initOnClick.Set the Disable on Invalid Forms toggle to
.png) (ON).
(ON).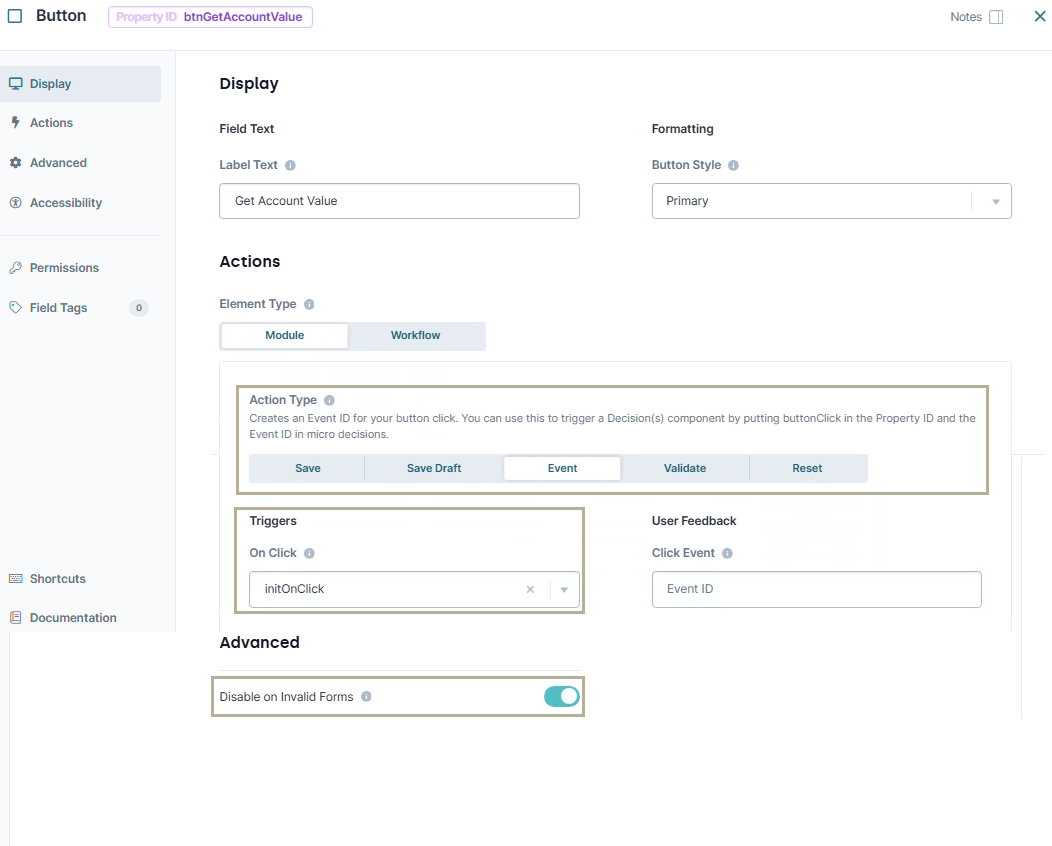
Click Save & Close.
Configure the Number Component
Now, you'll display the account value associated with its account name. You'll add a Number component to display unblocked data.
Drag and drop a Number component onto your canvas. Place it below the
btnGetAccountValueButton component.In the Property ID field, enter
accountValue.In the Label Text field, enter
Account Value.Set Show Thousands Separator to
.png) (ON).
(ON).
Click Save & Close.
Configure the Initializer Component
Then you'll want to add an Initializer component to run the application every time the end-user clicks the button. That way, the application returns different results without refreshing the page.
Drag and drop an Initializer component onto your canvas, placing it below the
btnGetAccountValueButton component.In the Property ID and Canvas Label Text fields, enter
initOnClick.In the Outputs table, enter the following:
Property ID
Type
Value
accountValue
clear
yes
dwfFilterWithGate
trigger
GO

Click Save & Close.
Configure the Data Workflow Component
Next, you'll add a Data Workflow component to retrieve data from the dtCompanies Data Table component and filter it through your Filter and Gate operators. The results will display in the accountValue Number component.
Drag and drop a Data Workflow component onto your canvas, placing it below the
initOnClickInitializer component.In the Canvas Label Text and Property Name fields, enter
dwfFilterWithGate.
Configure the First Input Operator
Drag and drop an Input operator onto your Data Workflow canvas.
Configure the operator's Info window as follows:
Setting
Value
Category
Input
Component
filter
Required
Yes
Source
Default
Configure the Second Input Operator
Drag and drop another Input operator onto your Data Workflow canvas.
Configure the operator's Info window as follows:
Setting
Value
Category
Input
Component
dtCompanies
Required
Yes
Source
Default
Configure the Filter Operator
Next, you'll add a Filter operator so that when the input matches the Filter operator's expression, it passes through the true output port. For this example, the input is the data from the dtCompanies Data Table component and the expression is the end-user's Radio Buttons component selection.
Drag and drop a Filter operator onto your Data Workflow canvas.
Configure the operator's Info window as follows:
Setting
Value
Category
Filter
Label
Account Name
Do Not Sanitize Formula
.png) (checked)
(checked)Expression
accountName = _arg
Connect the output port (right) of the
filterInput operator to the argument port (top) of theAccount NameFilter operator.Connect the output port (right) of the
dtCompaniesInput operator to the input port (left) of theAccount NameFilter operator.
Configure the First Console Operator
This Console operator displays the Data Workflow's progress after your data passes through the Account Name Filter operator.
Drag and drop a Console operator onto your Data Workflow canvas.
Configure the operator's Info window as follows:
Setting
Value
Category
Console
Label
Filter True
Connect the upper output port (right) of the
Account NameFilter operator to the input port (left) of theFilter TrueConsole operator.
Configure the Second Console Operator
This Console operator lets you determine if your data returns false as it passes through the Account Name Filter operator.
Drag and drop a Console operator onto your Data Workflow canvas.
Configure the operator's Info window as follows:
Setting
Value
Category
Console
Label
Filter False
Connect the lower output port (right) of the
Account NameFilter operator to the input port (left) of theFilter FalseConsole operator.
Configure the Size Operator
You’ll use a Size operator to convert your data into a number value. The dtCompanies Data Table component stores your data as an array. A Size operator measures the length of an array and assigns it a number value. For this module, the data stores one data set, so the size is 1. If the data does not exist, the operator returns a 0. You’ll use the Size number value as the argument for the Gate operator you’ll add later.
Drag and drop a Size operator onto your Data Workflow canvas.
Configure the operator's Info window as follows:
Setting
Value
Category
Size
Label
Convert Number Value
Connect the upper output port (right) of the
Account NameFilter operator to the input port (left) of theConvert Number ValueSize operator.
Configure the Gate Operator
Next, you'll add a Gate operator to block all values that are 0 or that do not exist.
Drag and drop a Gate operator onto your Data Workflow canvas.
Configure the operator's Info window as follows:
Setting
Value
Category
Gate
Label
_arg > 0
Do Not Sanitize Formula
.png) (checked)
(checked)Condition
_arg > 0
Connect the upper output port (right) of the
Account NameFilter operator to the input port (left) of the_arg > 0Gate operator.Connect the output port (right) of the
Size of ResultSize operator to the argument port (top) of the_arg > 0Gate operator.
Configure the Third Console Operator
Then, you'll add another Console operator to view your data's progress after passing through the Gate operator.
Drag and drop a Console operator onto your Data Workflow canvas.
Configure the operator's Info window as follows:
Setting
Value
Category
Console
Label
Gate Output
Connect the output port (right) of the
_arg > 0Gate operator to the input port (left) of theGate OutputConsole operator.
Configure the Get Operator
At this point, your data consists of the account name and value. You only want to output the account value for the end-user to view. You'll use the Get operator to separate the account value from the data and then pass it to the output.
Drag and drop a Get operator onto your Data Workflow canvas.
Configure the operator's Info window as follows:
Setting
Value
Category
Get
Label
accountValue
Path
[0].accountValue
Connect the output port (right) of the
_arg > 0Gate operator to the input port (left) of theaccountValueGet operator.
Configure the Fourth Console Operator
You'll add one more Console operator to view your data's progress after passing through the Get operator.
Drag and drop a Console operator onto your Data Workflow canvas.
Configure the operator's Info window as follows:
Setting
Value
Category
Console
Label
Get [0] accountValue
Connect the lower output port (right) of the
accountValueGet operator to the input port (left) of theGet [0] accountValueConsole operator.
Configure the Output Operator
Drag and drop an Output operator onto your Data Workflow canvas.
Configure the operator's Info window as follows:
Setting
Value
Category
Output
Component
accountValue
Action
value
Connect the output port (right) of the
accountValueGet operator to the input port (left) of theaccountValueOutput operator..png)
Click Save.
Save the module.
Here's how the completed example looks in the Module Builder:
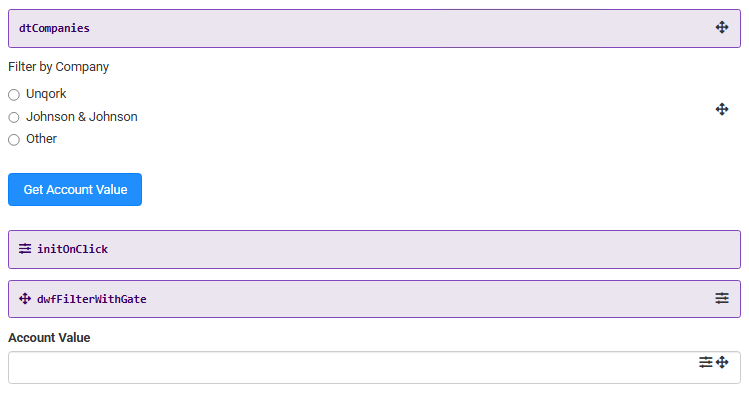
Preview the module in Express View and open the DevTools Console. Begin by selecting the Unqork radio button. Then, click the Get Account Value button to see the account value display in the Account Value field.

Now, try using the criteria that do not exist in the data set. Select the Other radio button and click the Get Account Value button. Now, you'll see that no value displays in the Account Value field.
