Overview
Because of its many customization settings, the ViewGrid component is one of Unqork’s best tools for displaying data. The ViewGrid component lets you customize headers, text, containers, and button styles using HTML and CSS. Using the HTML table, you can also filter and sort your data to your specifications.
The concepts in this article require a strong understanding of HTML, CSS, and table data structures. Ensure you're familiar with these languages before proceeding.
Set Headings in a ViewGrid
HTML uses strings to determine what your end-user sees in an application, meaning you can style text using HTML styles.
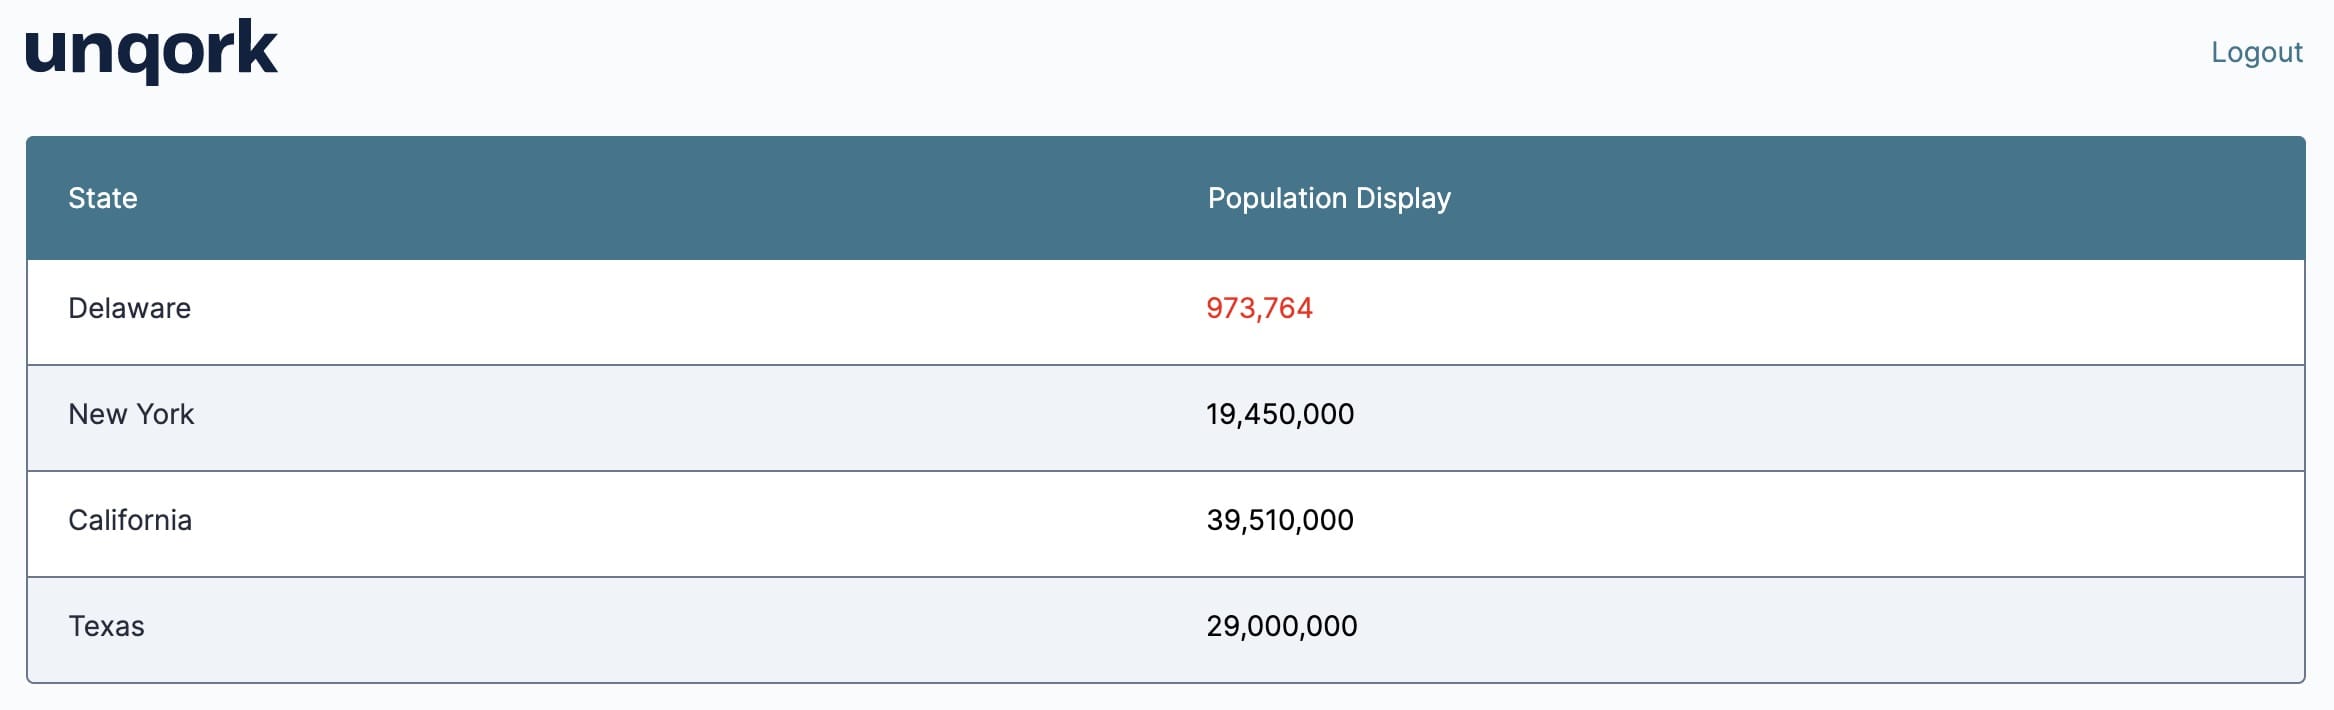
For example, let's say you have a list of states in a ViewGrid component and you want the State Name to show as an h3, or a size 3 heading. Use a Data Workflow with a Create Field operator to write the following formula: stateDisplay=CONCATENATE(“<h3>”,state,”</h3>”).
Here, you're creating a new field called stateDisplay. The Data Workflow takes each state name in your data and creates an h3 version of it. You can then add this field to your ViewGrid, resulting in the following when previewed in Express View:
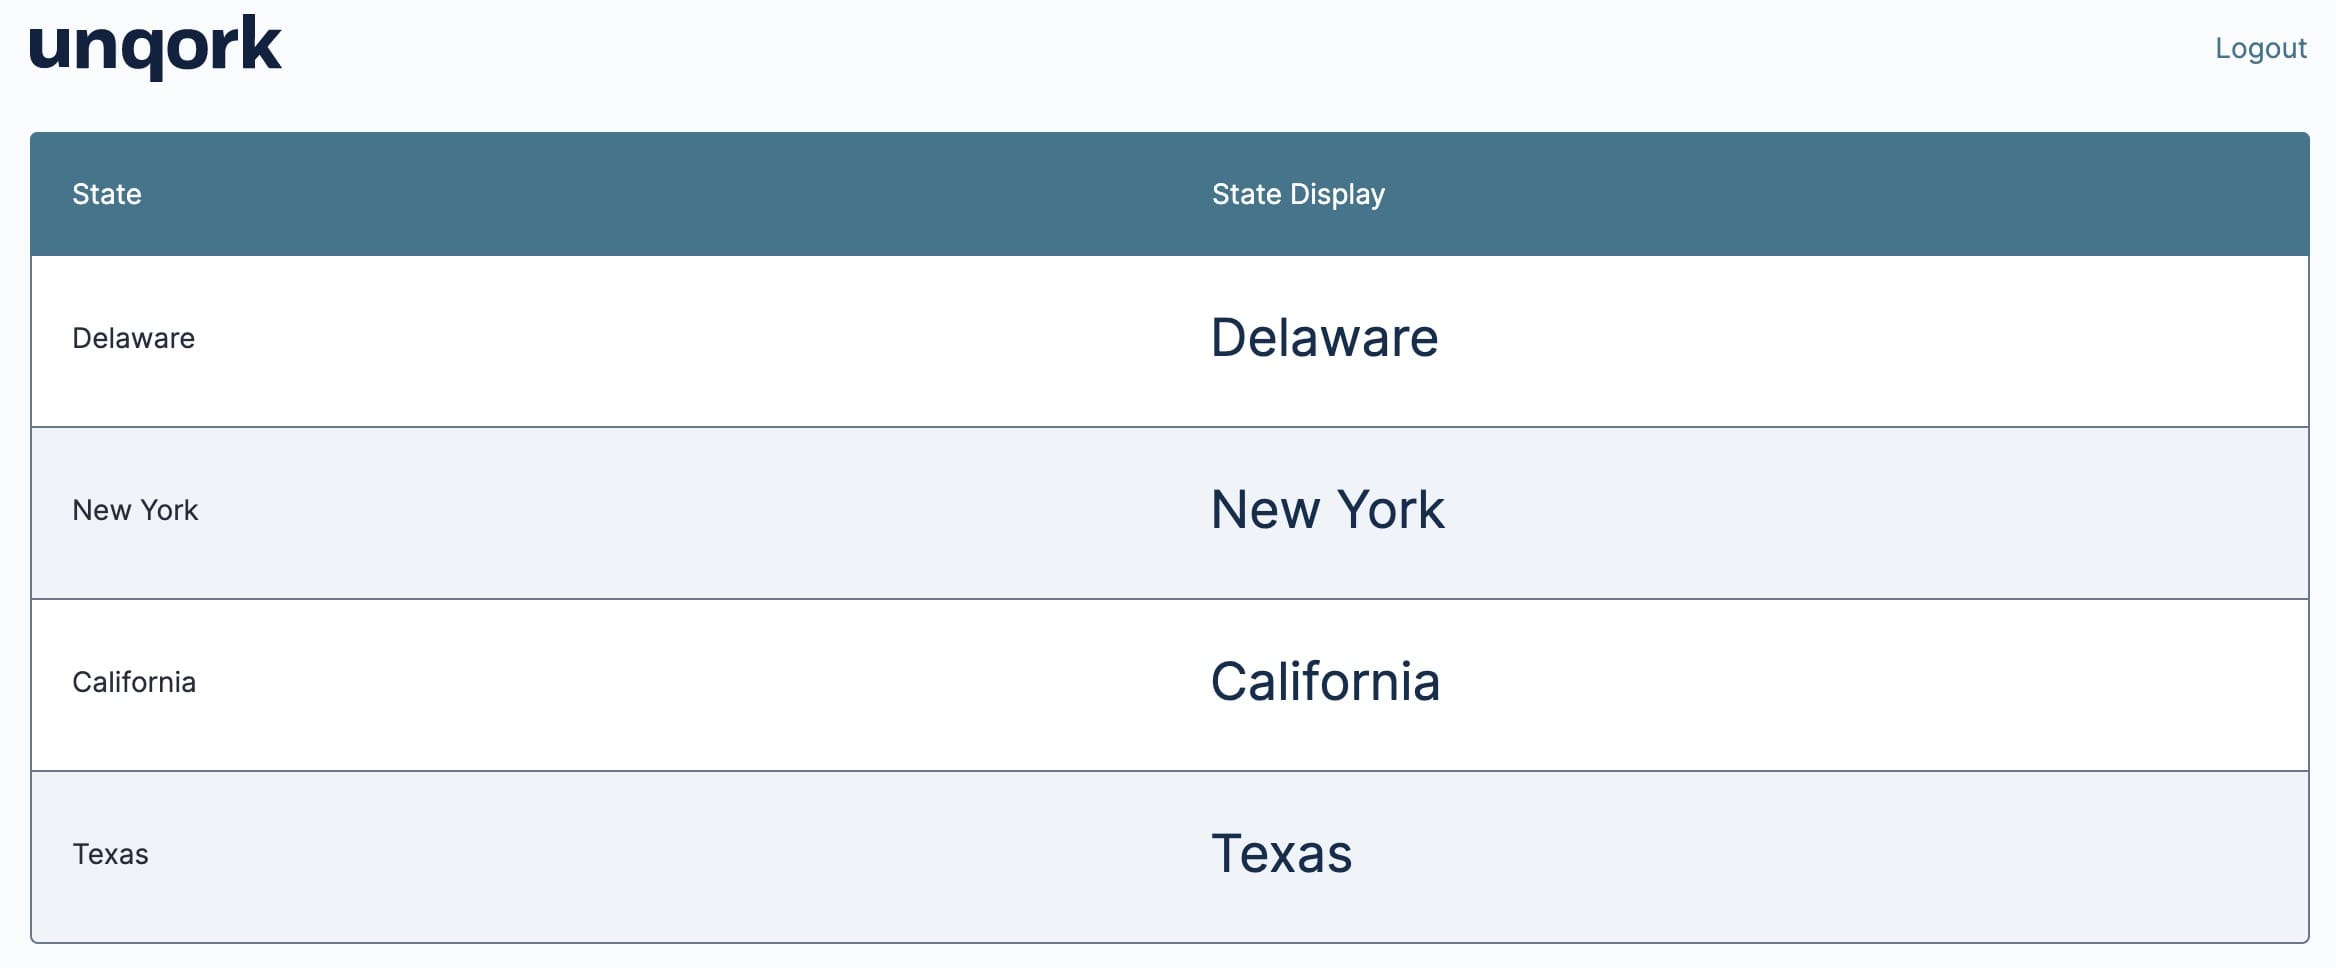
For this example, we created a new field instead of altering the data we already had. Because the HTML used is only changing the appearance of your data, creating a new field lets you maintain the original data for storage.
If you only wanted the h3 state name to display, you'd omit the original field from your ViewGrid component, so the ViewGrid component displays your newly created and styled field, stateDisplay.
Change ViewGrid Text Styles
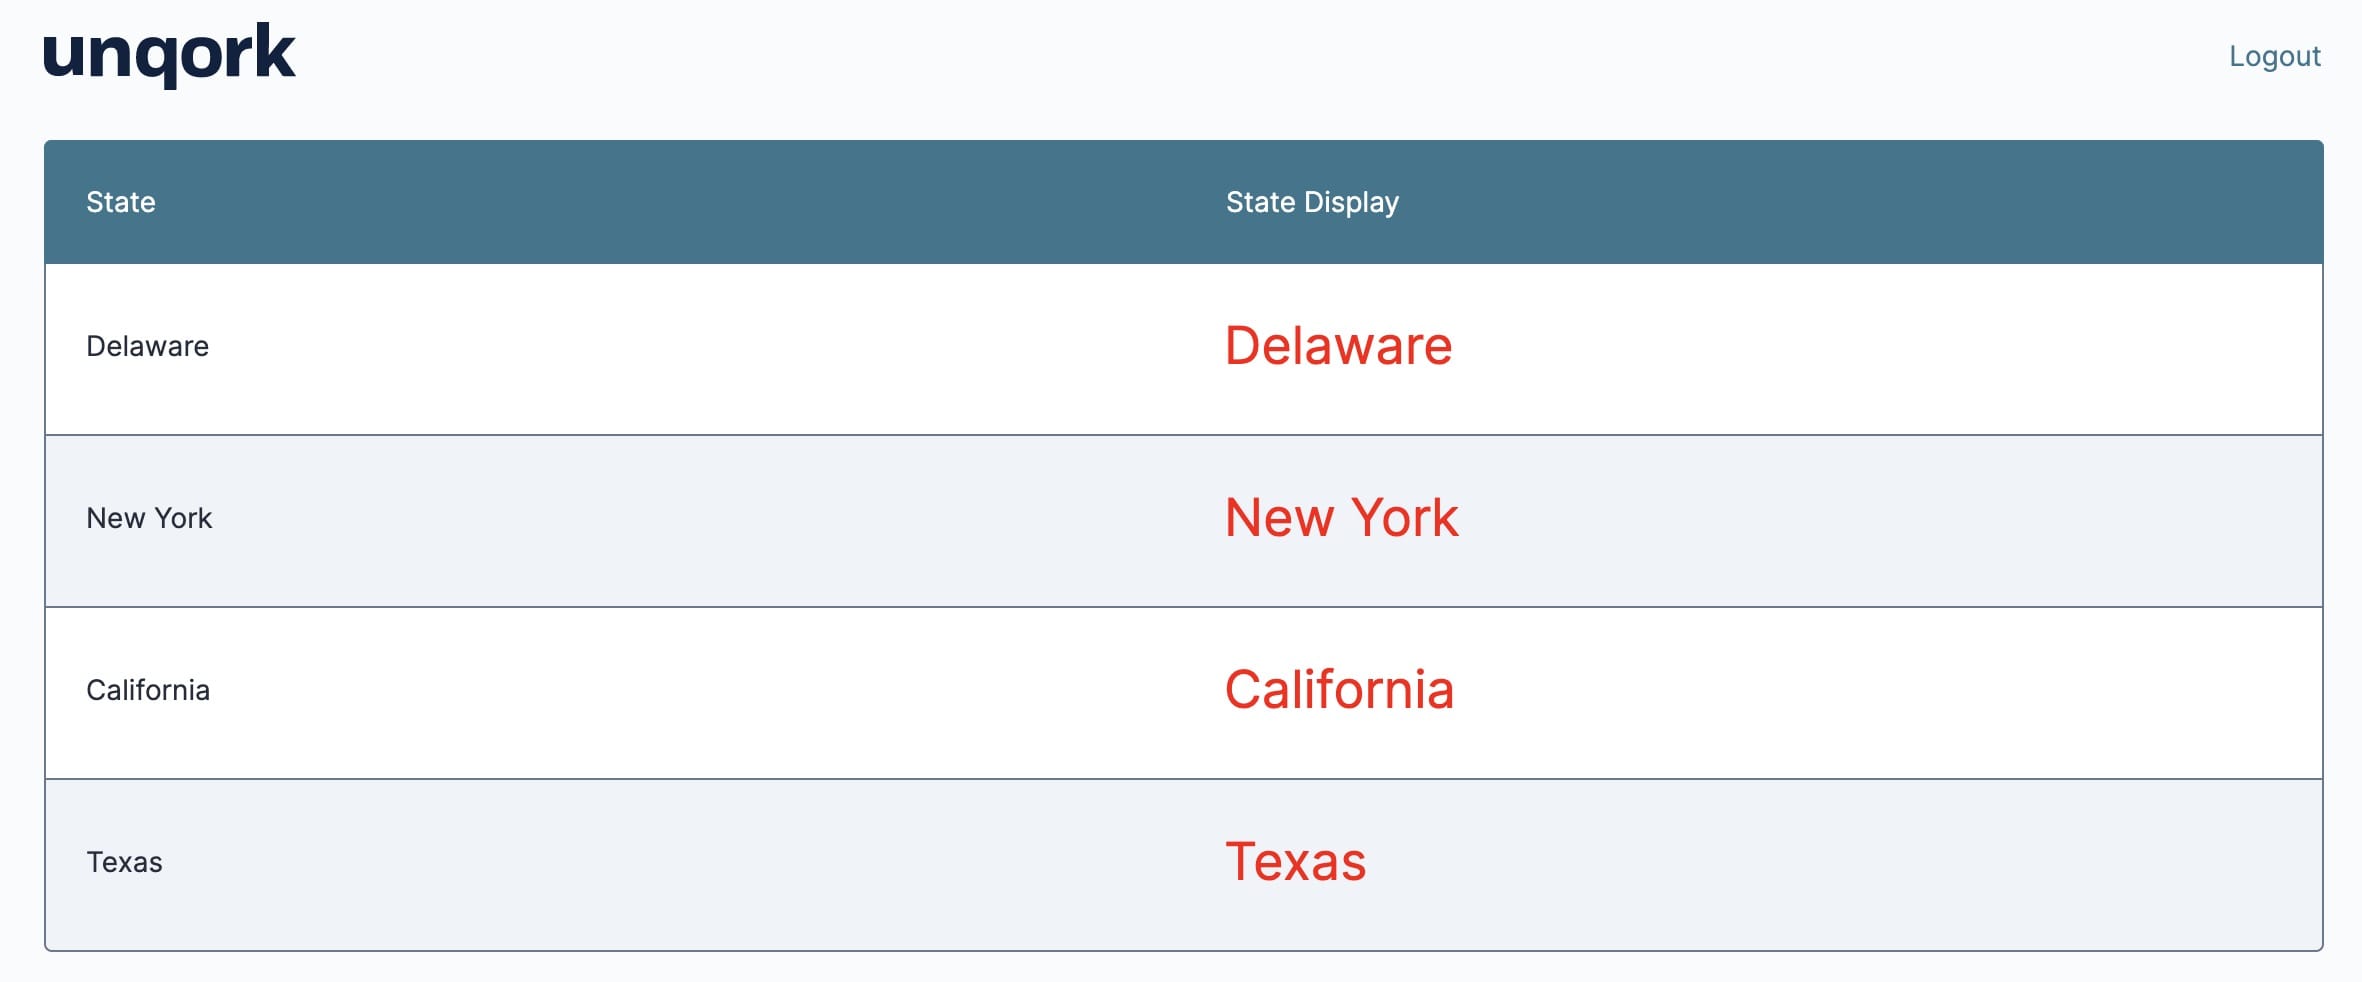
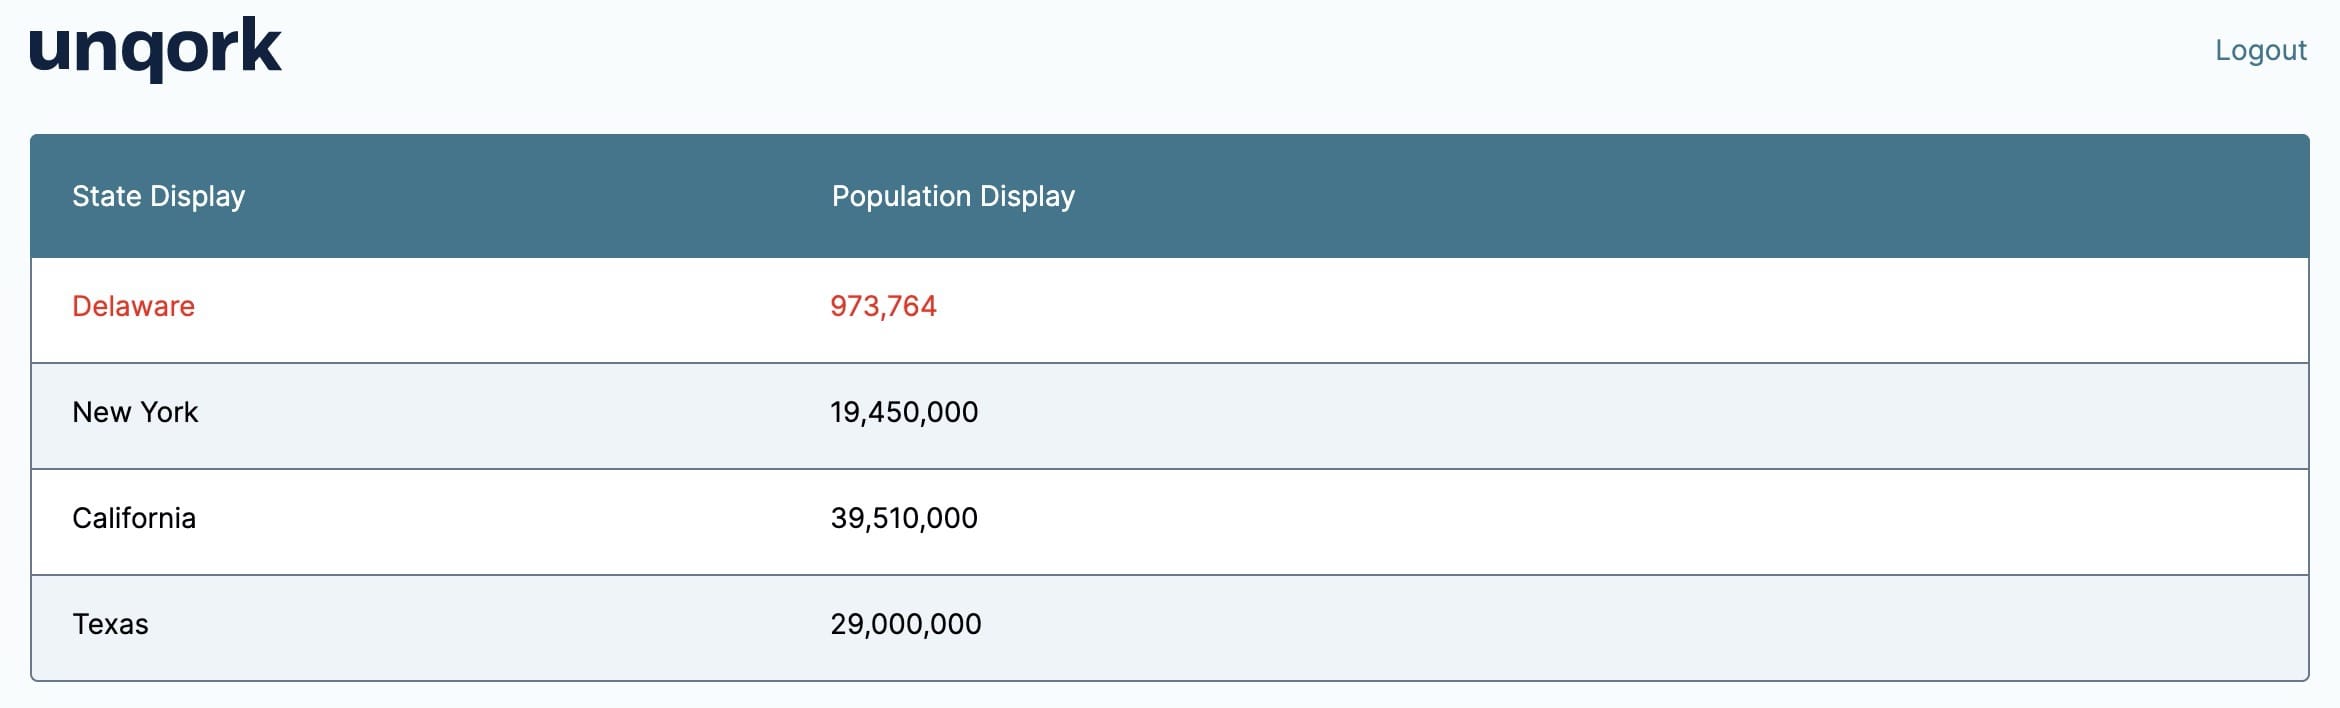
You can continue to customize your HTML using inline CSS styles. Using CSS, you can customize the color, alignment, and text transformation. For example, if you want your h3 state names to show up in red text, you'll add a CSS style inside your opening h3 tag. Here's how this formula looks:
stateDisplay=CONCATENATE("<h3 style='color:red'>",state,"</h3>")
When added to the stateDisplay field, the following generates in Express View:
Style HTML Containers
HTML makes use of containers, which let you designate the part of a given item you want to style. For example, let's say a cell in a ViewGrid component has two containers: span and div:
A span container refers to the text in a given space.
A div container refers to the space itself.
When looking at a ViewGrid component, the text in a cell is part of your span container, and the space around the text in that cell is your div container.
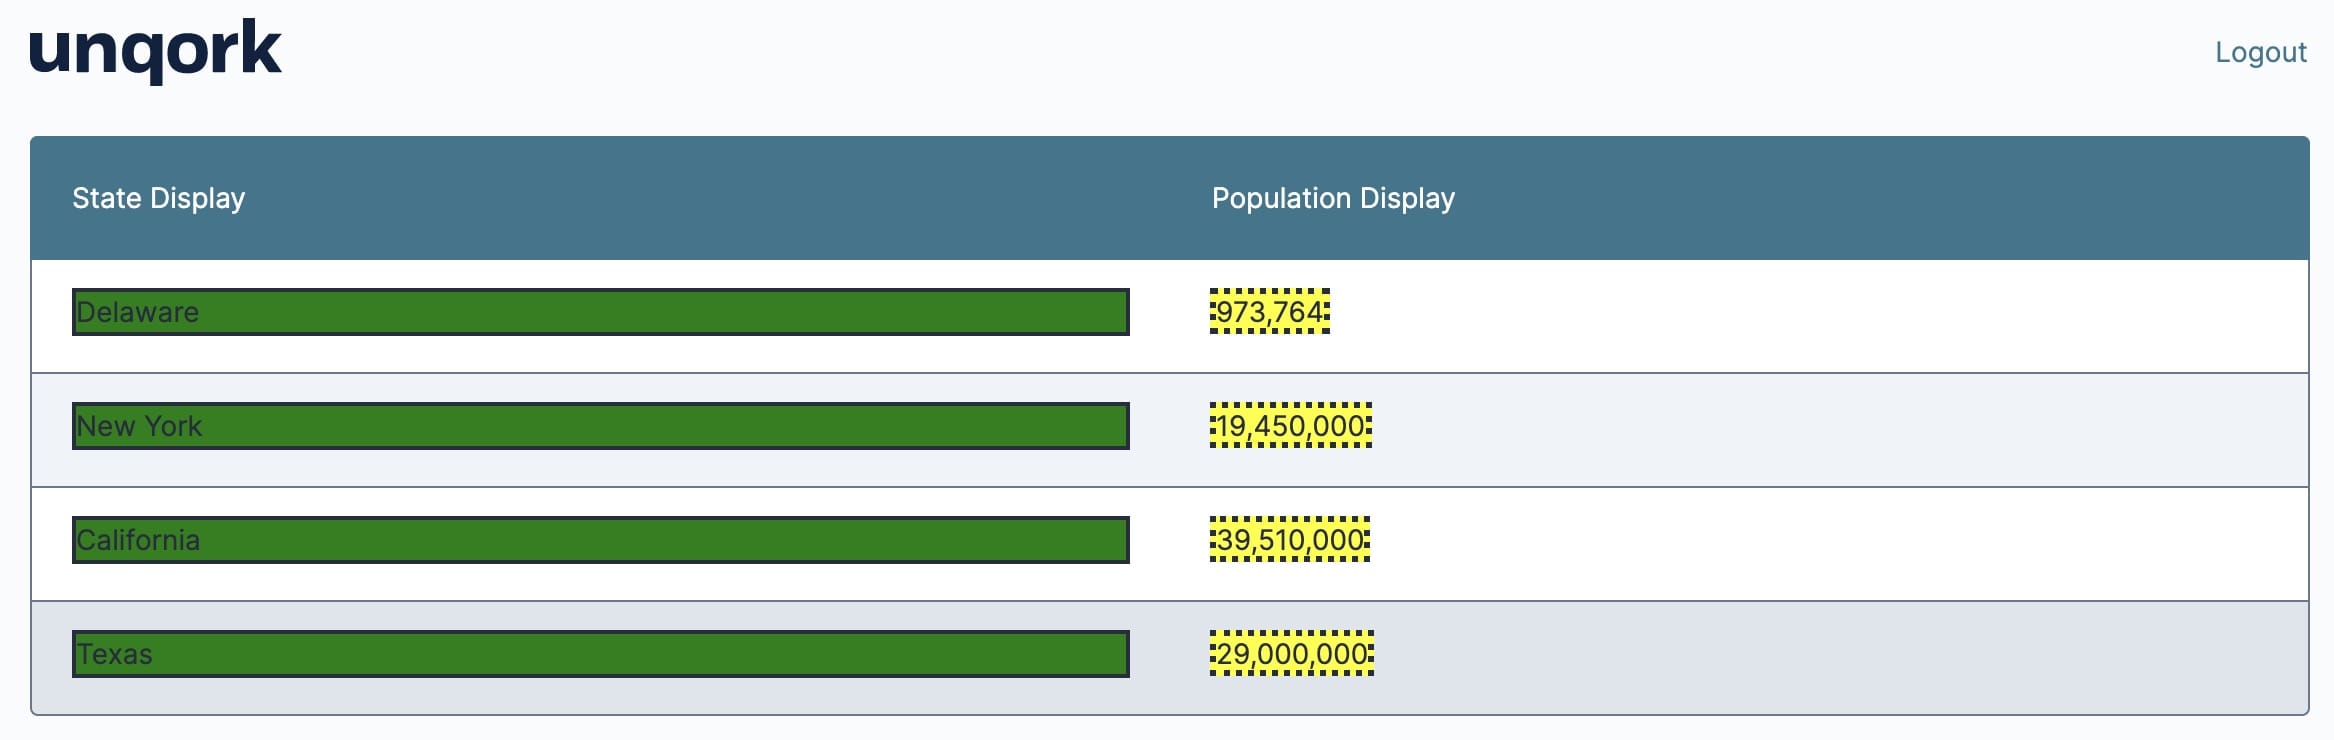
For example, let's say you're displaying the population for each state in your ViewGrid component. You want the state name to have a black border and a green background that covers the entire cell. To achieve this style, you'll update the div style.
For the population, you want a dotted border and a yellow background that only covers the text. To achieve this style, you'll update the span container. Remember, create new fields to hold this styled data.
Here's how your final stateDisplay formula looks like:
stateDisplay=CONCATENATE("<div style='background-color:green;border:2px solid'>",state,"</div>")
Here's how your final populationDisplay formula looks like:
populationDisplay=CONCATENATE("<span style='background-color:yellow;border:3px dotted'>",population,"</span>")
Adding these to your ViewGrid component displays the following in Express View:
Set Up ViewGrid Conditional Formatting
HTML is primarily uniform throughout entire columns in a ViewGrid component. To change styling based on what the individual value is, like highlighting any population less than 1,000,000, you'll use conditional formatting.
First, you'll create a new field and formula with more data processing. You'll convert your population data to a number data type using the VALUE() formula in your Data Workflow in the following way: populationStyling=VALUE(population).
Next, you'll write an if/then statement to create your conditional logic. If a population is less than 1,000,000, then the font turns red. To achieve this style, use the following formula:
populationStyling=IF(populationStyling<1000000,'<span style="color:red">','<span style="color:black">')
Doing so turns any populationStyling values under 1,000,000 a red color and leaves all other values black.
When writing formulas, always use a single quote to contain the entire string and a double quote for substrings.
Now, you have the styling for each population set. Here's how the formula looks:
populationDisplay=CONCATENATE(populationStyling,population,'</span>')
This formula references the populationStyling and population fields, and adds a closing span tag to maintain proper HTML syntax.
After adding these fields to a ViewGrid component, you'll see the following in Express View:
Going a step further, let's say you also want the state's name to display as red color if its population is less than 1,000,000. You can achieve this style by referencing the populationStyling field you've already set up using the following formula:
stateDisplay=CONCATENATE(populationStyling,state,'</span>')
Here's how this style looks in Express View:
Add ViewGrid HTML Buttons
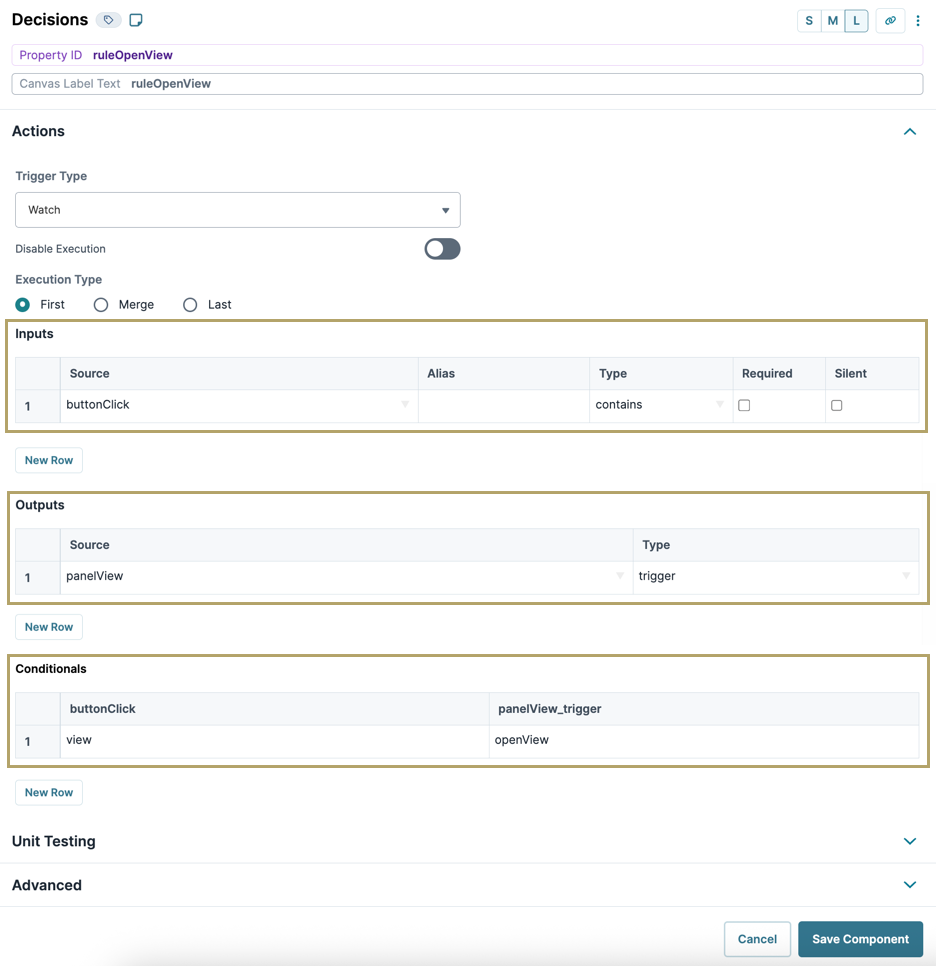
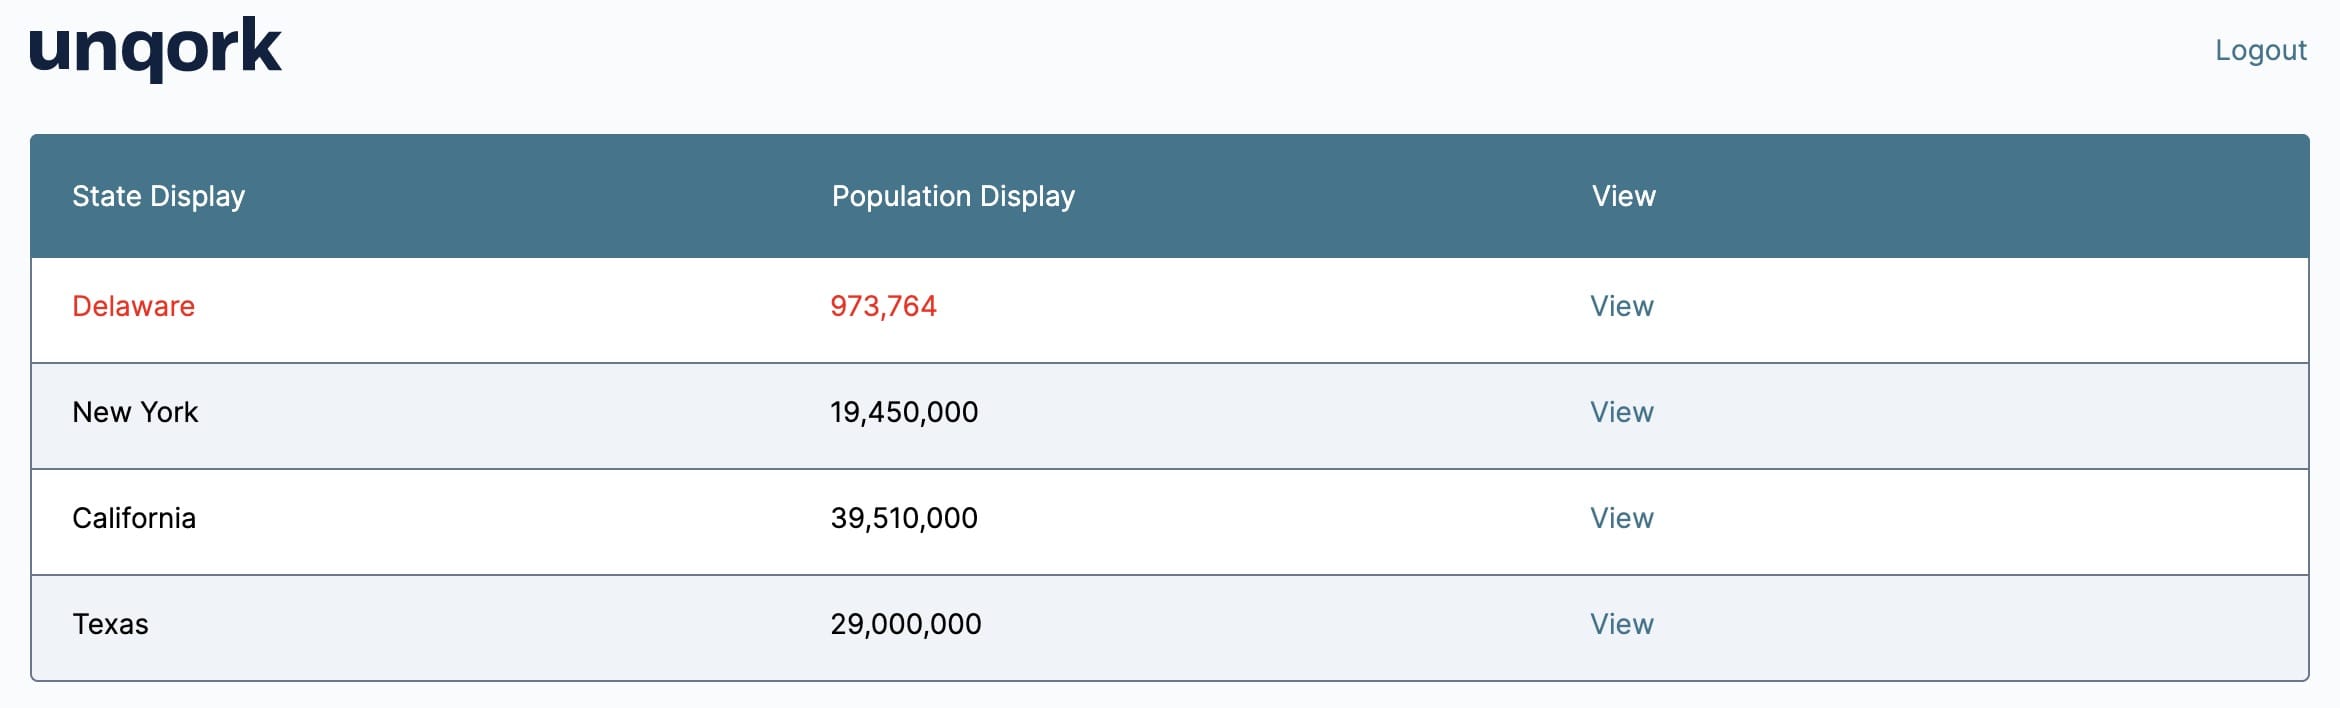
Using inline HTML, you can customize buttons in your ViewGrid component to change appearance in different states. The ViewGrid component also lets you modify buttonClick events. A buttonClick event displays in the browser's console and can be used to trigger other actions in your application. These events tell other operations in your application that they can proceed. Using HTML, you can create a buttonClick event using data in a ViewGrid component.
To initiate a buttonClick event when text is clicked, you'll use the HTML attribute onclick. Here's the basic HTML syntax for this function:
<container >TEXT</container>
In this formula, a container refers to the item where you want to assign your onClick action. A function() refers to what happens when that item is clicked. In this case, we want to display the button as a link. So, use the <a> container to represent a hyperlink. We want a buttonClick event to occur when that link is clicked, so you'll use buttonClick as your function.
Using a Data Workflow, here's how the final formula looks:
viewButton=CONCATENATE('<a href="#" onclick="buttonClick(event, ',"'", 'view',"'", ')">View</a>')
Once added to a ViewGrid component, here's how it looks in Express View:
When your end-user clicks the button, a buttonClick event registers in the browser. You can use that event to trigger other actions in your module. For example, you can configure a Decisions component to open a Express View using a Panel component to serve as a hidden modal. Then, you'll configure your Decisions component with the following: