Proxy Layer Structure for Applications with Anonymous Users
Overview
Security should be top-of-mind when building applications. You never want to leave data susceptible to interception or manipulation. This is even more true when creating an application for use by anonymous users. A Proxy Layer Structure for anonymous users can help.
What is the Proxy Layer Structure?
The Proxy Layer Structure takes an application and switches it to the server-side. After that, actions performed by your application won't show in the underlying code.
Say you have a module that collects a user's name, address, phone number, and email address. You then want to validate the data and create a submission for storage. A Proxy Layer Structure does this outside of your application's code.
The Proxy Layer Structure contains at least 4 modules. You may add more depending on what actions you'd like to perform. For this use case, you'll create 6 modules:
| Module | Description |
|---|---|
|
Browser |
This is the user-facing part of your application. This is the module your end-user interacts with, whether they fill out an application or upload files. As an example use case, you'll build an application requesting an end-user’s name, address, phone number, and email. |
|
Proxy |
This module switches your application from the user-facing application to the server-side. Think of this as a curtain between your end-user and your application’s inner-workings. For roles that need to initiate remote execution from an Express module, enhance Proxy module security by setting the permissions to Write |
|
Master |
This is the powerhouse of your application. Here, you’ll orchestrate the actions you’d like to perform. Actions can include validating data, creating user submissions, or sending emails. The Master Module connects to each action and transmits the needed data. For this use case, you'll set up actions to validate data and create submissions from data. |
|
Validate |
For this use case, this module validates your end-user's data from the Browser Module. |
|
Create |
For our use case, this is where your end-user’s data becomes a submission. |
|
Schema |
This is the end-point of your application where the submission stores after validation. |
Learning Objectives
In this article, you'll learn how to create a Proxy Layer Structure from scratch.
These instructions assume you have a new workspace open, saved, and with a title.
Set Up the Browser Module
This is the only module your end-user ever sees. Here, they'll input their data. But, if their entries don't match your requirements, they won't be able to submit. Instead, they'll see an error asking them to update their entries before submitting. Let's get started.
To set up the Browser Module, you’ll need the following:
- 1 Panel component
- 1 Columns component
- 3 Text Field components
- 1 Address component
- 1 Phone Number component
- 1 Email component
- 1 Button component
- 1 Plug-In component
- 2 Hidden components
- 1 Decisions component
- 2 HTML Element components
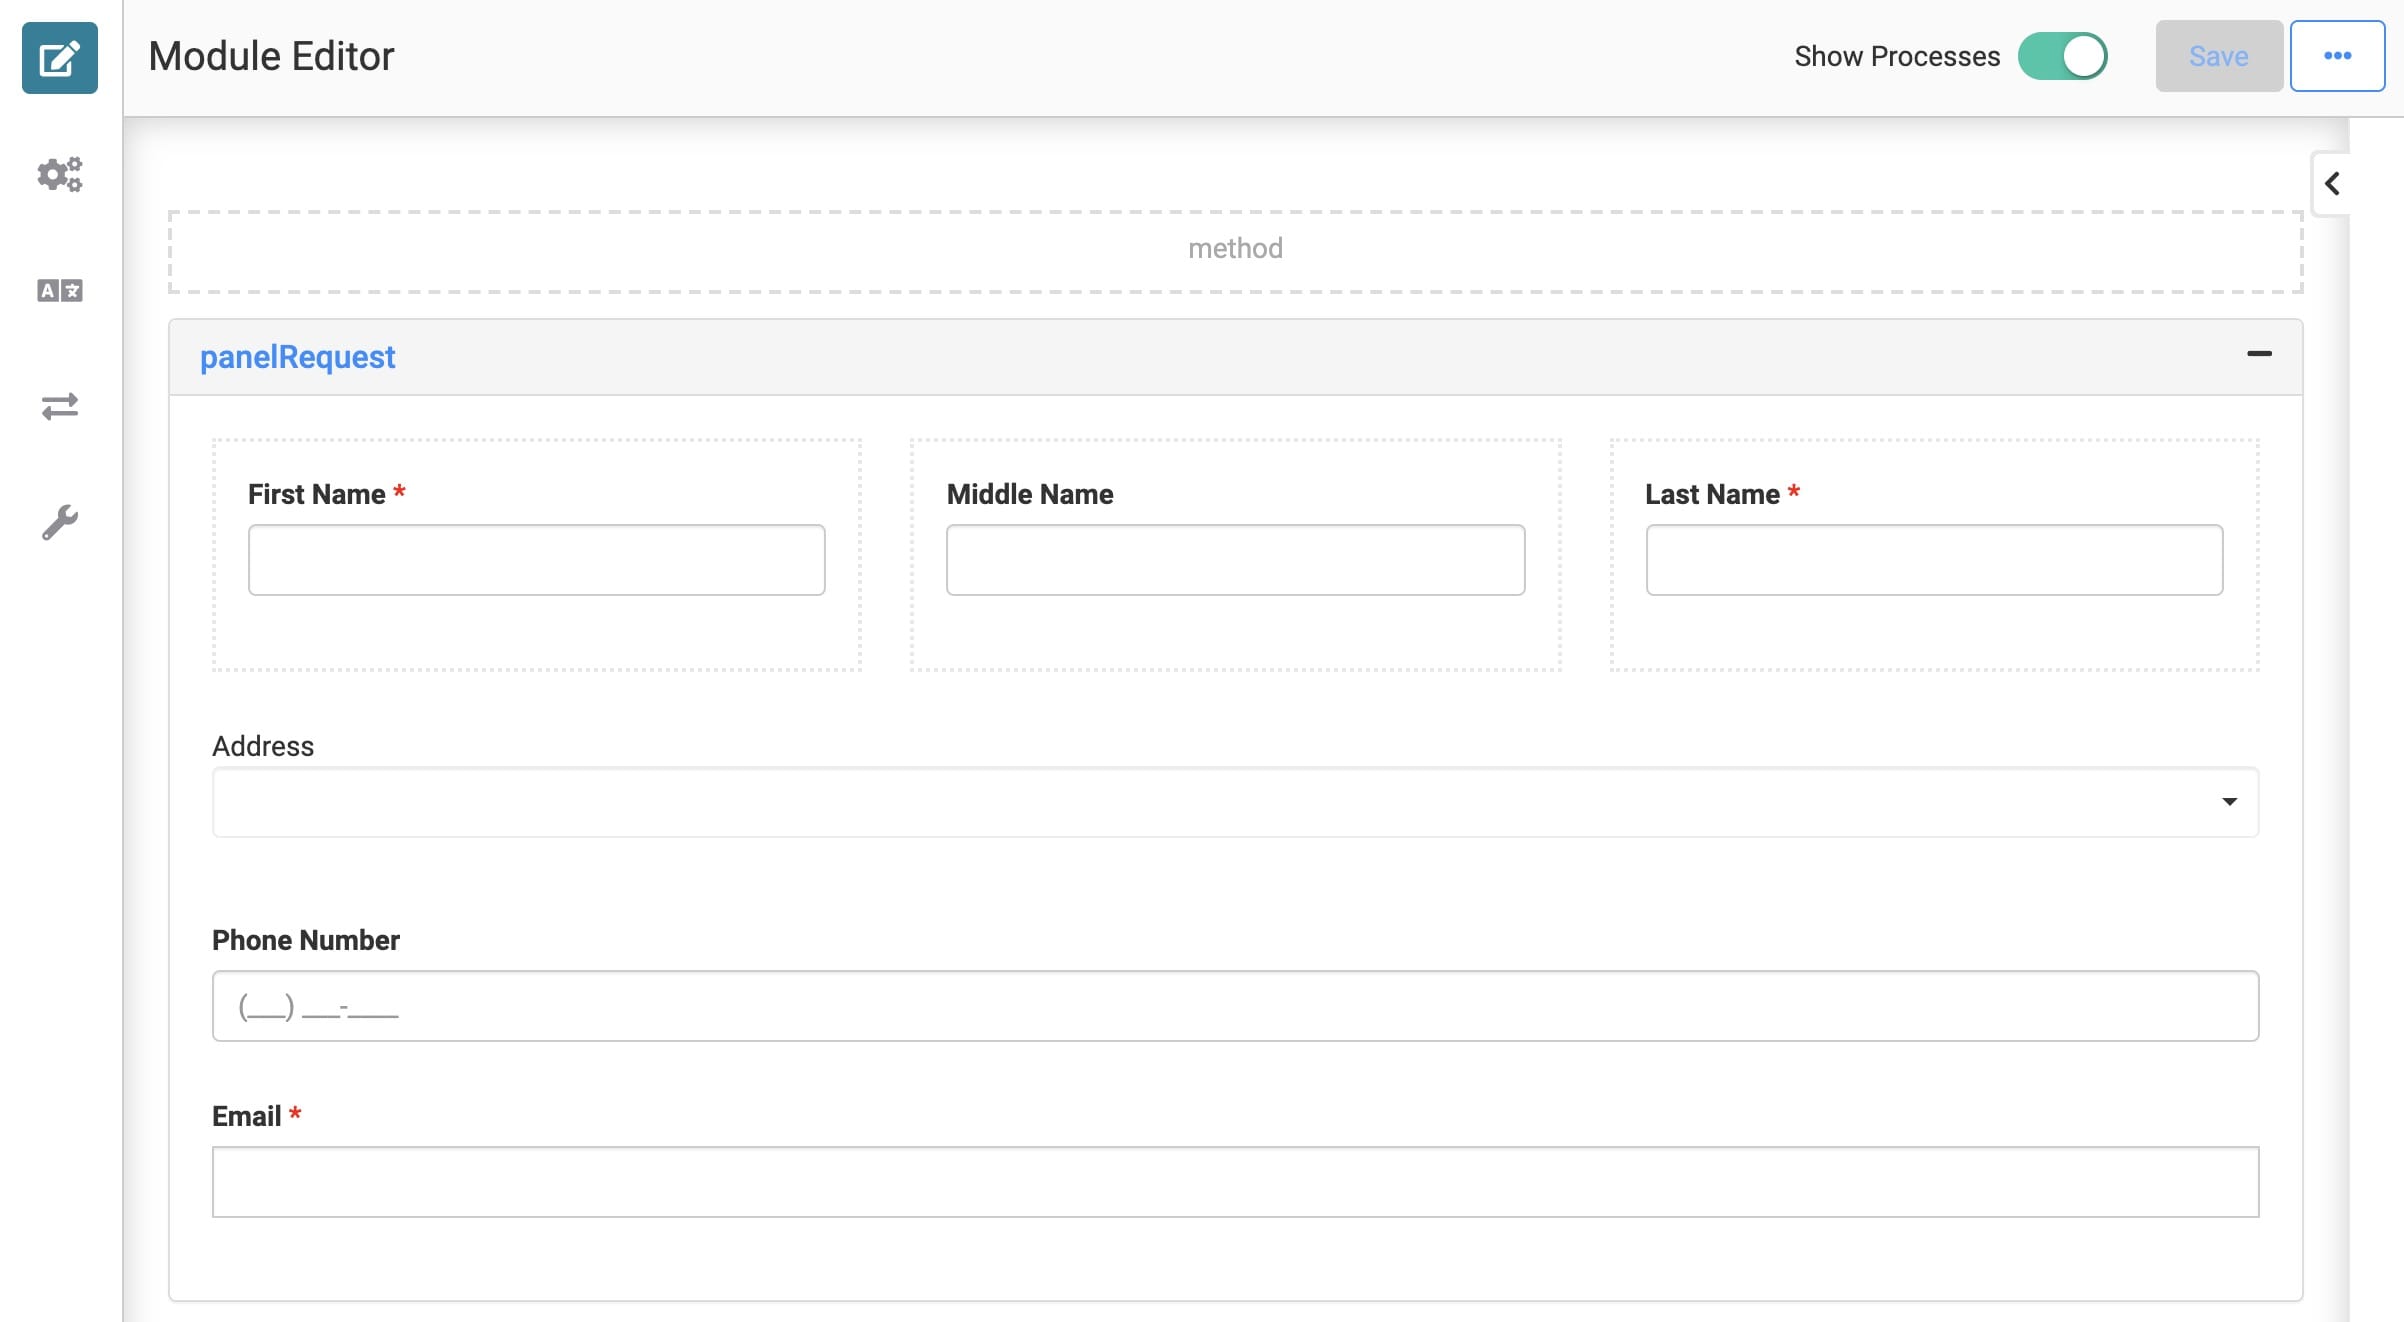
Here's how your Browser Module will look in the Module Builder:
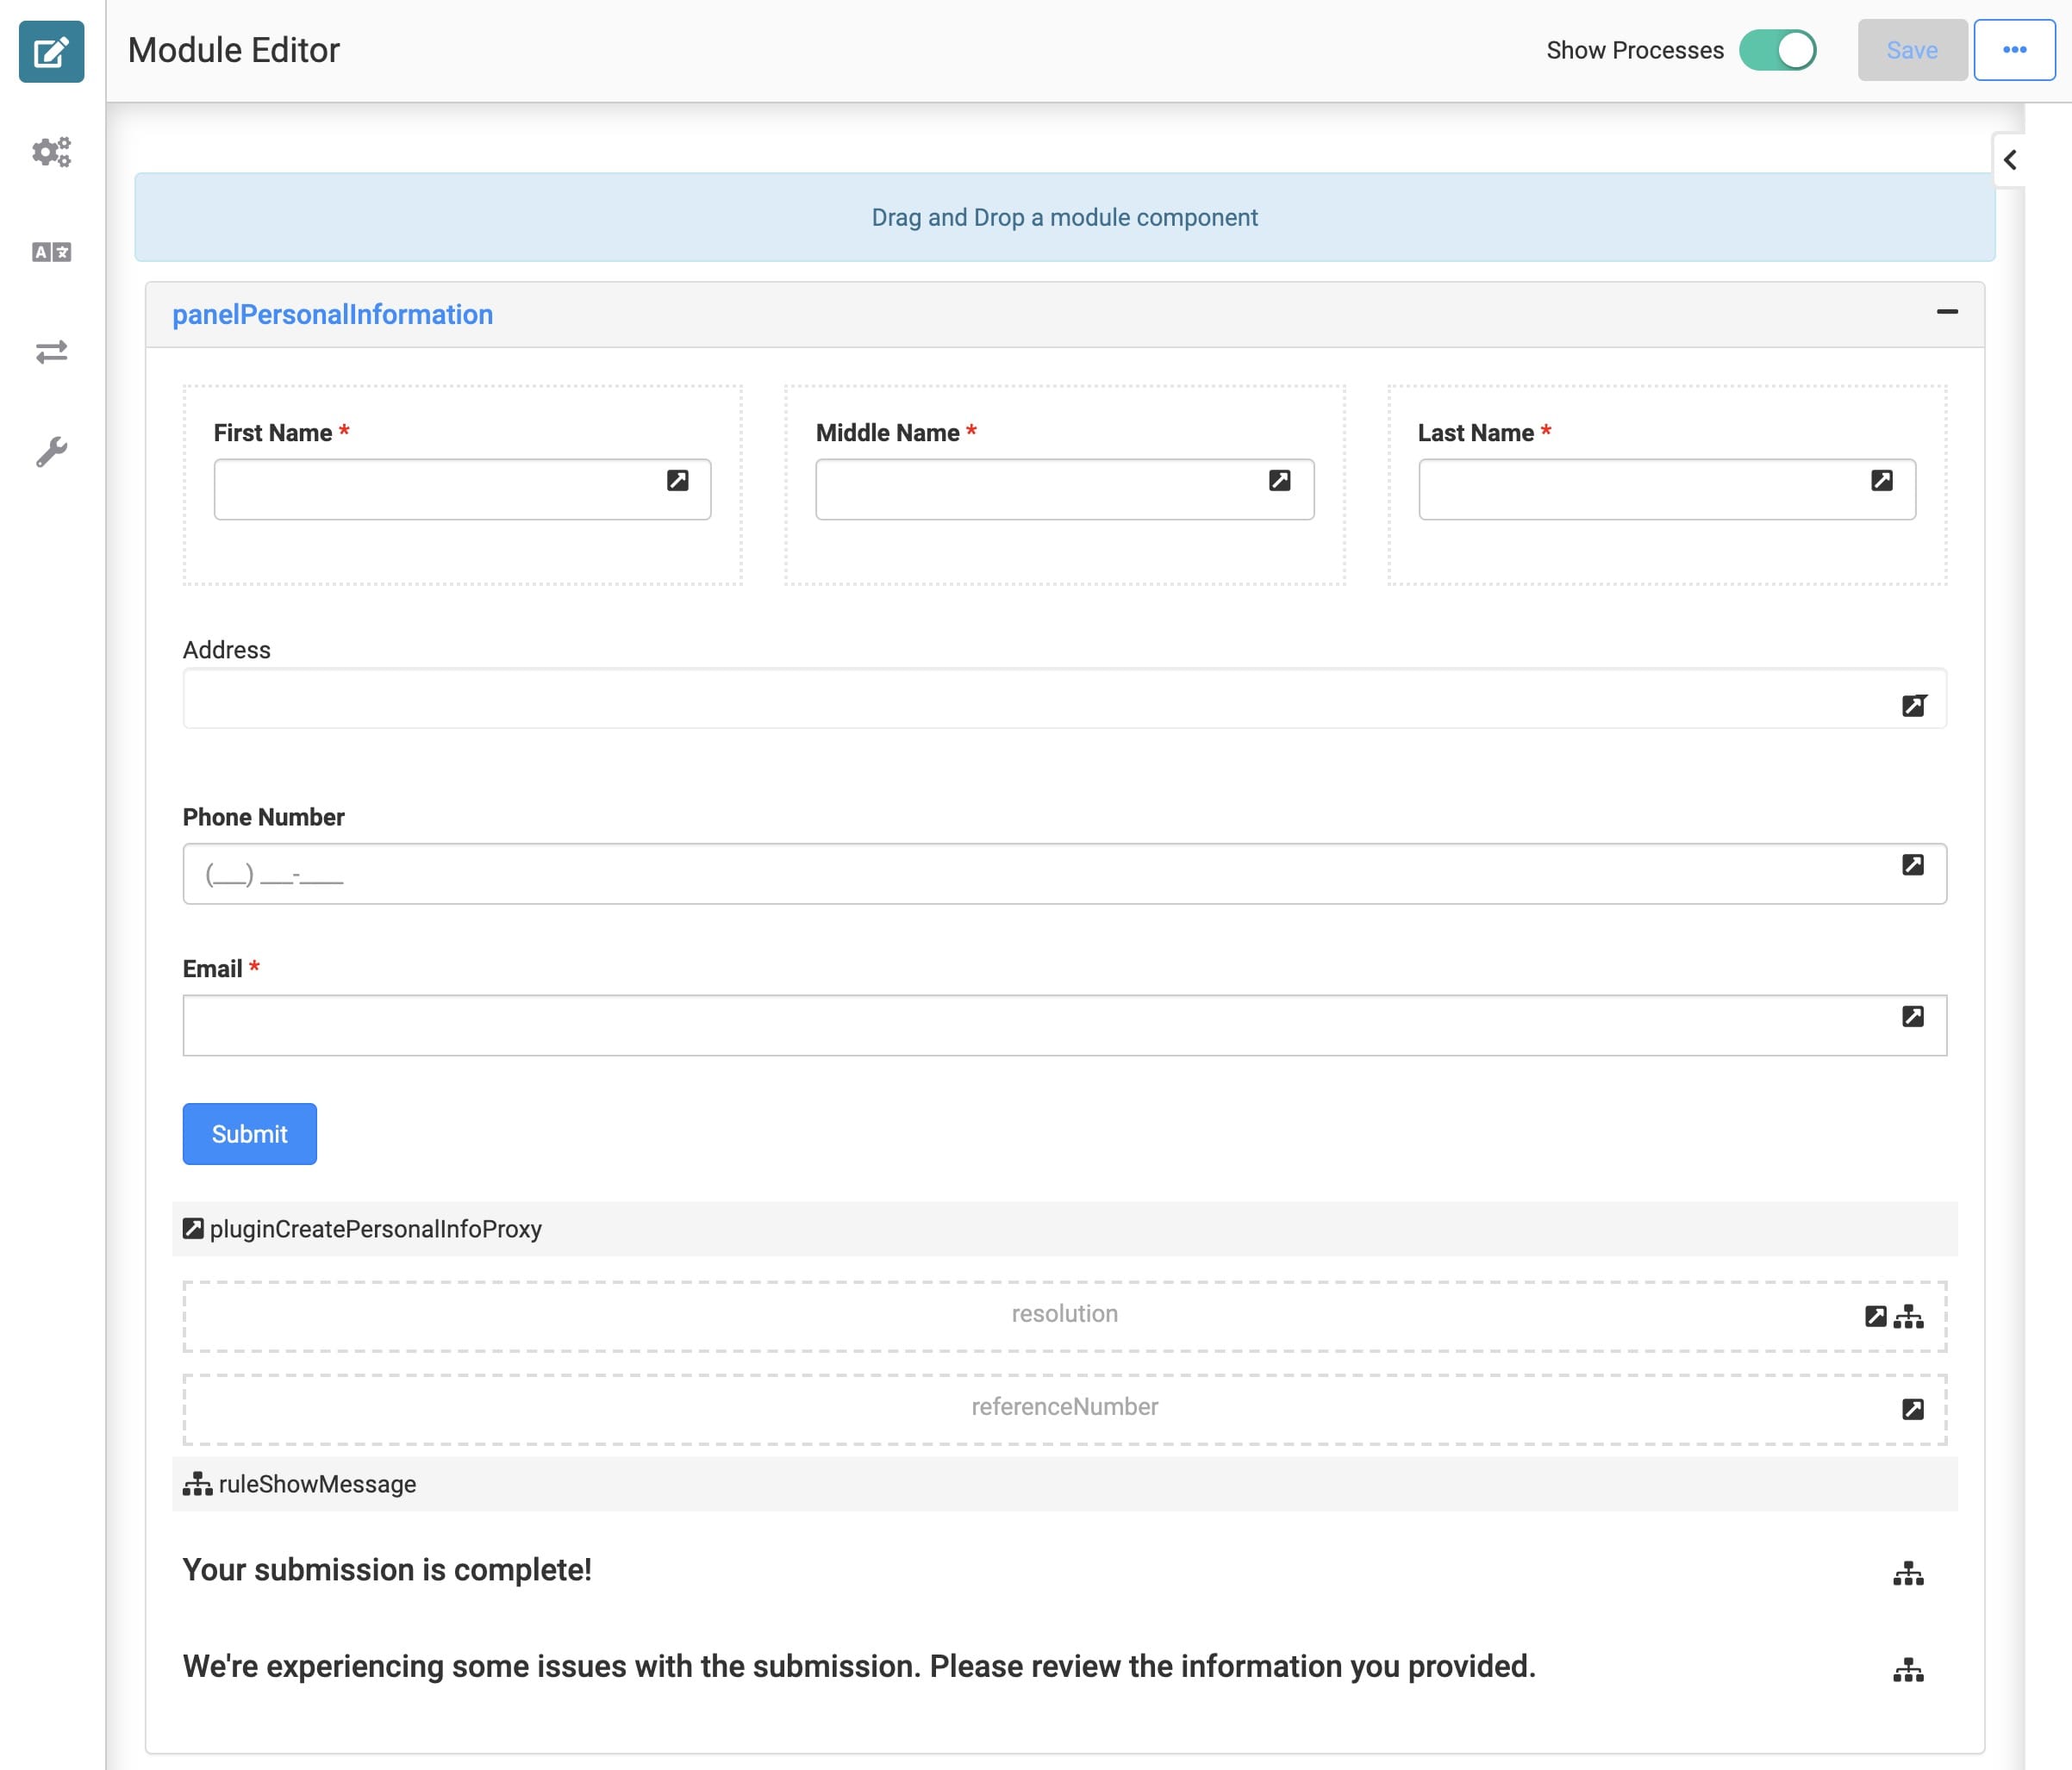
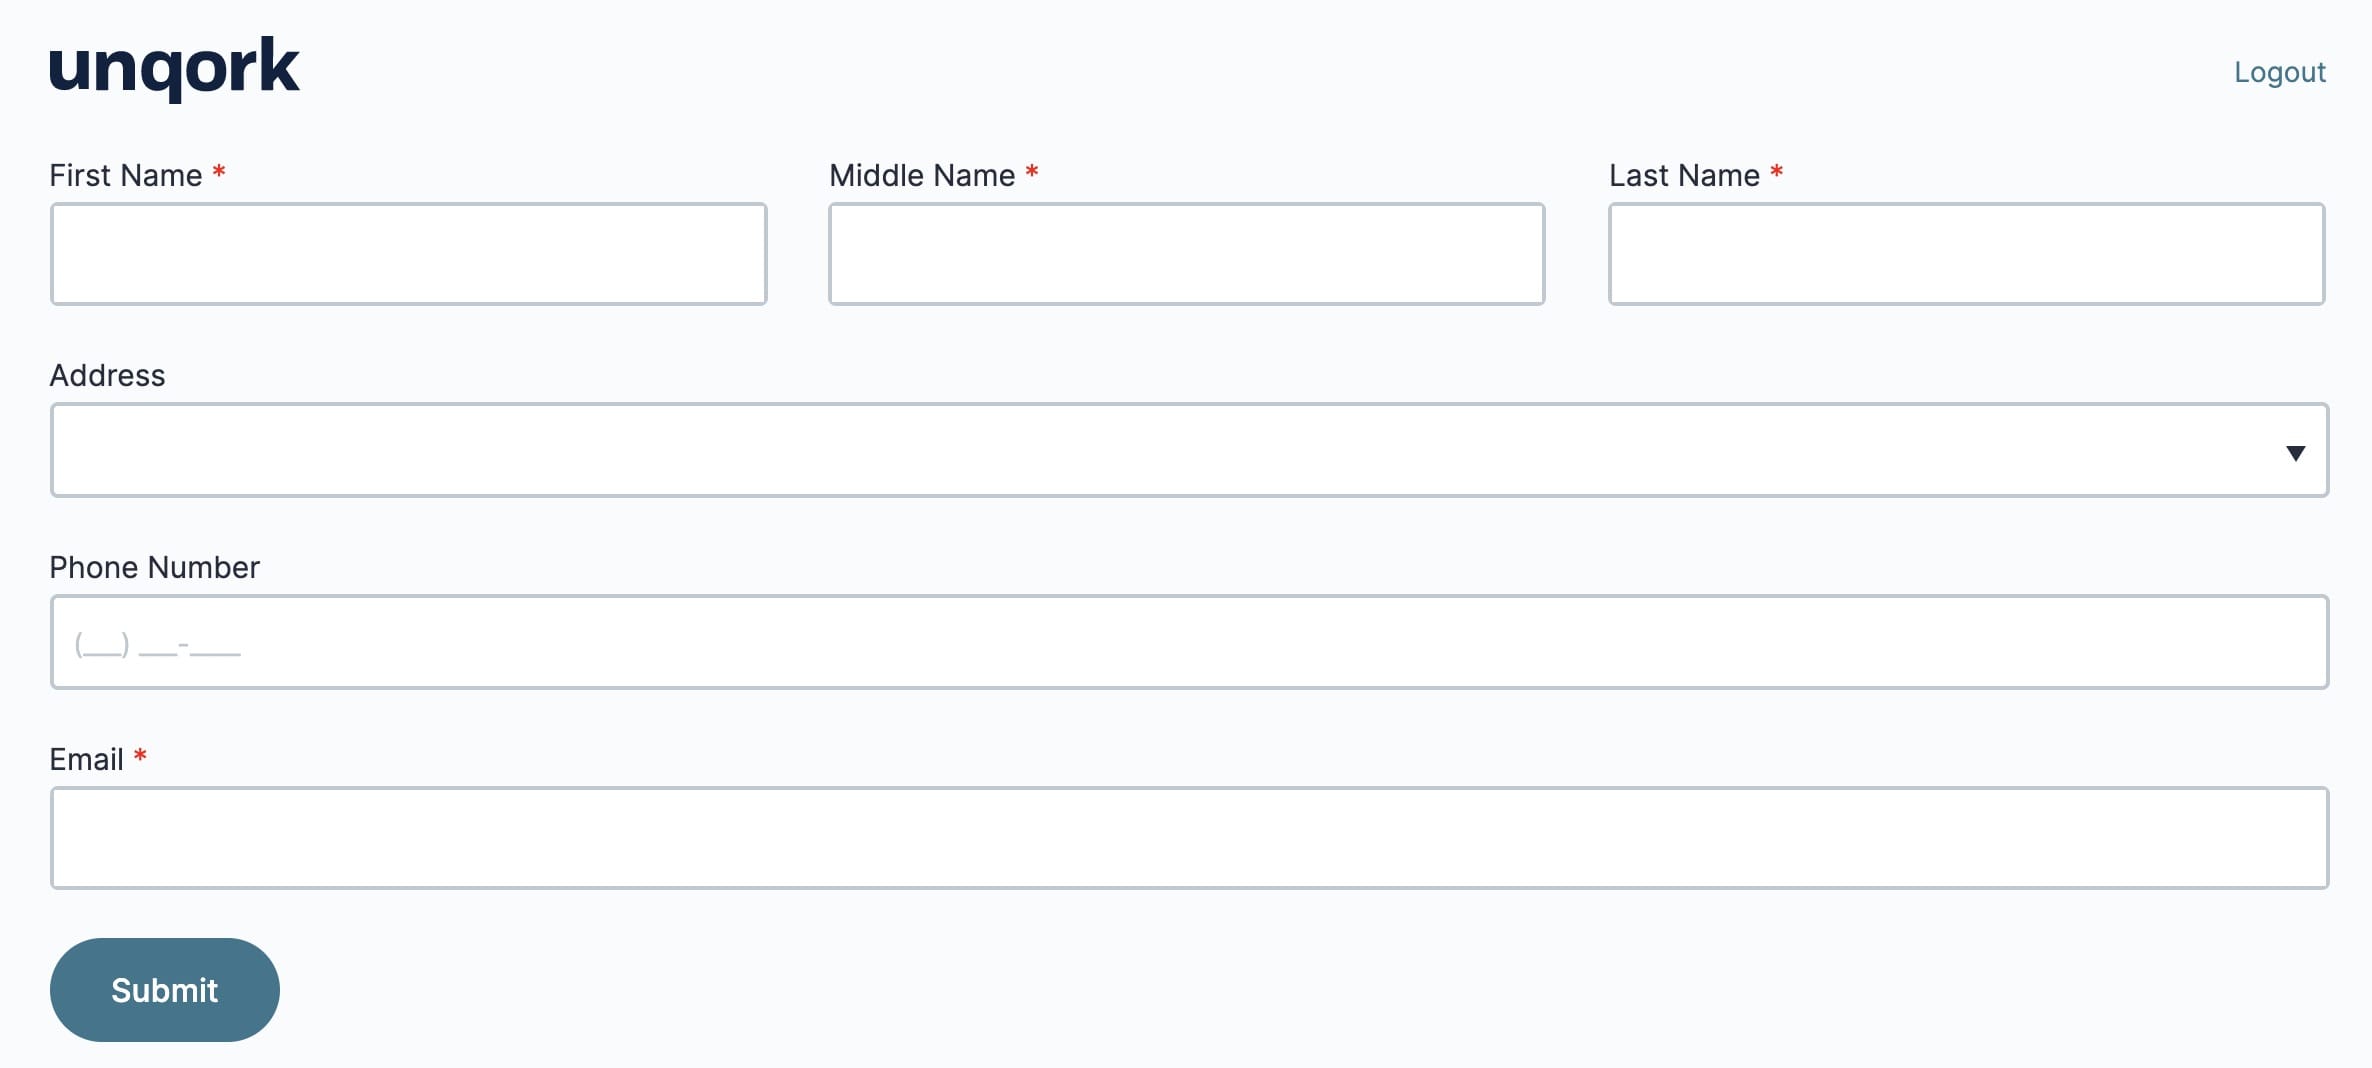
And here's how your Browser Module will look in Express View:
Create the Module
| 1. | In your workspace, click + Create App. The Create App modal opens. |
| 2. | Enter an App Name that contains Browser Module. |
| 3. | Select Module from the App Type drop-down. |
| 4. | Click Create. Your new module shows on the following page. |
| 5. | Click your module to open it. |
Configure the Panel Component
Your Panel acts as a container for the components that follow.
| 1. | Drag and drop a Panel component onto your canvas. |
| 2. | Enter panelPersonalInfo in the Property Name. |
| 3. | Click Save. |
Configure the Columns Component
Your Columns help keep your Browser Module organized for your end-user. You’ll place fields for the user’s First Name, Middle Name, and Last Name here.
| 1. | Drag and drop a Columns component onto your canvas. Place your Columns component in the panelPersonalInfo Panel. |
| 2. | Enter colPersonalInfo in the Property ID. |
| 3. | Under Column Layout, click on the icon displaying 3 evenly spaced columns. |
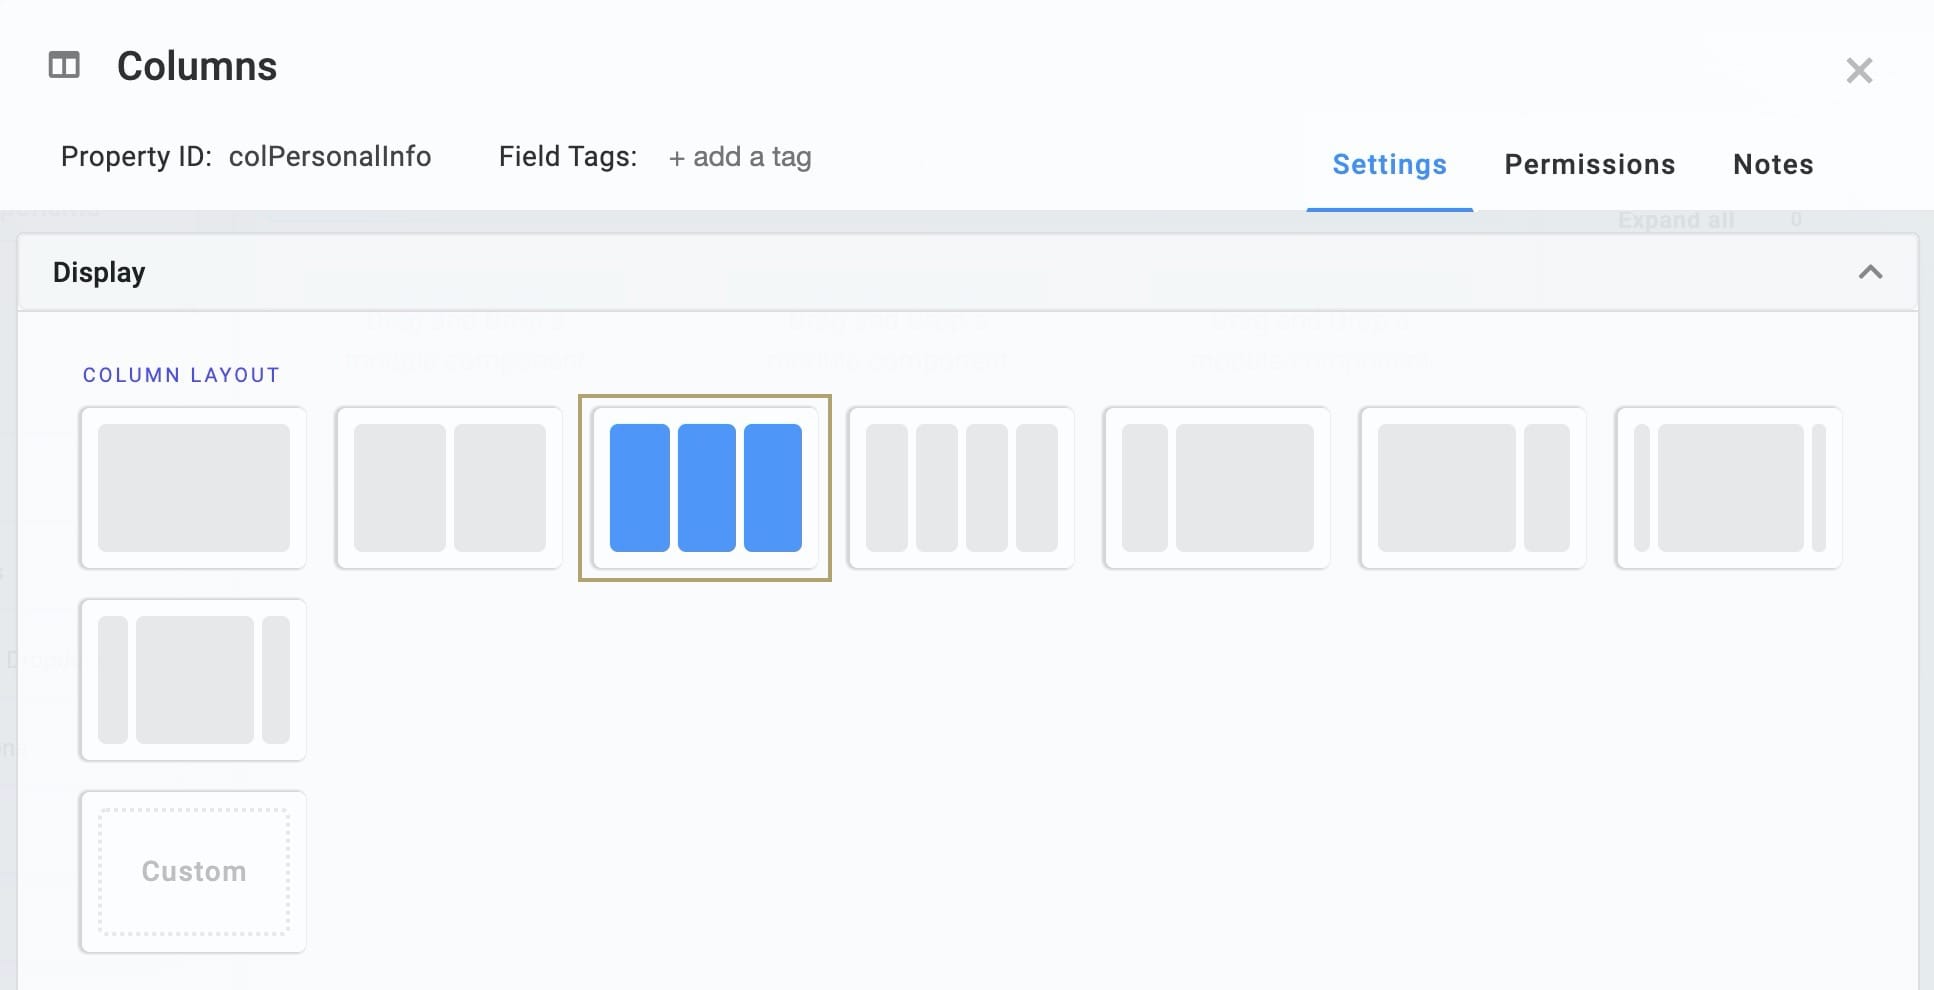
| 4. | Click Save. |
Configure the Text Field Components
To collect your user’s name, you’ll use Text Field components. You’ll set the First Name and Last Name fields as Required fields for validation testing.
| 1. | Drag and drop 3 Text Field components onto your canvas. Place a Text Field component inside each of your 3 columns. |
| 2. | Enter the following Property IDs and Label Text: |
| Property ID | Label Text |
|---|---|
|
firstName |
First Name |
|
middleName |
Middle Name |
|
lastName |
Last Name |
| 3. | Set the Required toggle in your firstName and lastName components to ON. |
| 4. | Save each component as you add it. |
Configure the Address Component
To collect your user’s address, you’ll use an Address component. An Address component calls the Google Maps API (application programming interface) for auto-formatting.
| 1. | Drag and drop an Address component onto your canvas. Place your Address component in the panelPersonalInfo Panel below your Columns. |
| 2. | Enter Address in the Label. |
| 3. | Enter address in the Property Name. |
| 4. | Click Save. |
Configure the Phone Number Component
To collect your end-user’s phone number, you’ll use a Phone Number component.
| 1. | Drag and drop a Phone Number component onto your canvas. Place your Phone Number component in the panelPersonalInfo Panel below your Address component. |
| 2. | Enter phoneNumber in the Property ID. |
| 3. | Enter Phone Number in the Label Text. |
| 4. | Enter ^(\+\d{1,2}\s)?\(?\d{3}\)?[()\s.-]?\d{3}[\s.-]?\d{4}$ in the Regex Pattern. |
A Regular Expression Pattern enforces phone number formatting. This expression returns an error if your end-user enters letters or special characters.
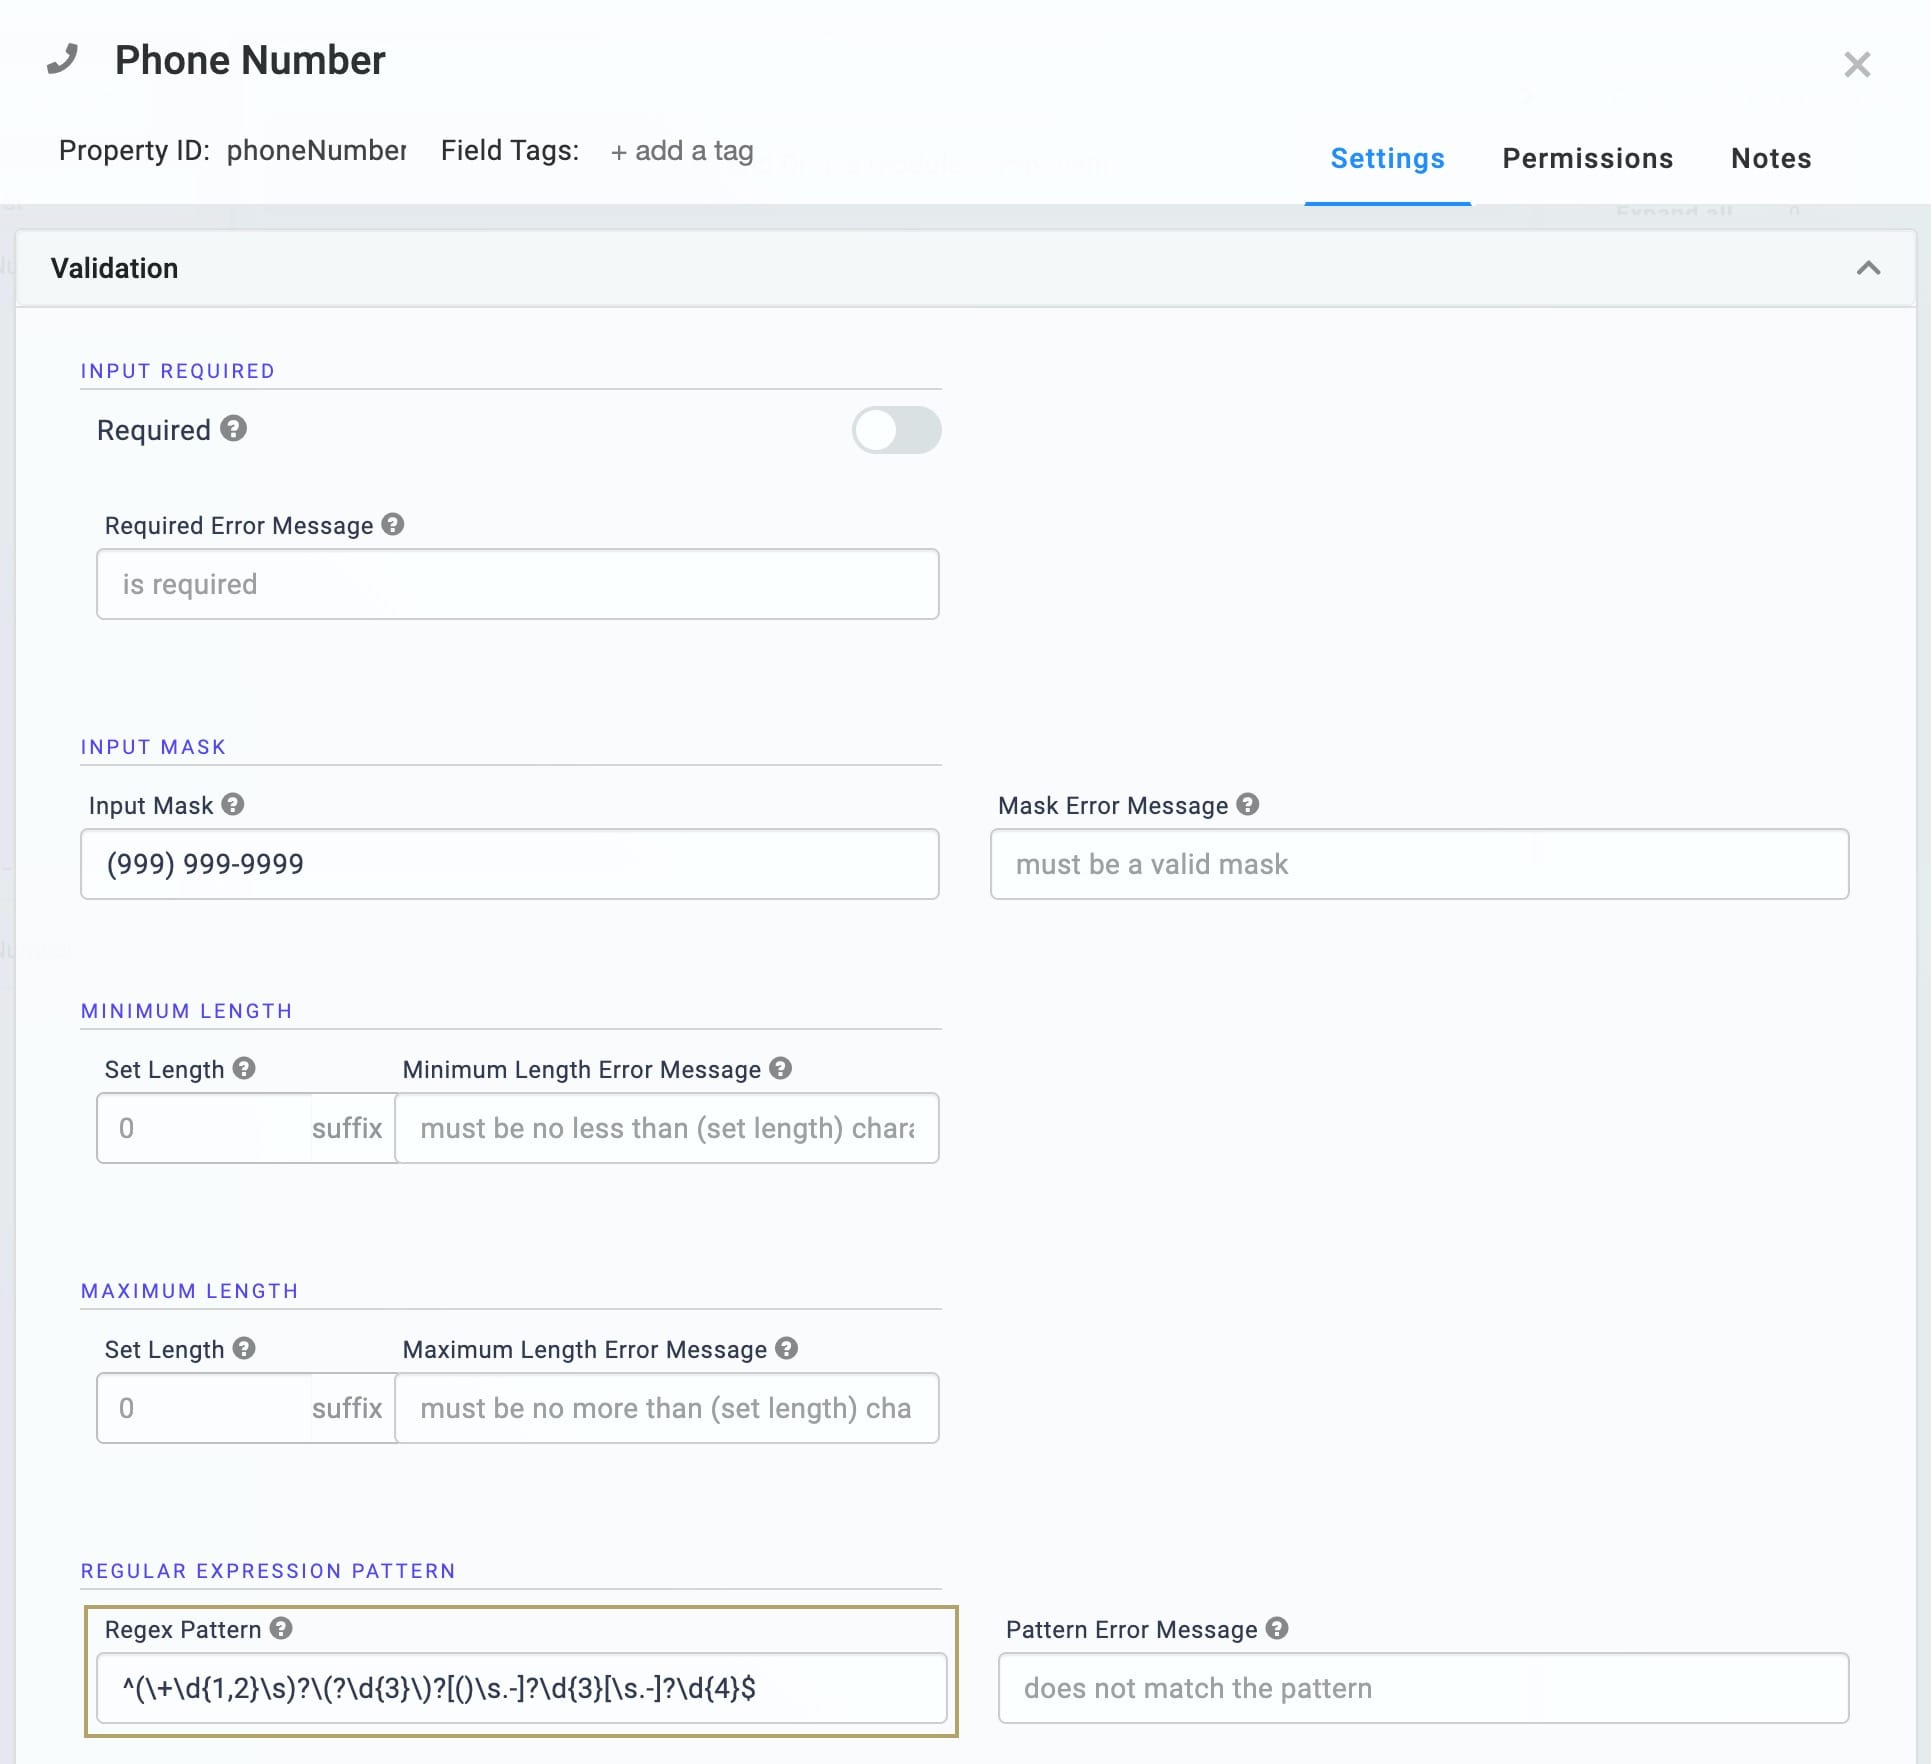
| 5. | Click Save. |
Configure the Email Component
To collect your end-user’s email address, you’ll use an Email component.
| 1. | Drag and drop an Email component onto your canvas. Place your Email component in the panelPersonalInfo Panel below your Phone Number component. |
| 2. | Enter email in the Property ID. |
| 3. | Enter Email in the Label Text. |
| 4. | Set the Required toggle to ON. |
| 5. | Enter ^([a-zA-Z0-9_\-\.]+)@([a-zA-Z0-9_\-\.]+)\.([a-zA-Z]{2,5})$ in the Define Pattern field. |
The Regular Expression Pattern enforces email formatting. This expression returns an error if your end-user enters an invalid email address.
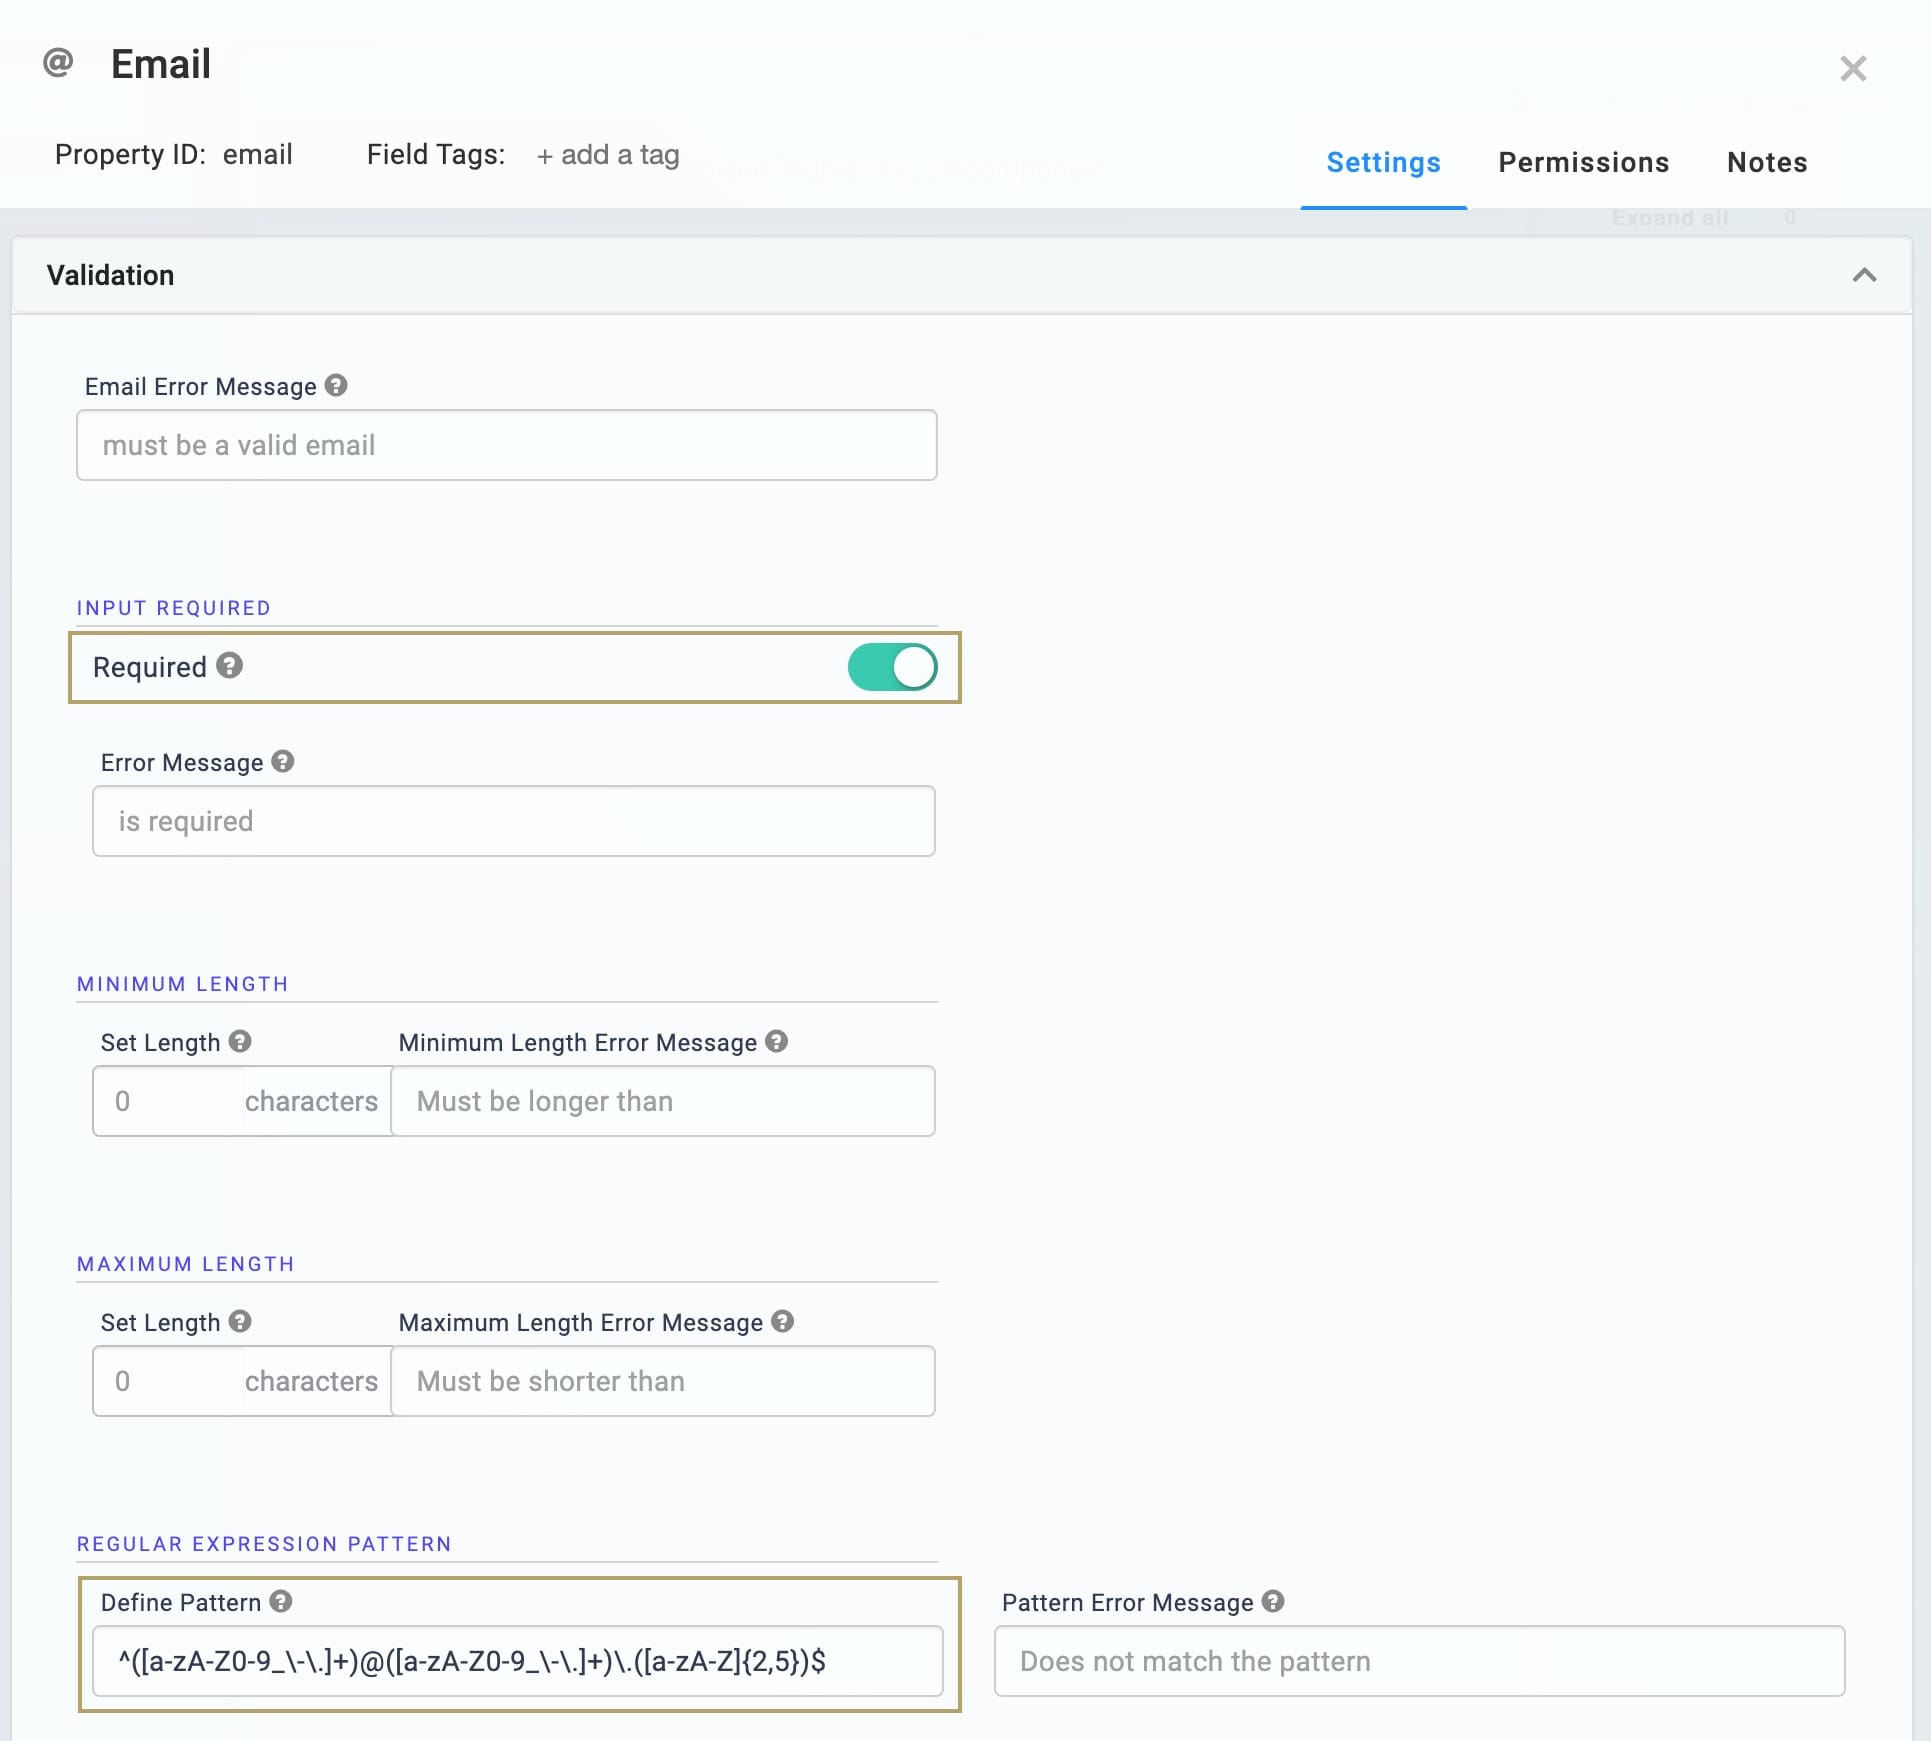
| 6. | Click Save. |
Configure the Button Component
When your end-user completes their entry, they’ll need to submit it. So, let's add a Button component to your module.
| 1. | Drag and drop a Button component onto your canvas. Place your Button component in the panelPersonalInfo Panel below your Email component. |
| 2. | Enter btnValidate in the Property ID. |
| 3. | Enter Submit in the Label Text. |
| 4. | Select Event from the Button Action Type. |
| 5. | Enter pluginCreatePersonalInfoProxy in the Trigger on Click. |
This ties the Button to the Plug-In component you'll add in the next step. When an end-user clicks the button, the Plug-In triggers.
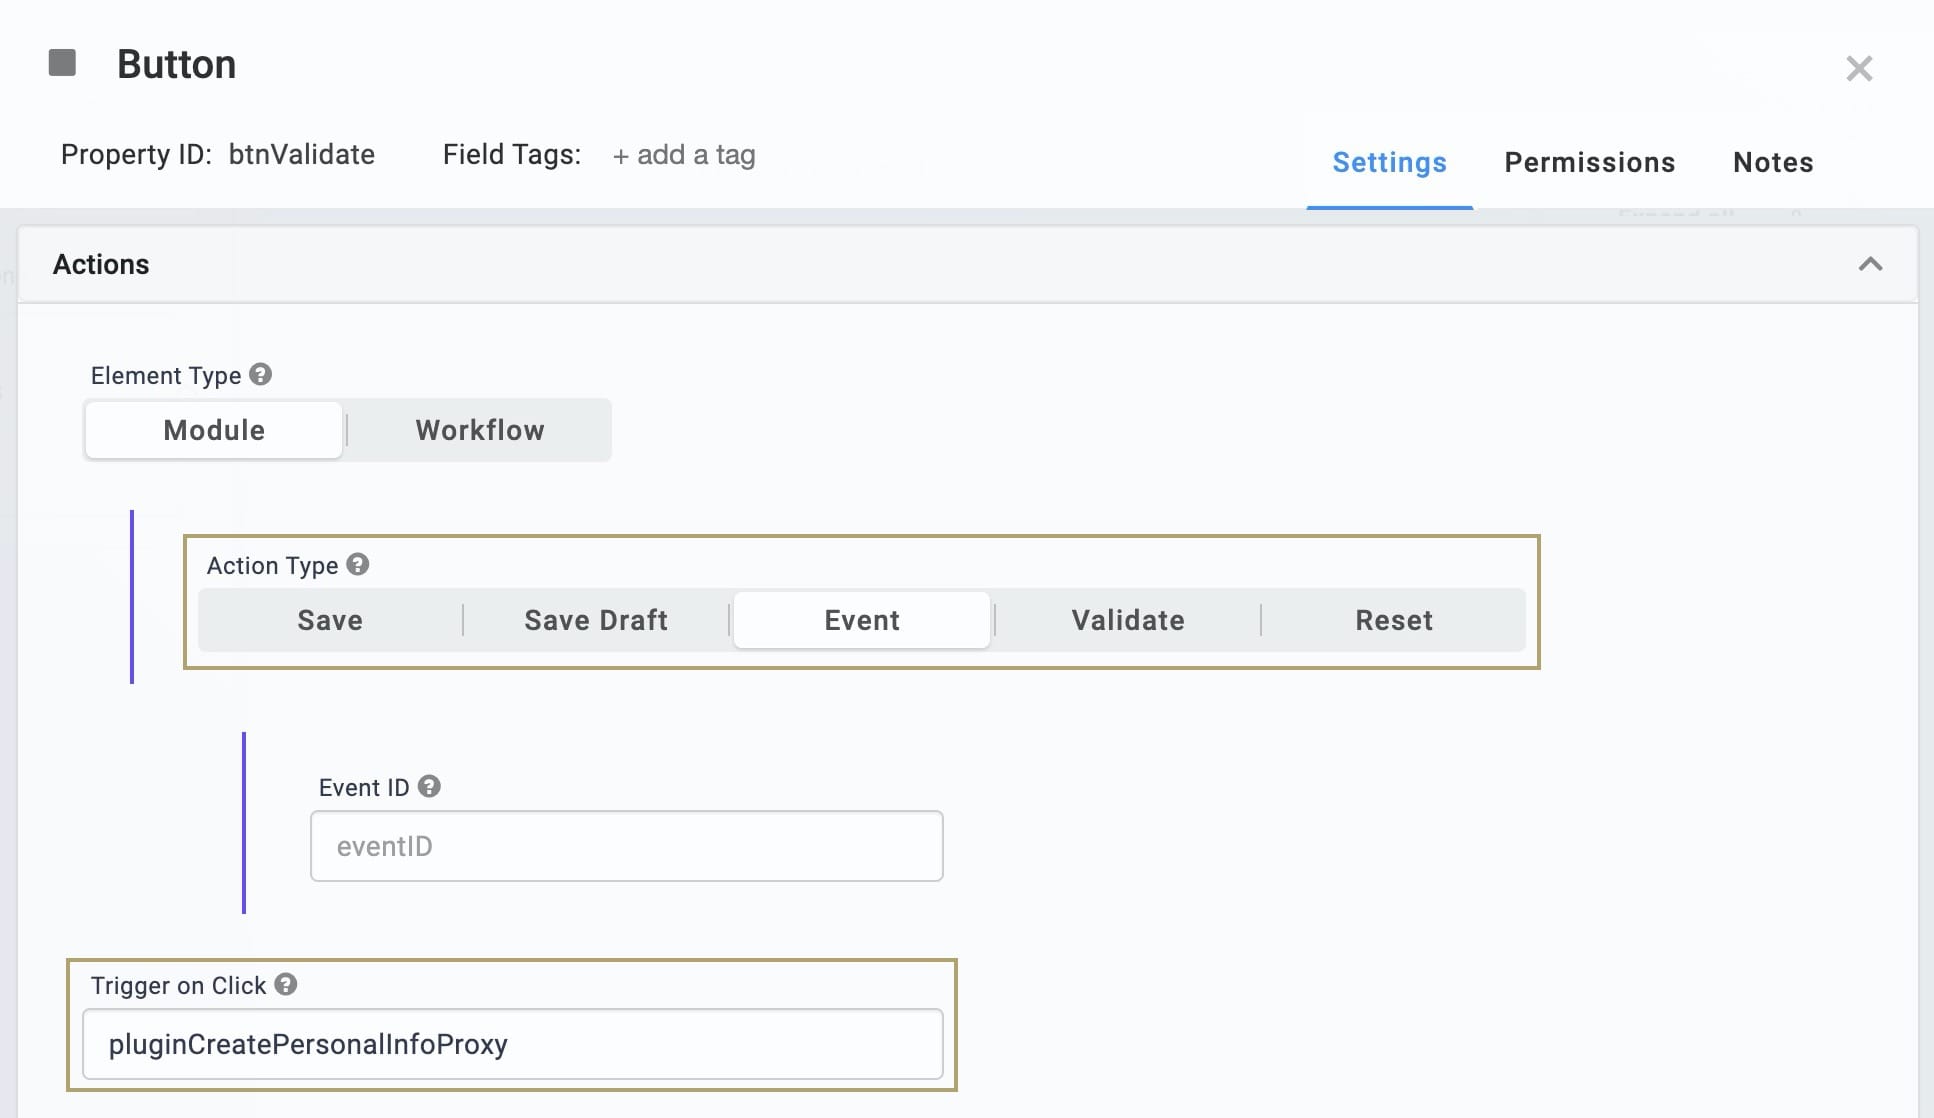
| 6. | Click Save. |
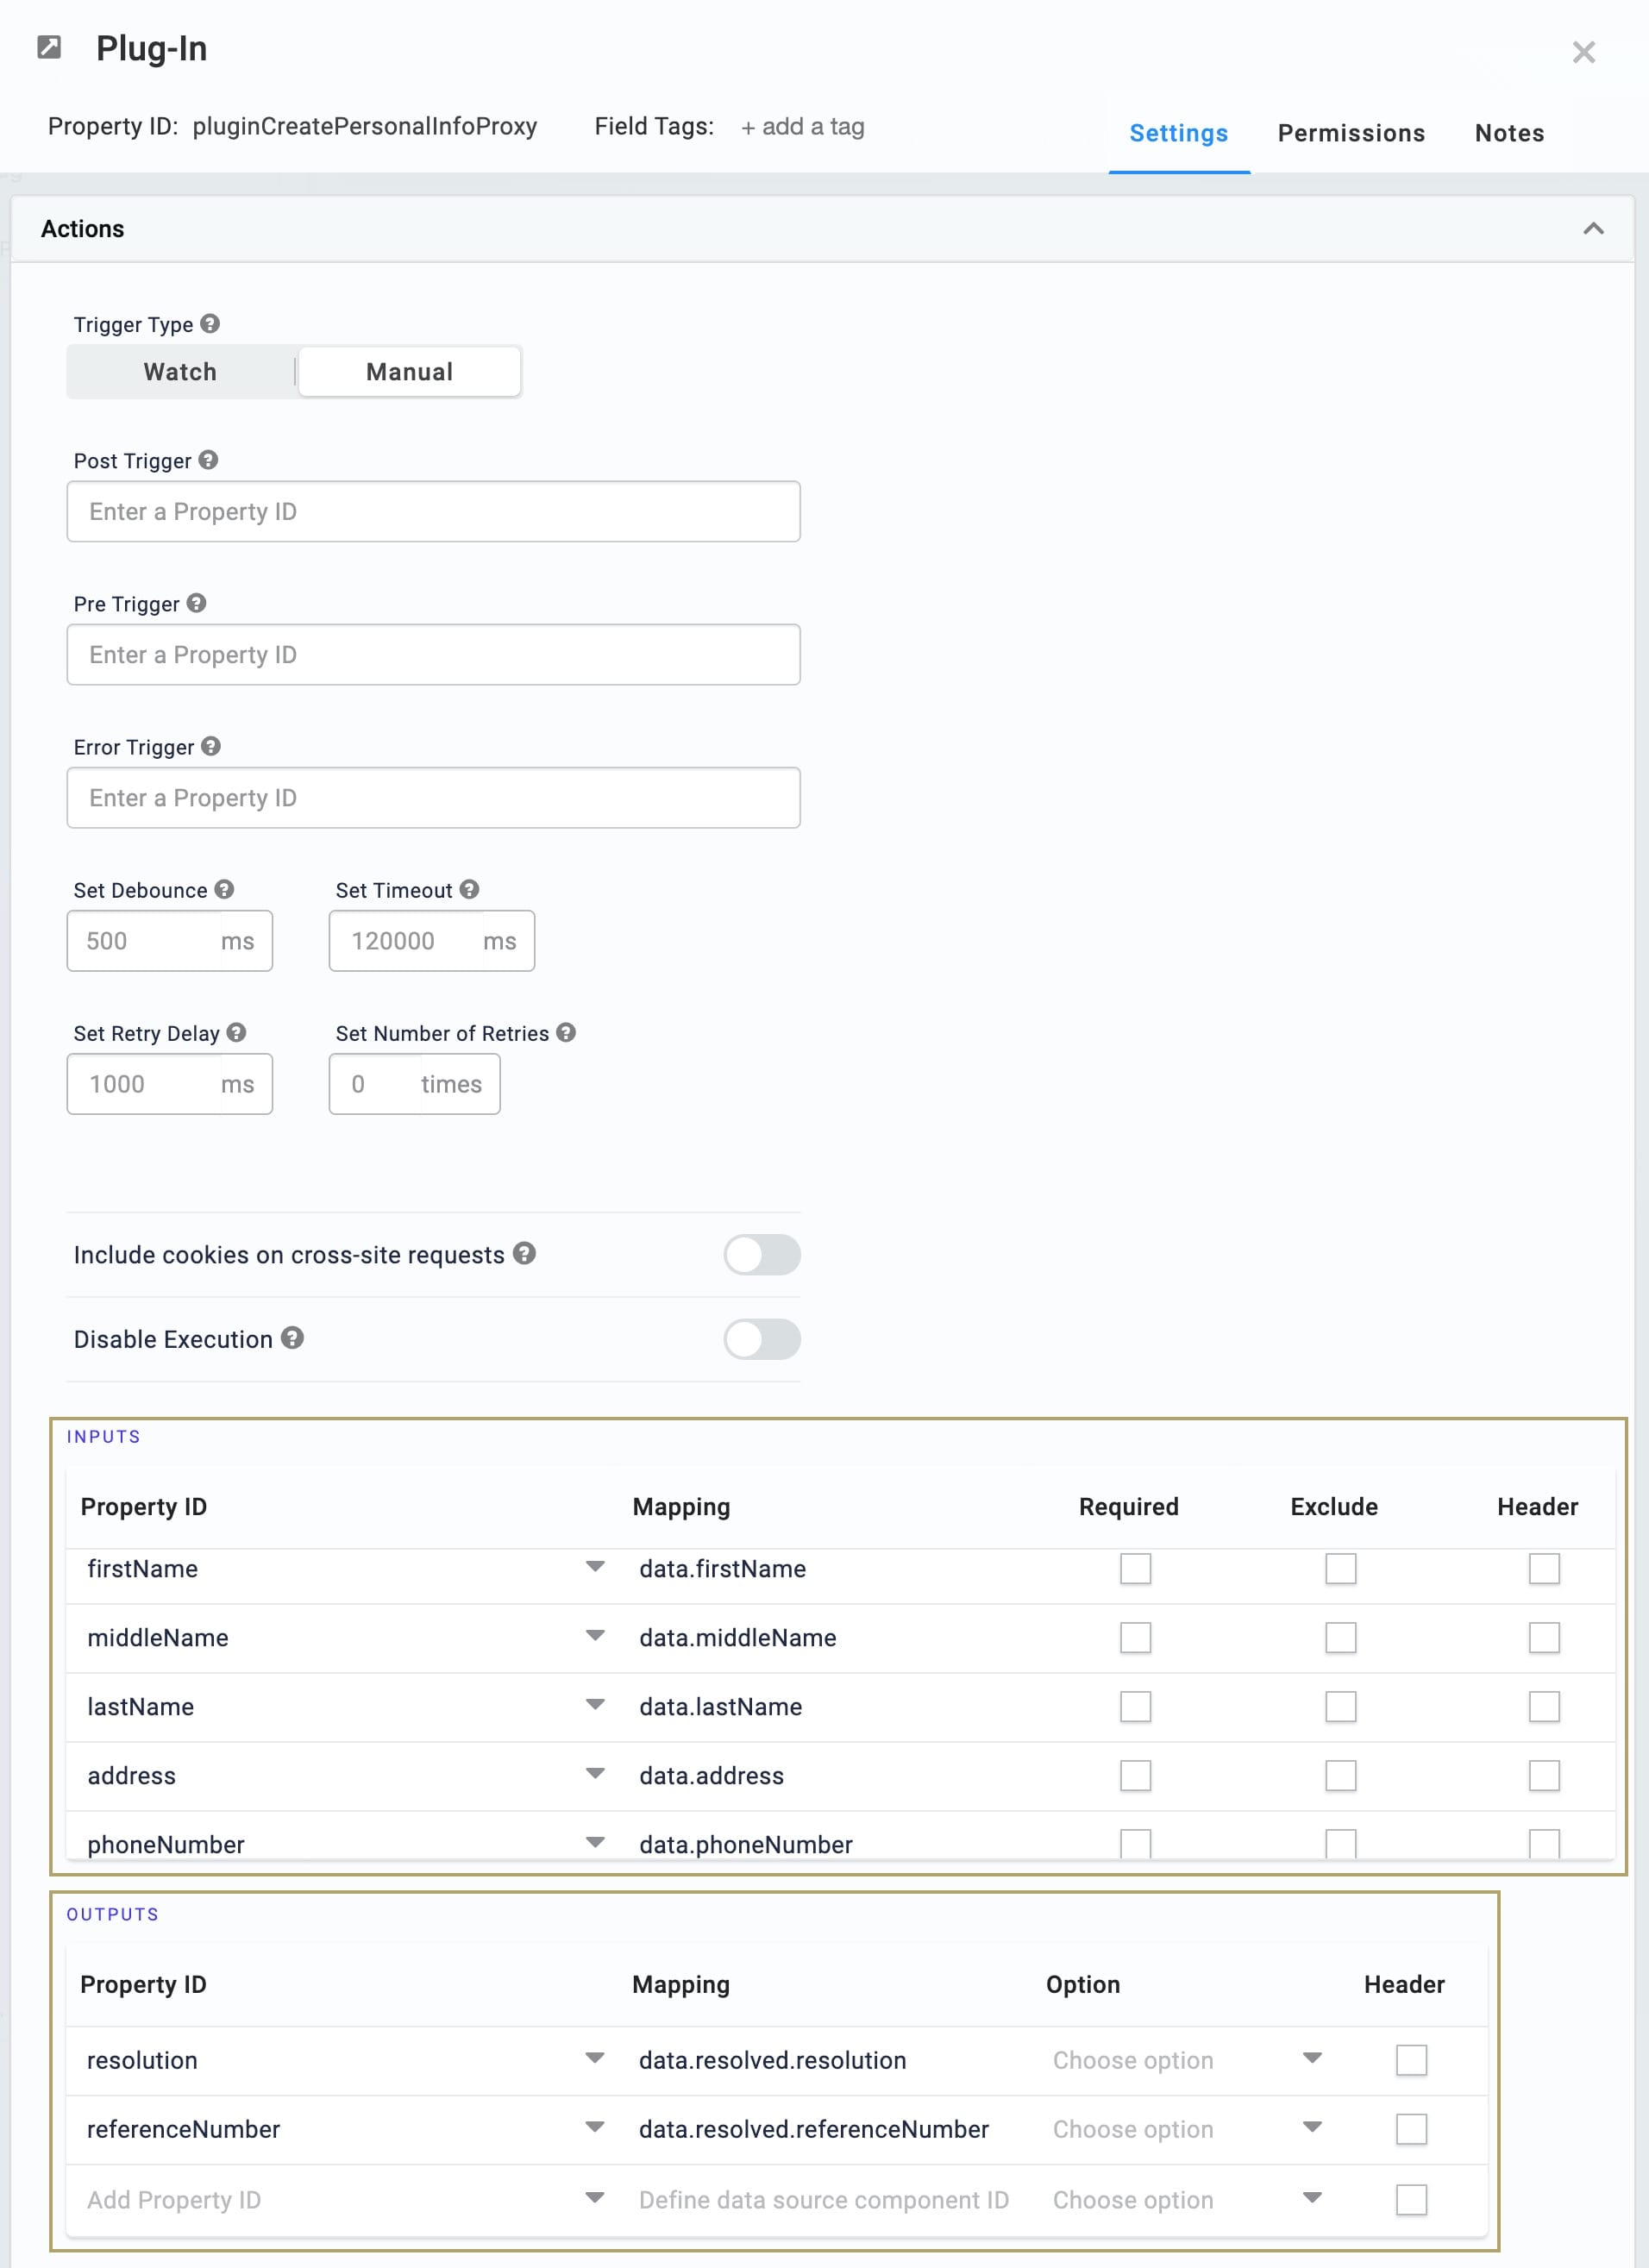
Configure the Plug-In Component
To pass the collected data from your Browser Module to the Proxy Module, you’ll use a Plug-In component. This Plug-In component also receives a response at the end of the data flow. Depending on this result, either a Success or an Error message shows for your end-user.
| 1. | Drag and drop a Plug-In component onto your canvas. Place your Plug-In component in the panelPersonalInfo Panel below your Button component. |
| 2. | Enter pluginCreatePersonalInfoProxy in the Property ID and Canvas Label Text. |
| 3. | In the Inputs table, enter the following: |
| ID | Mapping |
|---|---|
|
firstName |
data.firstName |
|
middleName |
data.middleName |
|
lastName |
data.lastName |
|
address |
data.address |
|
phoneNumber |
data.phoneNumber |
|
|
data.email |
| 4. | In the Outputs table, enter the following: |
| ID | Mapping |
|---|---|
|
resolution |
data.resolved.resolution |
|
referenceNumber |
data.resolved.referenceNumber |
The Outputs table links to the Hidden components you'll add in the next step.
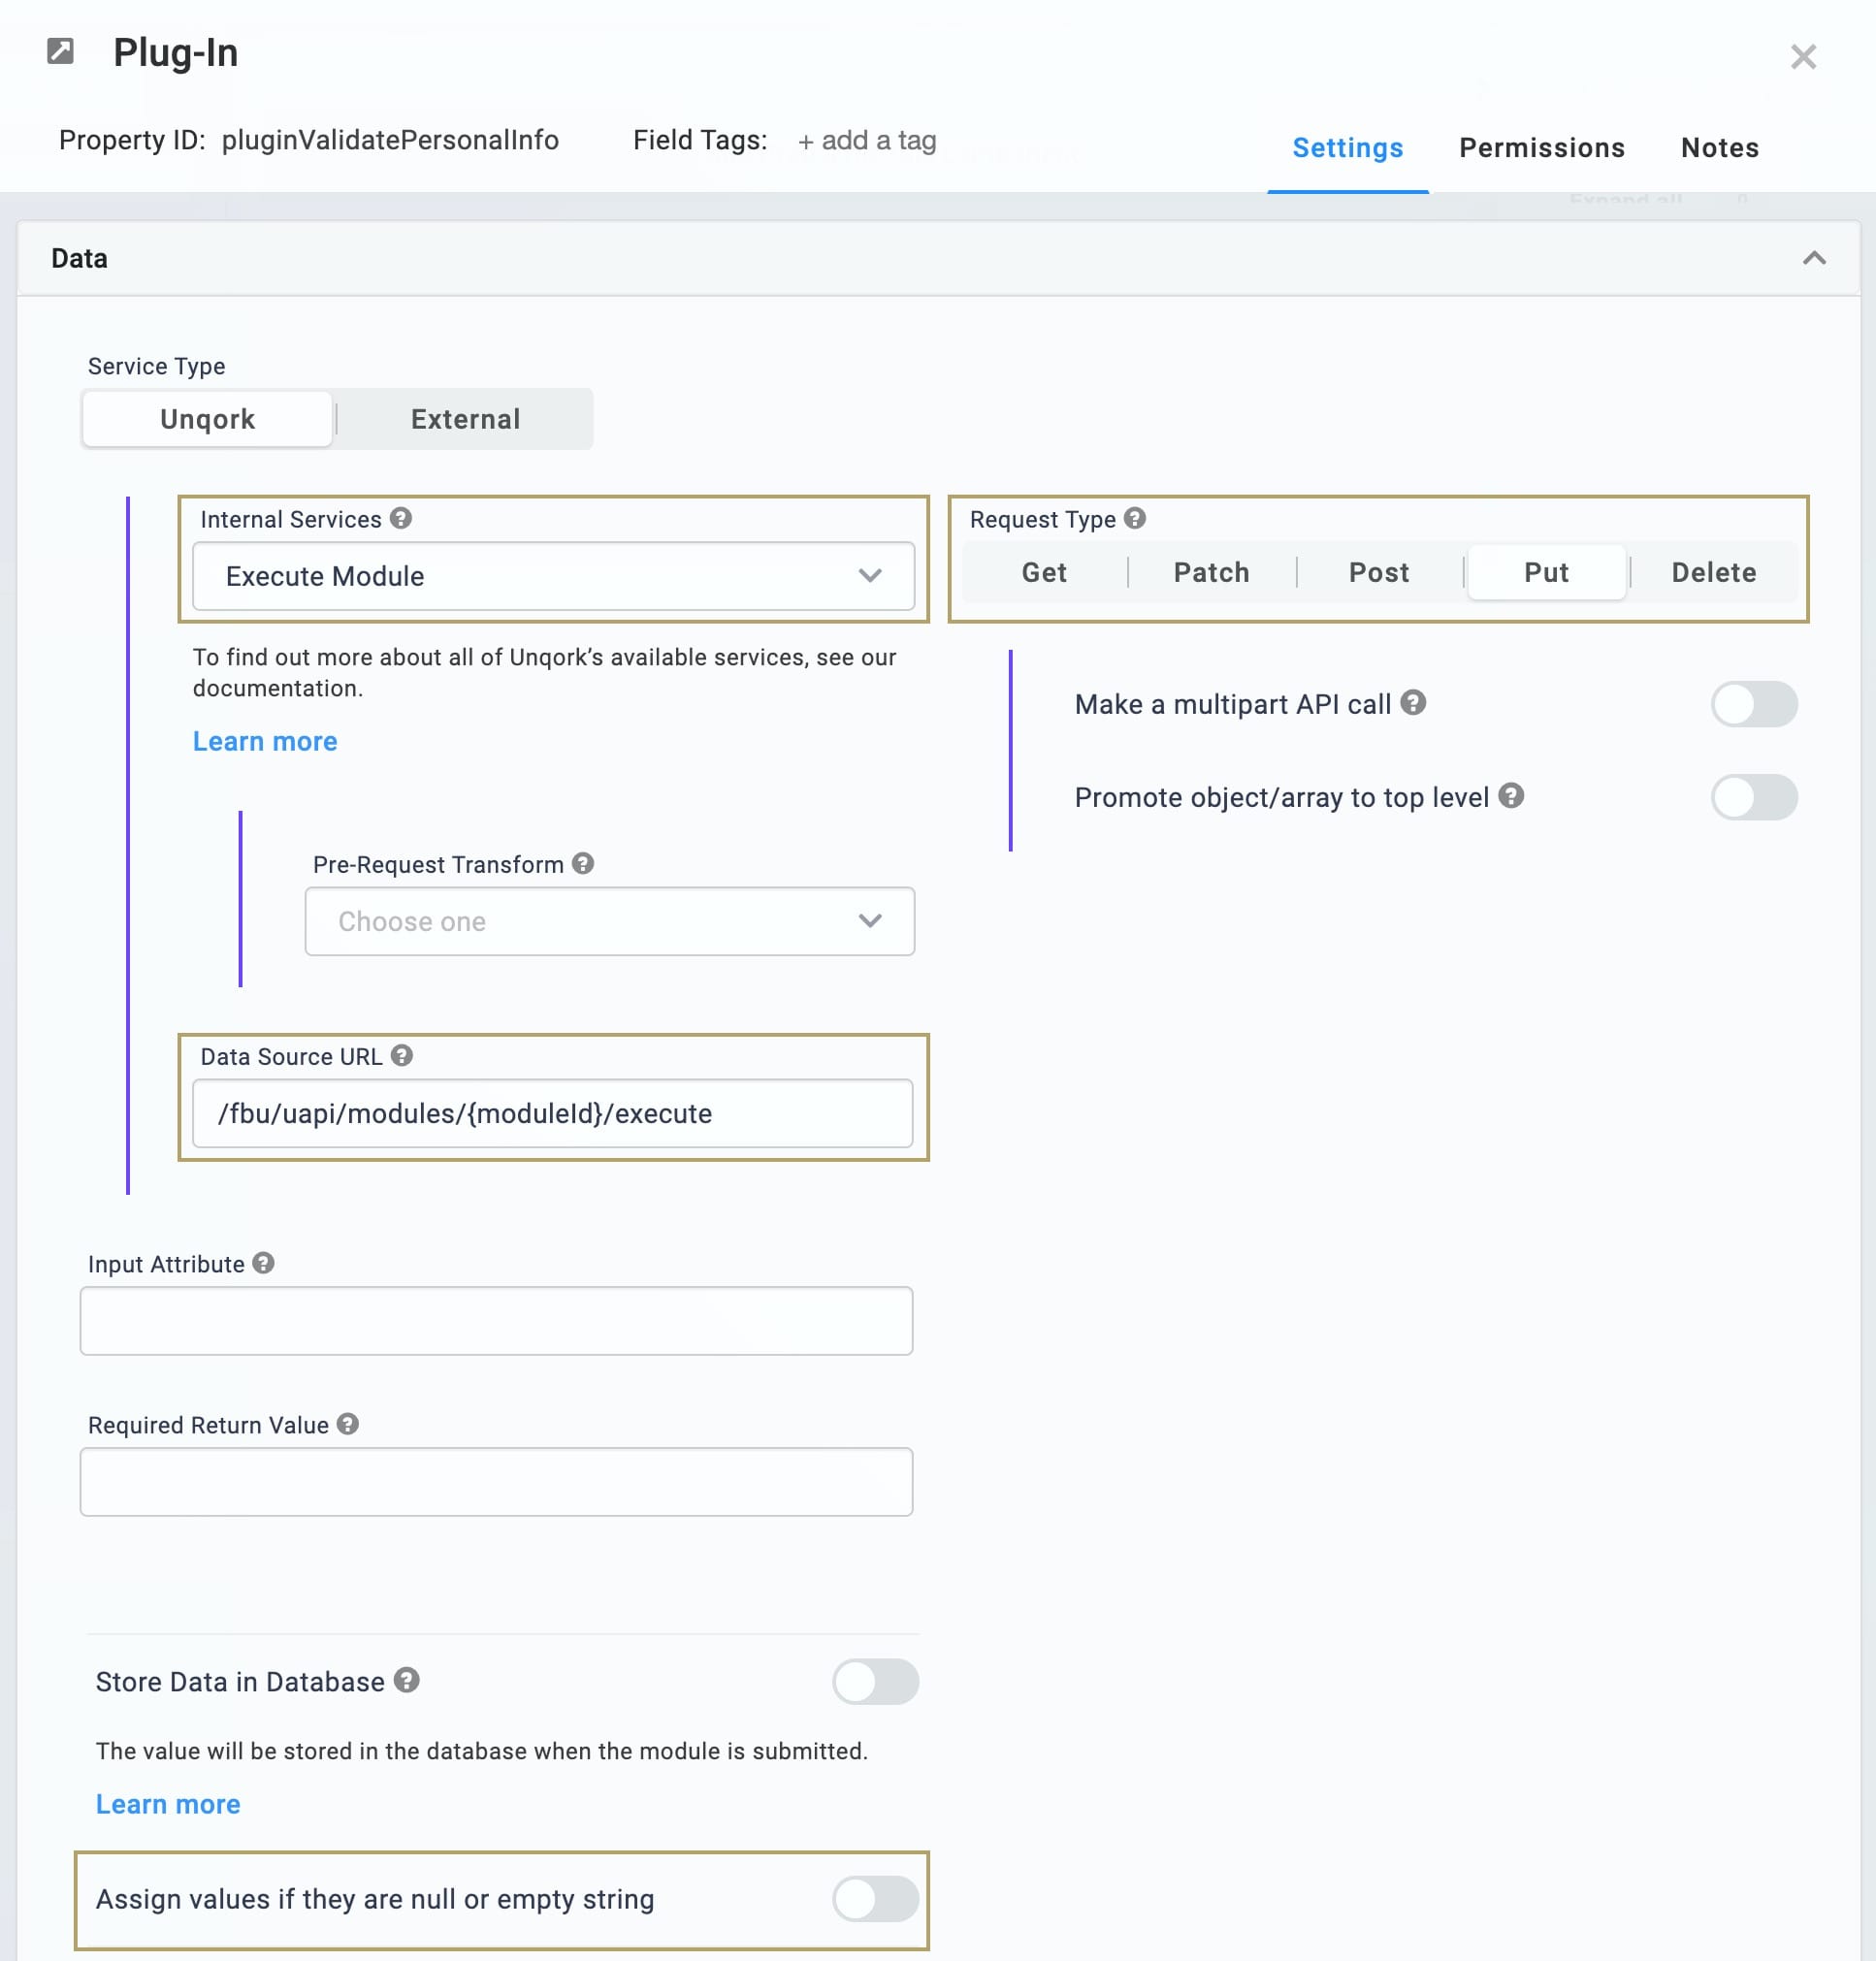
| 5. | Select Execute Module from the Internal Services drop-down. |
The Request Type and Data Source URL auto-populate. You'll see /fbu/uapi/modules/{moduleId}/execute as your Data Source URL. You'll return to this Plug-In once you have created your Proxy Module. Then you'll replace {moduleId} with the module ID for your Proxy Module.
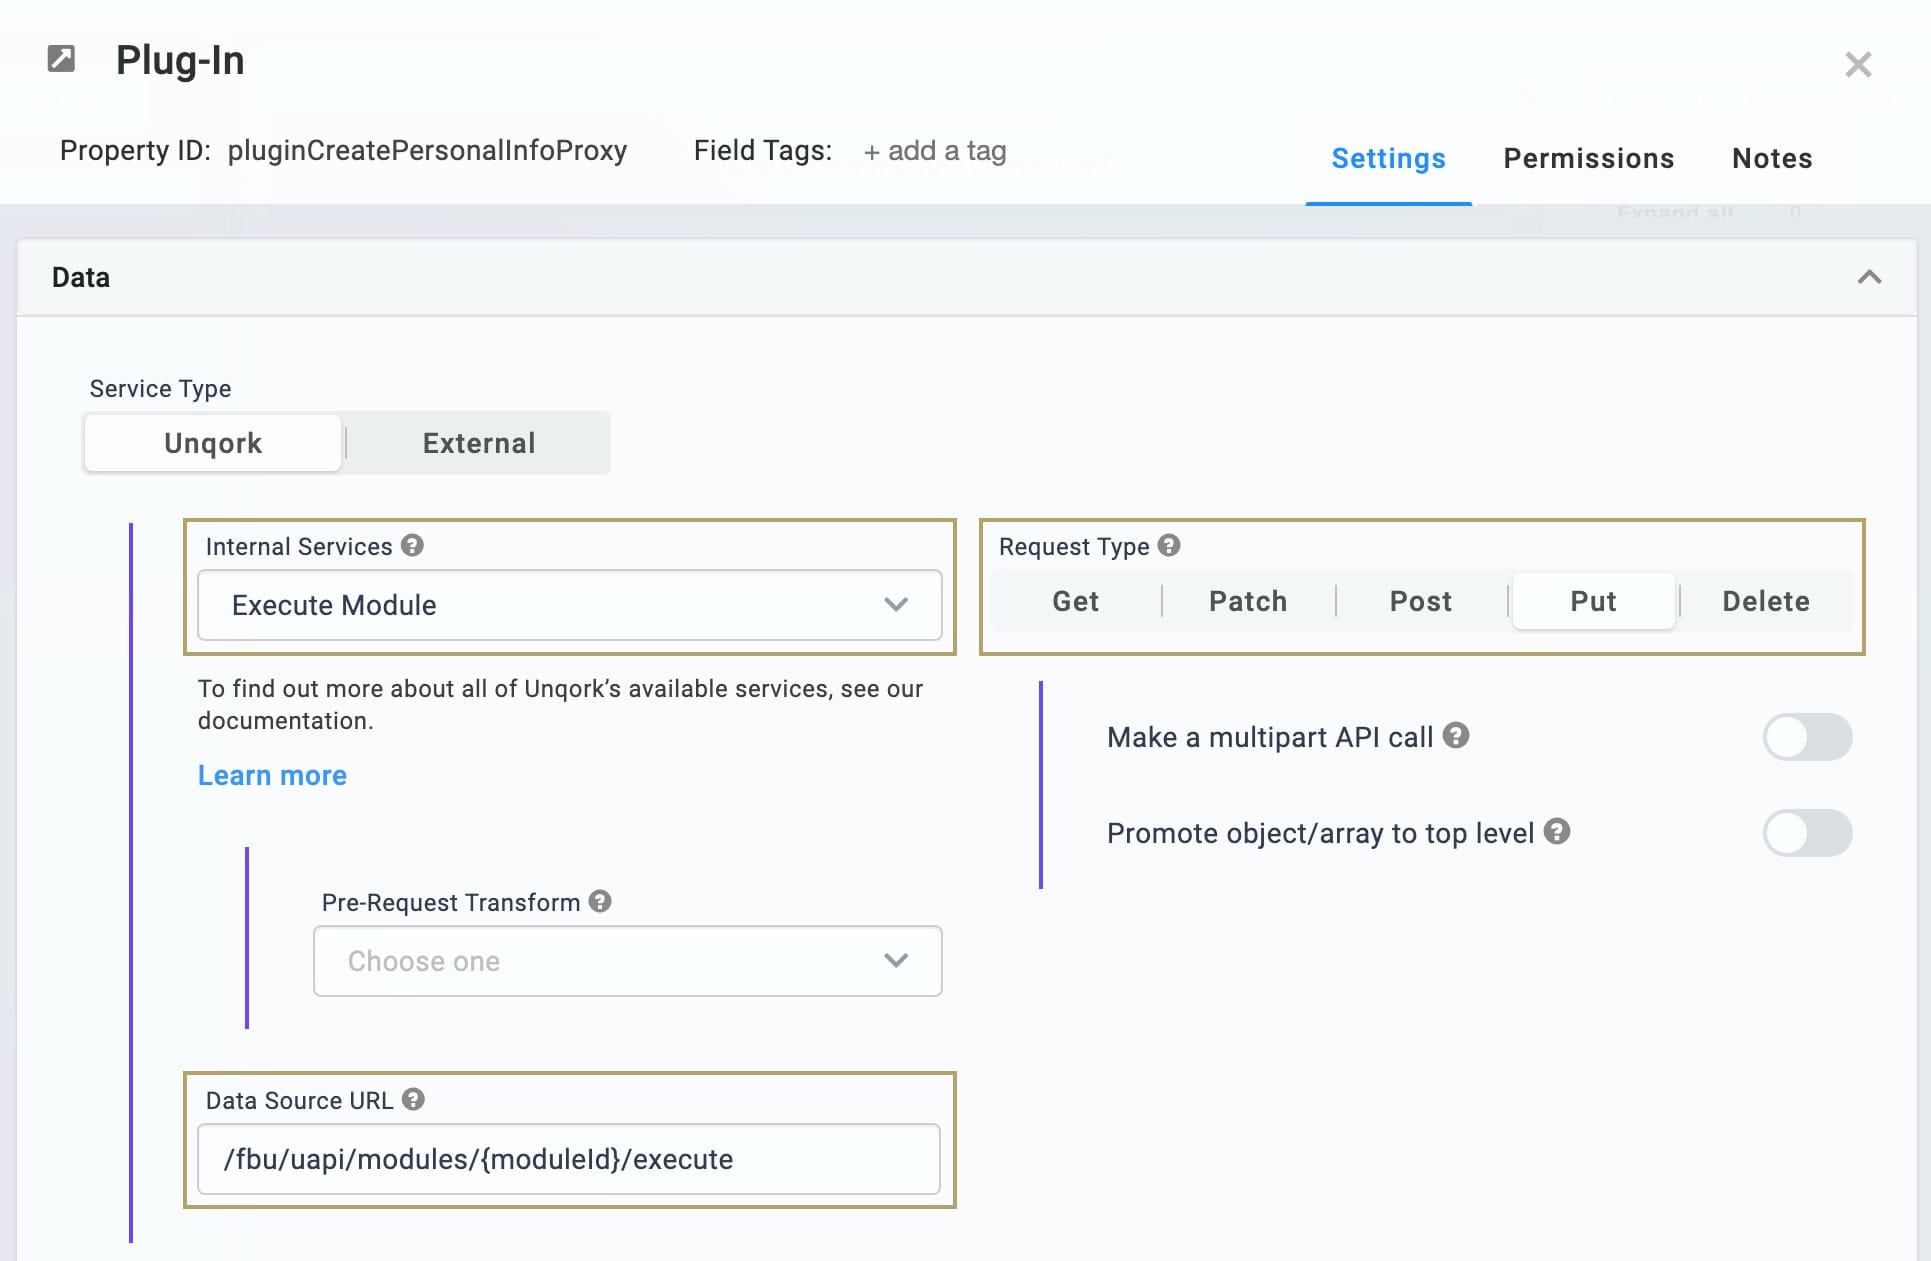
| 6. | Click Save. |
Configure the Hidden Components
Once finished, the data flow returns a result to the Browser Module. To receive that result, you’ll use Hidden components. The resolution manages the response from any module further in the data flow. And the referenceNumber holds the end-user's reference number once their submission saves.
| 1. | Drag and drop 2 Hidden components onto your canvas. Place your Hidden components in the panelPersonalInfo Panel below your Plug-In component. |
| 2. | Enter the following Property IDs and Canvas Label Text: |
| Property ID | Canvas Label Text |
|---|---|
|
resolution |
resolution |
|
referenceNumber |
referenceNumber |
| 3. | Set the Store Data in Database toggle to ON. |
| 4. | Save each component as you add it. |
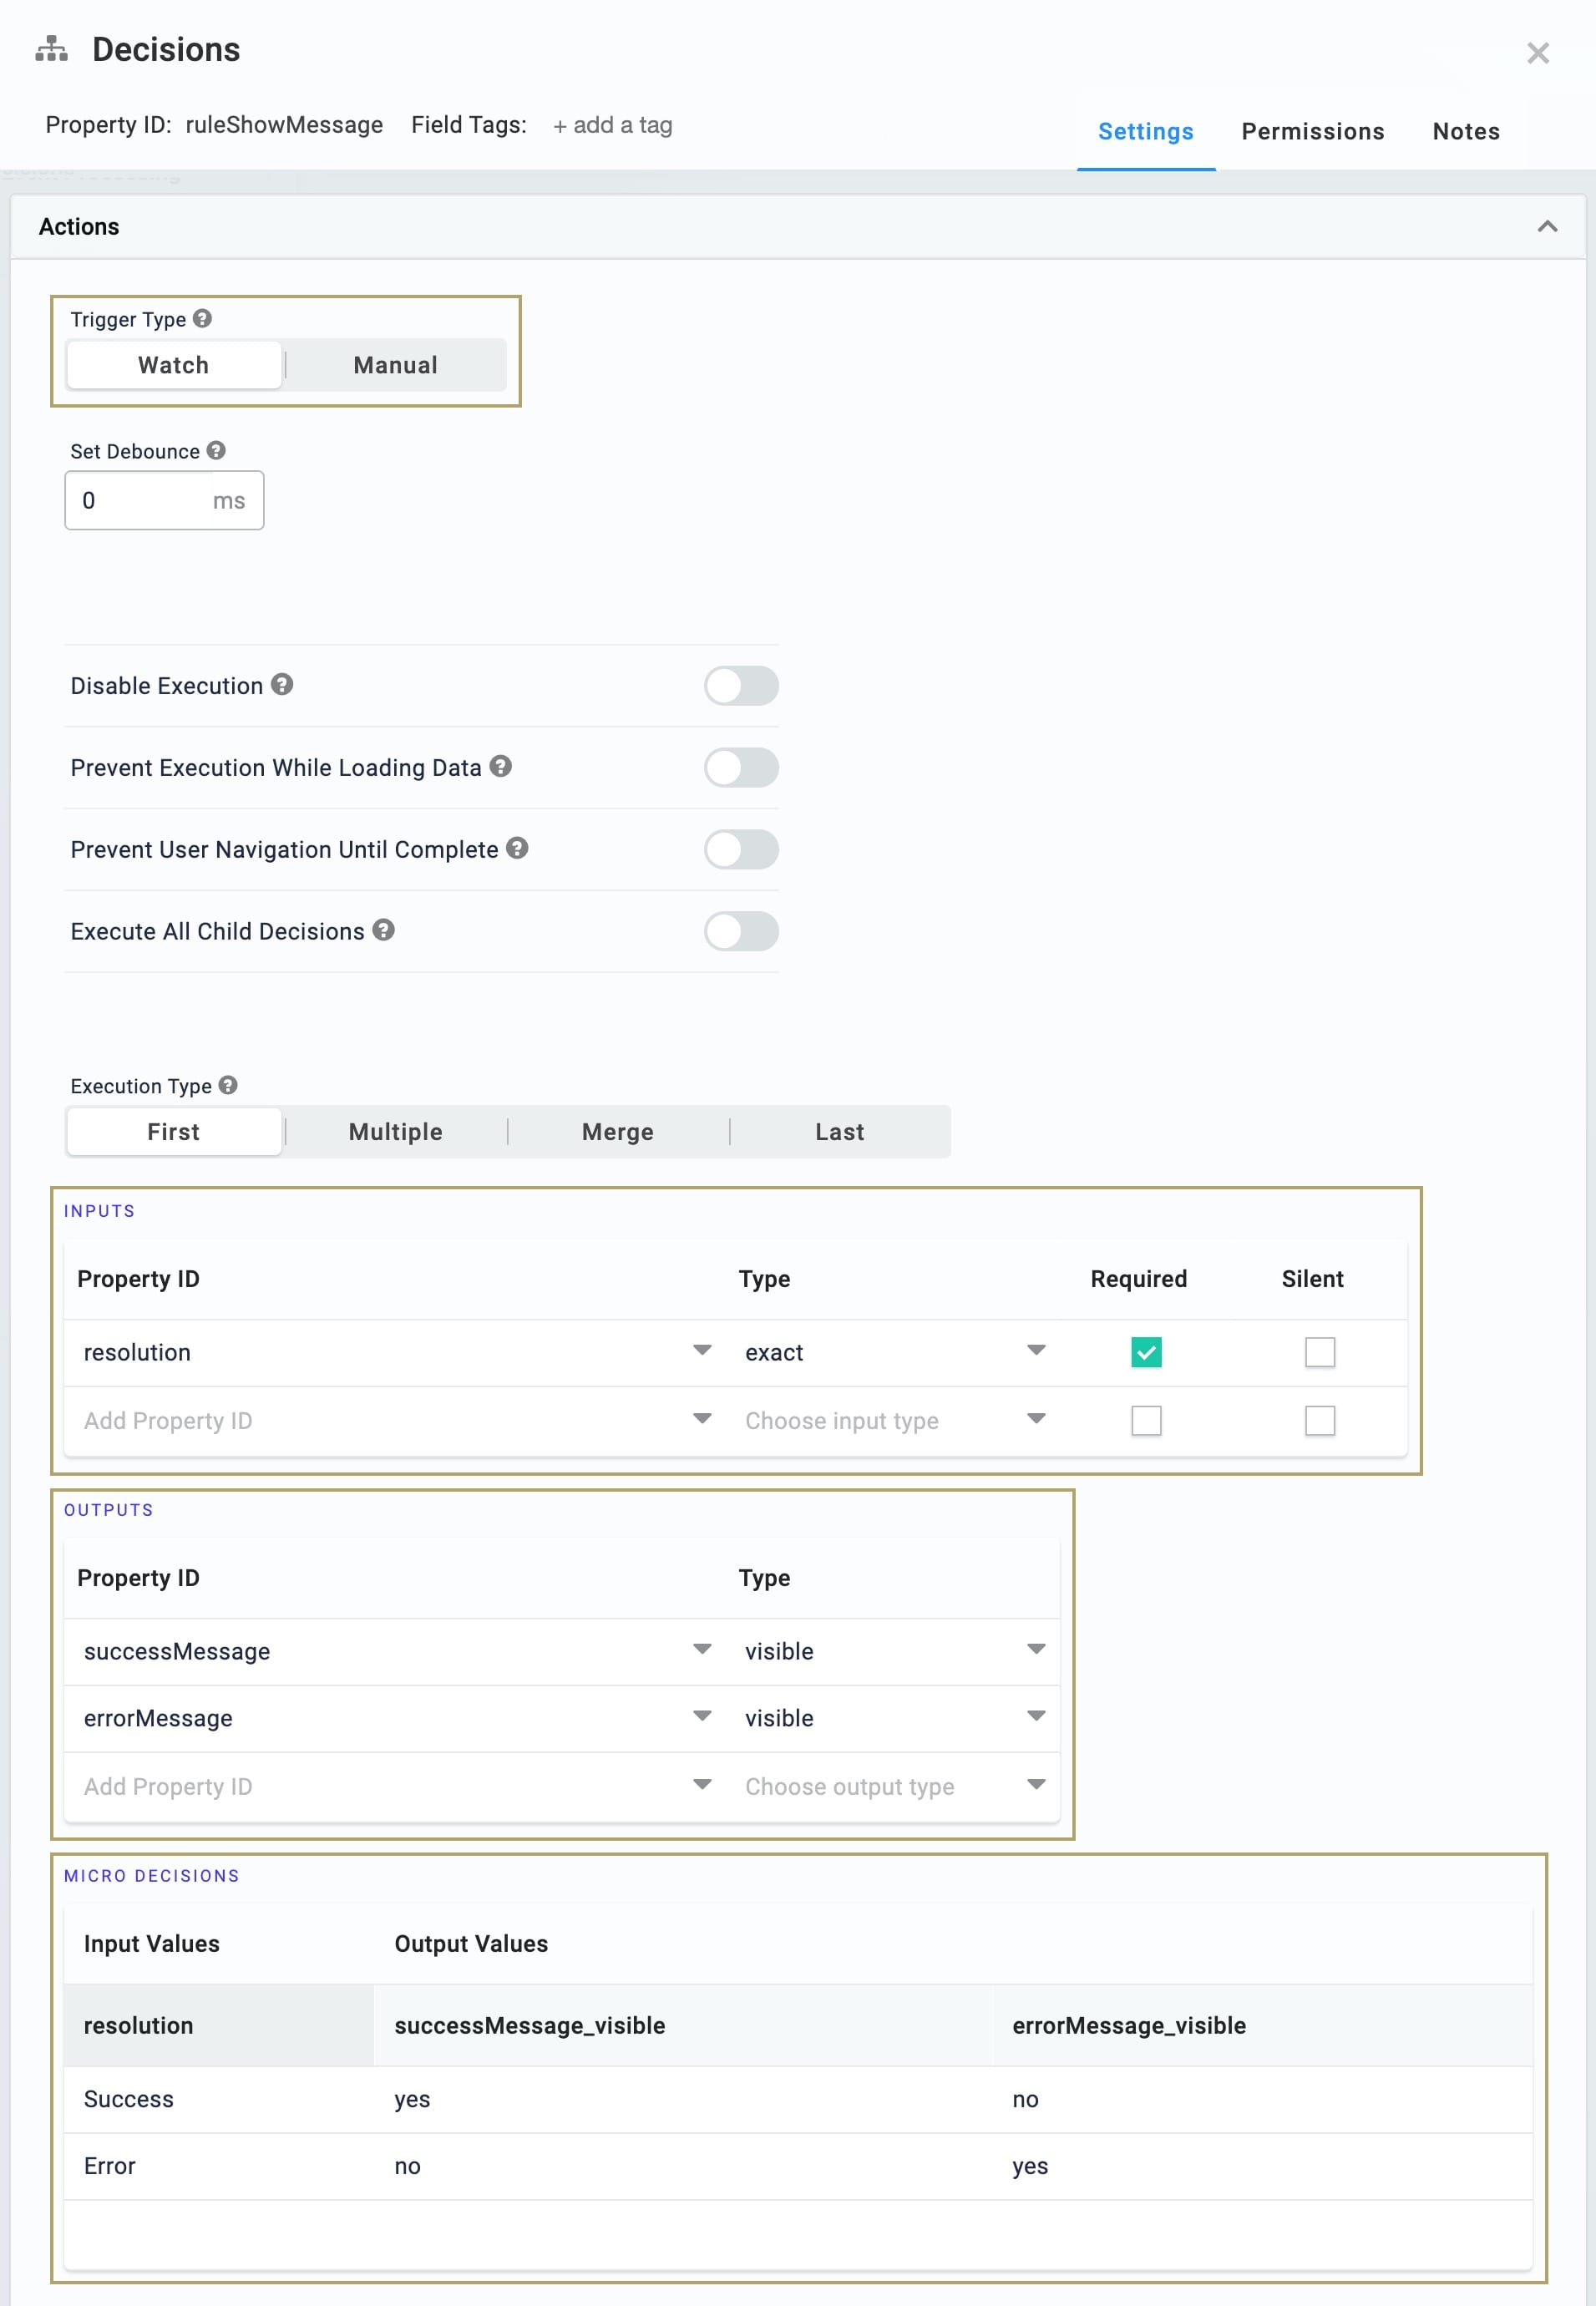
Configure the Decisions Component
At the end of the data flow, you need to reveal either a Success or an Error message to your end-user. To do this, you’ll use a Decisions component.
| 1. | Drag and drop a Decisions component onto your canvas. Place your Decisions component in the panelPersonalInfo Panel below your Hidden components. |
| 2. | Enter ruleShowMessage as the Property ID and Canvas Label Text. |
| 3. | Select Watch from the Trigger Type. |
| 4. | In the Inputstable, enter the following: |
| a. | Property ID: enter resolution. |
| b. | Type: enter exact. |
| c. | Required: Yes (checked). |
| 5. | In the Outputs table, enter the following: |
| Property ID | Type |
|---|---|
|
successMessage |
visible |
|
errorMessage |
visible |
The Property IDs here refer to the HTML Element components you'll add in the next few steps.
| 6. | In the Micro Decisions table, enter the following: |
| resolution | successMessage_visible | errorMessage_visible |
|---|---|---|
|
Success |
yes |
no |
|
Error |
no |
yes |
| 7. | Click Save. |
Configure the Success HTML Element Component
This HTML Element component acts as your Success message. This component remains hidden until the data flow returns a response.
| 1. | Drag and drop an HTML Element component onto your canvas. Place your HTML Element component in the panelPersonalInfo Panel below your Decisions component. |
| 2. | Enter successMessage in the Property ID. |
| 3. | Enter h4 in the HTML Tag. |
| 4. | Enter successMessage in the Container Custom Class. |
| 5. | Enter Your submission is complete! in the Content field. |
This message is only an example. Your message can read as anything you’d like.
| 6. | Set the Hide Element toggle to ON. |
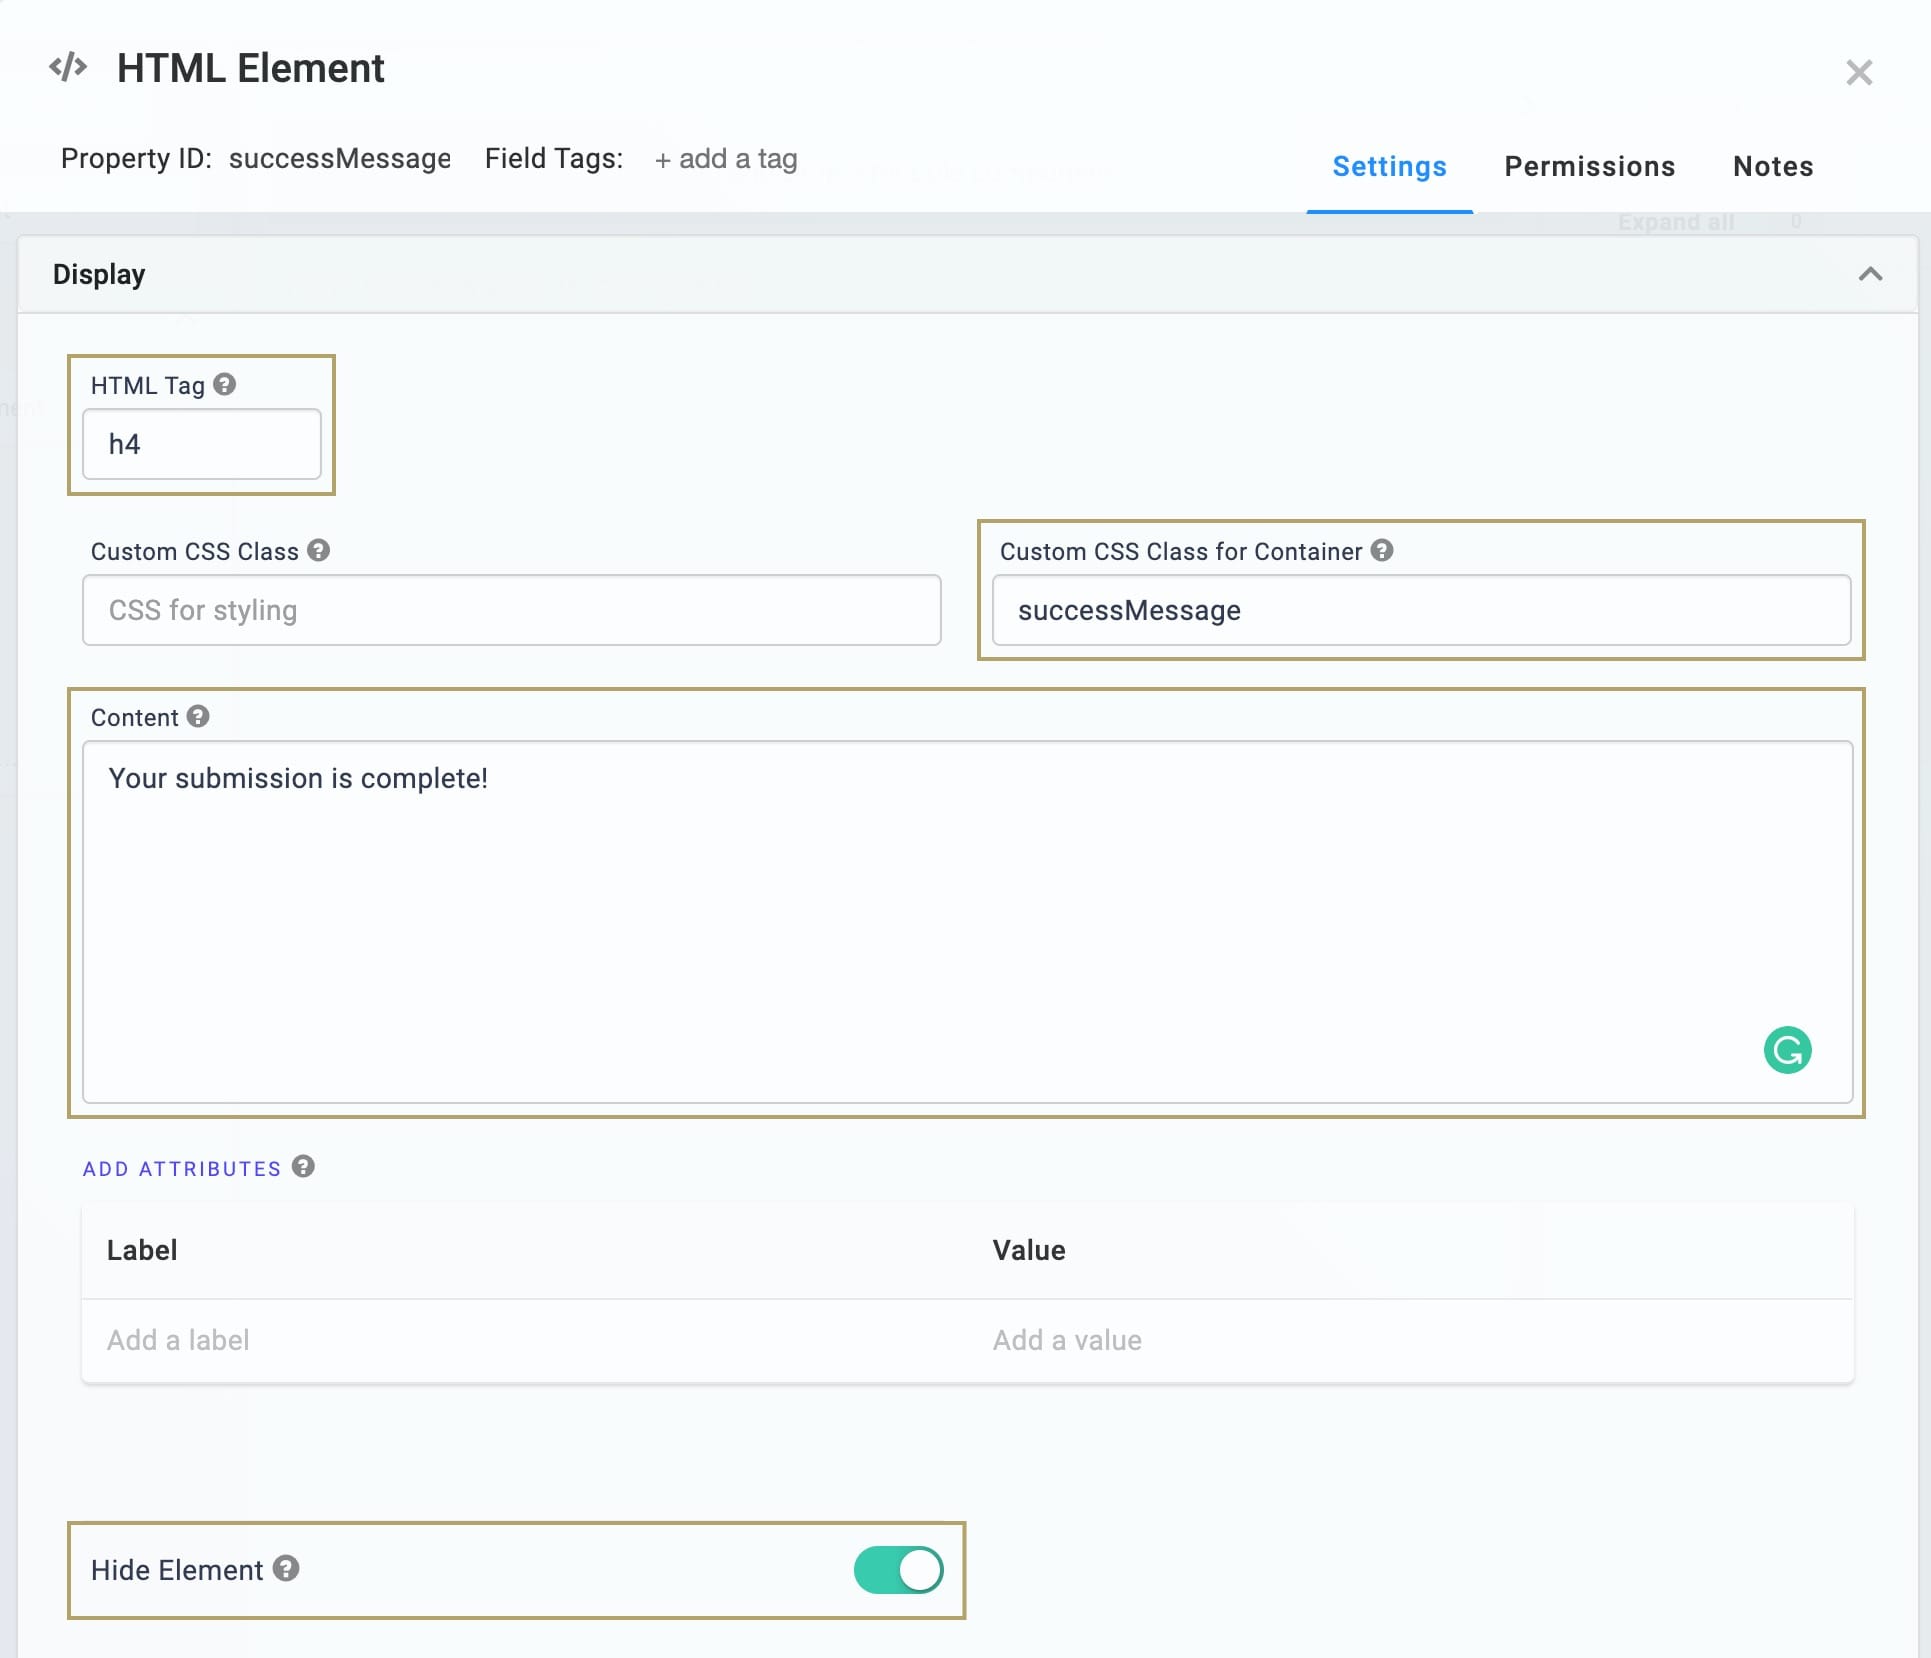
| 7. | Click Save. |
Configure the Error HTML Element Component
This HTML Element component acts as your Error message. This component remains hidden until the data flow returns a response.
| 1. | Drag and drop a second HTML Element component onto your canvas. Place your HTML Element component in the panelPersonalInfo Panel below your successMessage HTML Element component. |
| 2. | Enter errorMessage in the Property ID. |
| 3. | Enter h4in the HTML Tag. |
| 4. | Enter errorMessage in the Container Custom Class. |
| 5. | Enter We're experiencing some issues with the submission. Please review the information you provided. in the Content field. |
This message is only an example. Your message can read as anything you’d like.
| 6. | Set the Hide Element toggle to ON. |
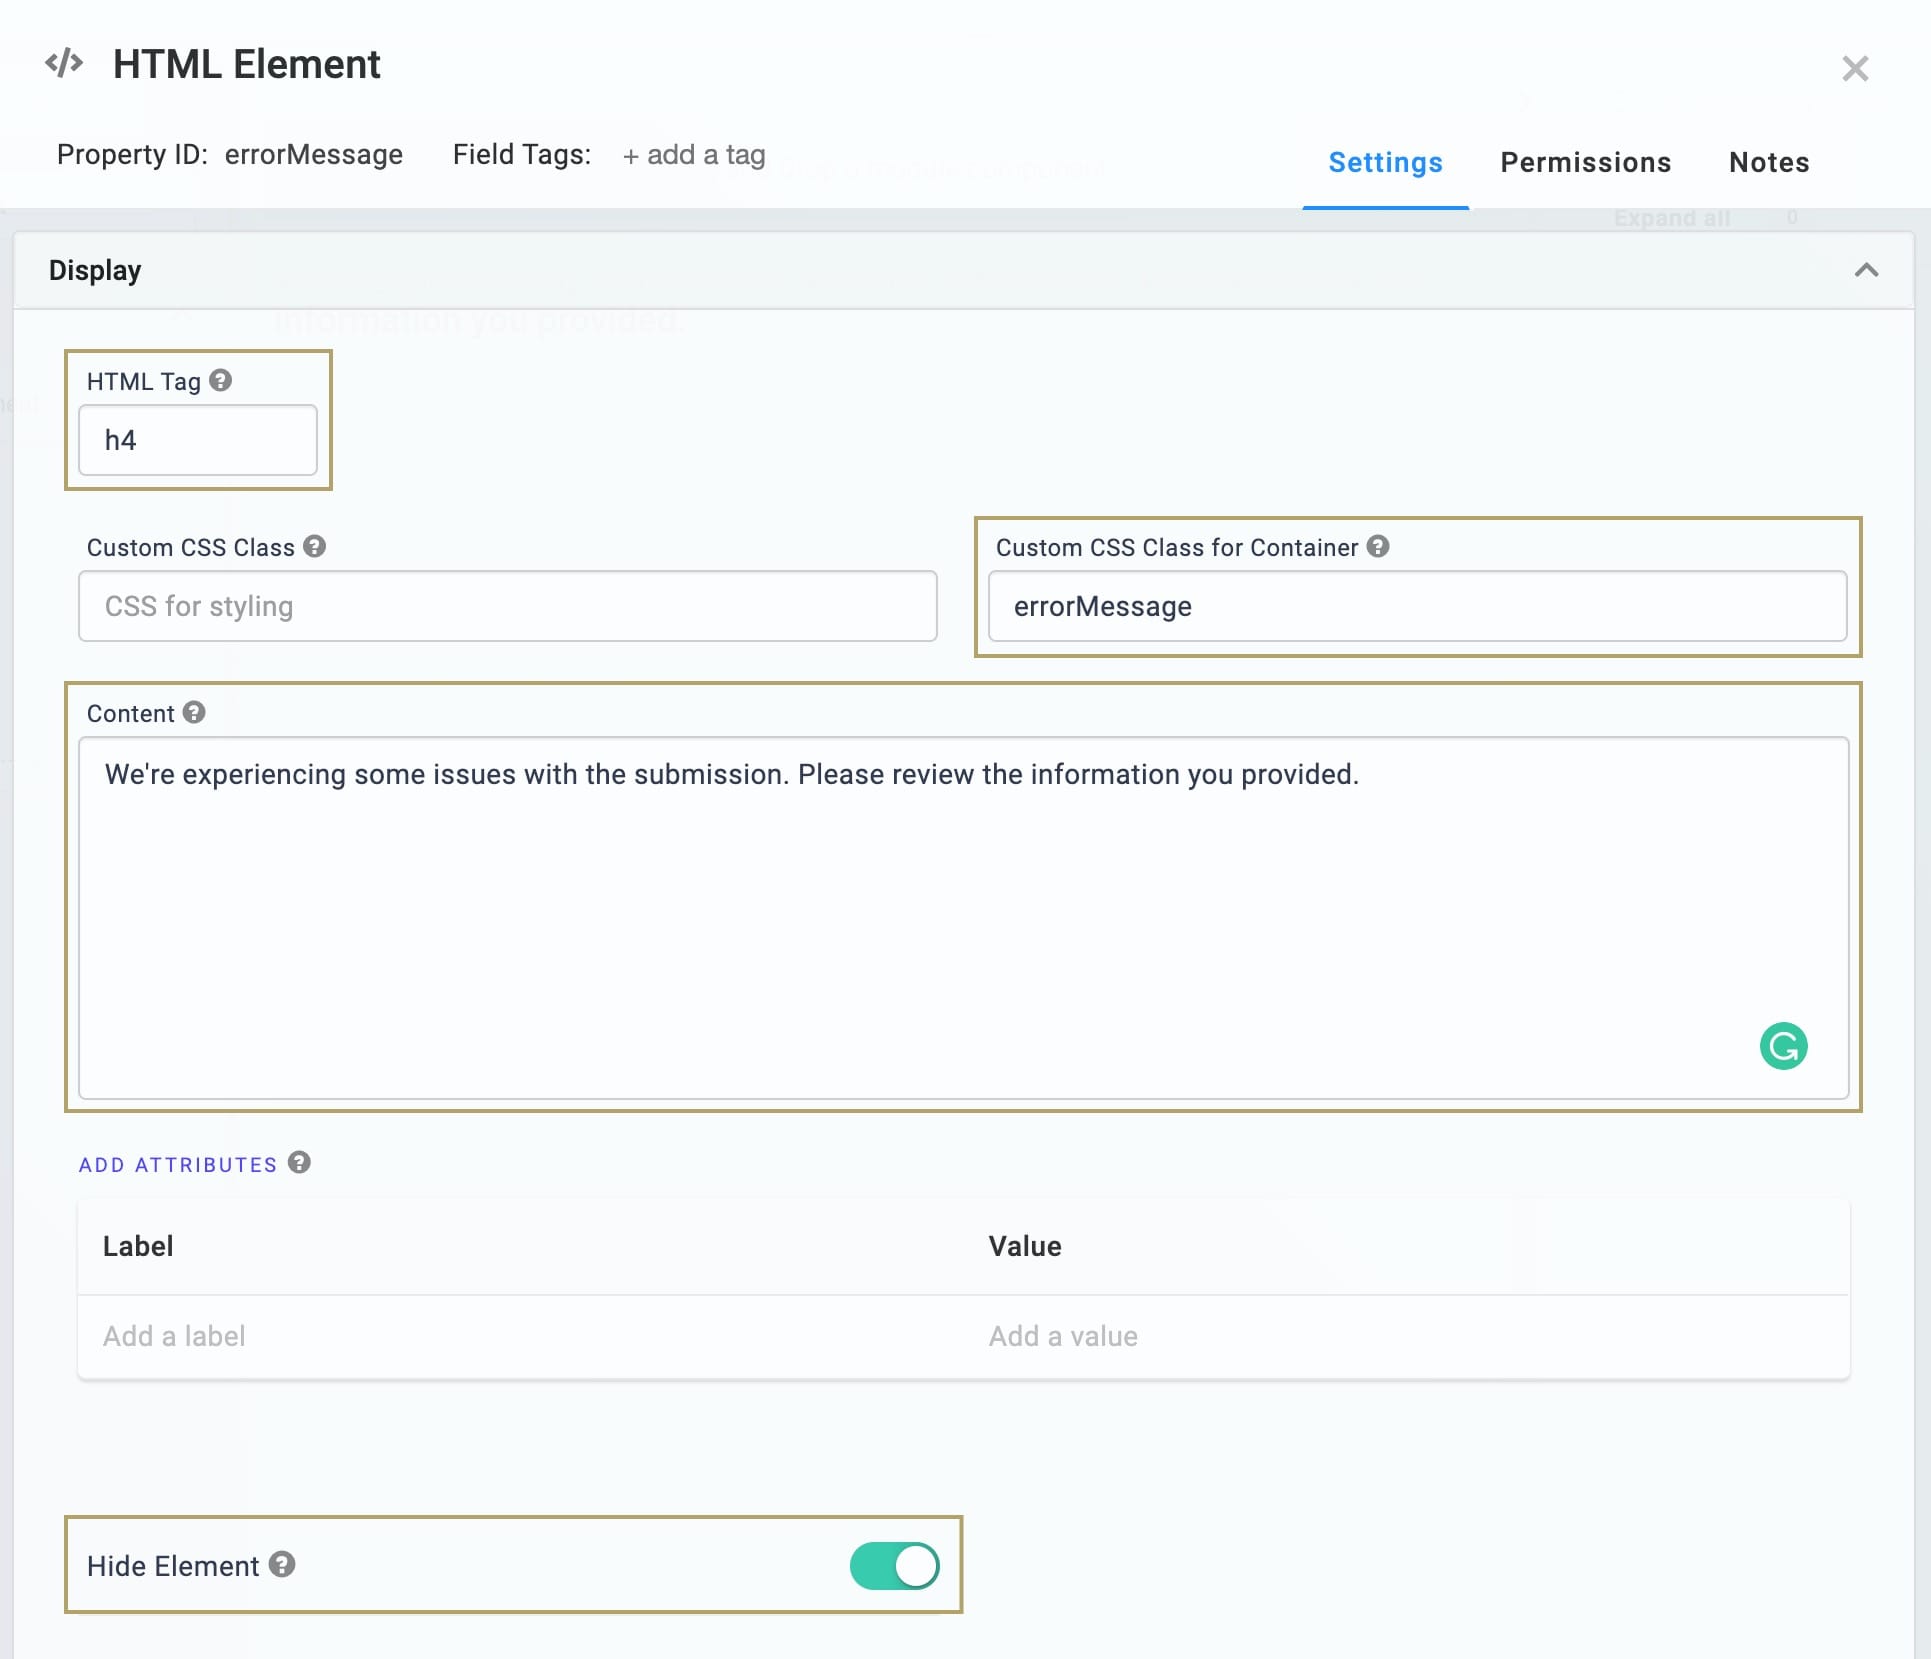
| 7. | Click Save. |
| 8. | Save your module. |
You now have a user-facing Browser Module to collect your end-user’s personal information. Your Browser Module starts the data flow when your end-user clicks the Submit button. You can preview your module in Express View.
You can find the completed Browser Module for this use case here: https://training.unqork.io/#/form/5ebbf5b67b2213020fc9ed98/edit.
Set Up the Proxy Module
After a successful submission in the Browser Module, the end-user’s data passes to the Proxy Module.
To set up the Proxy Module, you’ll need:
- 3 Panel components
- 9 Hidden components
- 2 Initializer components
- 1 Plug-In component
Here's how your Proxy Module will look in the Module Builder:
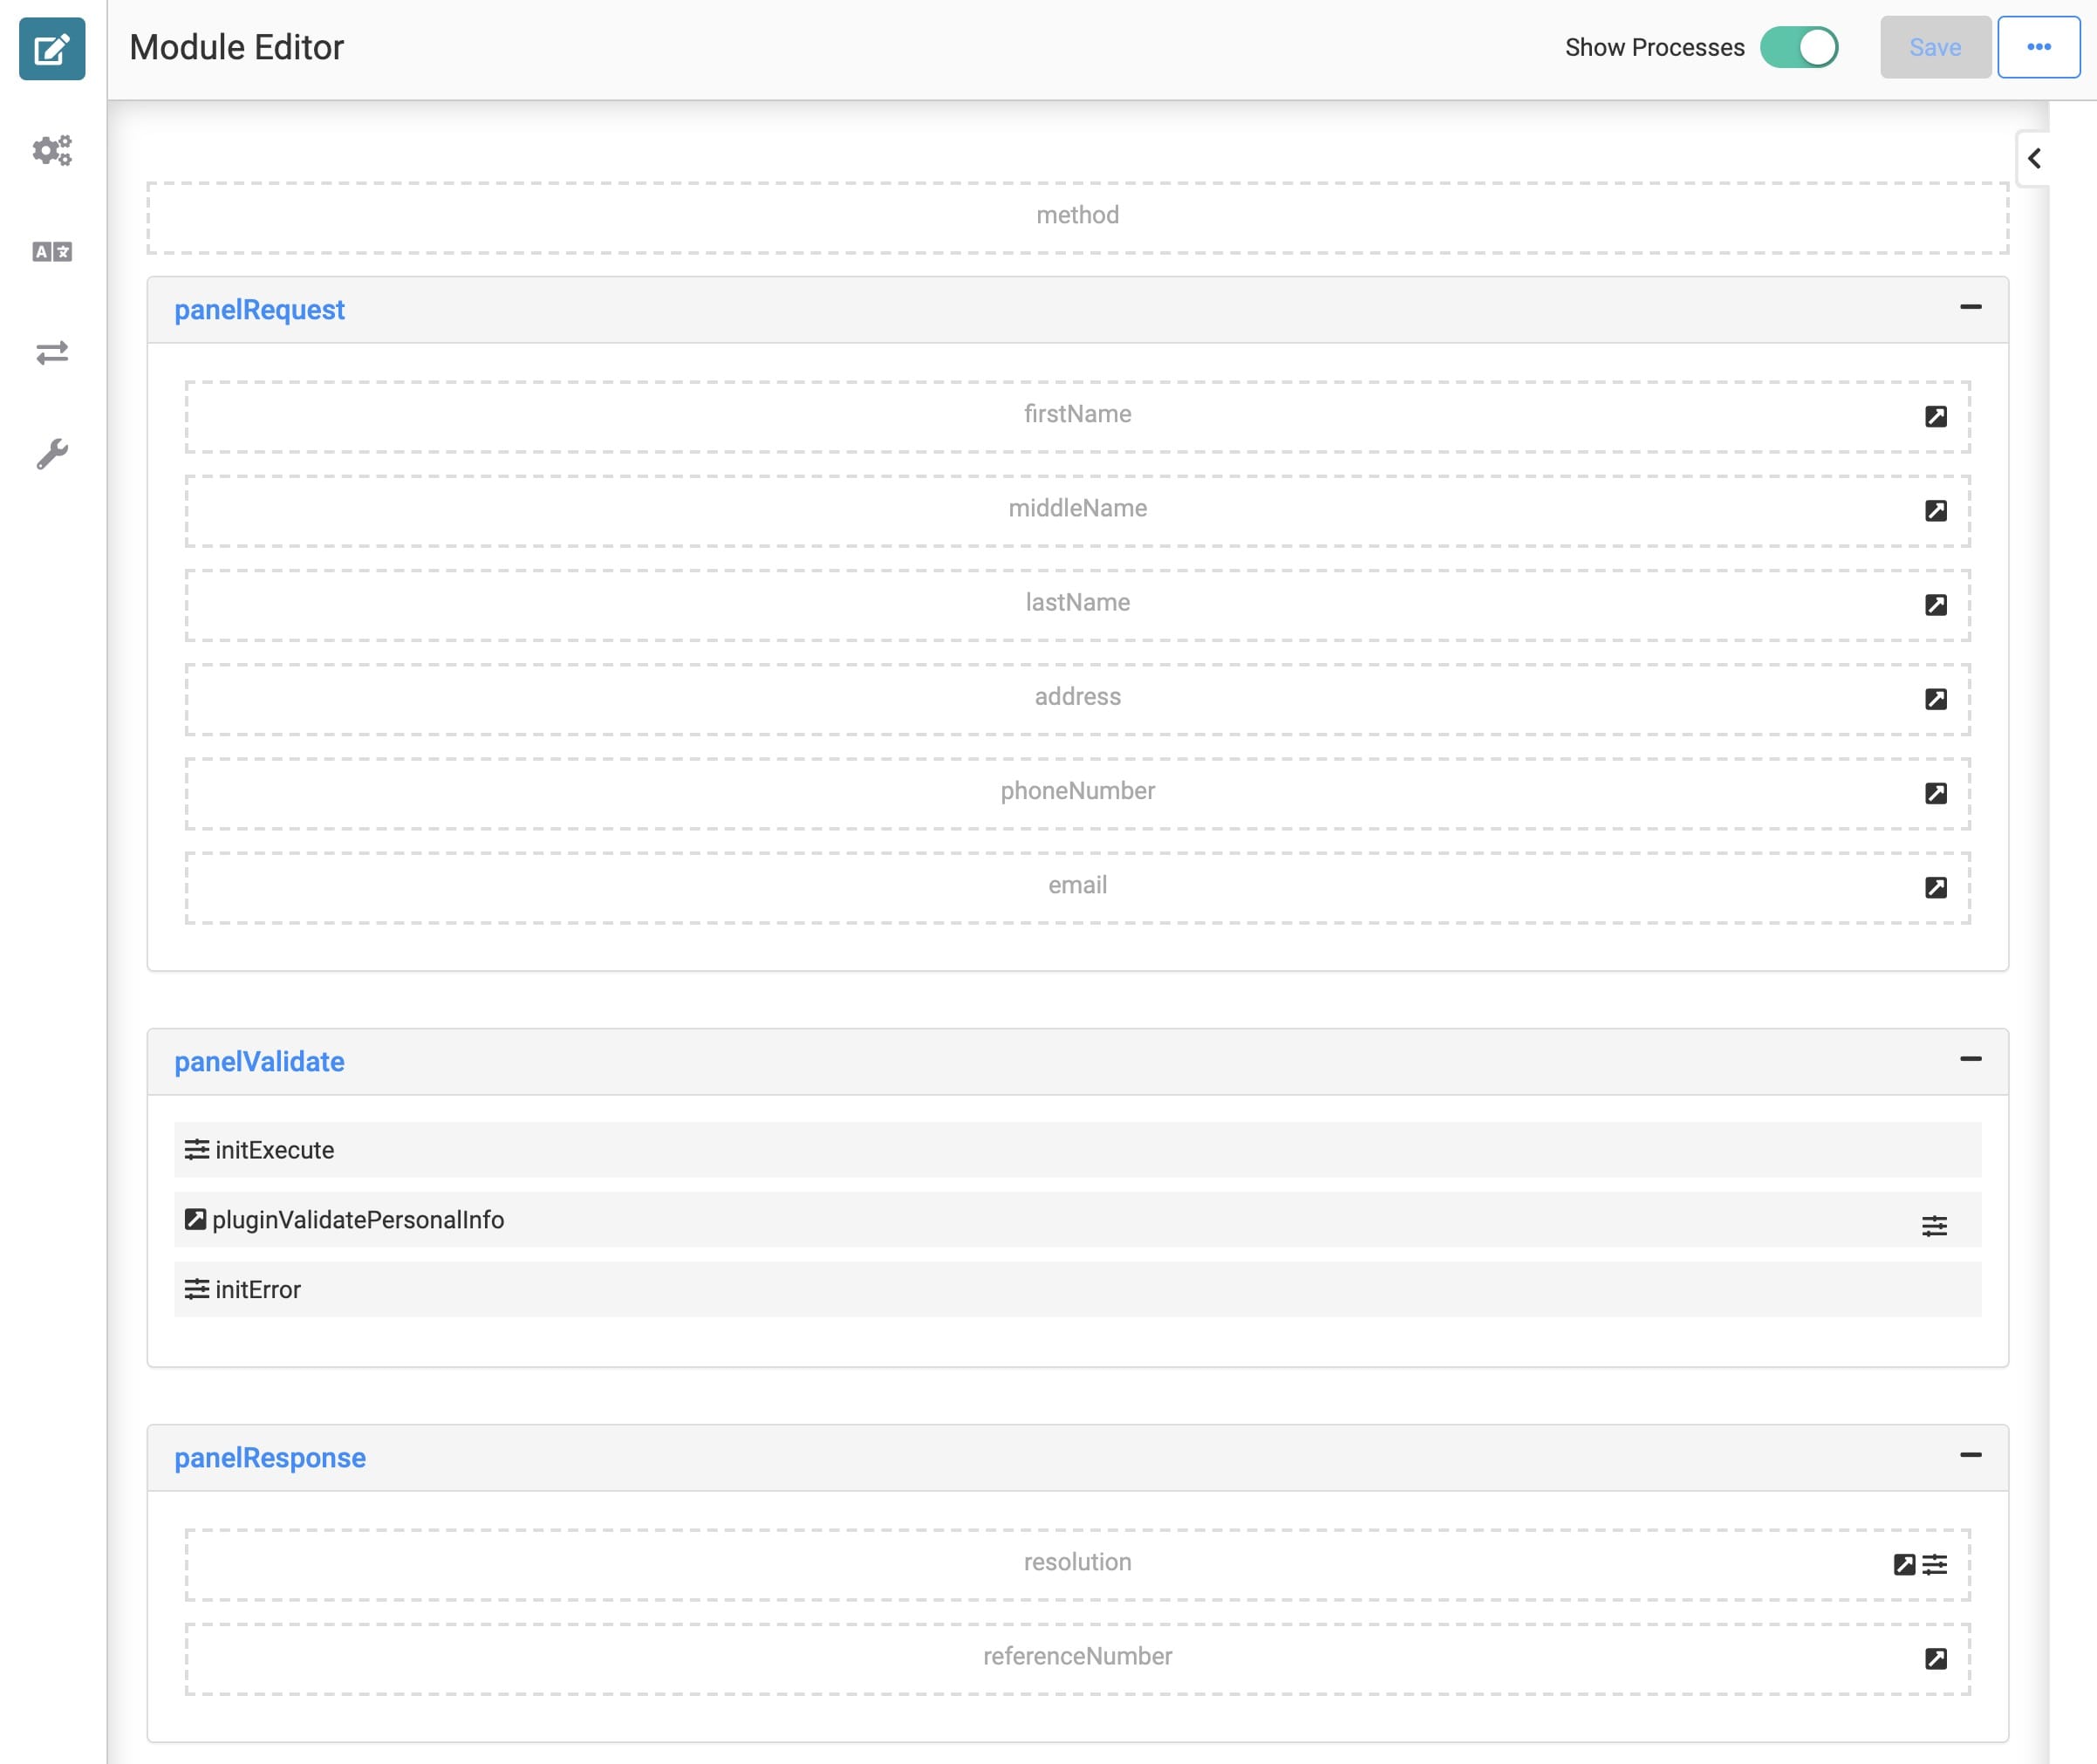
Your Proxy Module works on the server-side only, so your end-users will never see it in Express View.
Create the Module
First, let's add a new module to your application.
| 1. | In the application view of your workspace, create a new module from scratch. |
| 2. | Enter a Module Name that contains Proxy Module. |
| 3. | Click Create. Your new module shows on the following page. |
| 4. | Click your Proxy Module to open it. |
To enhance security, you can set the Proxy module permissions to 'Write' for the roles that need to initiate remote execution from the Express module.
Enable Server Side Execution Only
The only module visible to your end-user in this structure is the Browser Module. So, you'll enable Server Side Execution Only so your Proxy Module isn't accessible in Express View.
| 1. | In the Module Builder, hover over the left menu bar and click Settings. |
| 2. | Set the Server Side Execution Only toggle to ON. |
| 3. | Set the Act as Super-user when Server Side Executingtoggle to ON. |
This does not grant Super-user access to the end-user, only server-side module access.
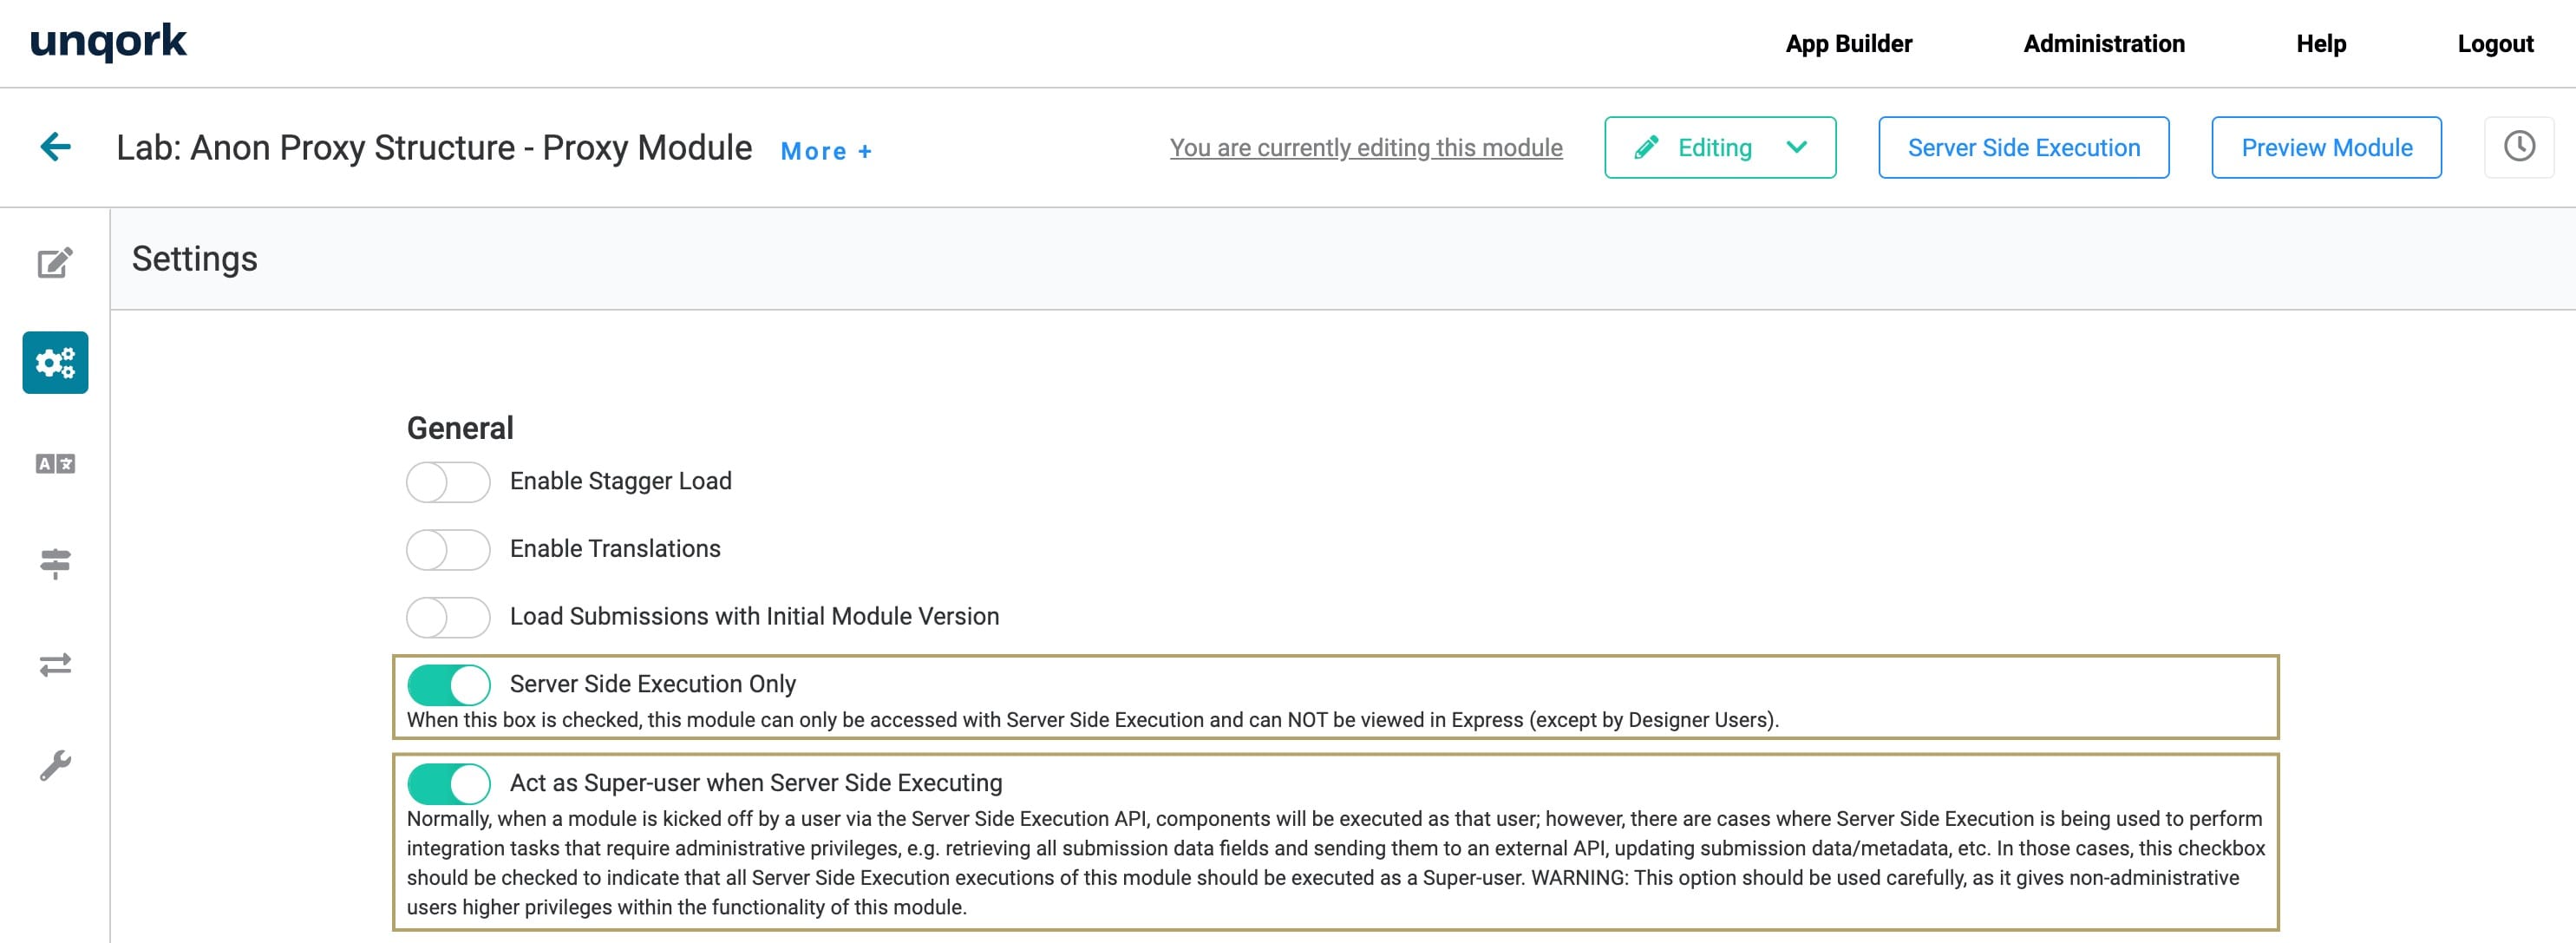
| 4. | Click Save Changes. |
Configure the Panel Components
Your Panels act as containers for the components that follow. Your panelRequest manages the end-user’s data. Your panelValidate manages the data validation and progresses the data flow. And your panelResponse manages the result of the data flow.
| 1. | In the Module Builder, drag and drop 3 Panel components onto your canvas. |
| 2. | Enter the following Titles and Property Names: |
| Title | Property Name |
|---|---|
|
panelRequest |
panelRequest |
|
panelValidate |
panelValidate |
|
panelResponse |
panelResponse |
| 3. | Save each component as you add it. |
Configure the API Hidden Component
This Hidden component allows automatic API documentation of the module for others working on the application
| 1. | Drag and drop a Hidden component onto your canvas. Place your Hidden component above the panelRequest Panel. |
| 2. | Enter method in the Property ID and Canvas Label Text. |
| 3. | Enter PUT in the Default Value. |
This indicates the HTTP request your module simulates.
| 4. | Click Save. |
Configure the Data Hidden Components
These Hidden components carry data passed all the way from the Browser Module.
| 1. | Drag and drop 6 Hidden components onto your canvas. Place your Hidden components in the panelRequest Panel. |
| 2. | Enter the following Property IDsand Canvas Label Text: |
| Property ID | Canvas Label Text |
|---|---|
|
firstName |
firstName |
|
middleName |
middleName |
|
lastName |
lastName |
|
address |
address |
|
phoneNumber |
phoneNumber |
|
|
|
These Property IDs are the same as the Property IDs used in your Browser Module. These must match for data mapping purposes.
| 3. | Save each component as you add it. |
Configure the Response Hidden Components
These Hidden components handle the data flow response.
| 1. | Drag and drop 2 Hidden components onto your canvas. Place your Hidden components in the panelResponse Panel. |
| 2. | Enter the following Property IDs and Canvas Label Text: |
| Property ID | Canvas Label Text |
|---|---|
|
resolution |
resolution |
|
referenceNumber |
referenceNumber |
These Property IDs are the same as the Property IDs used in your Browser Module. These must match for data mapping purposes.
| 3. | Save each component as you add it. |
Configure the Initializer Components
Your Initializer components act as triggers in the data flow. Your initExecute progresses the data flow forward. If an error occurs here, initError sends the response back to the Browser Module.
| 1. | Drag and drop an Initializer component onto your canvas. Place your Initializer component in the panelValidate Panel. |
| 2. | Enter initExecute in the Property ID and Canvas Label Text. |
| 3. | Select New Submission from the Trigger Type. |
| 4. | In the Outputs table, enter the following: |
| a. | Property ID: enter pluginValidatePersonalInfo. |
| b. | Type: enter trigger. |
| c. | Value: enter GO. |
This Property ID must match the Property ID of the Plug-In component you'll add in the next step.
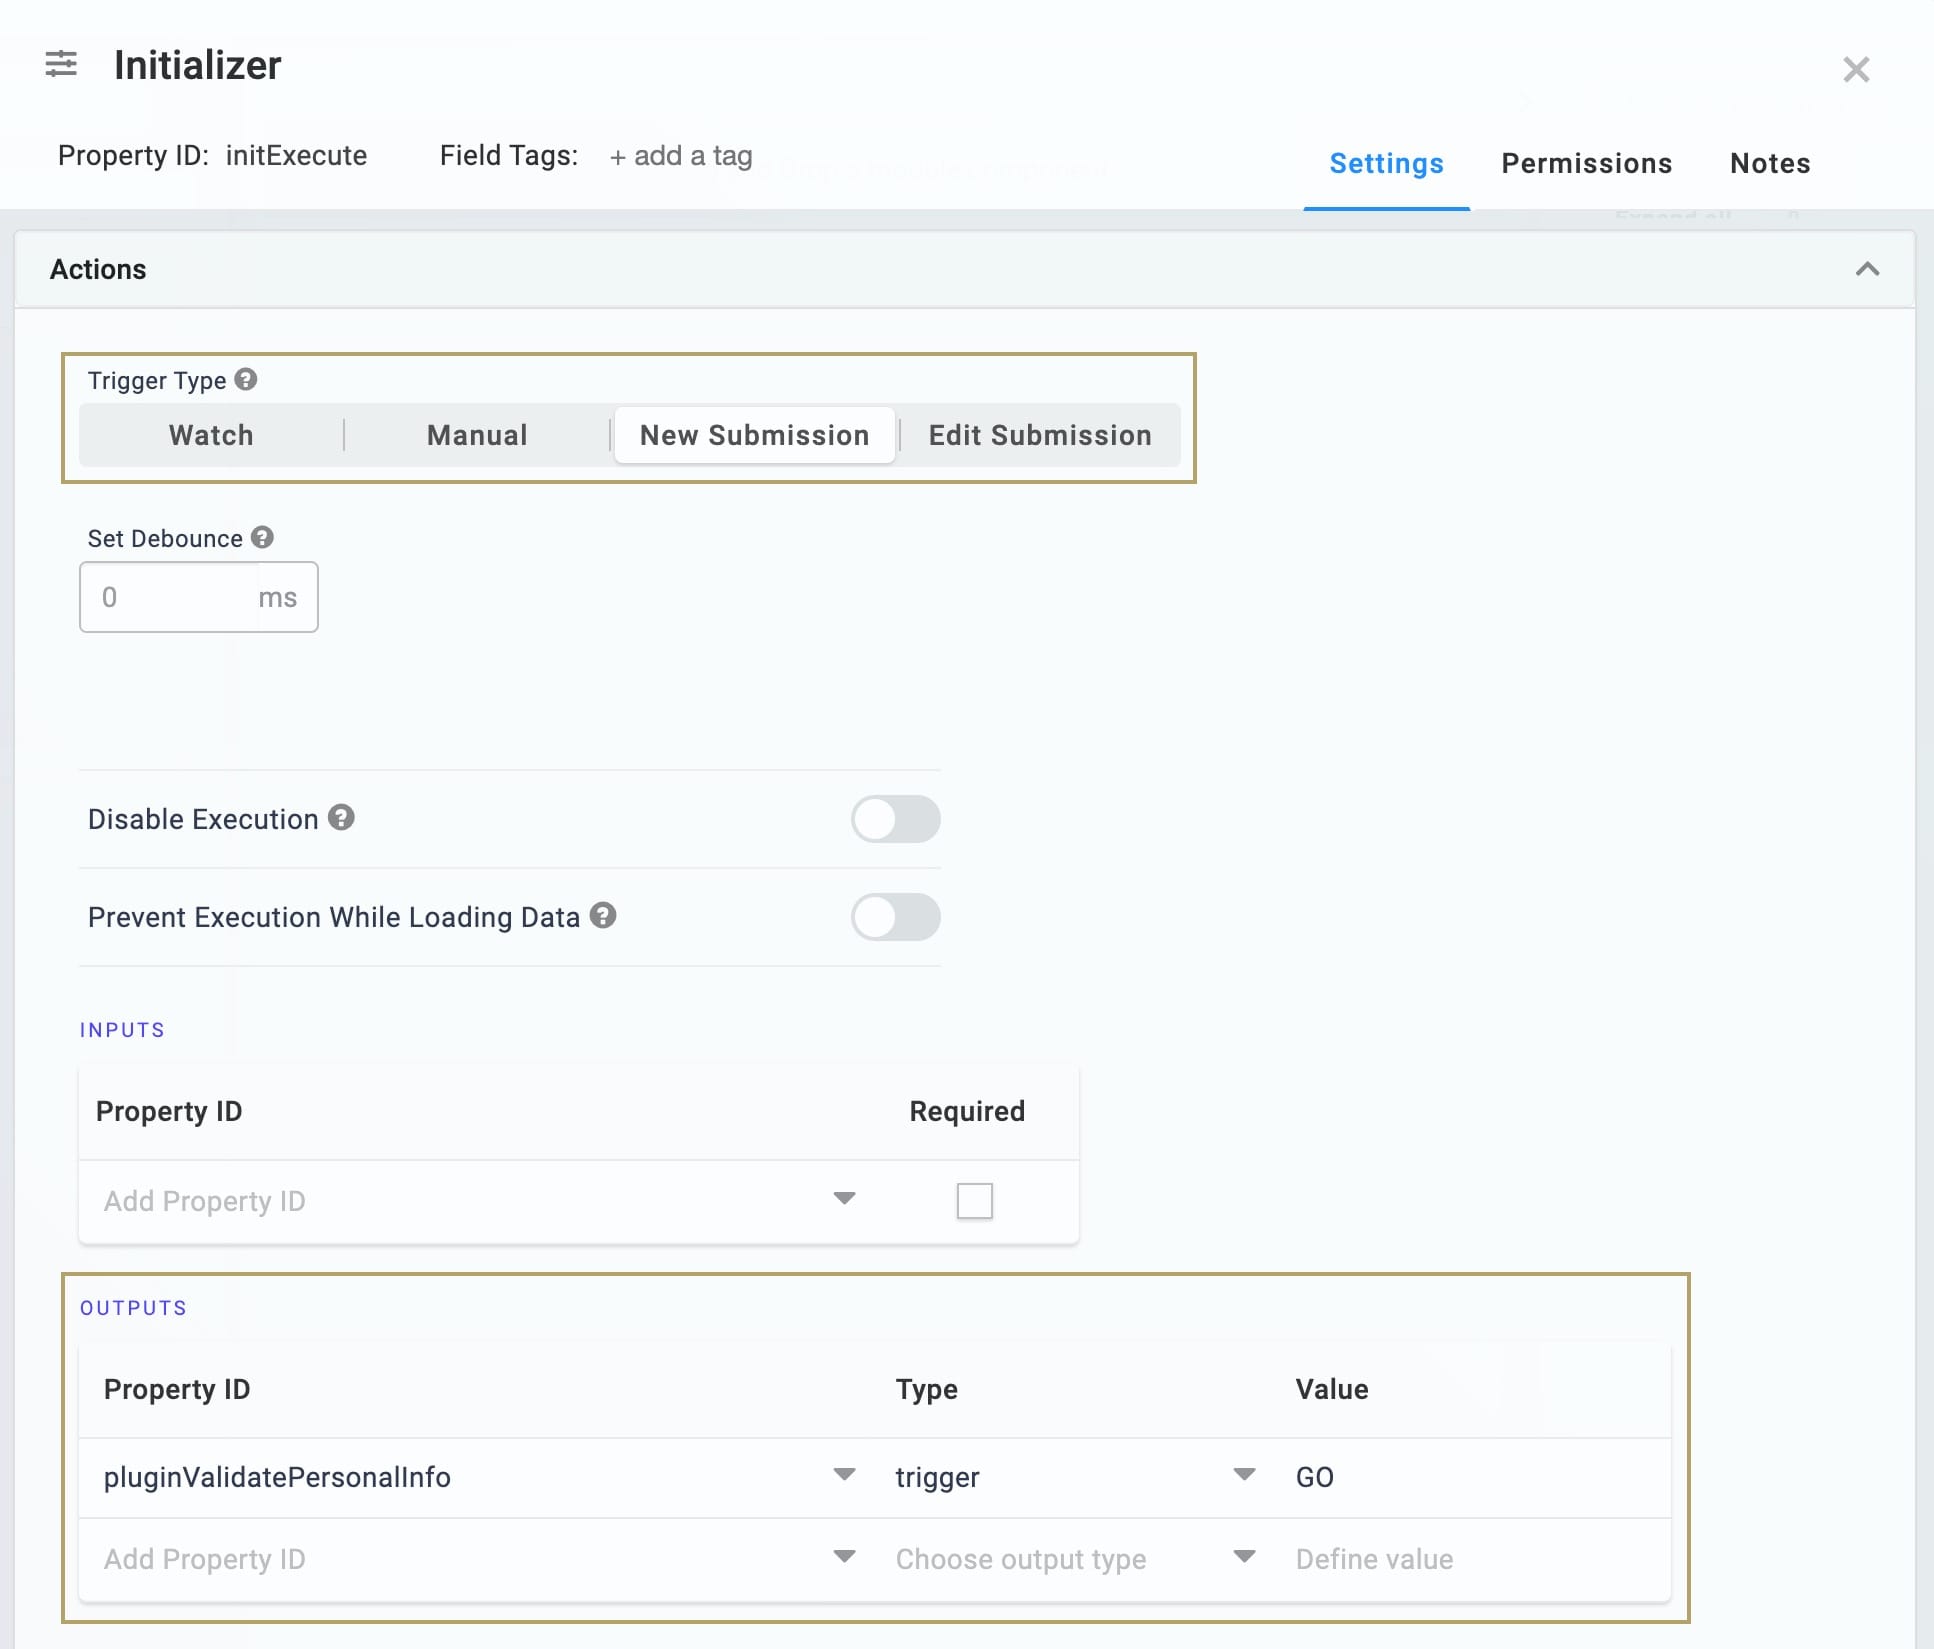
| 5. | Click Save. |
| 6. | Drag and drop a second Initializer component onto your canvas. Place your Initializer component in the panelValidate Panel below your first Initializer component. |
| 7. | Enter initError in the Property ID and Canvas Label Text. |
| 8. | In the Outputs table, enter the following: |
| a. | Property ID: enter resolution. |
| b. | Type: enter value. |
| c. | Value: enter Error. |
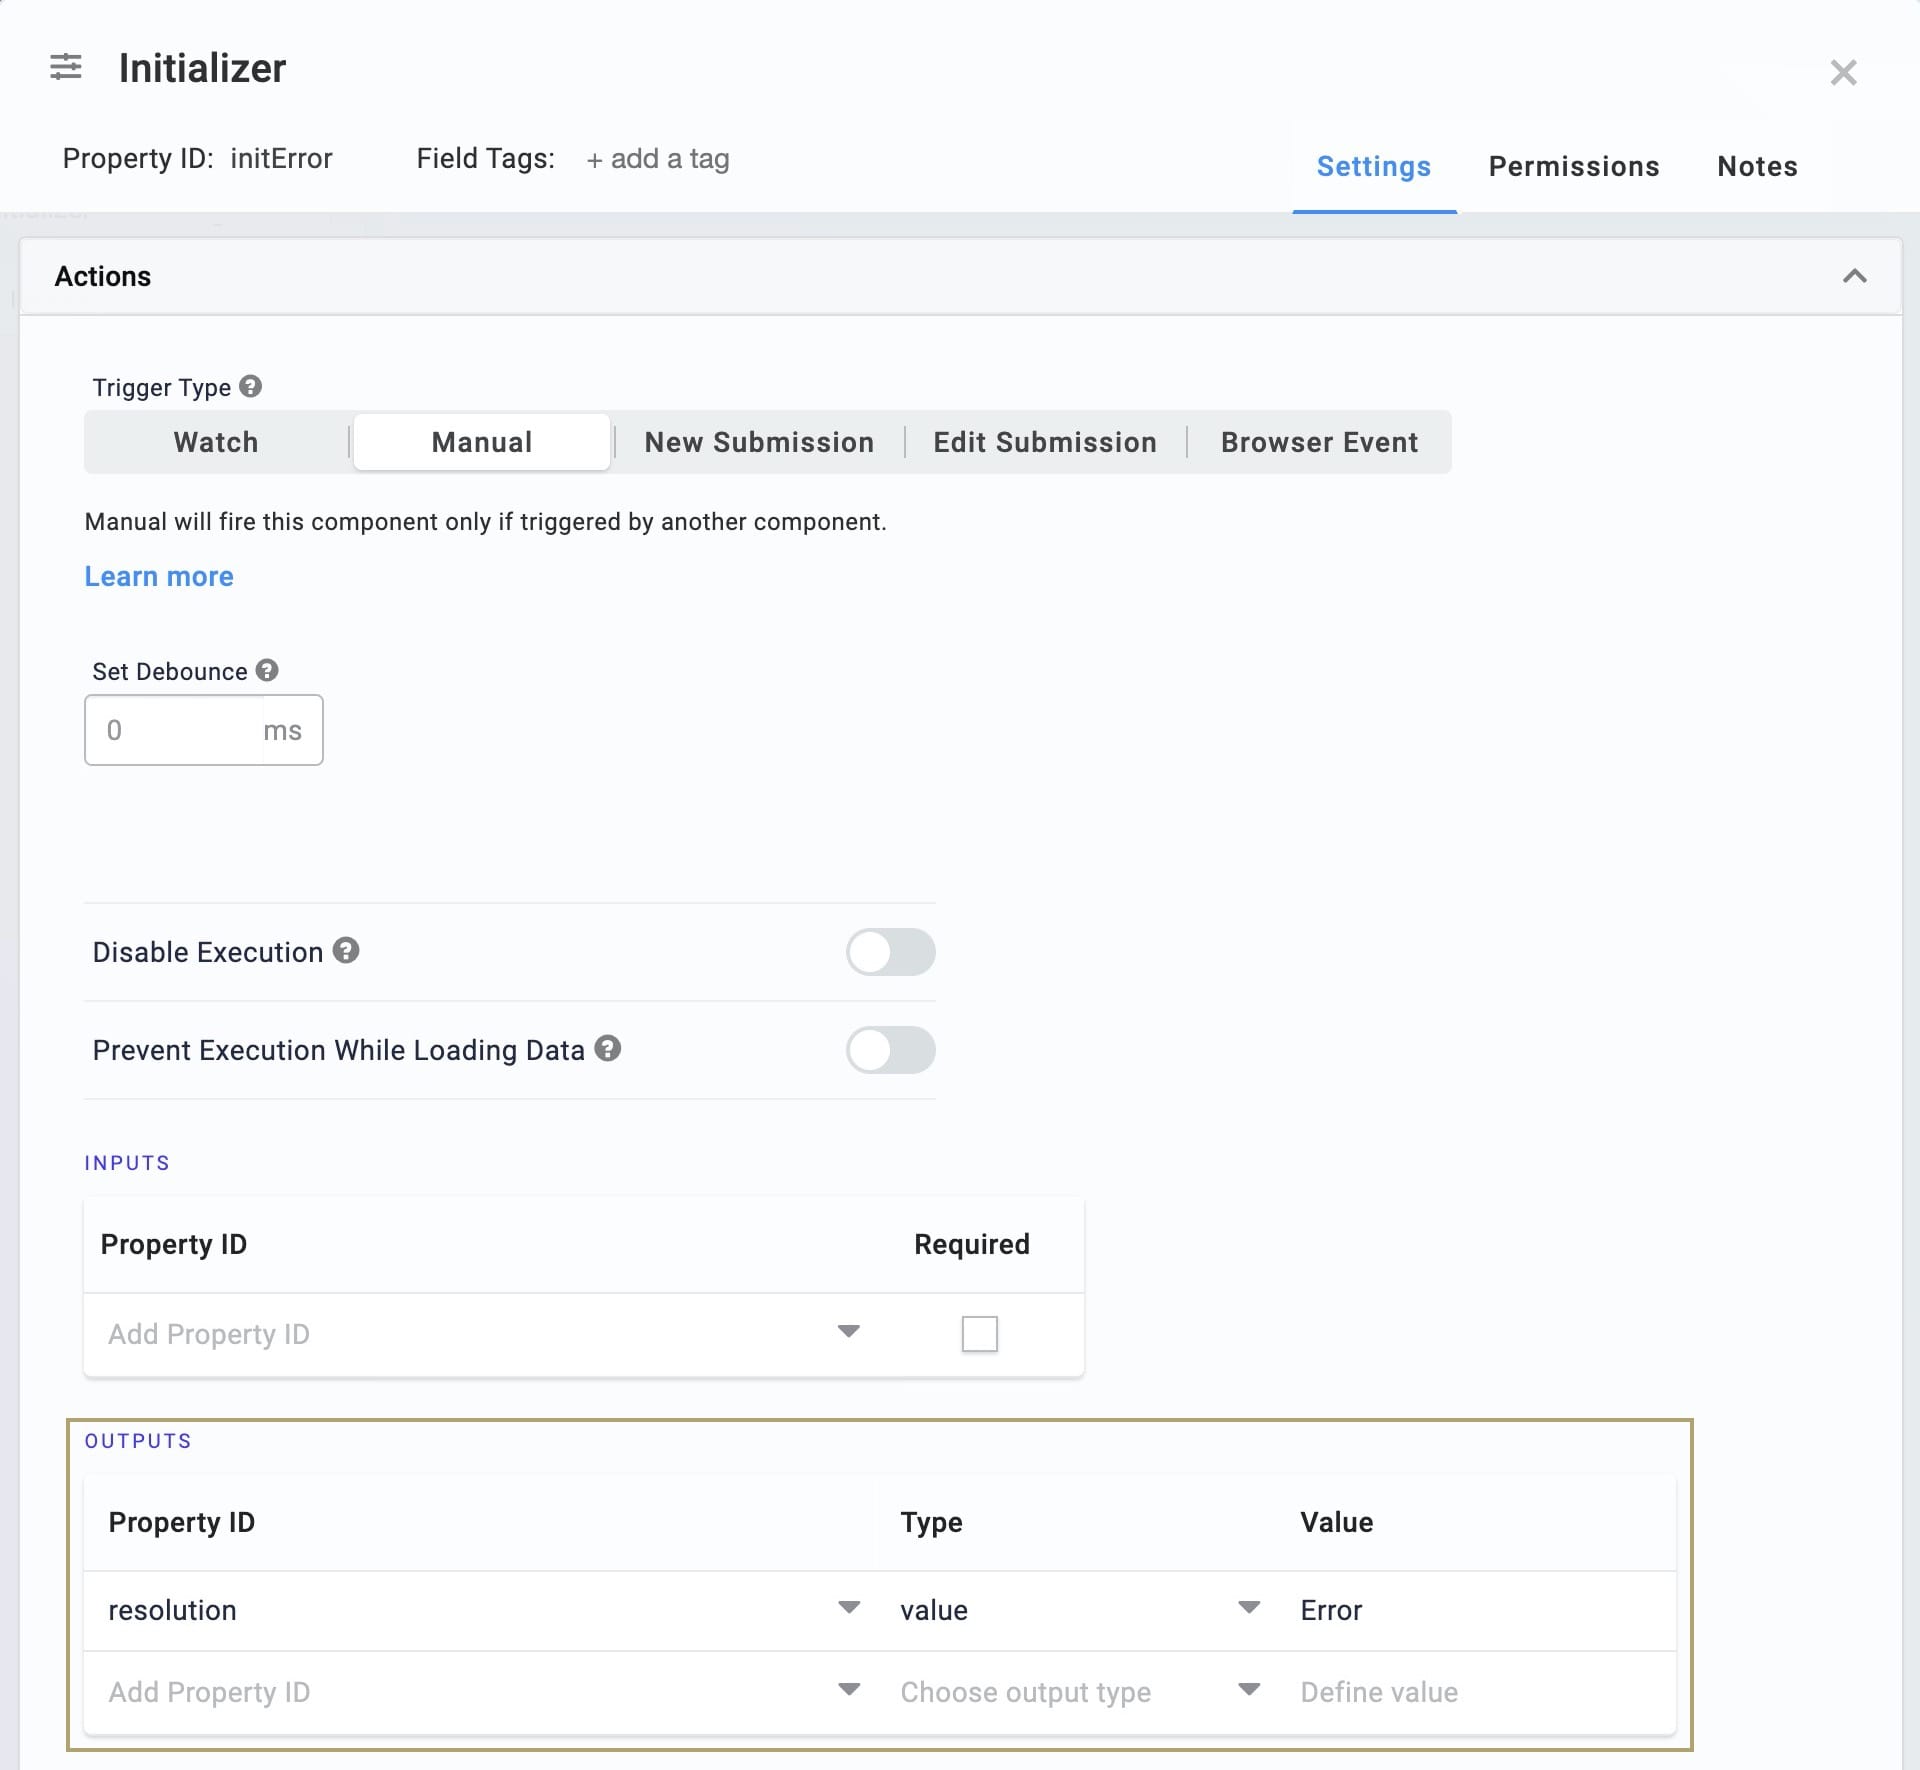
| 9. | Click Save. |
Configure the Plug-In Component
To pass the data from your Proxy Module to the Master Module, you’ll use a Plug-In component. This Plug-In component also receives a response back from the rest of the data flow.
| 1. | Drag and drop a Plug-In component onto your canvas. Place your Plug-In component in the panelValidate Panel between your Initializer components. |
| 2. | Enter pluginValidatePersonalInfo as the Property ID and Canvas Label Text. |
| 3. | Enter initError in the Error Trigger. |
| 4. | In the Inputs table, enter the following: |
| ID | Mapping |
|---|---|
|
firstName |
data.firstName |
|
middleName |
data.middleName |
|
lastName |
data.lastName |
|
address |
data.address |
|
phoneNumber |
data.phoneNumber |
|
|
data.email |
| 5. | In the Outputs table, enter the following: |
| ID | Mapping |
|---|---|
|
resolution |
data.resolved.resolution |
|
referenceNumber |
data.resolved.referenceNumber |
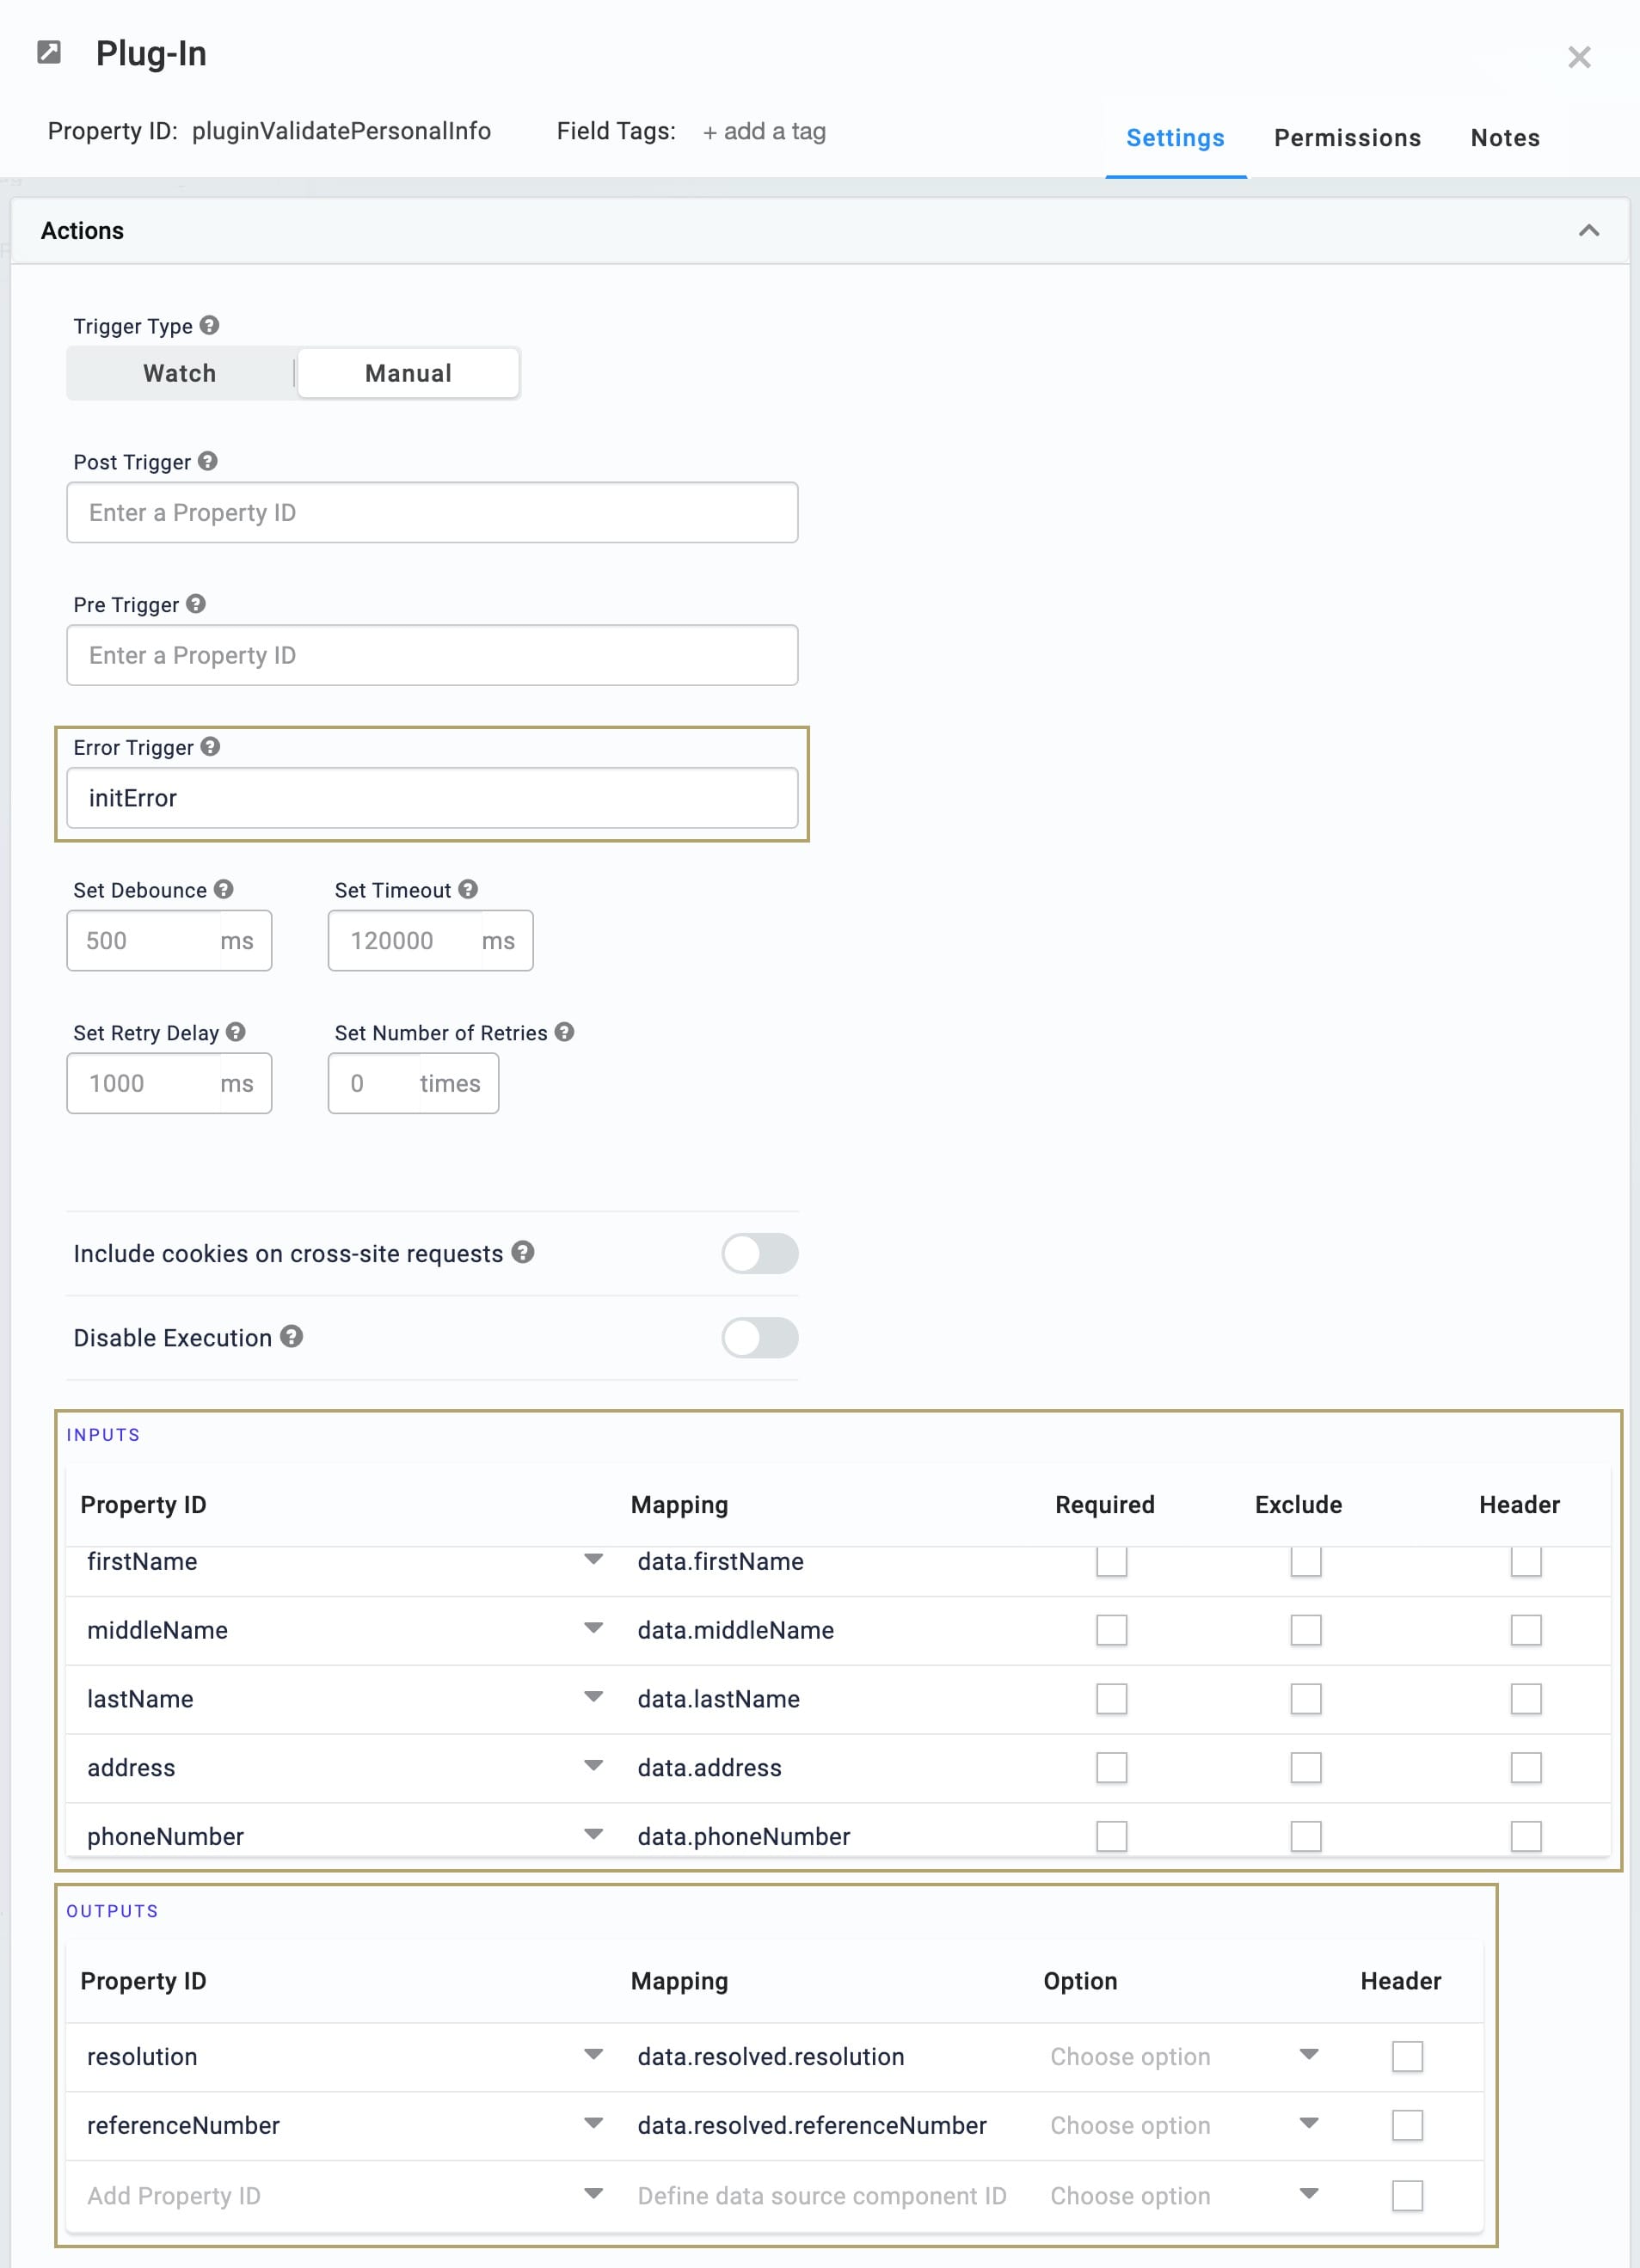
| 6. | Select Execute Module from the Internal Services drop-down. |
The Request Type and Data Source URL auto-populate. You'll see /fbu/uapi/modules/{moduleId}/execute as your Data Source URL. You'll return to this Plug-In once you have created your Master Module. Then you'll replace {moduleId} with the module ID for your Master Module.
| 7. | Set the Assign Values If They Are Null or Empty String toggle to OFF. |
| 8. | Click Save. |
| 9. | Save your module. |
Link the Proxy Module to the Browser Module
Next, you'll link your Proxy Module back to the Browser Module you created in the previous section.
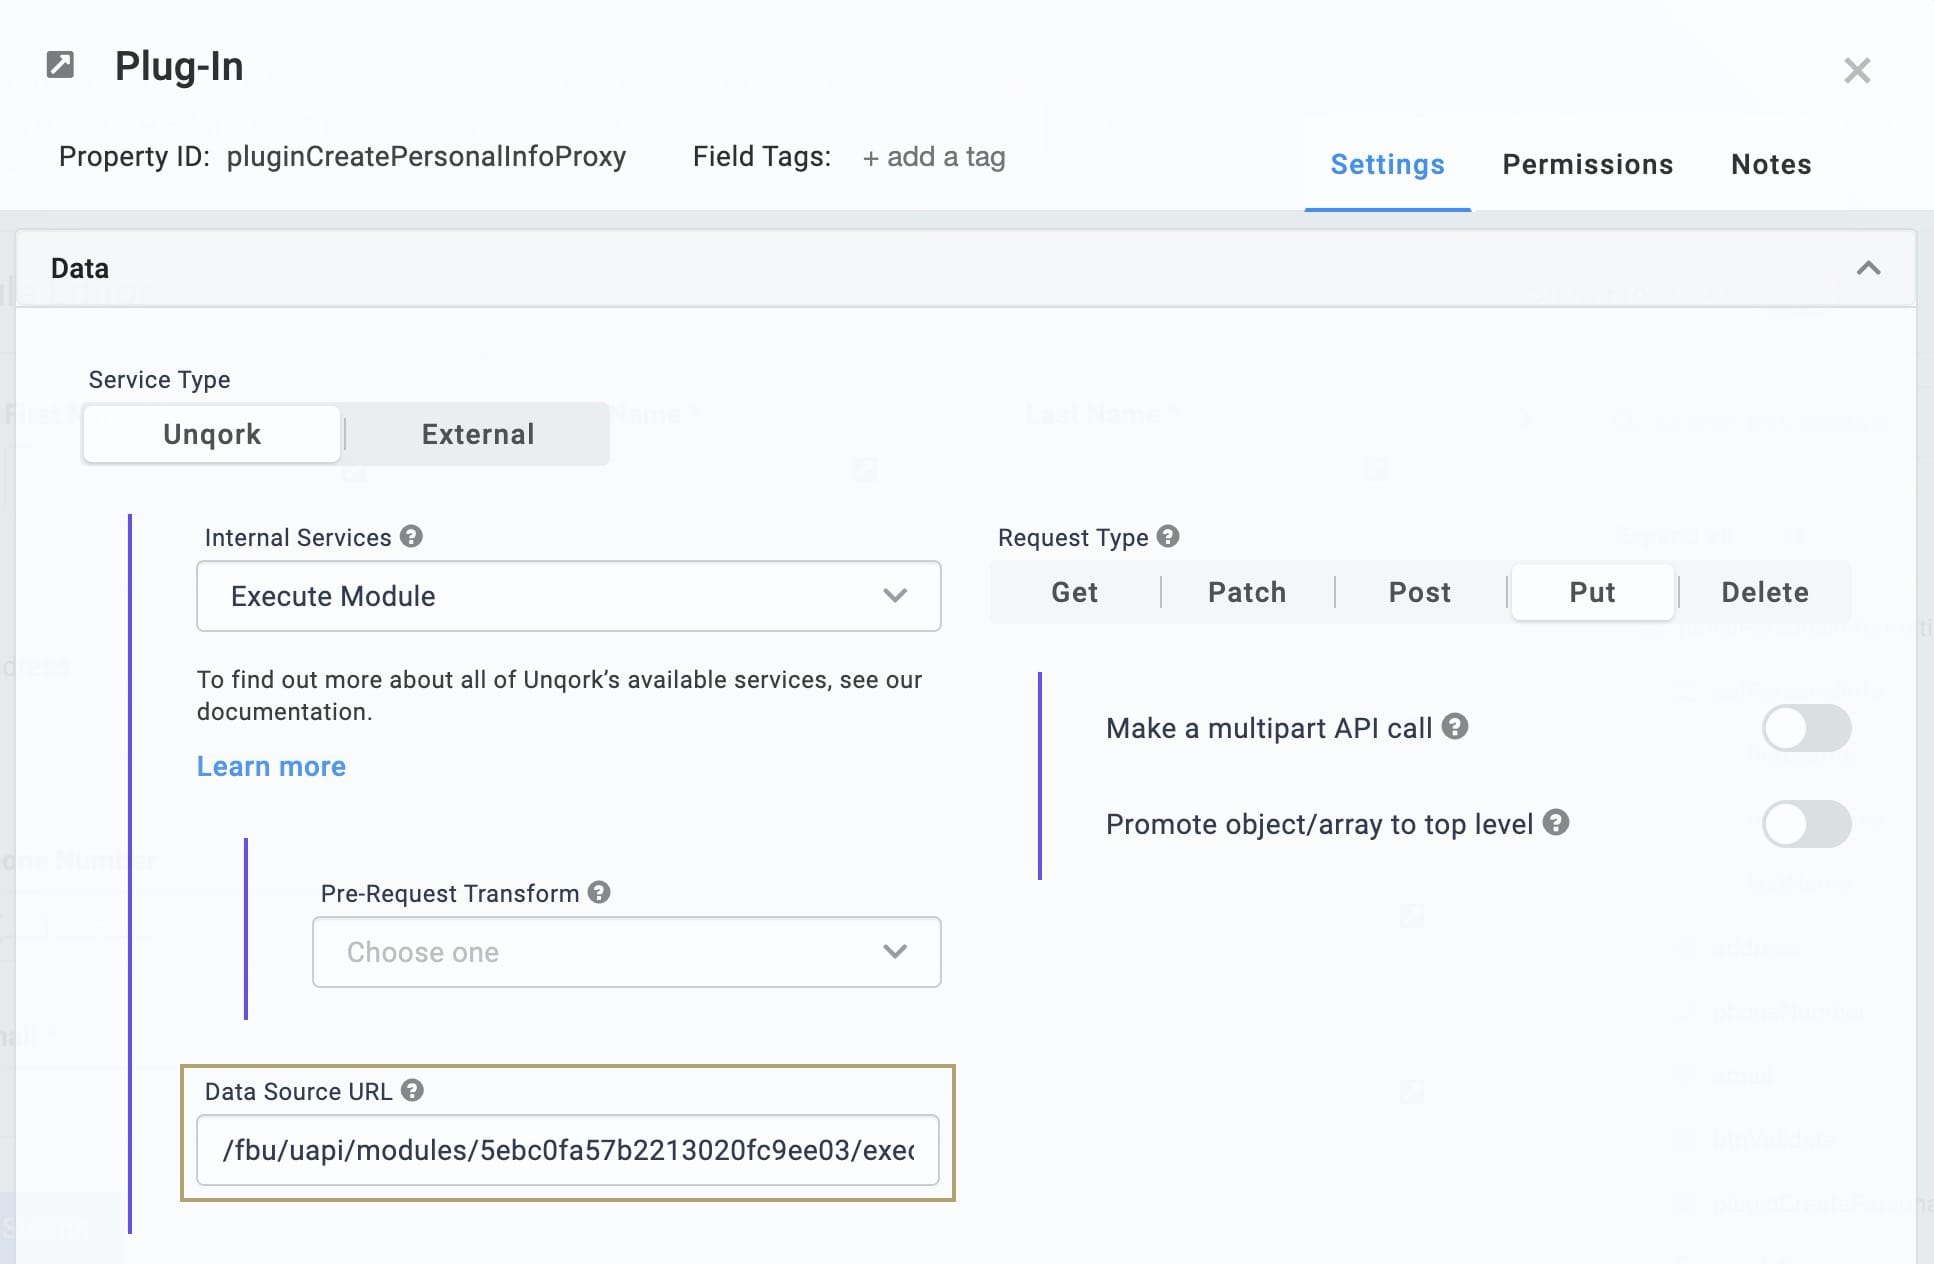
| 1. | In your Browser Module, hover over the pluginCreatePersonalInfoProxy Plug-In component. A 5-button toolbar appears above the component on hover-over. |
| 2. | Using the toolbar, click the  (Settings) button. (Settings) button. |
| 3. | In the Data Source URL, replace {moduleId} with the module ID of your Proxy Module. |
To find the module ID, look in the module URL. You can see the module ID for our sample Proxy module bolded here: https://training.unqork.io/#/form/5ebc0fa57b2213020fc9ee03/edit.
| 4. | Click Save. |
| 5. | Save your module. |
You now have a Server Side Execute Only Proxy Module to pass data through the flow. From here on, the data flow happens “behind the scenes” and out of any underlying code. Your Proxy Module continues the data flow from the Browser Module.
You can find the completed Proxy Module for this use case here: https://training.unqork.io/#/form/5ebc0fa57b2213020fc9ee03/edit.
Set Up the Master Module
Your Master Module is the powerhouse in this structure. This module communicates with subsequent modules to orchestrate the following:
- Data validation.
- Creation of user submissions.
To set up the Master Module, you’ll need:
- 4 Panel components
- 9 Hidden components
- 4 Initializer components
- 2 Plug-In components
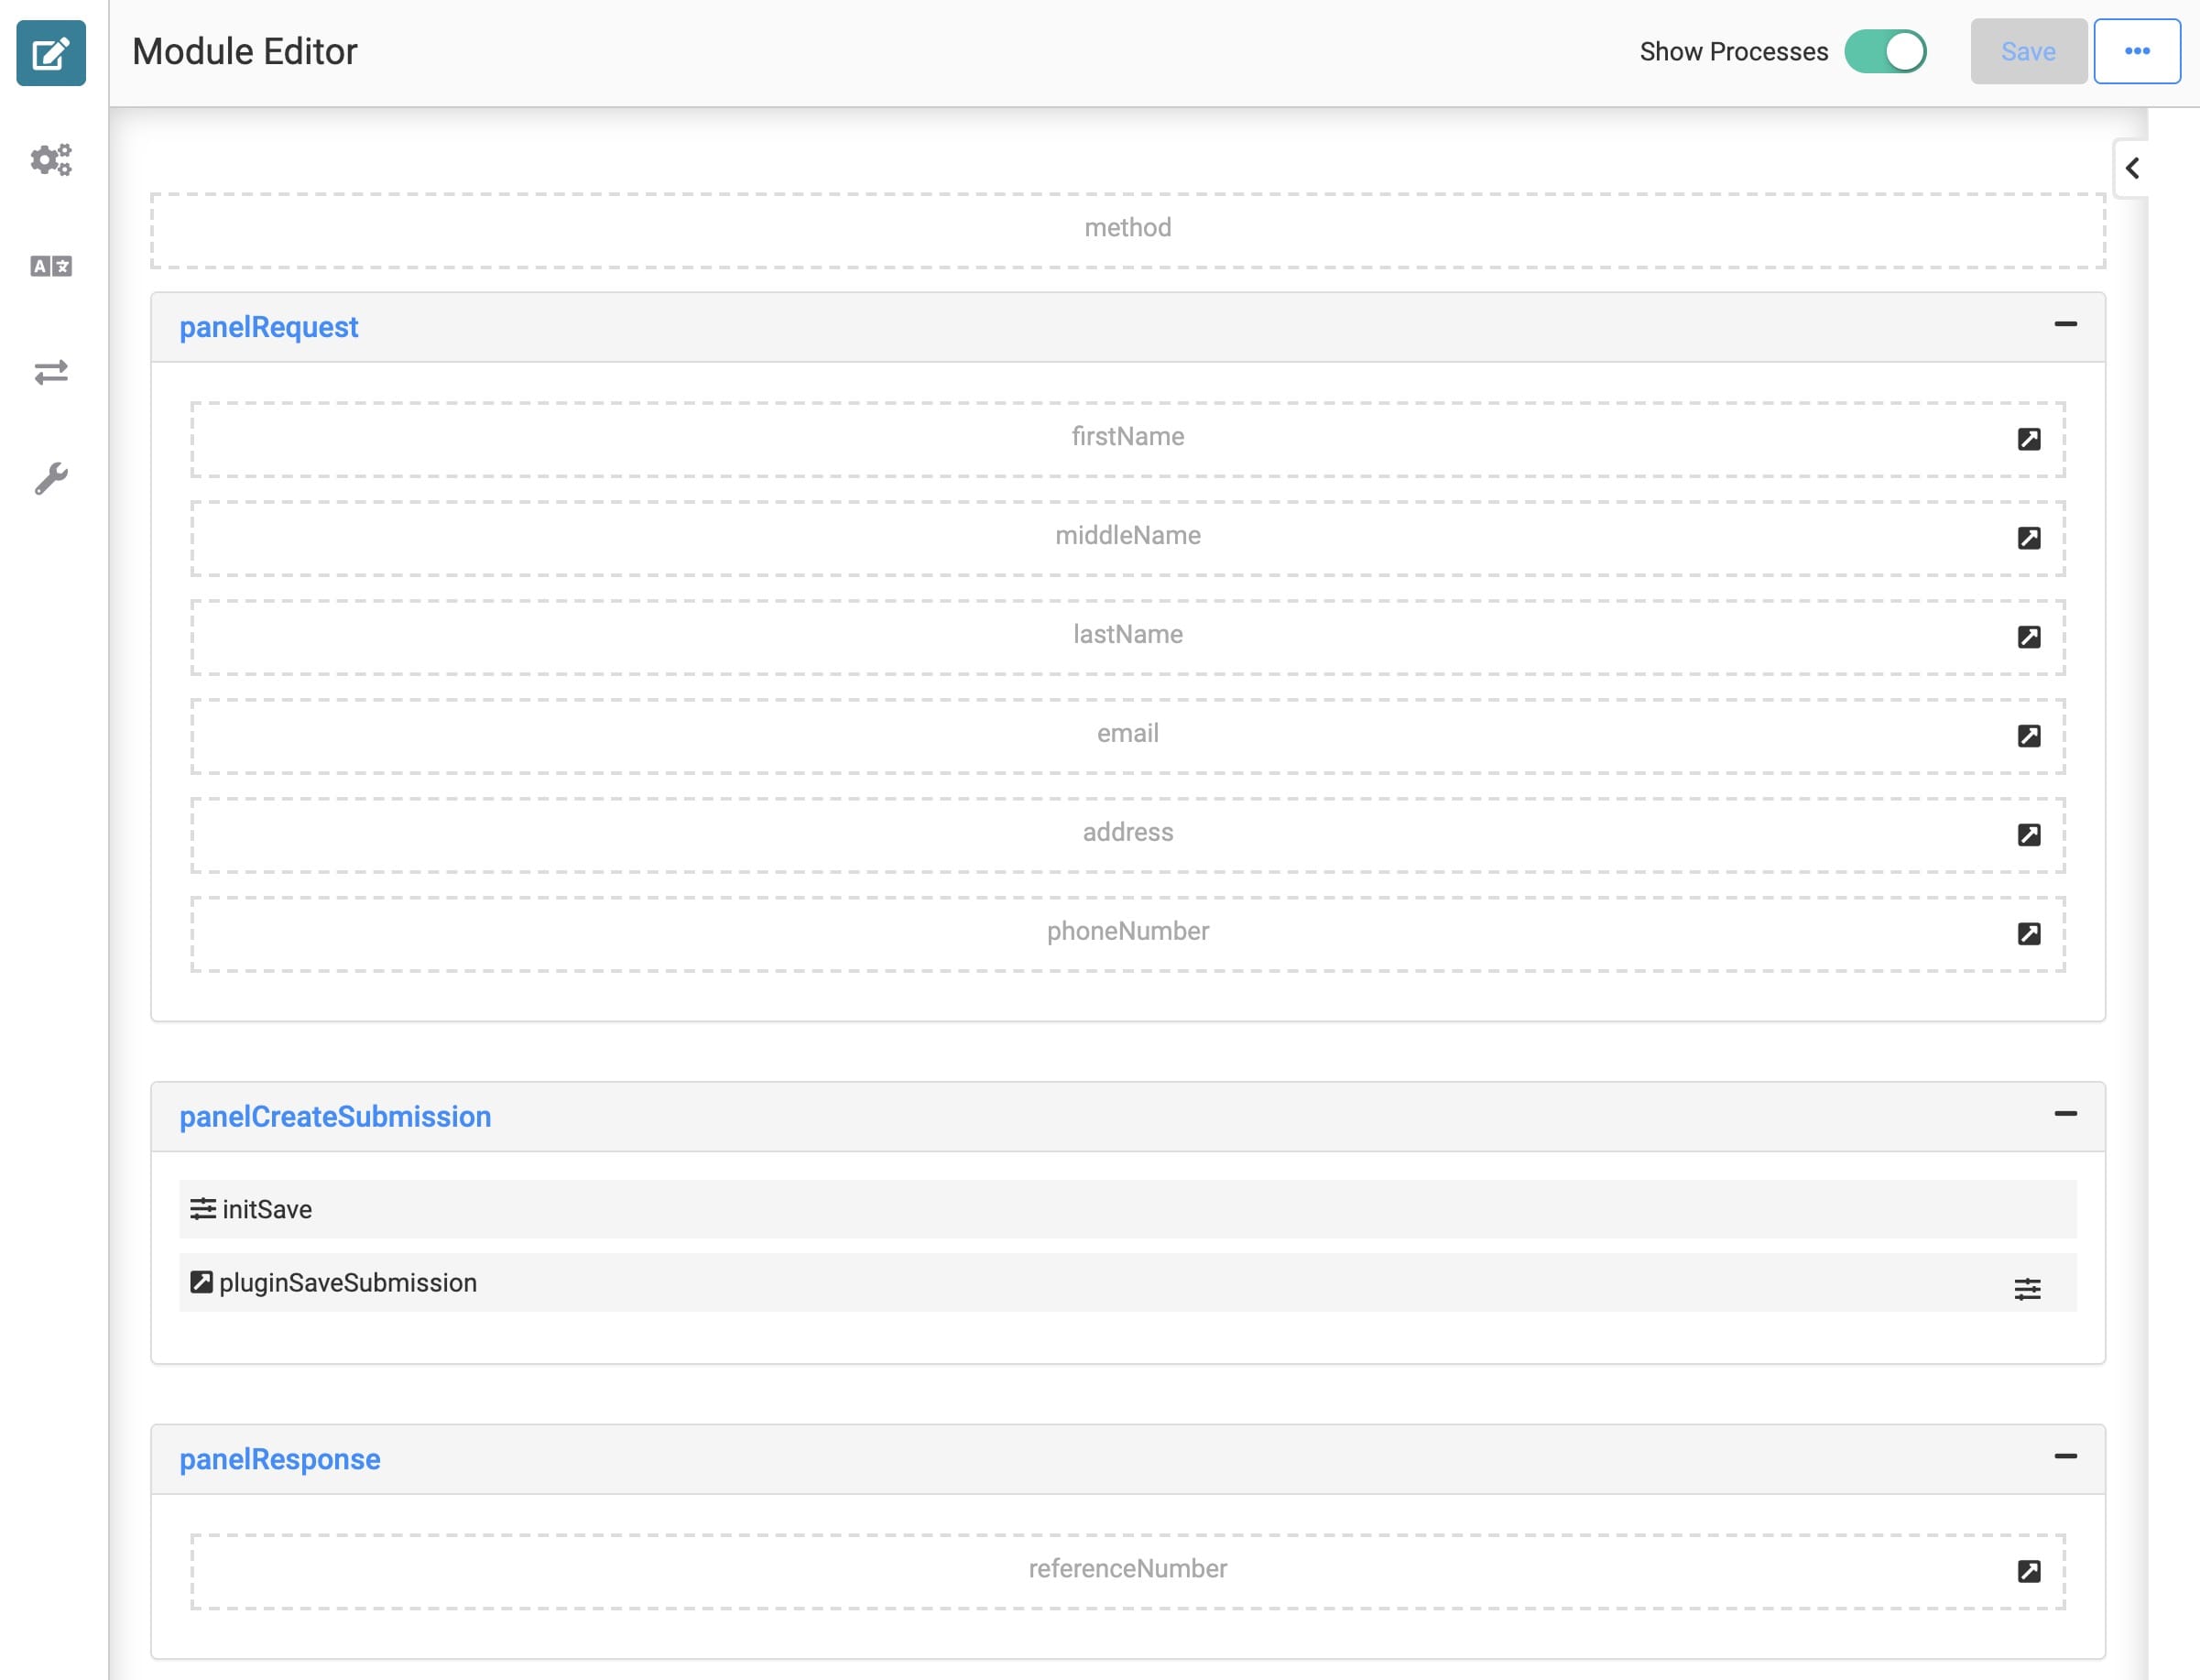
Here's how your Master Module will look in the Module Builder:
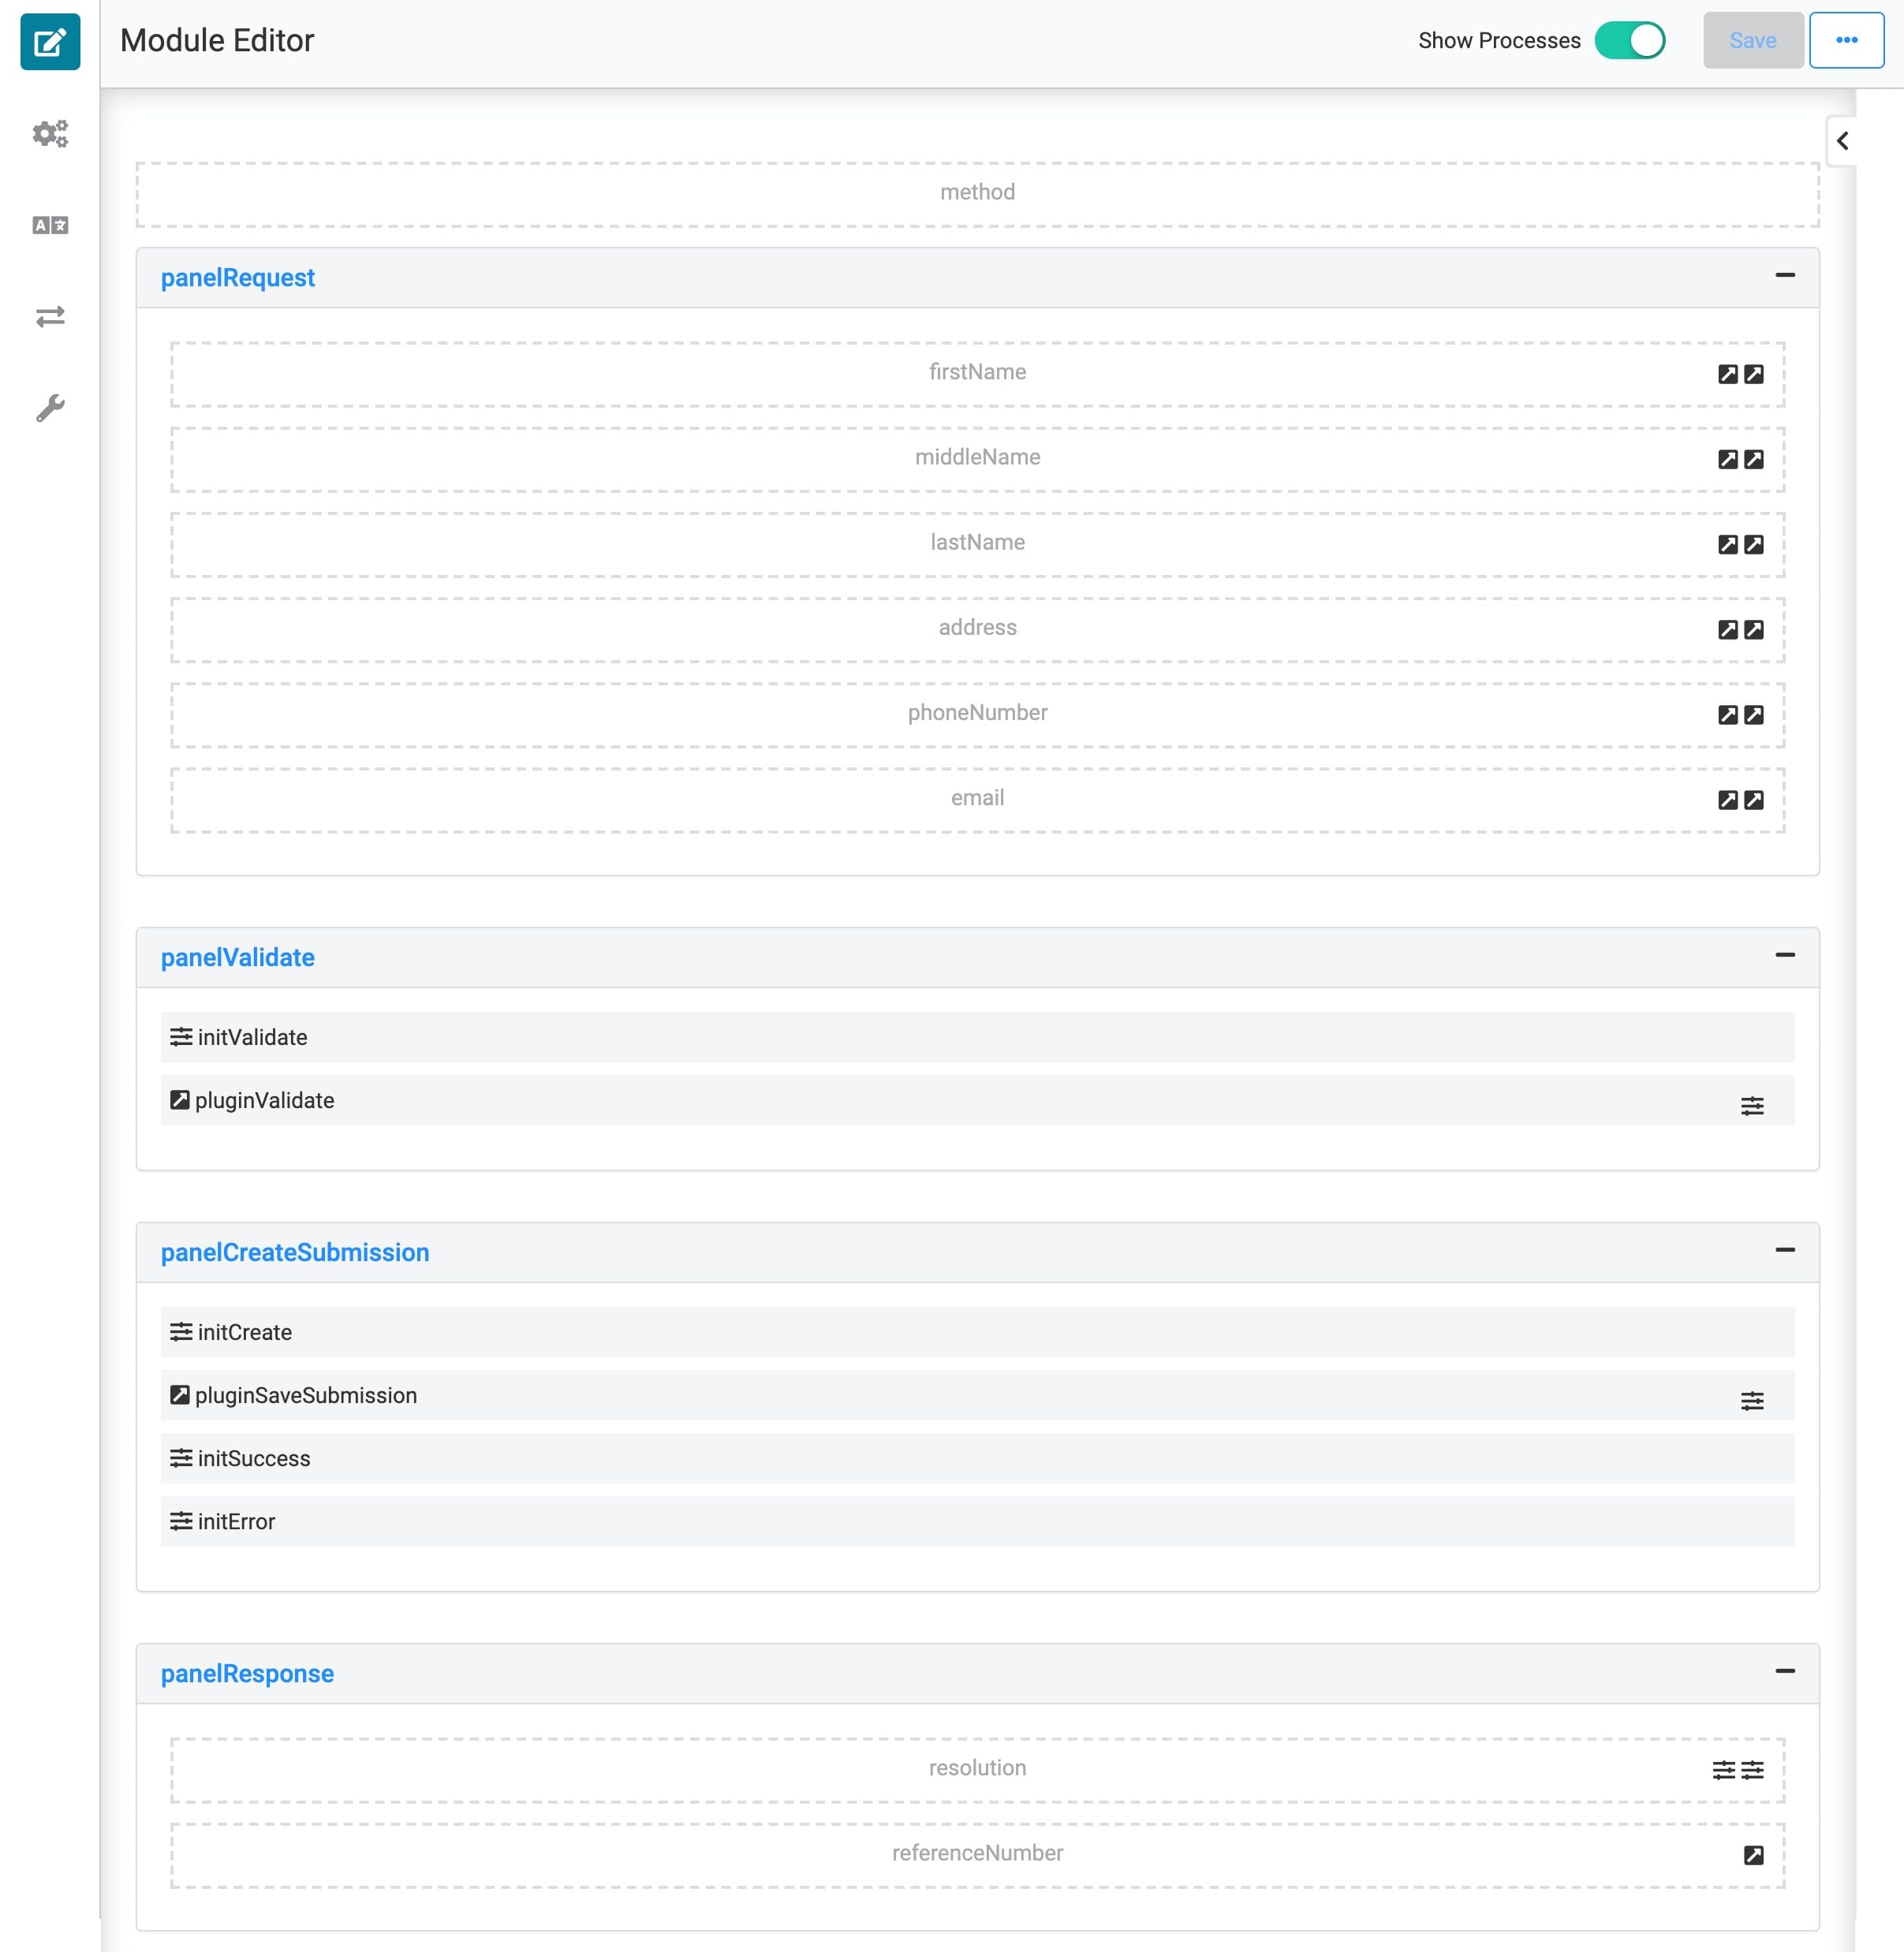
Your Master Module works on the server-side, so your end-users will never see it in Express View.
Create the Module
To start this section, let's add a new module to your application.
| 1. | In the application view of your workspace, create a new module from scratch. |
| 2. | Enter a Module Name that contains Master Module. |
| 3. | Click Create. Your new module shows on the following page. |
| 4. | Click your Master Module to open it. |
Enable Server Side Execution Only
The only module visible to your end-user in this structure is the Browser Module. You'll enable Server Side Execution Only so your Master Module isn't accessible in Express View.
| 1. | In the Module Builder, hover over the left menu bar and click Settings. |
| 2. | Set the Server Side Execution Only toggle to ON. |
| 3. | Click Save Changes. |
Configure the Panel Components
Your Panels act as containers for the components that follow. Your panelRequest manages your end-user’s data. Your panelValidate manages the data validation. Your panelCreateSubmission manages the creation of the end-user’s submission. And your panelResponse manages error/success messages.
| 1. | In the Module Builder, drag and drop 4 Panel components onto your canvas. |
| 2. | Enter the following Titles and Property Names: |
| Title | Property Name |
|---|---|
|
panelRequest |
panelRequest |
|
panelValidate |
panelValidate |
|
panelCreateSubmission |
panelCreateSubmission |
|
panelResponse |
panelResponse |
| 3. | Save each component as you add it. |
Configure the API Hidden Component
This Hidden component allows automatic API documentation of the module for others working on the application.
| 1. | Drag and drop a Hidden component onto your canvas. Place your Hidden component above the panelRequest Panel. |
| 2. | Enter method as the Property ID and Canvas Label Text. |
| 3. | Enter PUT in the Default Value. |
This indicates the HTTP request your module simulates.
| 4. | Click Save. |
Configure the Data Hidden Components
These Hidden components Carry data passed all the way from the Browser Module.
| 1. | Drag and drop 6 Hidden components onto your canvas. Place your Hidden components in the panelRequest Panel. |
| 2. | Enter the following Property IDsand Canvas Label Text: |
| Property ID | Canvas Label Text |
|---|---|
|
firstName |
firstName |
|
middleName |
middleName |
|
lastName |
lastName |
|
address |
address |
|
phoneNumber |
phoneNumber |
|
|
|
These Property IDs are the same as the Property IDs used in the Proxy Module. These must match for data mapping purposes.
| 3. | Save each component as you add it. |
Configure the Response Hidden Components
These Hidden components handle the data flow response.
| 1. | Drag and drop 2 Hidden components onto your canvas. Place your Hidden components in the panelResponse Panel. |
| 2. | Enter the following Property IDs and Canvas Label Text: |
| Property ID | Canvas Label Text |
|---|---|
|
resolution |
resolution |
|
referenceNumber |
referenceNumber |
These Property IDs are the same as the Property IDs used in the Proxy Module. These must match for data mapping purposes.
| 3. | Save each component as you add it. |
Configure the Validation Initializer
This Initializer progresses the data validation flow.
| 1. | Drag and drop an Initializer component onto your canvas. Place your Initializer component in the panelValidate Panel. |
| 2. | Enter initValidate as the Property ID and Canvas Label Text. |
| 3. | Select New Submission from the Trigger Type. |
| 4. | In the Outputs table, enter the following: |
| a. | Property ID: enter pluginValidate. |
| b. | Type: enter trigger. |
| c. | Value: enter GO. |

| 5. | Click Save. |
Configure the Create Submission Initializer
This Initializer creates the submission once your end-user’s data validates.
| 1. | Drag and drop an Initializer component onto your canvas. Place your Initializer component in the panelCreateSubmission Panel. |
| 2. | Enter initCreate as the Property ID and Canvas Label Text. |
| 3. | In the Outputs table, enter the following: |
| a. | Property ID: enter pluginSaveSubmission. |
| b. | Type: enter trigger. |
| c. | Value: enter GO. |
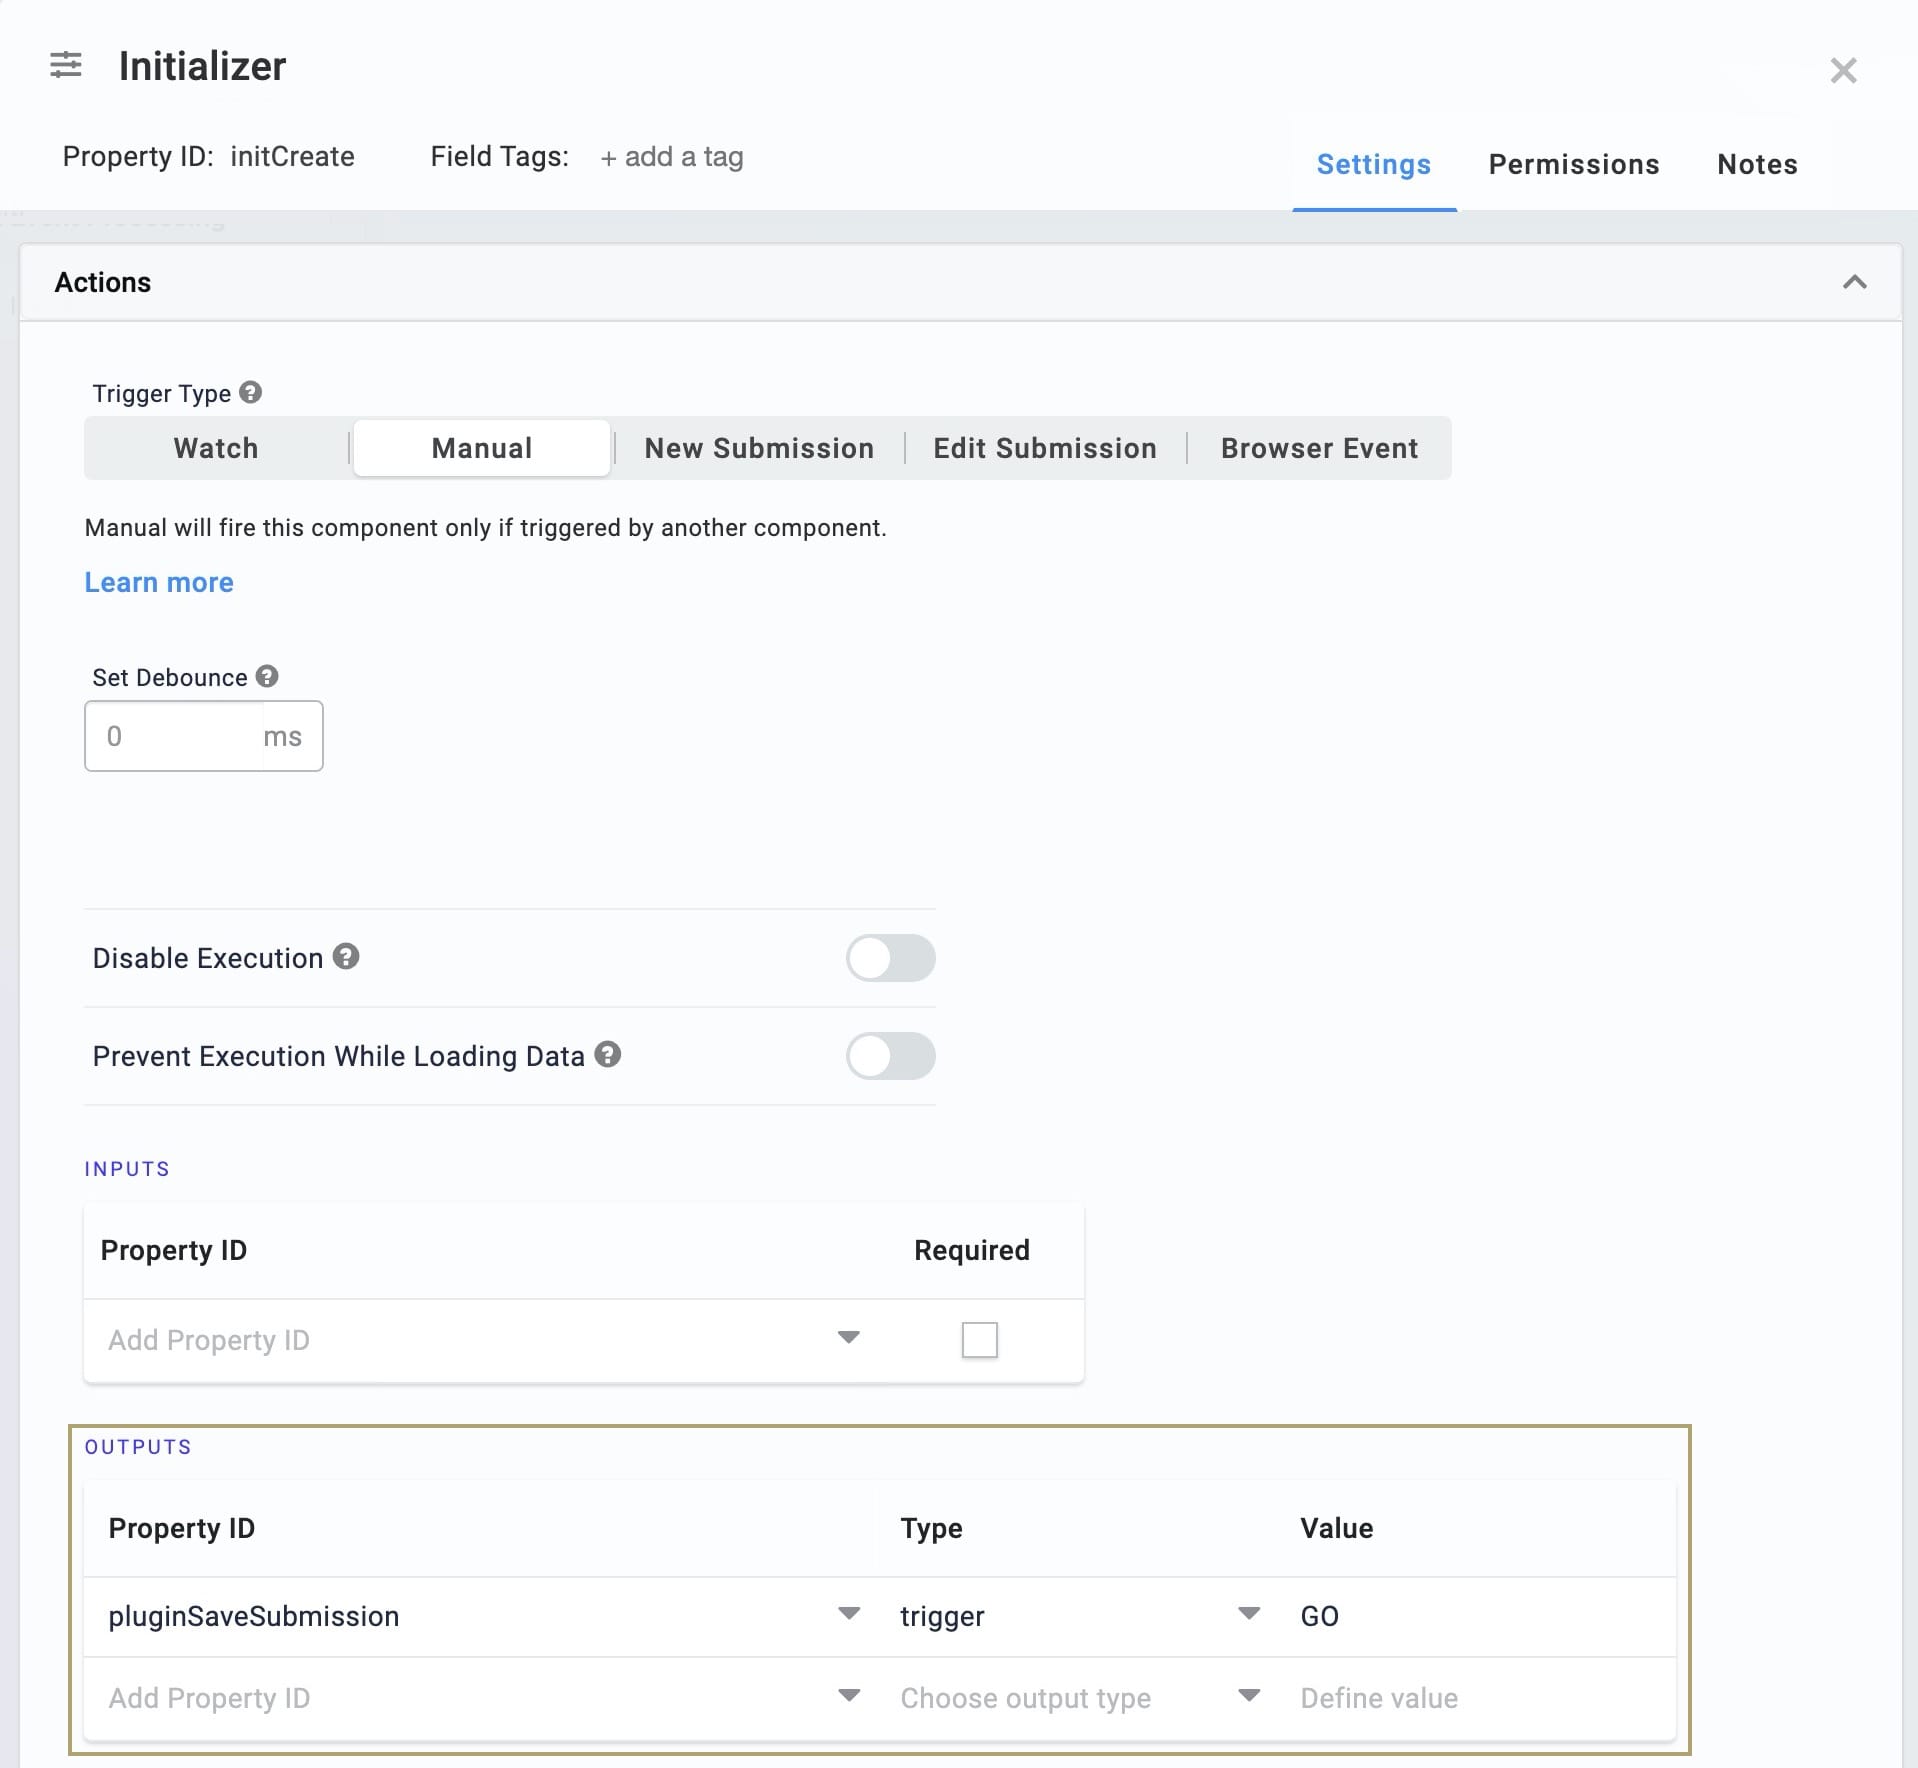
| 4. | Click Save. |
Configure the Response Handling Initializers
These Initializers relay Success or Error messages back up the data flow to the Browser Module (and ultimately, your end-user).
| 1. | Drag and drop an Initializer component onto your canvas. Place your Initializer component in the panelCreateSubmission Panel below the initCreate Initializer. |
| 2. | Enter initSuccess as the Property ID and Canvas Label Text. |
| 3. | Select Watch from the Trigger Type. |
| 4. | In the Outputs table, enter the following: |
| a. | Property ID: enter resolution. |
| b. | Type: enter value. |
| c. | Value: enter Success. |
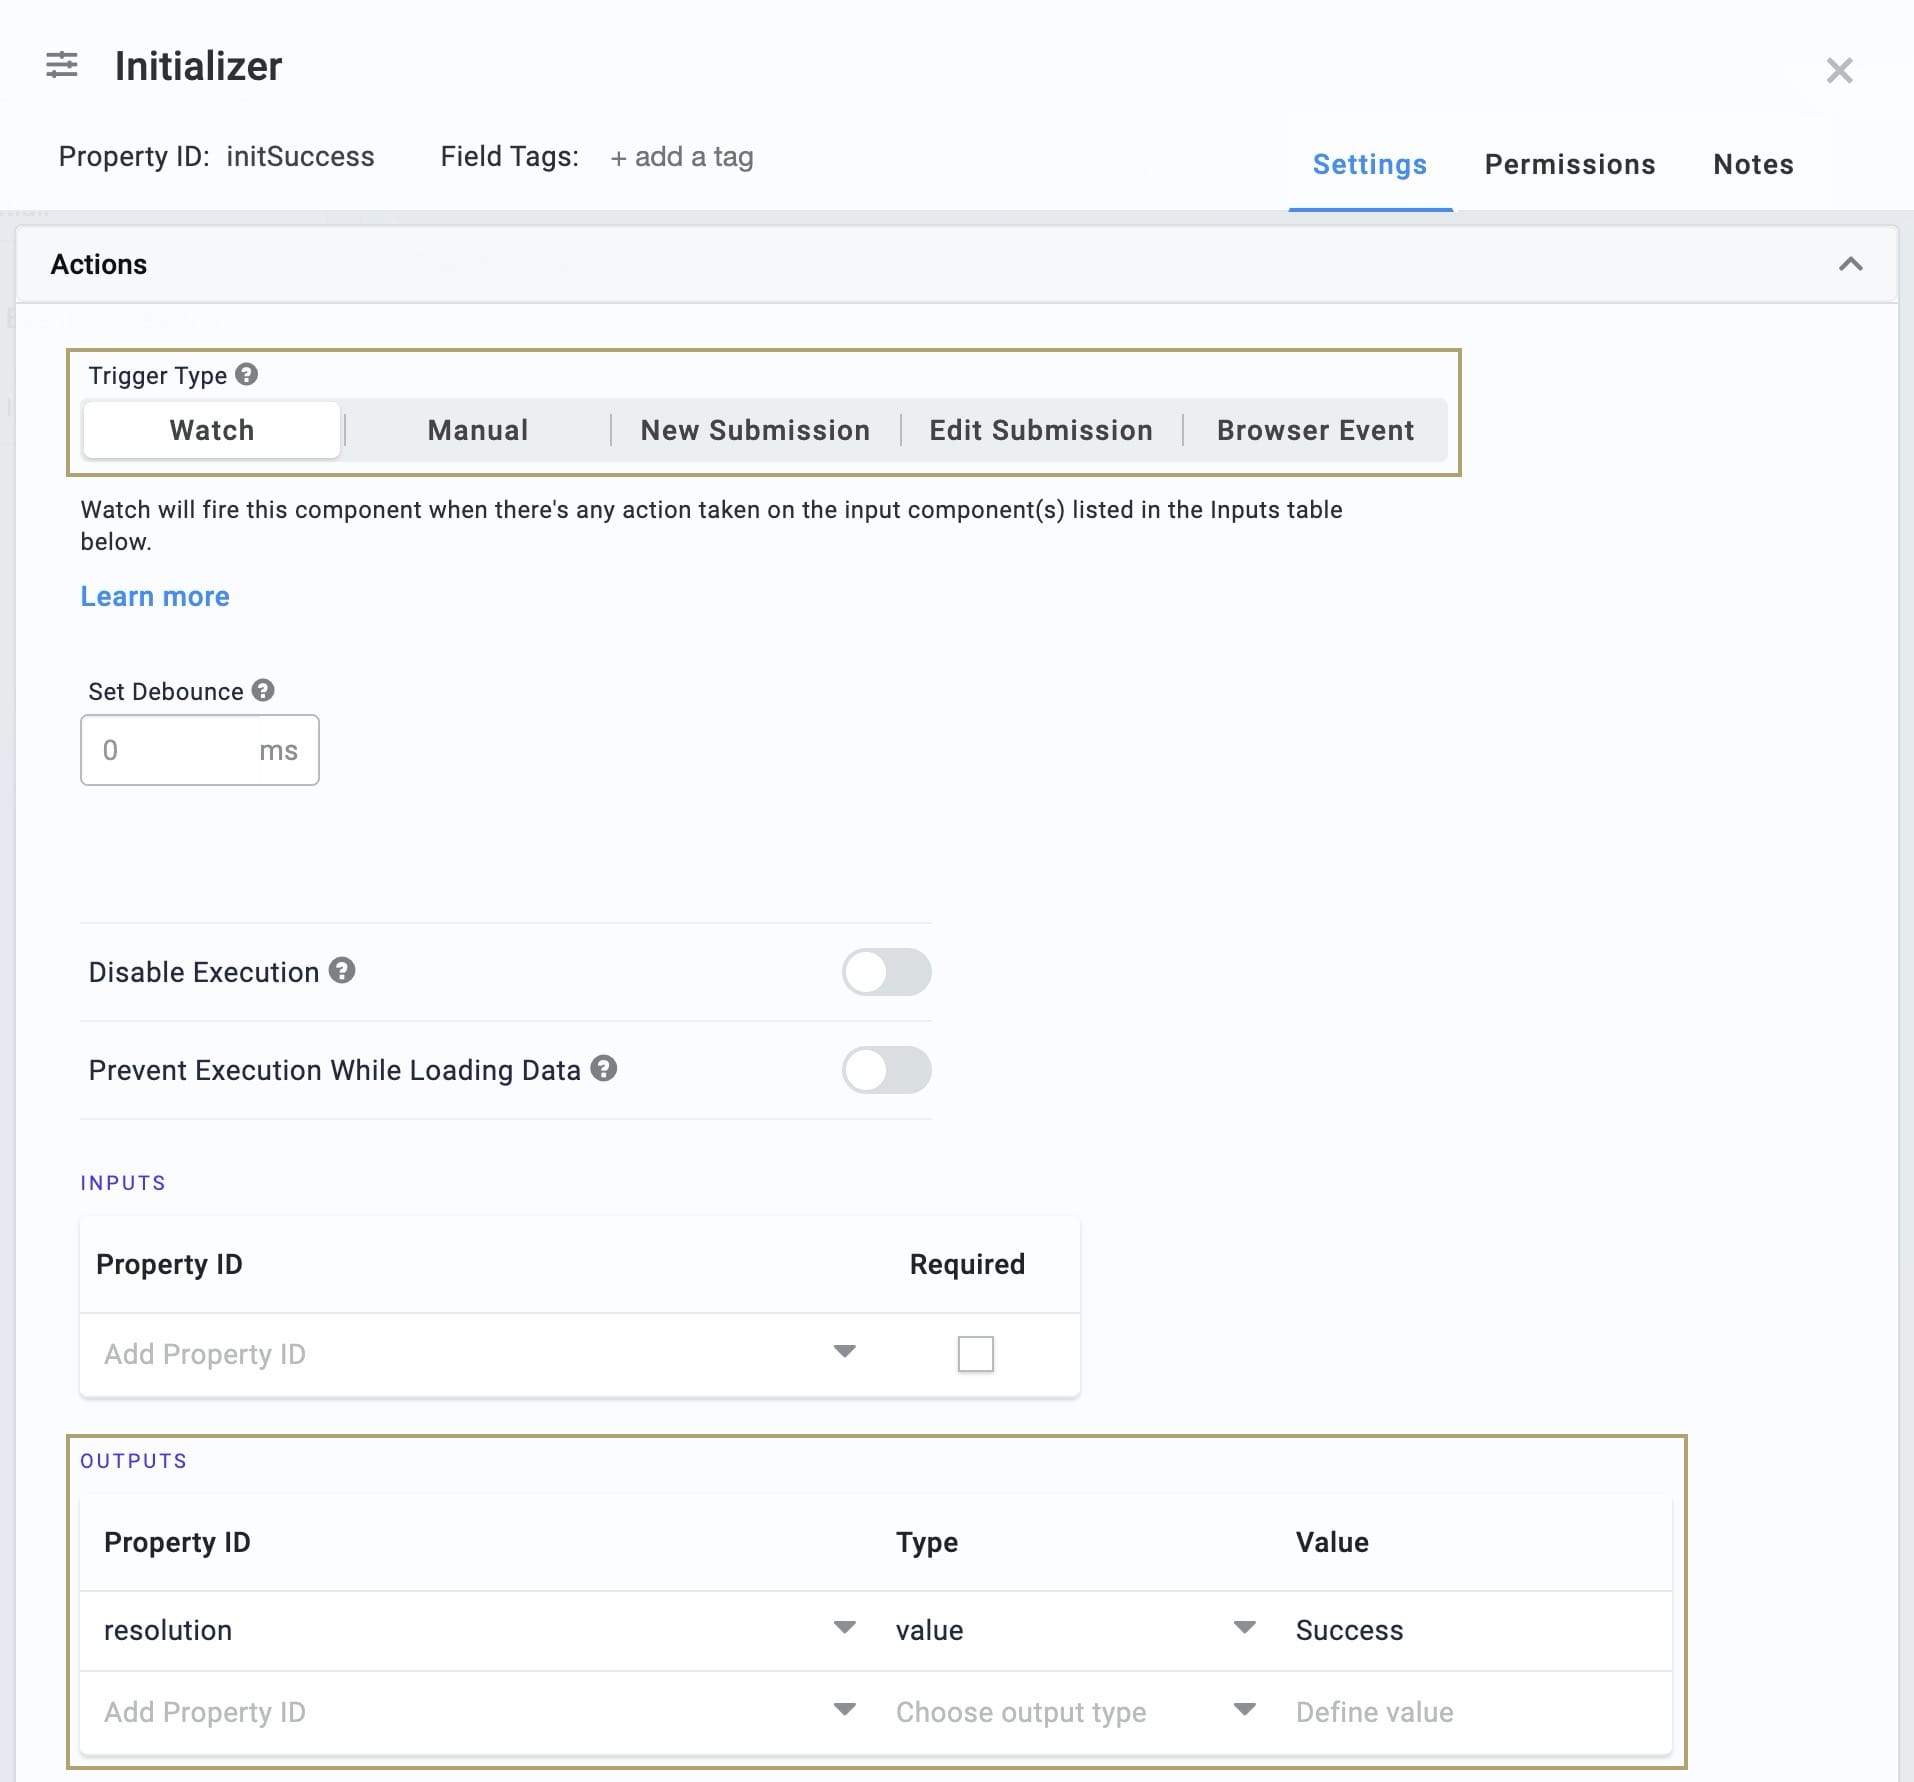
| 5. | Click Save. |
| 6. | Drag and drop a second Initializer component onto your canvas. Place your Initializer component in the panelCreateSubmission Panel below the initSuccess Initializer. |
| 7. | Enter initError in the Property ID and Canvas Label Text. |
| 8. | Select Watch from the Trigger Type. |
| 9. | In the Outputs table, enter the following: |
| a. | Property ID: enter resolution. |
| b. | Type: enter value. |
| c. | Value: enter Error. |
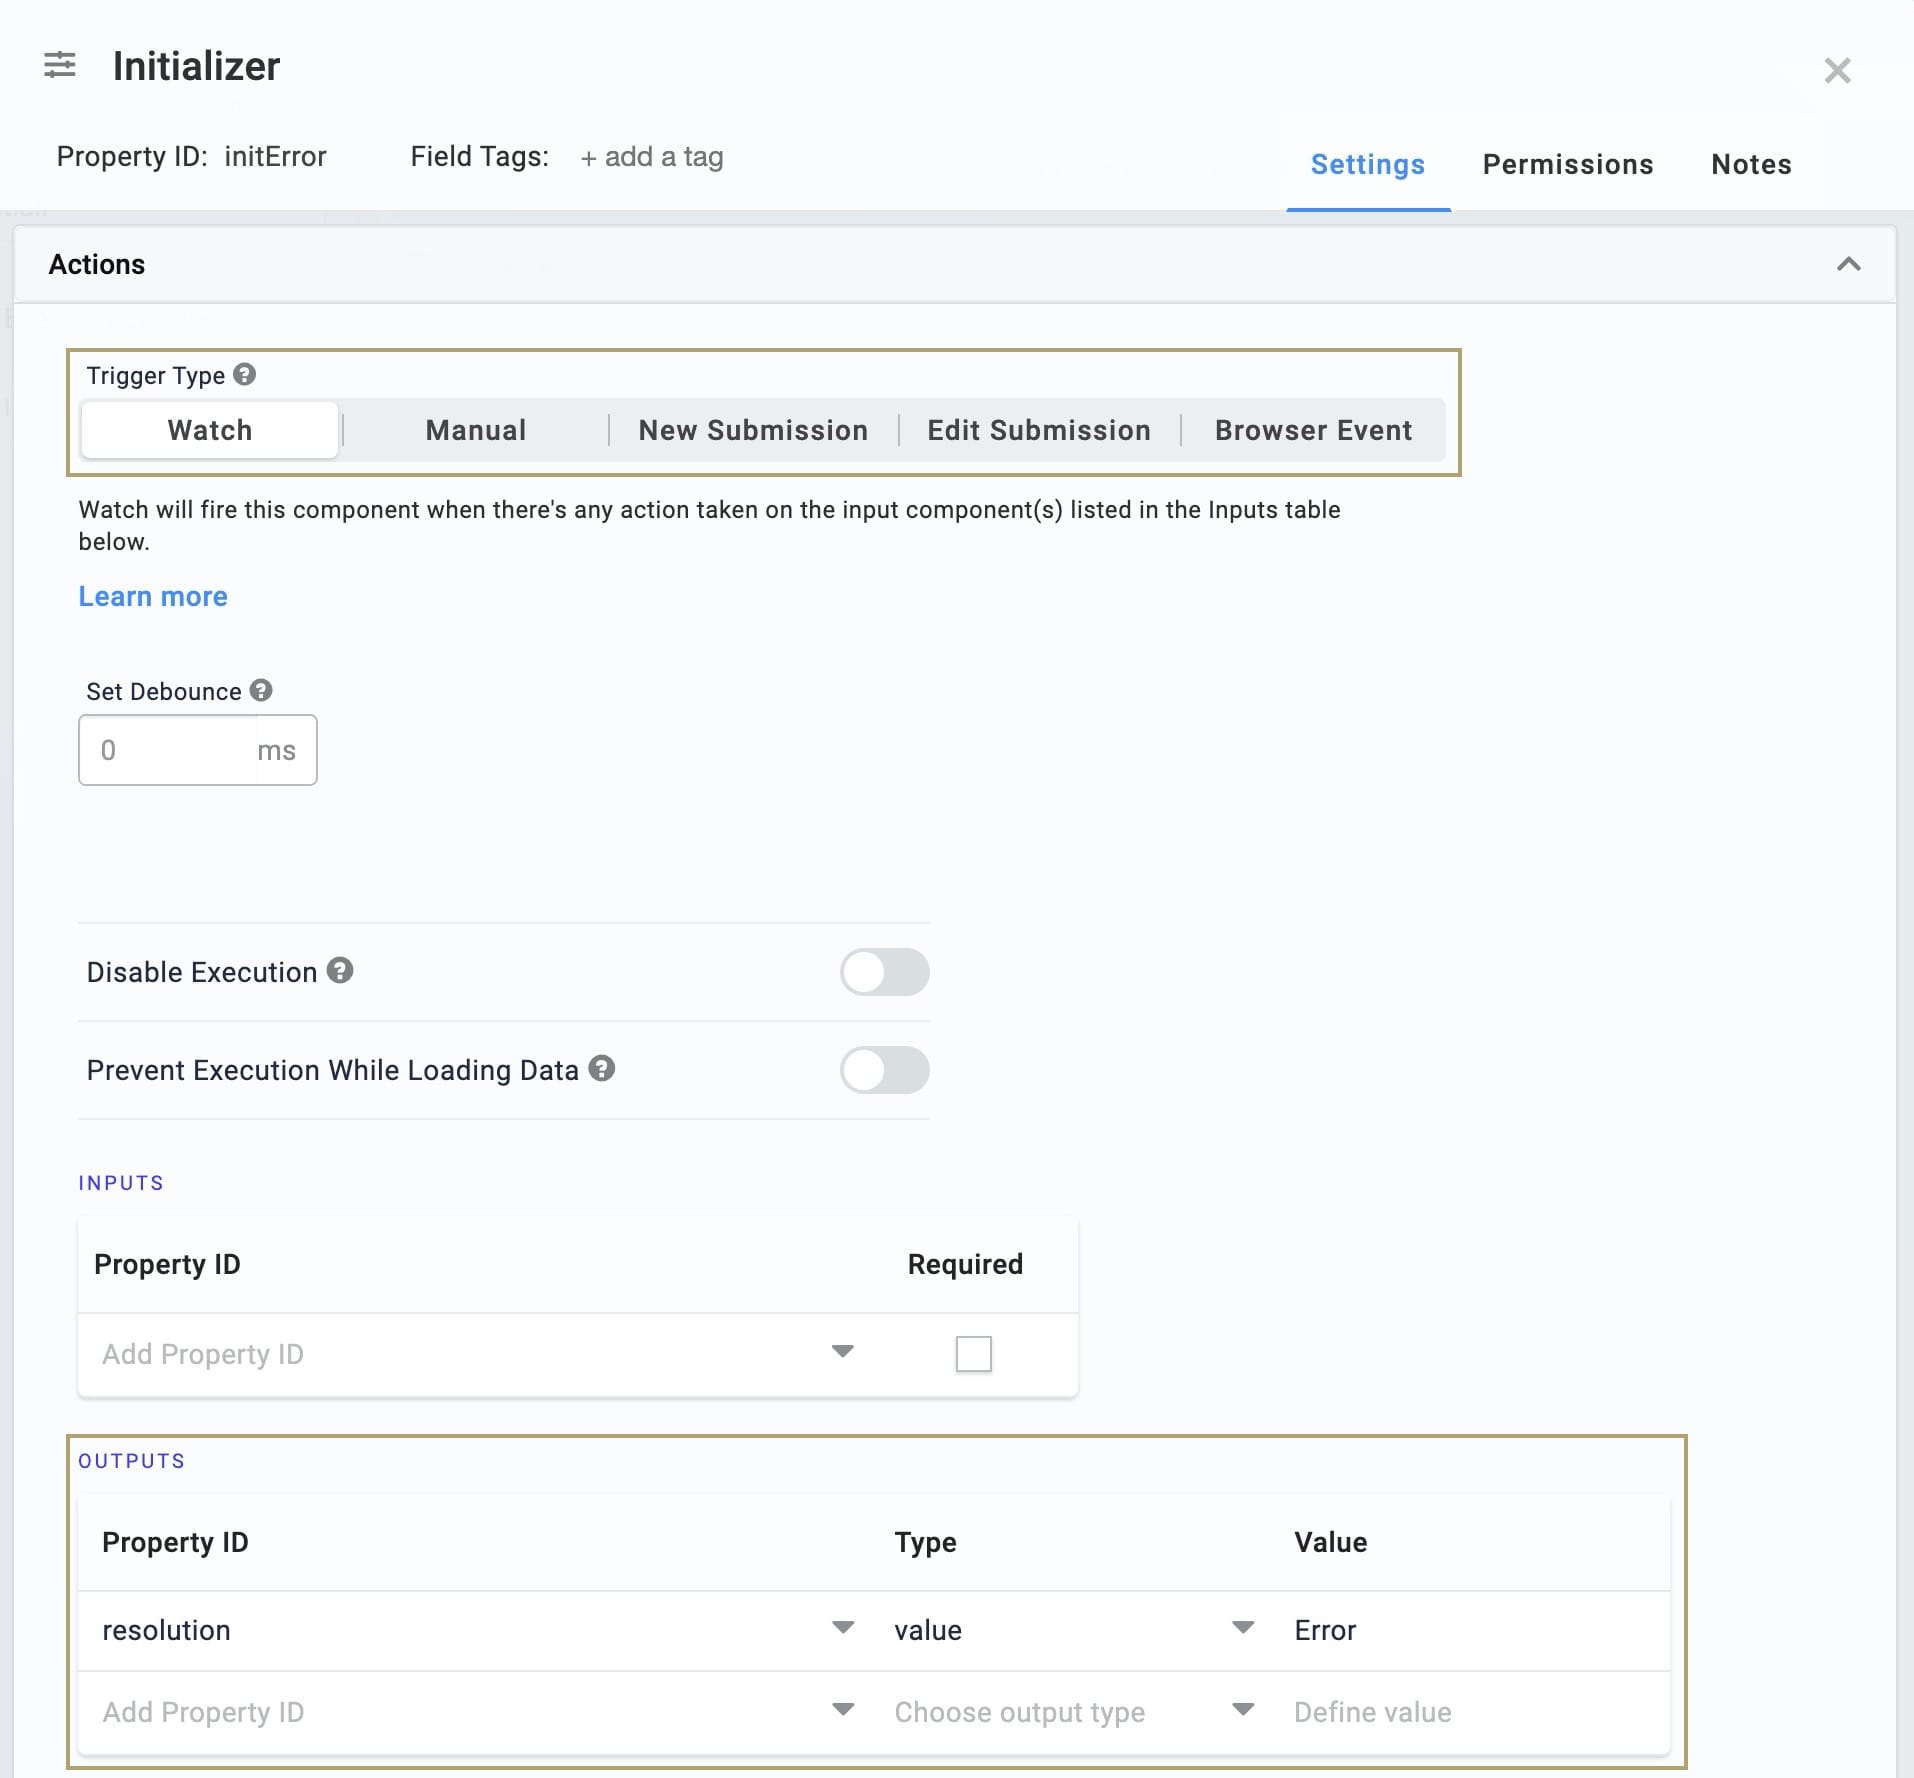
| 10. | Click Save. |
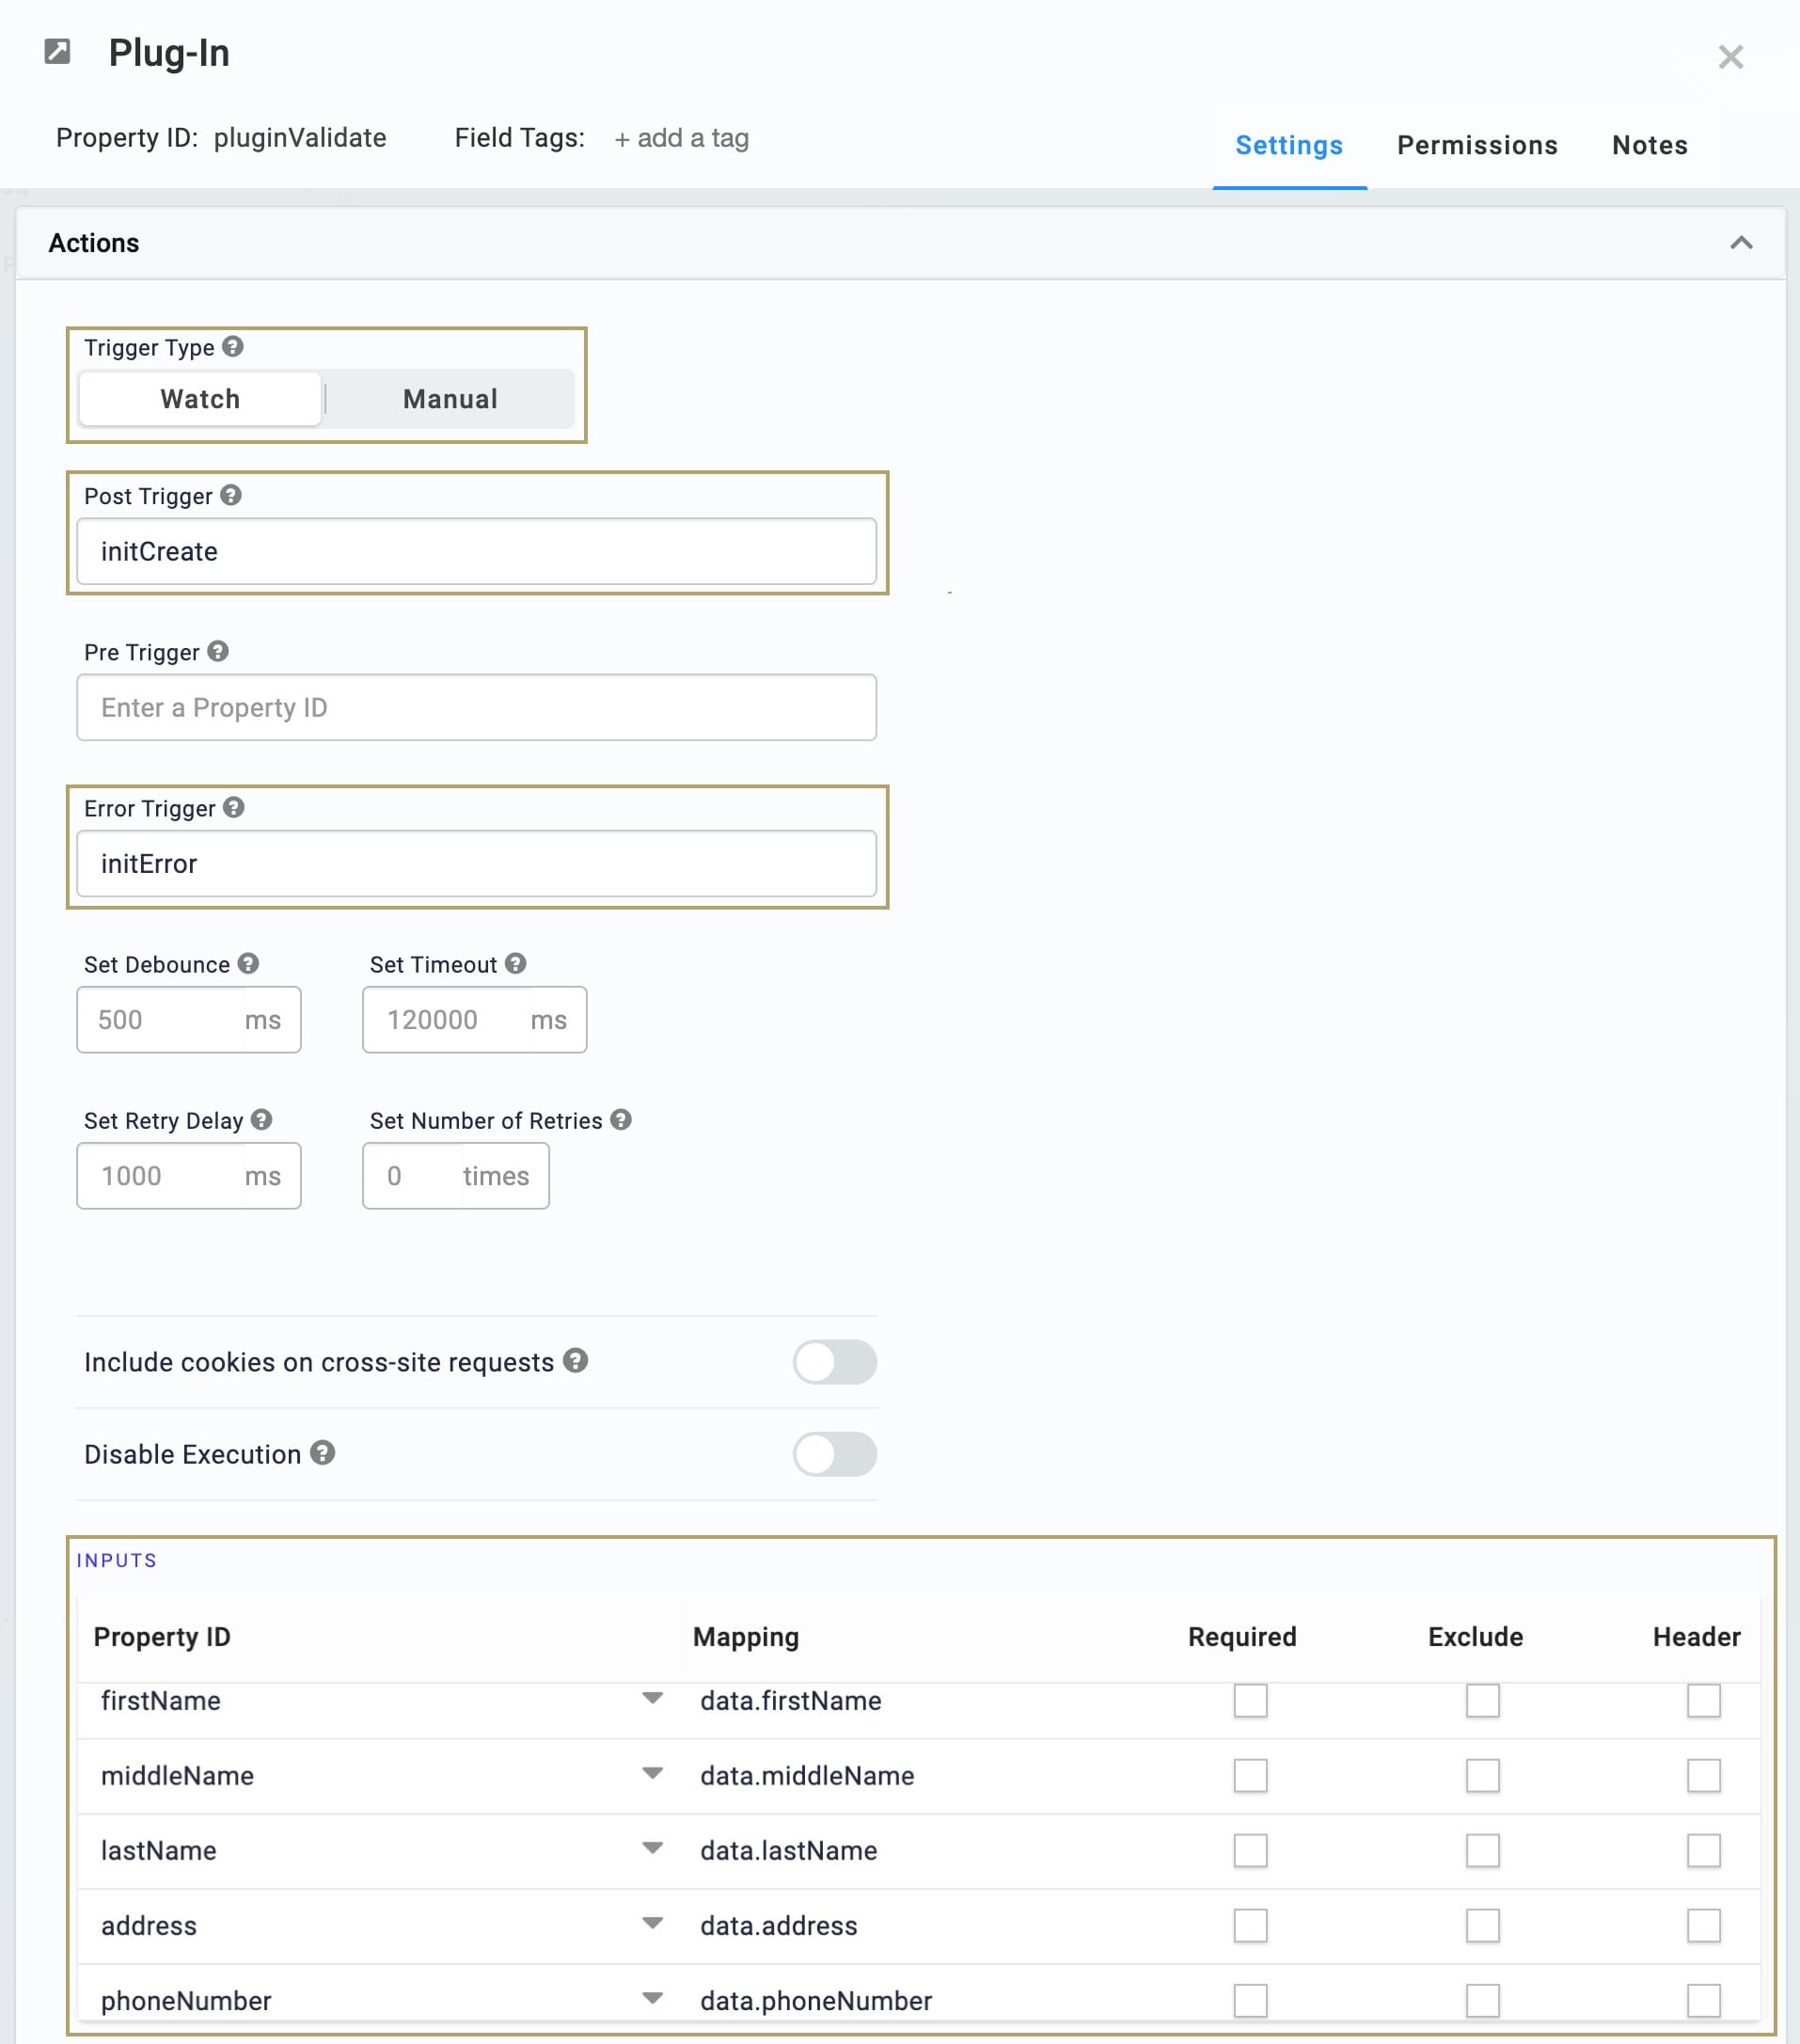
Configure the Validation Plug-In
This Plug-In progresses the data validation flow.
| 1. | Drag and drop a Plug-In component onto your canvas. Place your Plug-In component in the panelValidate Panel below the initValidate Initializer. |
| 2. | Enter pluginValidate as the Property ID and Canvas Label Text. |
| 3. | Select Watch from the Trigger Type. |
| 4. | Enter initCreate in the Post Trigger. |
| 5. | Enter initError in the Error Trigger. |
| 6. | In the Inputs table, enter the following: |
| Property ID | Mapping |
|---|---|
|
firstName |
data.firstName |
|
middleName |
data.middleName |
|
lastName |
data.lastName |
|
address |
data.address |
|
phoneNumber |
data.phoneNumber |
|
|
data.email |
|
'true' |
validate |
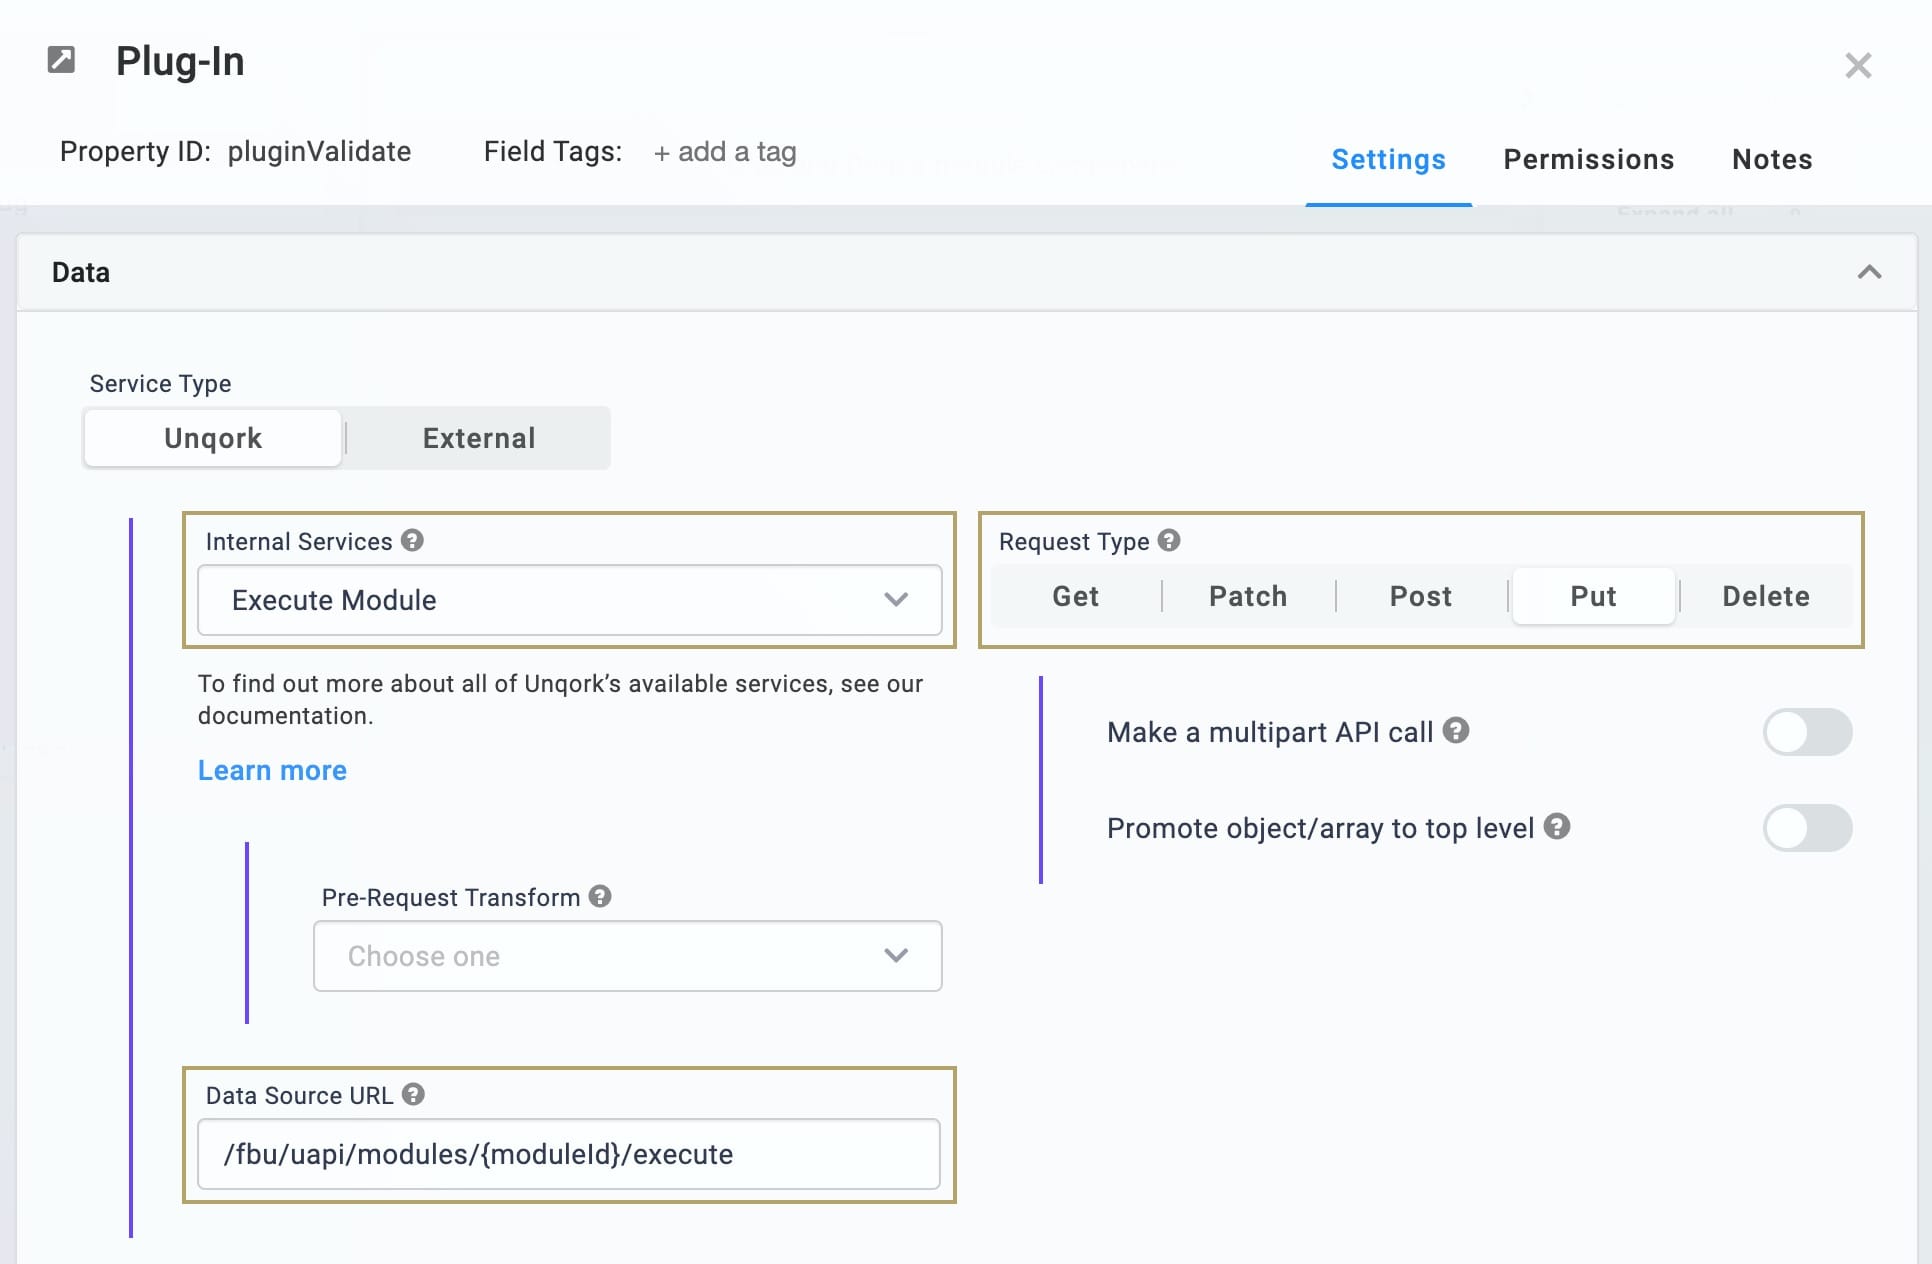
| 7. | Select Execute Module from the Internal Services drop-down. |
The Request Type and Data Source URL auto-populate. You'll see /fbu/uapi/modules/{moduleId}/execute as your Data Source URL. You'll return to this Plug-In once you have created your Validation Module. Then you'll replace {moduleId} with the module ID for your Validation Module.
| 8. | Click Save. |
Configure the Save Submission Plug-In
This Plug-In sends data to the Creation Module.
| 1. | Drag and drop a Plug-In component onto your canvas. Place your Plug-In component in the panelCreateSubmission Panel between the initCreate and initSuccess Initializers. |
| 2. | Enter pluginSaveSubmission as the Property ID and Canvas Label Text. |
| 3. | Enter initSuccess in the Post Trigger. |
| 4. | Enter initError in the Error Trigger. |
| 5. | In the Inputs table, enter the following: |
| Property ID | Mapping |
|---|---|
|
firstName |
data.firstName |
|
middleName |
data.middleName |
|
lastName |
data.lastName |
|
address |
data.address |
|
phoneNumber |
data.phoneNumber |
|
|
data.email |
| 6. | In the Outputs table, enter the following: |
| a. | Property ID: enter referenceNumber. |
| b. | Mapping: enter id. |
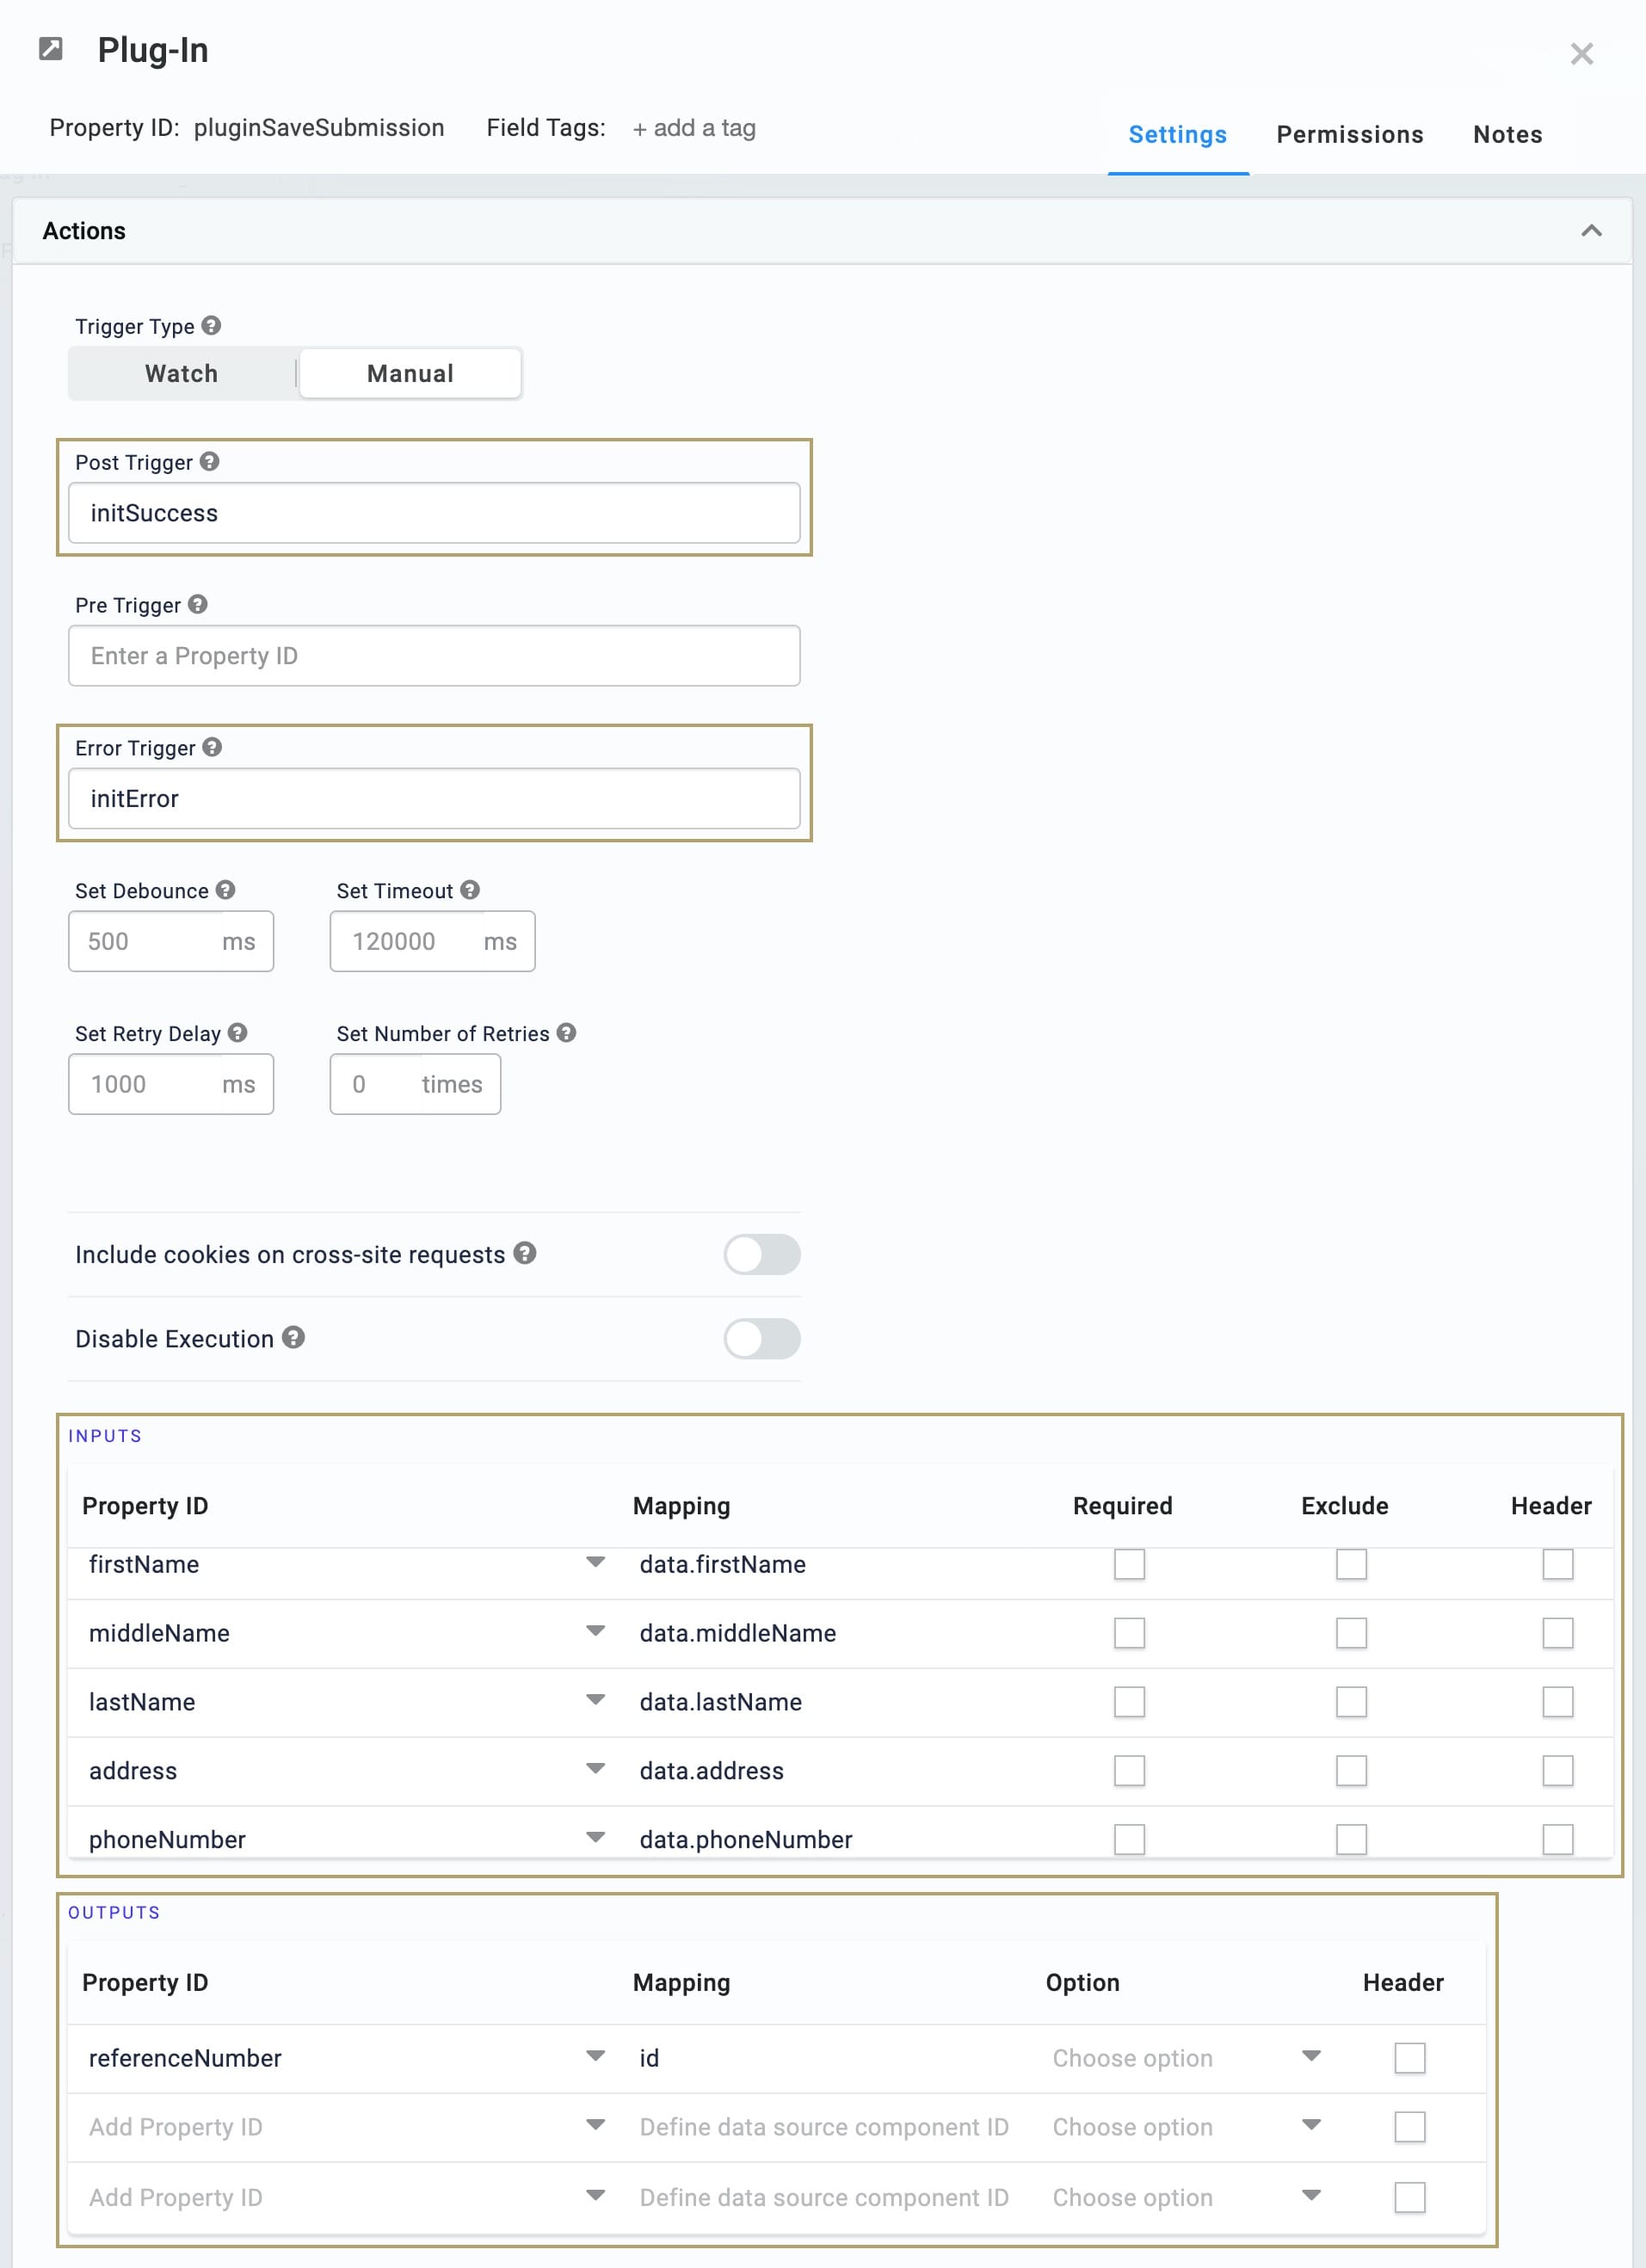
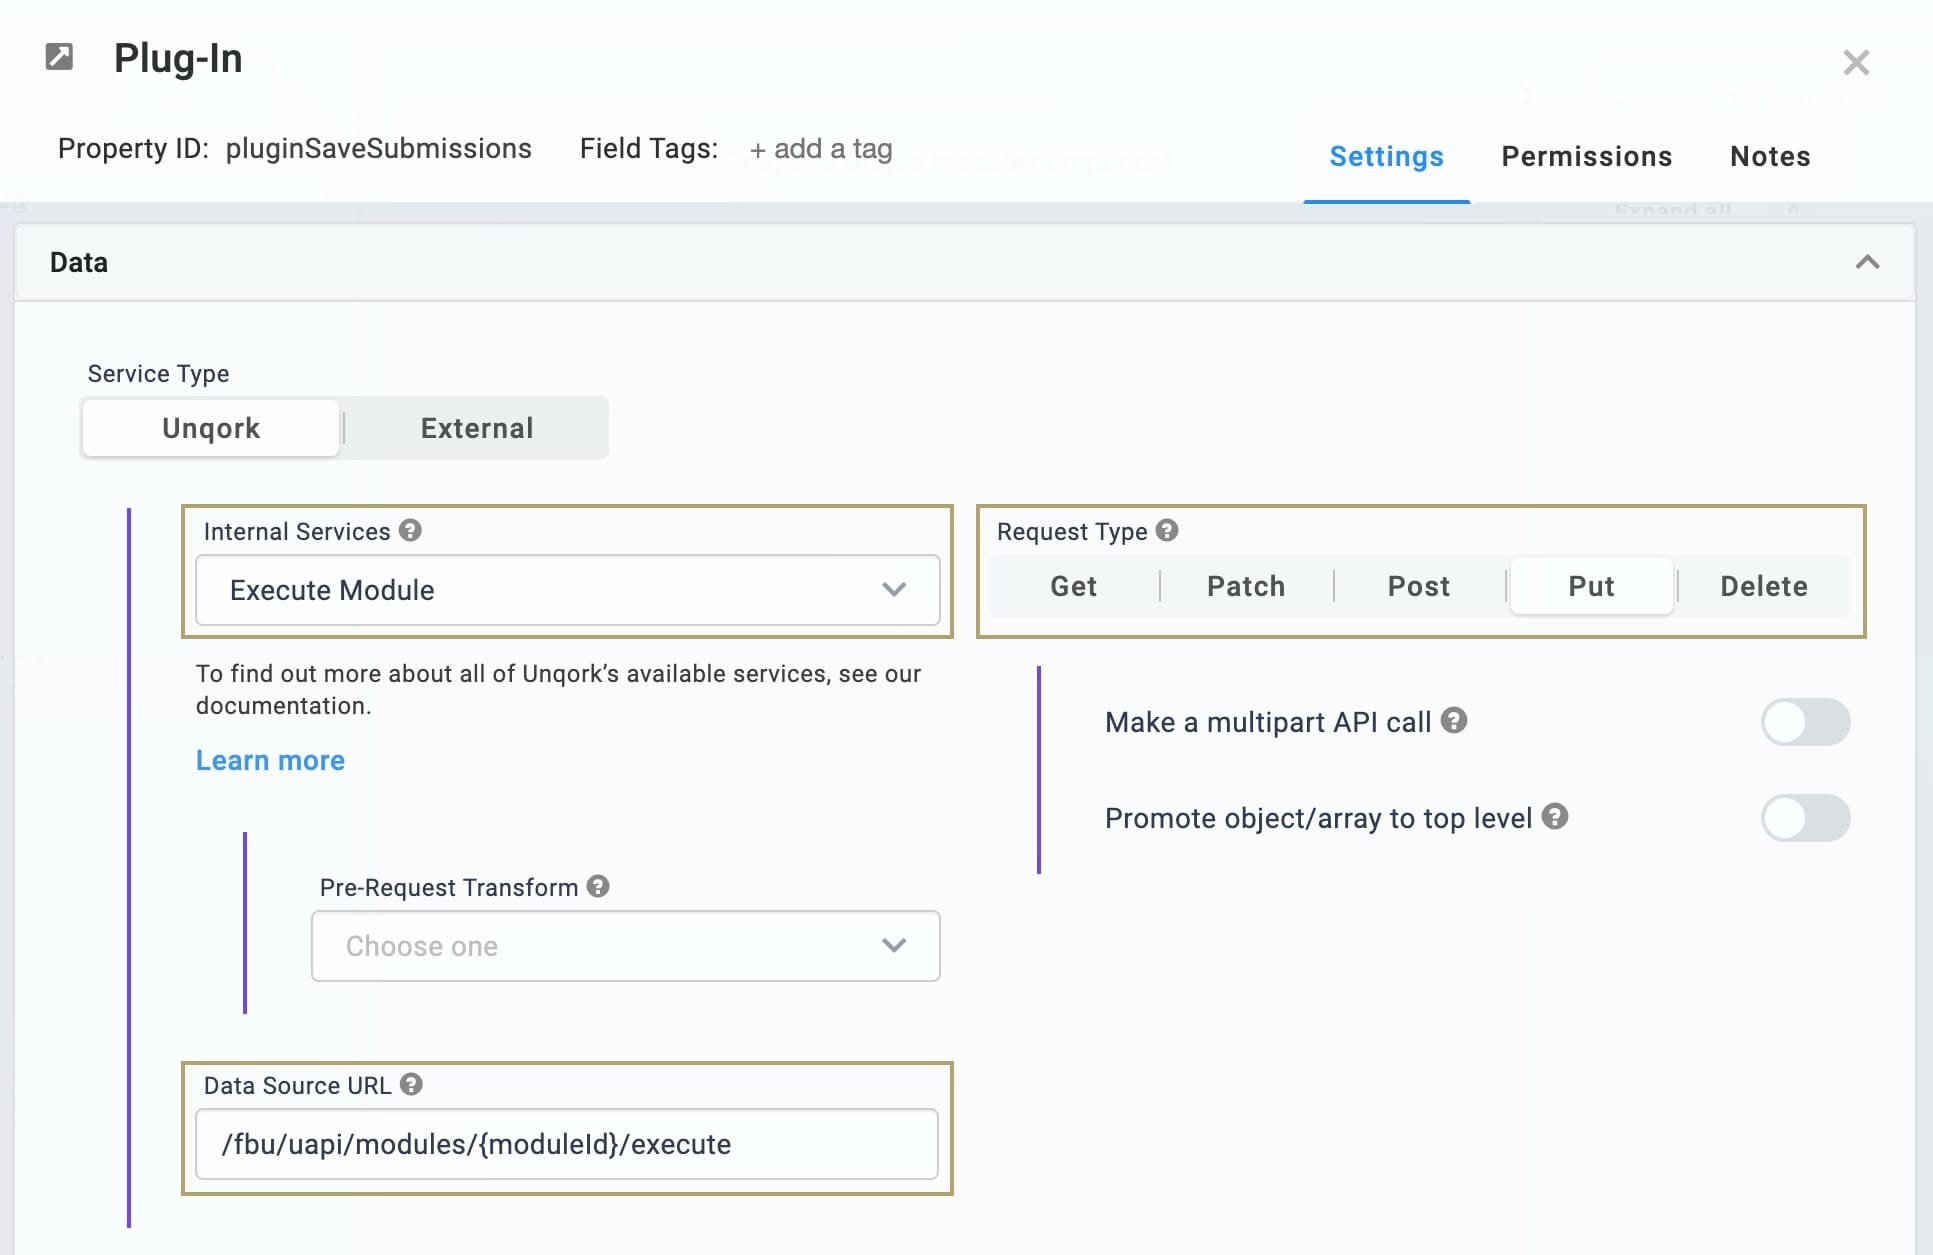
| 7. | Select Execute Module from the Internal Services drop-down. |
The Request Type and Data Source URL auto-populate. You'll see /fbu/uapi/modules/{moduleId}/execute as your Data Source URL. You'll return to this Plug-In once you have created your Creation Module. Then you'll replace {moduleId} with the module ID for your Creation Module.
| 8. | Click Save. |
| 9. | Save your module. |
Link the Master Module to the Proxy Module
Next, you'll link your Master Module back to the Proxy Module you created in the previous section.
| 1. | In your Proxy Module, hover over the pluginValidatePersonalInfo Plug-In component. |
A 5-button toolbar appears above the component on hover-over.
| 2. | Using the toolbar, click the (Settings) button. |
| 3. | In the Data Source URL, replace {moduleId} with the module ID of your Master Module. |
To find the module ID, look in the module URL. You can see the module ID for our sample Master Module bolded here: https://training.unqork.io/#/form/5ebc196fb47819020ecd171a/edit.
| 4. | Click Save. |
| 5. | Save your module. |
You now have a Server Side Execute Only module that passes data where needed to perform your desired actions. Your Master Module continues the data flow from the Proxy Module.
You can find the complete Master Module for this use case here: https://training.unqork.io/#/form/5ebc196fb47819020ecd171a/edit.
Set Up the Validation Module
The first action the Master Module calls is data validation. This is the second time your end-user’s data validates. But unlike the first time, this validation is happening server-side. This ensures the data still matches the requirements you set in the Browser Module. If validation fails here, an error message triggers and sends back up the data flow.
To set up the Validation Module, you’ll need:
- 1 Panel component
- 1 Columns component
- 1 Hidden component
- 3 Text Field components
- 1 Address component
- 1 Phone Number component
- 1 Email component
Here's how your Validation Module will look in the Module Builder:
Your Validation Module works on the server-side, so your end-users will never see it in Express View.
Create the Module
Let's add another new module to your application.
| 1. | In the application view of your workspace, create a new module from scratch. |
| 2. | Enter a Module Name that contains Validation Module. |
| 3. | Click Create. Your new module shows on the following page. |
| 4. | Click your Validation Module to open it. |
Enable Server Side Execution Only
The only module visible to your end-user in this structure is the Browser Module. You'll enable Server Side Execution Only so your Validation Module isn't accessible in Express View.
| 1. | In the Module Builder, hover over the left menu bar and click Settings. |
| 2. | Set the Server Side Execution Only toggle to ON. |
| 3. | Click Save Changes. |
Configure the Panel Component
Your Panel acts as a container for the components that follow. Your panelRequest Panel manages the data passed from the Browser Module.
| 1. | In the Module Builder, drag and drop a Panel component onto your canvas. |
| 2. | Enter panelRequest in the Title and Property Name. |
| 3. | Click Save. |
Configure the Columns Component
Columns help keep your Validation Module organized. You’ll place First Name, Middle Name, and Last Name fields here like you did in the Browser Module.
| 1. | Drag and drop a Columns component onto your canvas. Place your Columns component in the panelRequest Panel. |
| 2. | Enter colPersonalInfo in the Property ID. |
| 3. | Under Column Layout, click on the icon displaying 3 evenly spaced columns. |
| 4. | Click Save. |
Configure the Text Field Components
| 1. | Drag and drop 3 Text Field components onto your canvas. Place a Text Field component inside each of your 3 columns. |
| 2. | Enter the following Property IDs and Label Text: |
| Property ID | Label Text |
|---|---|
|
firstName |
First Name |
|
middleName |
Middle Name |
|
lastName |
Last Name |
| 3. | Set the Required toggle in your firstName and lastName components to ON. |
| 4. | Save each component as you add it. |
Configure the Address Component
| 1. | Drag and drop an Address component onto your canvas. Place your Address component in the panelRequest Panel below your Columns. |
| 2. | Enter Address in the Label. |
| 3. | Enter address in the Property Name. |
| 4. | Click Save. |
Configure the Phone Number Component
| 1. | Drag and drop a Phone Number component onto your canvas. Place your Phone Number component in the panelRequest Panel below your Address component. |
| 2. | Enter phoneNumber in the Property ID. |
| 3. | Enter Phone Number in the Label Text. |
| 4. | Enter ^(\+\d{1,2}\s)?\(?\d{3}\)?[()\s.-]?\d{3}[\s.-]?\d{4}$ in the Regex Pattern. |
This validates the data against the same requirement set in the Browser Module.
| 5. | Click Save. |
Configure the Email Component
| 1. | Drag and drop an Email component onto your canvas. Place your Email component in the panelRequest Panel below your Phone Number component. |
| 2. | Enter email in the Property ID. |
| 3. | Enter Email in the Label Text. |
| 4. | Set the Required toggle to ON. |
| 5. | Enter ^([a-zA-Z0-9_\-\.]+)@([a-zA-Z0-9_\-\.]+)\.([a-zA-Z]{2,5})$ in the Define Pattern field. |
This validates the data against the same requirement set in the Browser Module.
| 6. | Click Save. |
Configure the Hidden Component
The Hidden component allows automatic API documentation of the module for others working on the application.
| 1. | Drag and drop a Hidden component onto your canvas. Place your Hidden component above the panelRequest Panel. |
| 2. | Enter method in the Property ID and Label Text. |
| 3. | Enter PUT in the Default Value. |
This indicates the HTTP request your module simulates.
| 4. | Click Save. |
| 5. | Save your module. |
Link the Validation Module to the Master Module
Next, you'll link your Validation Module back to the Master Module you created in the previous section.
| 6. | In your Master Module, hover over the pluginValidate Plug-In component. |
A 5-button toolbar appears above the component on hover-over.
| 7. | Using the toolbar, click the (Settings) button. |
| 8. | In the Data Source URL, replace {moduleId} with the module ID of your Validation Module. |
To find the module ID, look in the module URL. You can see the module ID for our sample Validation Module bolded here: https://training.unqork.io/#/form/5ebc28147b2213020fc9ef10/edit.
| 9. | Click Save. |
| 10. | Save your module. |
You now have a Server Side Execute Only module that validates user data passed to it from the Master Module. Your Validation Module is the end of the validation portion of this Proxy Structure.
You can find the completed Validation Module for this use case here: https://training.unqork.io/#/form/5ebc28147b2213020fc9ef10/edit.
Set Up the Creation Module
Once data clears the Validation Module, the Master Module passes it to the next step. The Creation Module handles that by creating the submission from the data. Submissions then go to the Schema Module for storage, which you'll create in the next step. If the Creation Module fails, an error message sends back up the flow.
To set up the Creation Module, you’ll need:
- 3 Panel components
- 8 Hidden components
- 1 Initializer component
- 1 Plug-In component
Here's how your Creation Module will look in the Module Builder:
Your Creation Module works on the server-side, so your end-user will never see it in Express View.
Create the Module
First, let's add a new module to your application.
| 1. | In the application view of your workspace, create a new module from scratch. |
| 2. | Enter a Module Name that contains Create Module. |
| 3. | Click Create. Your new module shows on the following page. |
| 4. | Click your Create Module to open it. |
Enable Server Side Execution Only
The only module visible to your end-user in this structure is the Browser Module. You'll enable Server Side Execution Only so your Creation Module isn't accessible in Express View.
| 1. | In the Module Builder, hover over the left menu bar and click Settings. |
| 2. | Set the Server Side Execution Only toggle to ON. |
| 3. | Click Save Changes. |
Configure the Panel Components
Your Panels act as containers for the components that follow. Your panelRequest Panel manages the data passed all the way from the Browser Module. Your panelCreateSubmission manages the submission for storage in the Schema Module. And your panelResponse manages error handling.
| 1. | In the Module Builder, drag and drop 3 Panel components onto your canvas. |
| 2. | Enter the following Titles and Property Names: |
| Title | Property Name |
|---|---|
|
panelRequest |
panelRequest |
|
panelCreateSubmission |
panelCreateSubmission |
|
panelResponse |
panelResponse |
| 3. | Save each component as you add it. |
Configure the API Hidden Component
This Hidden component allows automatic API documentation of the module for others working on the application.
| 1. | Drag and drop a Hidden component onto your canvas. Place your Hidden component above the panelRequest Panel. |
| 2. | Enter method in the Property ID and Canvas Label Text. |
| 3. | Enter POST in the Default Value. |
This indicates the HTTP request your module simulates.
| 4. | Click Save. |
Configure the Data Hidden Components
These Hidden components carry data passed all the way from the BrowserModule.
| 1. | Drag and drop 6 Hidden components onto your canvas. Place your Hidden components in the panelRequest Panel. |
| 2. | Enter the following Property IDs and Canvas Label Text: |
| Property ID | Canvas Label Text |
|---|---|
|
firstName |
firstName |
|
middleName |
middleName |
|
lastName |
lastName |
|
|
|
|
address |
address |
|
phoneNumber |
phoneNumber |
These Property IDs are the same as the Property IDs used in the Master Module. These must match to ensure proper data mapping.
| 3. | Save each component as you add it. |
Configure the Response Hidden Component
This Hidden component handles the data flow response.
| 1. | Drag and drop another Hidden component onto your canvas. Place your Hidden component in the panelResponse Panel. |
| 2. | Enter referenceNumber as the Property ID and Canvas Label Text. |
This Property ID is the same as the Property ID used in the Master Module. These must match to ensure proper data mapping.
| 3. | Click Save. |
Configure the Plug-In Component
| 1. | Drag and drop a Plug-In component onto your canvas. Place your Plug-In component in the panelCreateSubmission Panel. |
| 2. | Enter pluginSaveSubmission in the Property ID and Canvas Label Text. |
| 3. | In the Inputs table, enter the following: |
| Property ID | Mapping |
|---|---|
|
firstName |
data.firstName |
|
middleName |
data.middleName |
|
lastName |
data.lastName |
|
address |
data.address |
|
phoneNumber |
data.phoneNumber |
|
|
data.email |
| 4. | In the Outputs table, enter the following: |
| a. | Property ID: enter referenceNumber. |
| b. | Mapping: enter id. |
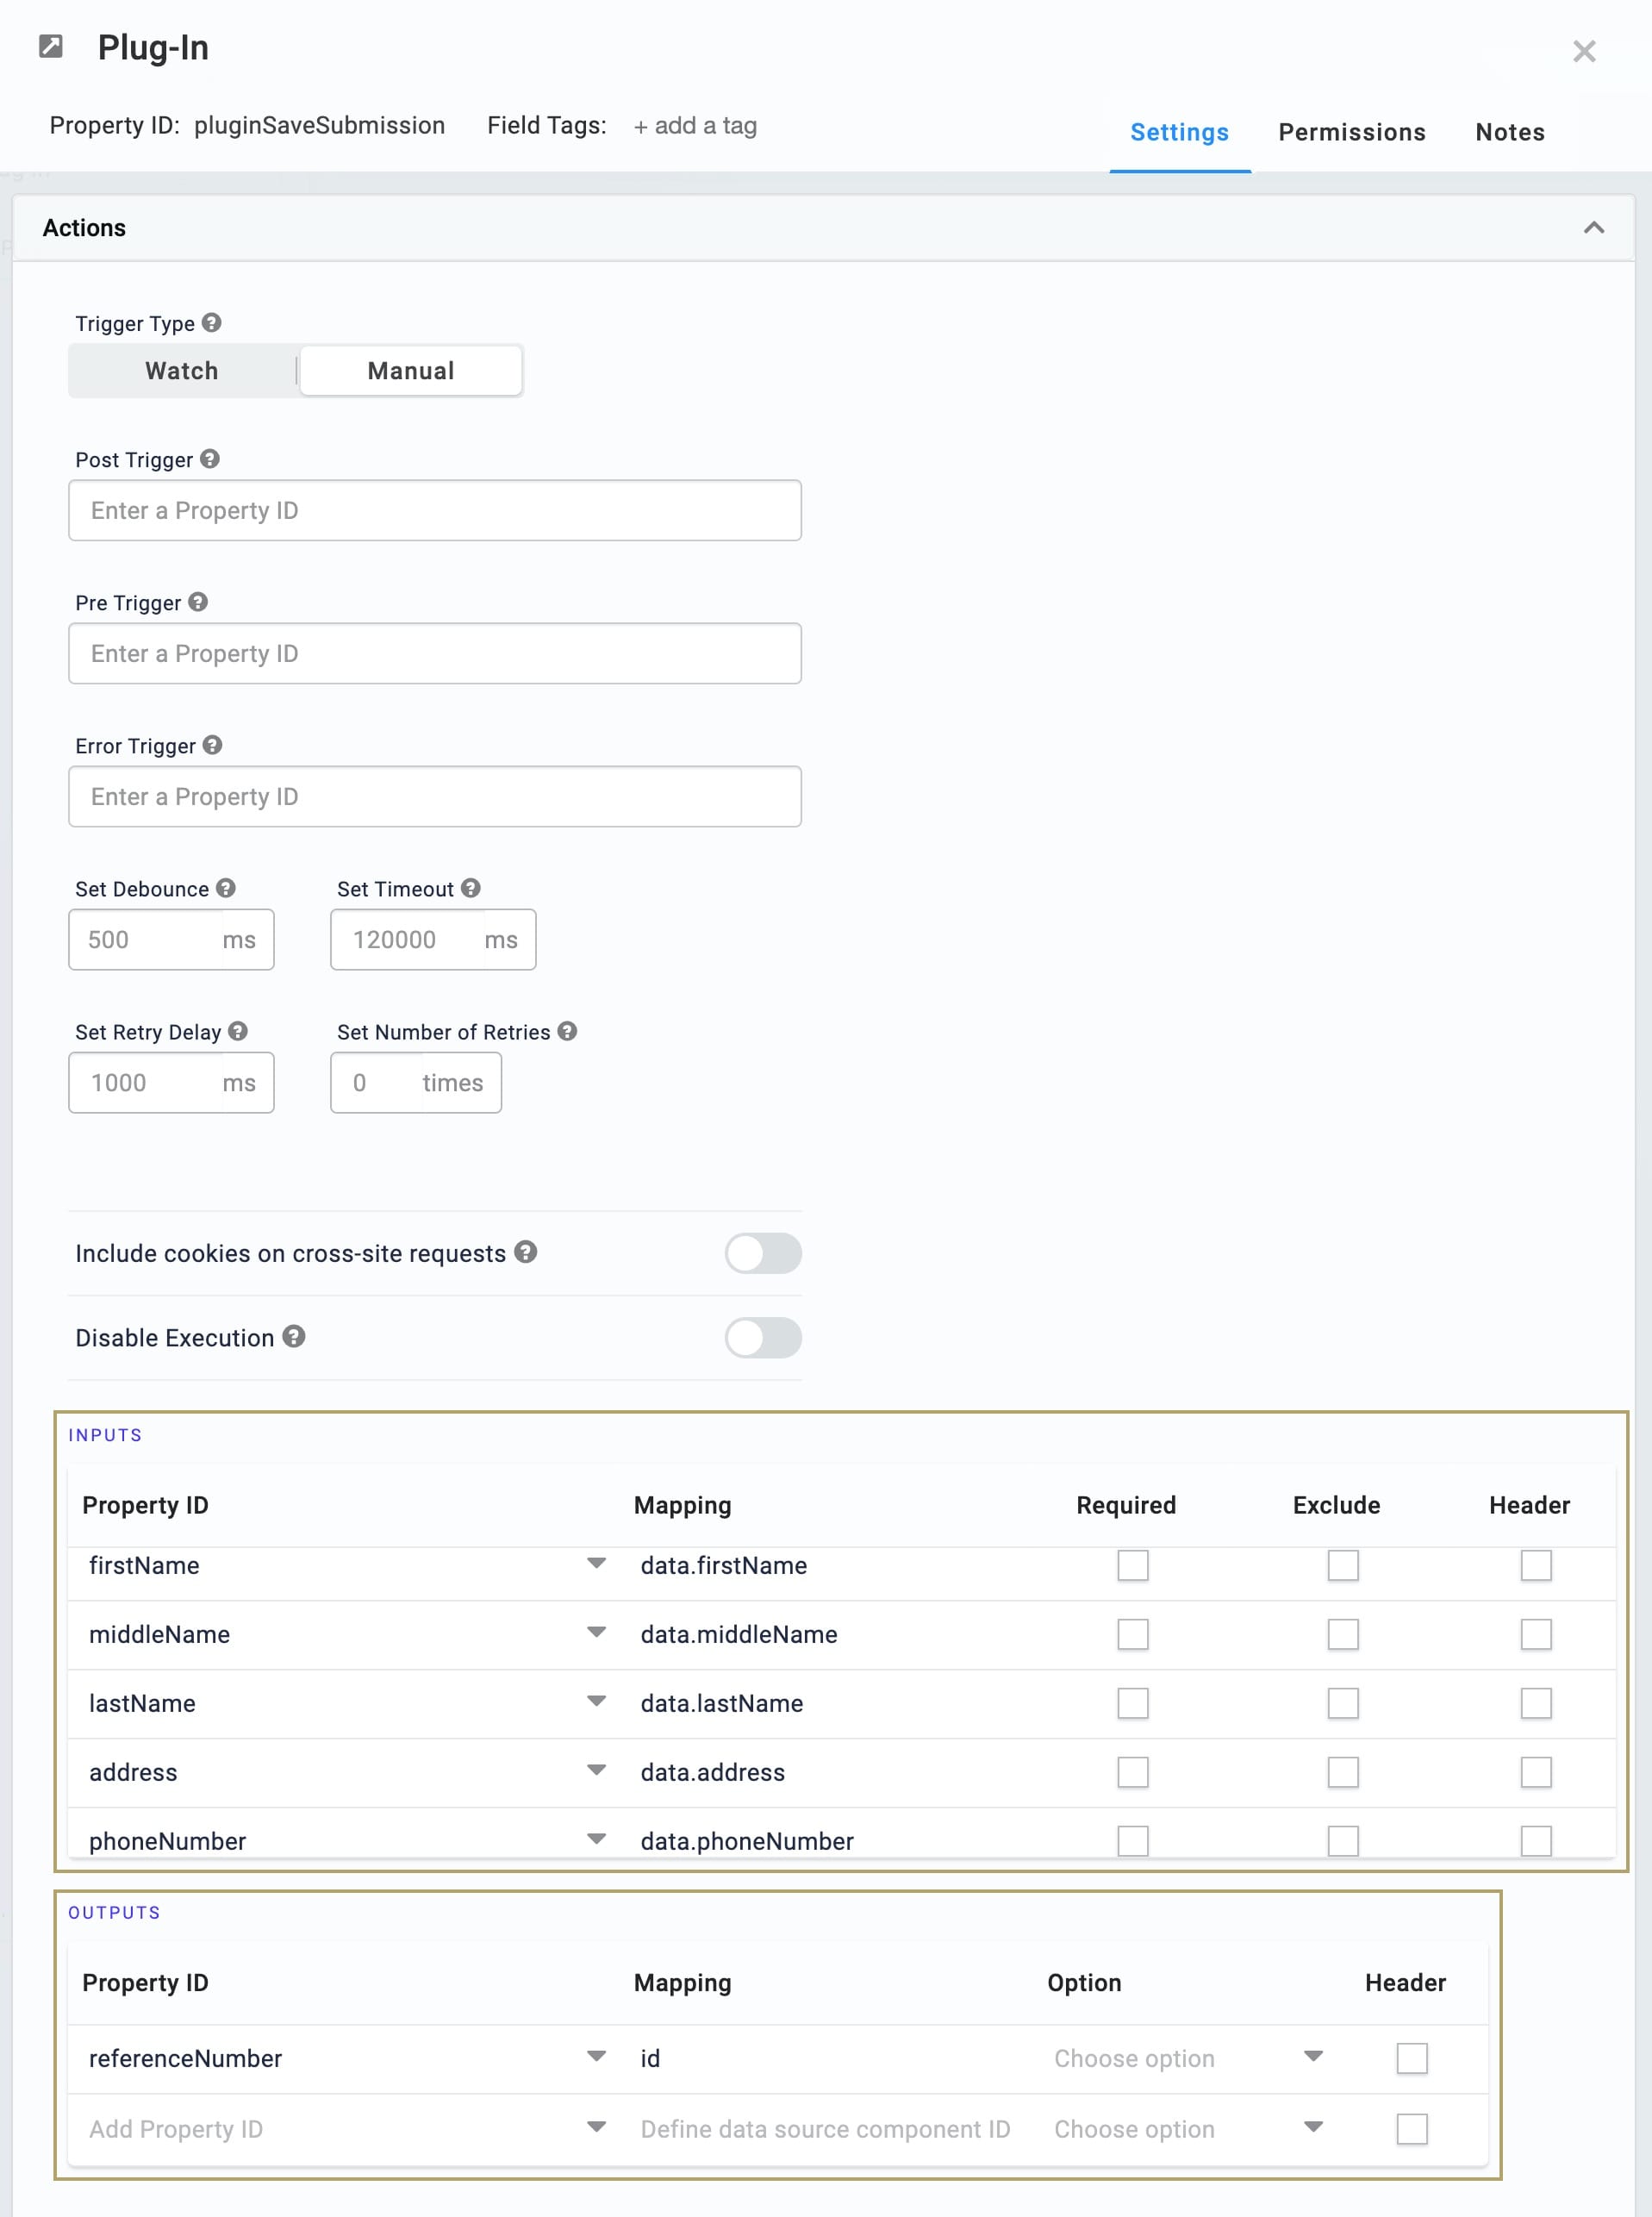
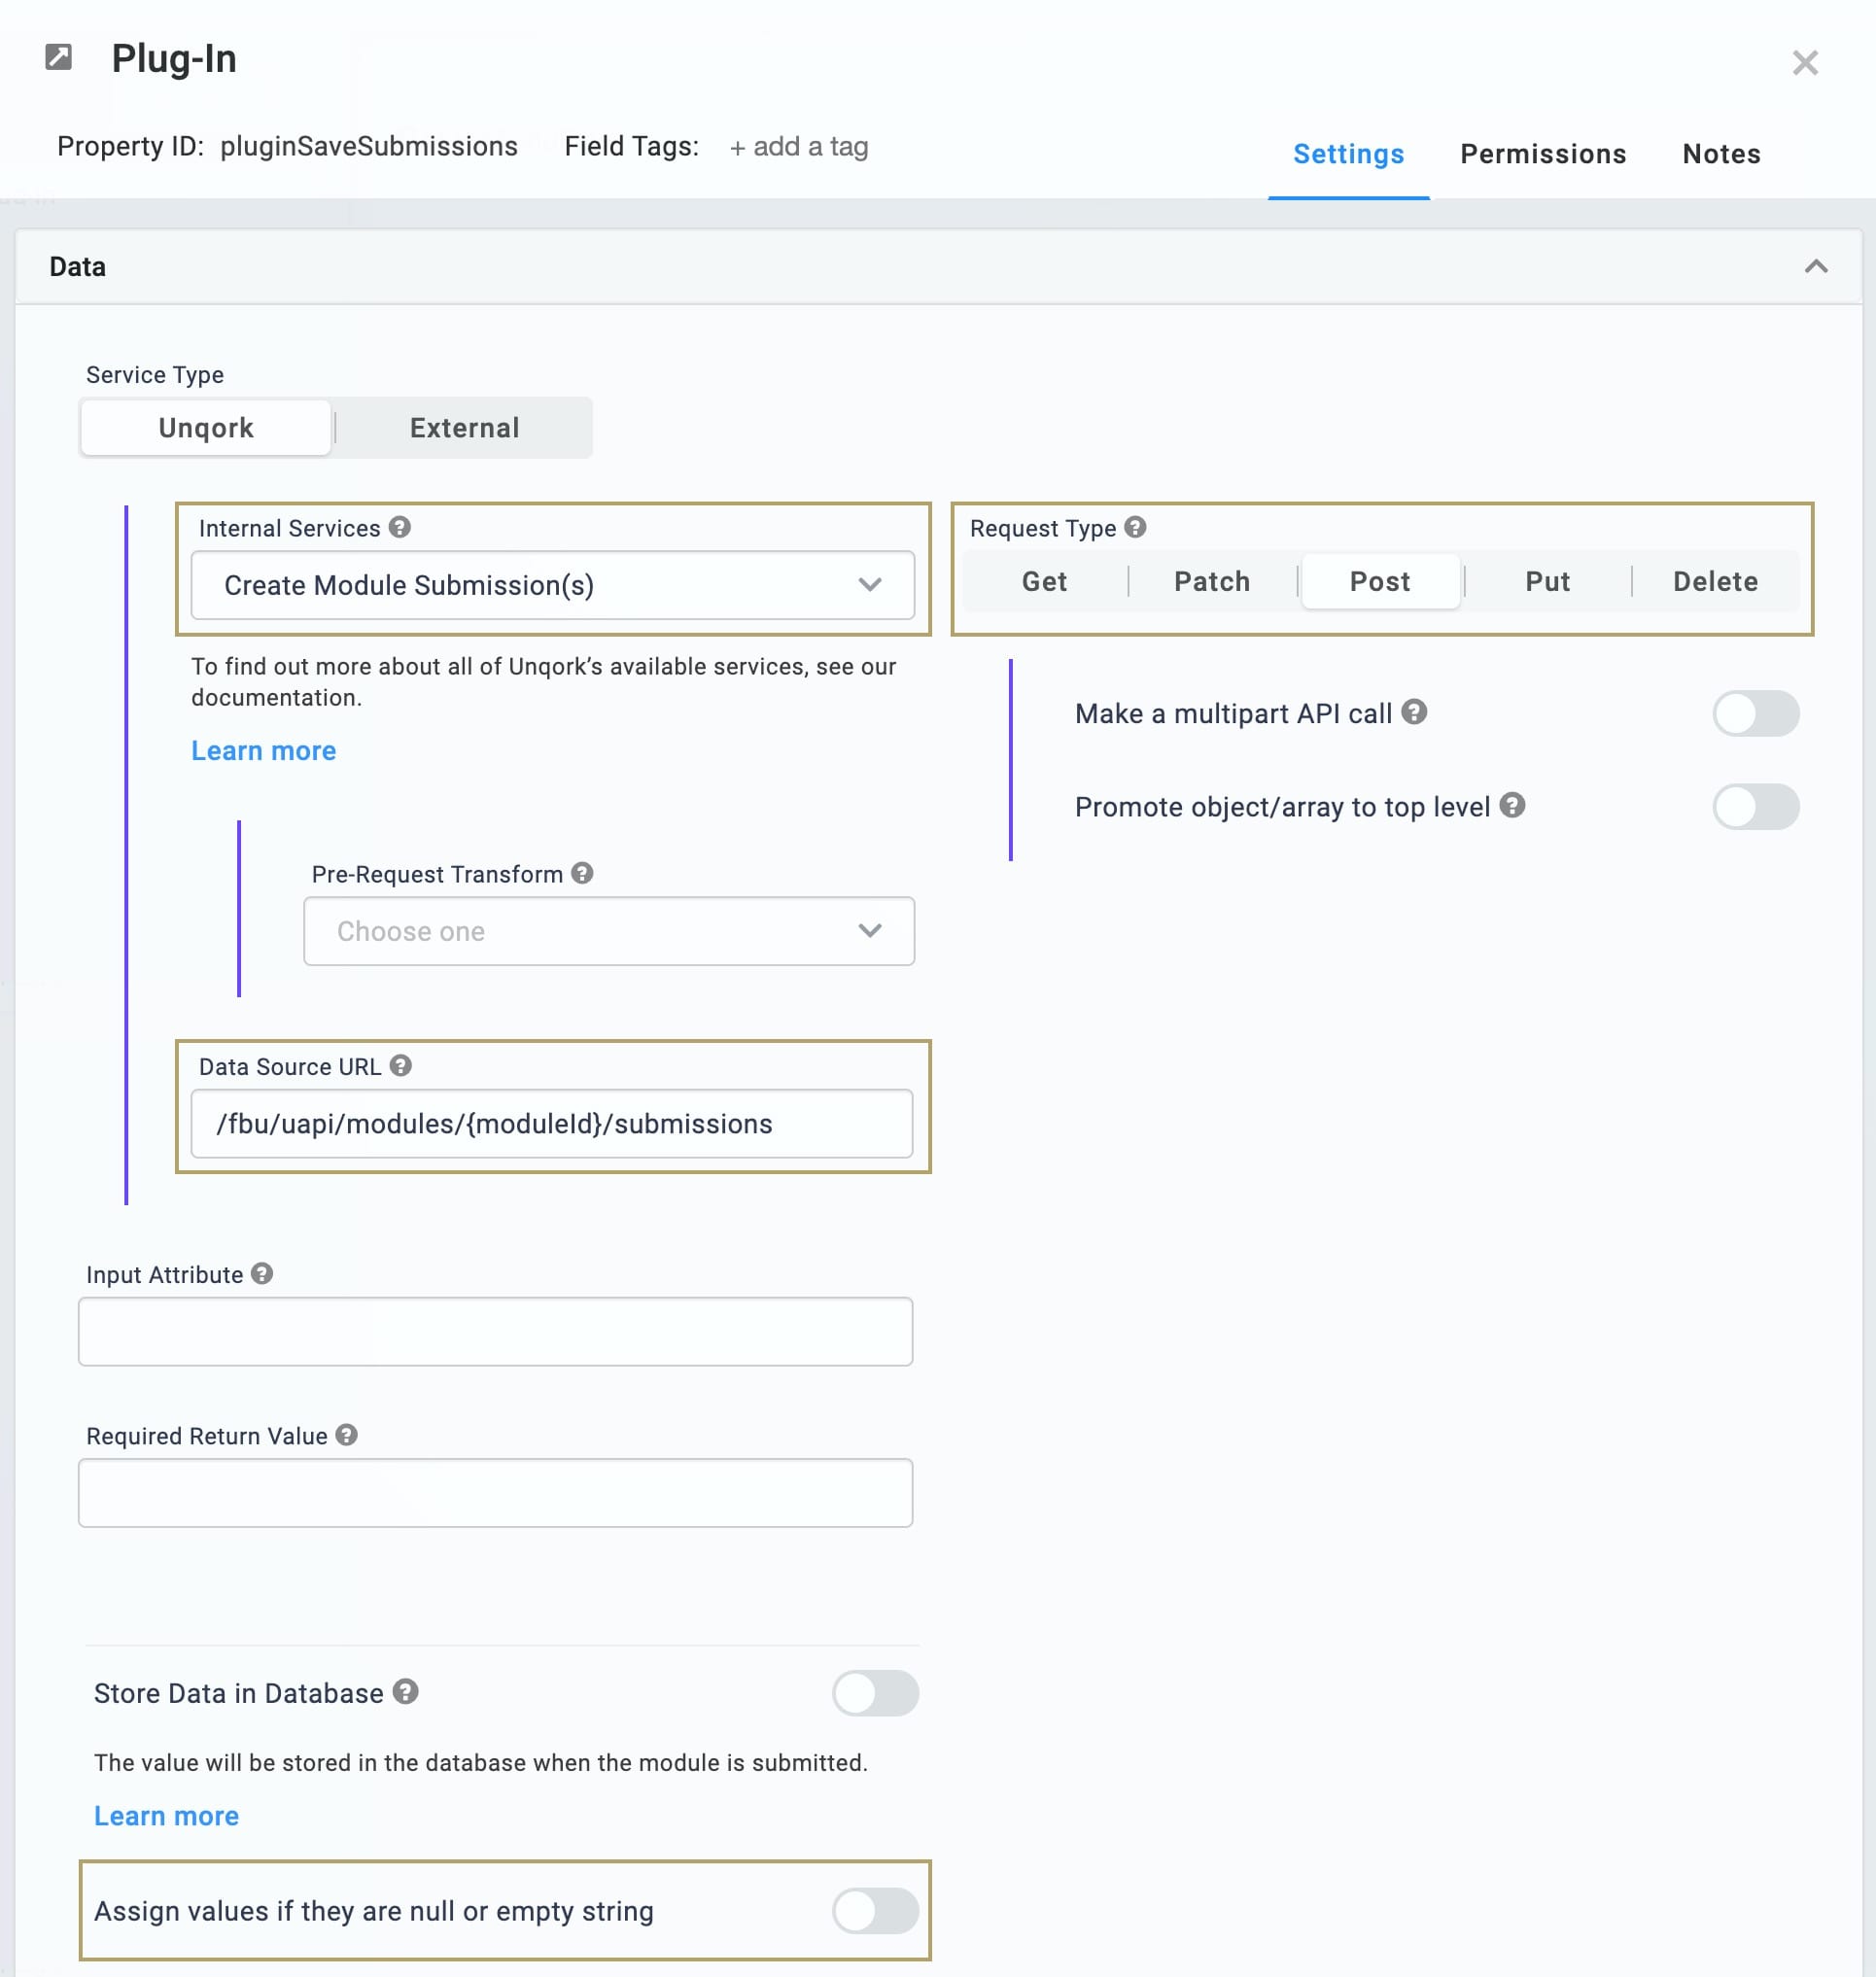
| 5. | Select Create Module Submission(s) from the Internal Services drop-down. |
The Request Type and Data Source URL auto-populate. You'll see /fbu/uapi/modules/{moduleId}/submissions as your Data Source URL. You'll return to this Plug-In once you have created your Schema Module. Then you'll replace {moduleId} with the module ID for your Schema Module.
| 6. | Set the Assign Values If They Are Null or Empty String toggle to OFF. |
| 7. | Click Save. |
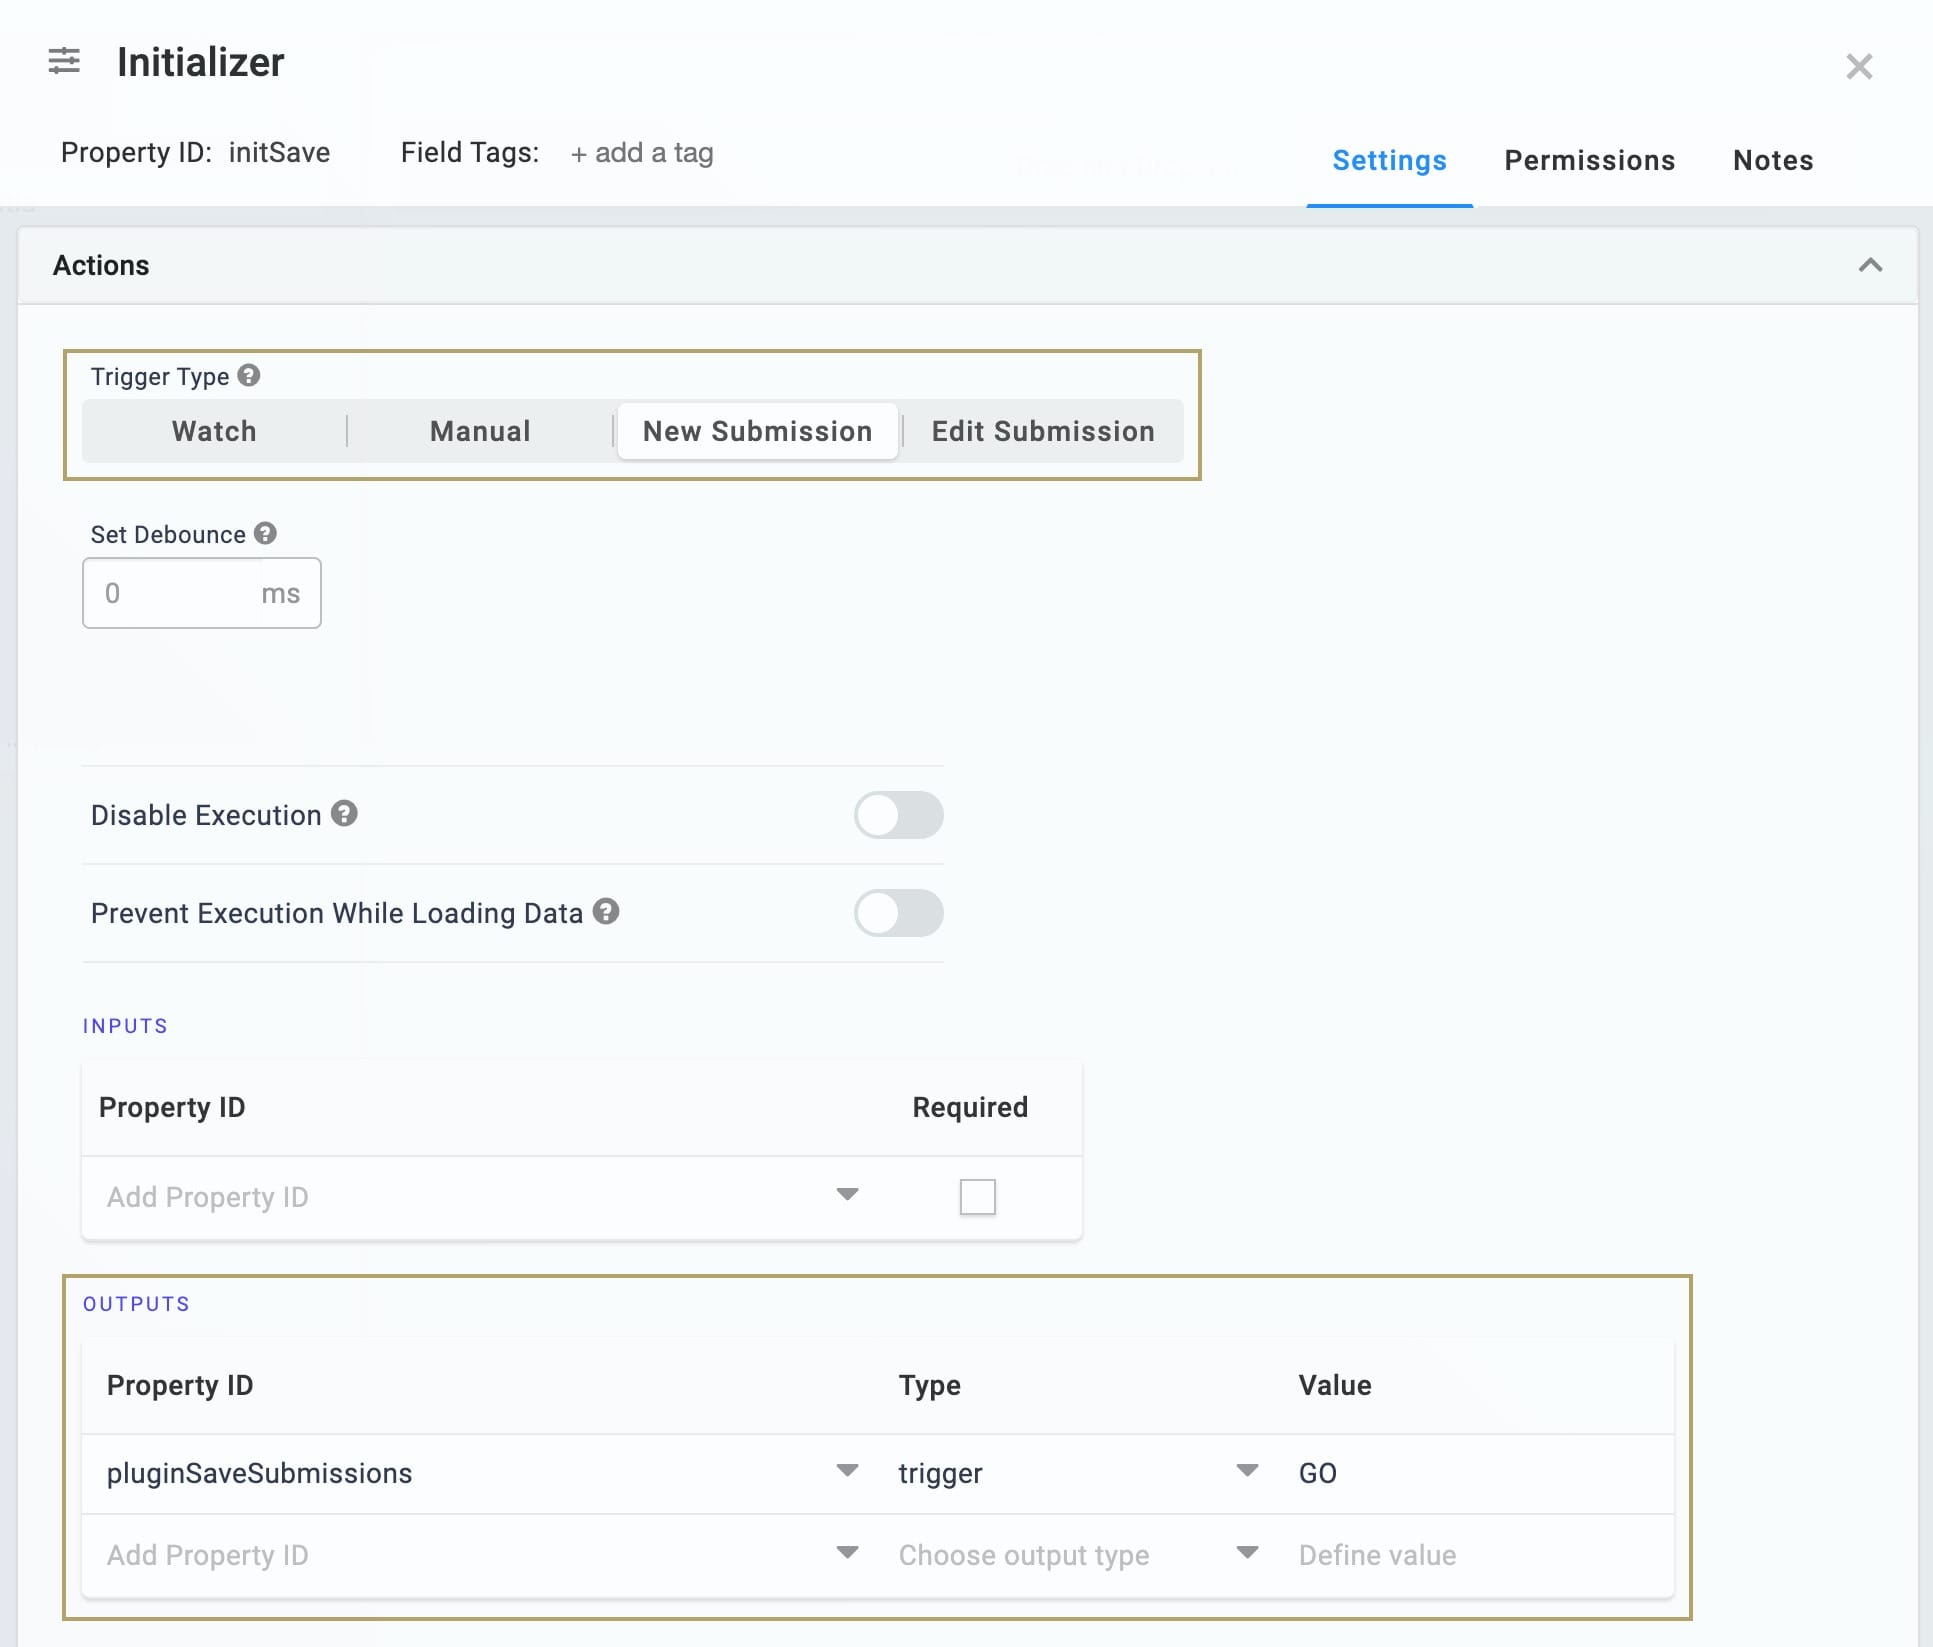
Configure the Initializer Component
| 1. | Drag and drop an Initializer component onto your canvas. Place your Initializer component in the panelCreateSubmission Panel below your Plug-In. |
| 2. | Enter initSave in the Property ID and Canvas Label Text. |
| 3. | Select New Submission from the Trigger Type. |
| 4. | In the Outputs table, enter the following: |
| a. | Property ID: enter pluginSaveSubmission. |
| b. | Type: enter trigger. |
| c. | Value: enter GO. |
| 5. | Click Save. |
| 6. | Save your module. |
Link the Creation Module to the Master Module
Next, you'll link your Creation Module back to the Master Module you created previously.
| 1. | In your Master Module, hover over the pluginSaveSubmission Plug-In component. |
A 5-button toolbar appears above the component on hover-over.
| 2. | Using the toolbar, click the (Settings) button. |
| 3. | In the Data Source URL, replace {moduleId} with the module ID of your Creation Module. |
To find the module ID, look in the module URL. You can see the module ID for our sample Creation Module bolded here: https://training.unqork.io/#/form/5ebc3204b47819020ecd1d55/edit.
| 4. | Click Save. |
| 5. | Save your module. |
You now have a Server Side Execute Only Creation Module that creates a submission based on end-user data. Your Creation Module passes that submission to the Schema Module for storage.
You can find the completed Creation Module for this use case here:
https://training.unqork.io/#/form/5ebc3204b47819020ecd1d55/edit.
Set Up the Schema Module
From the Creation Module, your user submissions store in your Schema Module. The Schema Module only serves as storage and doesn't take any actions.
The Schema Module components mirror the data-entry fields from your Browser Module. You’ll apply the same requirements in the Schema Module as you did in the Browser Module. But the structure here doesn't matter.
To set up the Schema Module, you’ll need 6 Hidden components.
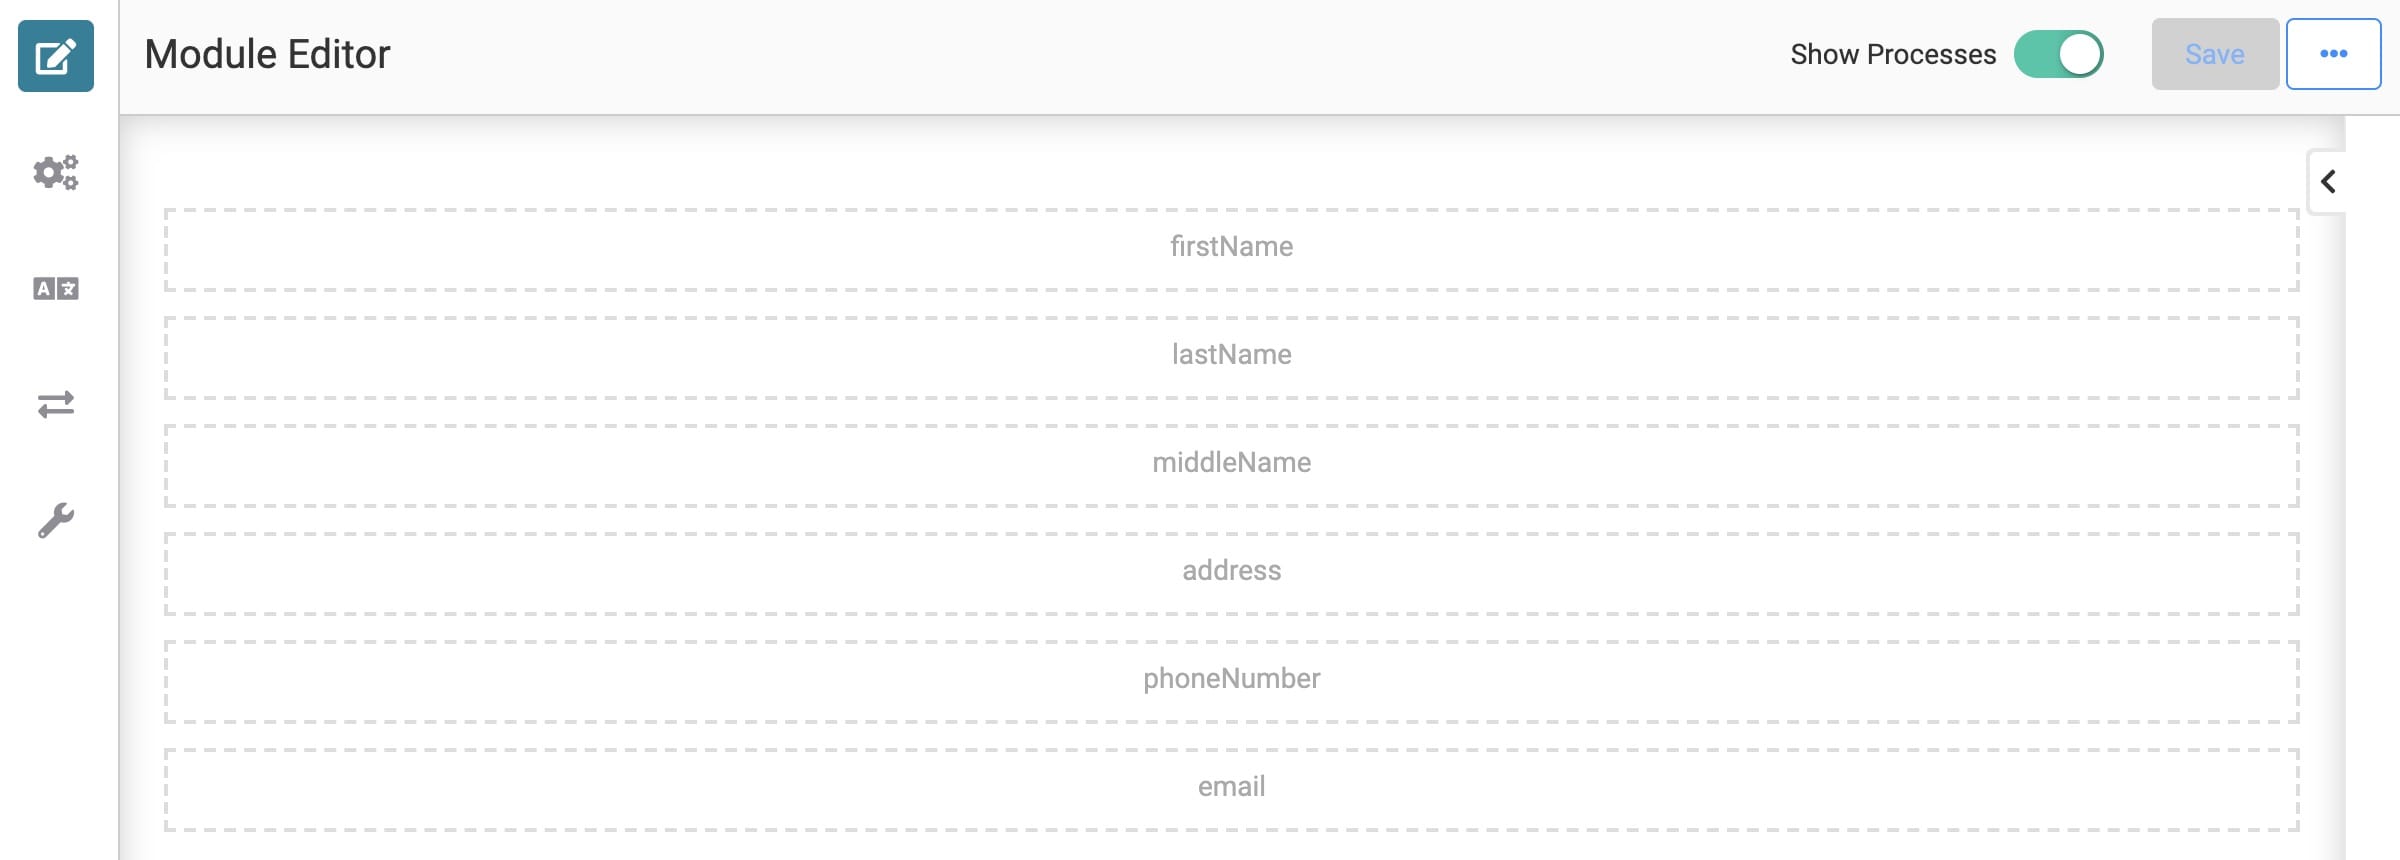
Here's how your Schema Module will look in the Module Builder:
Your Schema Module works on the server-side, so your end-users will never see it in Express View.
Create the Module
Now, let's add another module to your application.
| 1. | In the application view of your workspace, create a new module from scratch. |
| 2. | Enter a Module Name that contains Schema Module. |
| 3. | Click Create. Your new module shows on the following page. |
| 4. | Click your Schema Module to open it. |
Configure the Hidden Components
Your Hidden components correspond to the data-collecting fields in your Browser Module.
| 1. | Drag and drop 6 Hidden components onto your canvas. |
| 2. | Enter the following Property IDs and Label Text: |
| Property ID | Label Text |
|---|---|
|
firstName |
First Name |
|
middleName |
Middle Name |
|
lastName |
Last Name |
|
address |
Address |
|
phoneNumber |
Phone Number |
|
|
|
| 3. | Save each component as you add it. |
| 4. | Save your module. |
Link the Schema Module to the Creation Module
Next, you'll link your Schema Module back to the Creation Module you created in the previous section.
| 1. | In your Creation Module, hover over the pluginSaveSubmission Plug-In component. |
A 5-button toolbar appears above the component on hover-over.
| 2. | Using the toolbar, click the (Settings) button. |
| 3. | In the Data Source URL, replace {moduleId} with the module ID of your Schema Module. |
To find the module ID, look in the module URL. You can see the module ID for our sample Schema Module bolded here: https://training.unqork.io/#/form/5ebd7fb0ce23f0020fbf91d5/edit.
| 4. | Click Save. |
| 5. | Save your module. |
You now have a Schema Module that stores end-user submissions. You can use this Schema Module to populate a dashboard to view end-user submissions.
You can find the completed Schema Module for this use case here: https://training.unqork.io/#/form/5ebd7fb0ce23f0020fbf91d5/edit.
Summary
You now have a series of 6 modules that form a Proxy Layer Structure. The structure starts in the Browser Module where your end-user submits their information. The data then passes through the rest of the data flow, hiding it from any code. All the end-user sees after clicking Submit is a Success or an Error message.
Lab
As a reminder, you can view each module for the complete Proxy Layer Structure use case using the links below:
