In this article, you’ll configure Unqork internal API calls to better understand how to use Unqork’s API works.
In this example, you make use of two modules:
Schema Module: You’ll use a schema module to store your submissions. You'll reference the module ID for your schema module in your internal API calls.
Submission Module: You'll use a submission module to collect the end-user's first name, last name, a joke of their choosing, and the joke’s answer.
Configure the Schema Module
Set up a schema module to store your submissions and reference its module ID in your internal API calls. To set up the schema module, configure four Hidden components. Schema modules only require fields that mirror the data-entry fields to store the data.
These instructions assume that you have an open module saved with a title.
In the Module Builder, drag and drop four Hidden components onto your canvas.
Enter the following Property IDs and Label Text for each component:
#
Property ID
Label Text
1
firstName
firstName
2
lastName
lastName
3
jokeQuestion
jokeQuestion
4
jokeAnswer
jokeAnswer
Set Store Data to Database to
.png) (ON) for each component.
(ON) for each component.You must enable Store Data to Database for each component in your schema module for them to return in the API response.
Click Save Component after adding each Hidden Component
Save your module.
Below is how your schema module looks in the Module Builder:
.png)
With your Hidden components configured, your schema module is complete. Make note of the module ID for your schema module because you'll need it to make your API calls later. You can find the module ID in the Express View URL. In the following example, the bolded text is the module ID: https://trainingx.unqork.io/#/display/5ece83f7cf02e4020f247408.
Configure the Submissions Module
The second module in this configuration is your submissions module. In this module, you’ll collect the end-user’s first name, last name, a joke of their choosing, and the joke’s answer. Each set of answers creates a single submission.
Configure the Initializer Component
Each of your API calls must reference your schema module. You can enter the module ID into every API call manually, but that's not a best practice. Instead, use an Initializer component to set the module ID for every new submission. The Initializer component stores the module ID in a Hidden component that you'll add in the next step. At some point, you might need to update the schema module ID. With this approach, you only have to update the module ID in one component, instead of several.
These instructions assume that you have an open module saved with a title.
In the Module Builder, drag and drop an Initializer component onto your canvas.
In the Property ID and Canvas Label Text fields, enter
initNewSubmission.From the Trigger Type drop-down, select New Submission.
In the Outputs table, enter the following:
Property ID
Type
Value
moduleId
value
{your Schema module's unique module ID}
The Property ID listed in the Outputs table corresponds to the Hidden component you’ll add in the next step. This is where the schema module ID is stored. In the Value column, enter your schema module's unique module ID. The image below displays the module ID from the sample schema module.
.png)
Click Save Component.
Configure the Hidden Component
Next, add the Hidden component referenced by the Initializer component. You'll reference this component later in this example to retrieve the module ID in your API calls.
Drag and drop a Hidden component onto your canvas, placing it below the Initializer component.
In the Property ID and Label Text fields, enter
moduleId.Click Save Component.
Configure the Panel Component
You need a portal for your end-user in your submissions module to collect the information. Then, use a Create Module Submission(s) API call to store submissions in your schema module.
You’ll configure a Panel component that acts as a container for the components involved in this stage of the configuration.
Drag and drop a Panel component onto your canvas, placing it below your
moduleIdHidden component.In the Property ID field, enter
panelCreateModuleSubmissions.In the Canvas Label Text field, enter
Create.Click Save Component.
Configure the Columns Component
Next, add two columns using a Columns component to better organize the module.
Drag and drop a Columns component onto your canvas, placing it inside your
panelCreateModuleSubmissionsPanel component.In the Property ID field, enter
colCreateSubmissions.Click Save Component.
Configure the Text Field Components
Add two Text Field components to collect your end-user's first and last name.
Drag and drop two Text Field components onto your canvas, placing one in each column of the
colCreateSubmissionsColumns component.In the Property ID and Label Text fields, enter the following for each component:
#
Property ID
Label Text
1
firstName
First Name
2
lastName
Last Name
The
firstNamefield is in the first column, and thelastNamefield is in the second.Click Save Component after adding each component.
Configure the Text Area Components
Add two Text Area components to collect your end-user's joke and the joke's answer.
Drag and drop two Text Area components onto your canvas, placing one in each column of the
colCreateSubmissionsColumns component.In the Property ID and Label Text fields, enter the following for each component:
#
Property ID
Label Text
1
jokeQuestion
Joke Question
2
jokeAnswer
Joke Answer
The
jokeQuestionfield is in the first column, and thejokeAnswerfield is in the second.Click Save Component after adding each component.
Configure the Plug-In Component
Add a Plug-In component to run the Create Module Submission(s) API call. You'll map the data from your input fields into the call to create the submissions and store them in the schema module.
Drag and drop a Plug-In component onto your canvas, placing it below your
colCreateSubmissionsColumns component.In the Property ID and Canvas Label Text fields, enter
pluginCreateModuleSubmission.From the Internal Services drop-down, select Create Module Submission(s). The Data Source URL autopopulates.
In the Data Source URL field, replace
{moduleId}with{{data.moduleId}}.In the Inputs table, enter the following:
#
Property ID
Mapping
1
firstName
data.firstName
2
lastName
data.lastName
3
jokeAnswer
data.jokeAnswer
4
jokeQuestion
data.jokeQuestion
This Plug-In component maps the data from your
moduleIdHidden component into the Data Source URL..png)
Click Save Component.
Configure the Button Component
Add a Button component to trigger the Plug-In component and the API call.
Drag and drop a Button component onto your canvas, placing it below the Plug-In component.
In the Property ID field, enter
btnCreateSubmission.In the Label Text field, enter
Create Submission.From the Action Type drop-down, select Event.
From the On Click drop-down, select pluginCreateModuleSubmission.
.png)
Click Save Component.
Here’s how the first part of the configuration looks in the Module Builder:
.png)
Configure the Get Module Submissions API Call
Now that an end-user can create submissions, you must add functionality to view those submissions. There are a few options for GET API calls in Unqork. In this example, you'll use the Get Module Submissions call, which retrieves the data from your schema module. Then, you'll use the DevTools Console to view the submissions.
Configure the Panel Component
This Panel component acts as a container for the components involved in this section of the configuration.
Drag and drop a Panel component onto your canvas, placing it below your
CreatePanel component.In the Property ID field, enter
panelGetModuleSubmissions.In the Canvas Label Text field, enter
Get Module Submissions.Click Save Component.
Configure the Plug-In Component
Add a Plug-In component to run the Get Module Submissions API call.
Drag and drop a Plug-In component onto your canvas, placing it nside your
panelGetModuleSubmissionsPanel component.In the Property ID and Canvas Label Text fields, enter
pluginGetSubmissionsCall.From the Internal Services drop-down, select Get Module Submissions. The Data Source URL autopopulates.
In the Data Source URL field, replace
{moduleId}with{{data.moduleId}}.In the Inputs table, enter the following:
#
Property ID
Mapping
1
'created'
sortBy
2
'-1'
sortOrder
This configuration sorts the submissions in descending order, beginning with the most recent. Use single quotes around the values in the Property ID field to indicate to the component that you're not referencing actual Property IDs. Instead, you're hardcoding these values into the API call.
In the Outputs table, enter the following:
#
Property ID
Mapping
1
getSubmissionsResponse
data
From the Post Trigger drop-down, select dwfNestGetSubmissionsCall.
.png)
Click Save Component.
Configure the Hidden Component
Add a Hidden component to store the response of your API call.
Drag and drop a Hidden component onto your canvas, placing it below your
pluginGetSubmissionsCallPlug-In component.In the Property ID and Label Text fields, enter
getSubmissionsResponse.Click Save Component.
Configure the Data Workflow Component
There are different ways to log the response of this call and display the data. In this example, you'll add a Data Workflow component to nest the submission data returned by your API call.
Drag and drop a Data Workflow component onto your canvas, placing it below your
getSubmissionsResponseHidden component.In the Property ID and Canvas Label Text fields, enter
dwfNestGetSubmissionsCall.
Configure the Input Operator
Drag and drop an Input operator onto your workflow canvas.
Configure the operator’s Info window as follows:
Setting
Selection
Category
Input
Component
pluginGetSubmissionsCall
Required
Yes
Source
Default
Configure the Col2Array Operator
Drag and drop a Col2Array operator onto your workflow canvas.
Configure the operator’s Info window as follows:
Setting
Selection
Category
Col2Array
Label
Drop Empty
Yes
Path
data.rawData
Default Value
Connect the output port (right) of the Input operator to the input port (left) of the Col2Array operator.
Configure the Output Operator
Drag and drop an Output operator onto your workflow canvas.
Configure the operator’s Info window as follows:
Setting
Selection
Category
Output
Component
getSubmissionsAfterNesting
Action
value
You'll create the
getSubmissionsAfterNestingHidden component next. This Hidden component serves as the output for your Data Workflow.Connect the output (right) port of the Col2Array operator to the input (left) port of the Output operator.
.png)
Click Save Component.
Configure the Hidden Component
You need another Hidden component to serve as the output for your Data Workflow. The component must exist in the module before you can add it as an output for your dwfNestGetSubmissionsCall Data Workflow component.
Drag and drop a Hidden component onto your canvas, placing it below your
dwfNestGetSubmissionsCallData Workflow component.In the Property ID and Label Text fields, enter
getSubmissionsAfterNesting.Click Save Component.
Configure the Button Component
Configure a Button component to trigger your Plug-In. Your btnGetSubmissions triggers your pluginGetSubmissionsCall.
Drag and drop a Button component onto your canvas. Place your Button component below your
getSubmissionsAfterNestingHidden component.In the Property ID field, enter
btnGetSubmissions.In the Label Text field, enter
Get Submissions.From the Action Type drop-down, select Event.
From the On Click drop-down, select pluginGetSubmissionsCall.
.png)
Click Save Component.
Here’s how the second part of the configuration looks in the Module Builder:
.png)
Configure the List Submissions for Dashboard API Call
You can also perform a List Submissions for Dashboard API call. This is the second GET API option you have in Unqork. This call is similar to Get Module Submissions, but it returns a flat array of data. Flat arrays work well as inputs for ViewGrid components. So, use List Submissions for Dashboard to see your submissions in your application instead of relying on the DevTools Console to view them.
Configure the Panel Component
Add a Panel component to act as a container for the components involved in this section of the configuration.
Drag and drop a Panel component onto your canvas, placing it below your
Get Module SubmissionsPanel component.In the Property ID field, enter
panelListSubmissions.In the Canvas Label Text field, enter
List Submissions for Dashboard.Click Save Component.
Configure the Plug-In Component
Configure a Plug-In component to run the List Submissions for Dashboard API call.
Drag and drop a Plug-In component onto your canvas, placing it inside your
panelListSubmissionsPanel component.In the Property ID and Label Text fields, enter
pluginGetSubmissionsForDashboard.From the Internal Services drop-down, select List Submissions for Dashboard. The Data Source URL autopopulates.
You'll create the
dwfOutputdata workflow component next.In the Inputs table, enter the following:
Property ID
Mapping
moduleId
moduleId
'jokeQuestion, jokeAnswer, firstName, lastName'
fields
'-created'
sort
In the Post Trigger field, enter
dwfOutput.Click Save Component.
Configure the Data Workflow Component
Use a List Submissions for Dashboard call to retrieve an unnested array of data. That way, you can store the entire response in a Hidden component. Then, use a simple Data Workflow to separate the data.
Drag and drop a Data Workflow component onto your canvas, placing it below your
pluginGetSubmissionsForDashboardPlug-In component.In the Property ID and Canvas Label Text fields, enter
dwfOutput.
Configure the Input Operator
Drag and drop an Input operator onto your workflow canvas.
Configure the operator’s Info window as follows:
Setting
Selection
Category
Input
Component
pluginGetSubmissionsForDashboard
Required
Yes
Source
Default
Configure the Output Operator
Drag and drop an Output operator onto your workflow canvas.
Configure the operator’s Info window as follows:
Setting
Selection
Category
Output
Component
listSubmissionsResponse
Action
value
You'll create the
listSubmissionsResponseHidden component next. Again, this Hidden component serves as the output for your Data Workflow component.Connect the output port (right) of the
pluginGetSubmissionsForDashboardInput operator to the input port(left) of thelistSubmissionsResponseOutput operator..png)
Click Save Component.
Configure the Hidden Component
Add a Hidden component to store the output for your Data Workflow.
Drag and drop a Hidden component onto your canvas, placing it below your
dwfOutputData Workflow component.In the Property ID and Label Text fields, enter
listSubmissionsResponse.Click Save Component.
Configure the Button Component
Configure a Button component to execute the Plug-In component.
Drag and drop a Button component onto your canvas, placing it below your
listSubmissionsResponseHidden component.In the Property ID field, enter
btnListSubmissionsforDashboard.In the Label Text field, enter
List Submissions for Dashboard.From the Action Type drop-down, select Event.
From the On Click drop-down, select pluginGetSubmissionsForDashboard.
This ties your Button component to the ViewGrid component that you'll add in the next step.
.png)
Click Save Component.
Configure the ViewGrid Component
Lastly, configure a ViewGrid component to display the data retrieved using this API call.
Drag and drop a ViewGrid component onto your canvas, placing it below your
btnListSubmissionsforDashboardButton component.In the Property ID field, enter
vgSubmissionsResponse.In the Canvas Label Text field, enter
ViewGrid Submissions Response.In the Inputs table, enter the following:
#
ID
Required
1
listSubmissionsResponse
.png) (checked)
(checked)In the Display table, enter the following:
#
ID
Formula
Heading
Type
1
jokeQuestion
Question
string
2
jokeAnswer
Answer
string
3
firstName
Submitted By
string
4
id
SubmissionId
string
.png)
In the Action field, enter
null.Entering null in the Action field removes the default Submit button from your dashboard.
Click Save Component.
Here’s how the third part of the configuration looks in the Module Builder:
.png)
Configure the Update Module Submissions Call
Now that you have added a way to create and view submissions, you must add functionality to update those submissions. Set up an Update Module Submissions API call in your submissions module to change the end-user's name or joke, if needed.
Configure the Panel Component
Add a Panel component to act as a container for the components involved in this section
Drag and drop a Panel component onto your canvas, placing it below your
ReadPanel component.In the Property ID field, enter
panelUpdateModuleSubmissions.In the Canvas Label Text field, enter
Update.Click Save Component.
Configure the Columns Component
Next, add two columns using a Columns component to better organize the module.
Drag and drop a Columns component onto your canvas, placing it inside your
UpdatePanel component.In the Property ID field, enter
colUpdateSubmissions.For this use case, you'll use the component default of two columns.
Click Save Component.
Configure the Text Field Components
These Text Field components display the submission ID and the field you’re updating.
Drag and drop two Text Field components onto your canvas, placing them inside the left column of your
colUpdateSubmissionsColumns component.In the Property ID and Label Text fields, enter the following for each component:
#
Property ID
Label Text
1
submissionIdUpdate
SubmissionId to Update
2
firstNameUpdate
First Name
Click Save Component as you add each component.
Drag and drop two more Text Field components onto your canvas, placing them inside the right column of your
colUpdateSubmissionsColumns component.In the Property ID and Label Text fields, enter the following for each component:
#
Property ID
Label Text
1
valueThatDoesntExist
Value That Doesn't Exist in Schema
2
lastNameUpdate
Last Name
Click Save Component as you add each component.
Configure the Text Area Components
Add Text Area components to update the joke question and the joke answer from the original submission data.
Drag and drop two Text Area components onto your canvas, placing one in each column of your
colUpdateSubmissionsColumns component, below the Text Field components.In the Property ID and Label Text fields, enter the following for each component:
#
Property ID
Label Text
1
jokeQuestionUpdate
Joke Question
2
jokeAnswerUpdate
Joke Answer
The
jokeQuestionUpdatefield is in the first column, and thejokeAnswerUpdatefield in the second.Click Save Component as you add each component.
Configure the Plug-In Component
Add a Plug-In component to run the Update Module Submissions API call. You'll map the data from the input fields into the call to update the submissions in the schema module.
Drag and drop a Plug-In component onto your canvas, placing it below your
colUpdateSubmissionsColumns component.In the Property ID and Label Text fields, enter
pluginUpdateMOduleSubmission.From the Internal Services drop-down, select Update Module Submission. The Data Source URL autopopulates.
In the Data Source URL field, replace
{moduleId}with{{data.moduleId}}and{submissionId}with{{data.submissionUpdate}}.In the Inputs table, enter the following:
#
Property ID
Mapping
Optional
1
firstNameUpdate
data.firstName
.png) (checked)
(checked)2
lastNameUpdate
data.lastName
.png) (checked)
(checked)3
jokeAnswerUpdate
data.jokeAnswerUpdate
.png) (checked)
(checked)4
jokeQuestionUpdate
data.jokeQuestionUpdate
.png) (checked)
(checked)5
valueThatDoesntExist
data.valueThatDoesntExist
.png) (checked)
(checked)You must select each field as optional. If they remain clear, the submission updates with blank data in any fields left blank during the update. Adding
valueThatDoesntExistdisplays what happens when you map new data in the Schema module. Notice the call returnsvalueThatDoesntExistif you perform another Get Submissions call..png)
Click Save Component.
Configure the Button Component
Add a Button component to execute the API call.
Drag and drop a Button component onto your canvas, placing it below your
pluginUpdateModuleSubmissionPlug-In Component.In the Property ID field, enter
btnUpdateSubmission.In the Label Text field, enter
Update Submission.From the Action Type drop-down, select Event.
From the On Click drop-down, select pluginUpdateModuleSubmission.
.png)
Click Save Component.
Here’s how the fourth part of the configuration looks in the Module Builder:
.png)
Configure the Delete Module Submissions Call
There might be instances when you want to delete submissions from your schema module. You can add a Delete Submissions API call to achieve this task. You also might want to maintain the ability to restore those deleted submissions. Let’s take a look at how those work together and consider an example of what happens when you try to restore a deleted submission.
Configure the Panel Component
Add a Panel component to provide a container for the components involved in this section of the configuration.
Drag and drop a Panel component onto your canvas, placing it below your
UpdatePanel component.In the Property ID field, enter
panelDeleteModuleSubmissions.In the Canvas Label Text field, enter
Delete.Click Save Component.
Configure the Columns Component
Add a Columns component to keep your components organized. Use the default setting of two columns.
Drag and drop a Columns component onto your canvas. Place your Columns component inside your
Deletepanel component.In the Property ID field, enter
colDeleteSubmissions.Click Save Component.
Configure the Text Field Component
Add a Text Field component where you’ll enter the submission ID you want to delete.
Drag and drop a Text Field component onto your canvas, placing it in the left column of
colDeleteSubmissionsColumns component.In the Property ID field, enter
submissionsIdDelete.In the Label Text field, enter
SubmissionId to Delete.Click Save Component.
Configure the Plug-In Component
Configure a Plug-In component to run the delete submissions API call.
Drag and drop a Plug-In component onto your canvas, placing it below your
colDeleteSubmissionsColumns component.In the Property ID and Label Text fields, enter
pluginDeleteMultipleModuleSubmissions.From the Internal Services drop-down, select Deletes Multiple Module Submissions. The Data Source URL autopopulates.
In the Data Source URL, replace
{moduleId}with{{data.moduleId}}.In the Inputs table, enter the following:
#
Property ID
Mapping
1
submissionIdDelete
ids
.png)
Click Save Component.
Configure the Delete Submissions Button Component
Configure a Button component to trigger the pluginDeleteMultipleModuleSubmissions Plug-In component to delete submissions.
Drag and drop a Button component onto your canvas, placing it below your
pluginDeleteMultipleMOduleSubmissionsPlug-In component.In the Property ID field, enter
btnDeleteSubmission.In the Label Text field, enter
Delete Submission(s).From the Action Type field, select Event.
From the On Click drop-down, select pluginDeleteMultipleMOduleSubmissions.
.png)
Click Save Component.
Configure the Get Deleted Submission Button Component
Configure a second Button component to trigger your Plug-In component to retrieve previously deleted submissions. This example demonstrates what happens when you try to GET a deleted submission.
Drag and drop a Button component onto your canvas, placing it in the right column of the
colDeleteSubmissionsColumns component.In the Property ID field, enter
btnGetDeletedSubmission.In the Label Text field, enter
Get Deleted Submission.From the Button Style drop-down, select Info.
From the Action Type drop-down, select Event.
From the On Click drop-down, select pluginGetDeletedSubmission.
This sets the button to trigger the Plug-In component you'll add in the next step.
.png)
Click Save Component.
Configure the Plug-In Component
Configure a second Plug-In component to run the GET call to retrieve a deleted submission.
Drag and drop a Plug-In component onto your canvas, placing it in the right column of the
colDeleteSubmissionsColumns component, below yourbtnGetDeletedSubmissionButton Component.In the Property ID and Label Text fields, enter
pluginGetDeletedSubmission.From the Internal Services drop-down, select Get Module Submission. The Data Source URL autopopulates.
In the Data Source URL field, replace
{moduleId}with{{data.moduleId}}and{submissionId}with{{data.submissionDelete}}..png)
Click Save Component.
Configure the Restore Deleted Submissions Button Component
Configure a third Button component to trigger your Plug-In component to restore previously deleted submissions.
Drag and drop a Button component onto your canvas, placing it in the right column of the
colDeleteSubmissionsColumns component, below yourpluginGetDeleteSubmissionPlug-In Component.In the Property ID field, enter
btnRestoreDeletedSubmission.In the Label Text field, enter
Restore Deleted Submission.From the Button Style drop-down, select Success.
From the Action Type drop-down, select Event.
From the On Click drop-down, enter pluginRestoreDeletedModuleSubmission.
This sets the button to trigger the Plug-In component you'll add in the next step.
.png)
Click Save Component.
Configure the Plug-In Component
Configure a third Plug-In component to restore previously deleted submissions.
Drag and drop a Plug-In component onto your canvas, placing it in the right column of the
colDeleteSubmissionsColumns component, below yourbtnRestoreDeletedSubmissionButton component.In the Property ID and Canvas Label Text fields, enter
pluginRestoreDeleteModuleSubmission.From the Internal Services drop-down, select Restore a Deleted Module Submission. The Data Source URL autopopulates.
In the Data Source URL, replace
{moduleId}with{{data.moduleId}}and{submissionId}with{{data.submissionDelete}}..png)
Click Save Component.
Save your module.
Here’s how the final configuration looks in the Module Builder:
.png)
In this article, you’ll configure Unqork internal API calls to better understand how to use Unqork’s API works.
In this example, you make use of two modules:
Schema Module: You’ll use a schema module to store your submissions. You'll reference the module ID for your schema module in your internal API calls.
Submission Module: You'll use a submission module to collect the end-user's first name, last name, a joke of their choosing, and the joke’s answer.
Configure the Schema Module
Set up a schema module to store your submissions and reference its module ID in your internal API calls. To set up the schema module, configure four Hidden components. Schema modules only require fields that mirror the data-entry fields to store the data.
These instructions assume that you have an open module saved with a title.
In the Module Builder, drag and drop four Hidden components onto your canvas.
In the Property ID and Label Text fields, enter the following for each component:
#
Property ID
Label Text
1
firstName
firstName
2
lastName
lastName
3
jokeQuestion
jokeQuestion
4
jokeAnswer
jokeAnswer
Set Store Data to Database to
.png) (ON) for each component.
(ON) for each component.You must enable Store Data to Database for each component in your Schema module for them to return in the API response.
Click Save & Close after adding each Hidden Component
Save your module.
This is how your schema module looks in the Module Builder:

With your Hidden components in place, your schema module is complete. Make note of the module ID for your schema module, though, because you'll need it to make your API calls later. You can find the module ID in the Express View URL. In the following example, identify the bolded text: https://trainingx.unqork.io/#/display/5ece83f7cf02e4020f247408.
Configure the Submission Module
The second module in this configuration is your submissions module. In this module, you’ll collect the end-user’s first name, last name, a joke of their choosing, and the joke’s answer. Each set of answers creates a single submission.
Configure the Initializer Component
Each of your API calls must reference your schema module. You can enter the module ID into every API call manually, but that's not a best practice. Instead, use an Initializer component to set the module ID for every new submission. The Initializer component stores the module ID in a Hidden component that you'll add in the next step. At some point, you might need to update the schema module ID. With this approach, you only have to update the module ID in one component, instead of several.
These instructions assume that you have an open module saved with a title.
In the Module Builder, drag and drop an Initializer component onto your canvas.
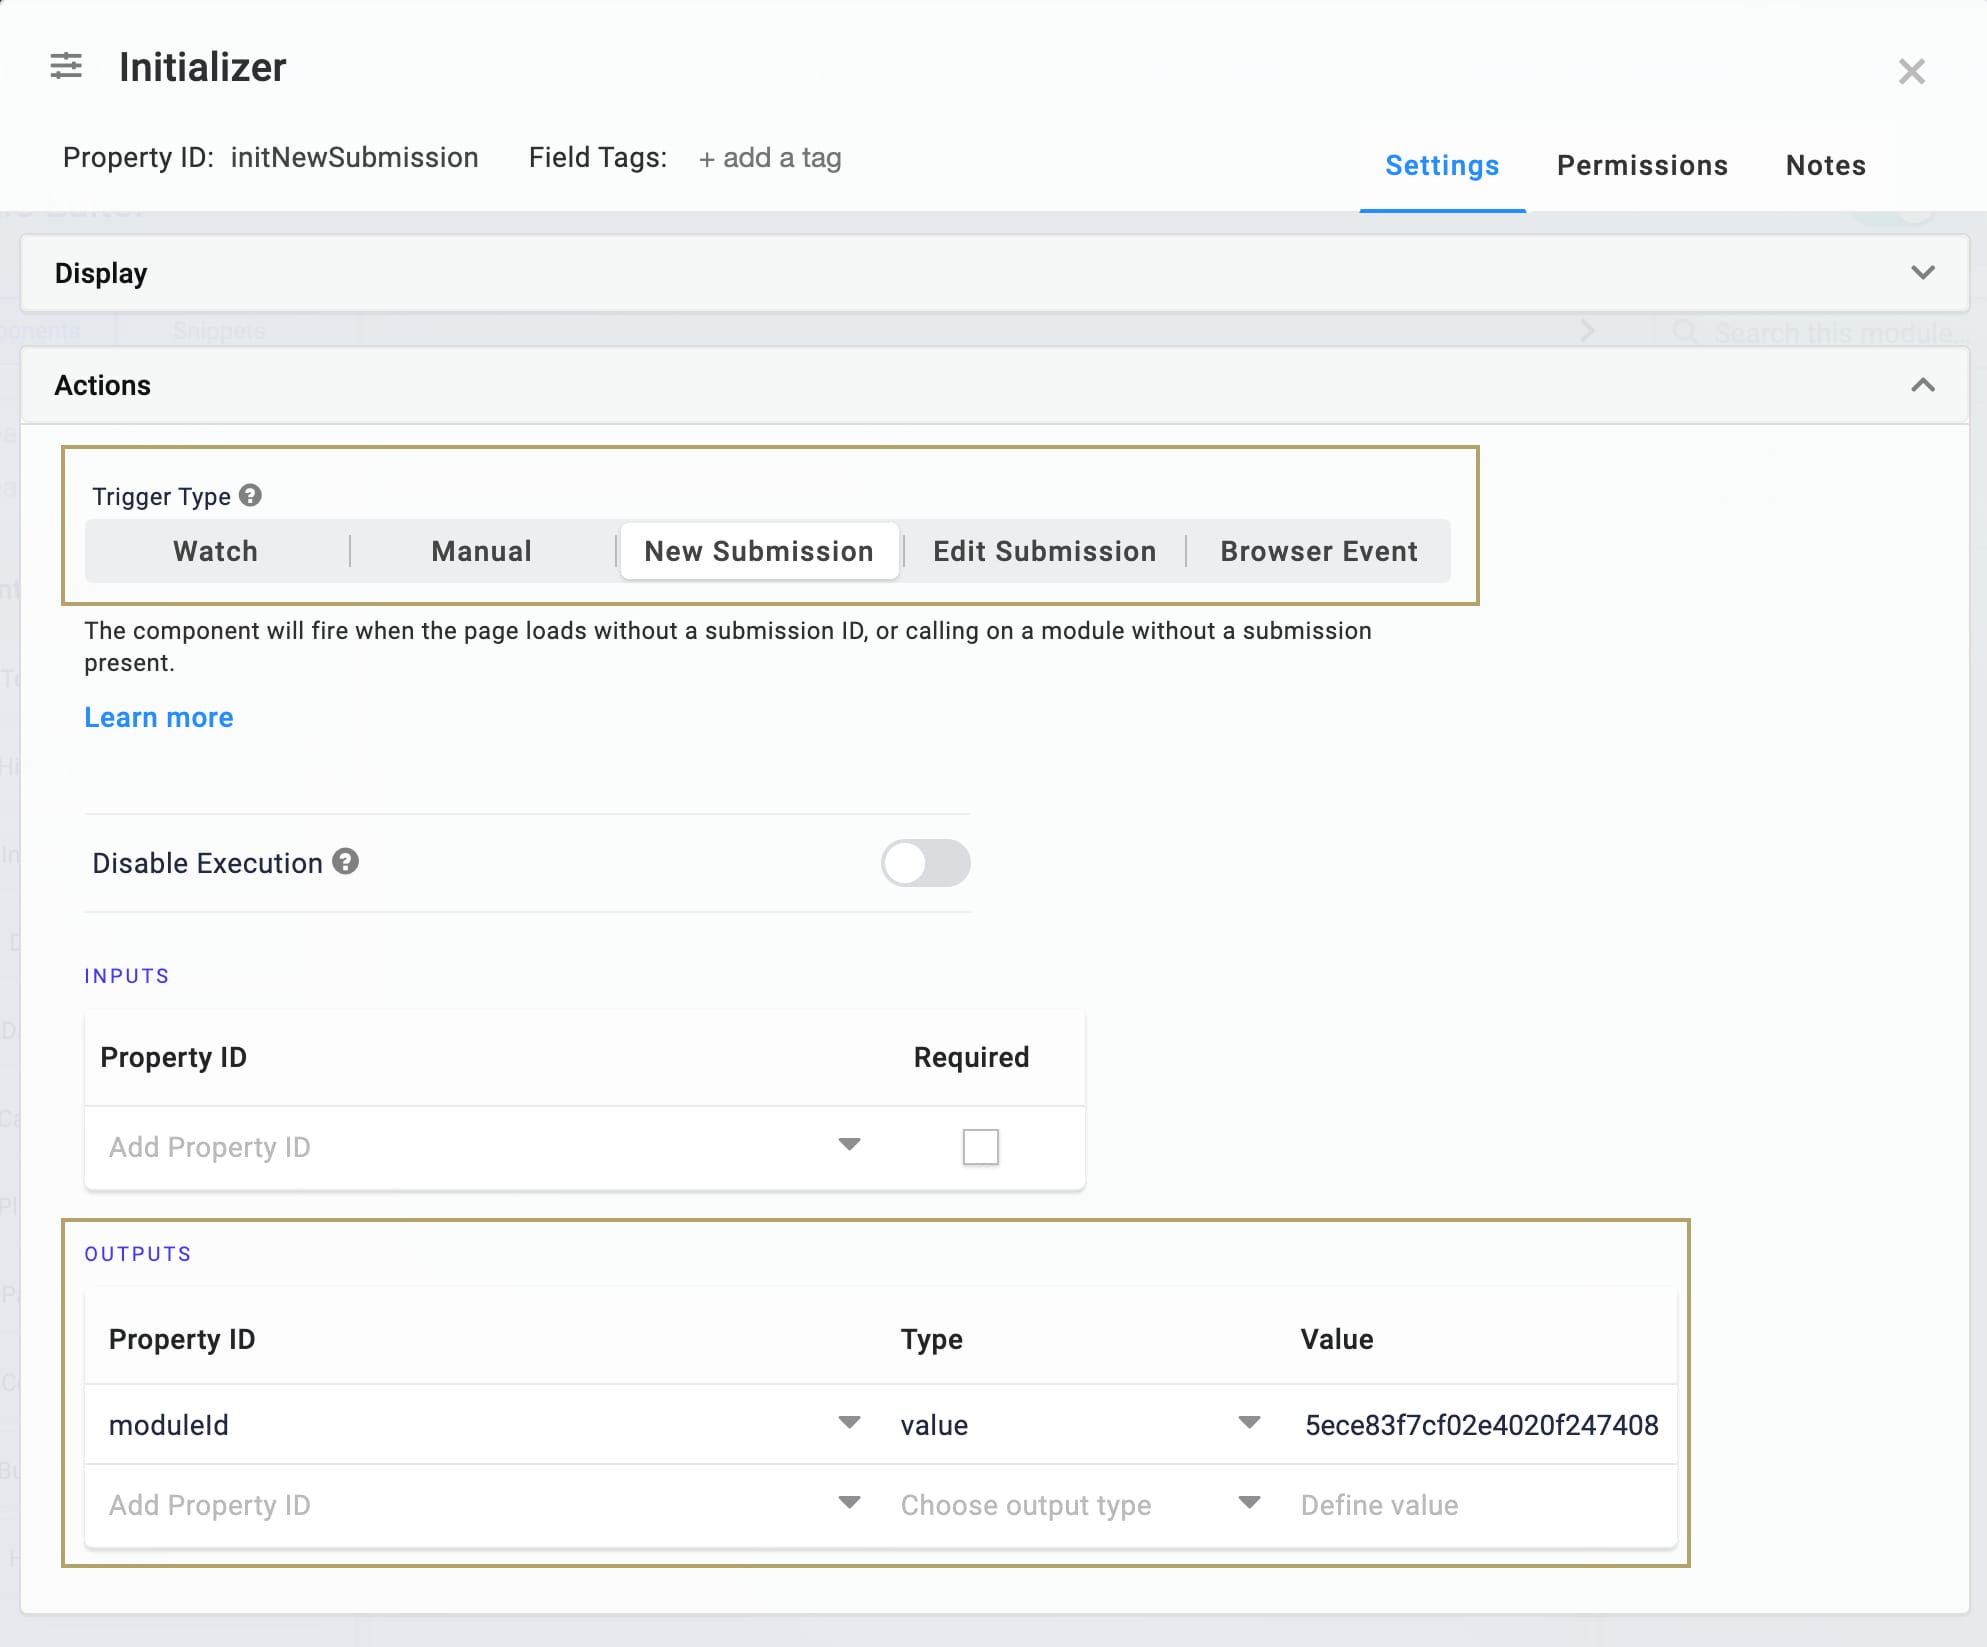
In the Property ID and Canvas Label Text fields, enter
initNewSubmission.Set the Trigger Type as New Submission.
In the Outputs table, enter the following:
Property ID
Type
Value
moduleId
value
{your Schema module's unique module ID}
The Property ID listed in the Outputs table corresponds to the Hidden component you’ll add in the next step. This is where the schema module ID is stored. In the Value column, enter your schema module's unique module ID. The image below displays the module ID from the sample schema module.
Click Save & Close
Configure the Hidden Component
Next, add the Hidden component referenced by the Initializer component. You'll reference this component later in this example to retrieve the module ID in your API calls.
Drag and drop a Hidden component onto your canvas, placing it below your
initNewSubmissionInitializer component.In the Property ID and Label Text fields, enter
moduleId.Click Save & Close.
Configure the Panel Component
You need a portal for your end-user in your submissions module to collect the information. Then, use a Create Module Submission(s) API call to store submissions in your schema module.
You’ll configure a Panel component that acts as a container for the components involved in this stage of the configuration.
Drag and drop a Panel component onto your canvas, placing it below your
moduleIdHidden component.In the Title field, enter
Create.In the Property Name field, enter
panelCreateModuleSubmissions.Click Save & Close.
Configure the Columns Component
Next, add two columns using a Columns component to better organize the module.
Drag and drop a Columns component onto your canvas, placing it inside your
panelCreateModuleSubmissionsPanel Component.In the Property ID field, enter
colCreateSubmissions.Click Save & Close.
Configure the Text Field Components
Add two Text Field components to collect your end-user's first and last name.
Drag and drop two Text Field components onto your canvas, placing one component in each column of the
colCreateSubmissionsColumns component.In the Property ID and Label Text fields, enter the following for each component:
#
Property ID
Label Text
1
firstName
First Name
2
lastName
Last Name
The
firstNamefield is in the first column, and thelastNamefield is in the second.Click Save & Close after adding each Text Field component.
Configure the Text Area Components
Add two Text Area components to collect your end-user's joke and the answer to the joke.
Drag and drop two Text Area components onto your canvas, placing one component in each column of the
colCreateSubmissionsColumns component.In the Property ID and Label Text fields, enter the following for each component:
#
Property ID
Label Text
1
jokeQuestion
Joke Question
2
jokeAnswer
Joke Answer
The
jokeQuestionfield is in the first column, and thejokeAnswerfield is in the second.Click Save & Close after adding each Text Area component.
Configure the Plug-In Component
Add a Plug-In component to run the Create Module Submission(s) API call. You'll map the data from your input fields into the call to create the submissions and store them in the schema module.
Drag and drop a Plug-In component onto your canvas, placing it below your
colCreateSubmissionsColumns component.In the Property ID and Label Text fields, enter
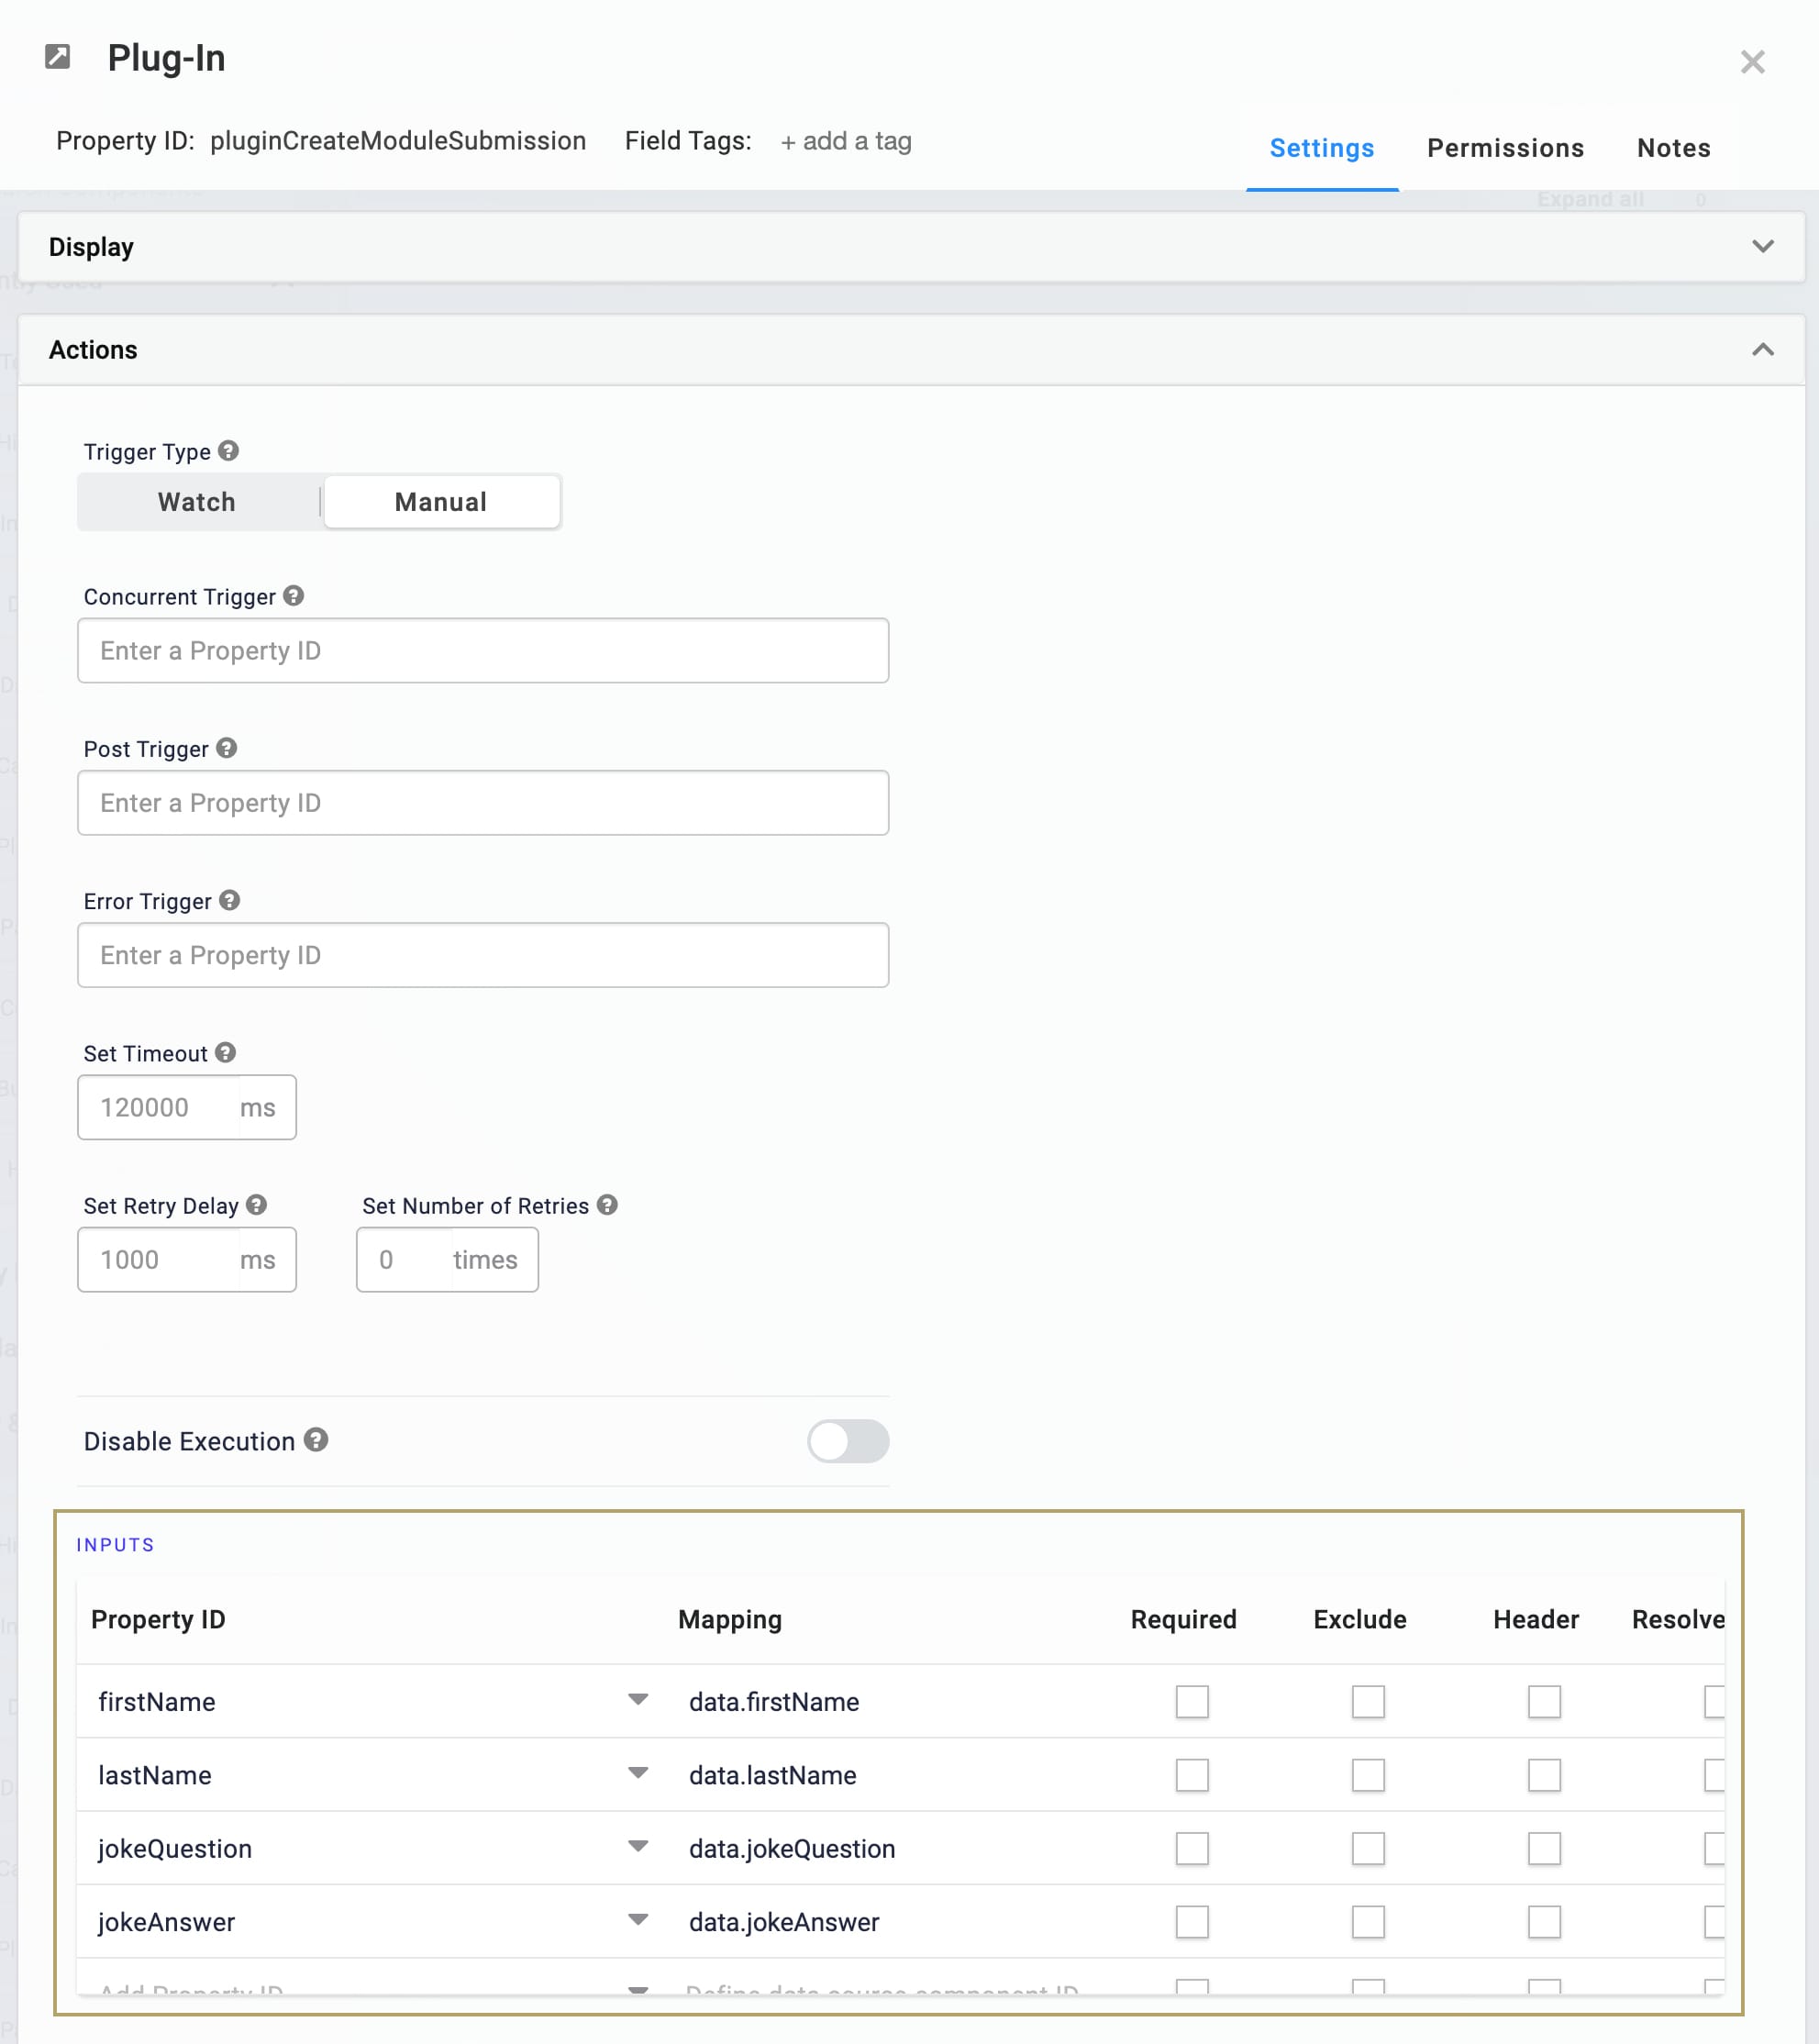
pluginCreateModuleSubmission.In the Inputs table, enter the following:
Property ID
Mapping
firstName
data.firstName
lastName
data.lastName
jokeAnswer
data.jokeAnswer
jokeQuestion
data.jokeQuestion
From the Internal Services drop-down, select Create Module Submission(s). The Data Source URL autopopulates.
In the Data Source URL field, replace
{moduleId}with{{data.moduleId}}.This Plug-In component maps the data from your
moduleIdHidden component into the Data Source URL.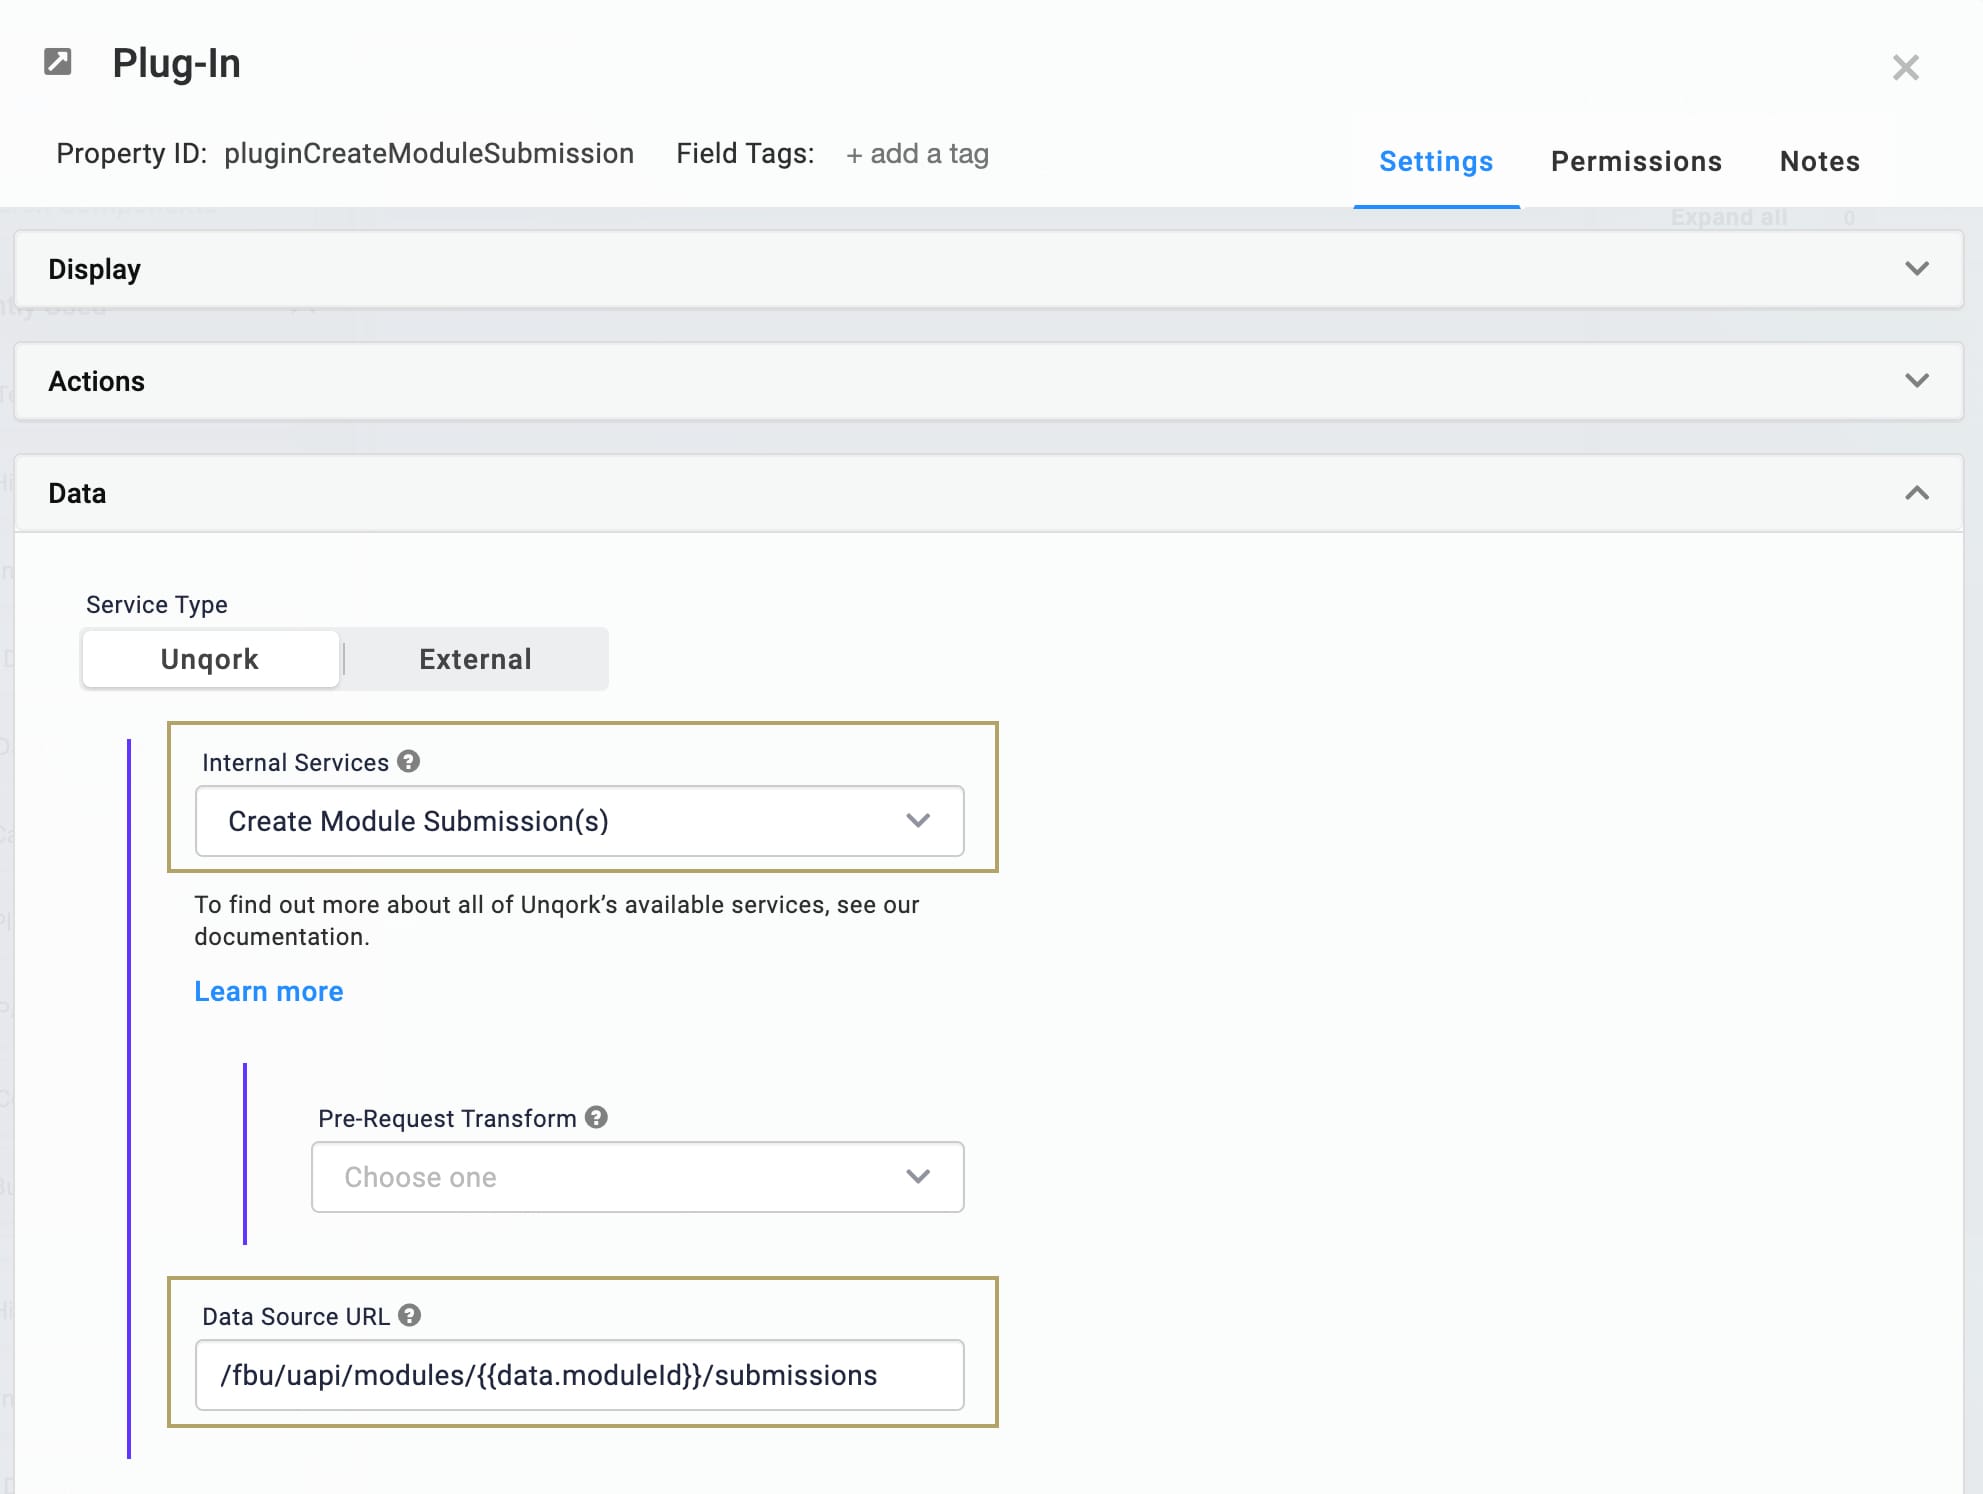
Click Save & Close.
Configure the Button Component
Add a Button component to trigger the Plug-In component and the API call.
Drag and drop a Button component onto your canvas, placing it below the
pluginCreateModuleSubmissionPlug-In component.In the Property ID field, enter
btnCreateSubmission.In the Label Text field, enter
Create Submission.Set the Action Type as Event.
In the Trigger on Click field, enter
pluginCreateModuleSubmission.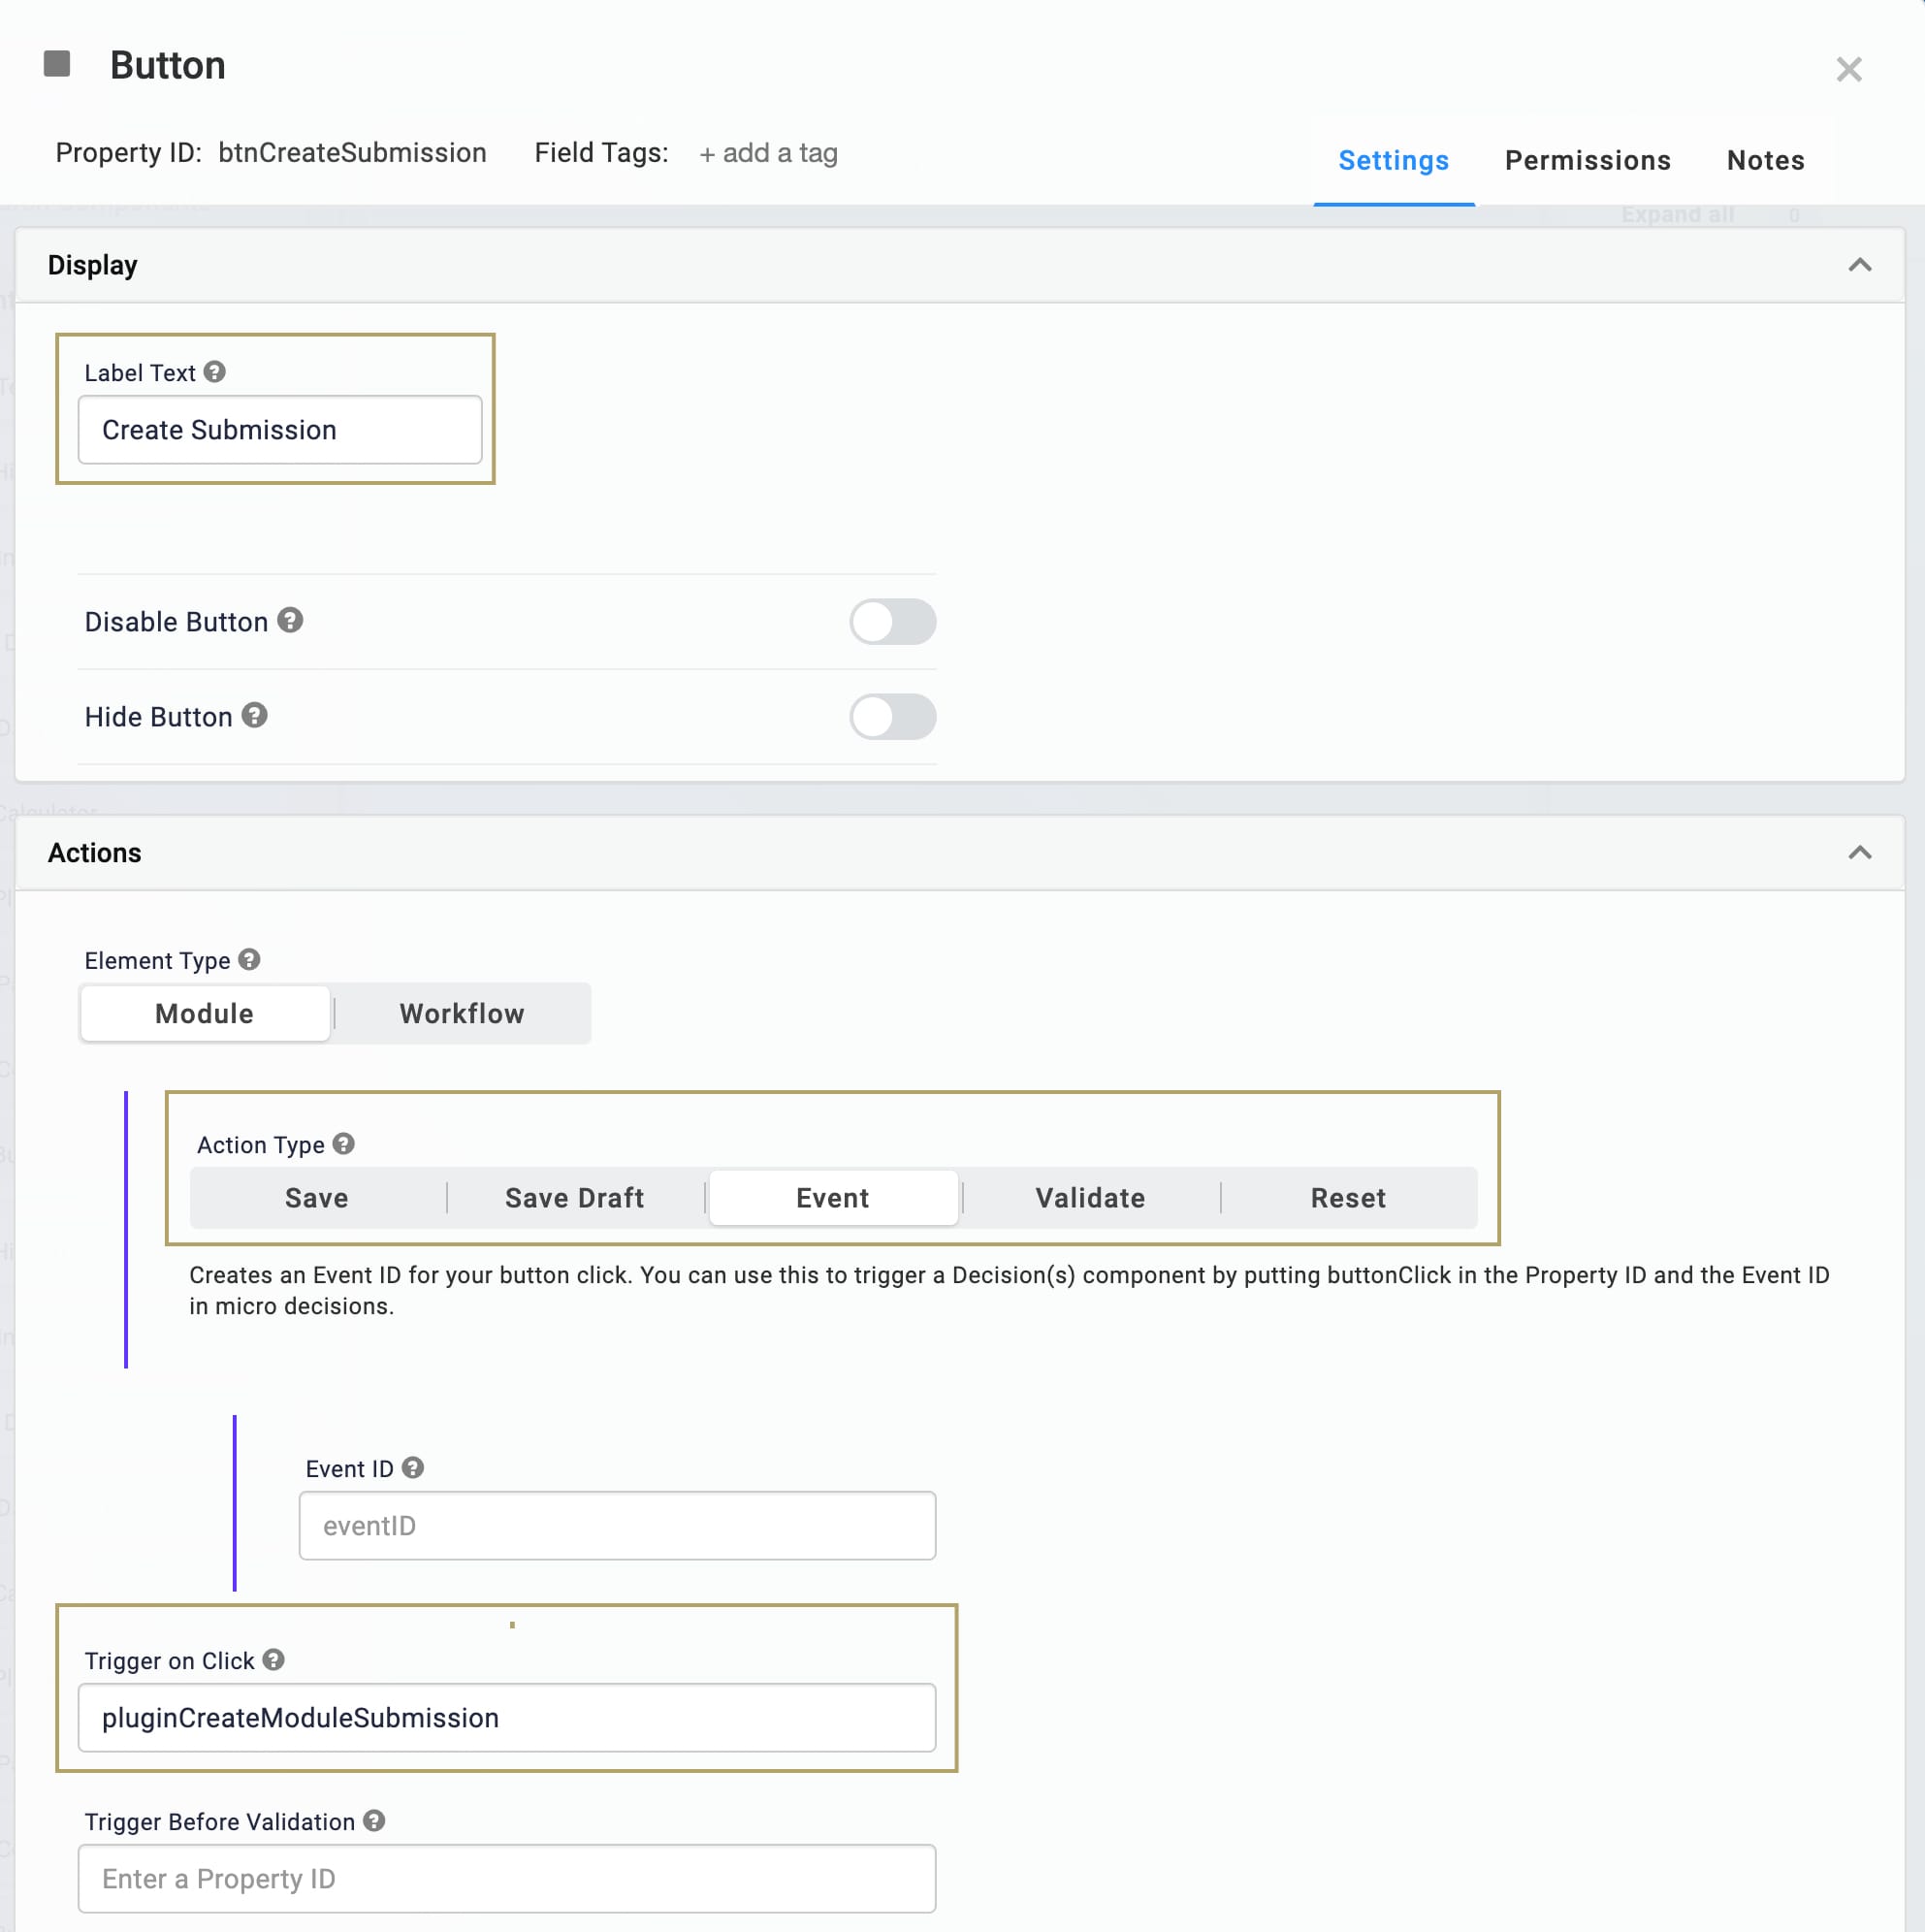
Click Save & Close.
Here’s how the first part of the configuration looks in the Module Builder:
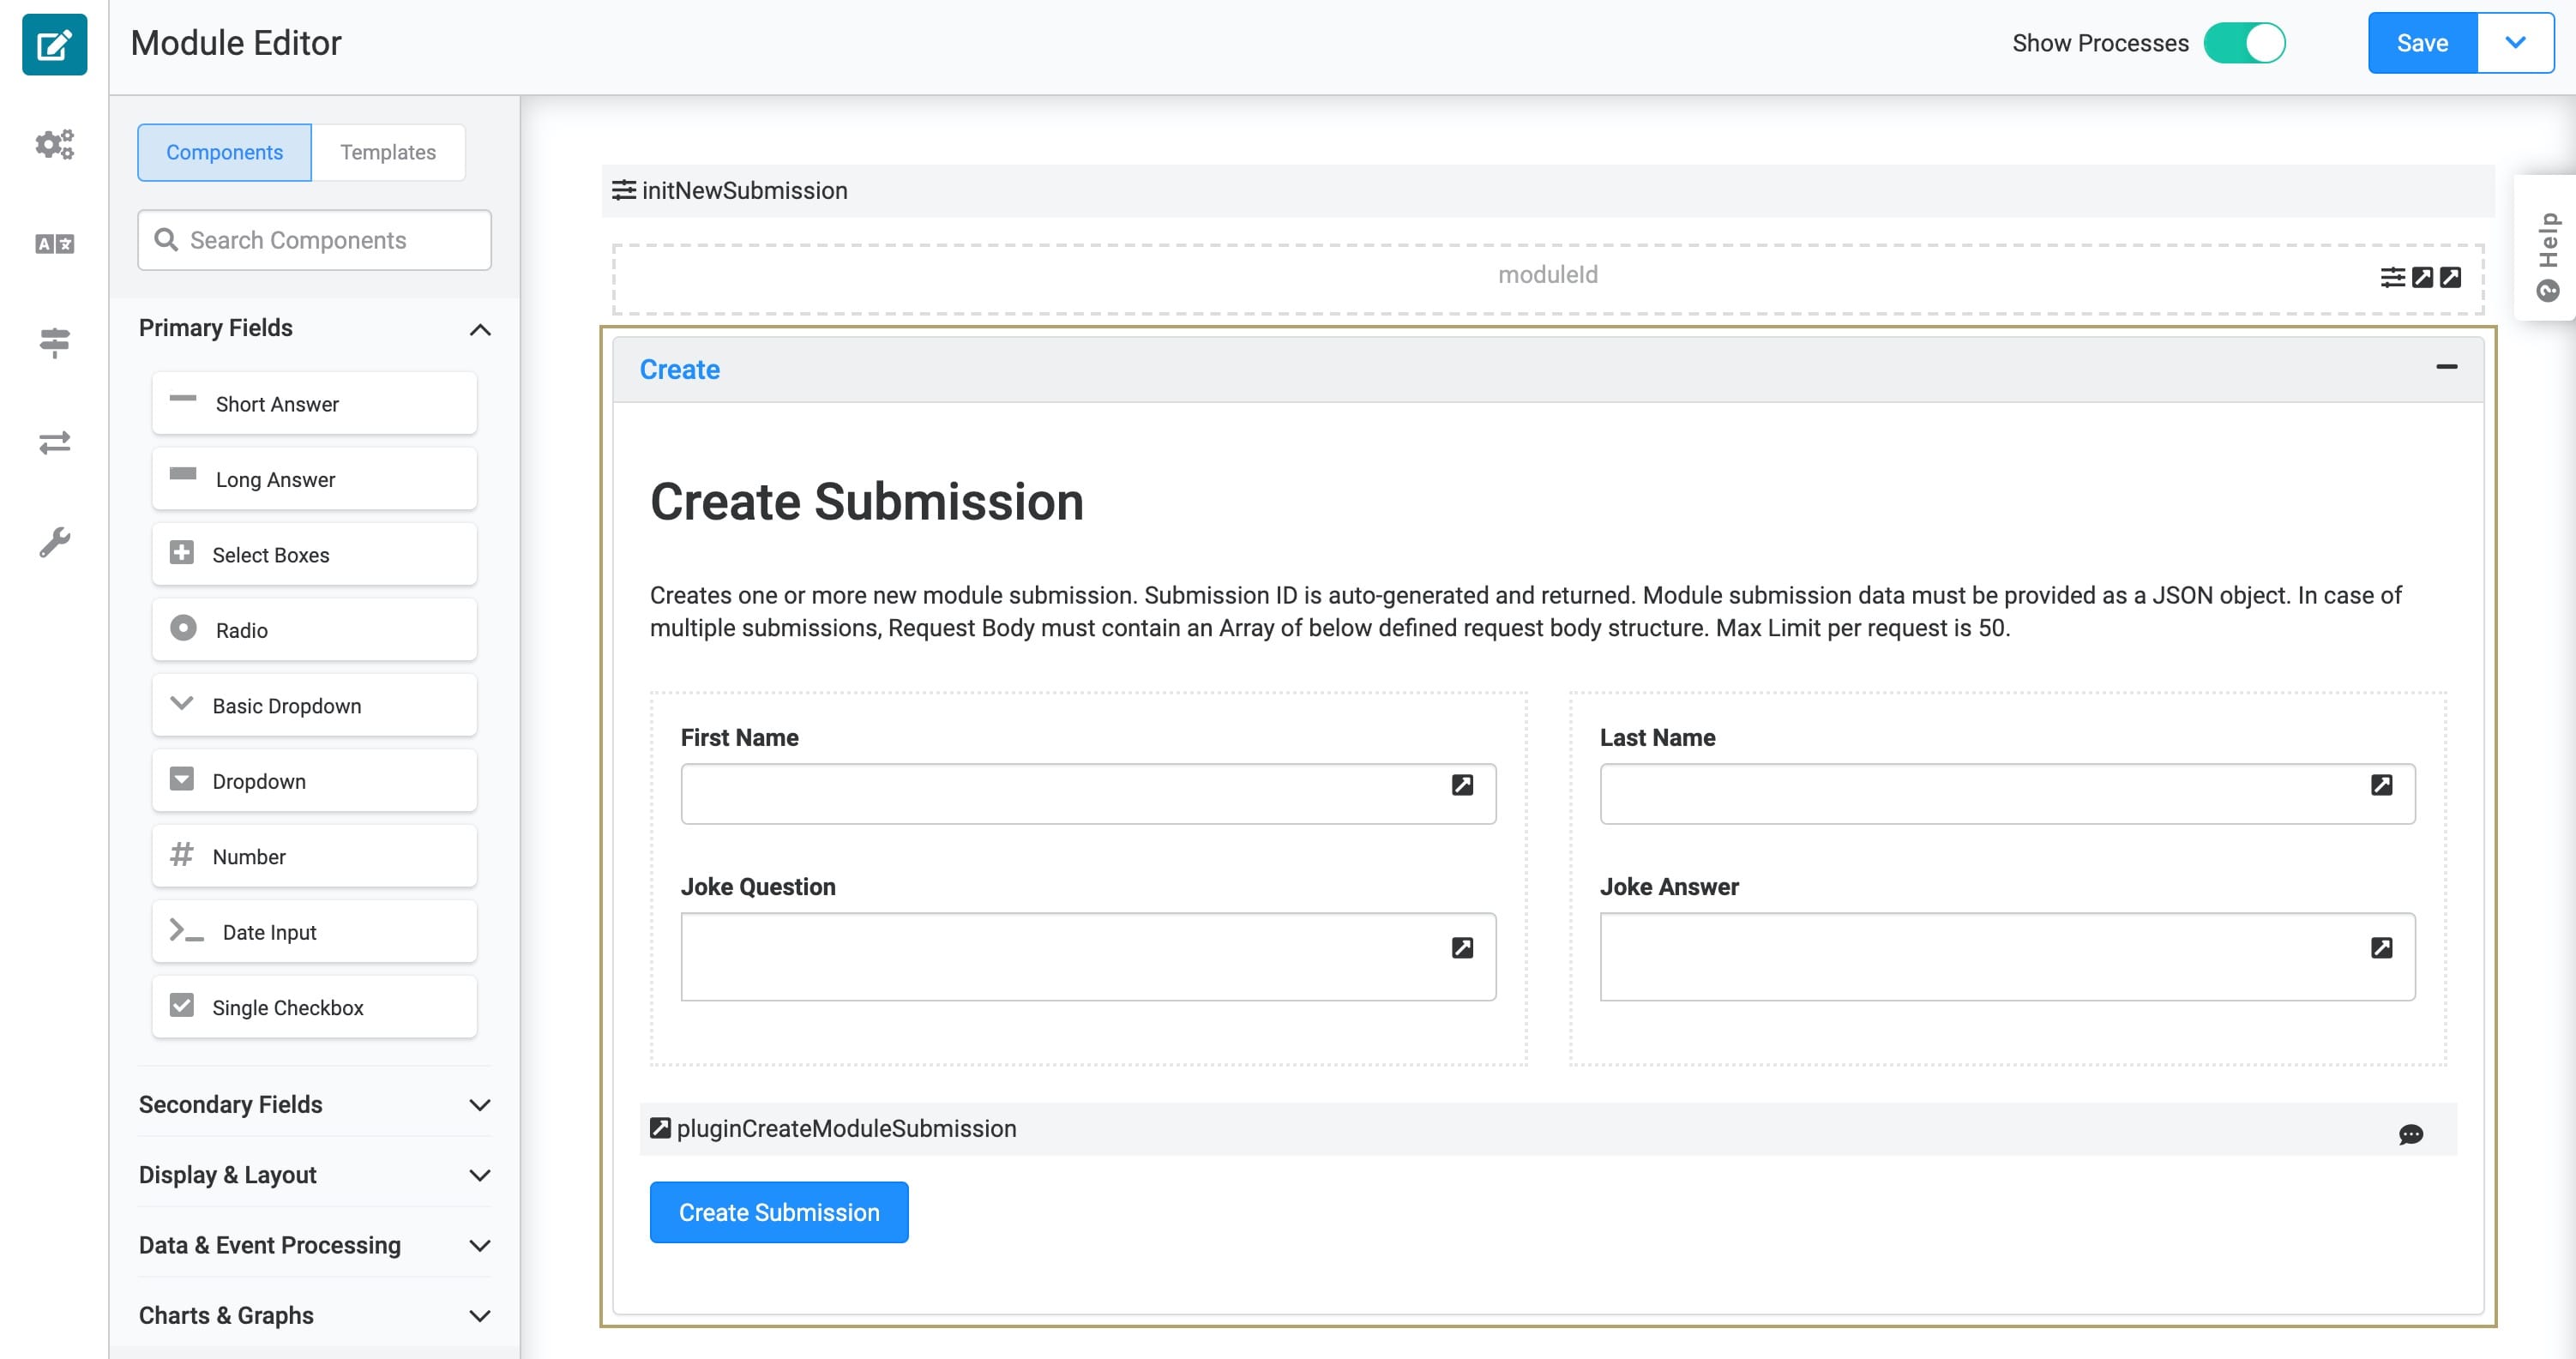
The above image uses optional HTML Element components to add a header and description in the Panel component.
Configure the Get Module Submissions API Call
Now that an end-user can create submissions, you must add functionality to view those submissions. There are a few options for GET API calls in Unqork. In this example, you'll use the Get Module Submissions call, which retrieves the data from your schema module. Then, you'll use the DevTools Console to view the submissions.
Configure the Panel Component
This Panel component acts as a container for the components involved in this section of the configuration.
Drag and drop a Panel component onto your canvas, placing it below your
CreatePanel Component.In the Title field, enter
Get Module Submissions.In the Property Name field, enter
panelGetModuleSubmissions.Click Save & Close.
Configure the Plug-In Component
Add a Plug-In component to run the Get Module Submissions API call.
Drag and drop a Plug-In component onto your canvas, placing it inside your
panelGetModuleSubmissionsPanel component.In the Property ID and Canvas Label Text fields, enter
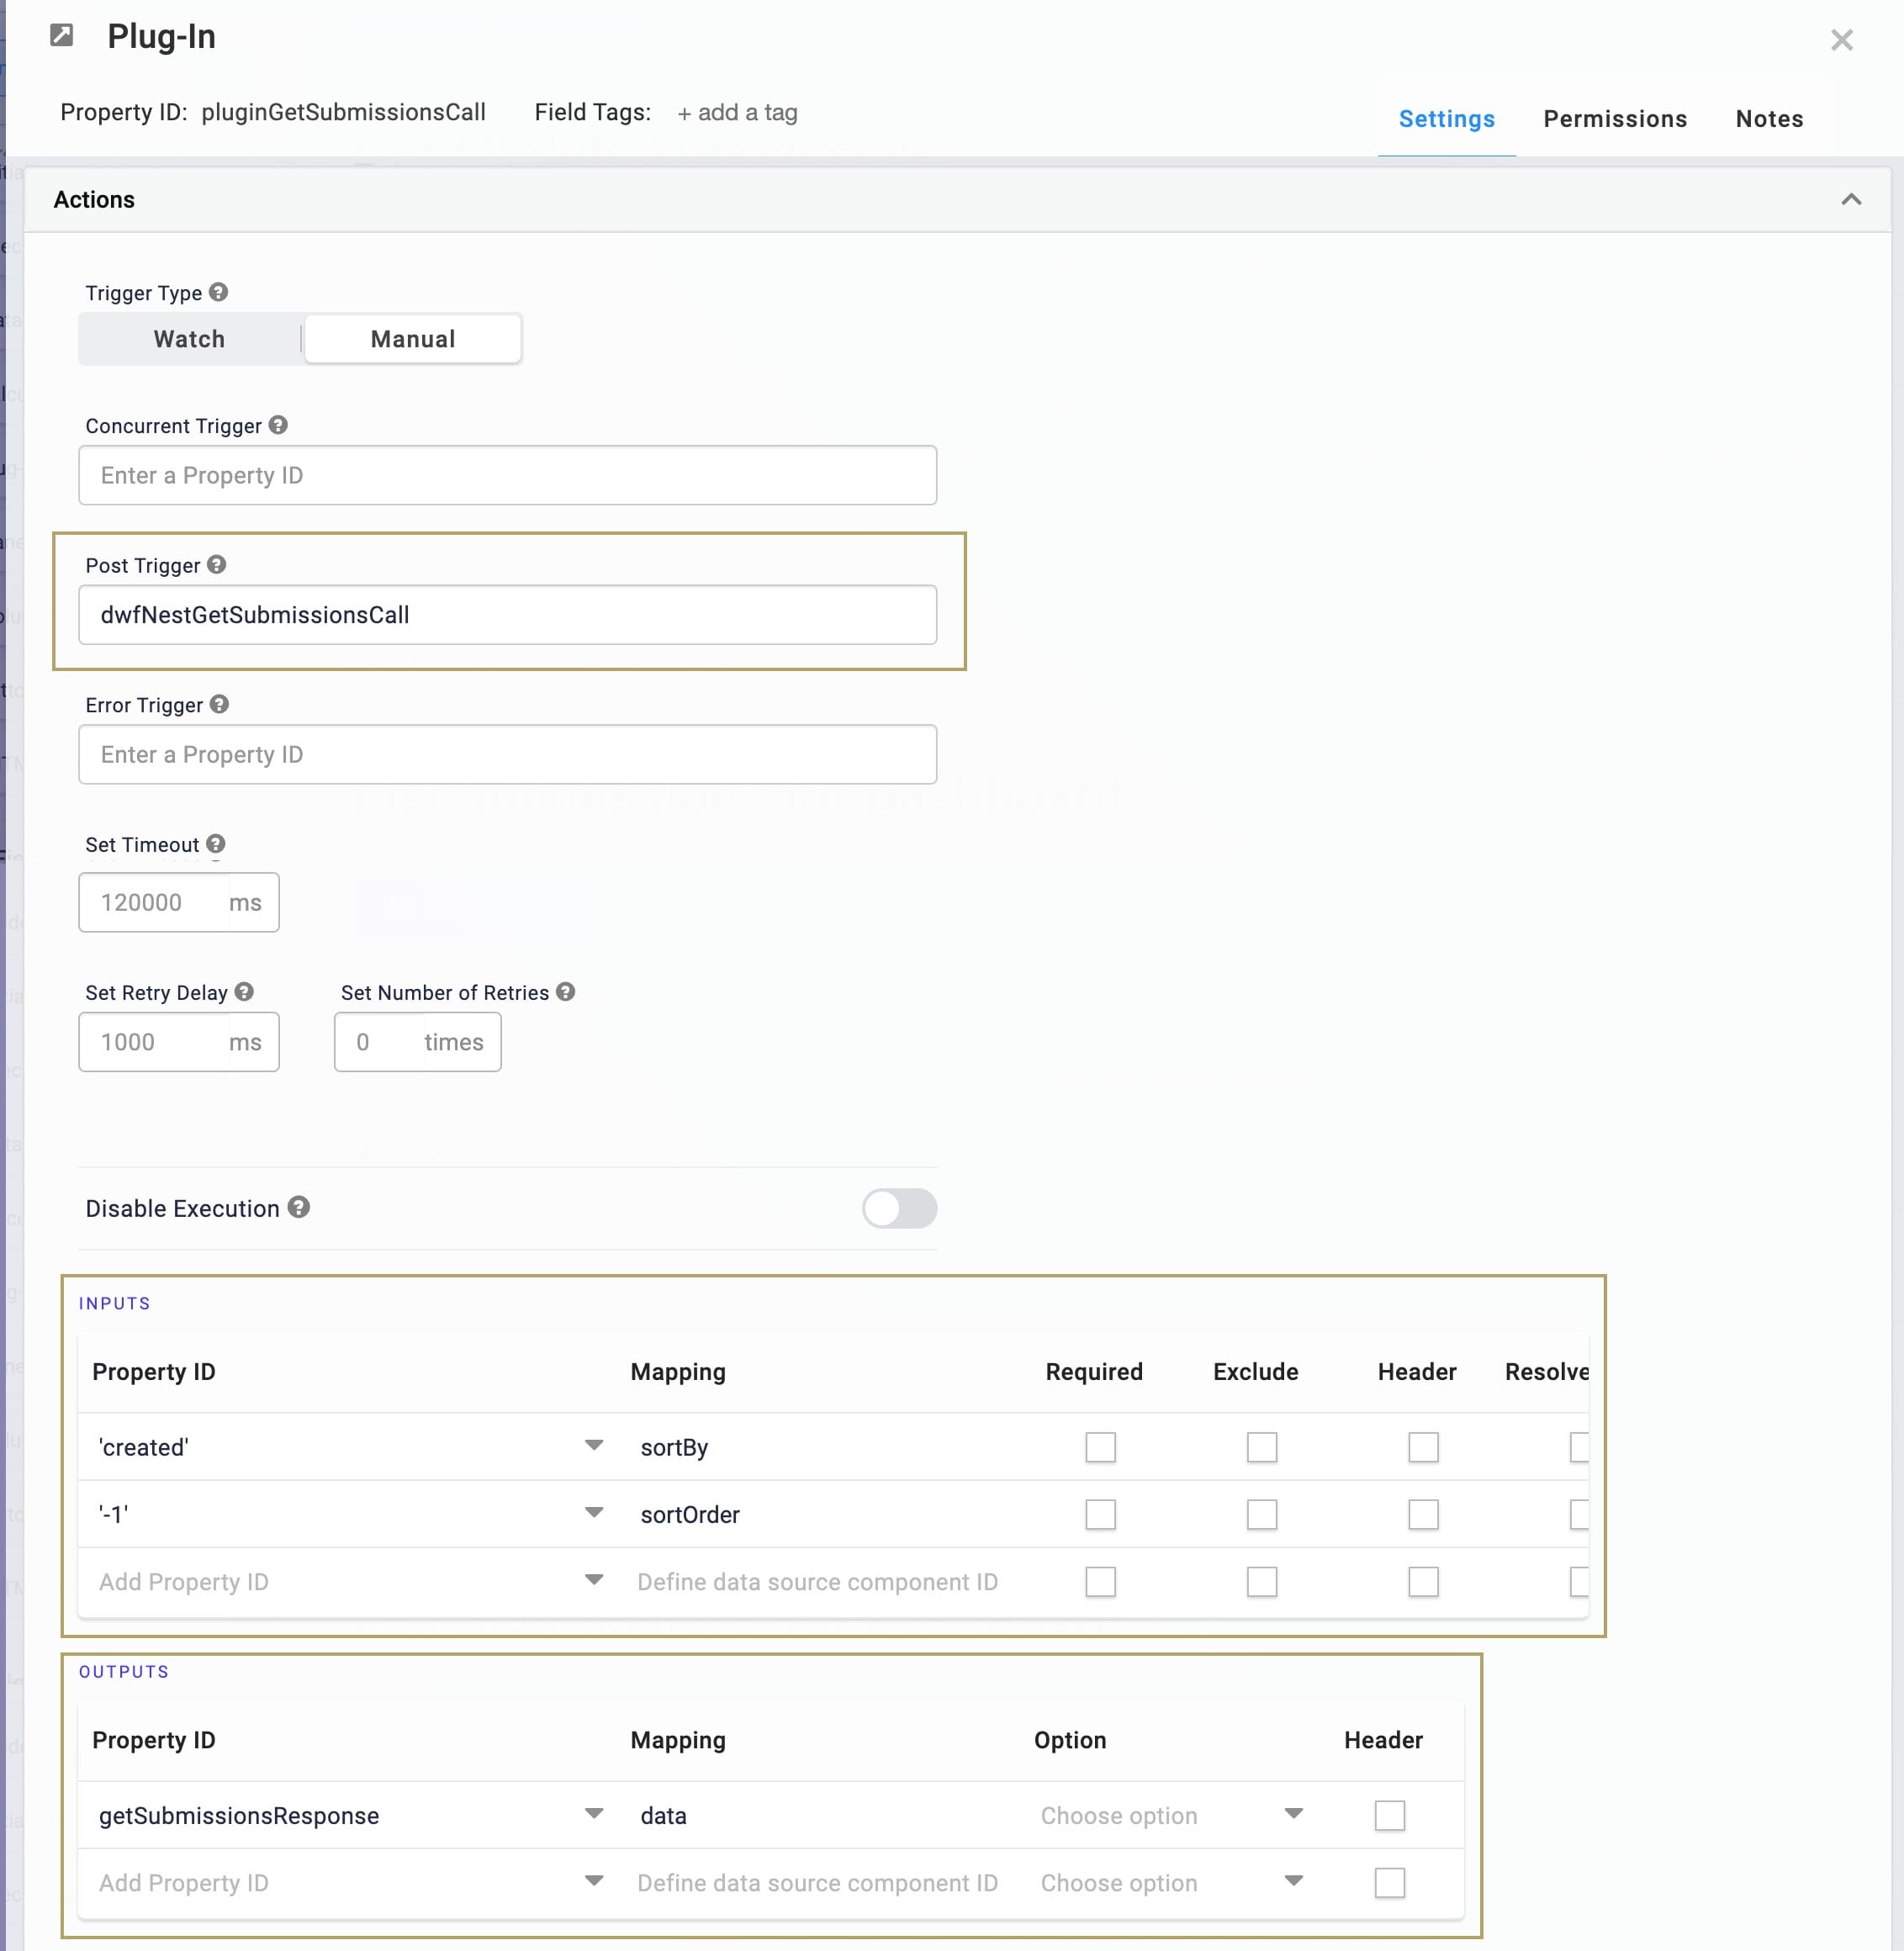
pluginGetSubmissionsCall.In the Post Trigger field, enter
dwfNestGetSubmissionsCall.In the Inputs table, enter the following:
Property ID
Mapping
'created'
sortBy
'-1'
sortOrder
This configuration sorts the submissions in descending order, starting with the most recent. Use single quotes around the values in the Property ID field to indicate to the component that you're not referencing actual Property IDs. Instead, you're hardcoding these values into the API call.
In the Outputs table, enter the following:
Property ID
Mapping
getSubmissionsResponse
data
From the Internal Services drop-down, select Get Module Submissions. The Data Source URL autopopulates.
In the Data Source URL field, replace
{moduleId}with{{data.moduleId}}.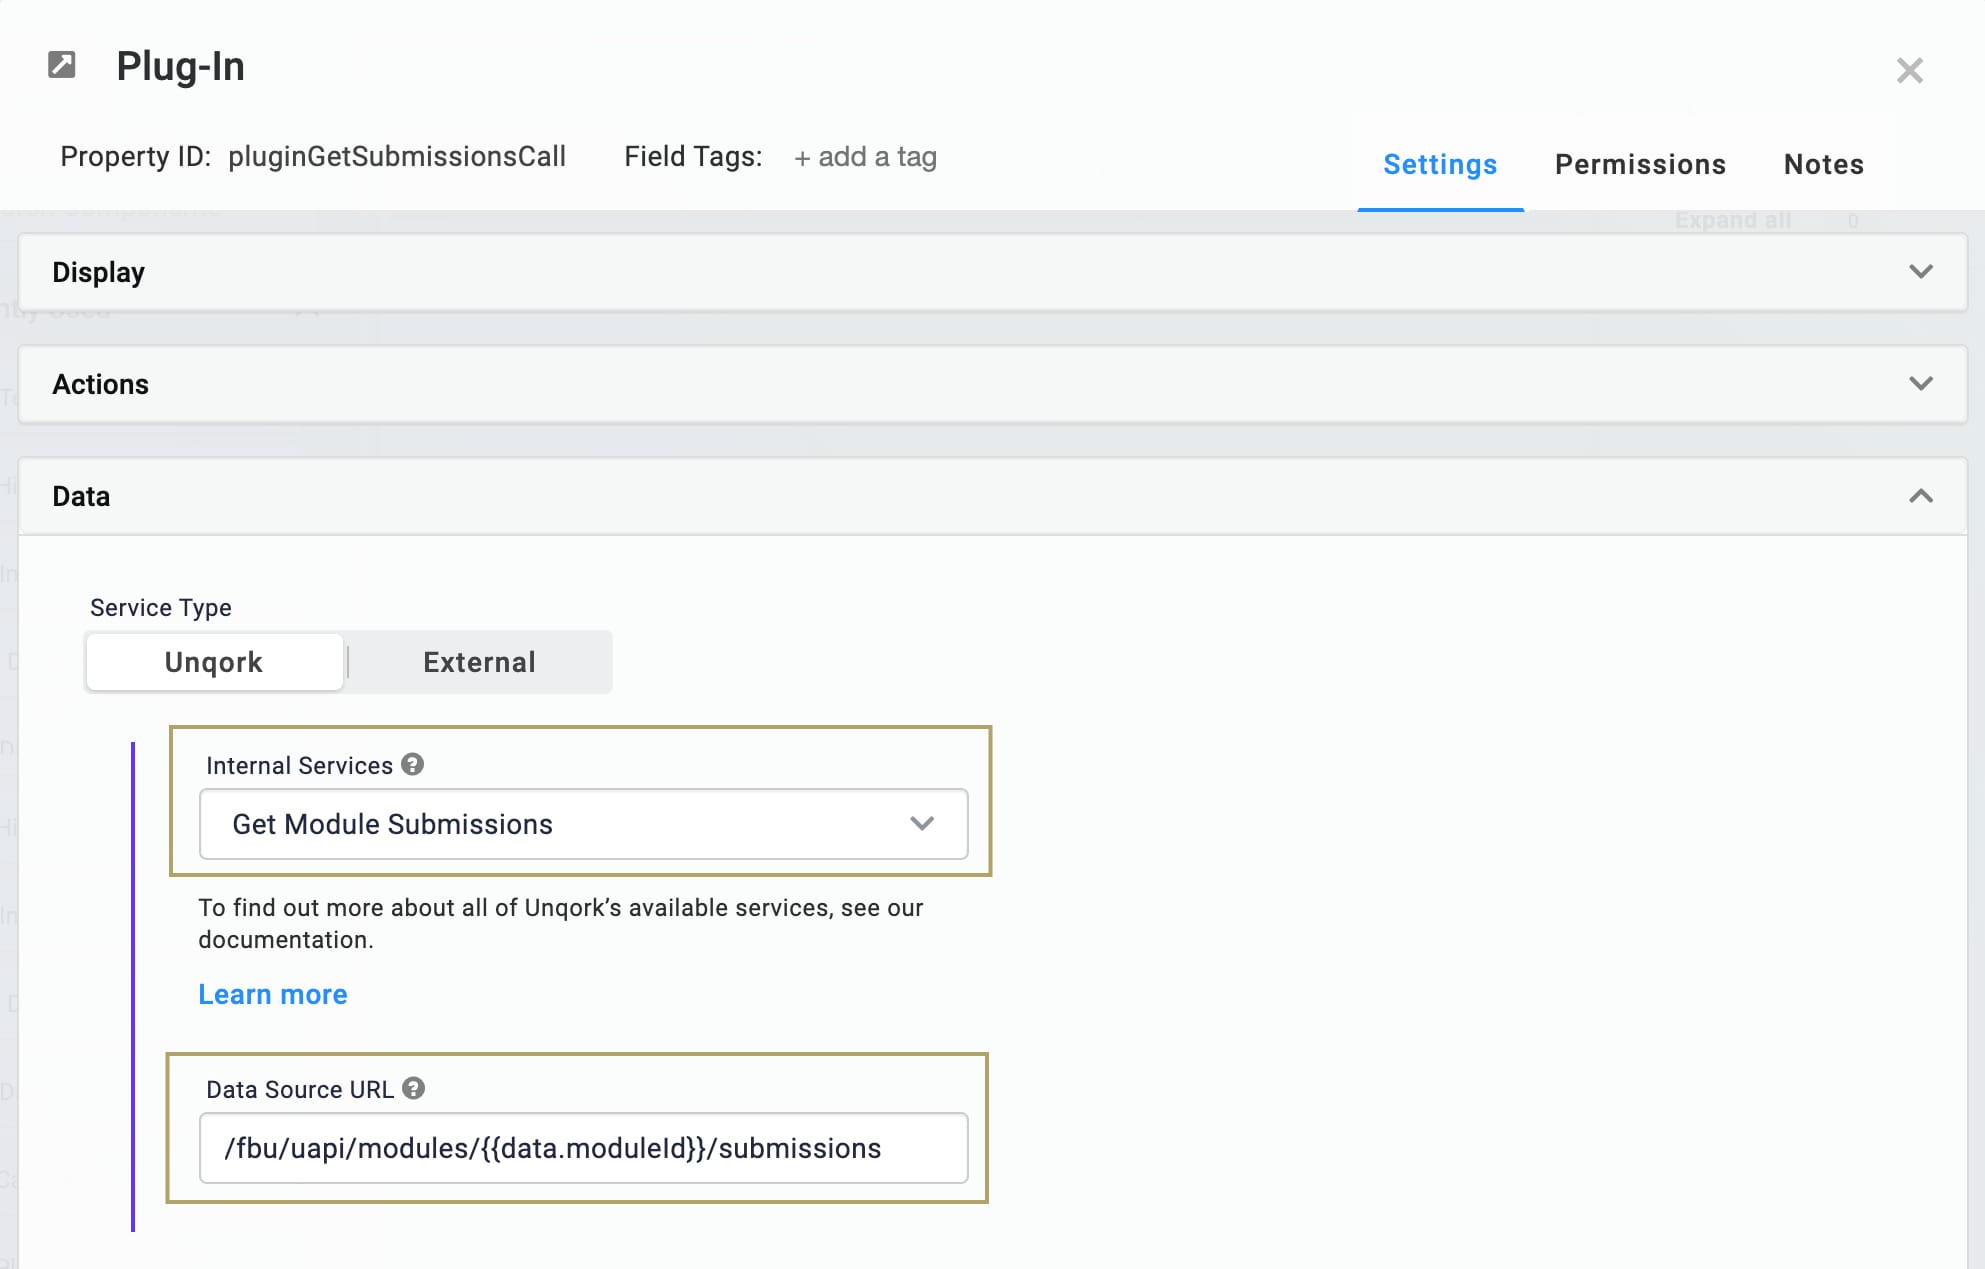
Click Save & Close.
Configure the Hidden Component
Add a Hidden component to store the response of your API call.
Drag and drop a Hidden component onto your canvas, placing it below your
pluginGetSubmissionsCallPlug-In component.In the Property ID and Label Text fields, enter
getSubmissionsResponse.Click Save & Close.
Configure the Data Workflow Component
There are different ways to log the response of this call and display the data. In this example, you'll add a Data Workflow component to nest the submission data returned by your API call.
Drag and drop a Data Workflow component onto your canvas, placing it below your
getSubmissionsResponseHidden component.In the Canvas Label Text and Property Name fields, enter
dwfNestGetSubmissionsCall.Click Save & Close.
Configure the Input Operator
Drag and drop an Input operator onto your Data Workflow canvas.
Configure the operator’s Info window as follows:
Setting
Selection
Category
Input
Component
pluginGetSubmissionsCall
Required
Yes
Source
Default
Configure the Col2Array Operator
Drag and drop a Col2Array operator onto your Data Workflow canvas.
Configure the operator’s Info window as follows:
Setting
Selection
Category
Col2Array
Label
Drop Empty
Yes
Path
data.rawData
Default Value
Connect the output port (right) of the Input operator to the input port (left) of the Col2Array operator.
Configure the Output Operator
Drag and drop an Output operator onto your Data Workflow canvas.
Configure the operator’s Info window as follows:
Setting
Selection
Category
Output
Component
getSubmissionsAfterNesting
Action
value
You'll create the
getSubmissionsAfterNestingHidden component next. This Hidden component serves as the output for your Data Workflow.Connect the output (right) port of the Col2Array operator to the input (left) port of the Output operator.
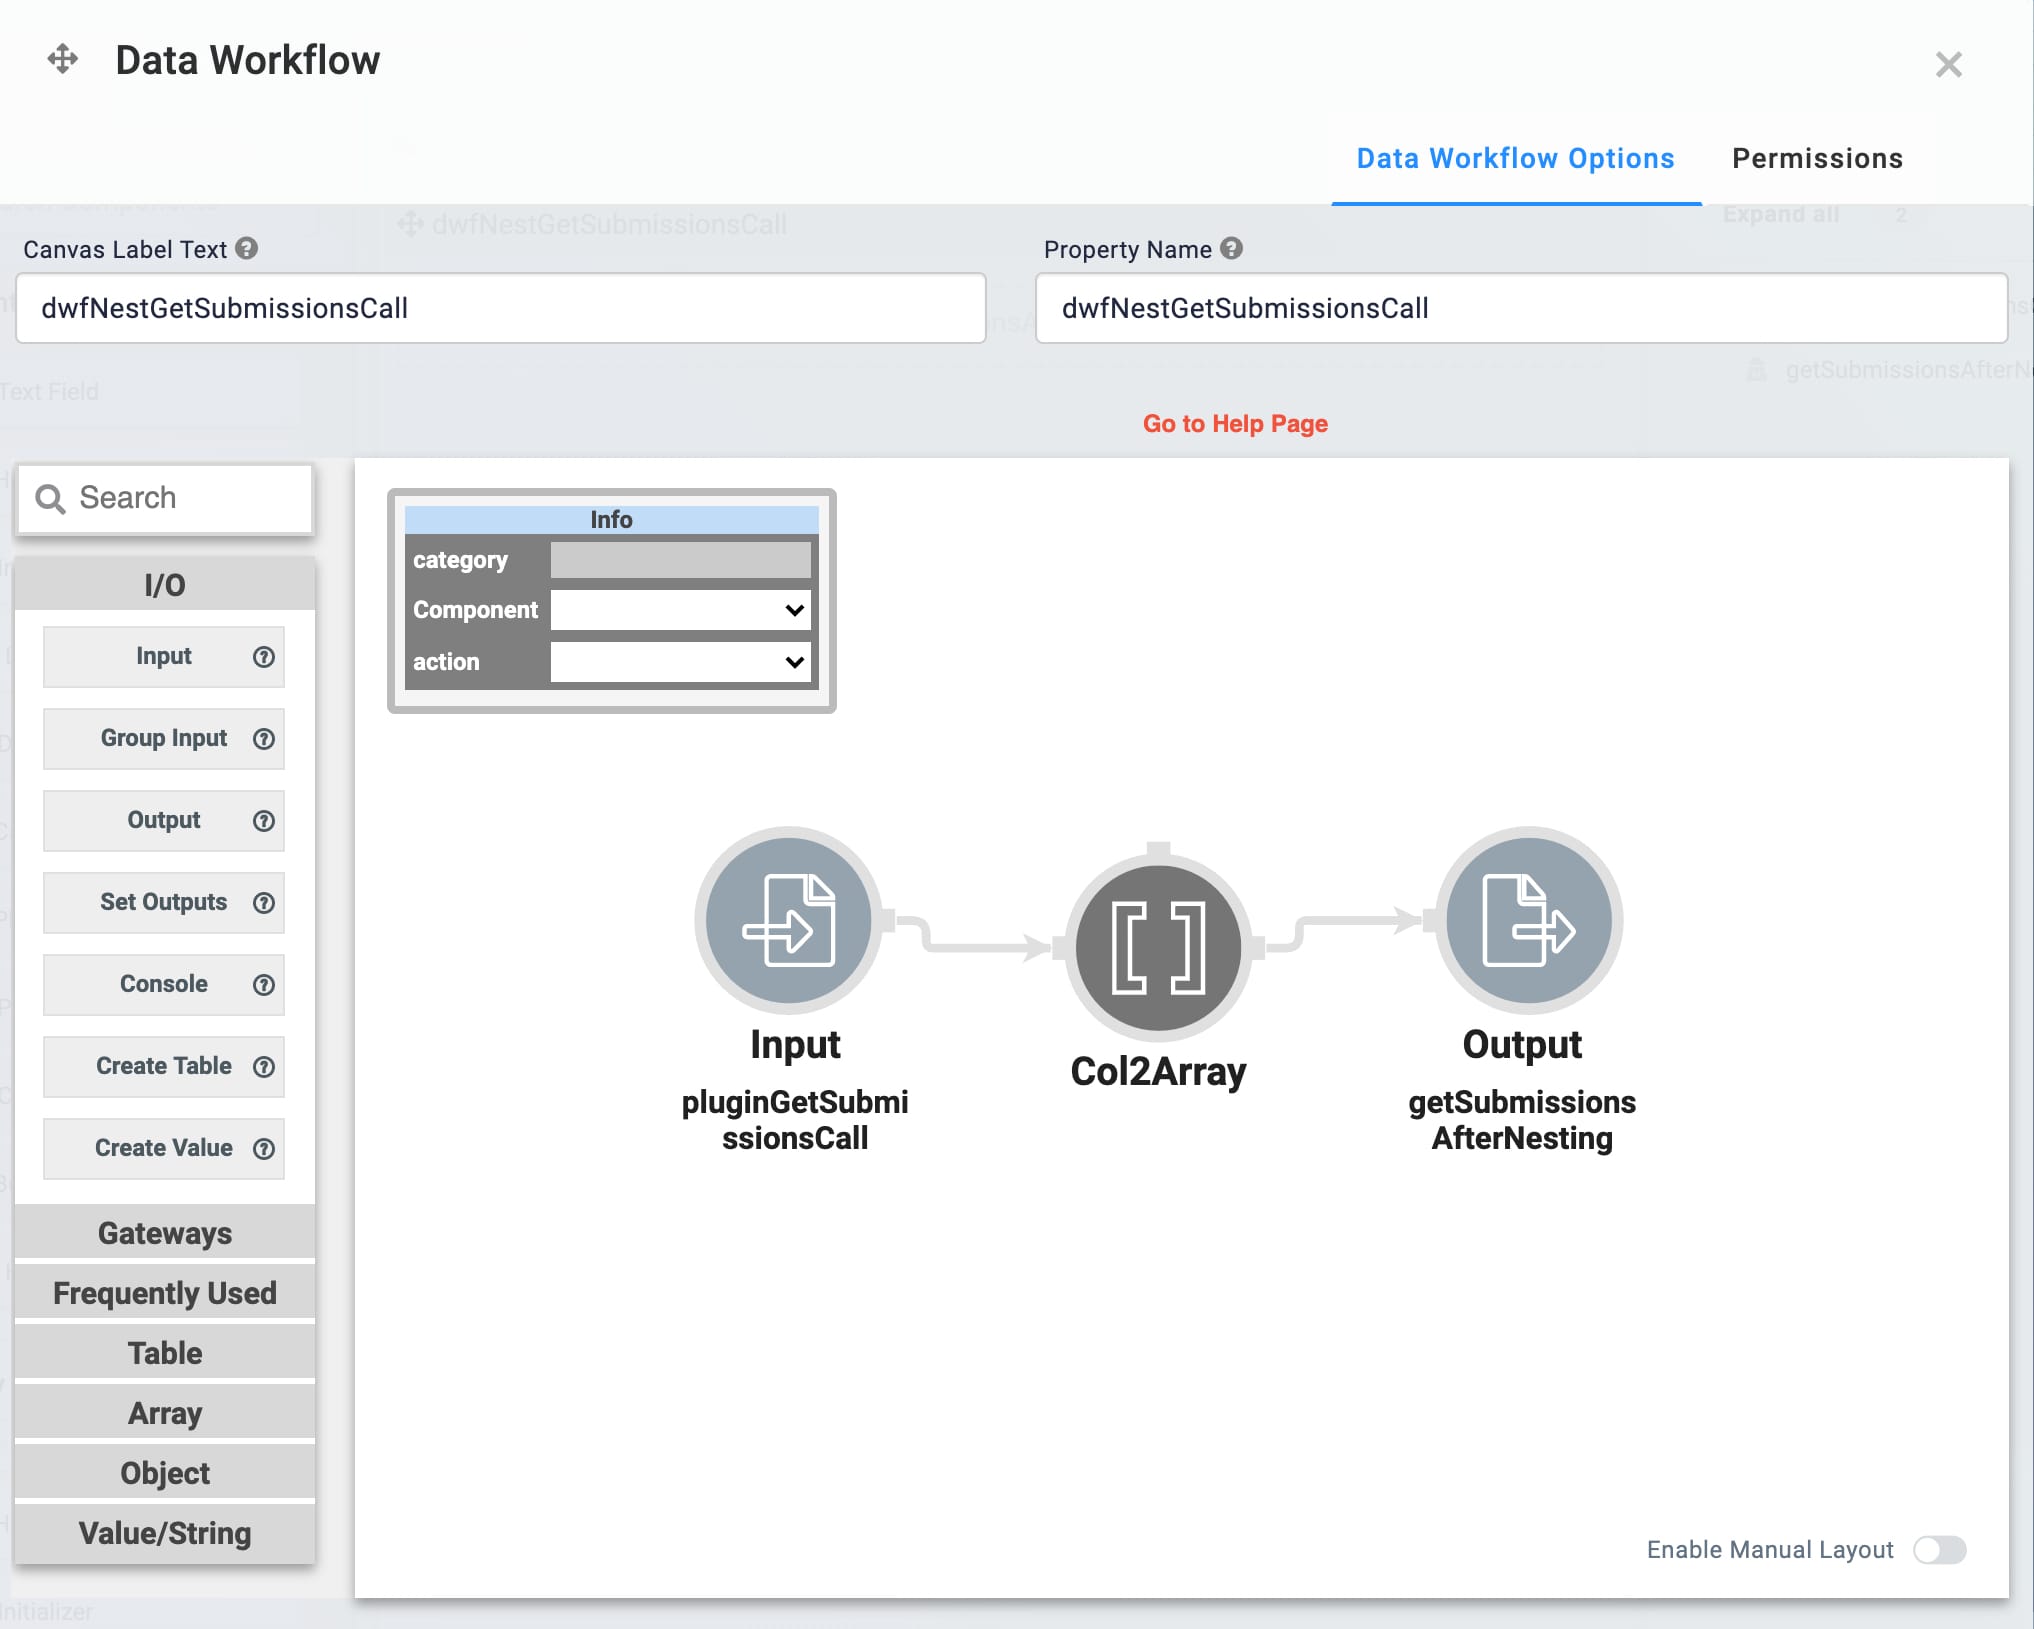
Click Save.
Configure the Hidden Component
You need another Hidden component to serve as the output for your Data Workflow. The component must exist in the module before you can add it as an output for your dwfNestGetSubmissionsCall Data Workflow component.
Drag and drop a Hidden component onto your canvas, placing it below your Data Workflow.
In the Property ID and Label Text fields, enter
getSubmissionsAfterNesting.Click Save & Close.
Configure the Button Component
Configure a Button component to trigger your Plug-In component.
Drag and drop a Button component onto your canvas, placing it below your
getSubmissionsAfterNestingHidden component.In the Property ID field, enter
btnGetSubmissions.In the Label Text field, enter
Get Submissions.Set the Action Type as Event.
In the Trigger on Click field, enter
pluginGetSubmissionsCall.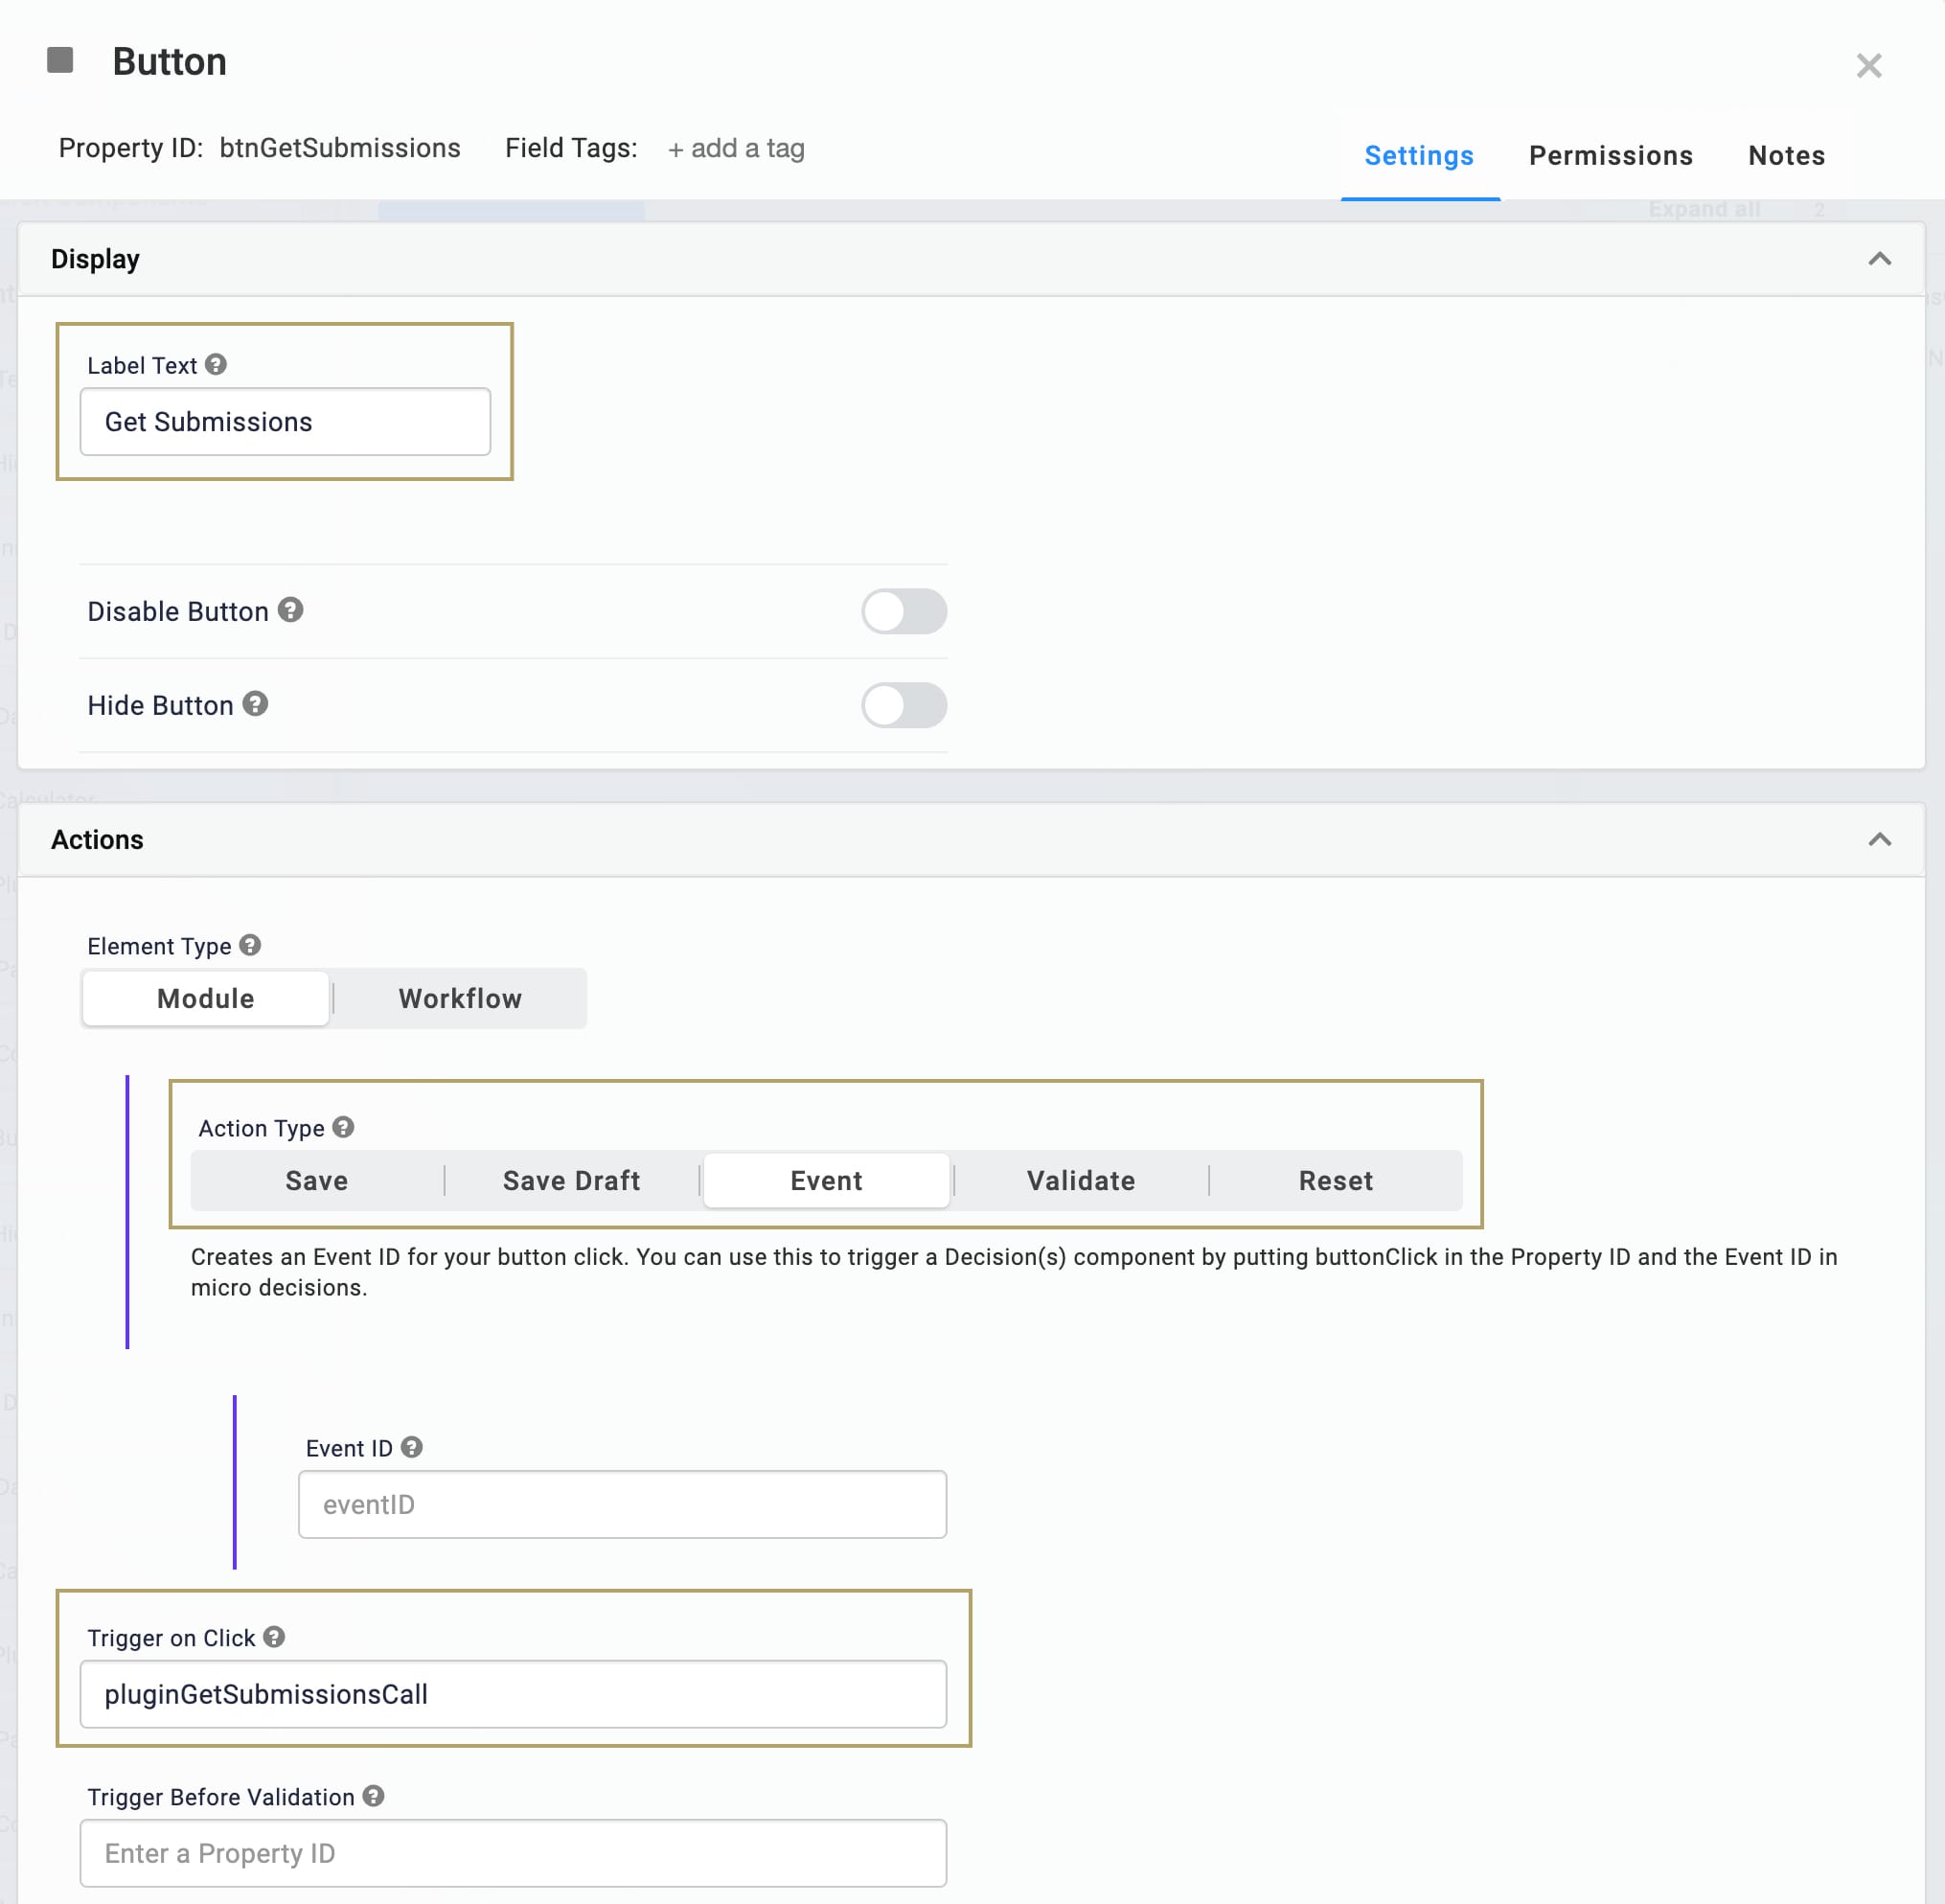
Click Save & Close.
Here’s how the second part of the configuration looks in the Module Builder:
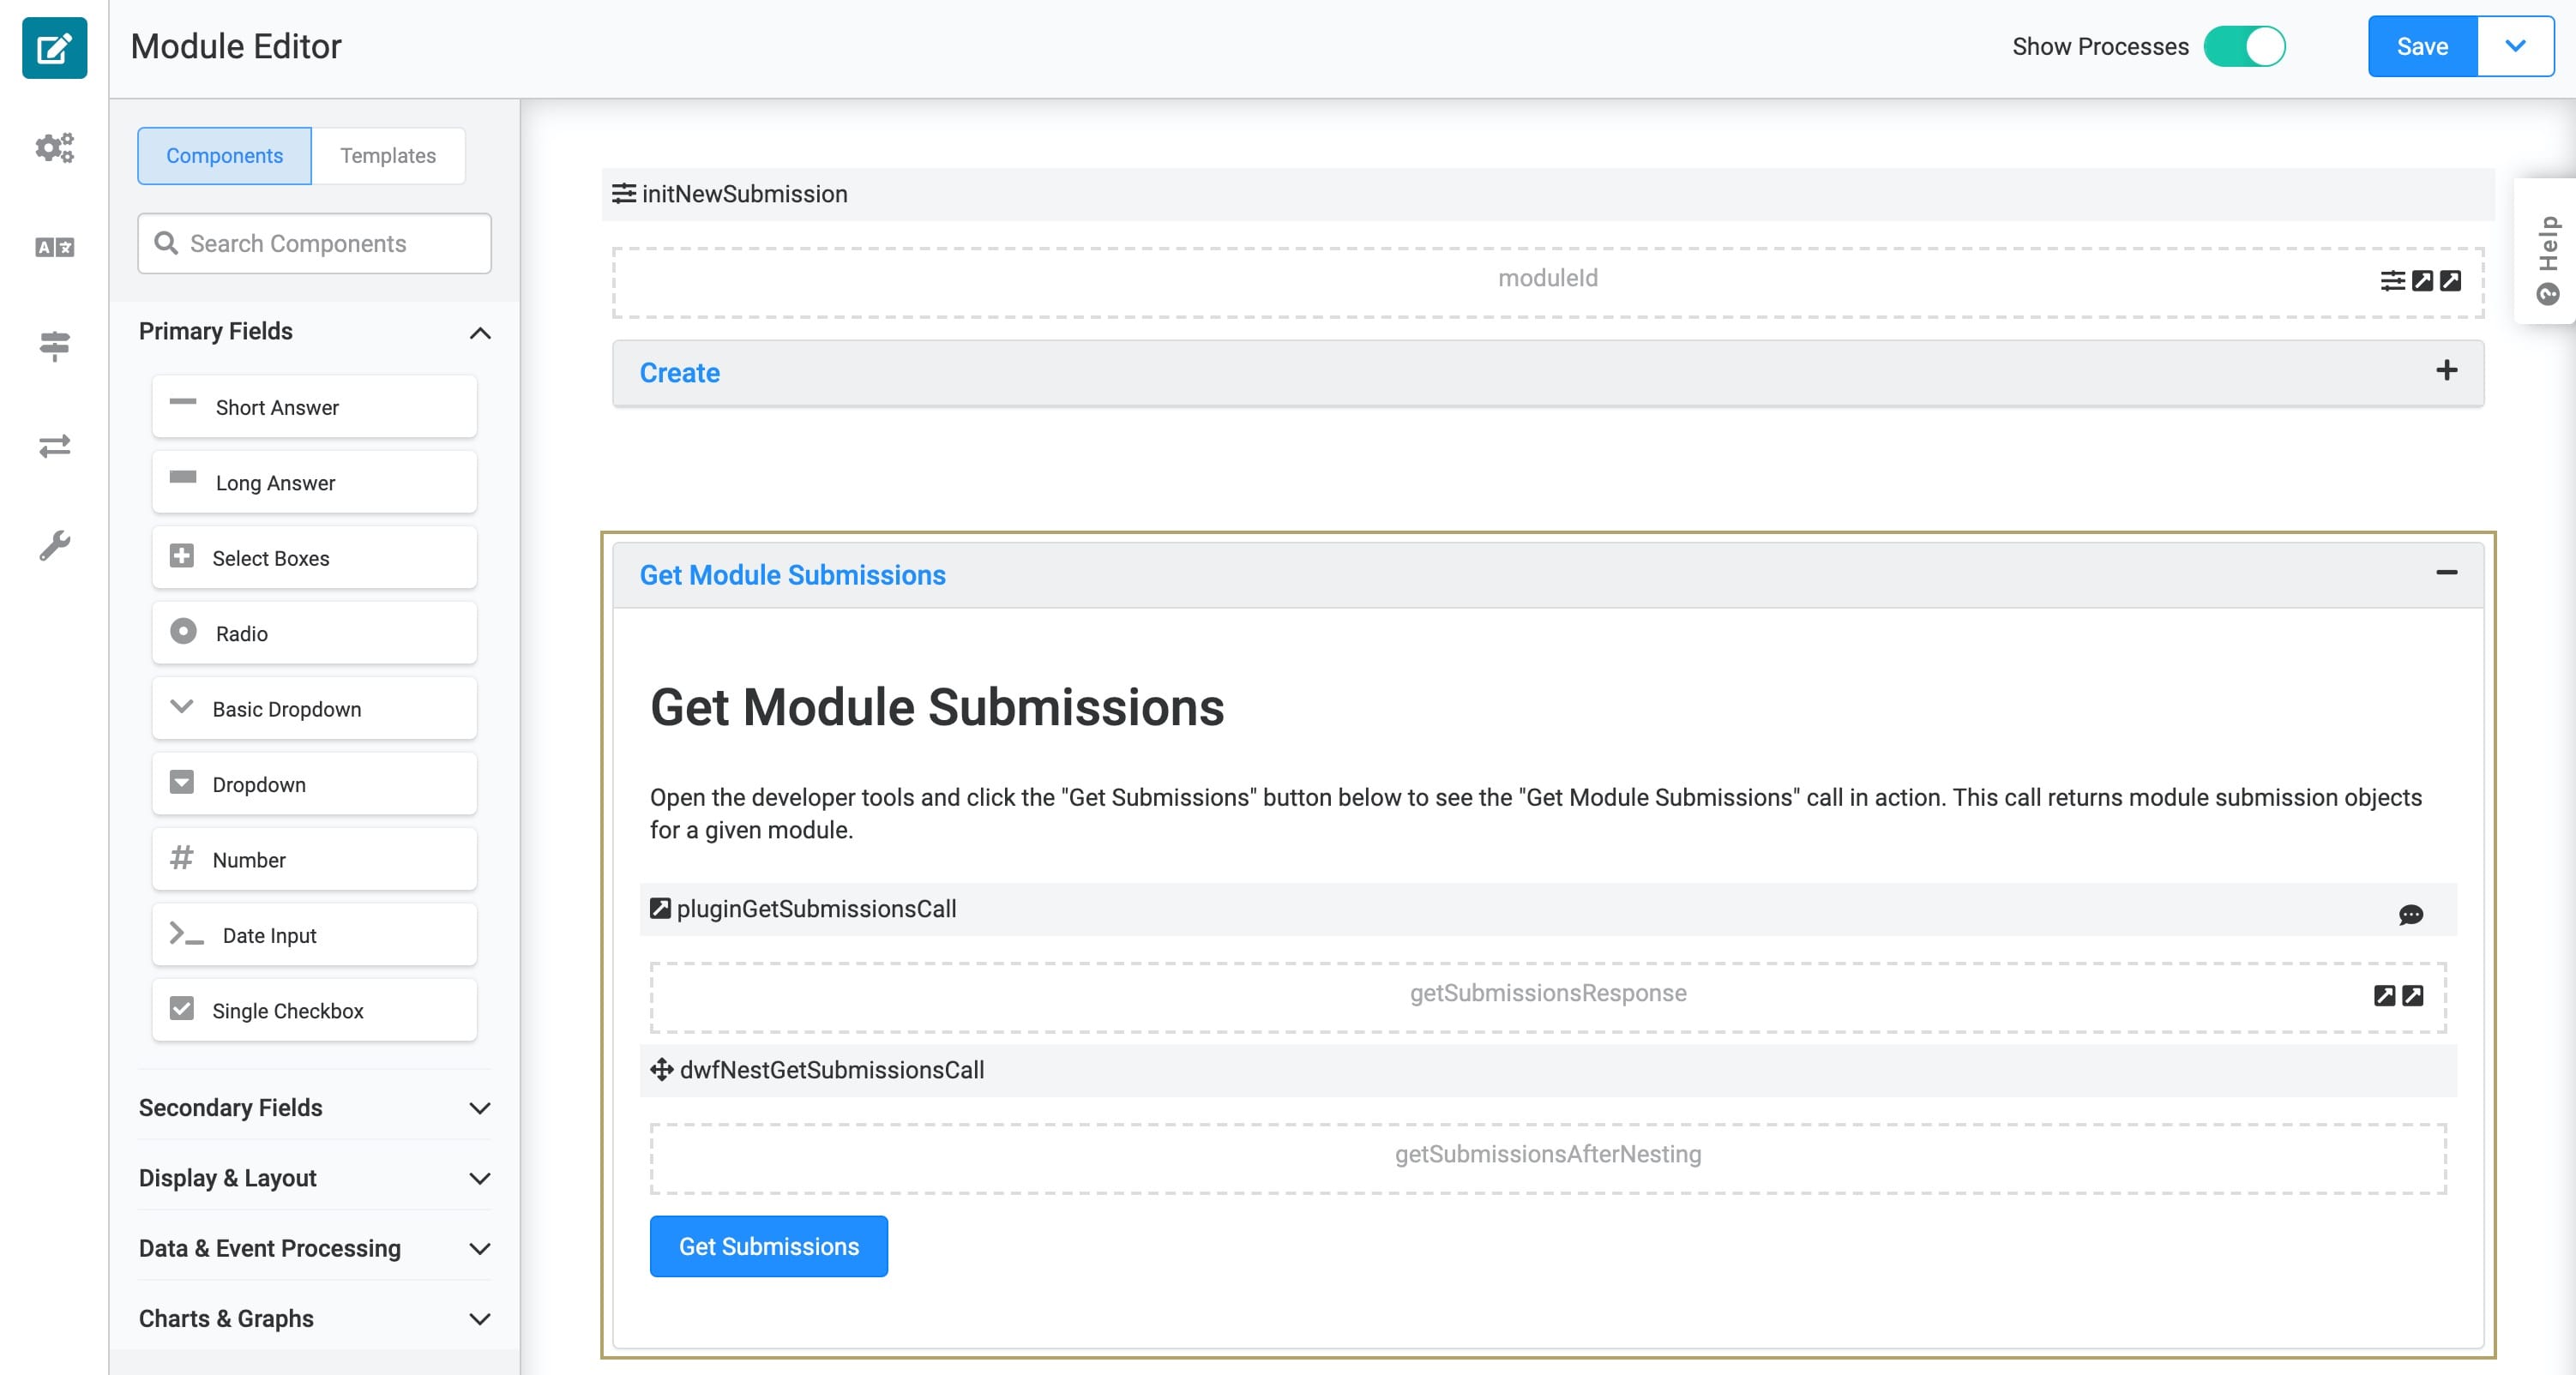
You can use optional HTML Element components to add a header and description in the Panel component.
Configure the List Submissions for Dashboard API Call
You can also perform a List Submissions for Dashboard API call. This is the second GET API option you have in Unqork. This call is similar to Get Module Submissions, but it returns a flat array of data. Flat arrays work well as inputs for ViewGrid components. So, use List Submissions for Dashboard to see your submissions in your application instead of relying on the DevTools Console to view them.
Configure the Panel Component
Add a Panel component to act as a container for the components involved in this section of the configuration.
Drag and drop a Panel component onto your canvas, placing it below your
Get Module SubmissionsPanel component.In the Title field, enter
List Submissions for Dashboard.In the Property Name field, enter
panelListSubmissions.Click Save & Close.
Configure the Plug-In Component
Configure a Plug-In component to run the List Submissions for Dashboard API call.
Drag and drop a Plug-In component onto your canvas, placing it inside your
panelListSubmissionsPanel component.In the Property ID and Canvas Label Text fields, enter
pluginGetSubmissionsForDashboard.In the Post Trigger field, enter
dwfOutput.You'll create the
dwfOutputData Workflow component next.In the Inputs table, enter the following:
Property ID
Mapping
moduleId
moduleId
'jokeQuestion, jokeAnswer, firstName, lastName'
fields
'-created'
sort
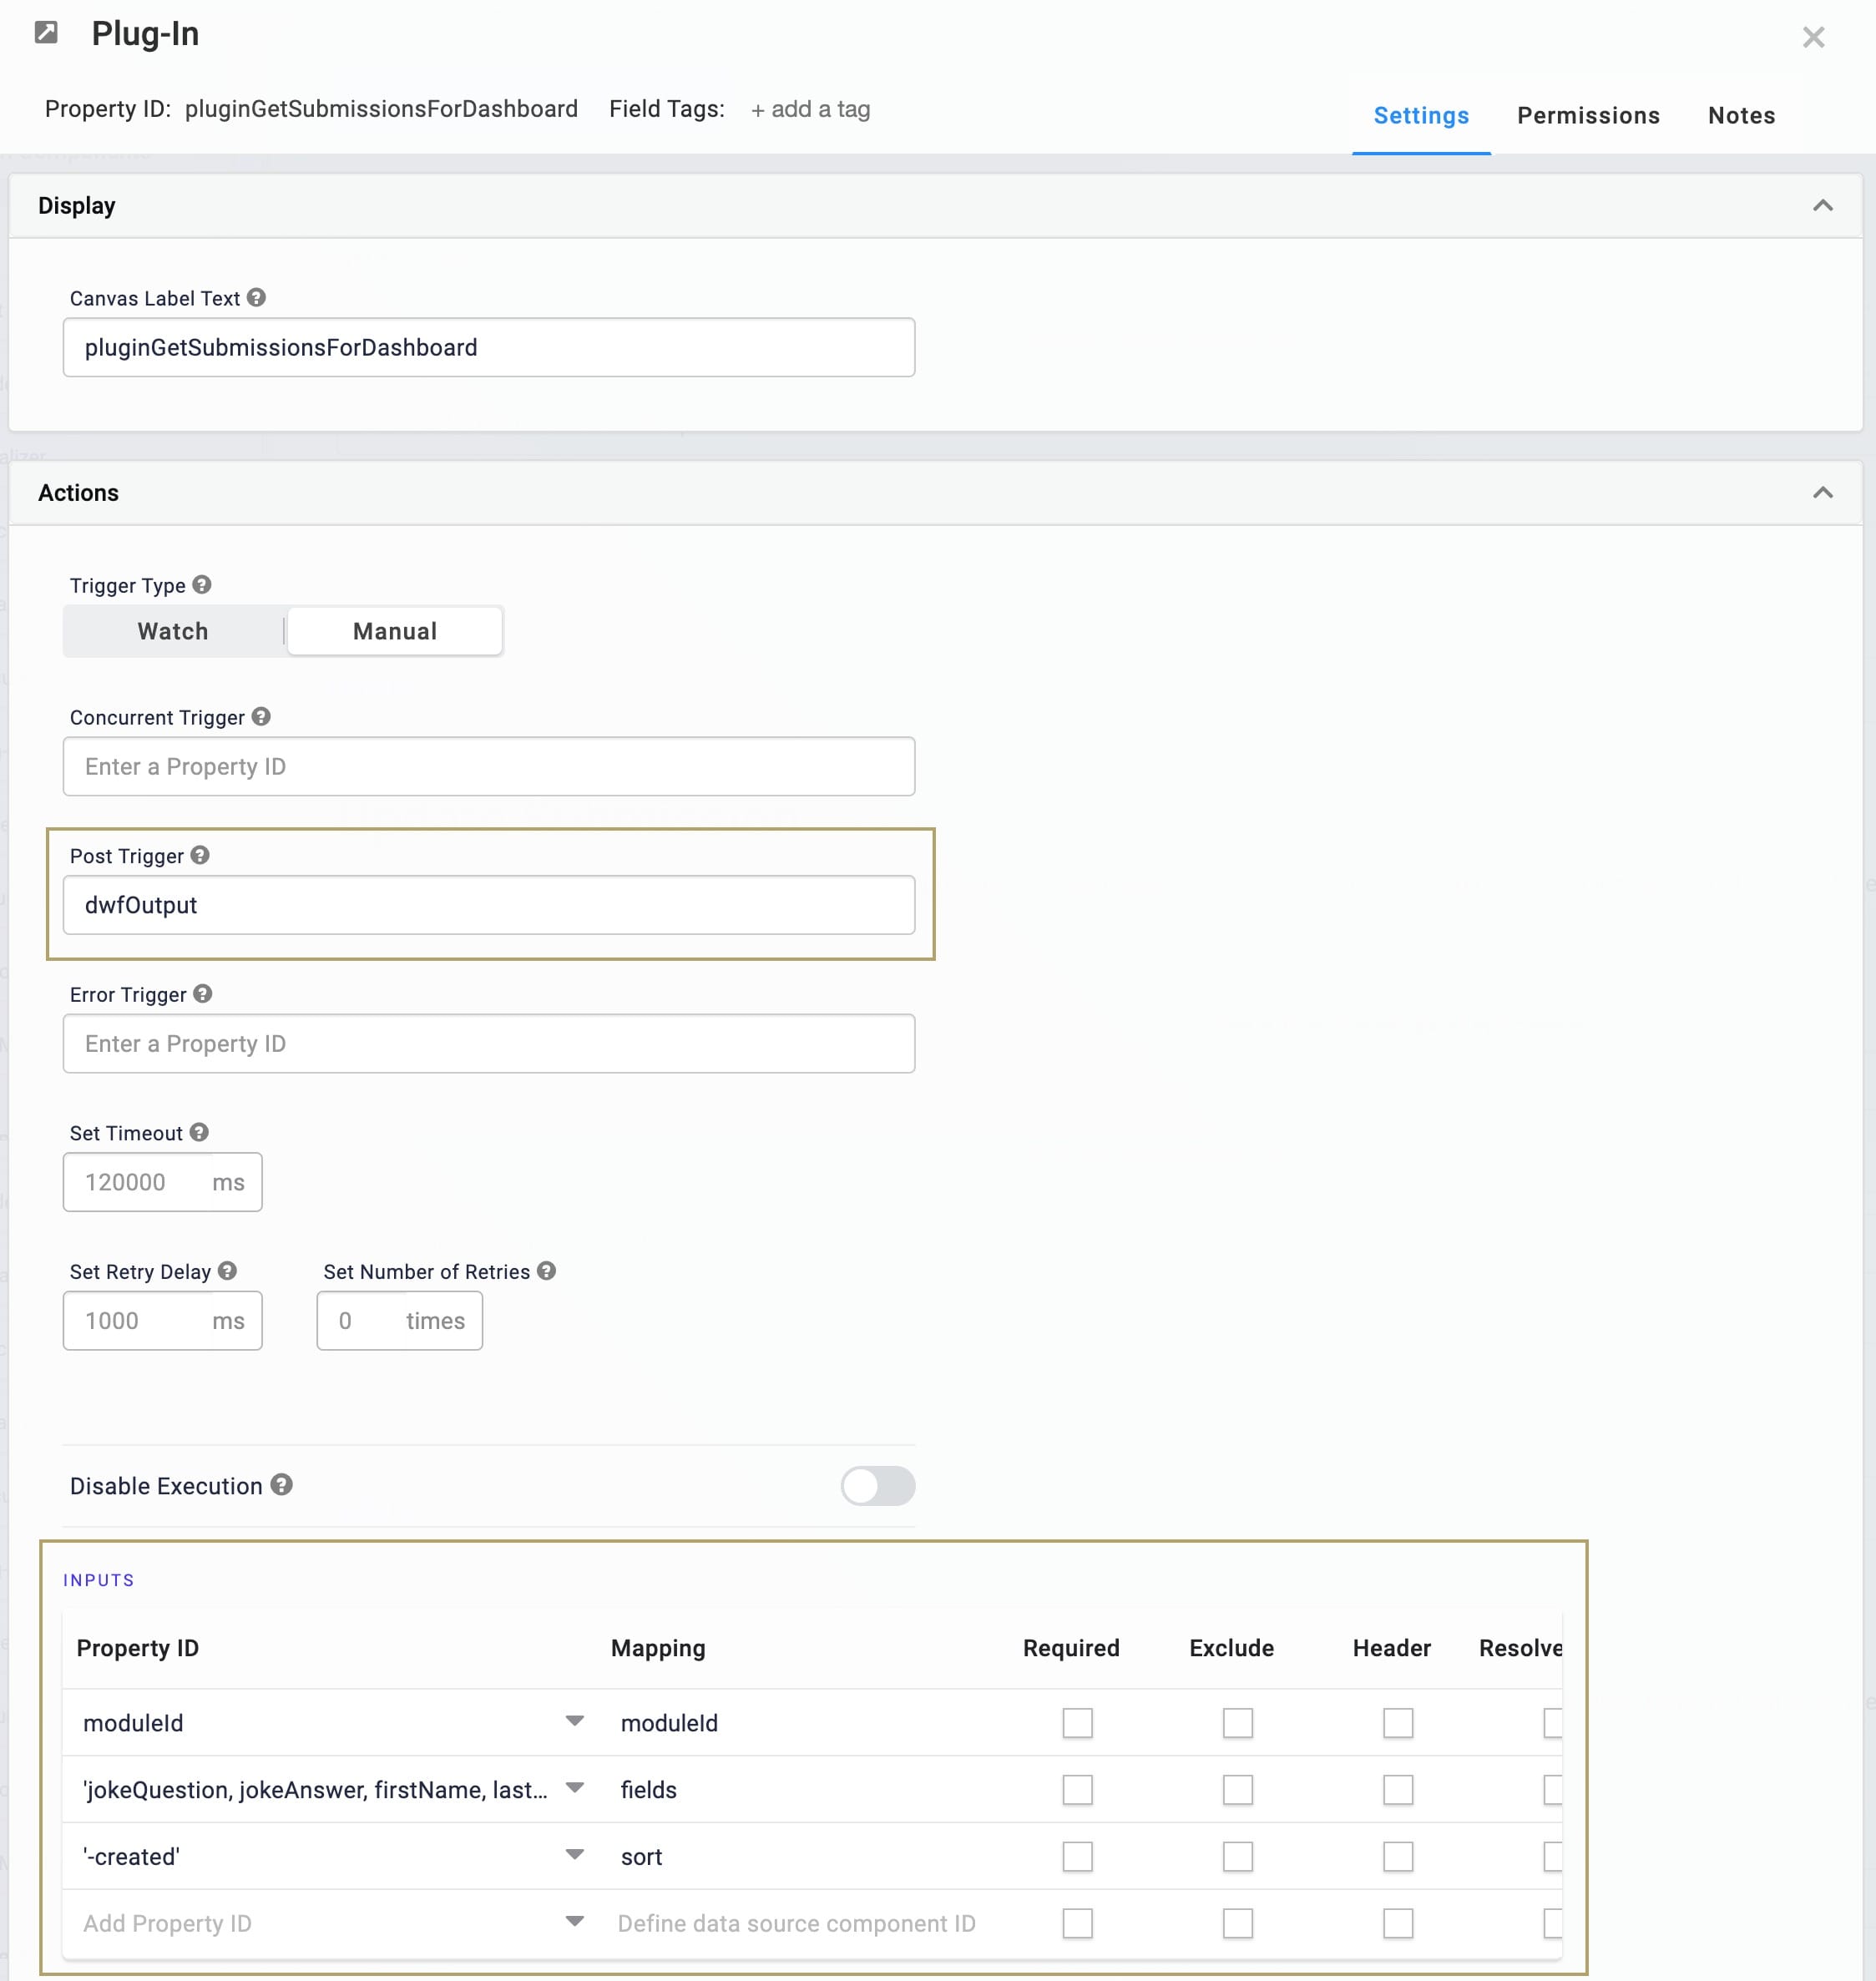
From the Internal Services drop-down, select List Submissions for Dashboard. The Data Source URL autopopulates.
Click Save & Close.
Configure the Data Workflow Component
Use a List Submissions for Dashboard call to retrieve an unnested array of data. That way, you can store the entire response in a Hidden component. Then, use a simple Data Workflow to separate the data.
Drag and drop a Data Workflow component onto your canvas, placing it below your
pluginGetSubmissionsForDashboardPlug-In component.In the Canvas Label Text and Property Name fields, enter
dwfOutput.Click Save & Close.
Configure the Input Data Operator
Drag and drop an Input operator onto your Data Workflow canvas.
Configure the operator’s Info window as follows:
Setting
Selection
Category
Input
Component
pluginGetSubmissionsForDashboard
Required
Yes
Source
Default
Configure the Output Data Operator
Drag and drop an Output operator onto your Data Workflow canvas.
Configure the operator’s Info window as follows:
Setting
Selection
Category
Output
Component
listSubmissionsResponse
Action
value
You'll create the
listSubmissionsResponseHidden component next. AThis Hidden component serves as the output for your Data Workflow.Connect the output port (right) of the
pluginGetSubmissionsForDashboardInput operator to the input port (left) of thelistSubmissionsResponseOutput operator.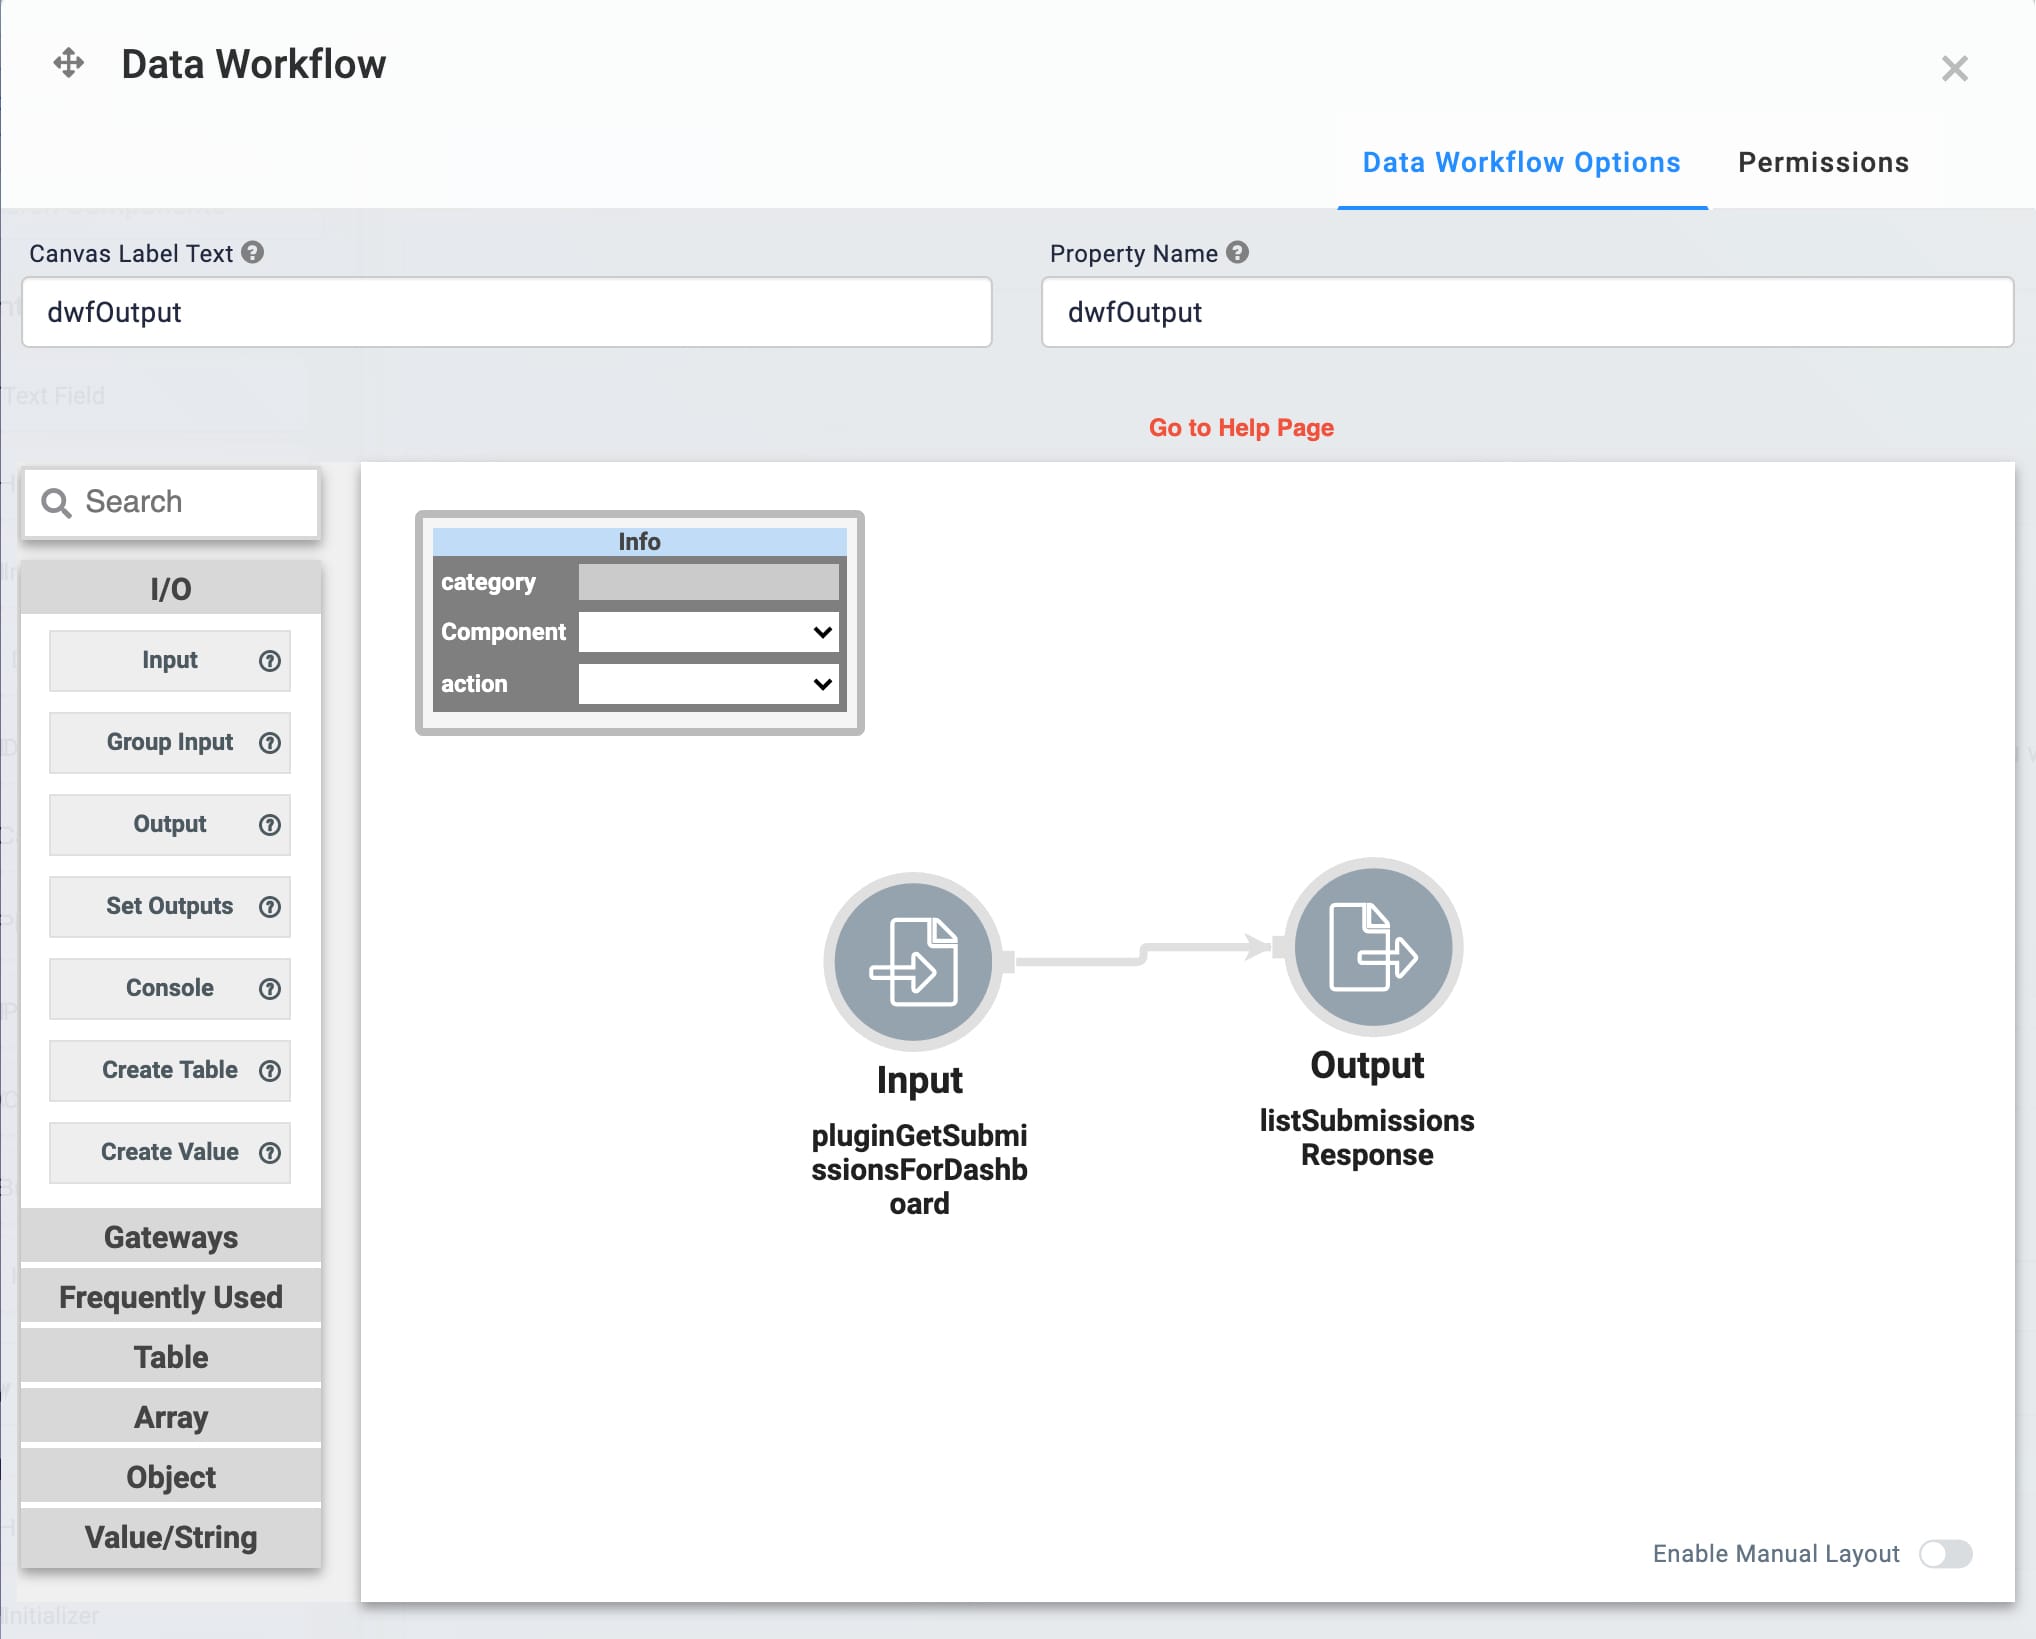
Click Save.
Configure the Hidden Component
Add a Hidden component to store the output for your Data Workflow.
Drag and drop a Hidden component onto your canvas, placing it below your
dwfOutputData Workflow.In the Property ID and Label Text fields, enter
listSubmissionsResponse.Click Save & Close.
Configure the Button Component
Configure a Button component to execute the Plug-In component.
Drag and drop a Button component onto your canvas, placing it below your
listSubmissionsResponseHidden component.In the Property ID field, enter
btnListSubmissionsforDashboard.In the Label Text field, enter
List Submissions for Dashboard.Set the Action Type as Event.
In the Trigger on Click field, enter
pluginGetSubmissionsForDashboard.This step connects your Button component to the ViewGrid component that you'll add in the next step.
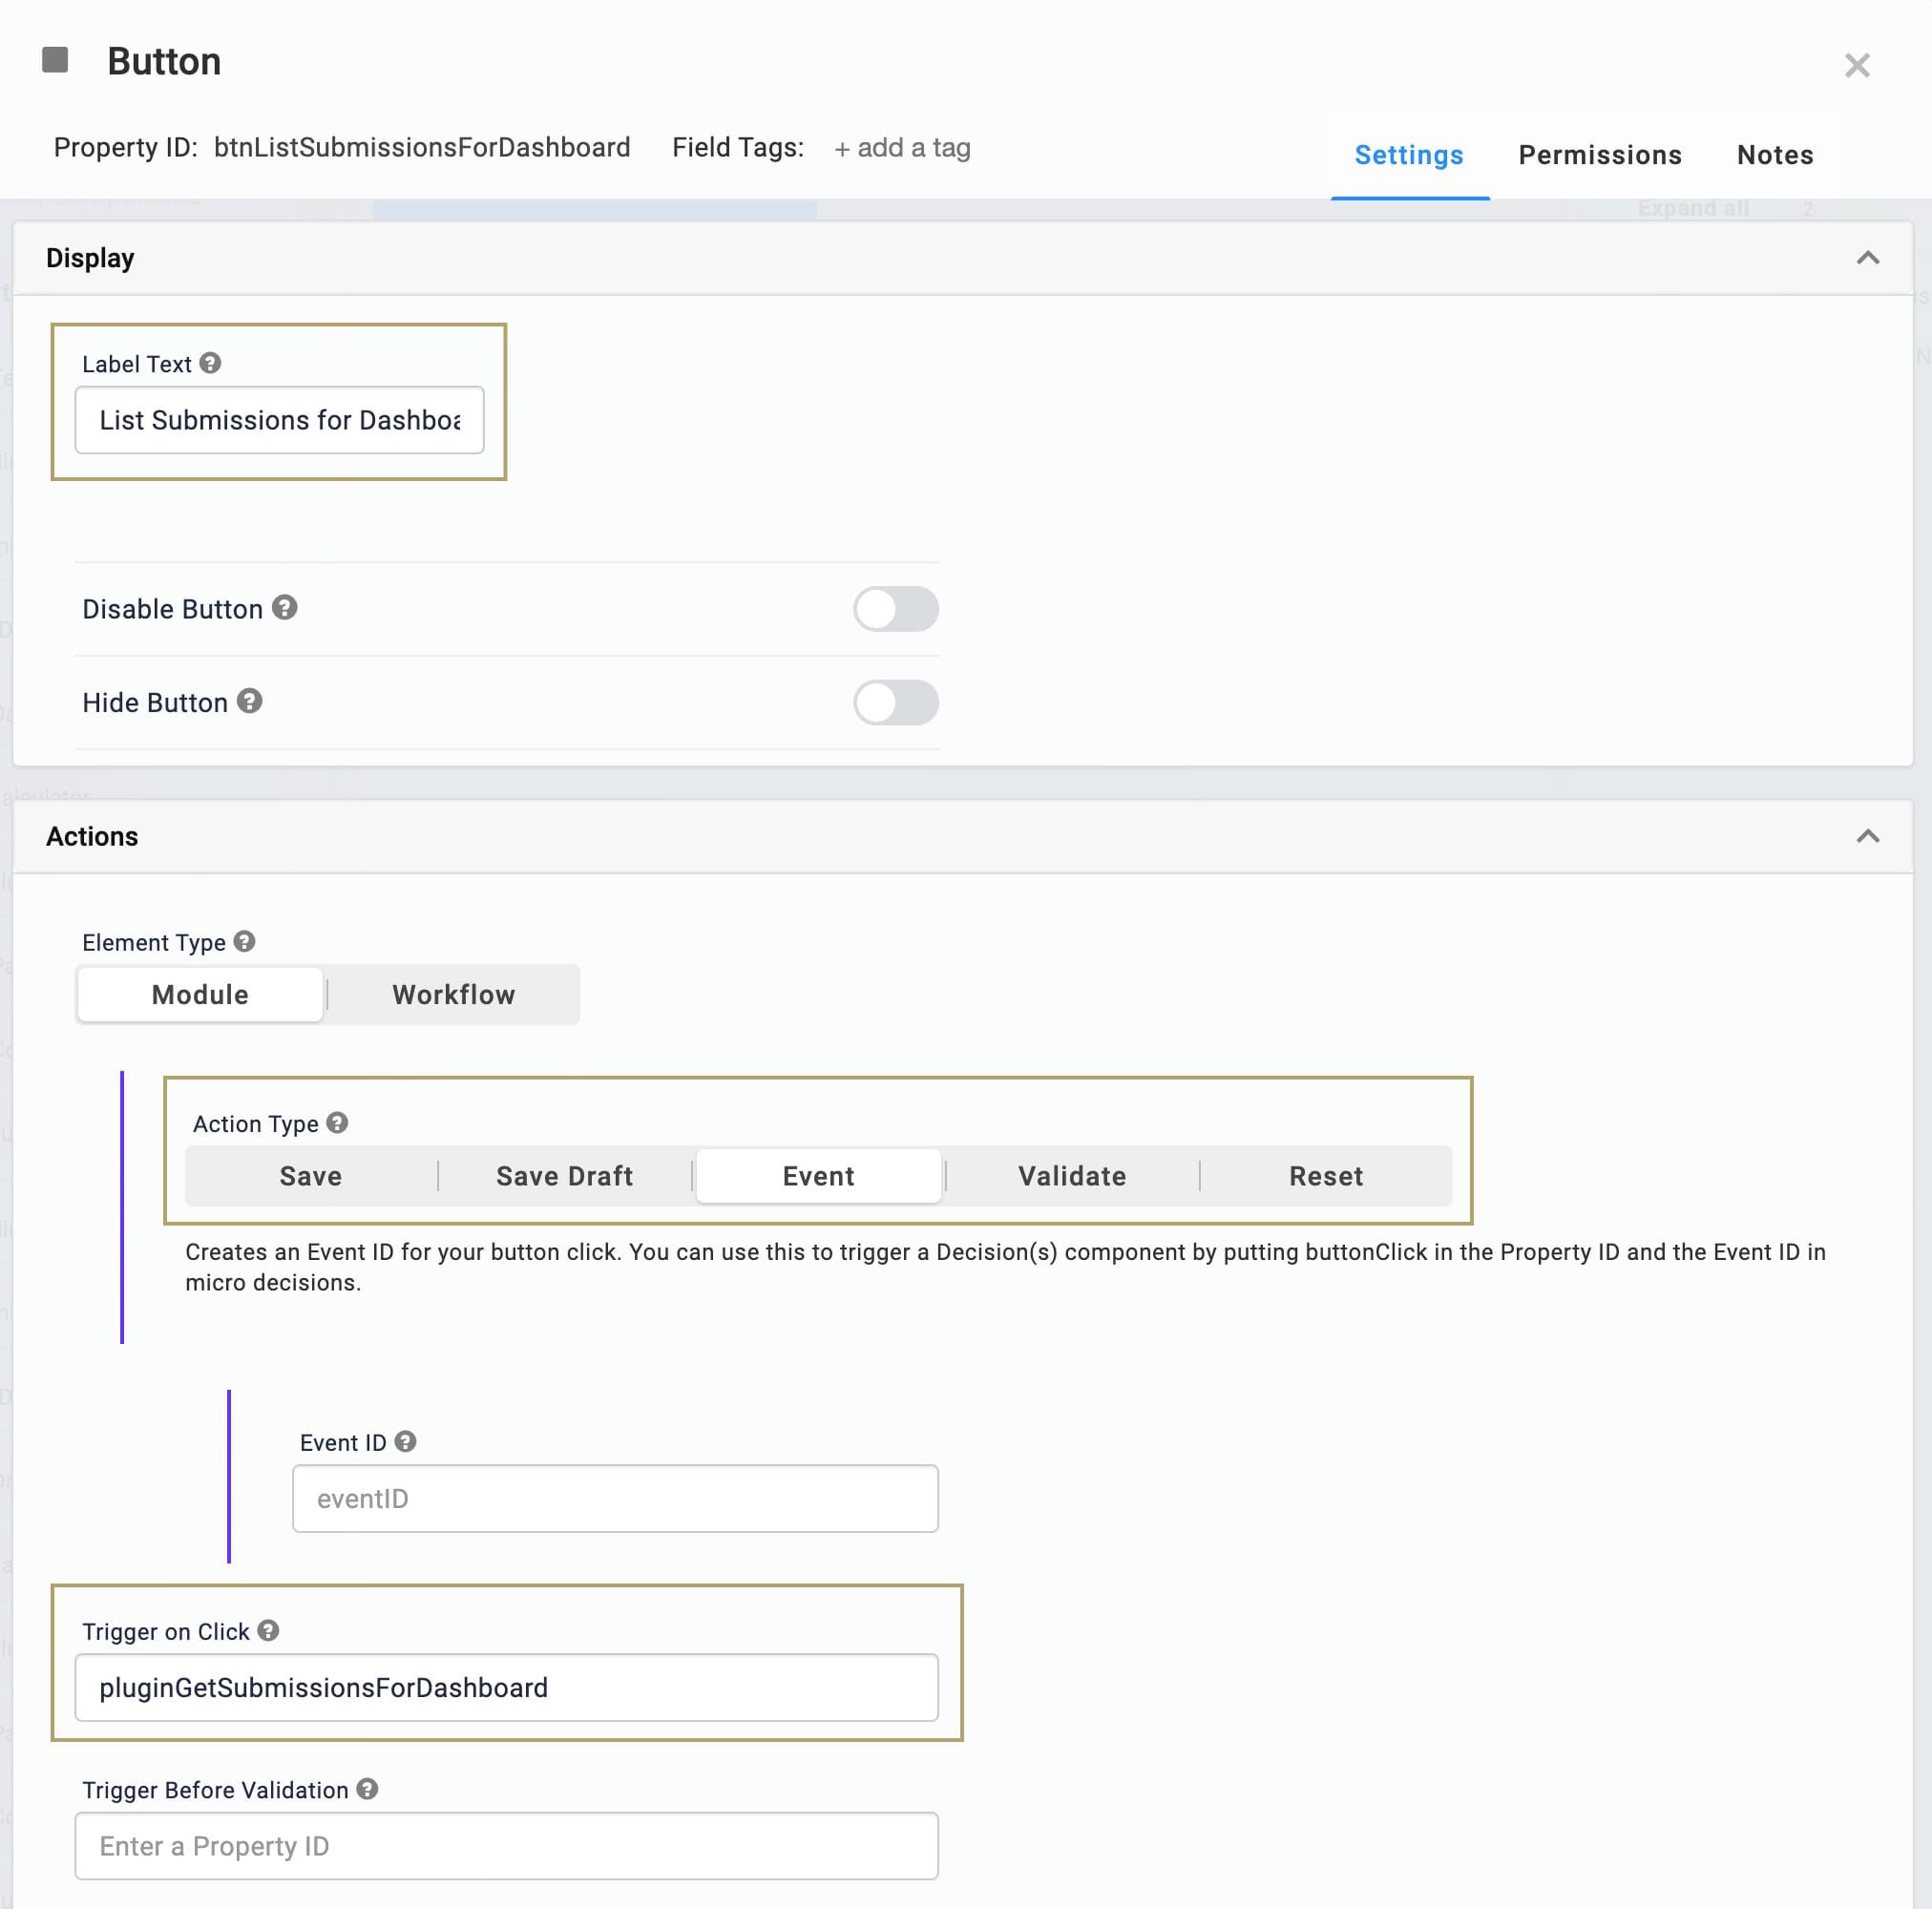
Click Save & Close.
Configure the ViewGrid Component
Lastly, configure a ViewGrid component to display the data retrieved using this API call.
Drag and drop a ViewGrid component onto your canvas, placing it below your
btnListSubmissionsforDashboardButton component.In the Title field, enter
ViewGrid Submissions Response.In the Property Name field, enter
vgSubmissionsResponse.In the Action field, enter
null.Entering
nullin the Action field removes the default Submit button from your dashboard.In the Inputs table, enter the following:
#
ID
Required
1
listSubmissionsResponse
.png) (checked)
(checked)Complete the Display table as follows:
ID
Formula
Heading
Type
jokeQuestion
Question
string
jokeAnswer
Answer
string
firstName
Submitted By
string
id
SubmissionId
string
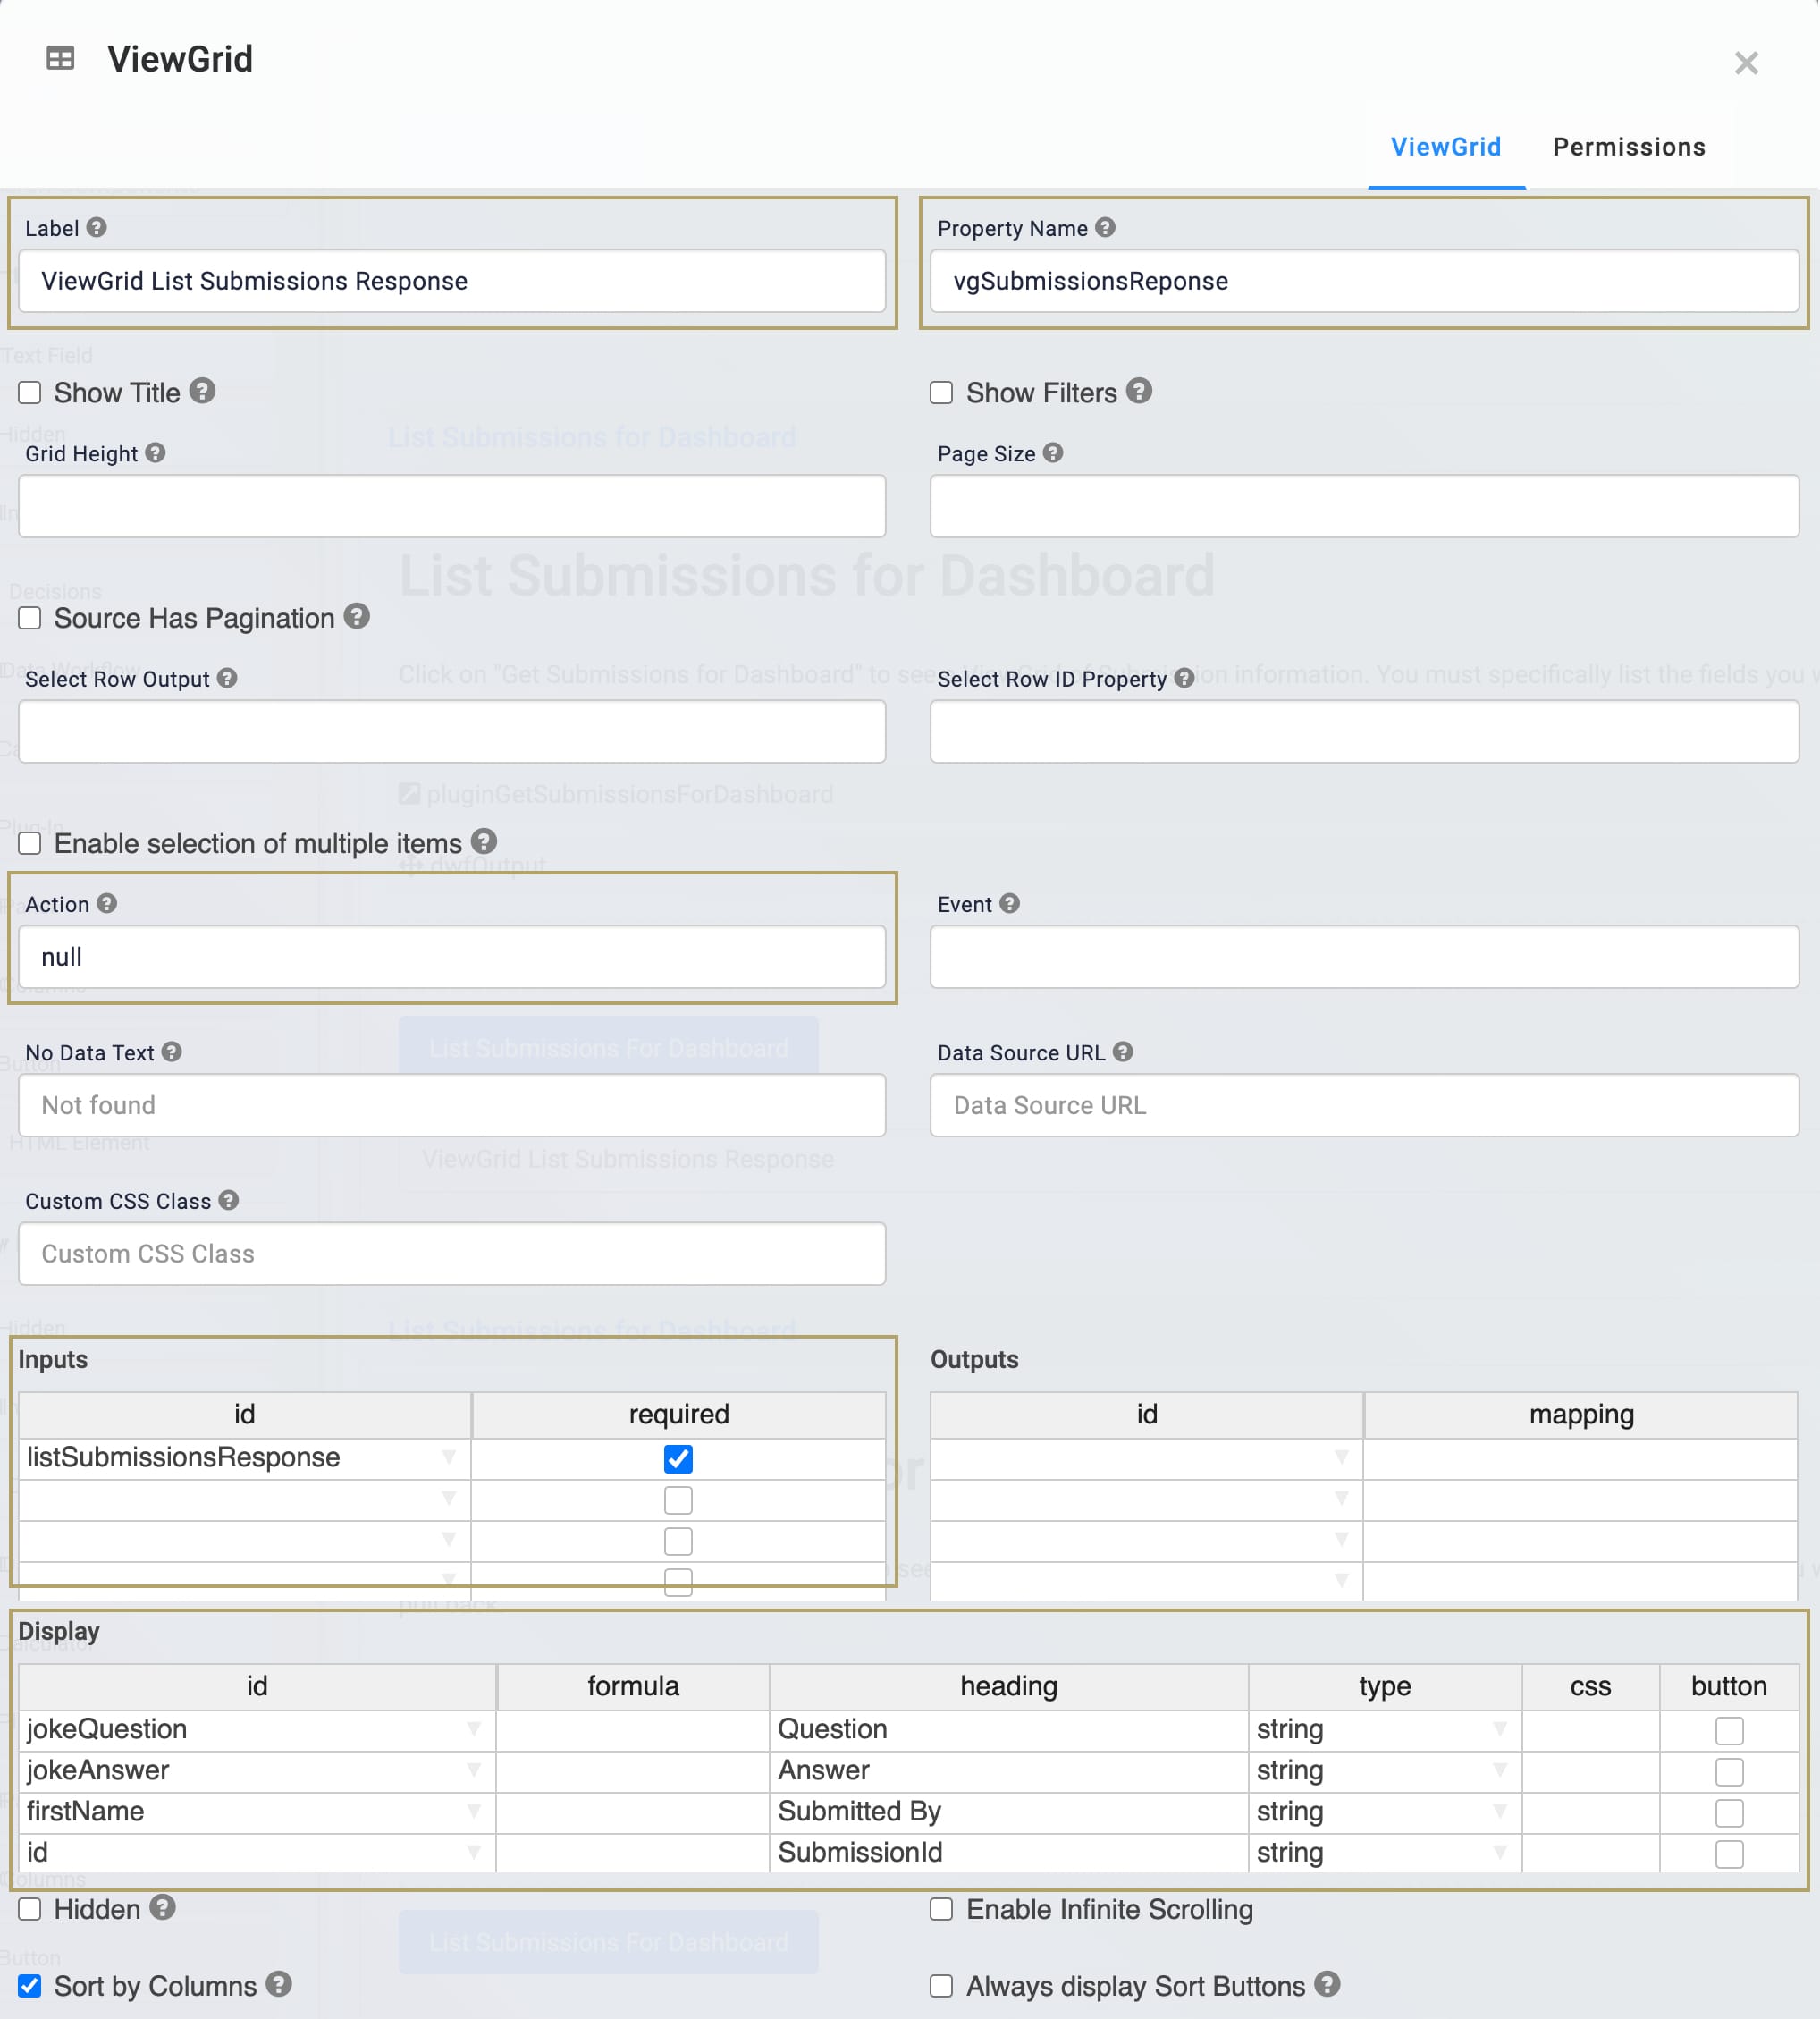
Click Save & Close.
Here’s how the third part of the configuration looks in the Module Builder:
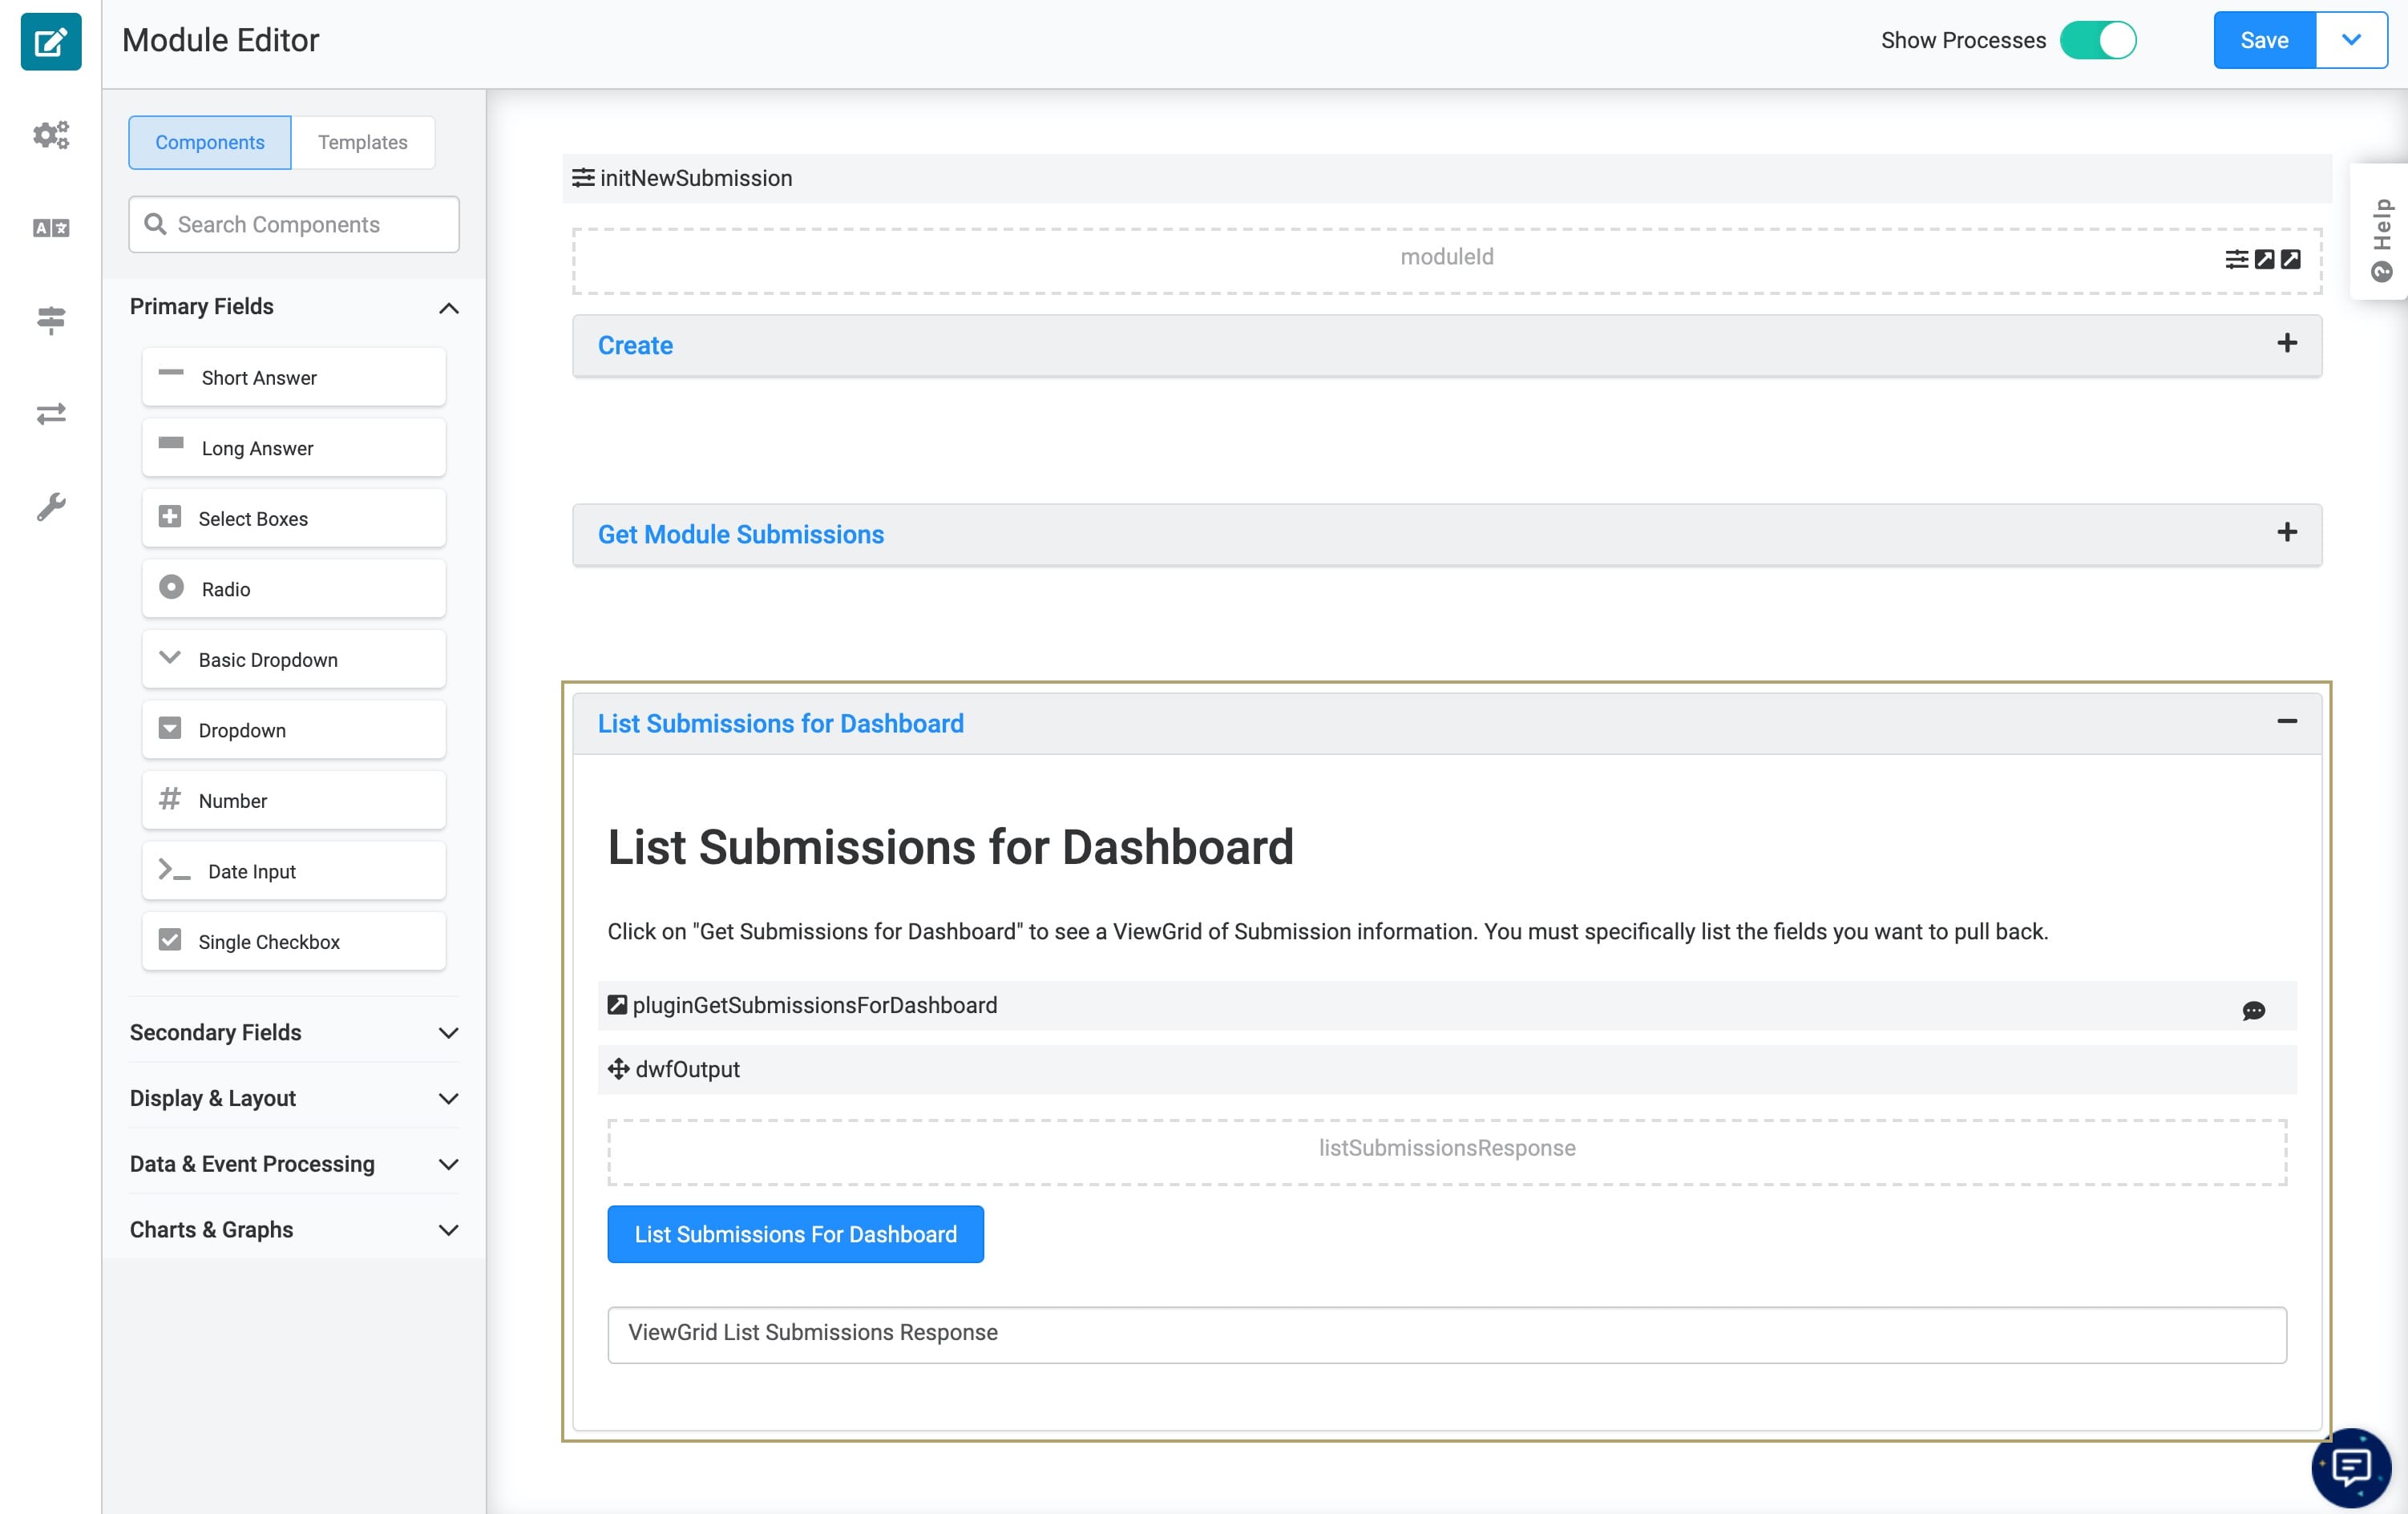
The image above uses optional HTML Element components, which allow you to display a header and description in the Panel.
Configure the Update Module Submissions Call
Now that you have added a way to create and view submissions, you must add functionality to update those submissions. Set up an Update Module Submissions API call in your submissions module to change the end-user's name or joke, if needed.
Configure the Panel Component
Add a Panel component to act as a container for the components involved in this section.
Drag and drop a Panel component onto your canvas, placing it below your
ReadPanel component.In the Title field, enter
Update.In the Property Name field, enter
panelUpdateModuleSubmissions.Click Save & Close.
Configure the Columns Component
Next, add two columns using a Columns component to better organize the module.
Drag and drop a Columns component onto your canvas, placing it inside your
UpdatePanel component.In the Property ID field, enter
colUpdateSubmissions.For this use case, you'll use the component’s default of two columns.
Click Save & Close.
Configure the Text Field Components
These Text Field components display the submission ID and the field you’re updating.
Drag and drop two Text Field components onto your canvas, placing them inside the left column of your
colUpdateSubmissionsColumns component.In the Property ID and Label Text fields, enter the following for each component:
#
Property ID
Label Text
1
submissionIdUpdate
SubmissionId to Update
2
firstNameUpdate
First Name
Click Save & Close for each component as you add it.
Drag and drop two more Text Field components onto your canvas. Place the Text Field components inside the right column.
In the Property ID and Label Text fields, enter the following for each component:
#
Property ID
Label Text
1
valueThatDoesntExist
Value That Doesn't Exist in Schema
2
lastNameUpdate
Last Name
Click Save & Close for each component as you add it.
Configure the Text Area Components
Add Text Area components to update the joke question and the joke answer from the original submission data.
Drag and drop two Text Area components onto your canvas, placing one component in each column of the Columns component, below the Text Field components.
In the Property ID and Label Text fields, enter the following for each component:
#
Property ID
Label Text
1
jokeQuestionUpdate
Joke Question
2
jokeAnswerUpdate
Joke Answer
The
jokeQuestionUpdatefield is in the first column, and thejokeAnswerUpdatefield in the second.Click Save & Close for each component as you add it.
Configure the Plug-In Component
Add a Plug-In component to run the Update Module Submissions API call. You'll map the data from the input fields into the call to update the submissions in the schema module.
Drag and drop a Plug-In component onto your canvas, placing it below your
colUpdateSubmissionsColumns component.In the Property ID and Label Text fields, enter
pluginUpdateMOduleSubmission.In the Inputs table, enter the following:
Property ID
Mapping
Optional
firstNameUpdate
data.firstName
.png) (checked)
(checked)lastNameUpdate
data.lastName
.png) (checked)
(checked)jokeAnswerUpdate
data.jokeAnswerUpdate
.png) (checked)
(checked)jokeQuestionUpdate
data.jokeQuestionUpdate
.png) (checked)
(checked)valueThatDoesntExist
data.valueThatDoesntExist
.png) (checked)
(checked)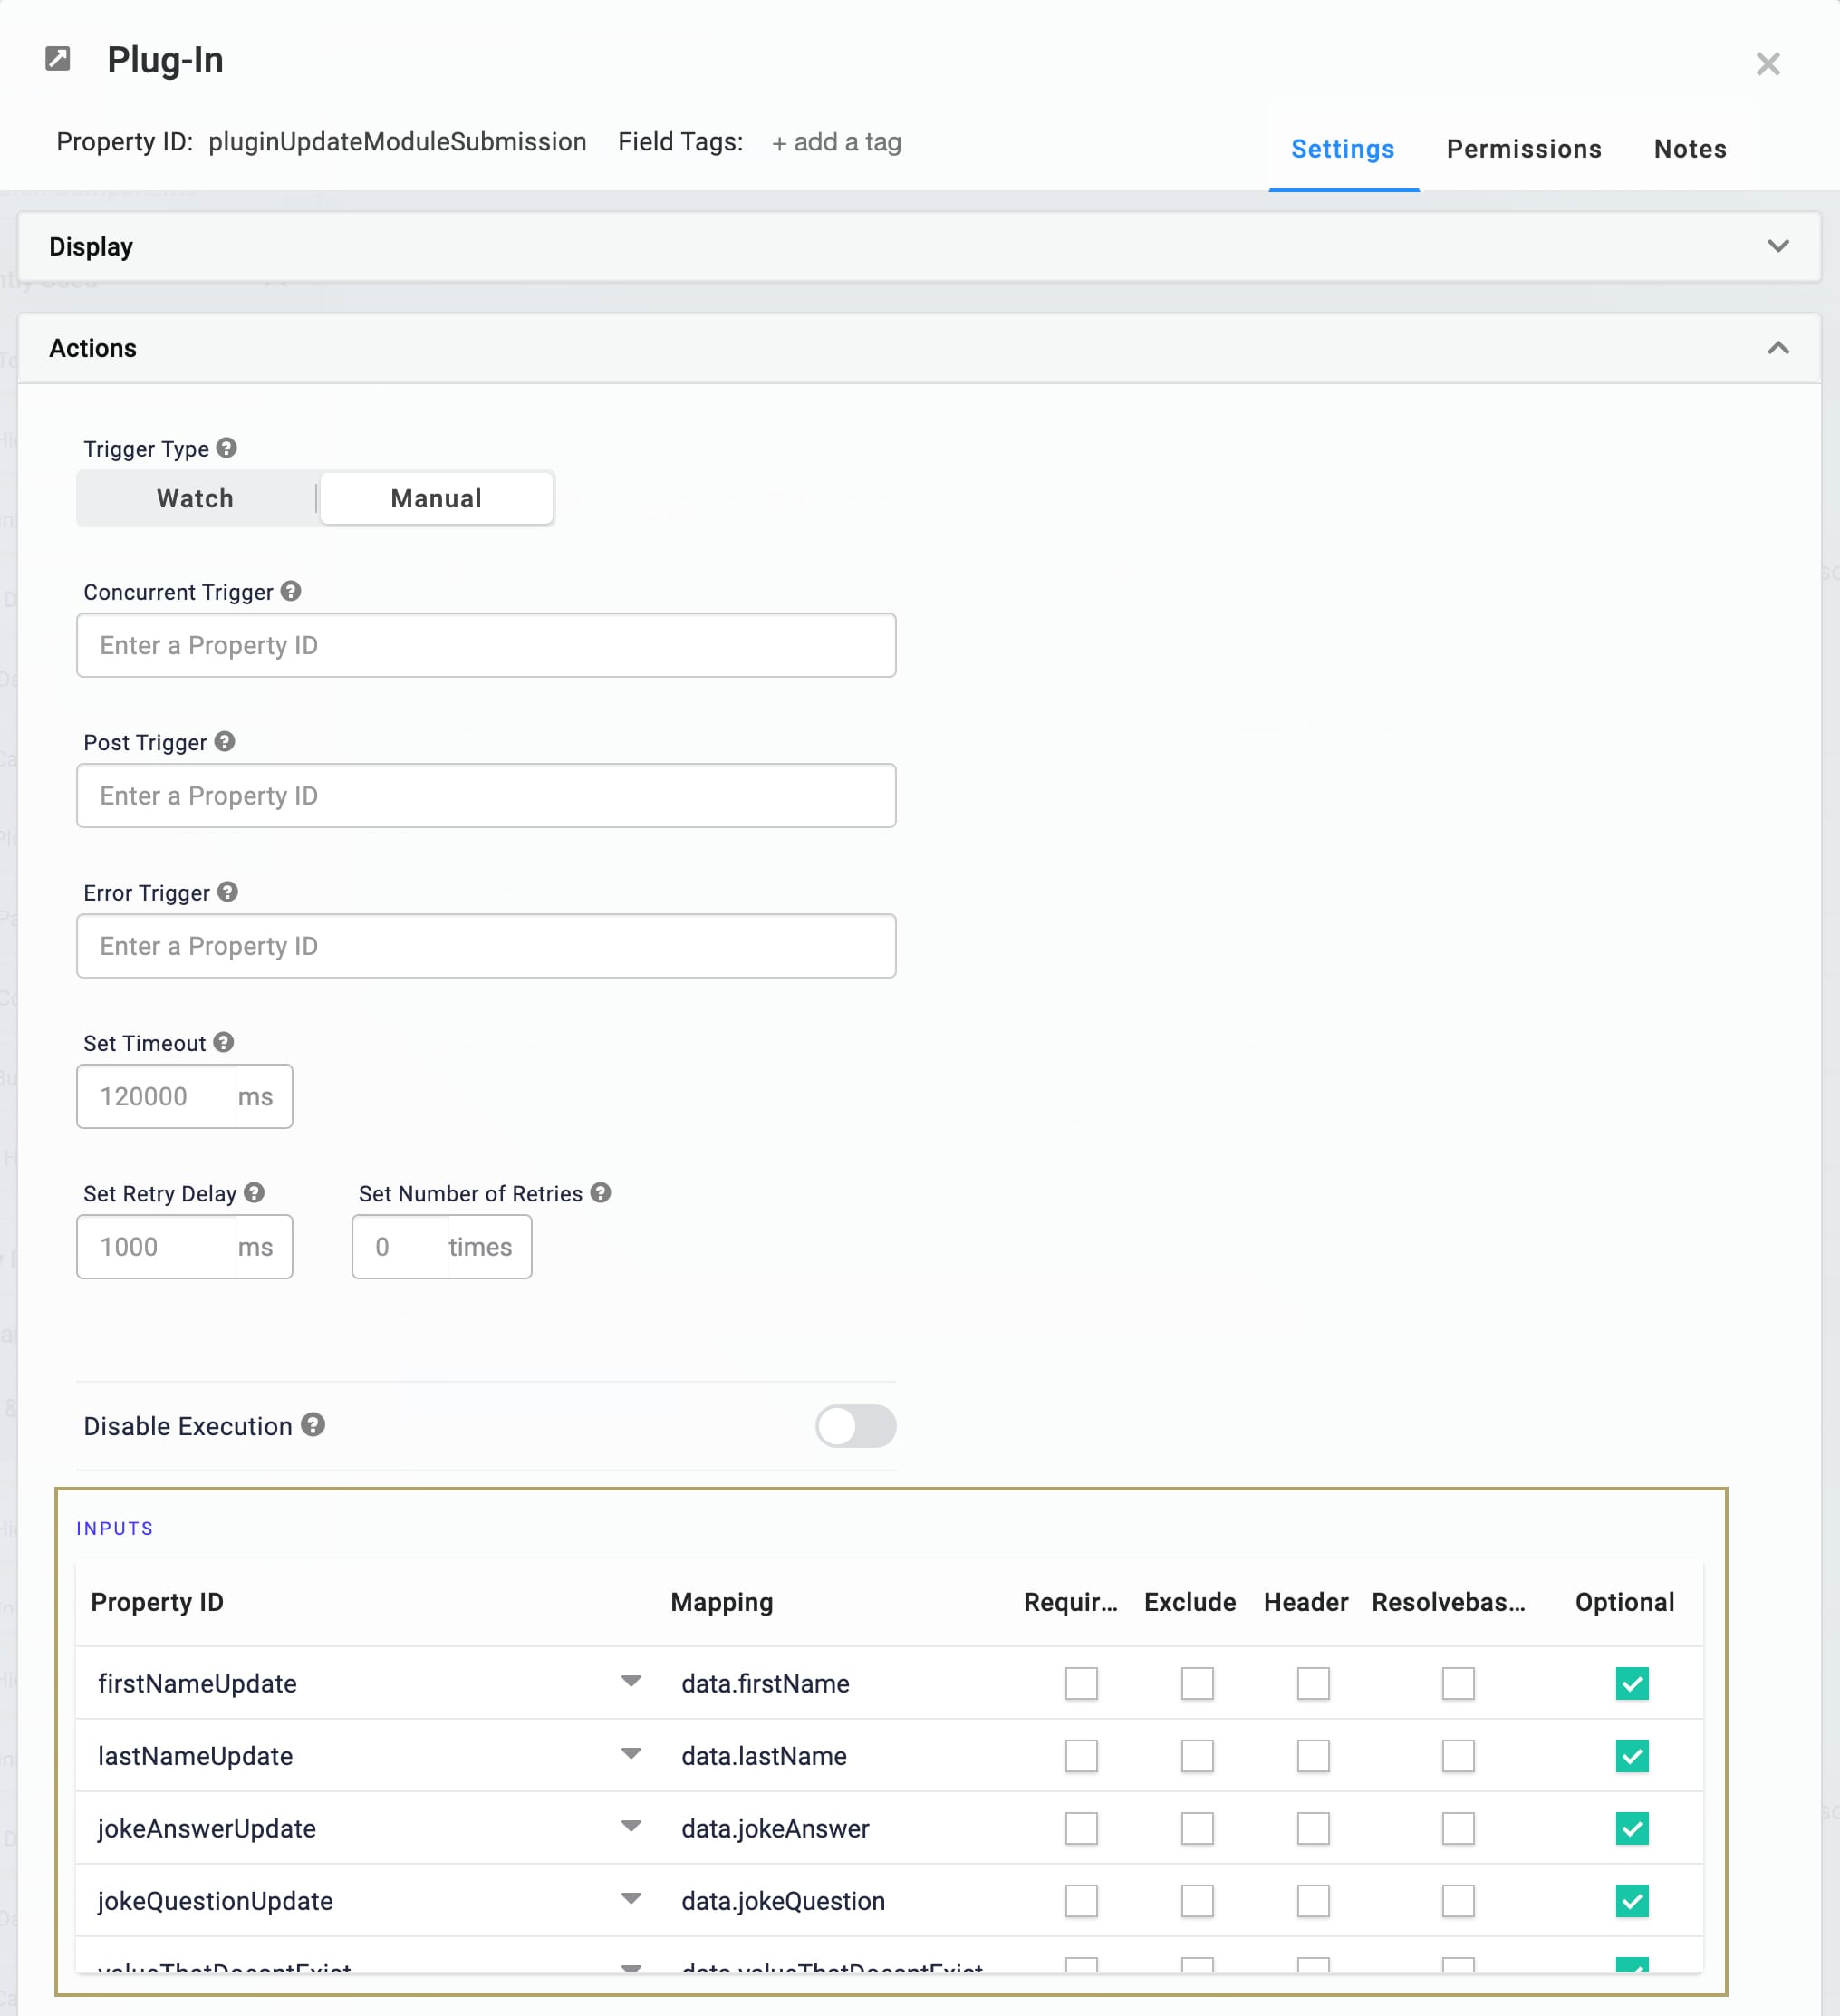
From the Internal Services drop-down, select Update Module Submission. The Data Source URL autopopulates.
In the Data Source URL field, replace
{moduleId}with{{data.moduleId}}and{submissionId}with{{data.submissionUpdate}}.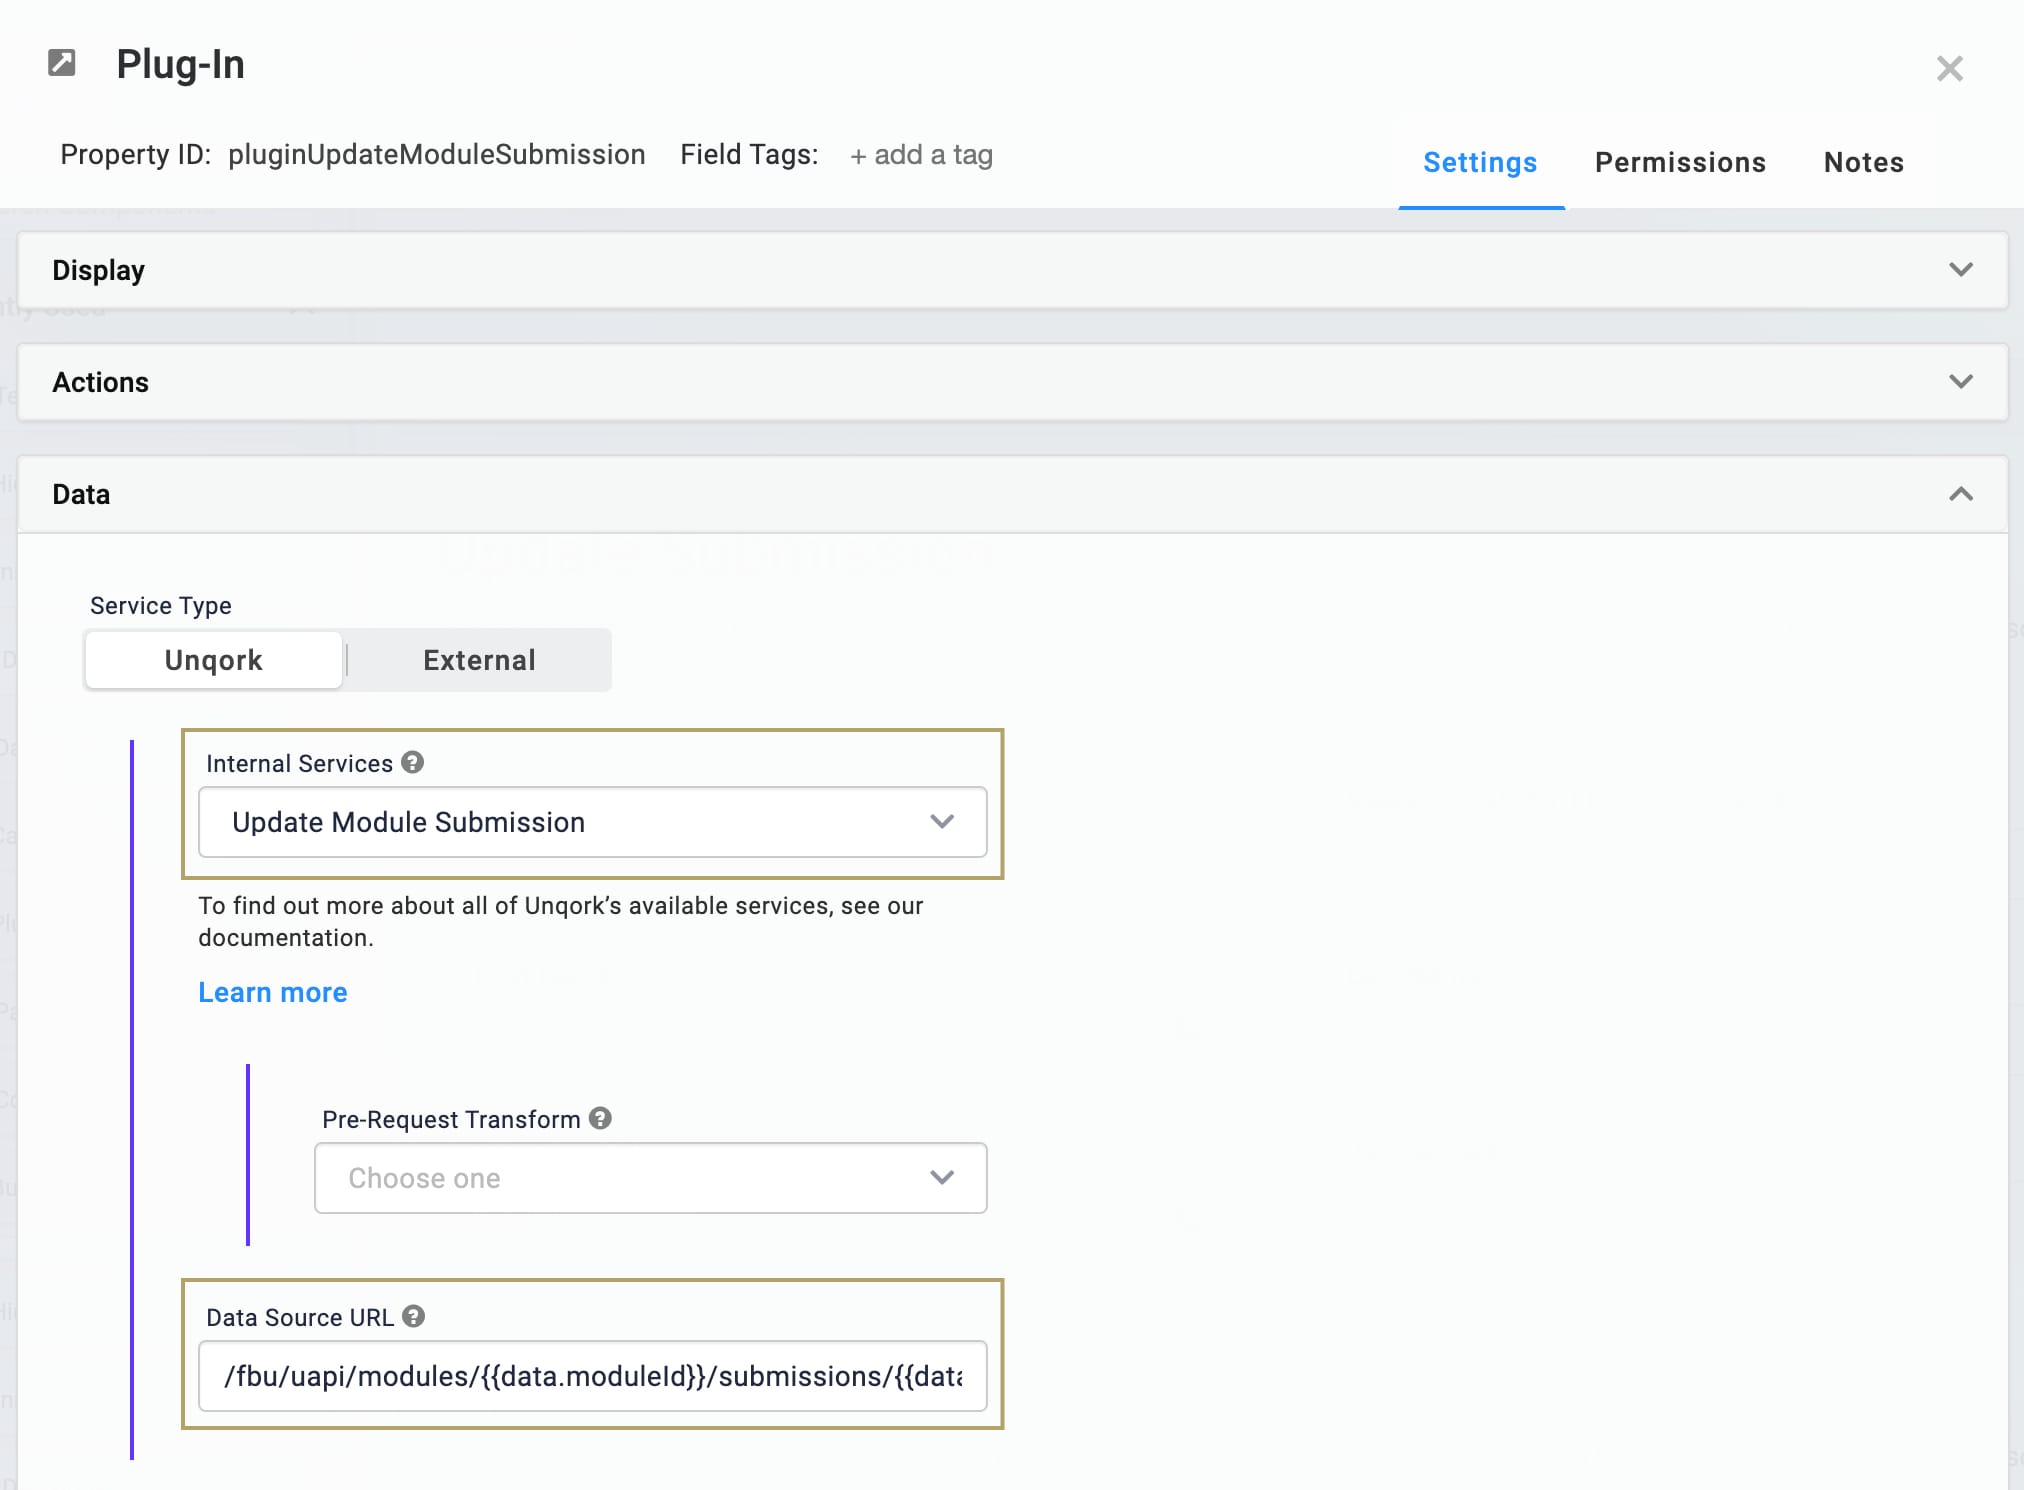
Click Save & Close.
Configure the Button Component
Add a Button component to execute the Plug-In component.
Drag and drop a Button component onto your canvas, placing it below your
pluginUpdateModuleSubmissionPlug-In component.In the Property ID field, enter
btnUpdateSubmission.In the Label Text field, enter
Update Submission.Set the Action Type as Event.
In the Trigger on Click field, enter
pluginUpdateModuleSubmission.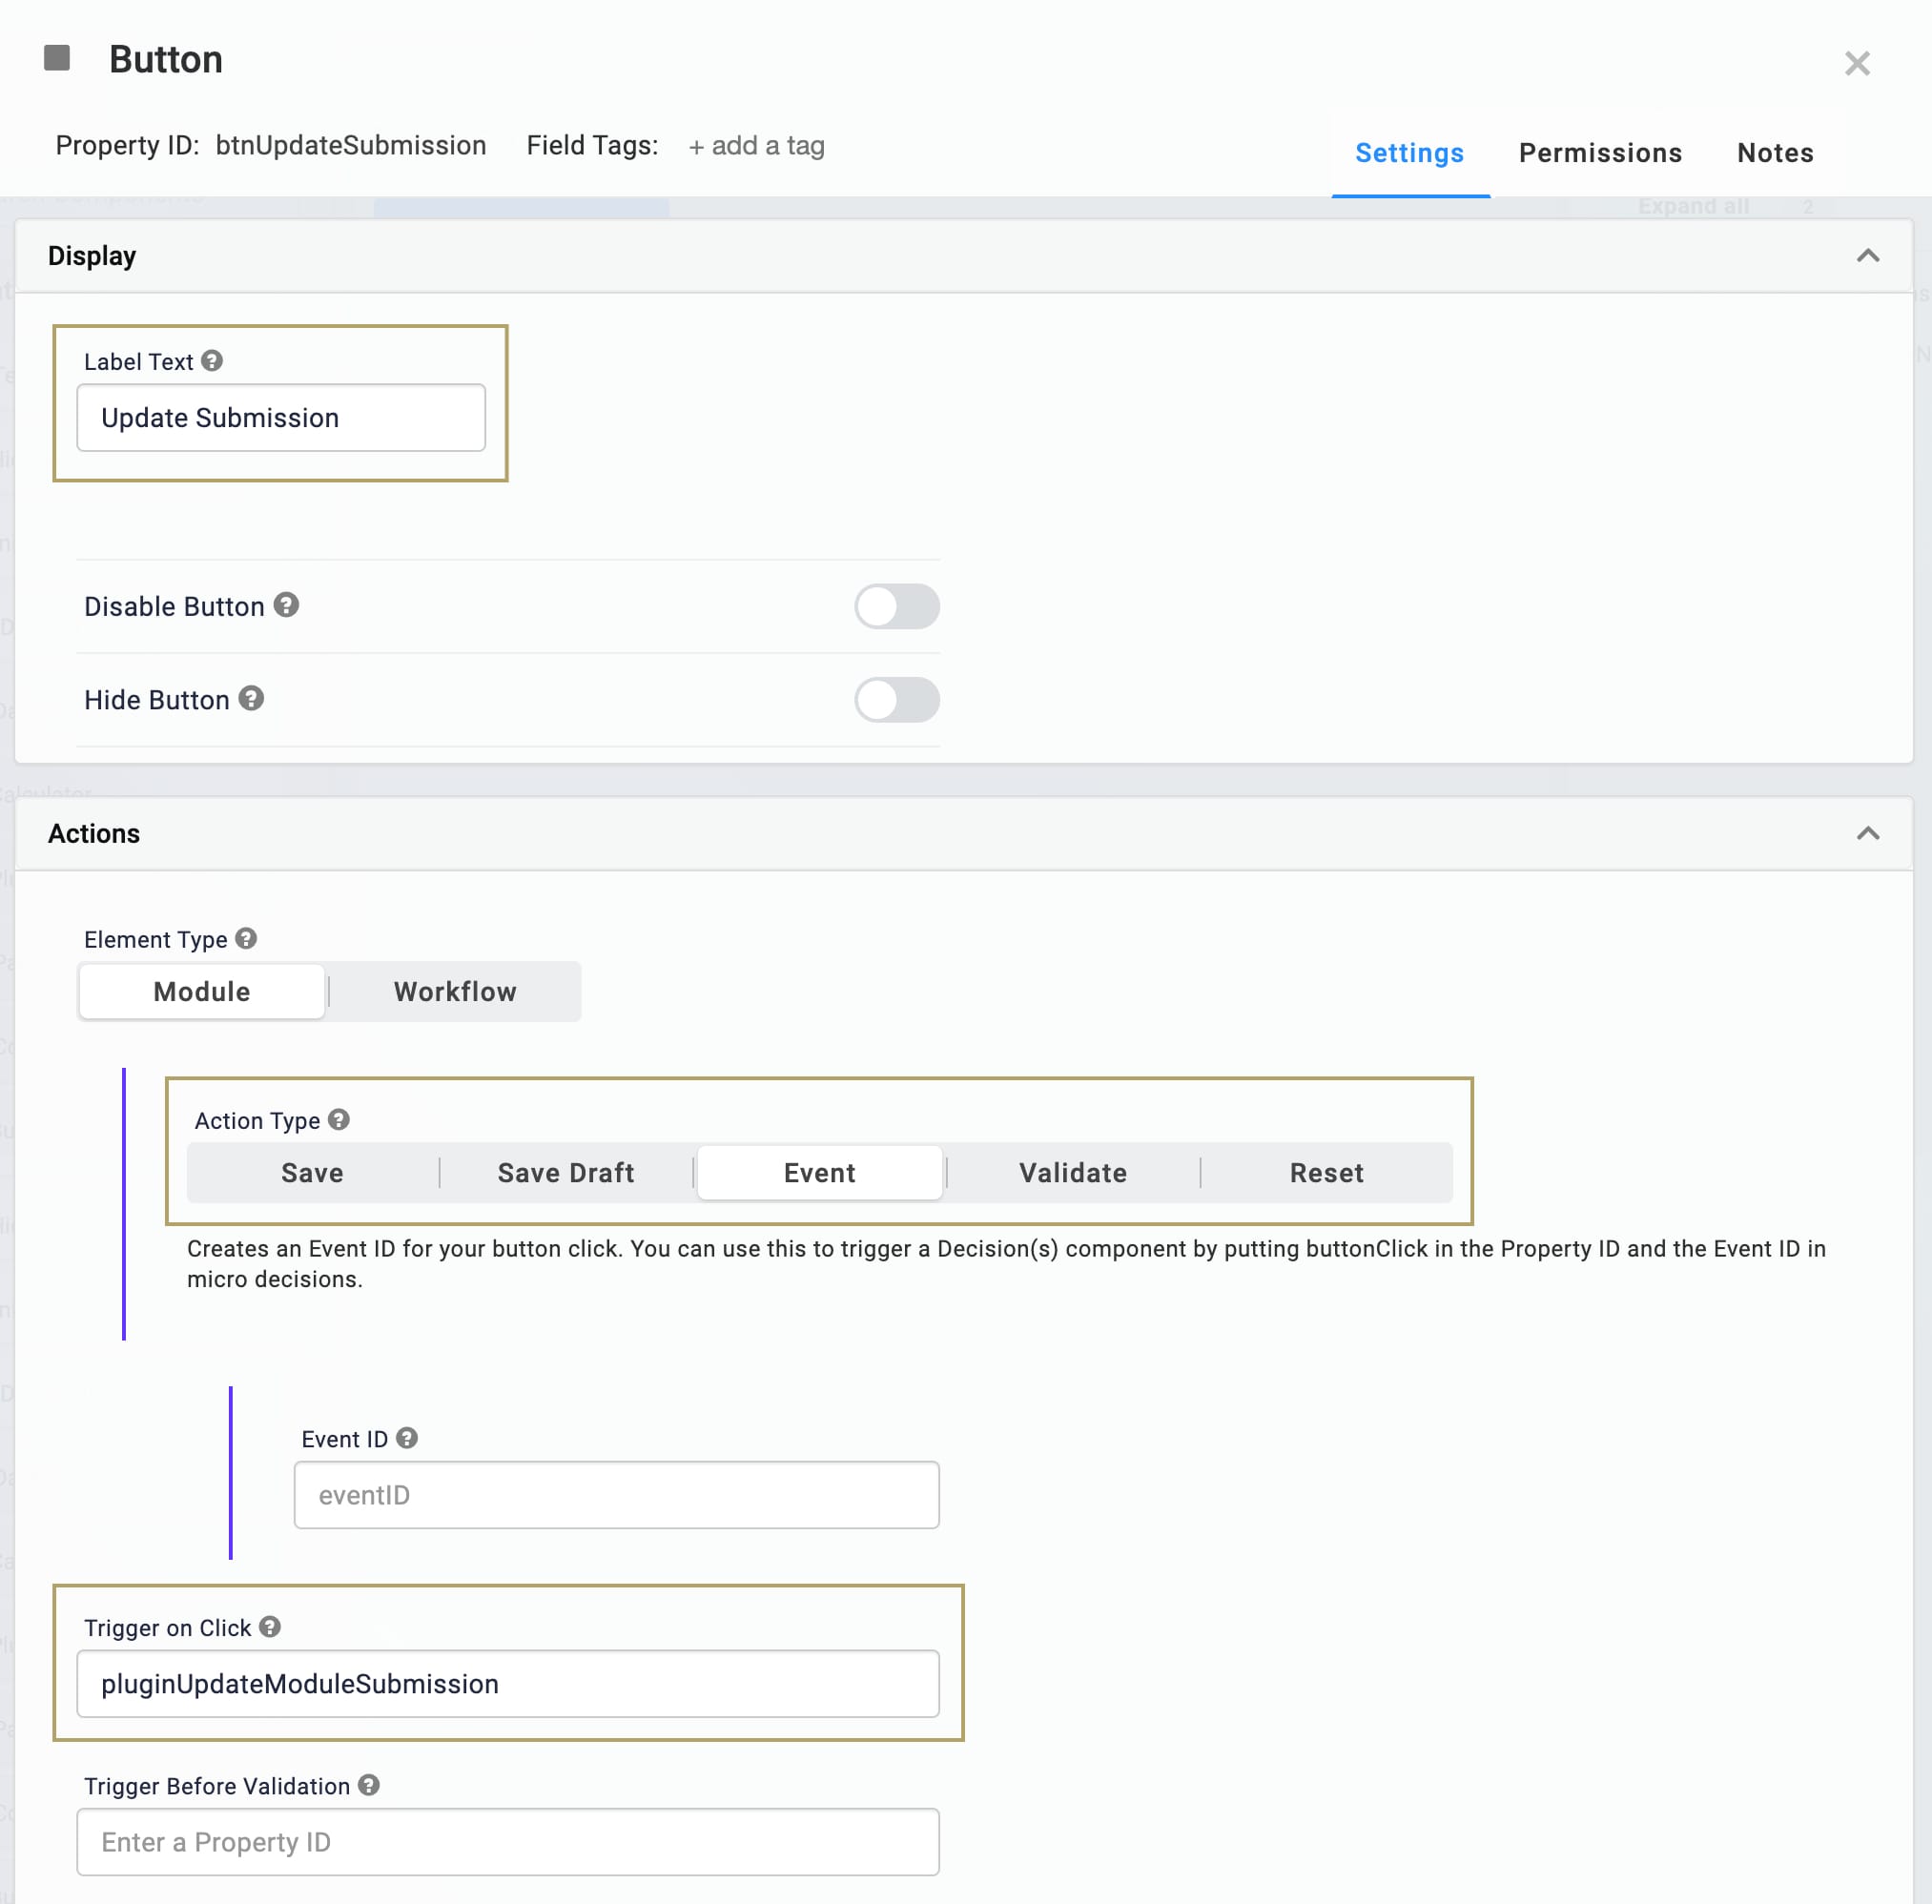
Click Save & Close.
Here’s how the fourth part of the configuration looks in the Module Builder:
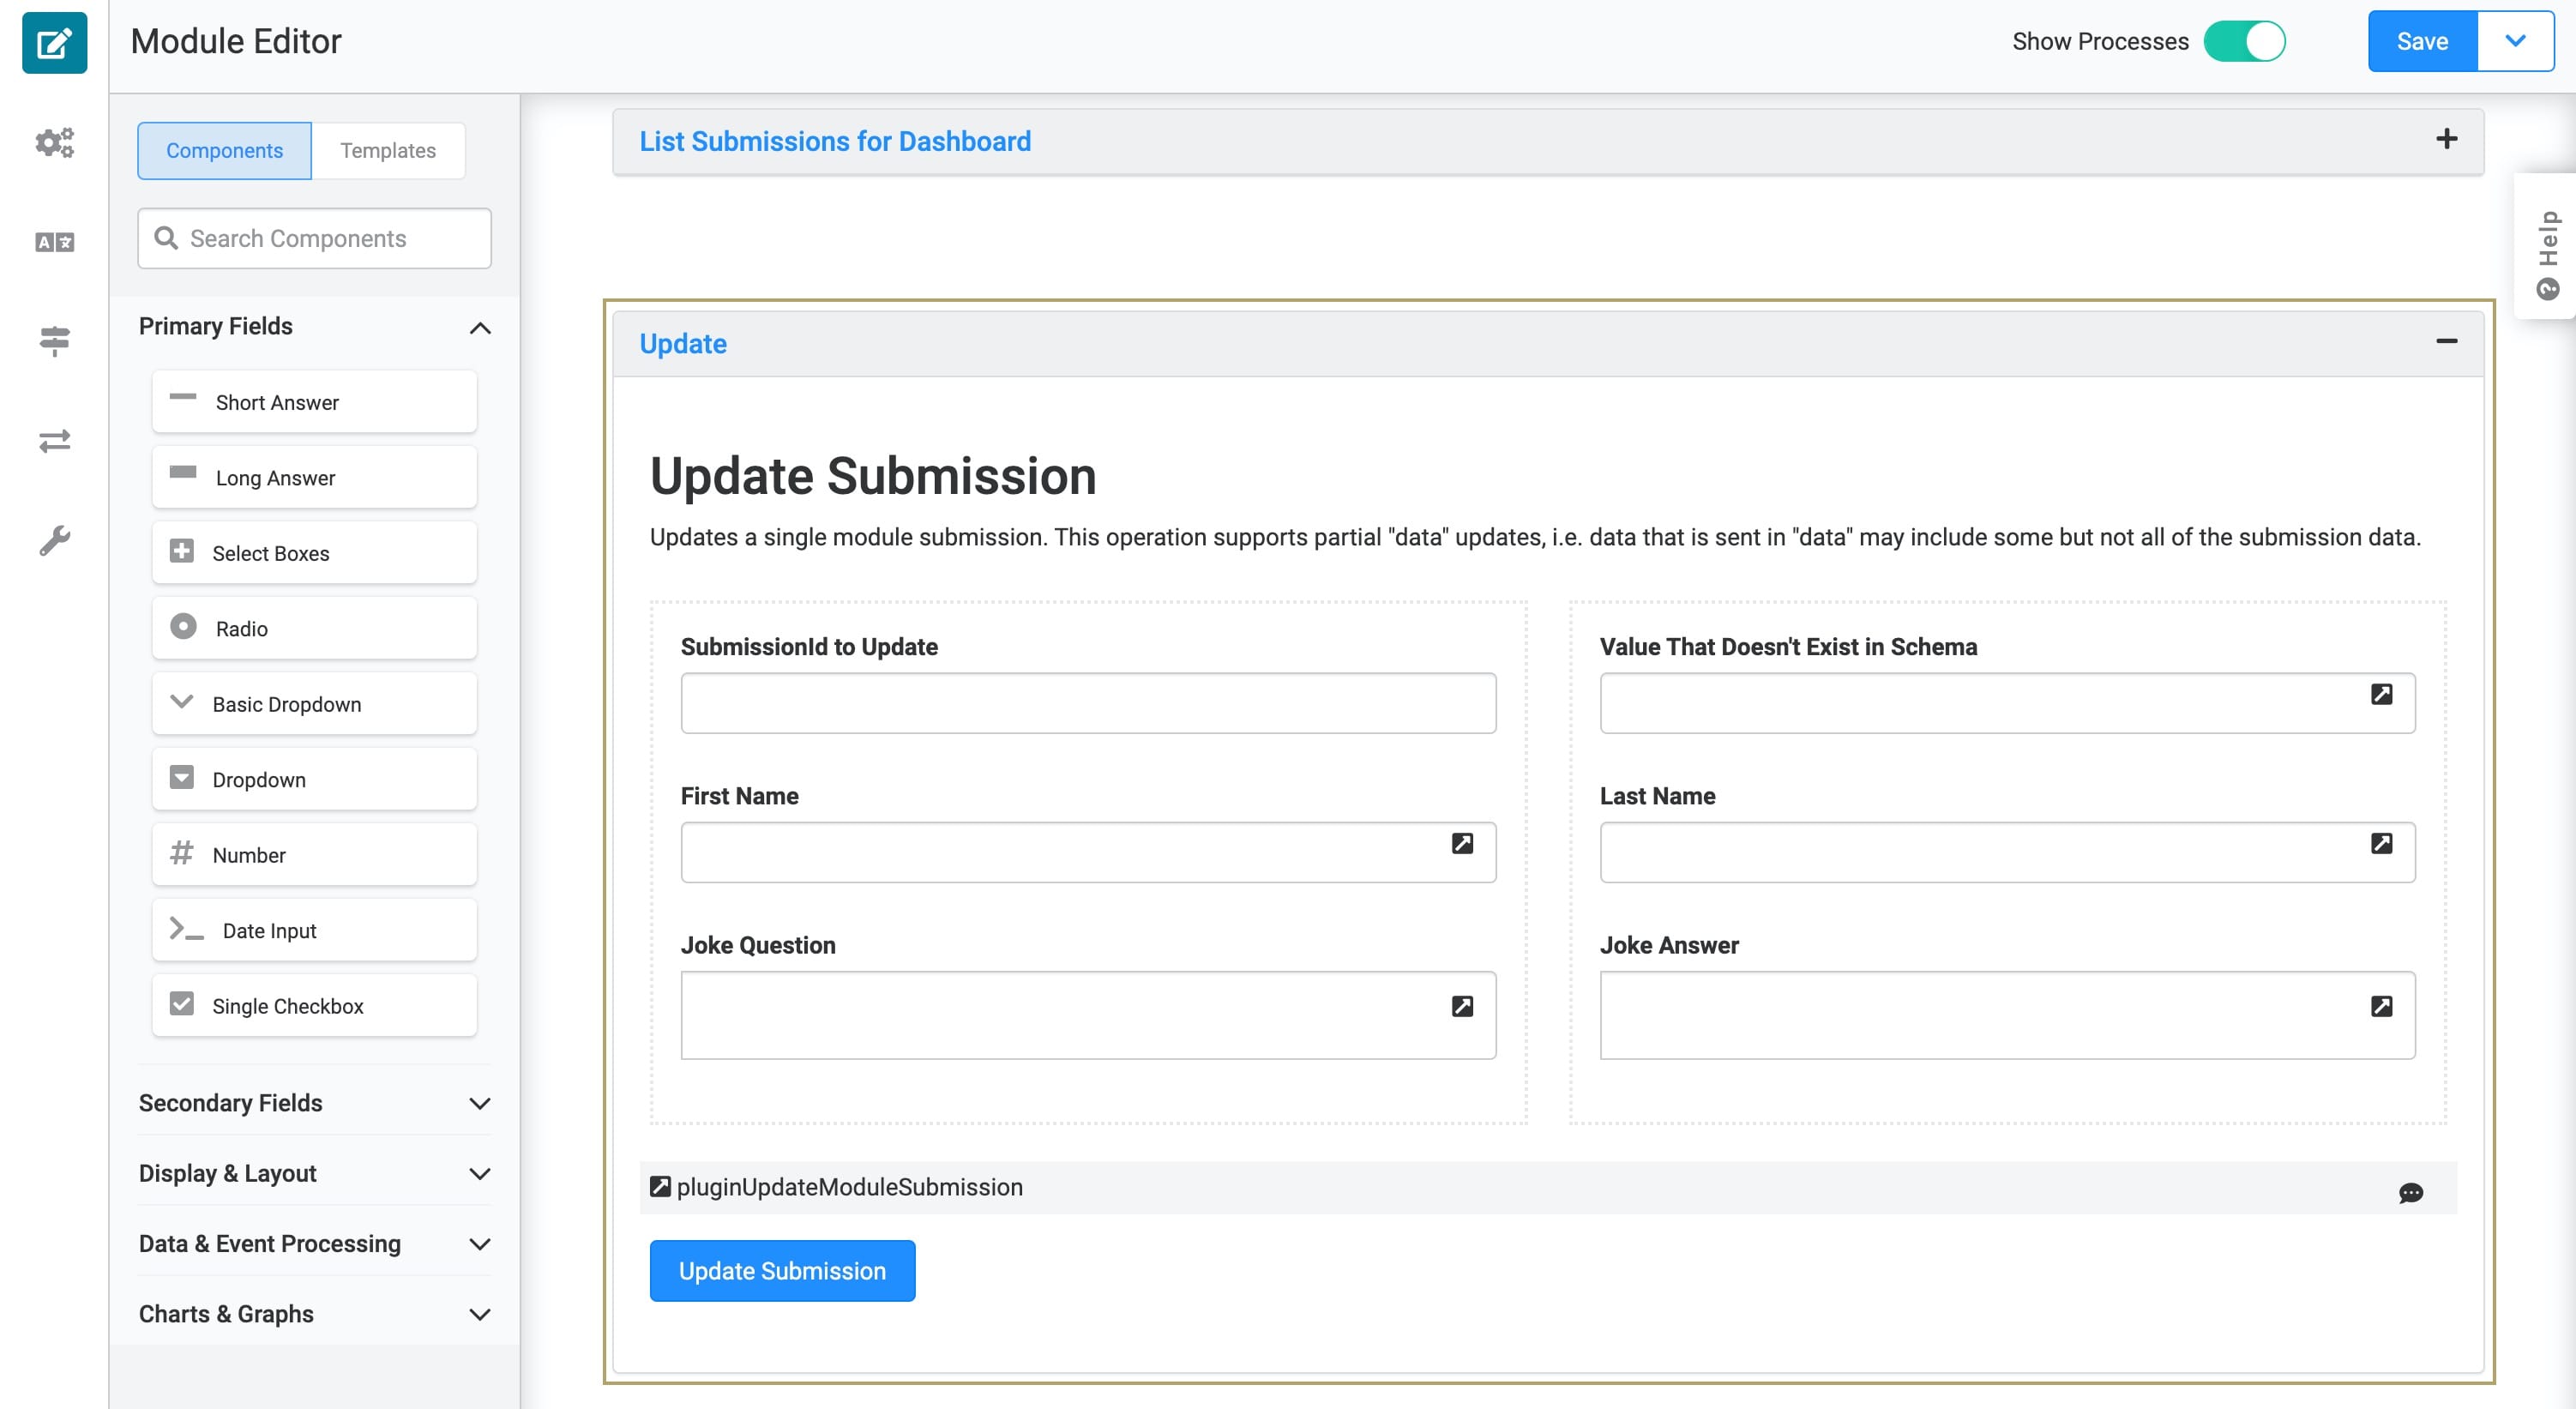
The image above uses optional HTML Element components, which allow you to display a header and description in the Panel component.
Configure the Delete Module Submissions Call
There might be instances when you want to delete submissions from your schema module. You can add a Delete Submissions API call to achieve this task. You also might want to maintain the ability to restore those deleted submissions. Let’s take a look at how those work together and consider an example of what happens when you try to restore a deleted submission.
Configure the Panel Component
Add a Panel component to act as a container for the components involved in this section of the configuration.
Drag and drop a Panel component onto your canvas, placing it below your
UpdatePanel component.In the Title field, enter
Delete.In the Property Name field, enter
panelDeleteModuleSubmissions.Click Save & Close.
Configure the Columns Component
Add a Columns component to keep your components organized. Use the default setting of two columns.
Drag and drop a Columns component onto your canvas, placing it inside your
DeletePanel component.In the Property ID field, enter
colDeleteSubmissions.Use the default setting of two columns in this example.
Click Save & Close.
Configure the Text Field Component
Add a Text Field component where you’ll enter the submission ID you want to delete.
Drag and drop a Text Field component onto your canvas, placing it in the left column of the
colDeleteSubmissionsColumns component.In the Property ID field, enter
submissionsIdDelete.In the Label Text field, enter
SubmissionId to Delete.Click Save & Close.
Configure the Plug-In Component
Configure a Plug-In component to run the delete submissions API call.
Drag and drop a Plug-In component onto your canvas, placing it below your
colDeleteSubmissionsColumns component.In the Property ID and Label Text fields, enter
pluginDeleteMultipleModuleSubmissions.In the Inputs table, enter the following:
Property ID
Mapping
submissionIdDelete
ids
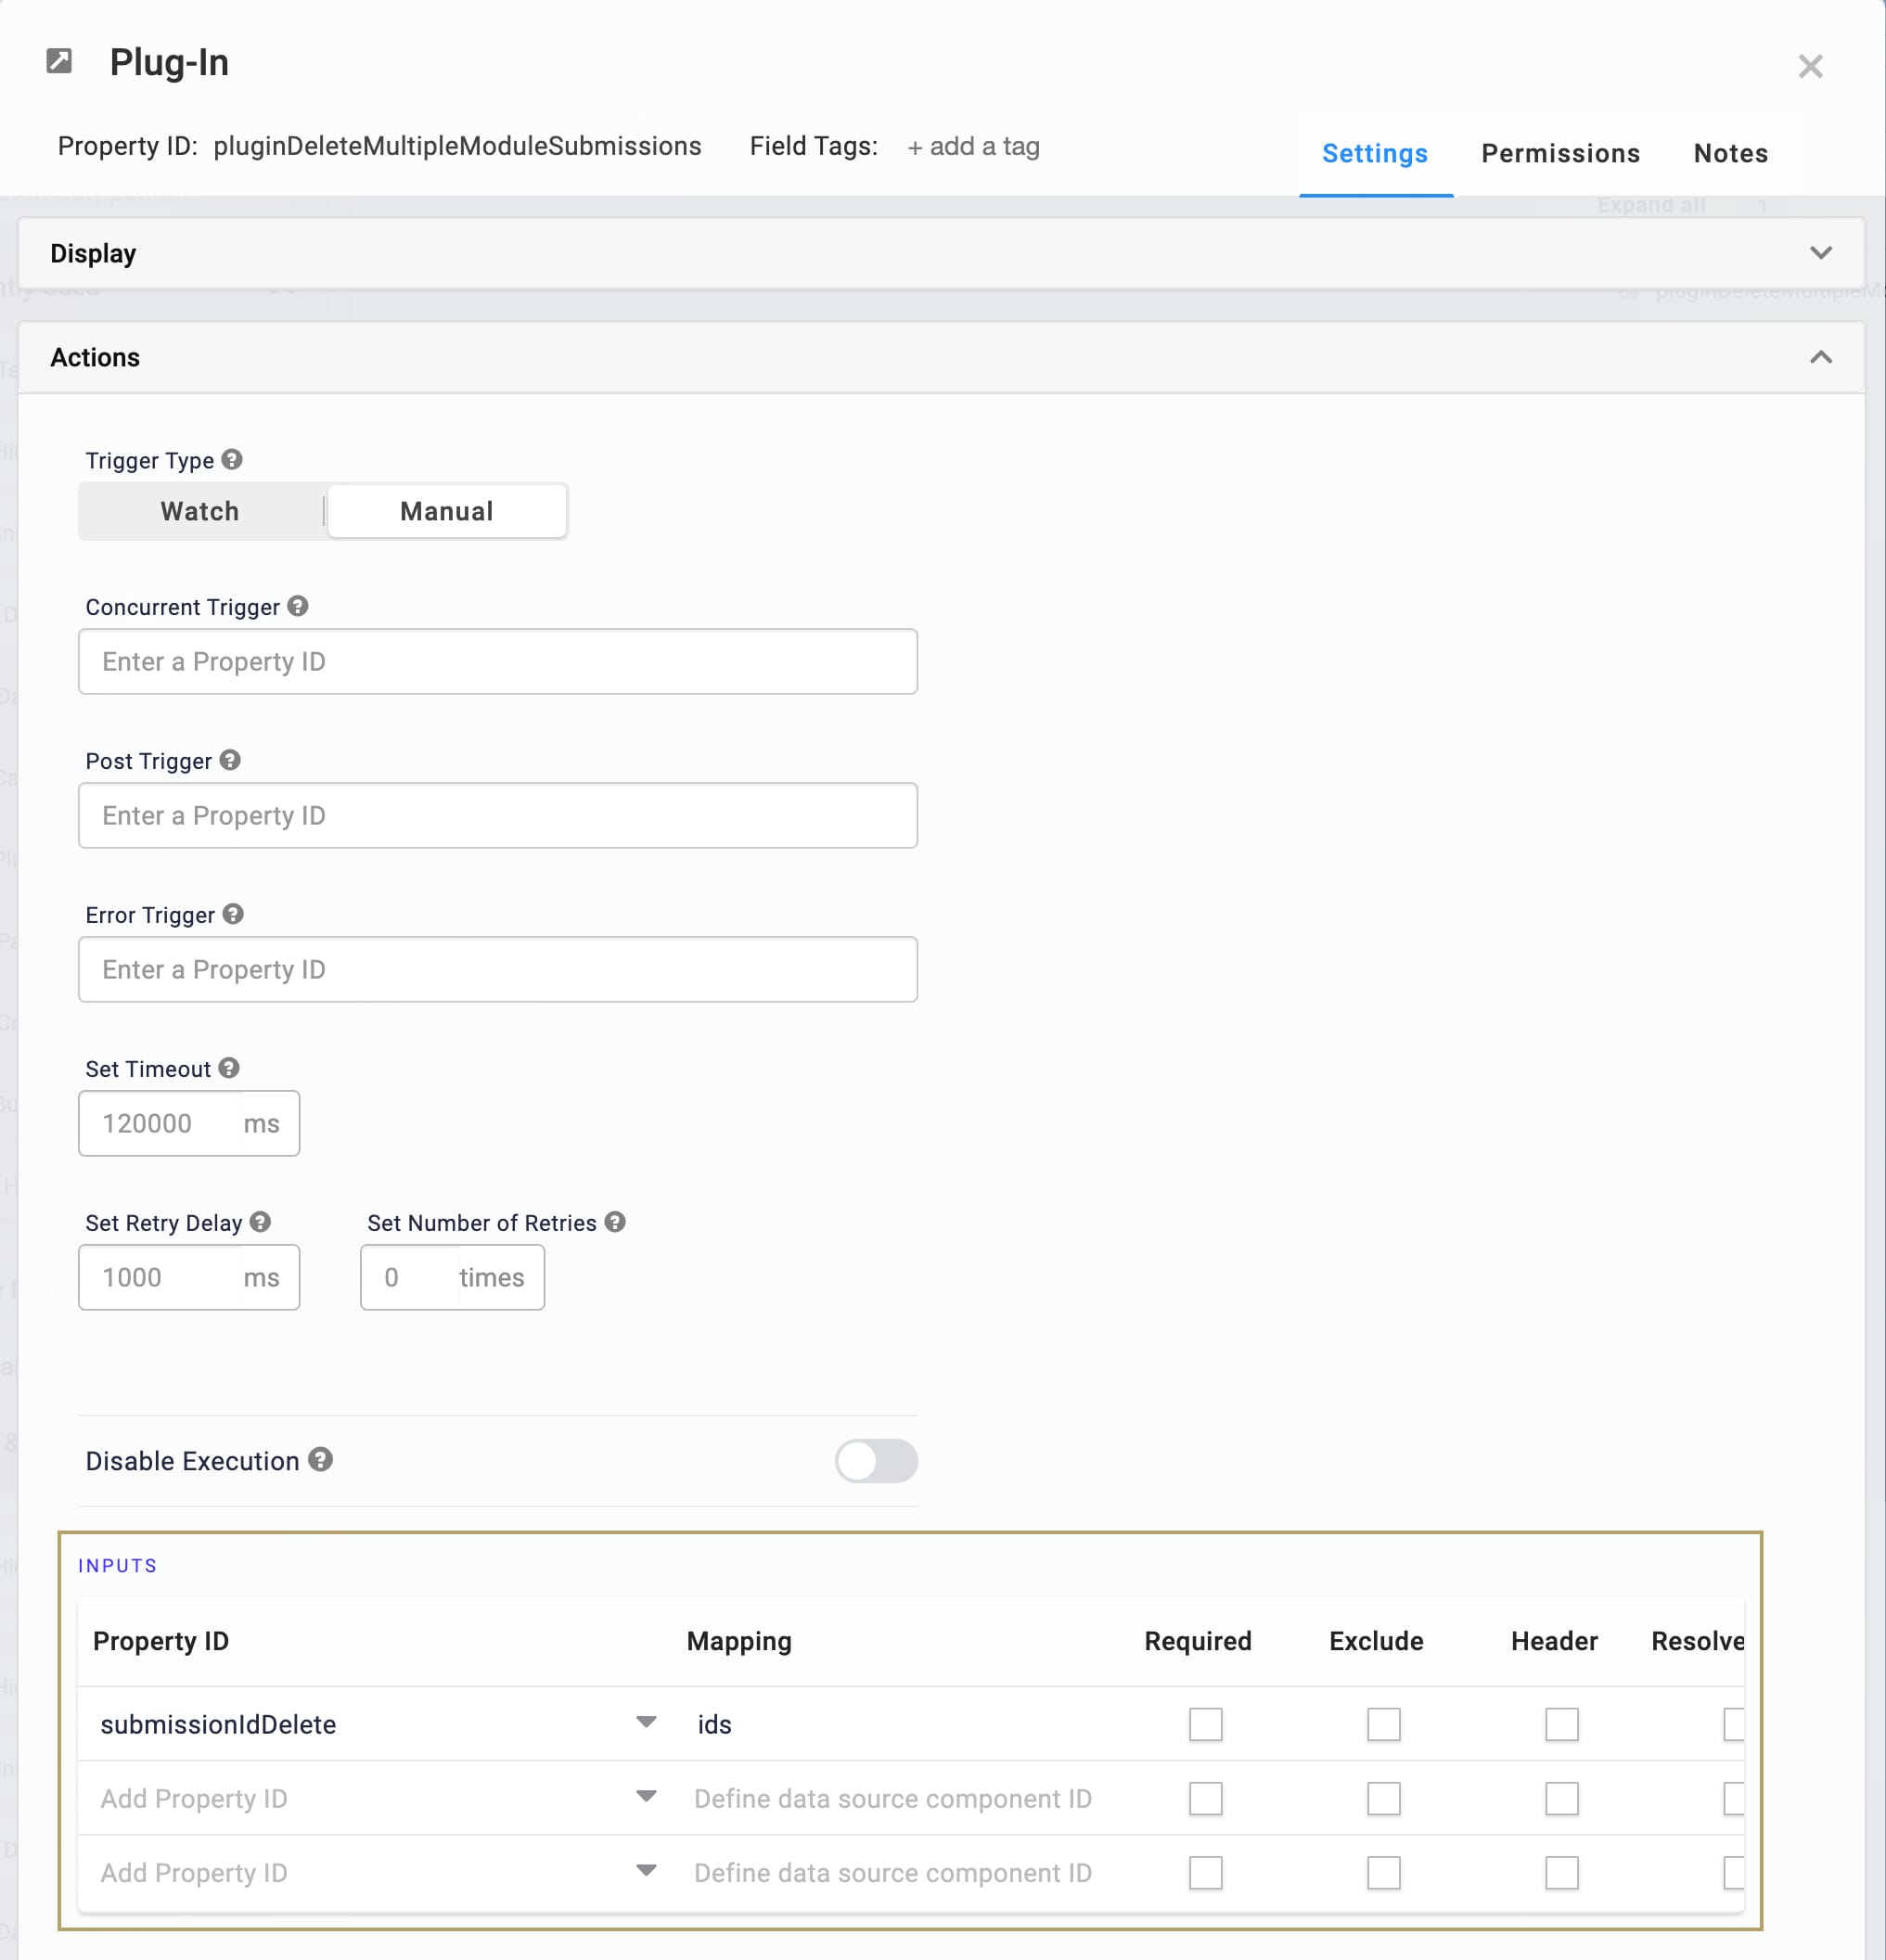
From the Internal Services drop-down, select Deletes Multiple Module Submissions. The Data Source URL autopopulates.
In the Data Source URL field, replace
{moduleId}with{{data.moduleId}}.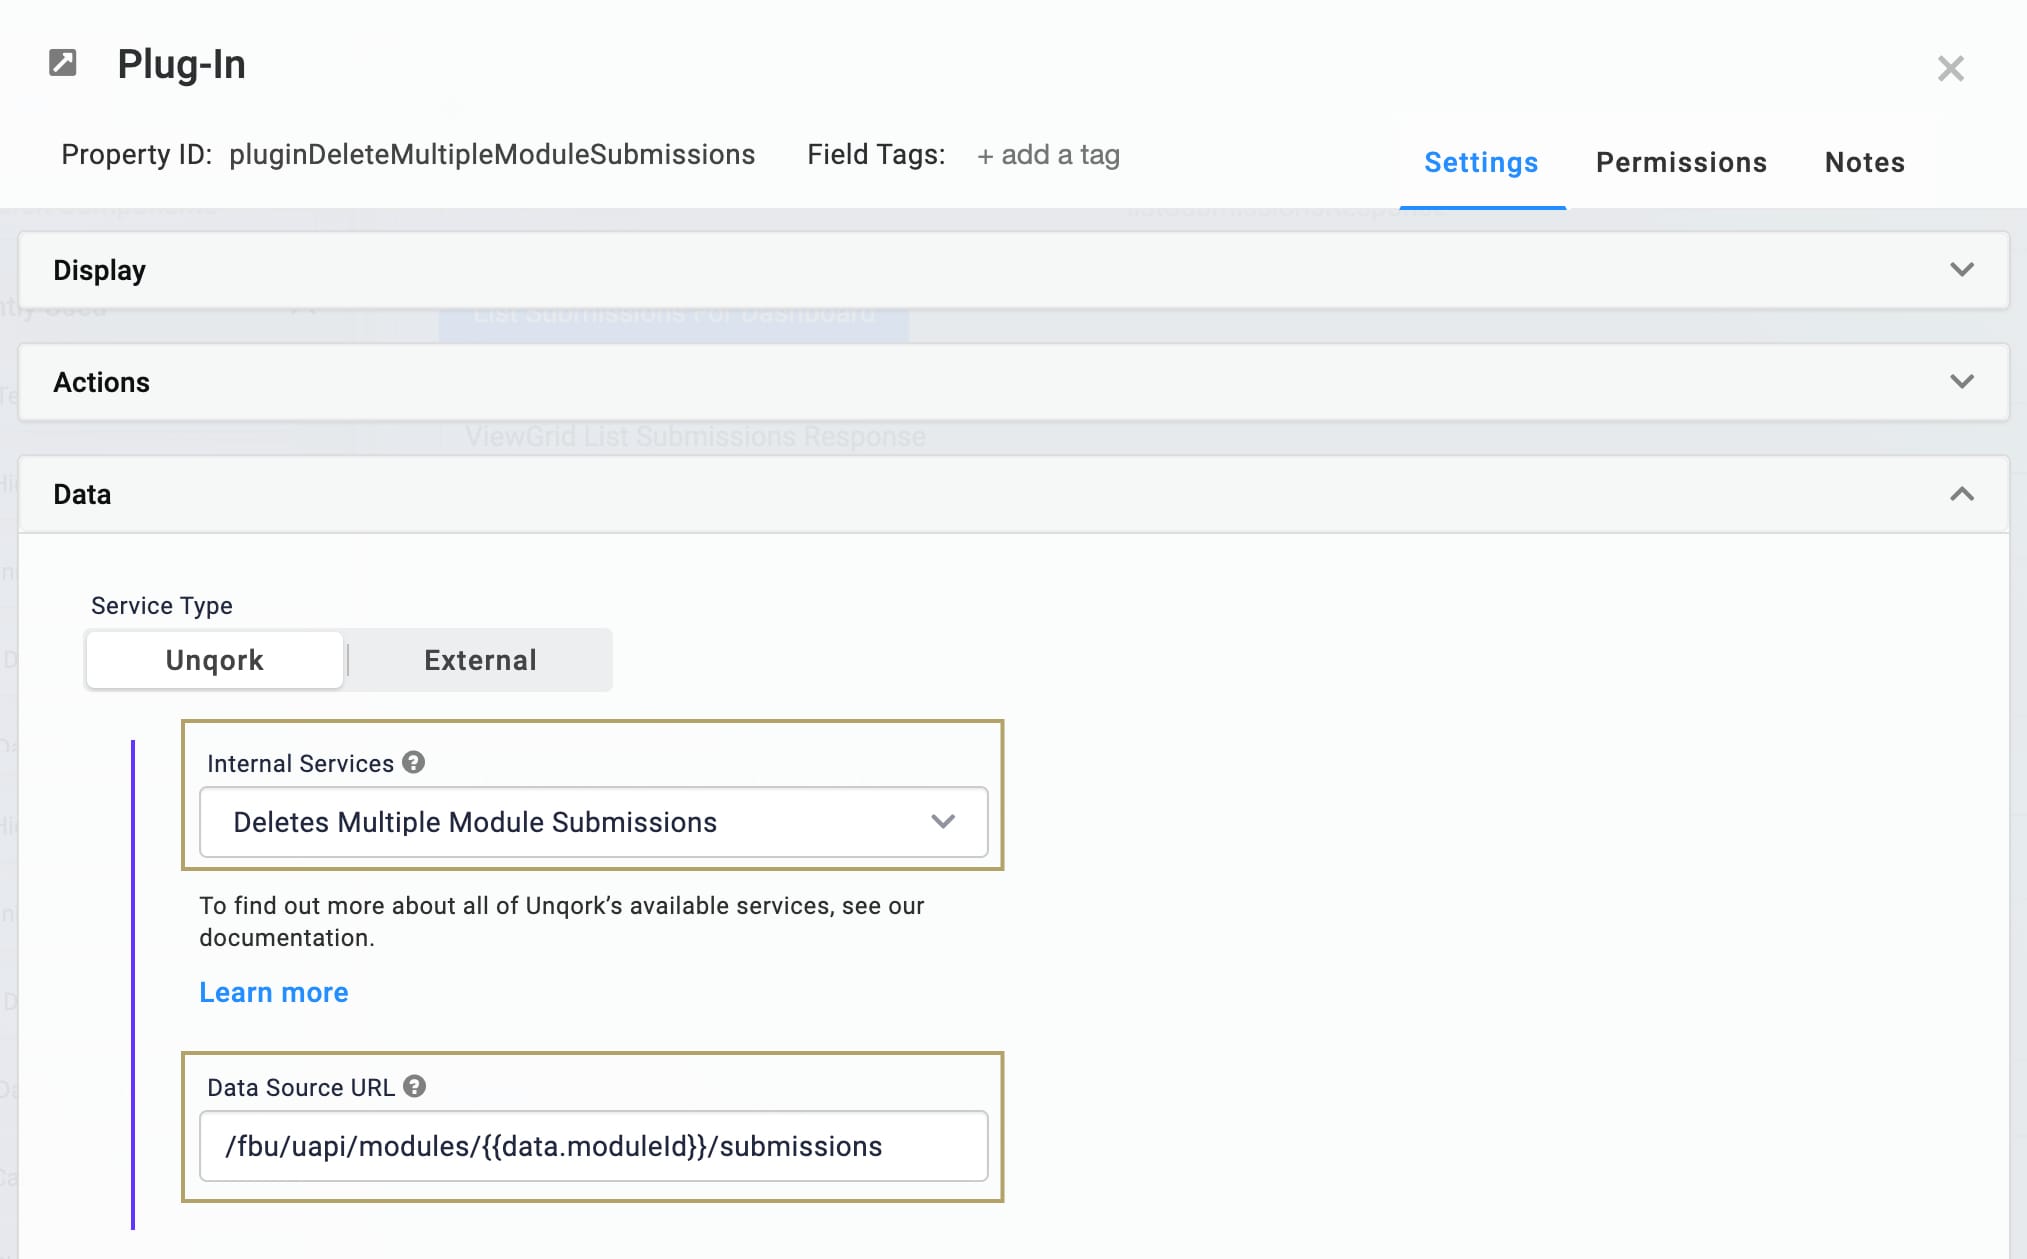
Click Save & Close.
Configure the Delete Submissions Button Component
Configure a Button component to trigger the pluginDeleteMultipleModuleSubmissions Plug-In component to delete submissions.
Drag and drop a Button component onto your canvas, placing it below your
pluginDeleteMultipleMOduleSubmissionsPlug-In component.In the Property ID field, enter
btnDeleteSubmission.In the Label Text field, enter
Delete Submission(s).Set the Action Type as Event.
In the Trigger on Click field, enter
pluginDeleteMultipleMOduleSubmissions.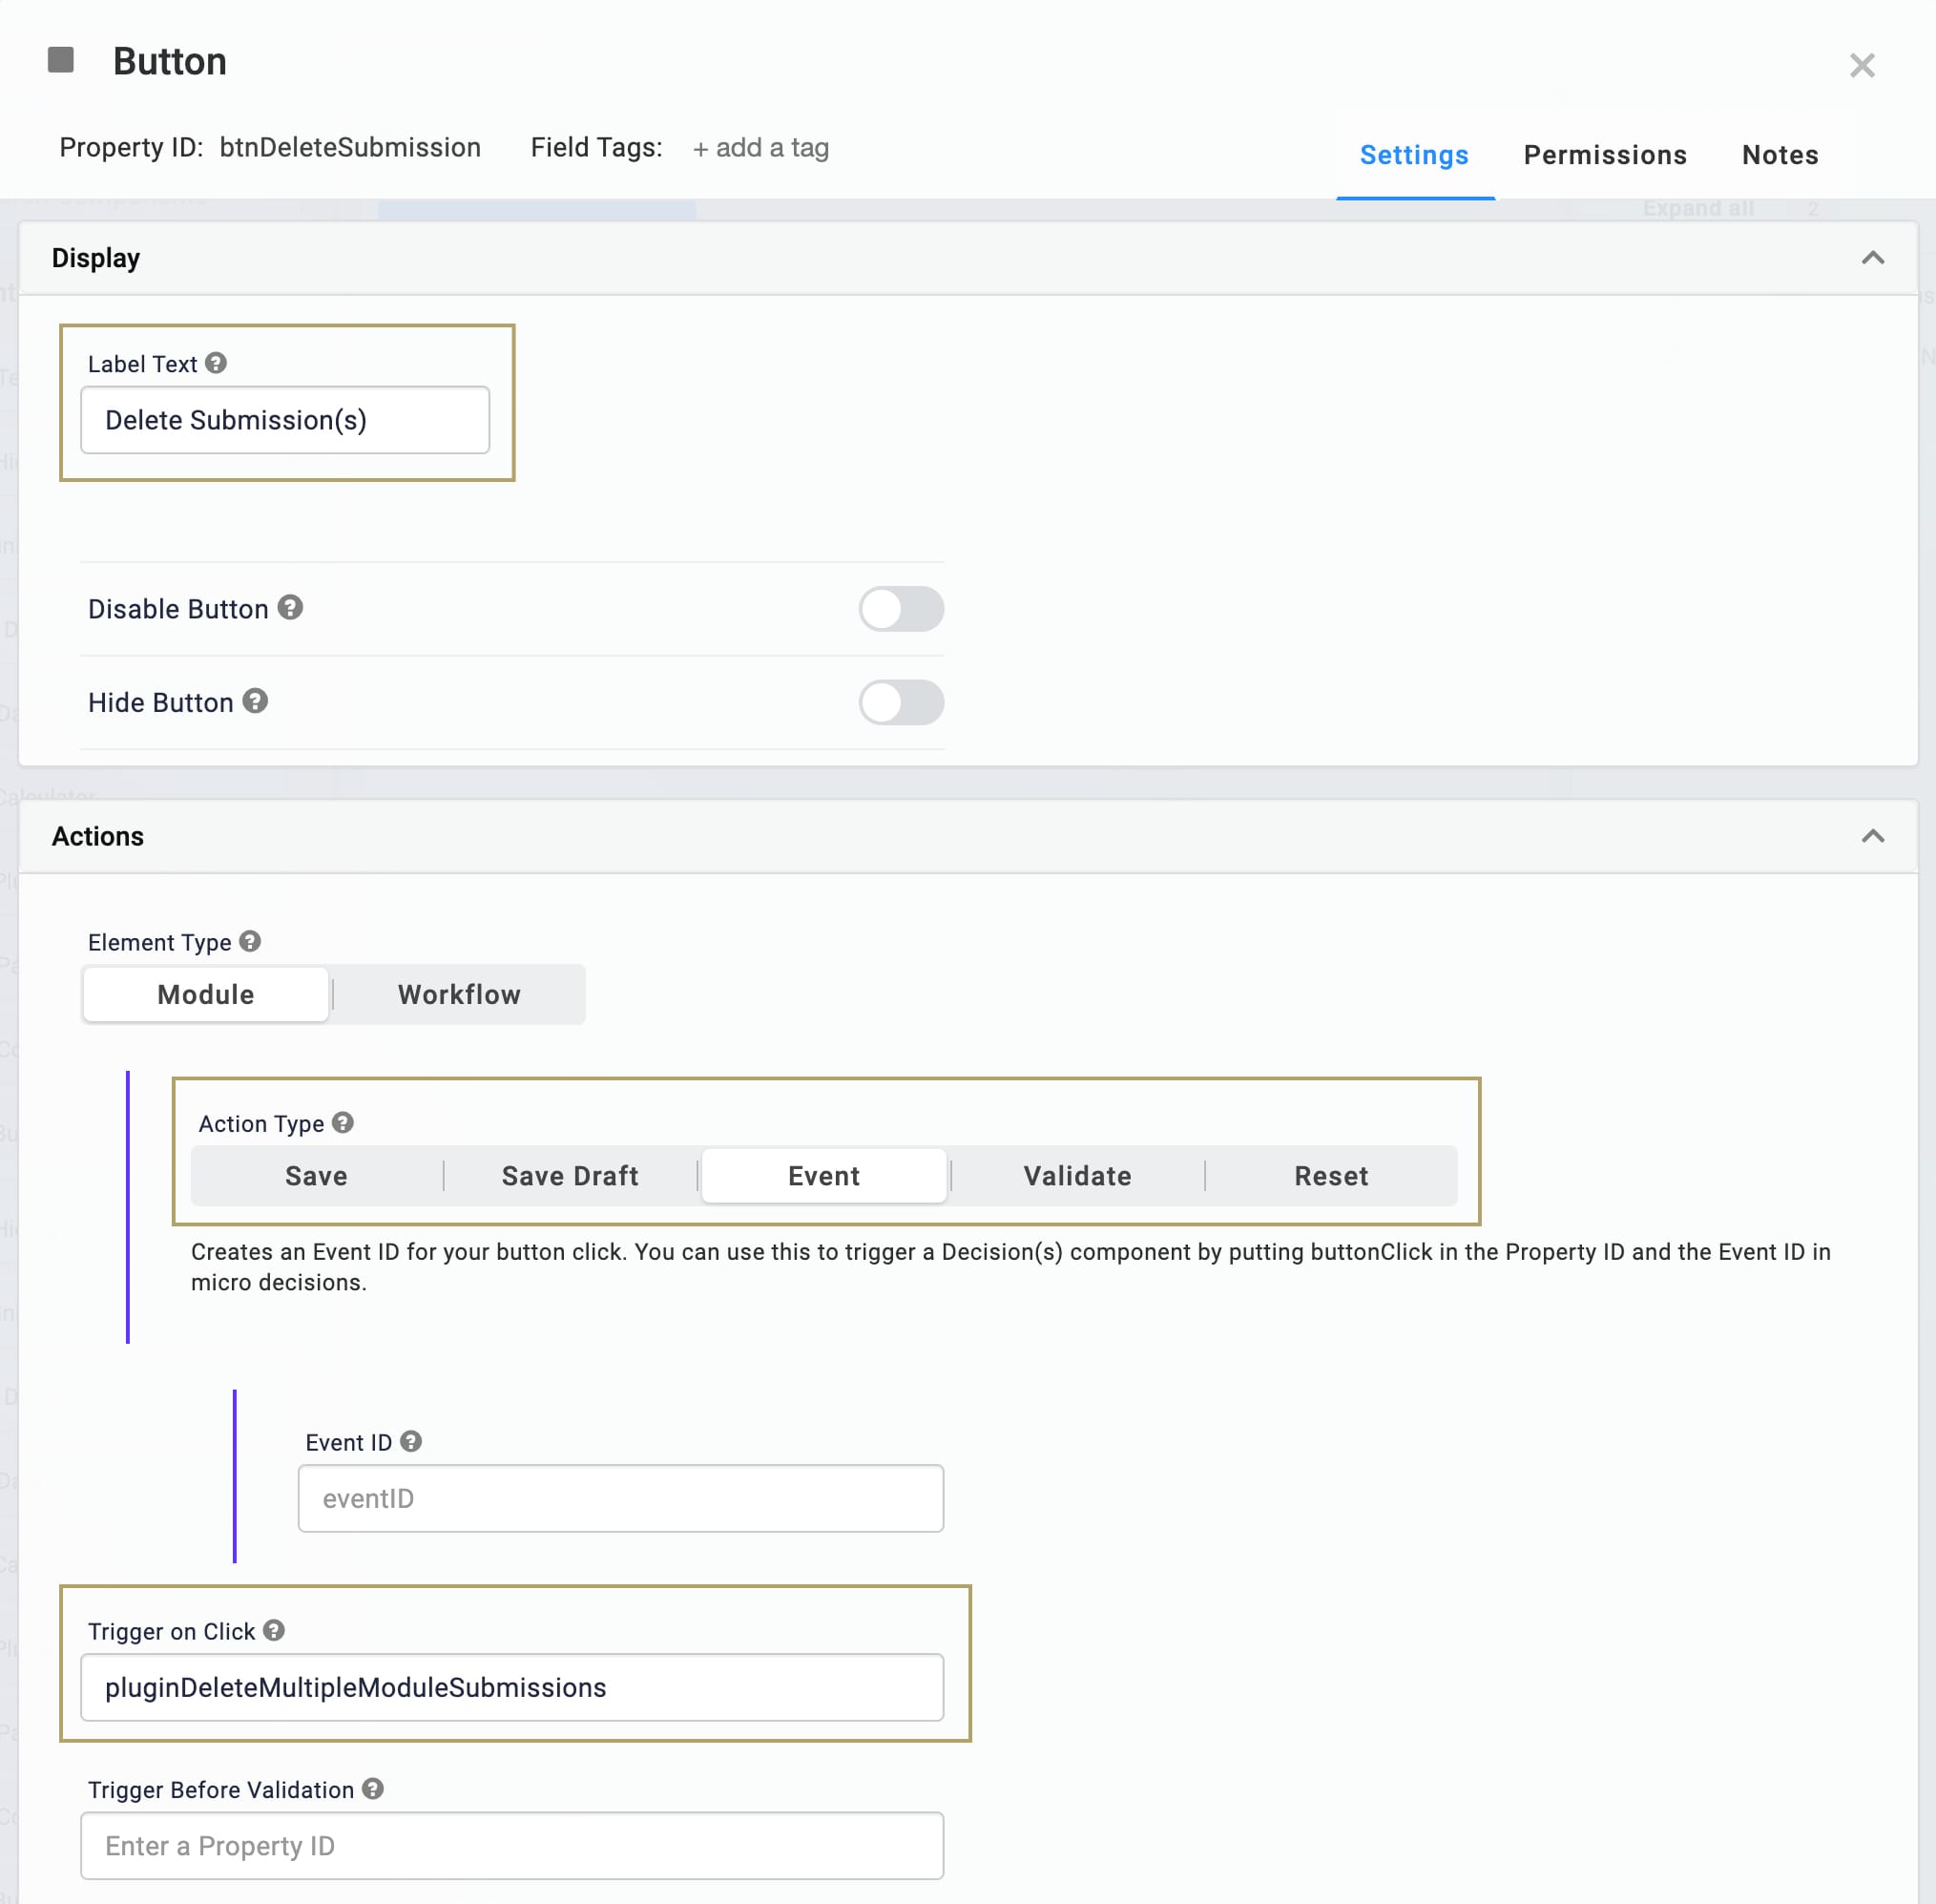
Click Save & Close.
Configure the Get Deleted Submission Button Component
Configure a second Button component to trigger your Plug-In component to retrieve previously deleted submissions. This example demonstrates what happens when you try to retrieve a deleted submission.
Drag and drop a Button component onto your canvas, placing it in the right column of your
colDeleteSubmissionsColumns component..In the Property ID field, enter
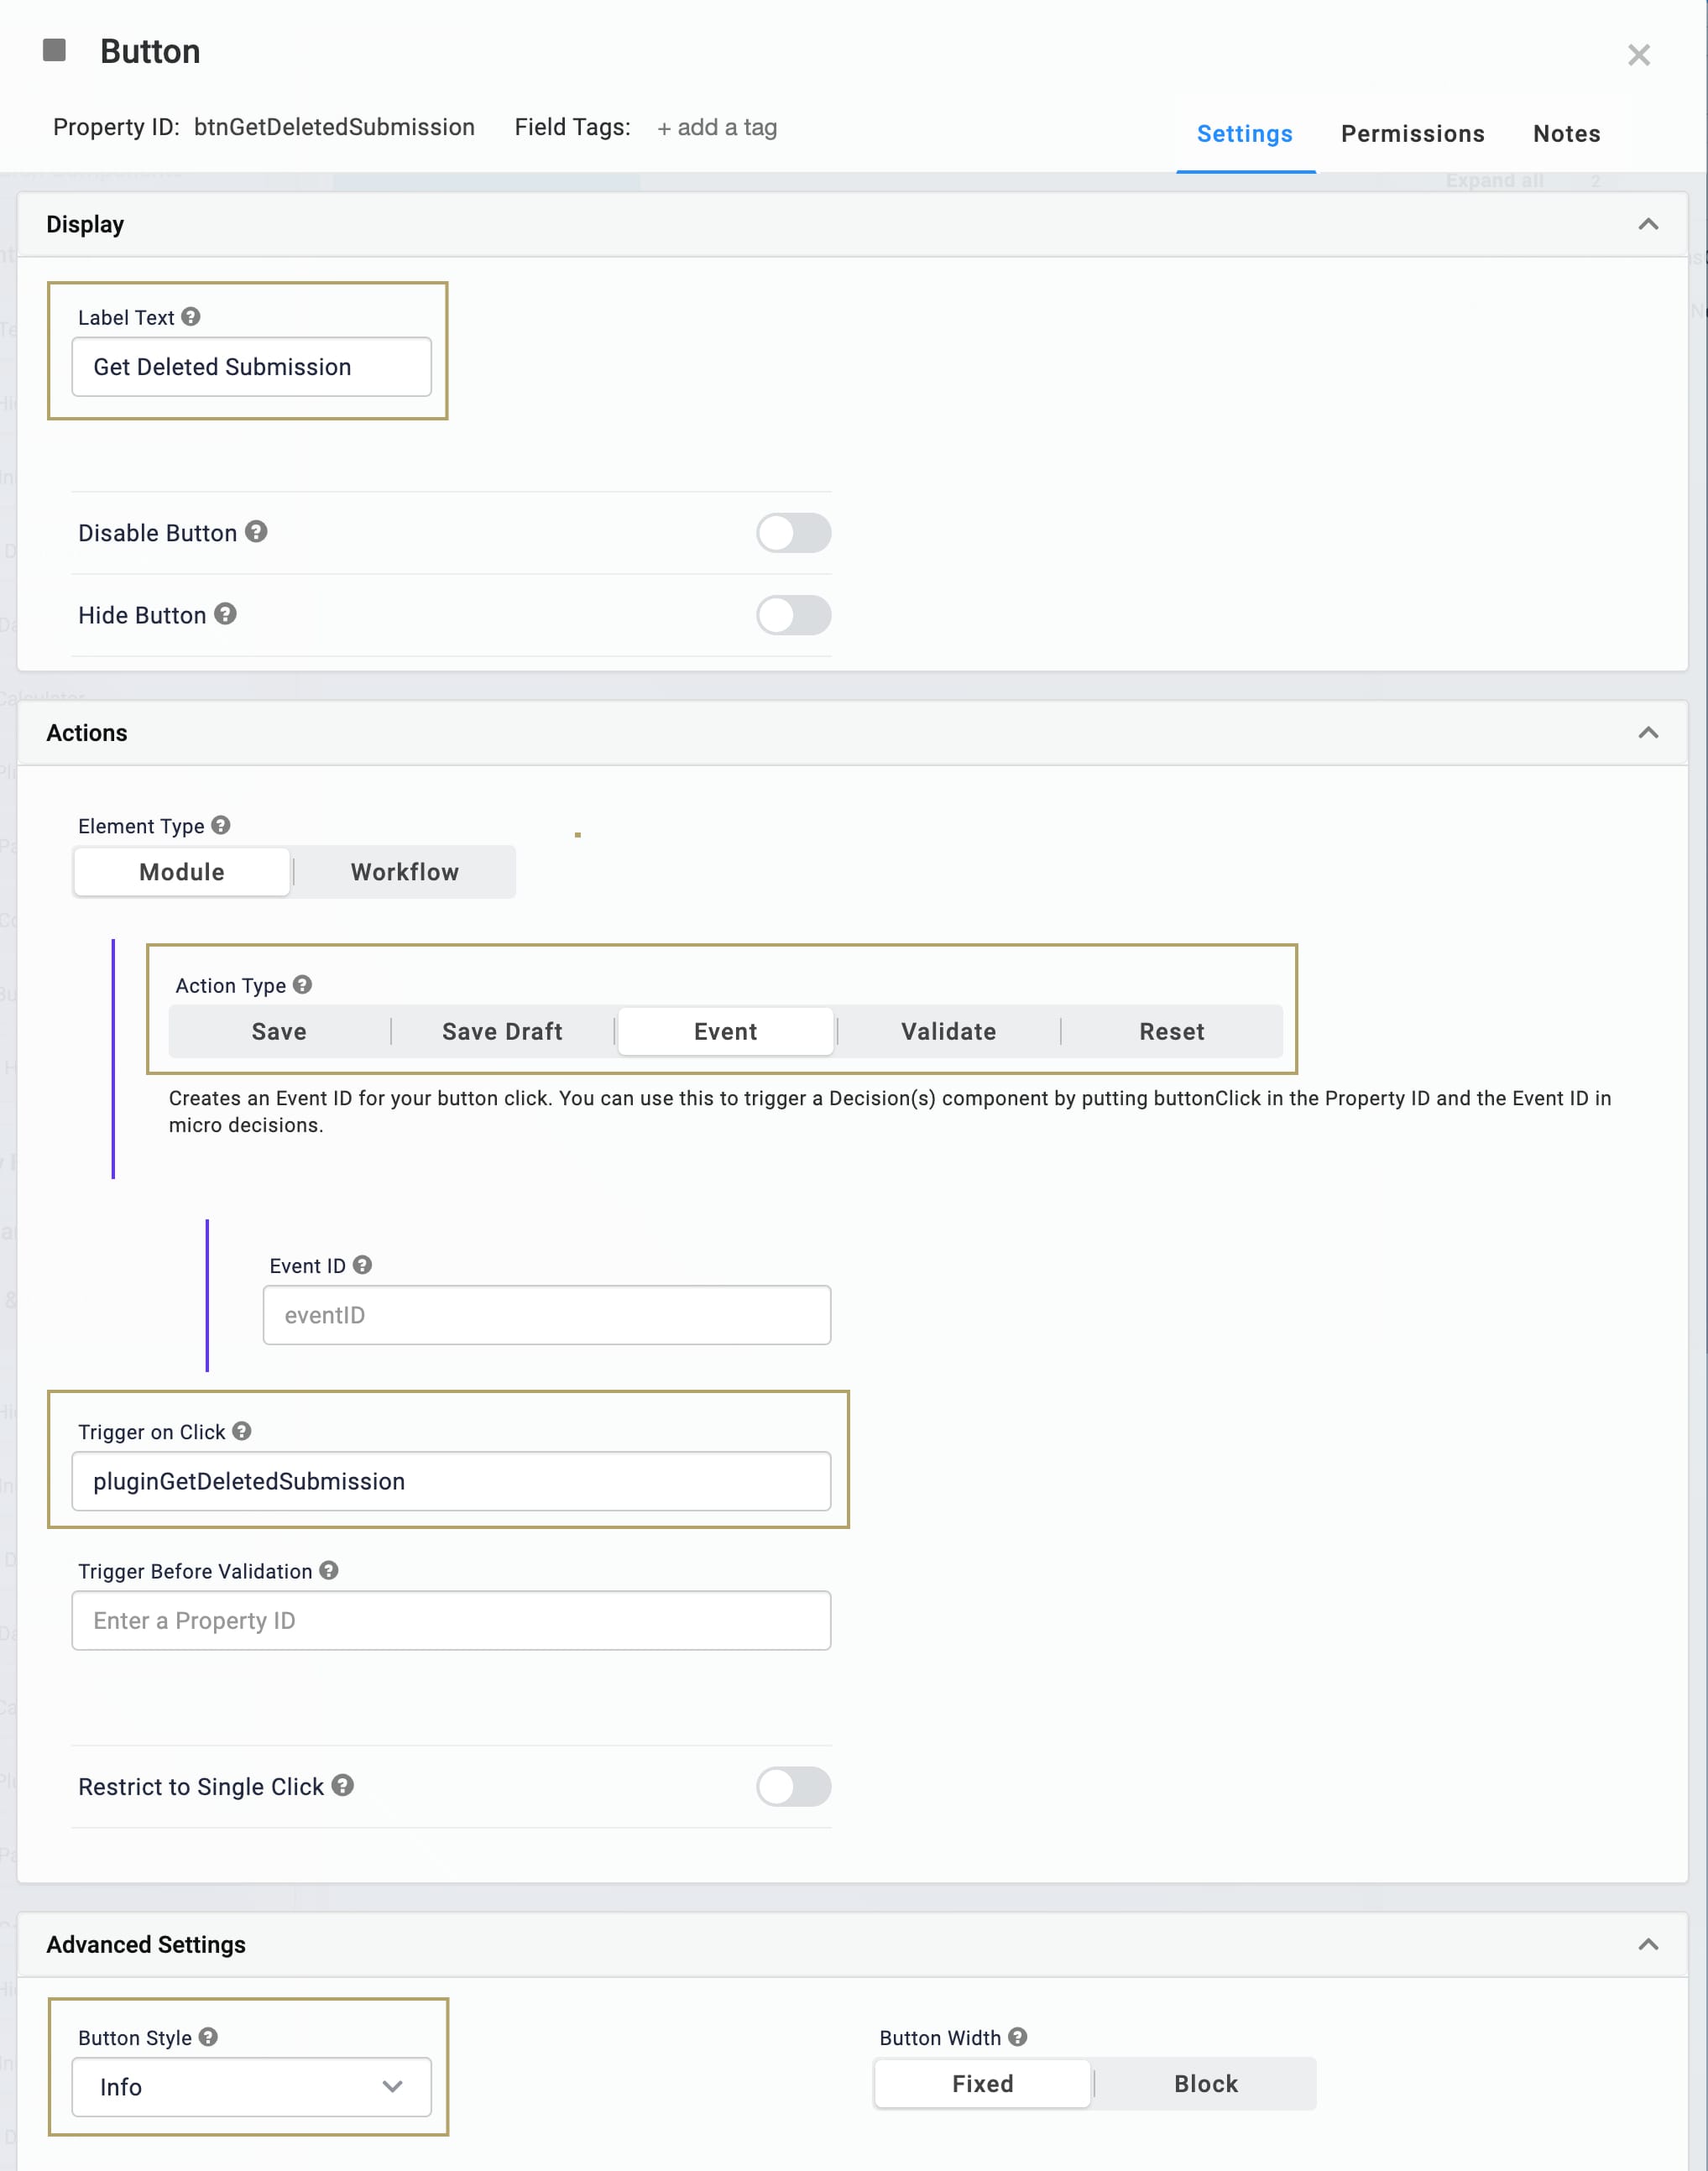
btnGetDeletedSubmission.In the Label Text field, enter
Get Deleted Submission.Set the Action Type as Event.
In the Trigger on Click field, enter
pluginGetDeletedSubmission.This step sets the button to trigger the Plug-In component you'll add in the next step.
From the Button Style drop-down, select Info.
Click Save & Close.
Configure the Plug-In Component
Configure a second Plug-In component to run the GET call to retrieve a deleted submission.
Drag and drop a Plug-In component onto your canvas, placing it in the right column, below your
btnGetDeletedSubmissionButton Component.In the Property ID and Label Text fields, enter
pluginGetDeletedSubmission.From the Internal Services drop-down, select Get Module Submission. The Data Source URL autopopulates.
In the Data Source URL field, replace
{moduleId}with{{data.moduleId}}and{submissionId}with{{data.submissionDelete}}.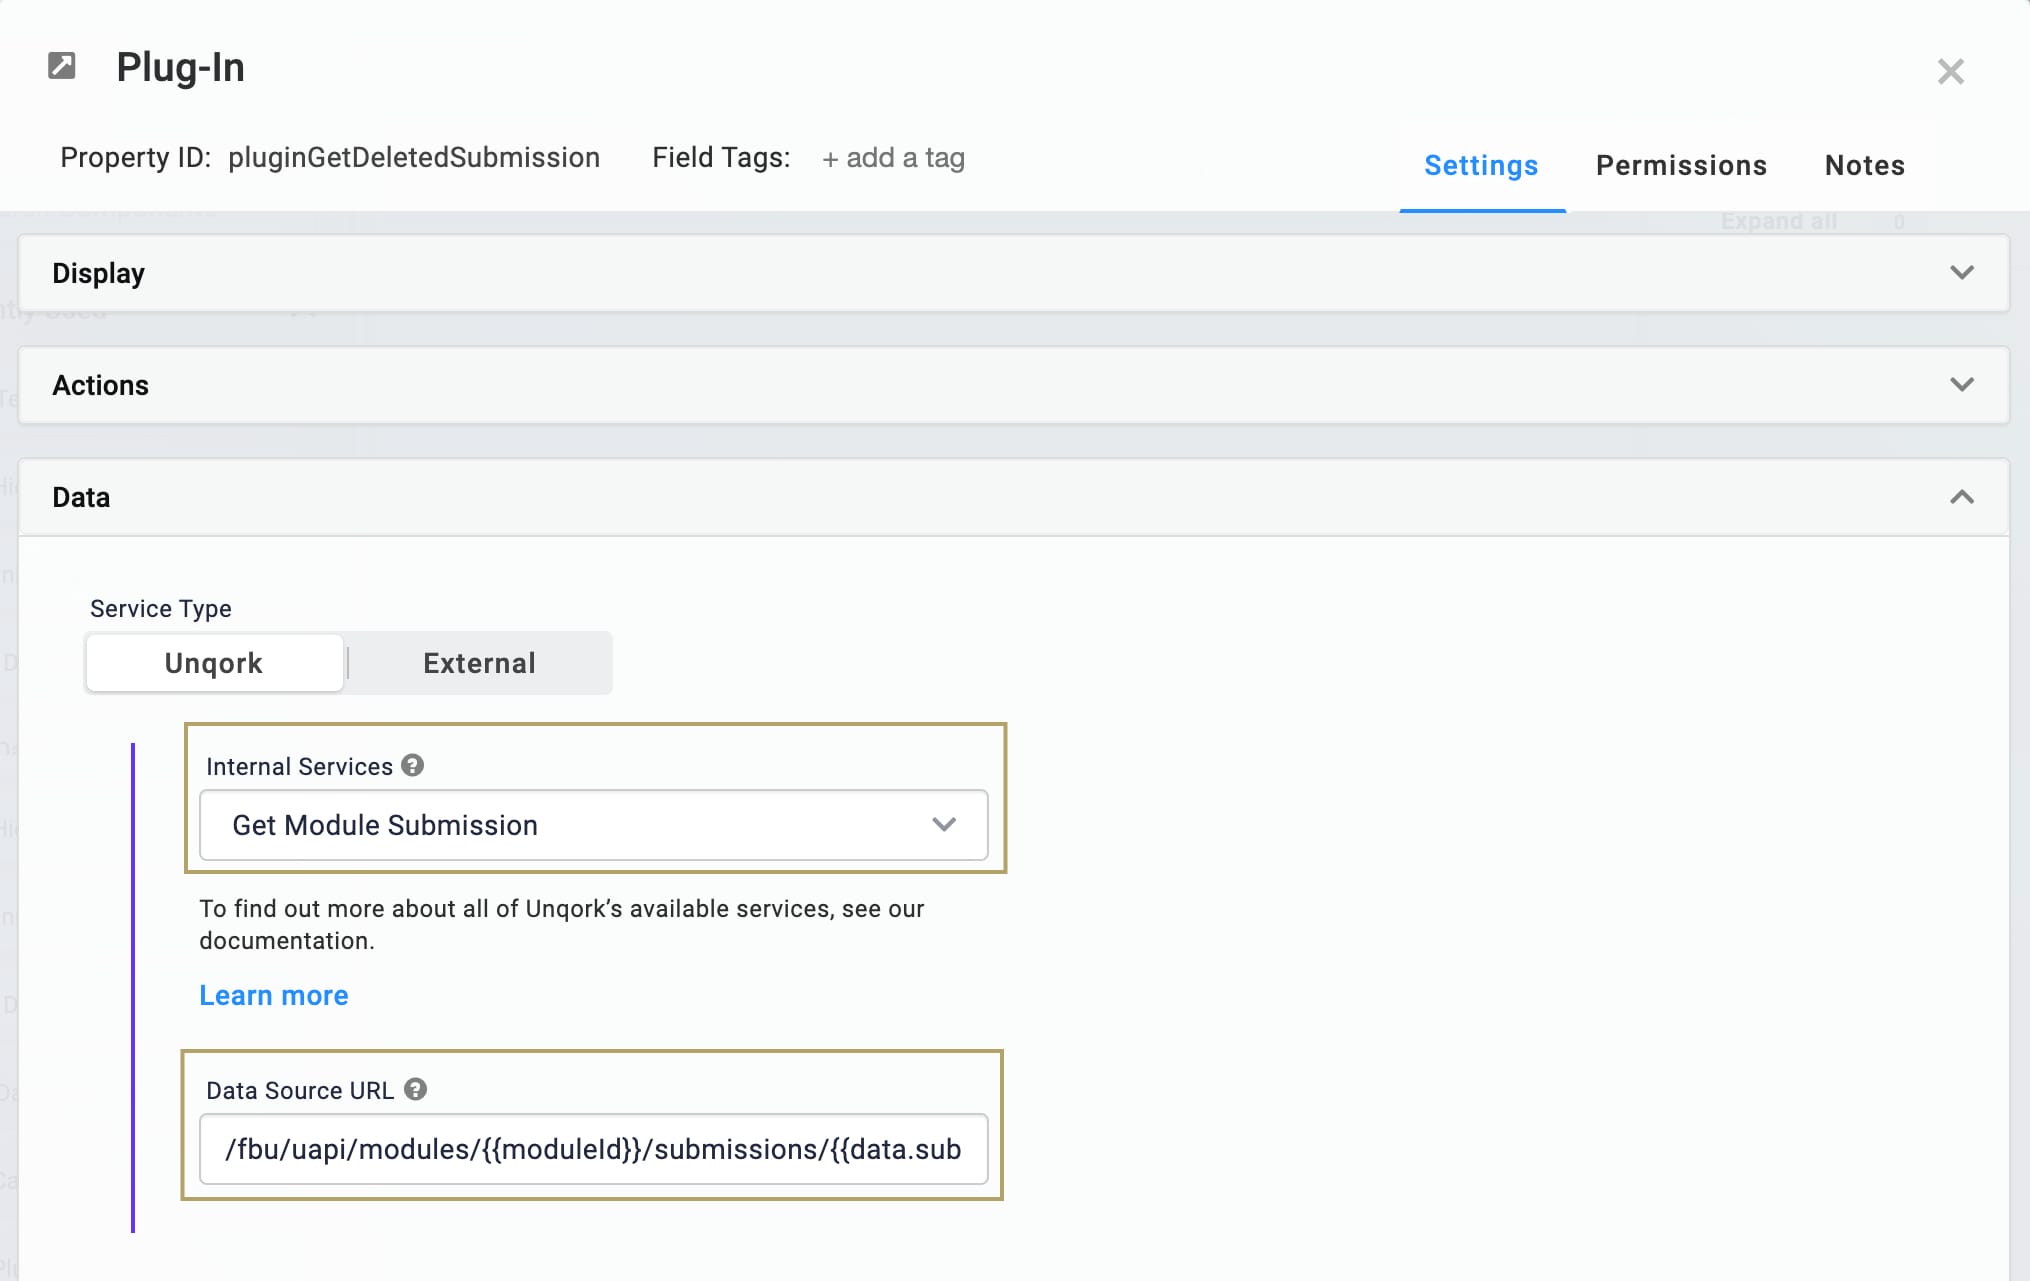
Click Save & Close.
Configure the Restore Deleted Submissions Button Component
Configure a third Button component to trigger your Plug-In component to restore previously deleted submissions.
Drag and drop a Button component onto your canvas, placing it in the right column, below your
pluginGetDeleteSubmissionPlug-In Component.In the Property ID field, enter
btnRestoreDeletedSubmission.In the Label Text field, enter
Restore Deleted Submission.Set the Action Type as Event.
In the Trigger on Click field, enter
pluginRestoreDeletedModuleSubmission.This sets the button to trigger the Plug-In component you'll add in the next step.
From the Button Style drop-down, select Success.
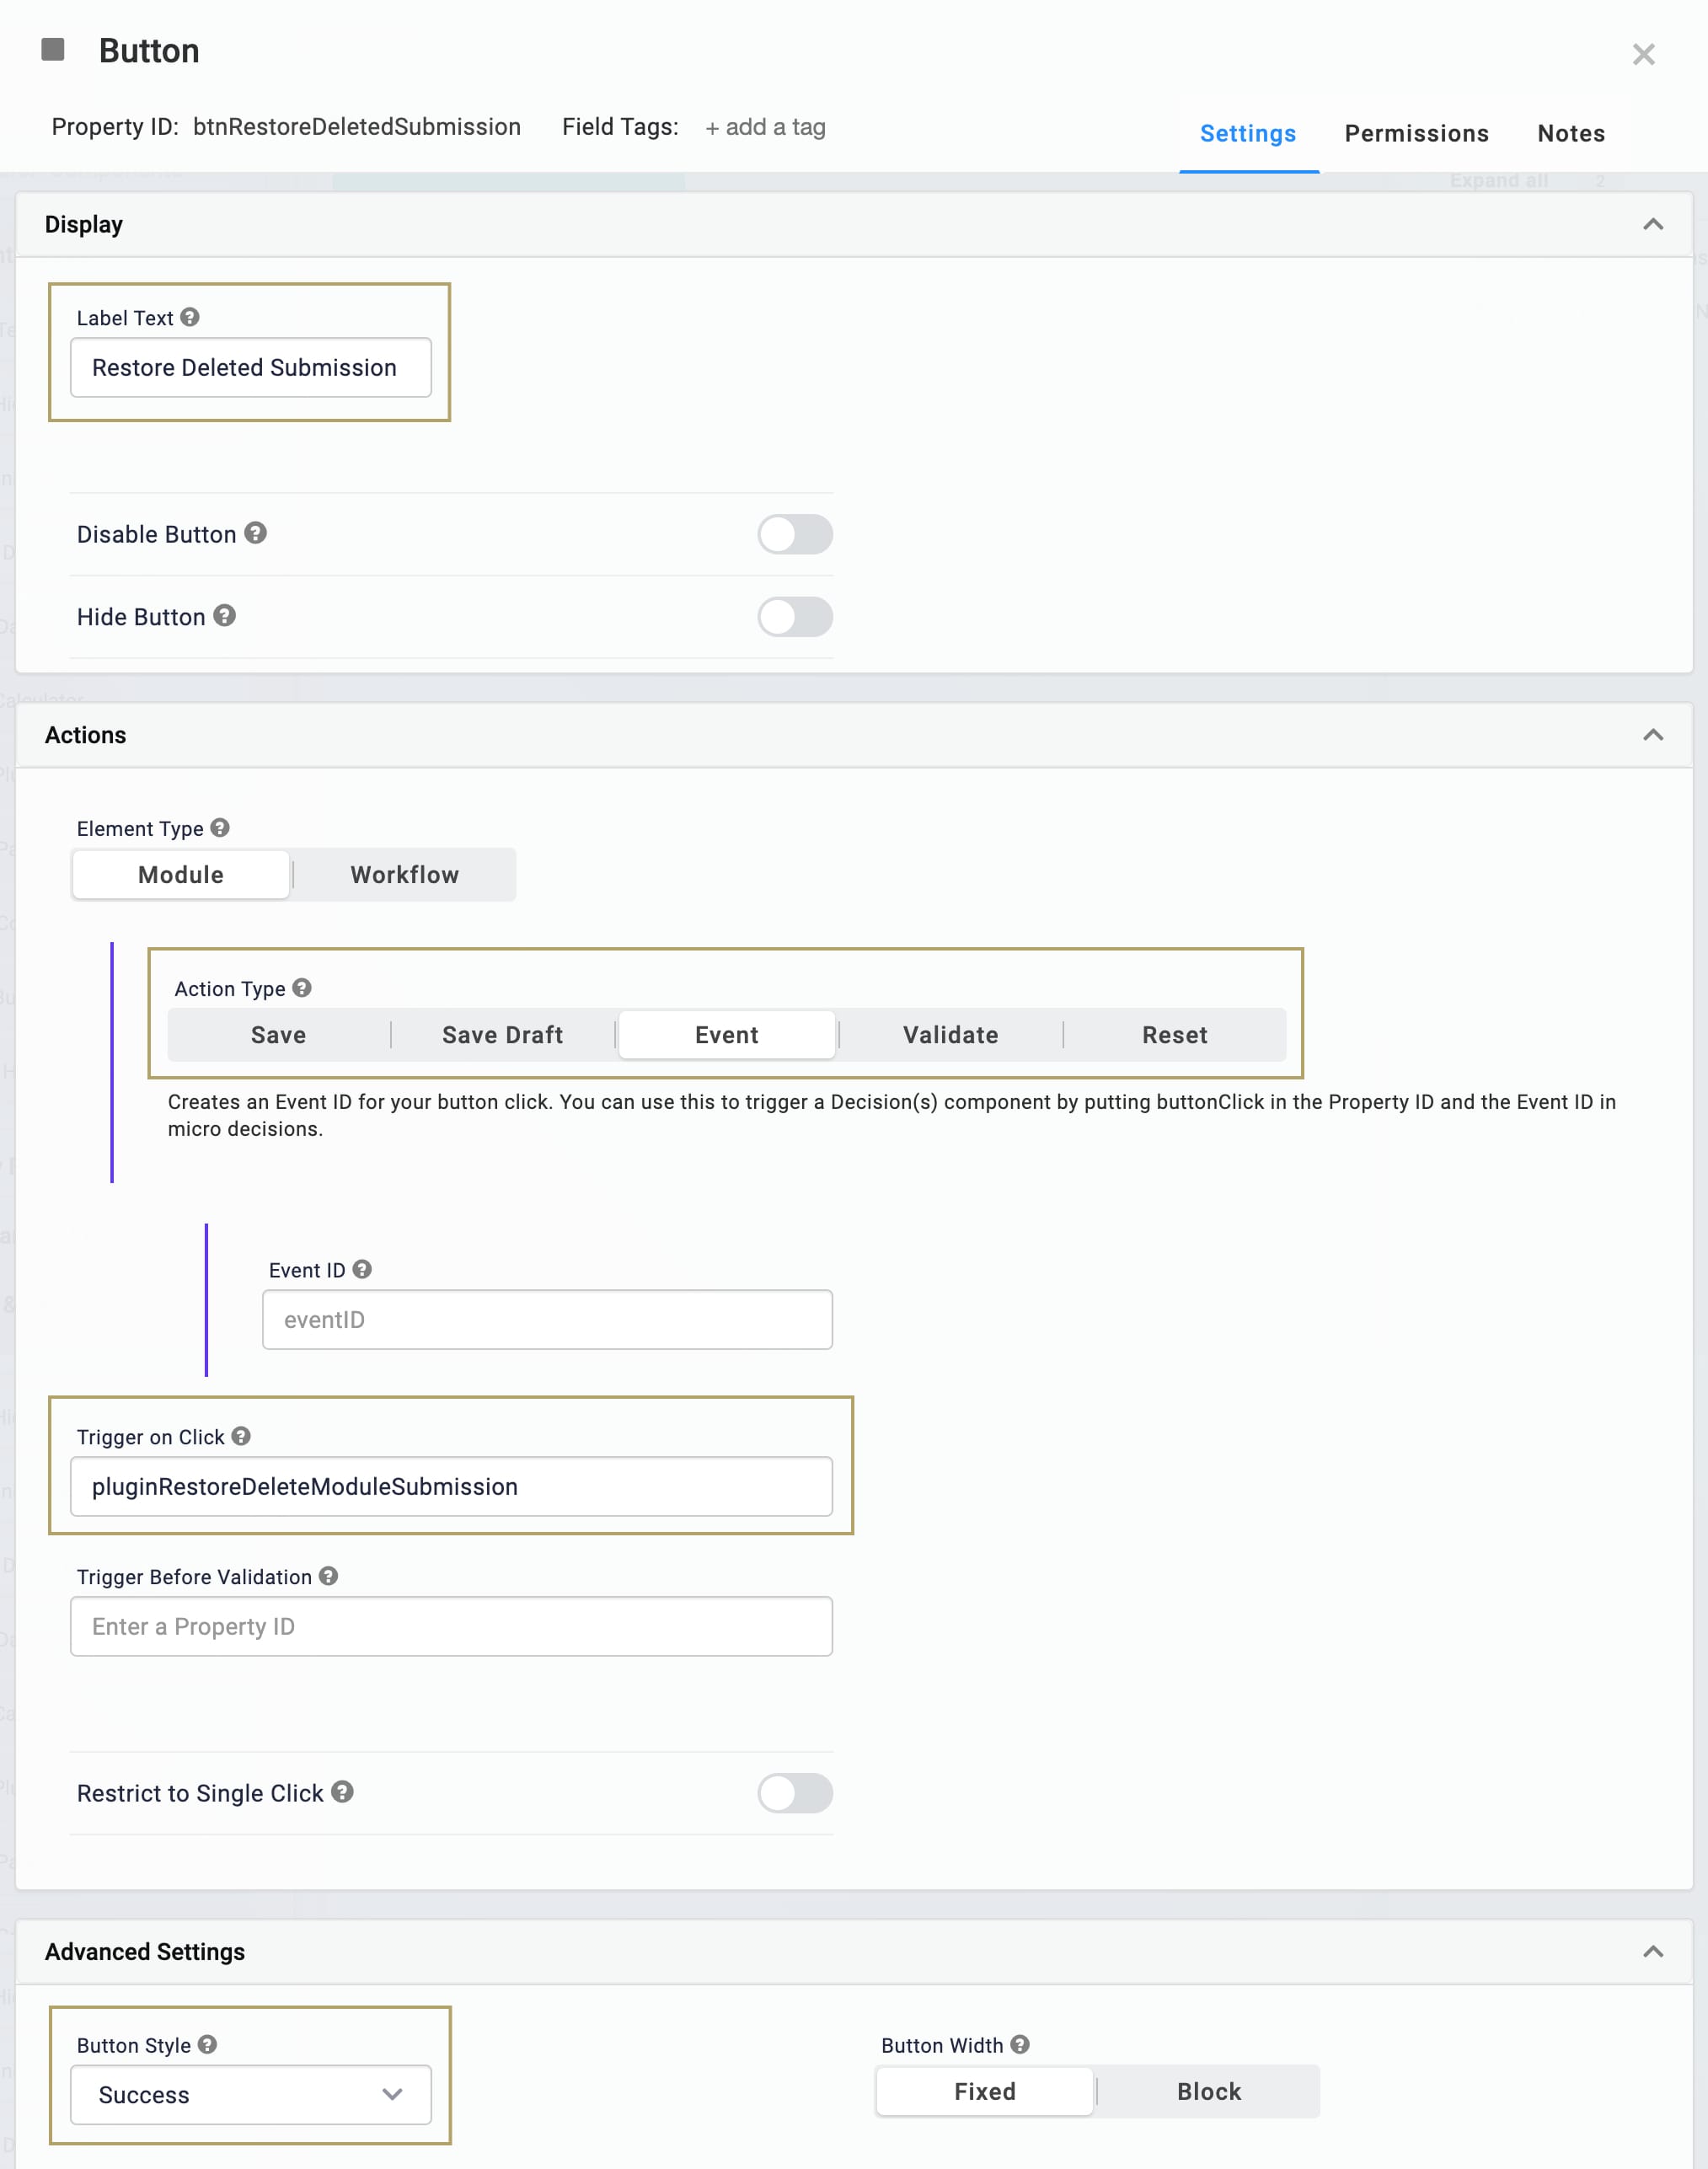
Click Save & Close.
Configure the Plug-In Component
Configure a third Plug-In component to restore previously deleted submissions.
Drag and drop a Plug-In component onto your canvas, placing it in the right column, below your
btnRestoreDeletedSubmissionButton Component.In the Property ID and Label Text fields, enter
pluginRestoreDeleteModuleSubmission.Set the Trigger Type to Manual.
From the Internal Services drop-down, select Restore a Deleted Module Submission. The Data Source URL autopopulates.
In the Data Source URL field, replace
{moduleId}with{{data.moduleId}}and{submissionId}with{{data.submissionDelete}}.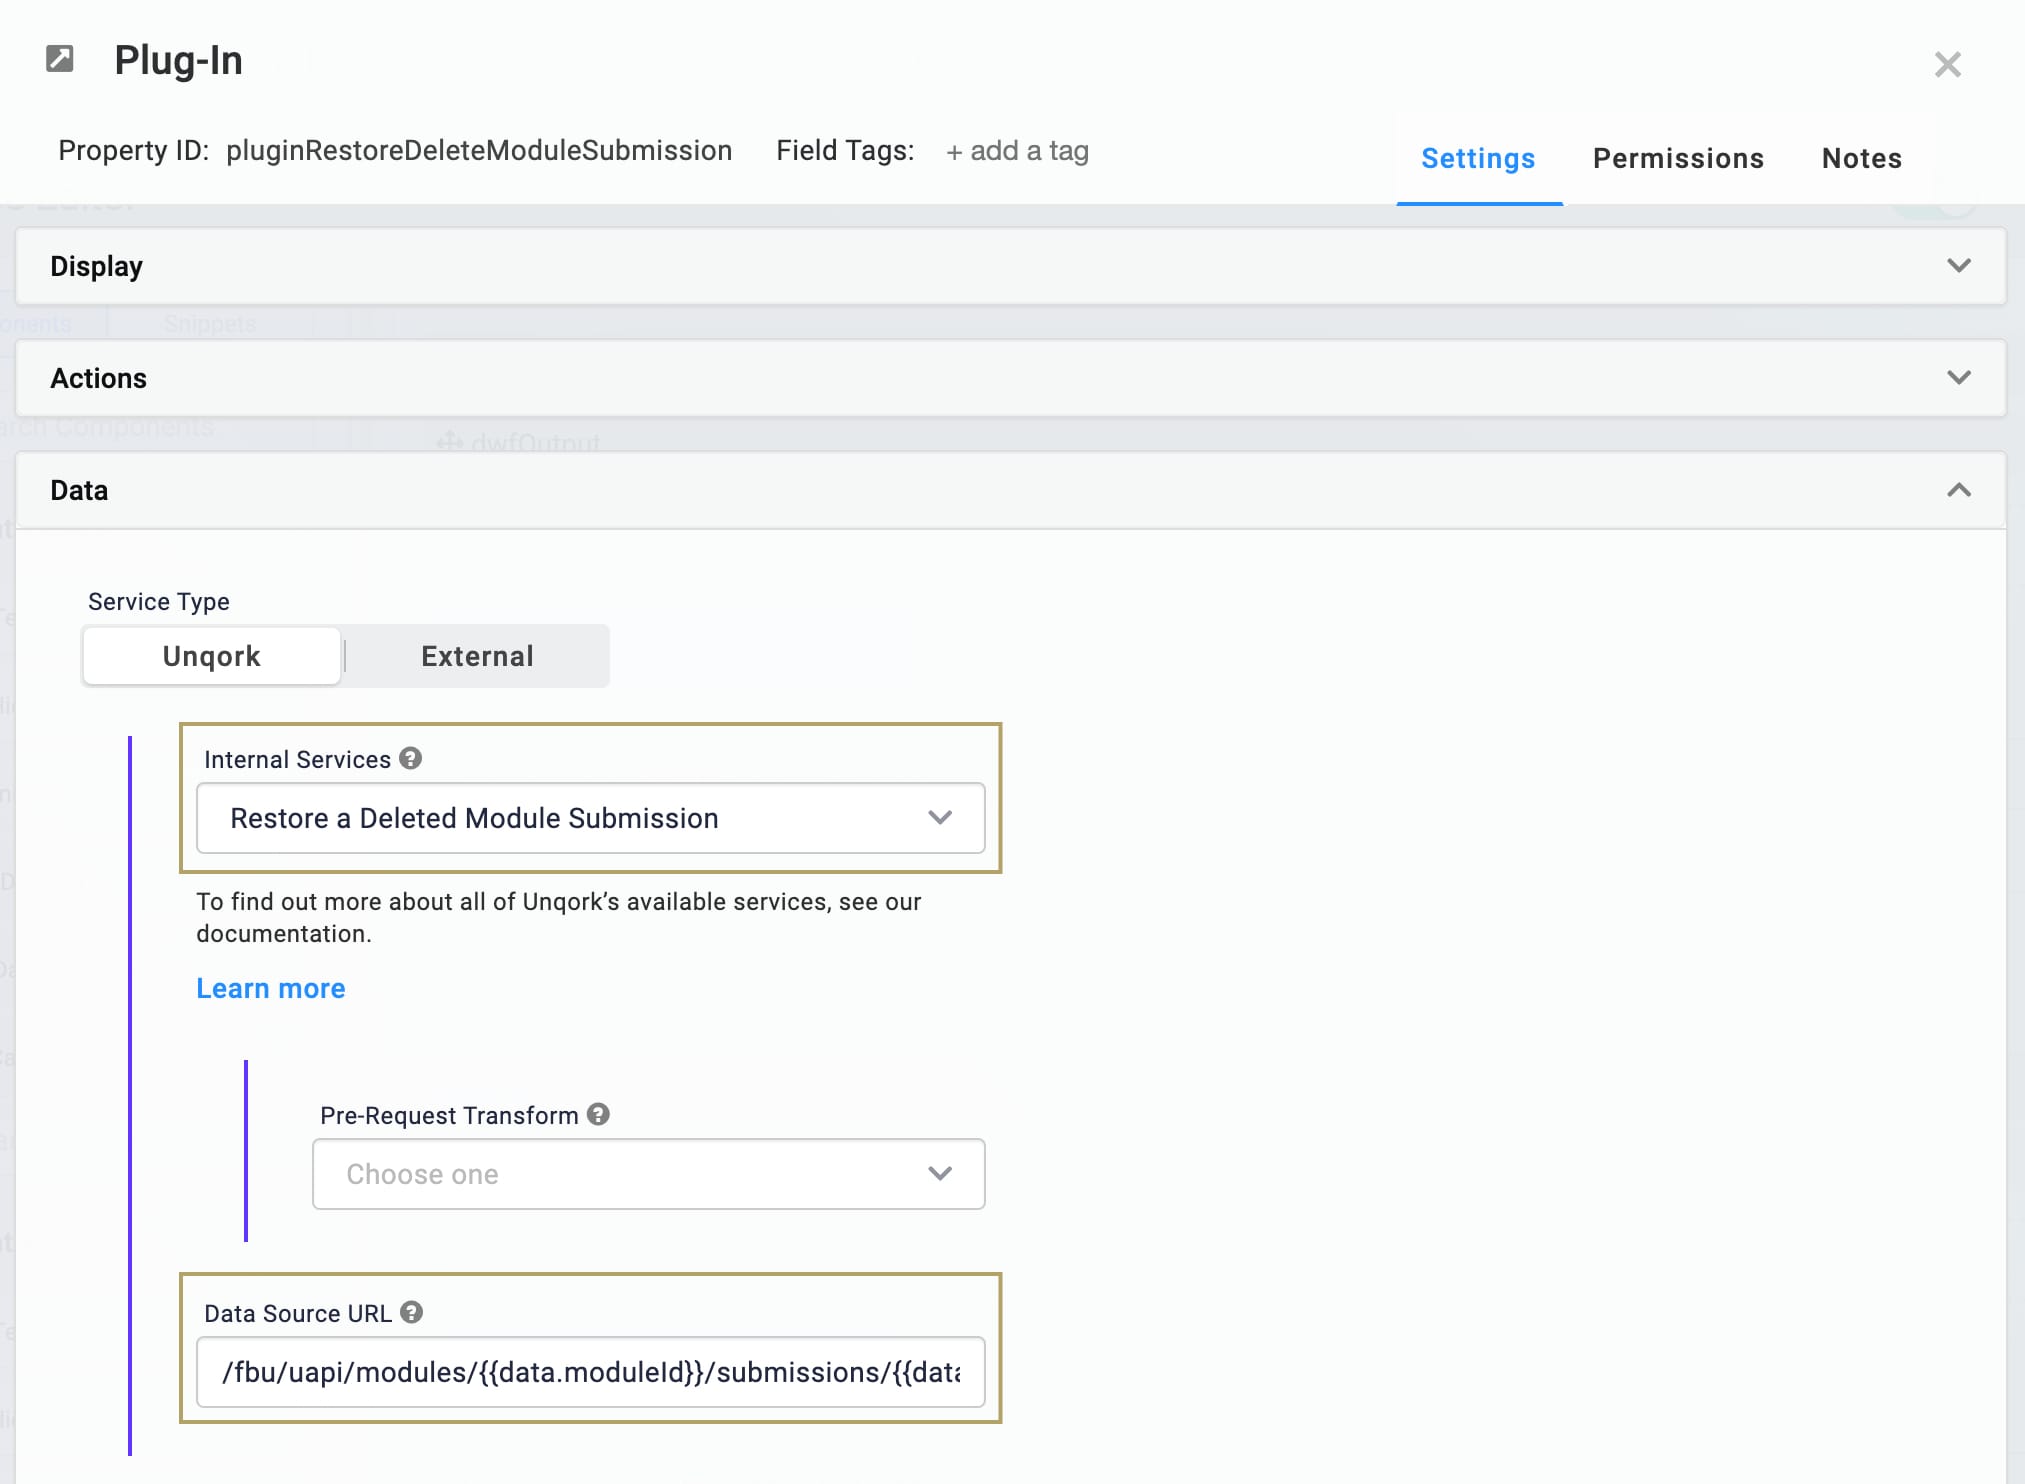
Click Save & Close.
Save your module.
Here’s how the final configuration looks in the Module Builder:
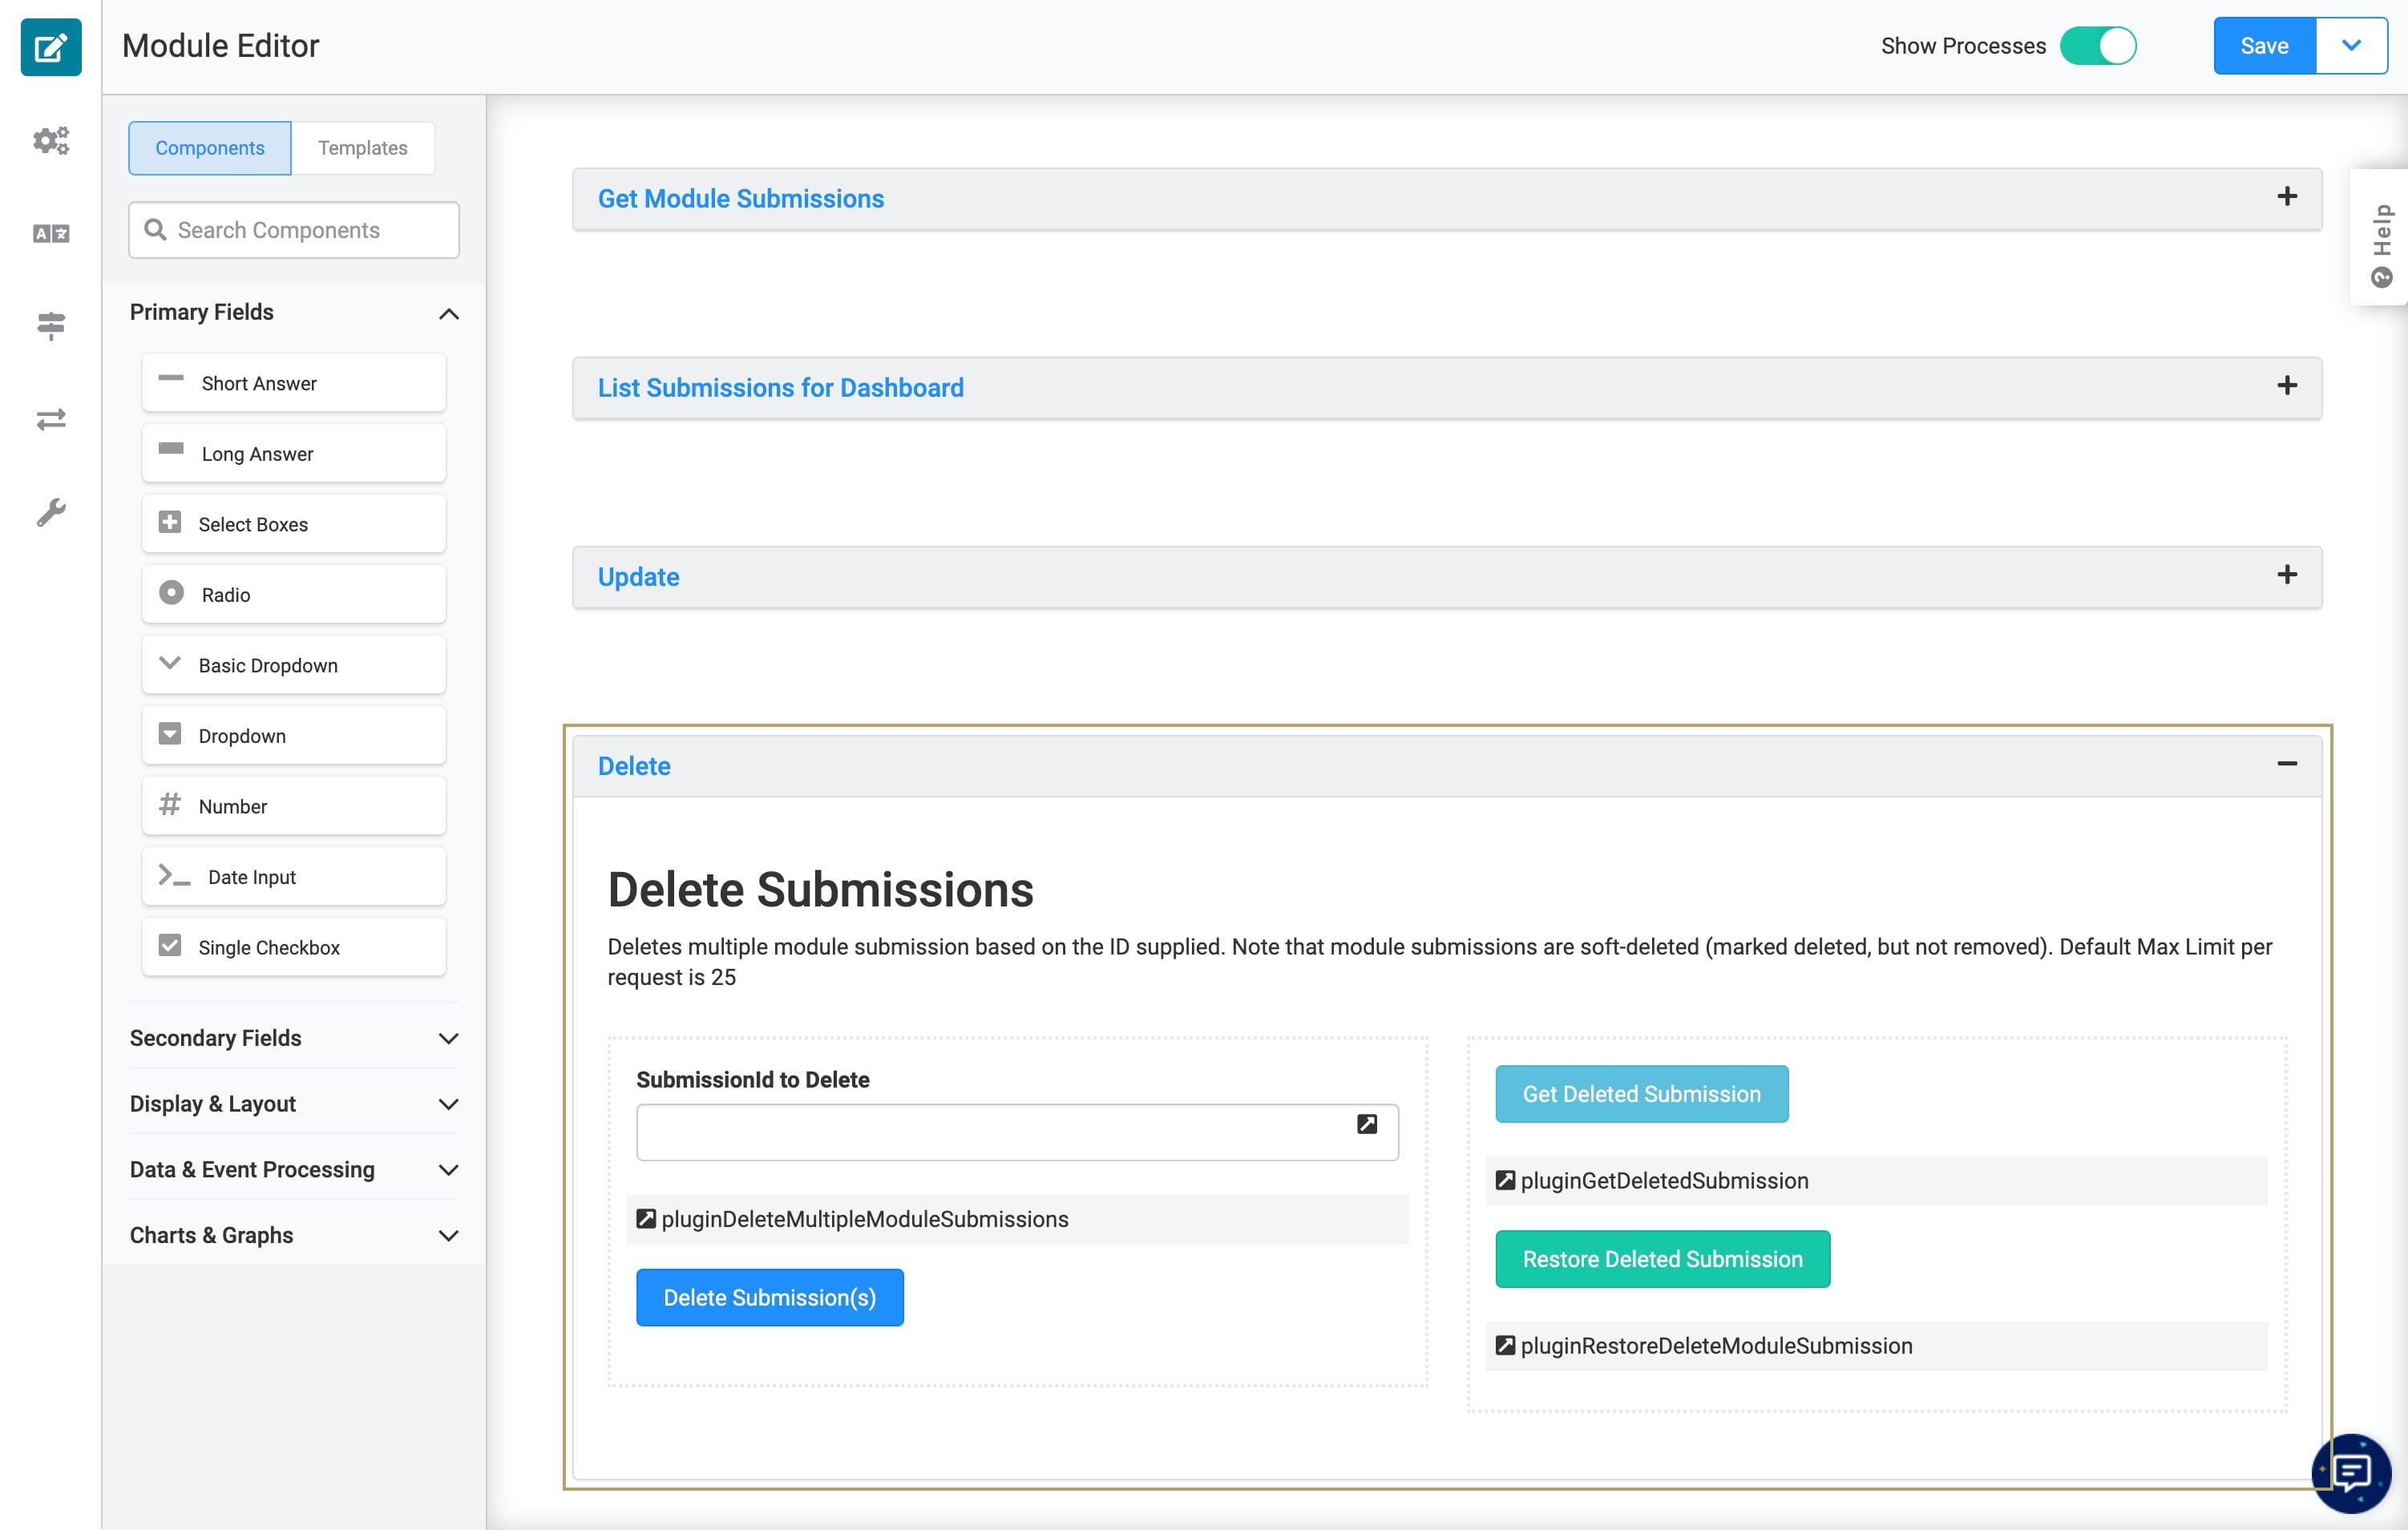
The image above uses optional HTML Element components, which allow you to display a header and description in the Panel component.