This how-to guide combines Calculator and Plug-In components to make a remote execute call.
In this guide, you'll create the following modules:
Front-End Module (1): Manages the front-end functions, so your end-user can select inputs for a insurance cost calculation.
Back-End Module (2): Manages the back-end functions and includes the module ID used by your remote execute.
These instructions assume you have a new Front-End module open, saved, and with a title.
Module 1 Configuration: Front-End Module
The Front-End module in this example collects details on items that the end-user is insuring. Based on the calculations of the Back-End module, a calculated insurance rate displays in an additional field.
Configure the Radio Buttons Component
Begin by configuring a Radio Buttons component to ask end-users what they're insuring.
In the Module Builder, drag and drop a Radio Buttons component onto your canvas.
In the Property ID field, enter
insuredAsset.In the Label Text field, enter
What do you need to insure?.In the Values table, enter the following:
#
Label
Value
1
House
house
2
Car
car
3
Boat
boat
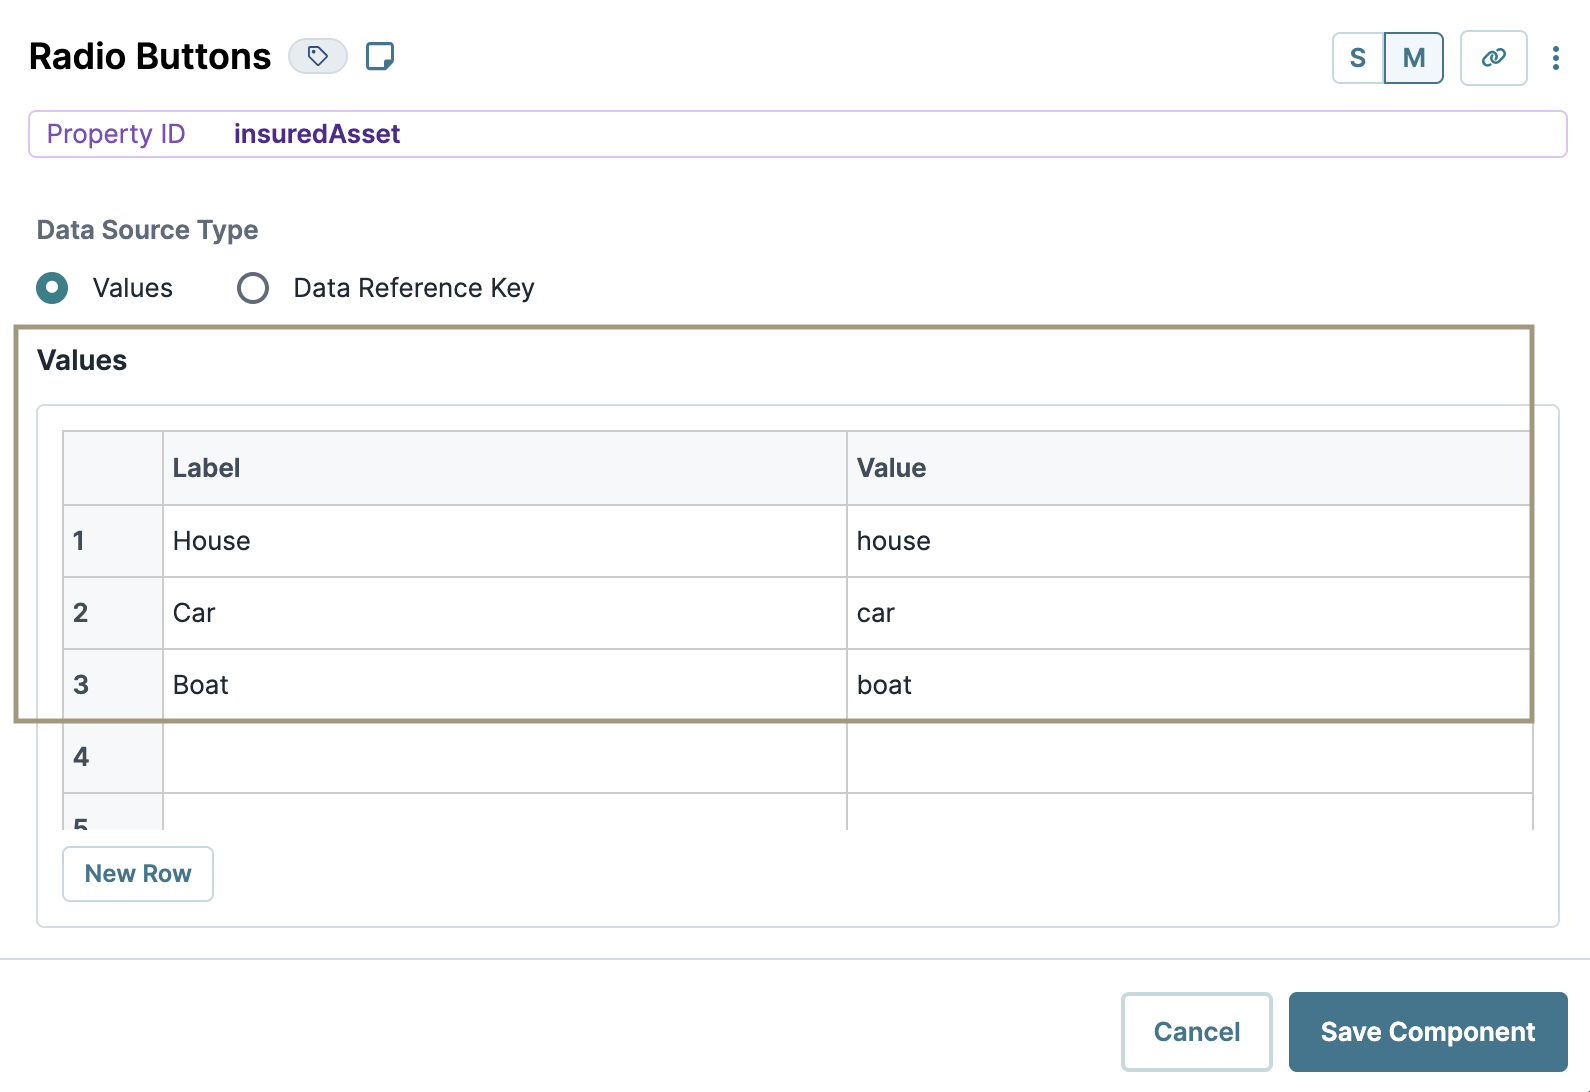
Click Save Component.
Configure the Number Component
Next, use a Number component to add a field that asks for the age of the end-user's insured asset.
Drag and drop a Number component onto your canvas, placing it below your Radio Buttons component.
In the Property ID field, enter
assetAge.In the Label Text field, enter
How old is your home, vehicle, or boat?.Click Save Component.
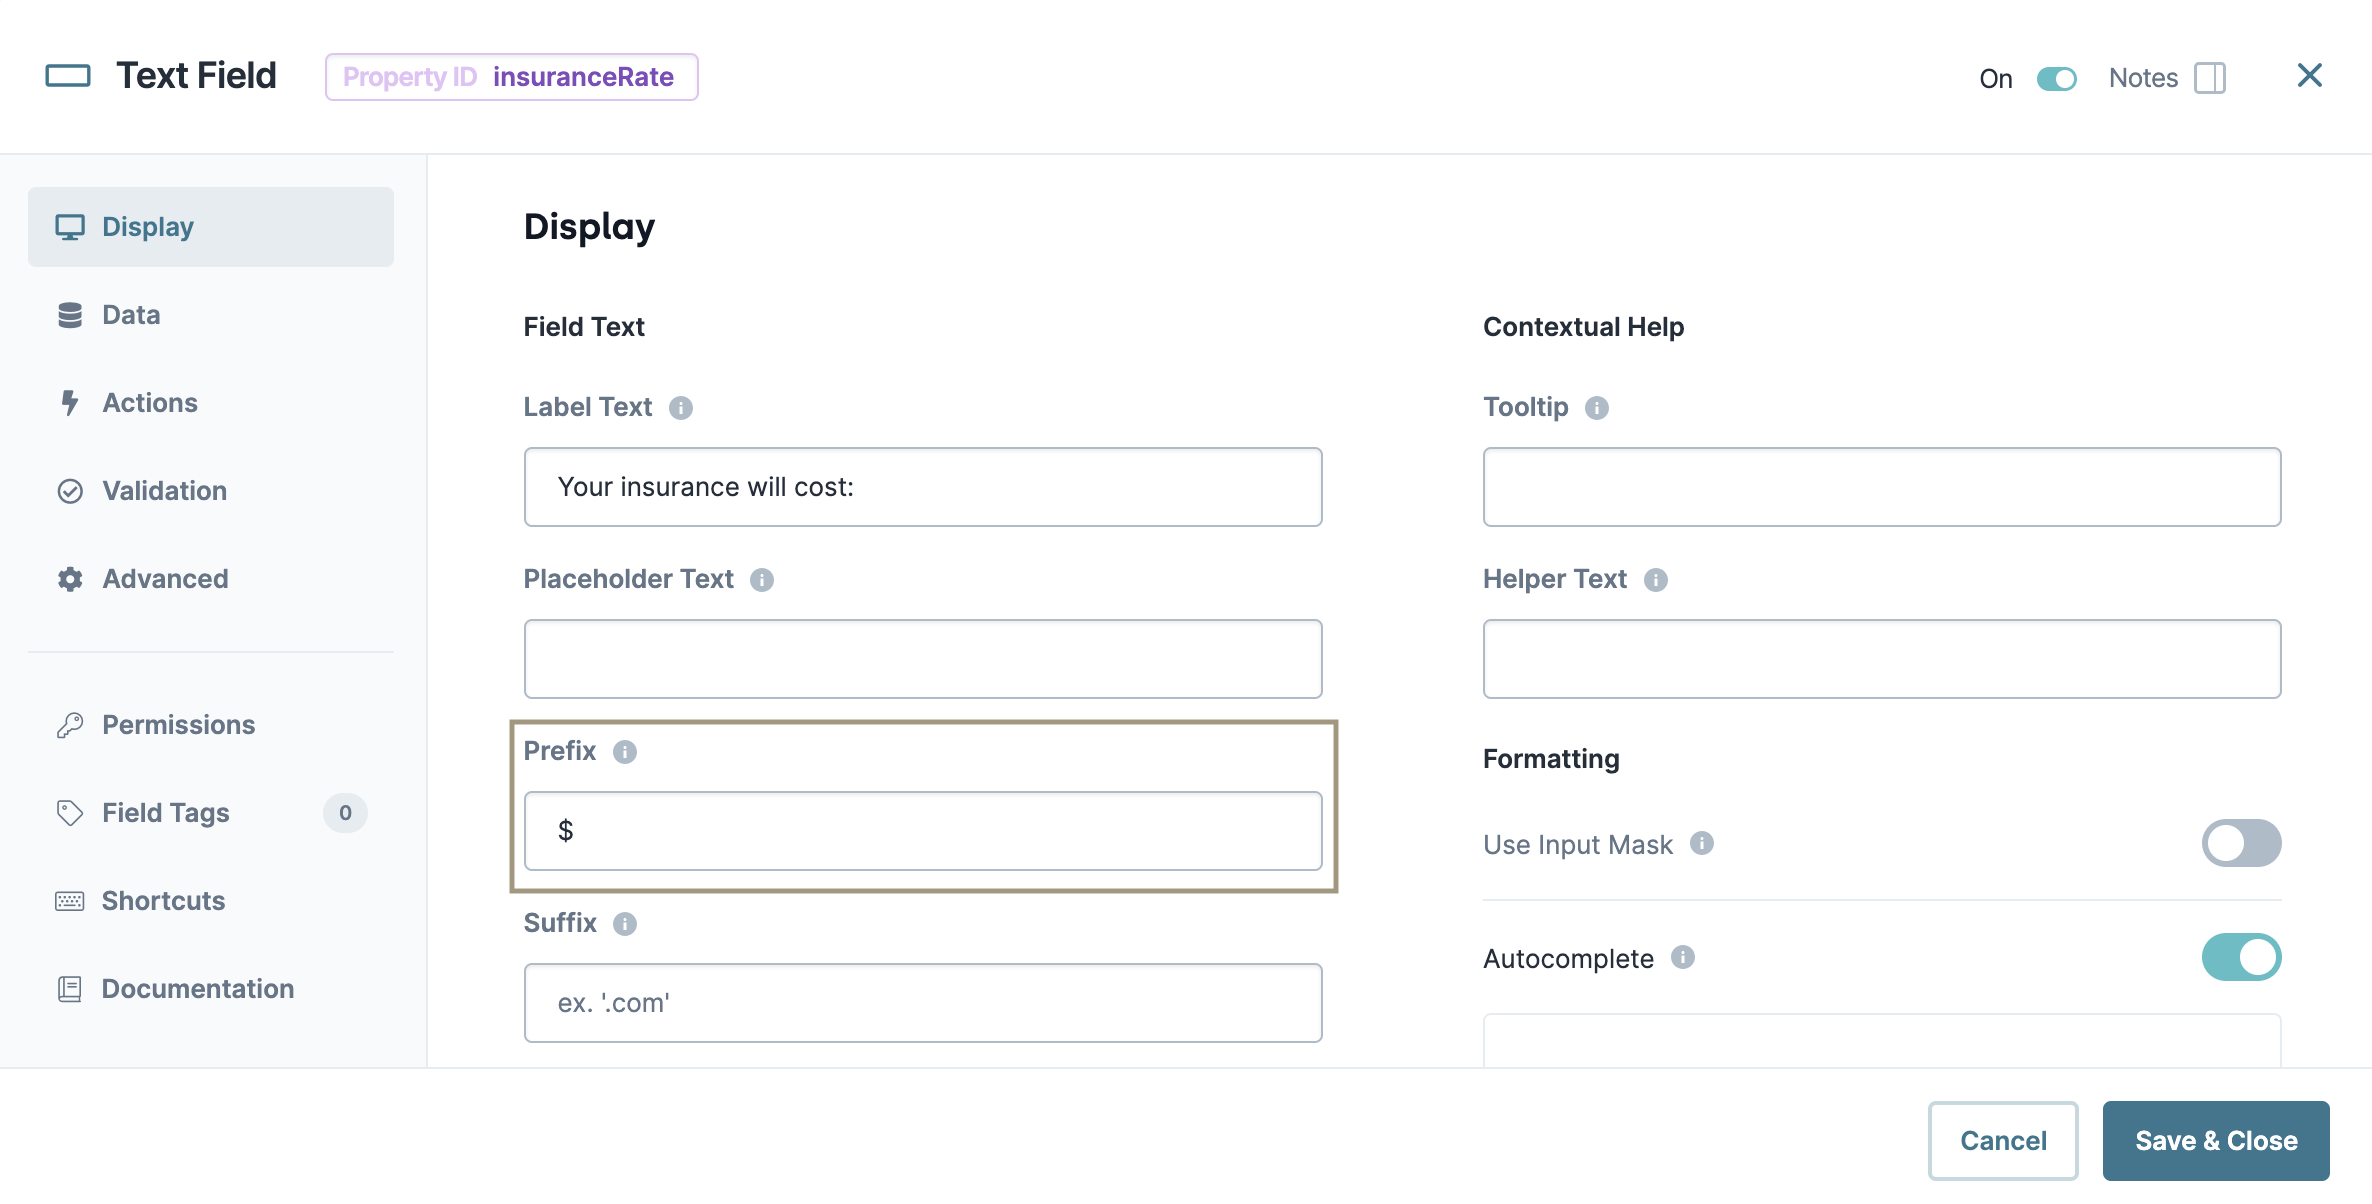
Configure the Text Field Component
Use a Text Field component to display the insurance cost for the asset. And because this field stores a monetary value, you'll set a dollar sign prefix.
Drag and drop a Text Field component onto your canvas, placing it below your Number component.
In the Property ID field, enter
insuranceRate.In the Label Text field, enter
Your insurance will cost:.In the Prefix field, enter
$.
Click Save Component.
Save your module.
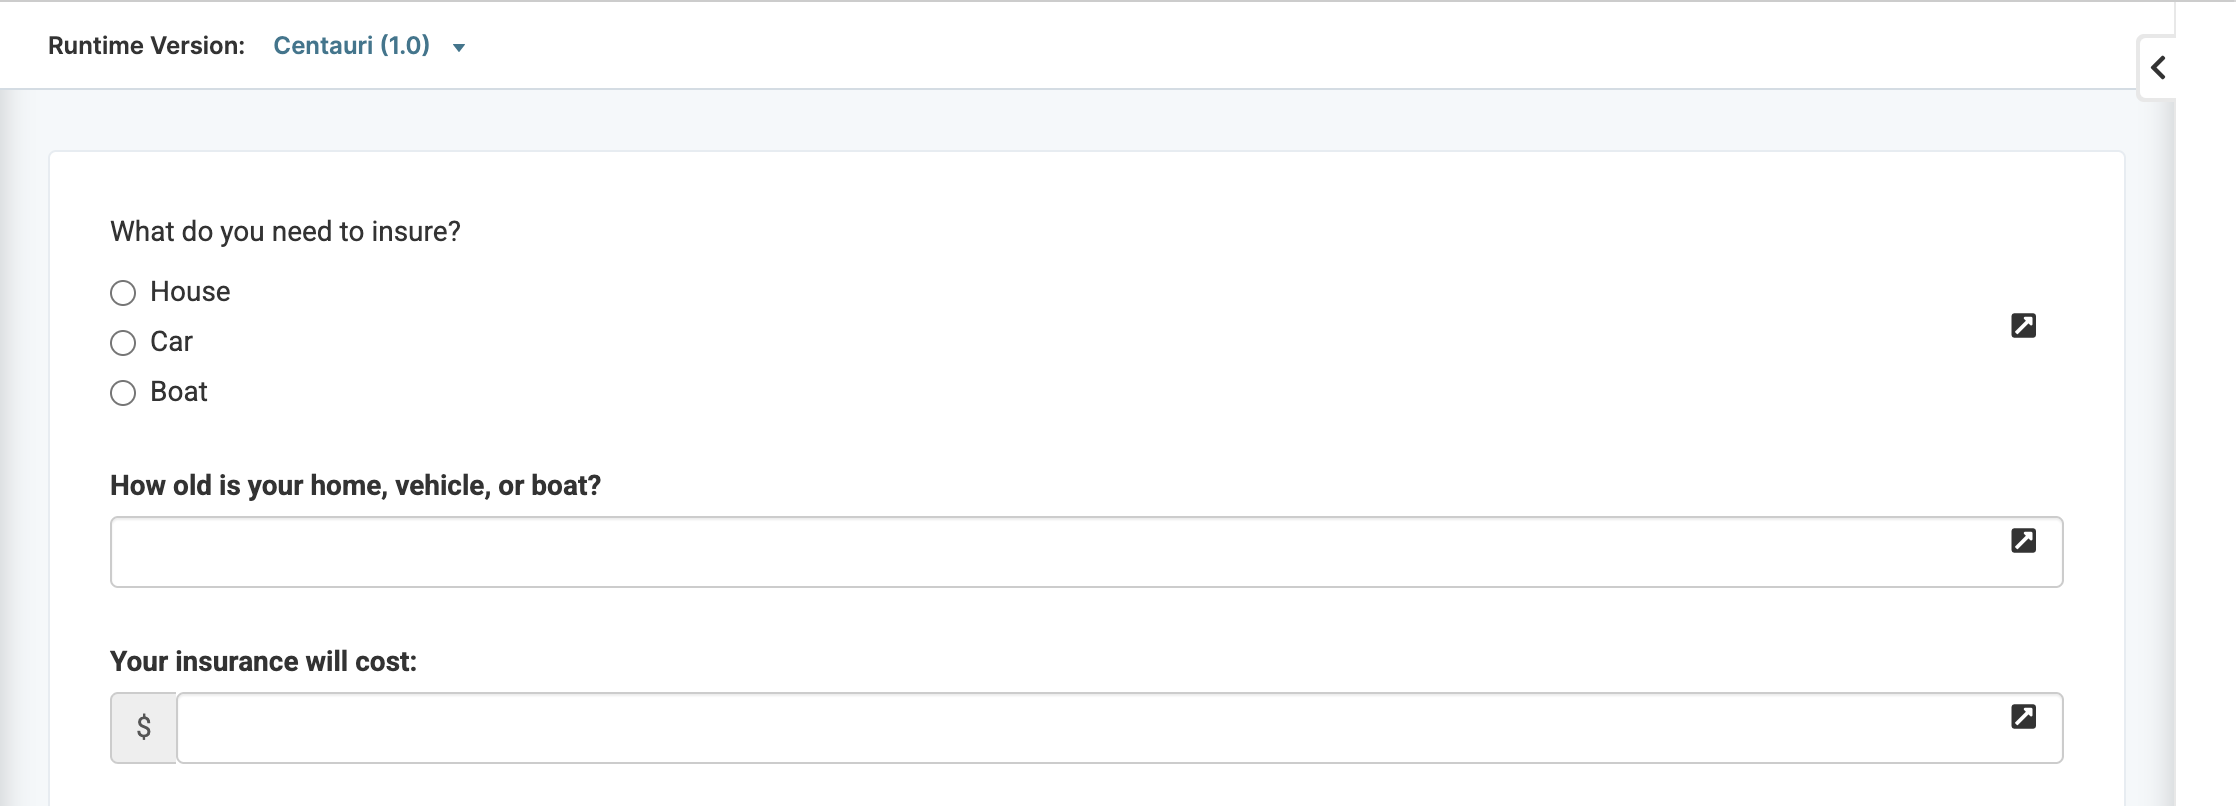
Here's how your Front-End module looks in the Module Builder:
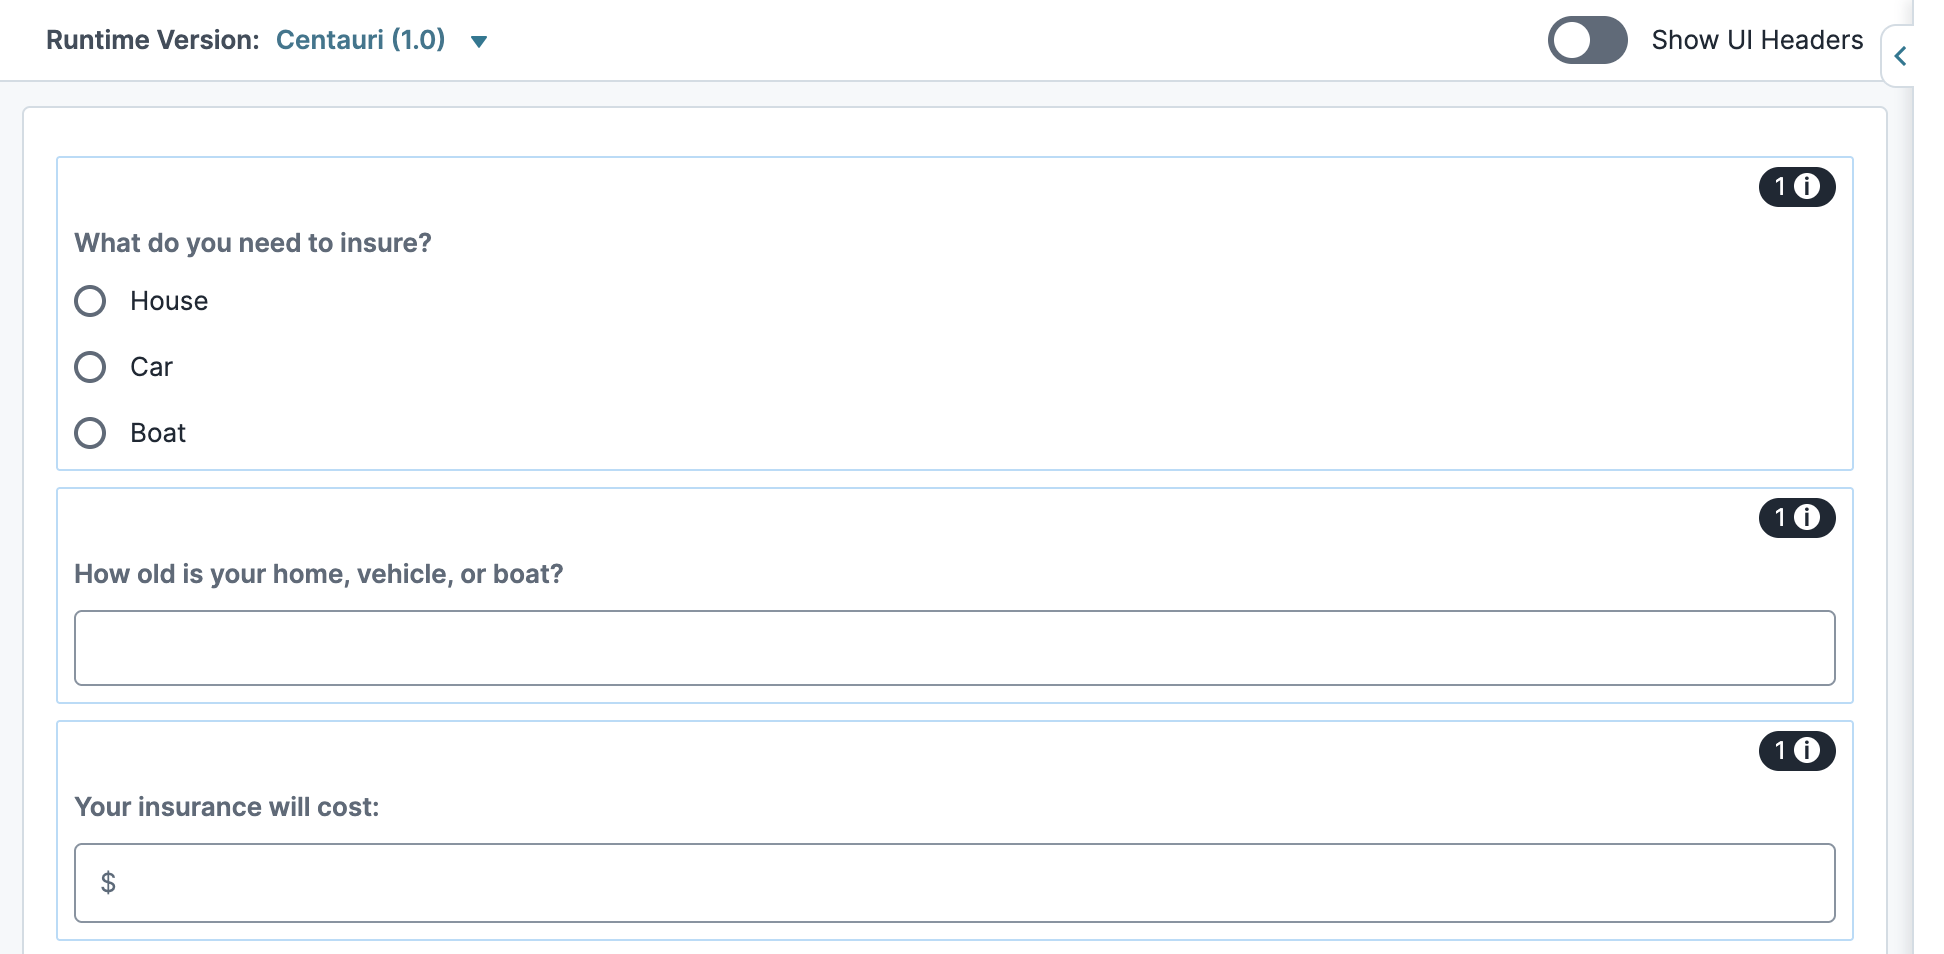
Module 2 Configuration: Back-End Module
Next, create a new API module for the Back-End module. This module does not run any APIs, but to keep end-users from accessing the module. The Back-End module stores the data collected in your Front-End module and uses it to calculate the insurance rate.
Edit Default Components
Because this module is an API module, the Server Side Execution Only setting is enabled by default. Setting your module to server-side execute, your module becomes inaccessible to anyone without Module Builder access.
The Server Side Execution Only setting enables HTTP status code outputs in API modules. To learn more about HTTP Output, visit our HTTP Status Codes article.
Before adding components to your Back-End module, you'll remove the default API module components:
In your API module, remove the
panelInfoPanel component, and its contents.In the
panelRequest,panelConfig, andpanelResponsePanel components, delete all contents, leaving three empty Panel components.Save your module.
Configure the Hidden Components
First, you'll add Hidden components to store the data from your Front-End module.
Drag and drop three Hidden components inside the
panelRequestPanel component.In the Property ID and Label Text field, enter the following for each component:
#
Property ID
Label Text
1
insuredAsset
insuredAsset
2
assetAge
assetAge
Drag and drop another Hidden component inside the
panelResponsePanel component.In the Property ID and Label Text fields, enter
insuranceRate.Click Save Component for each component as you add it.
Configure the calcHouse Calculator Component
This Calculator component uses the formula to calculate the home insurance rate.
Drag and drop a Calculator component inside the
panelConfigPanel component.In the Property ID and Canvas Label Text fields, enter
calcHouse.In the Inputs table, enter the following:
#
Source
Alias
Required
1
assetAge
A
 (unchecked)
In the Outputs table, enter the following:
#
Source
Formula
1
insuranceRate
=A*2

Click Save Component.
Configure the calcCar Calculator Component
This Calculator component uses the formula to calculate the car insurance rate.
Drag and drop a Calculator component onto your canvas, placing it below your
calcHouseCalculator component.In the Property ID and Canvas Label Text fields, enter
calcCar.In the Inputs table, enter the following:
#
Source
Alias
Required
1
assetAge
A
(unchecked)In the Outputs table, enter the following:
#
Source
Formula
1
insuranceRate
=A

Click Save Component.
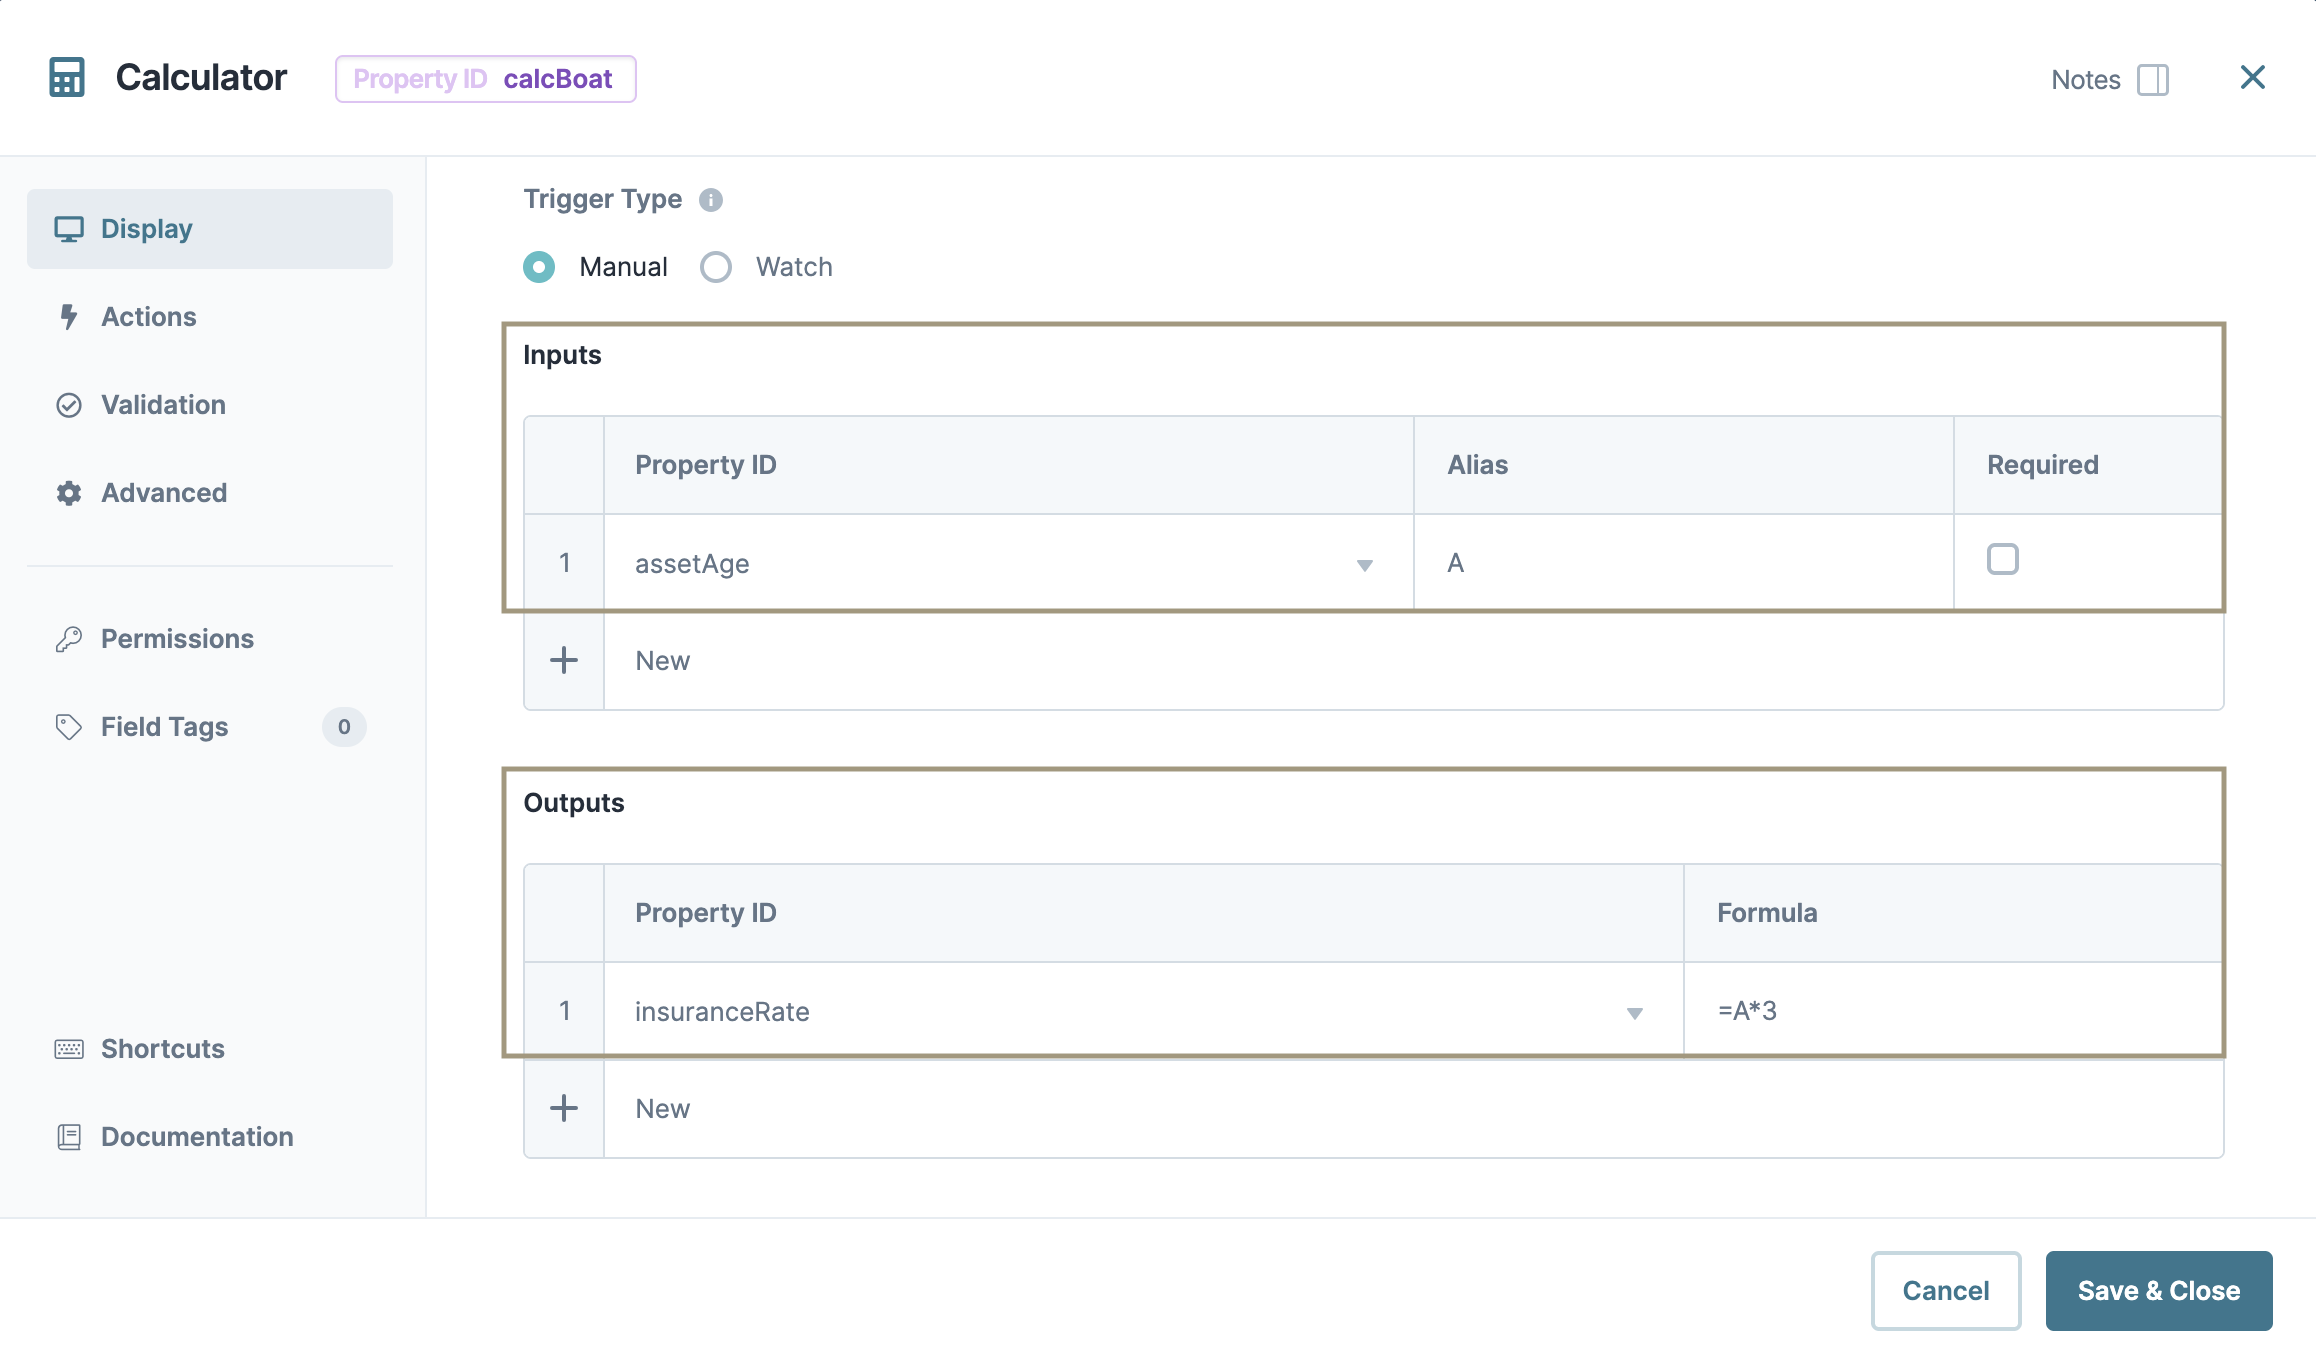
Configure the calcBoat Calculator Component
This Calculator component stores the formula to calculate your boat insurance rate.
Drag and drop a Calculator component onto your canvas, placing it below your
calcCarCalculator component.In the Property ID and Canvas Label Text fields, enter
calcBoat.In the Inputs table, enter the following:
#
Source
Alias
Required
1
assetAge
A
(unchecked)In the Outputs table, enter the following:
#
Source
Formula
1
insuranceRate
=A*3
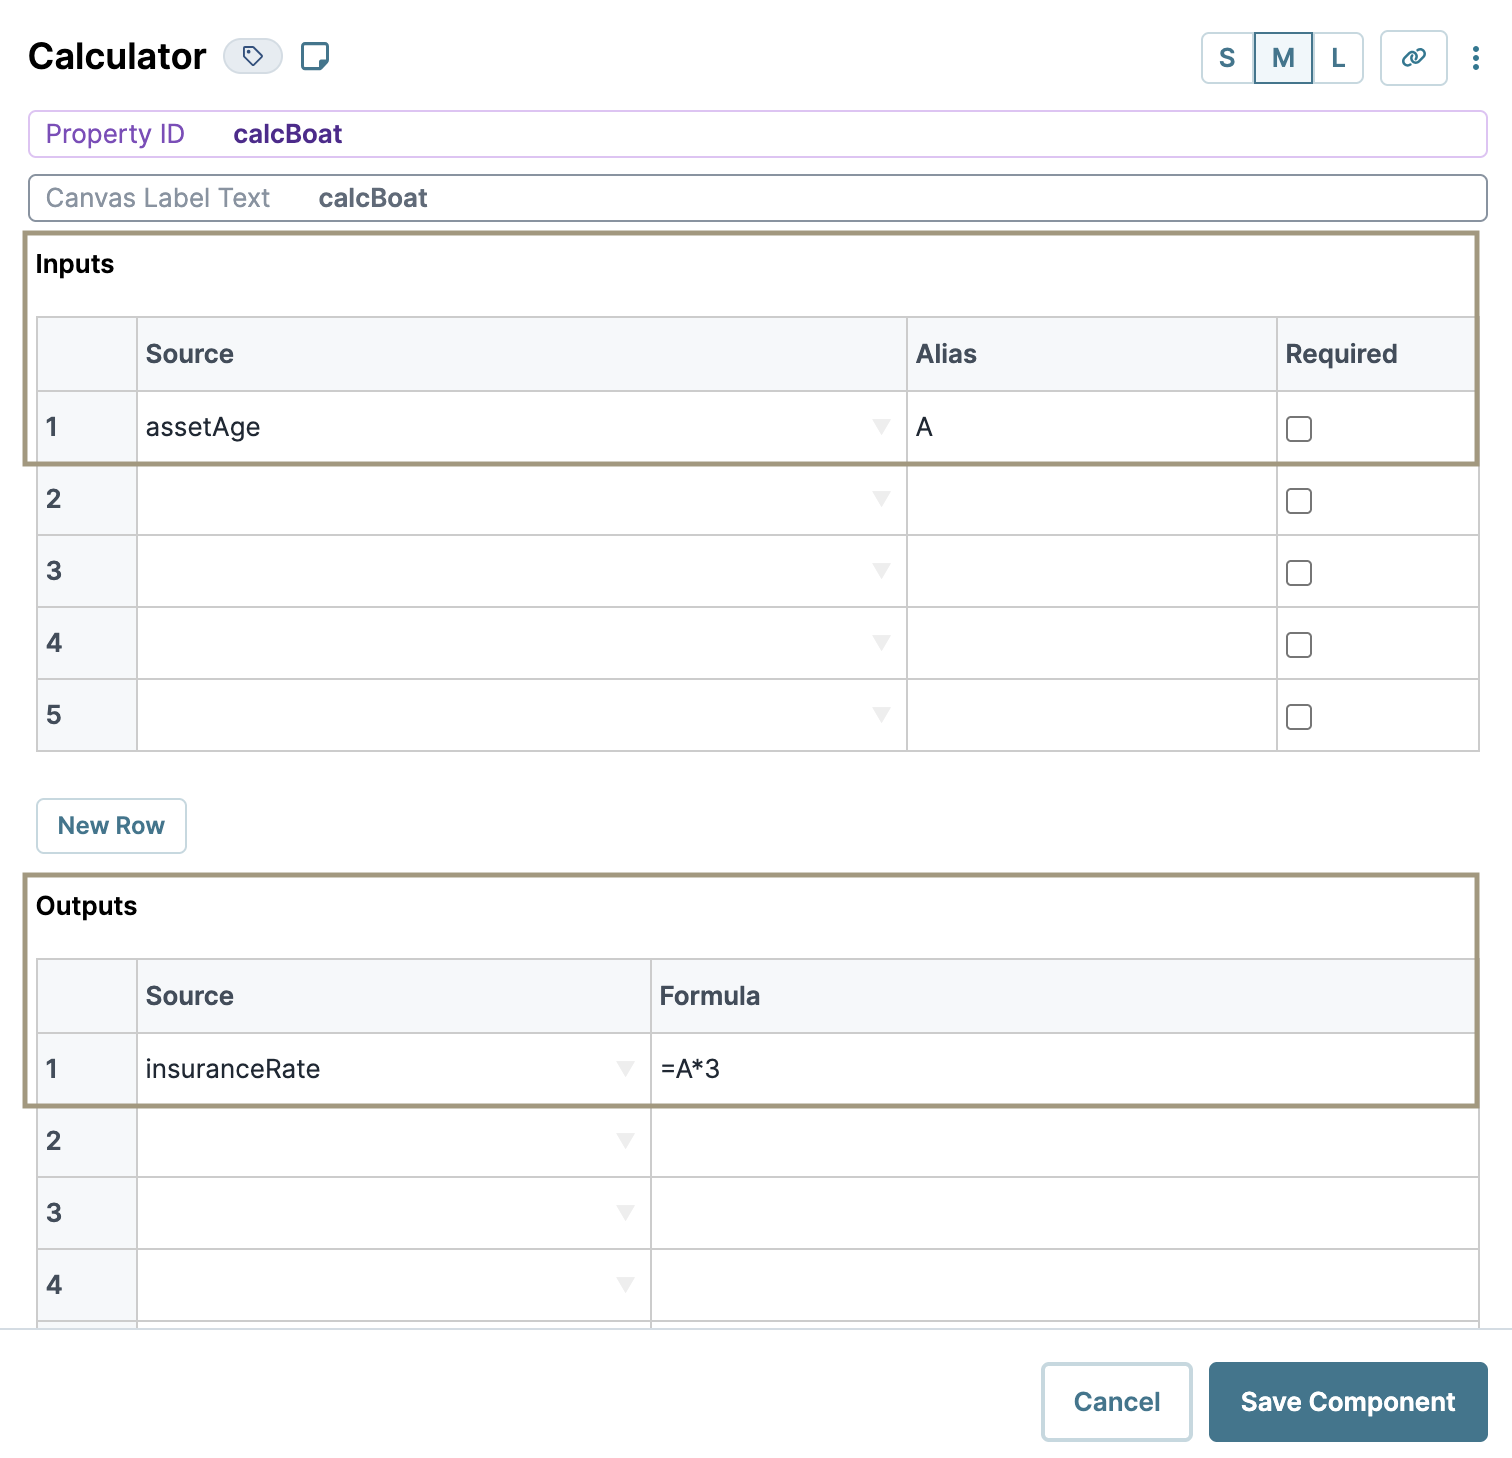
Click Save Component.
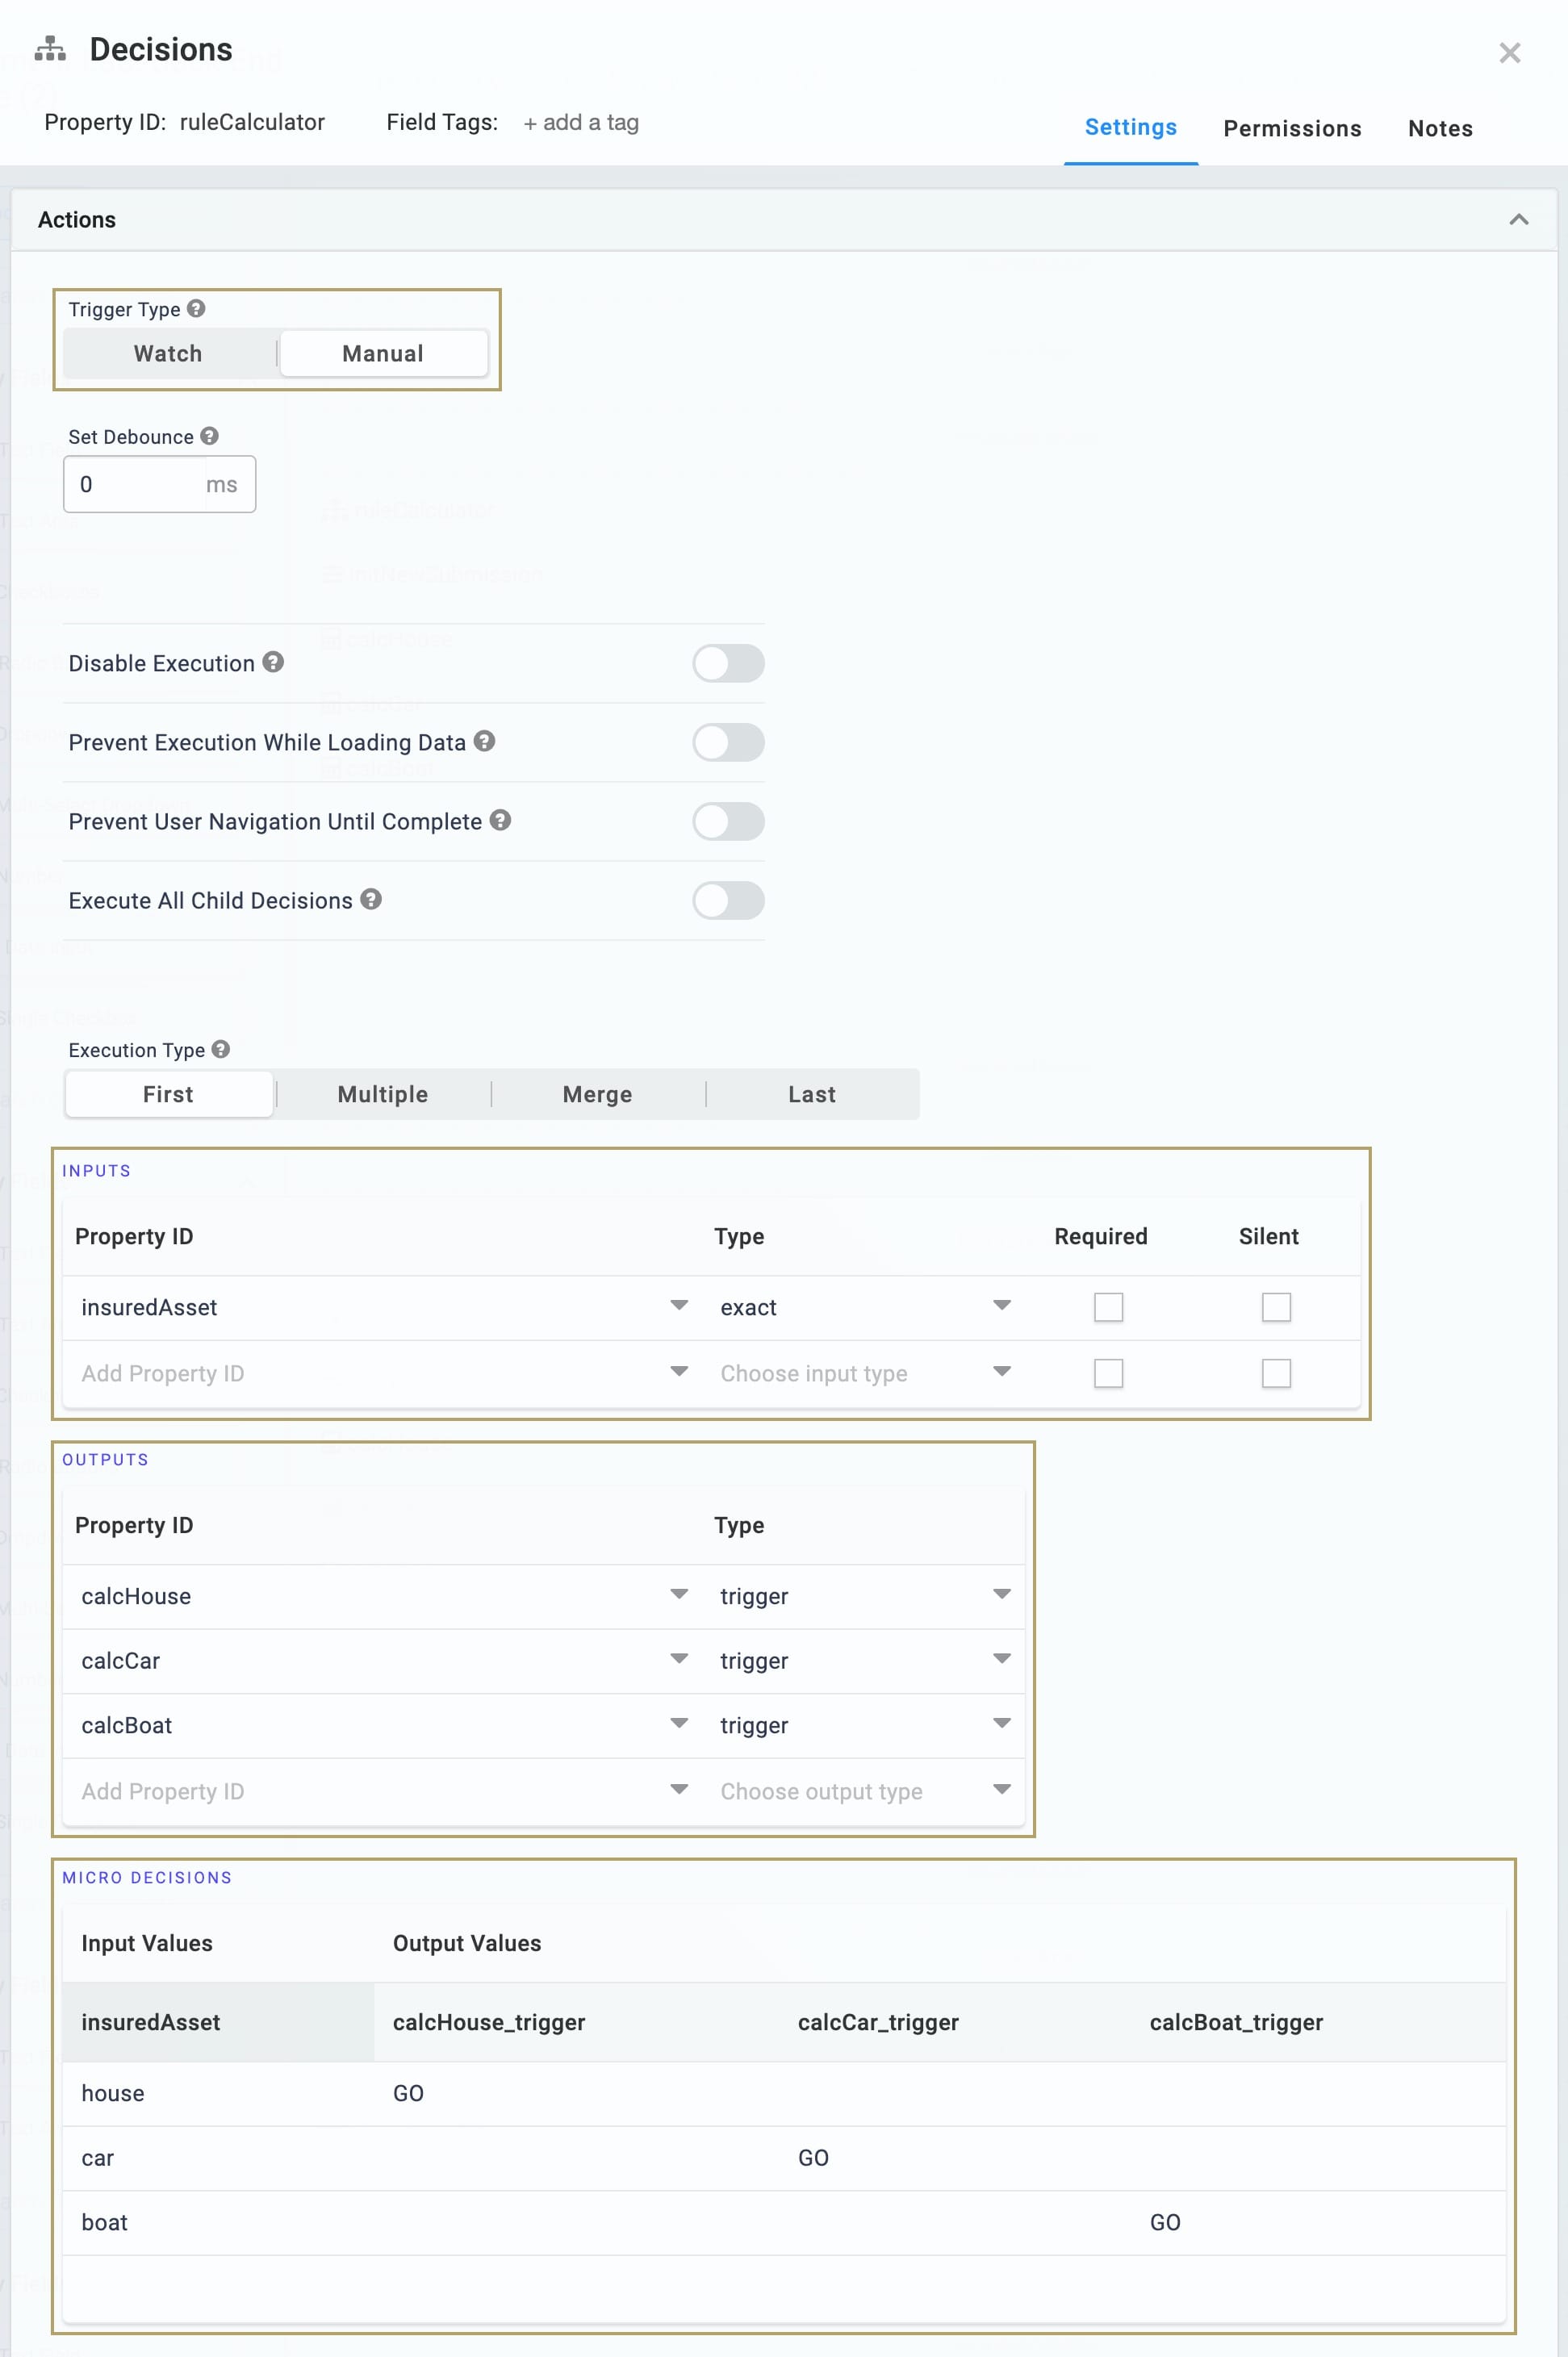
Configure the Decisions Component
To trigger the correct Calculator component, you must set up a rule using a Decisions component. Your insuredAsset Hidden component works as the input for your Decisions component. So, the value in insuredAsset determines which Calculator component is triggered.
Drag and drop a Decisions component inside your
panelConfigPanel component, above your Calculator components.In the Property ID and Canvas Label Text fields, enter
ruleCalculator.In the Inputs table, enter the following:
#
Source
Alias
Type
1
insuredAsset
exact
In the Outputs table, enter the following:
#
Property ID
Type
1
calcHouse
trigger
2
calcCar
trigger
3
calcBoat
trigger
In the Conditionals table, enter the following:
#
insuredAsset
calcHouse_trigger
calcCar_trigger
calcBoat_trigger
1
house
GO
2
car
GO
3
boat
GO
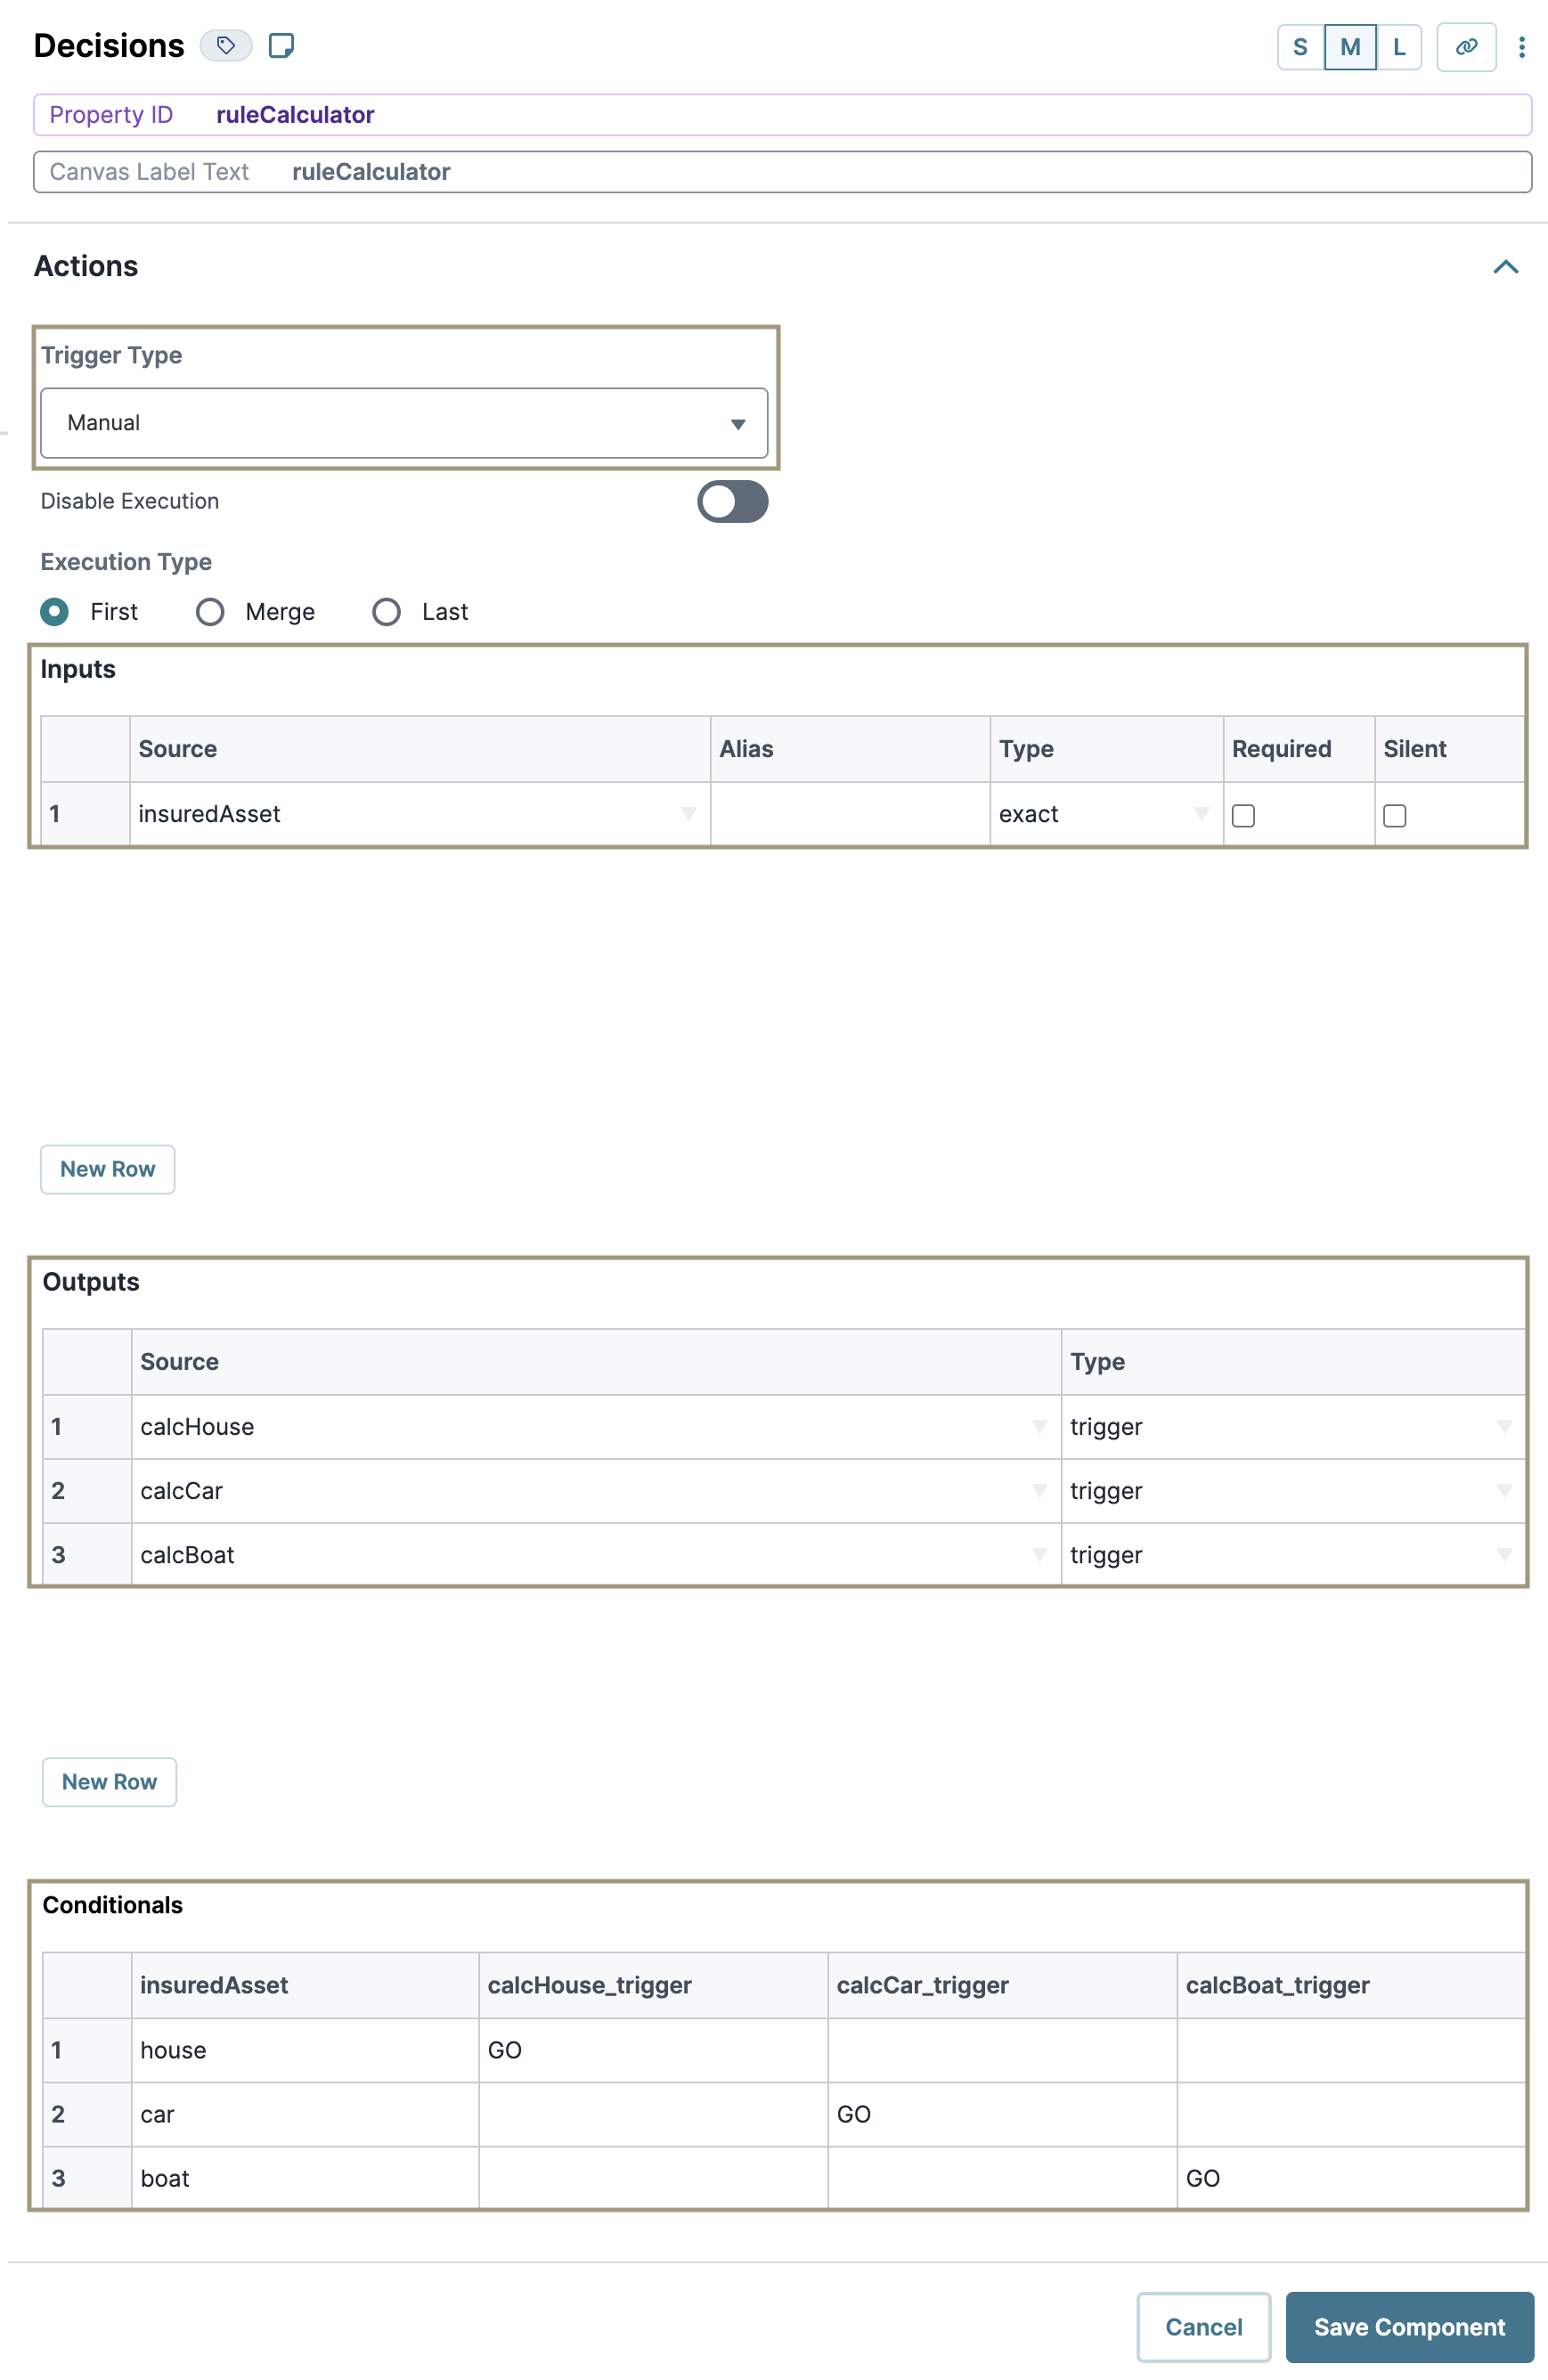
Click Save Component.
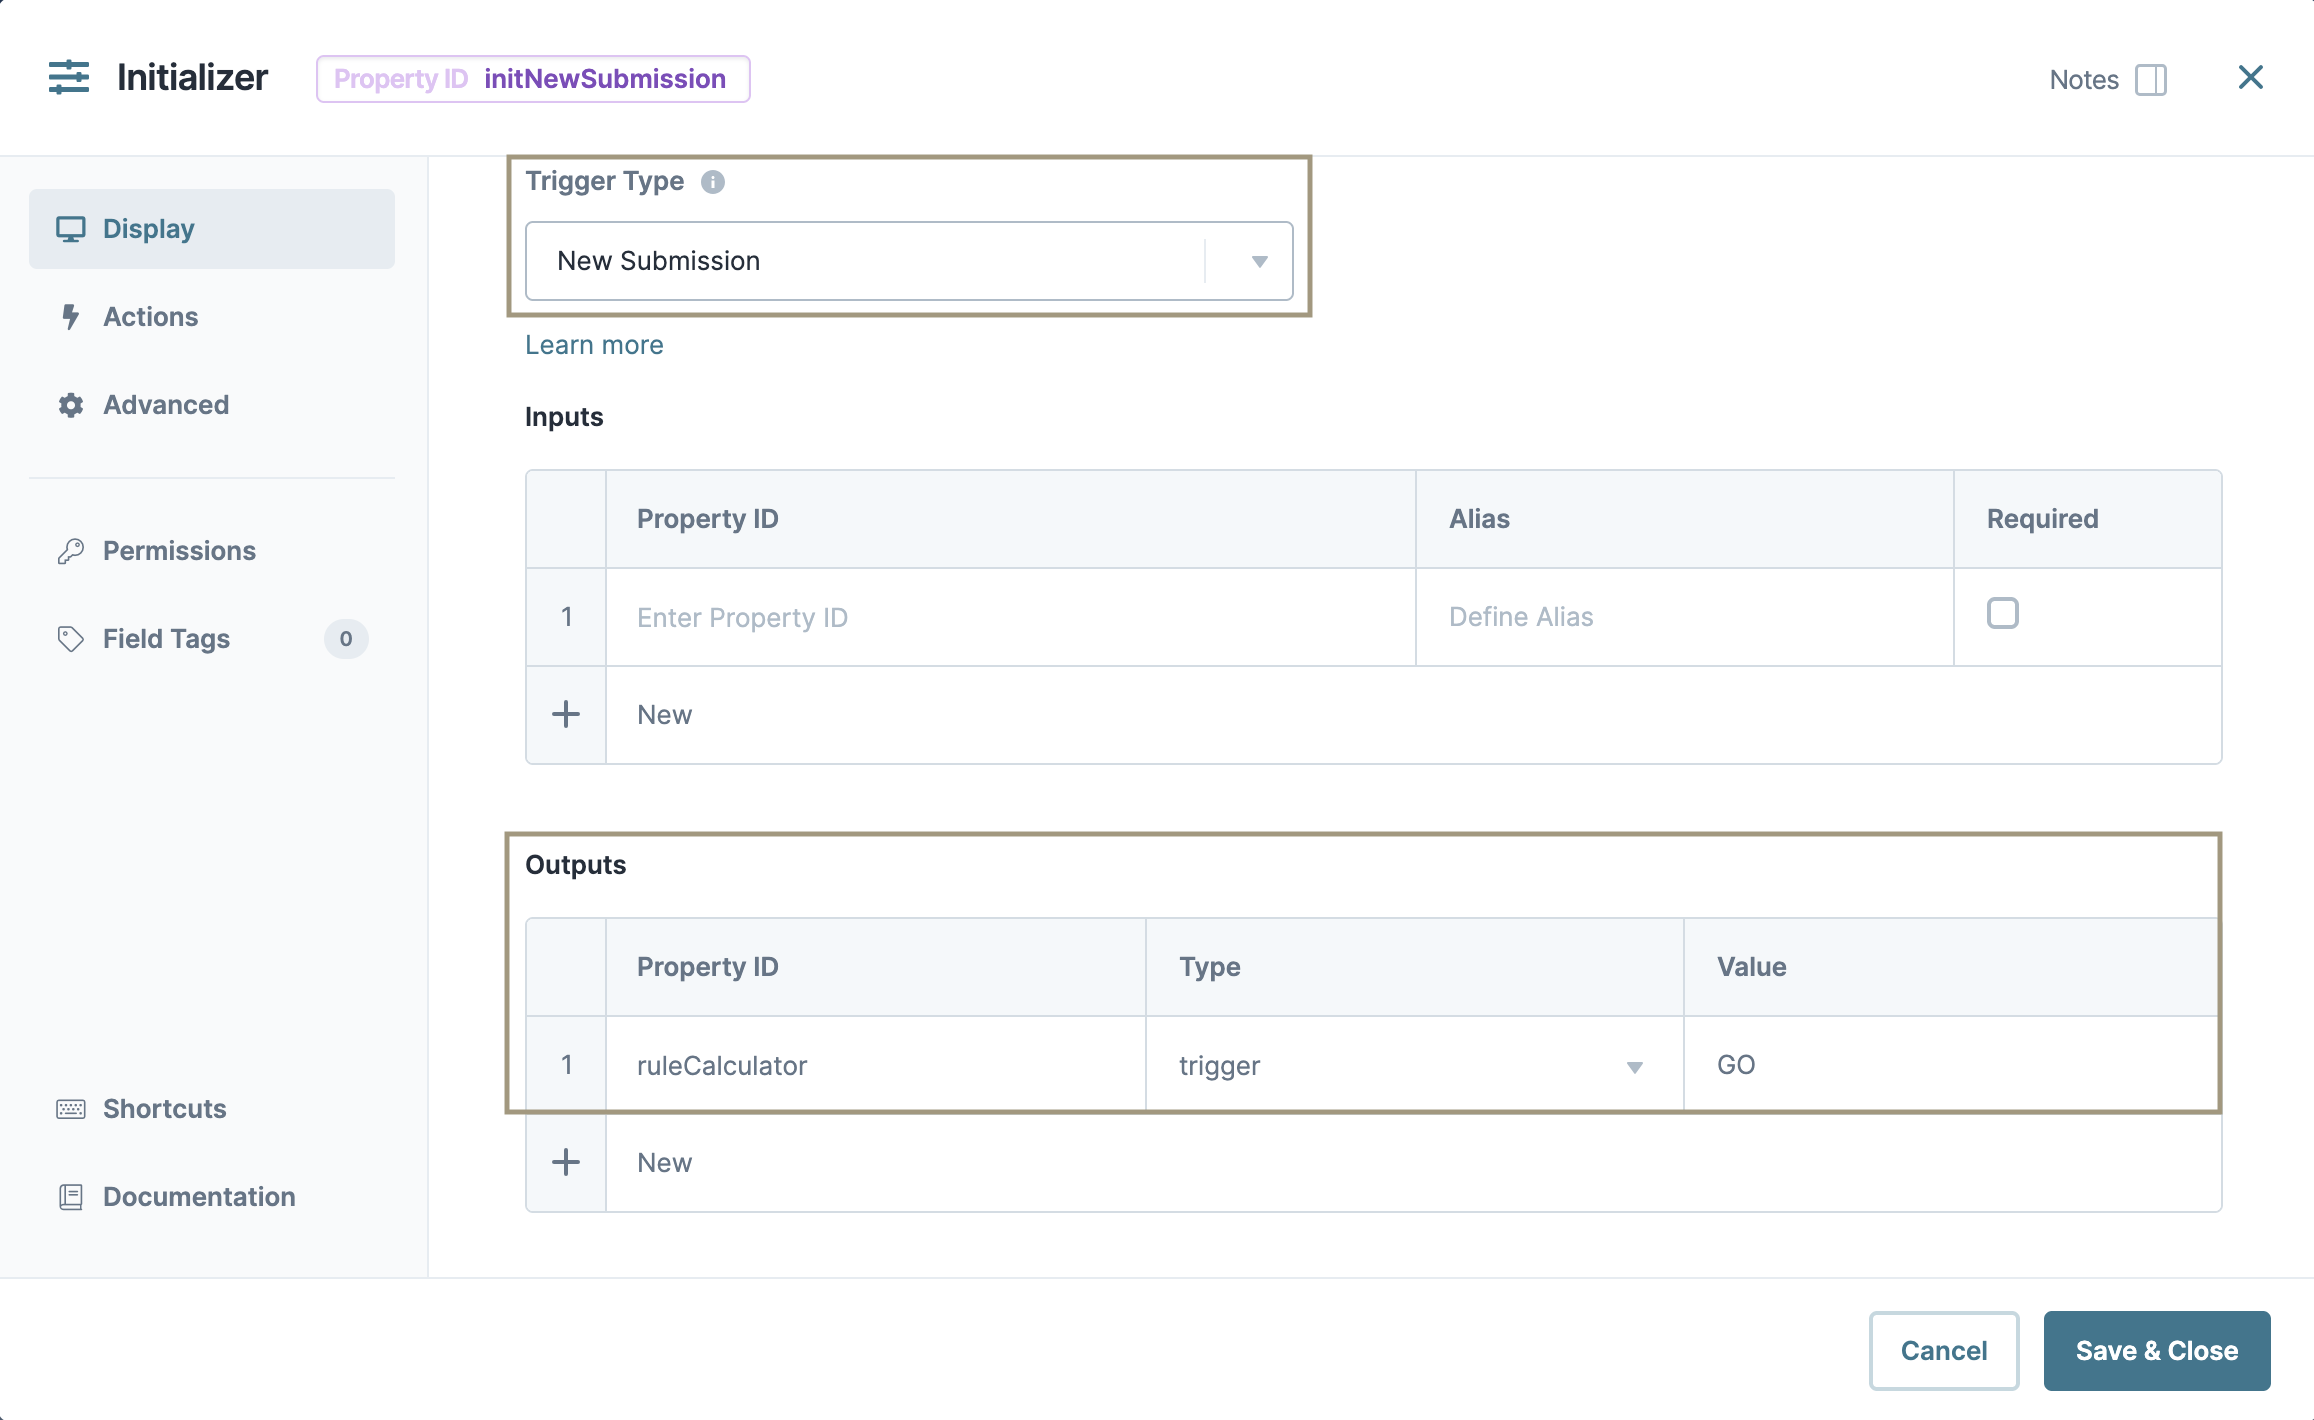
Configure the Initializer Component
Now, you'll add an Initializer component that triggers the Decisions component.
Drag and drop an Initializer component onto your canvas, placing it below your Decisions component.
In the Property ID and Canvas Label Text fields, enter
initNewSubmission.From the Trigger Type drop-down, select New Submission.
In the Outputs table, enter the following:
#
Source
Type
Value
1
ruleCalculator
trigger
GO

Click Save Component.
Save your module.
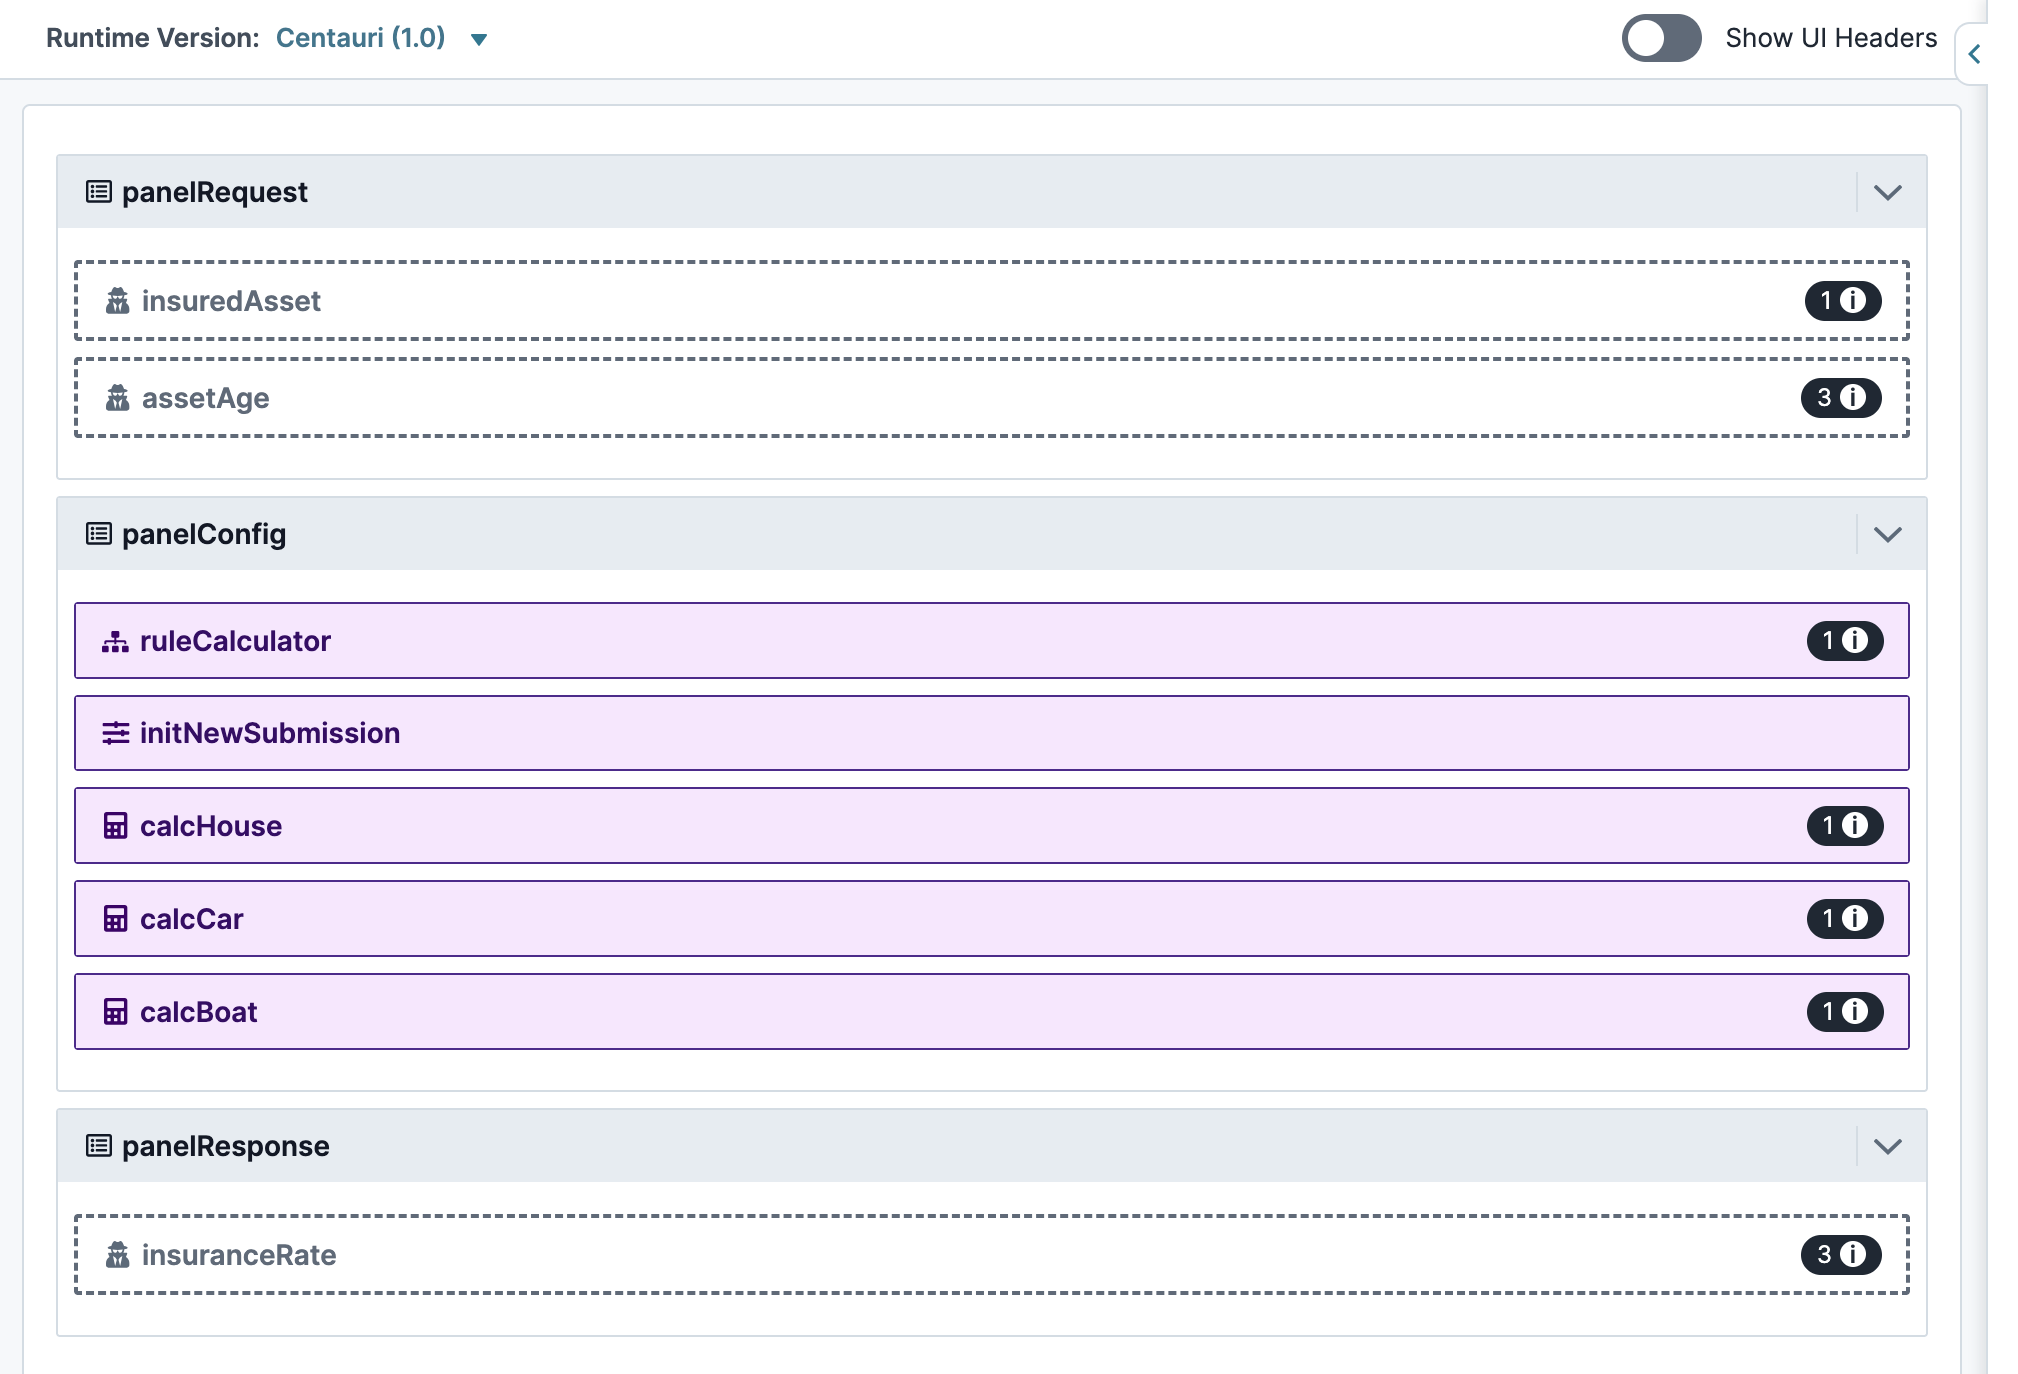
Here's how your Back-End module looks in the Module Builder:
Updating the Front-End Module
Now that you have your Back-End module configured, you'll connect the two modules. You'll add a Plug-In component to your Front-End module to handle the remote execute and create each new submission. You'll also add a Button component so your end-user can submit their responses and trigger the Plug-In component.
Configure the Plug-In Component
Your Plug-In component makes an API call to execute your Back-End module based on your end-user's response.
Drag and drop a Plug-In component onto your canvas, placing it below your Number component.
In the Property ID and Canvas Label Text fields, enter
pluginRemoteExecute.From the Internal Services drop-down, select Execute Module. The Request Type and Data Source URL autopopulate.
In the Data Source URL field, replace {moduleId} with the module ID of your Back-End module.
You can retrieve the module ID from the Back-End module’s URL as follows: https://training.unqork.io/#/form/5d9e06f2b5871a004223b54e/edit.
In the Inputs table, enter the following:
#
Property ID
Mapping
1
insuredAsset
data.insuredAsset
2
assetAge
data.assetAge
The Property ID column refers to the input fields in your Front-End module. The Mapping column refers to the destination fields in your Back-End module.
In the Outputs table, enter the following:
#
Property ID
Mapping
1
insuredRate
data.resolved.insuranceRate
Your Outputs table accepts the insurance rate calculated in your Back-End module. Then, it maps that insurance rate to your Text Field component for your end-user to view.
.png)
Click Save Component.
Configure the Button Component
Lastly, you'll add a Button component to trigger your Plug-In component. This button submits your end-user's response to the application. On button-click, data is sent to your Back-End module. Then, the corresponding Calculator component triggers and returns the insurance rate.
Drag and drop a Button component onto your canvas, placing it below your Plug-In component.
In the Property ID field, enter
btnSubmit.In the Label Text field, enter
Submit.In the On Click field, enter
pluginRemoteExecute.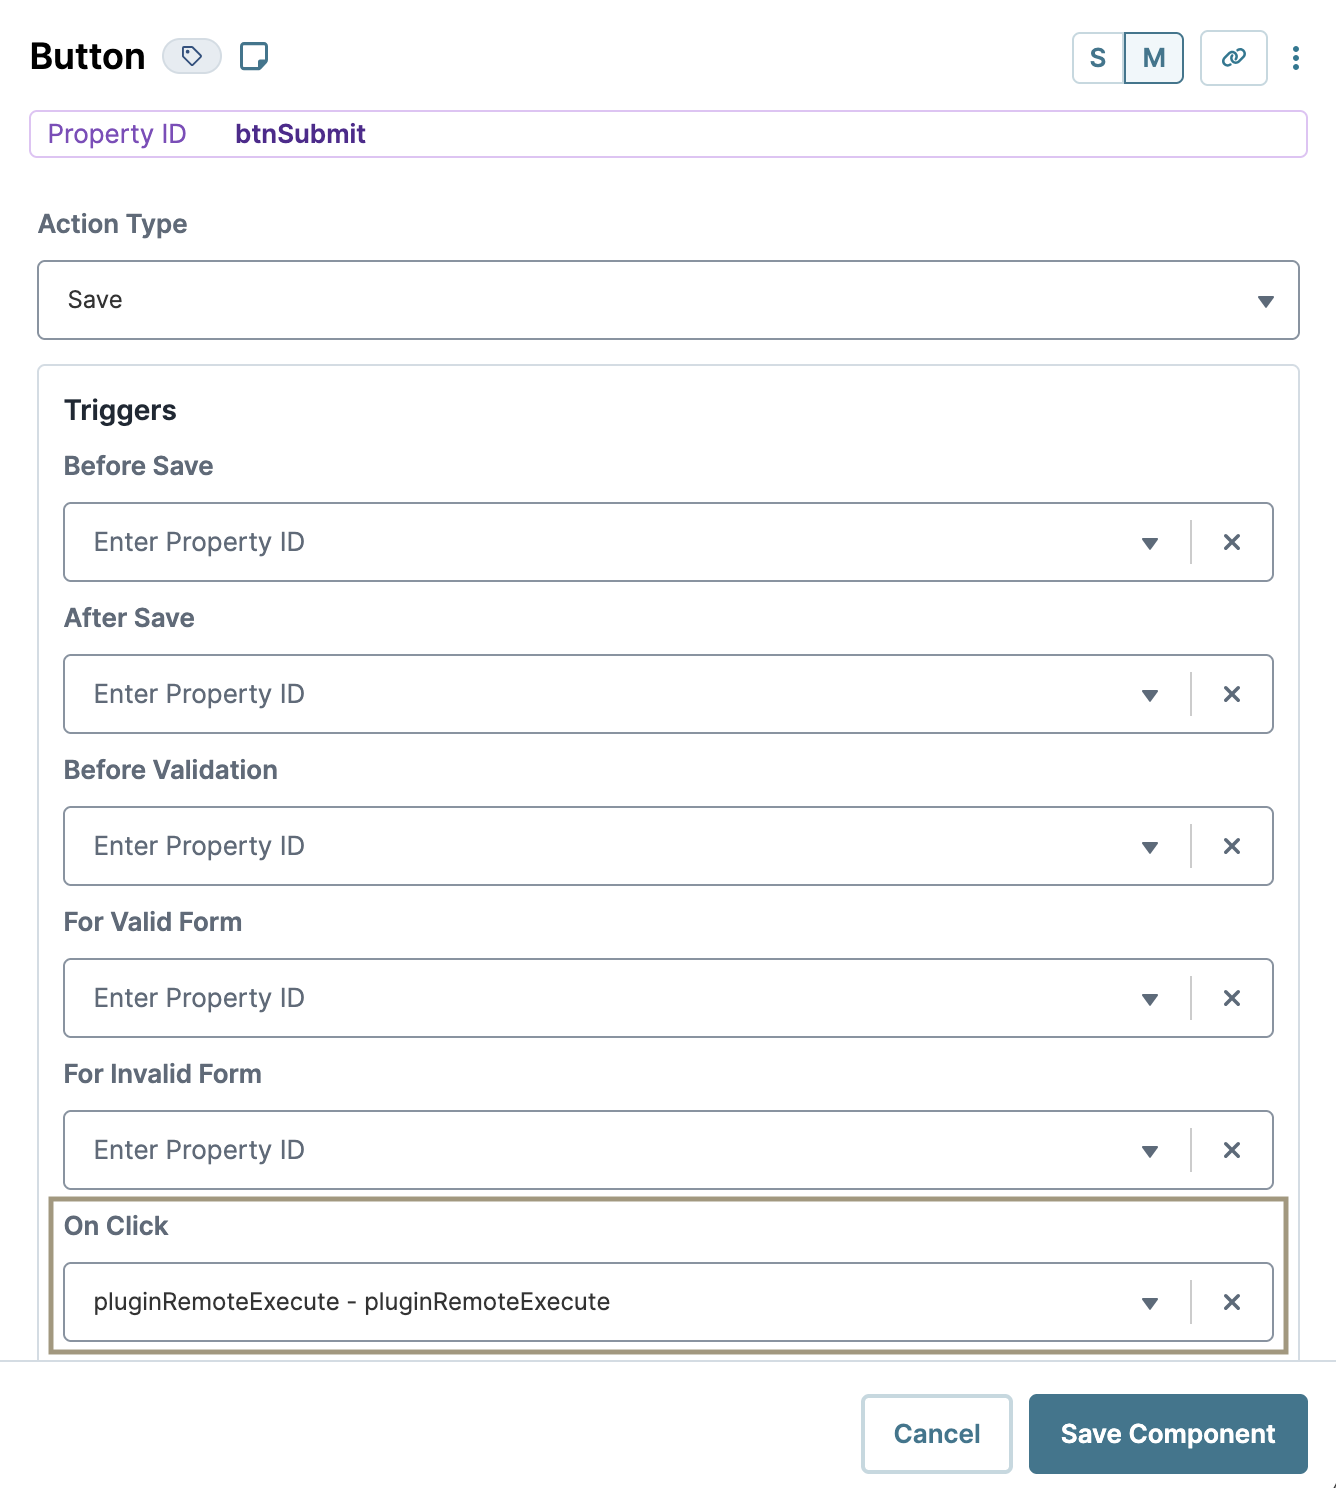
Click Save Component.
Save your module.
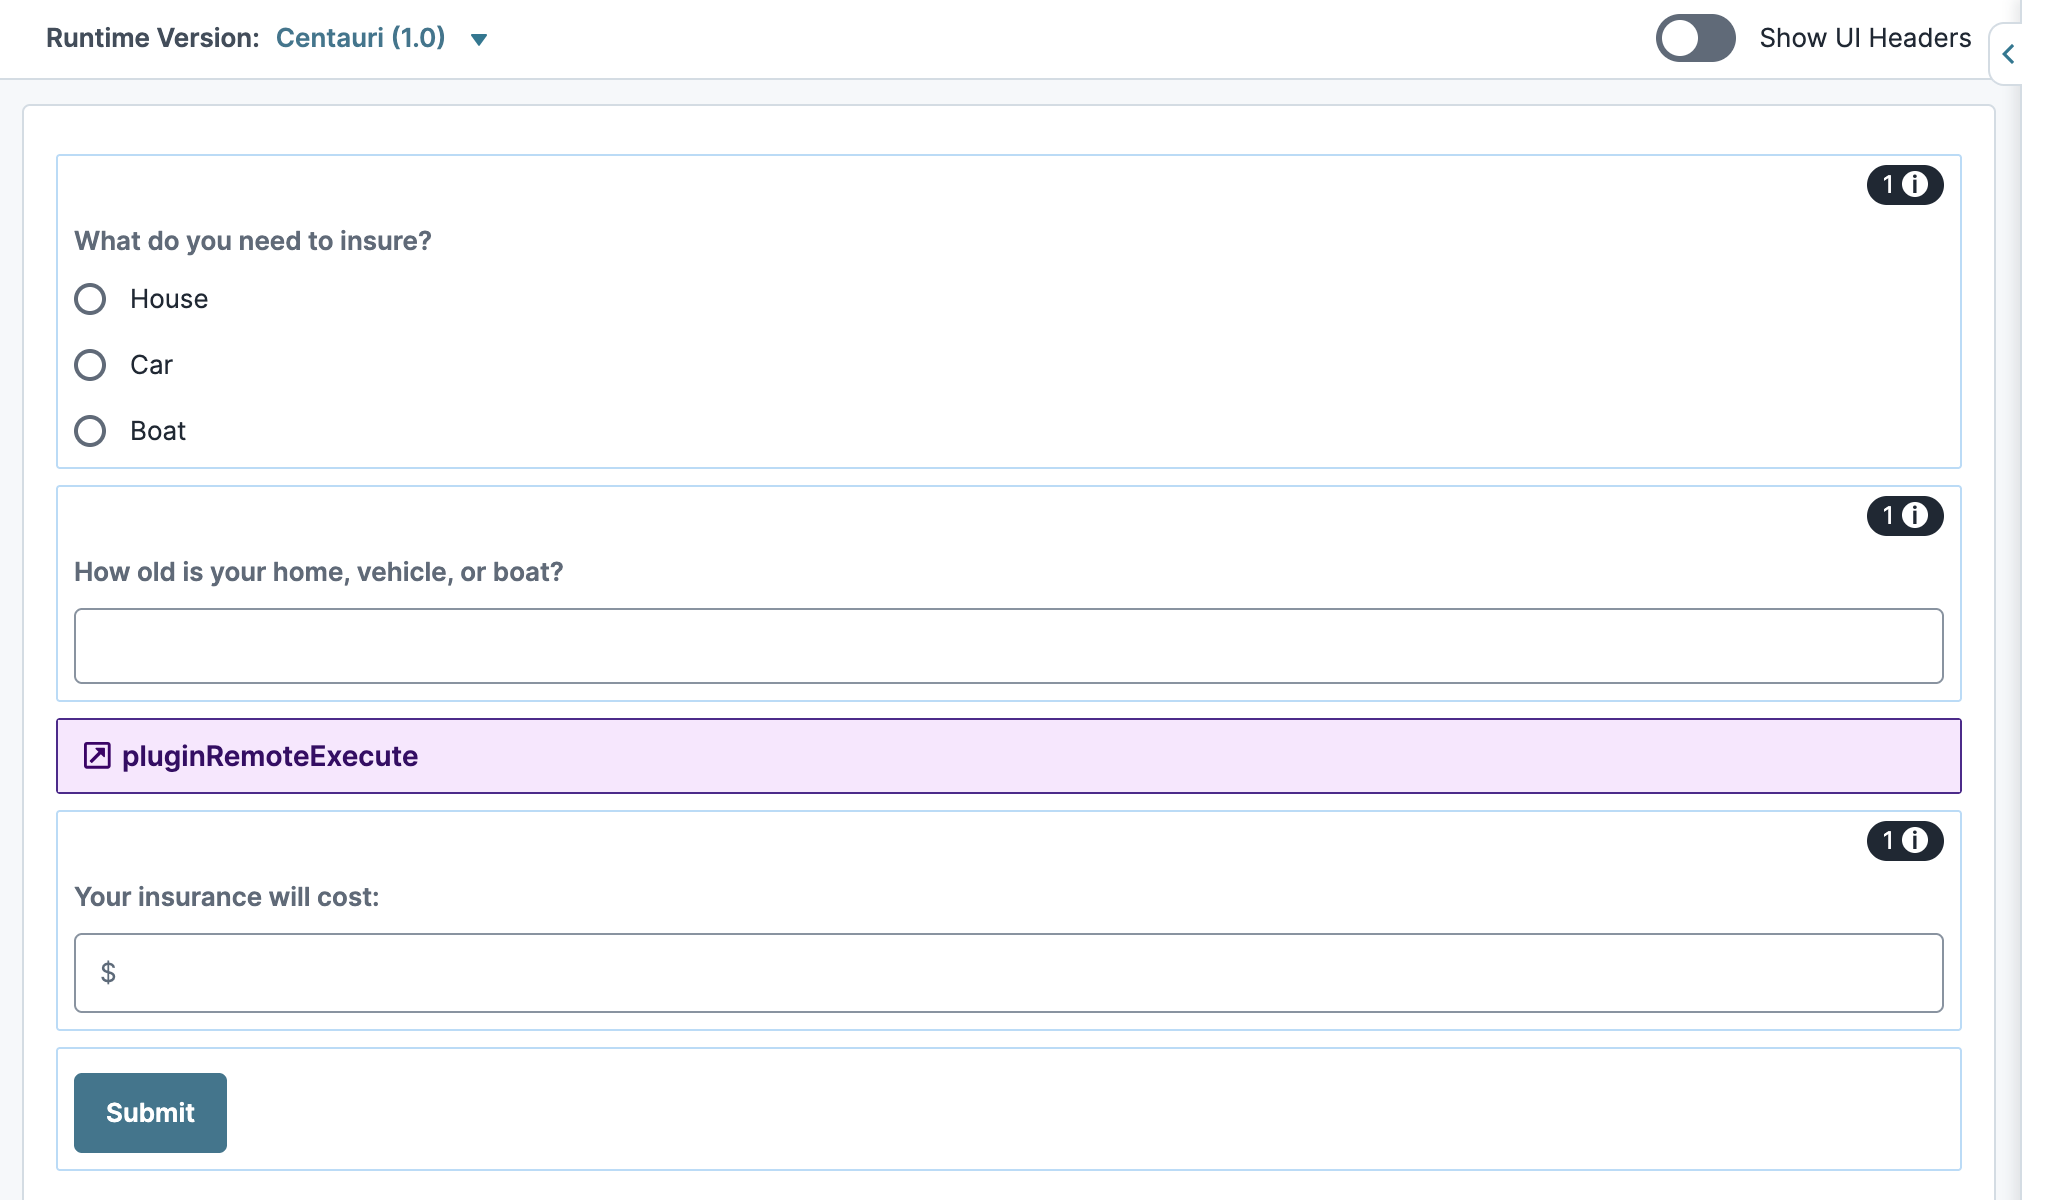
Here’s how your updated Front-End module looks in the Module Builder:
This how-to guide combines Calculator and Plug-In components to make a remote execute call.
In this guide, you'll create the following modules:
Front-End Module (1): Manages the front-end functions, so your end-user can select inputs for a insurance cost calculation.
Back-End Module (2): Manages the back-end functions and includes the module ID used by your remote execute.
These instructions assume you have a new Front-End module open, saved, and with a title.
Module 1 Configuration: Front-End Module
The Front-End module in this example collects details on items that the end-user is insuring. Based on the calculations of the Back-End module, a calculated insurance rate displays in an additional field.
Configure the Radio Buttons Component
Begin by configuring a Radio Buttons component to ask end-users what they're insuring.
In the Module Builder, drag and drop a Radio Buttons component onto your canvas.
In the Property ID field, enter
insuredAsset.In the Label Text field, enter
What do you need to insure?.In the Values table, enter the following:
#
Option Label
Value to Store in Submission Data
1
House
house
2
Car
car
3
Boat
boat
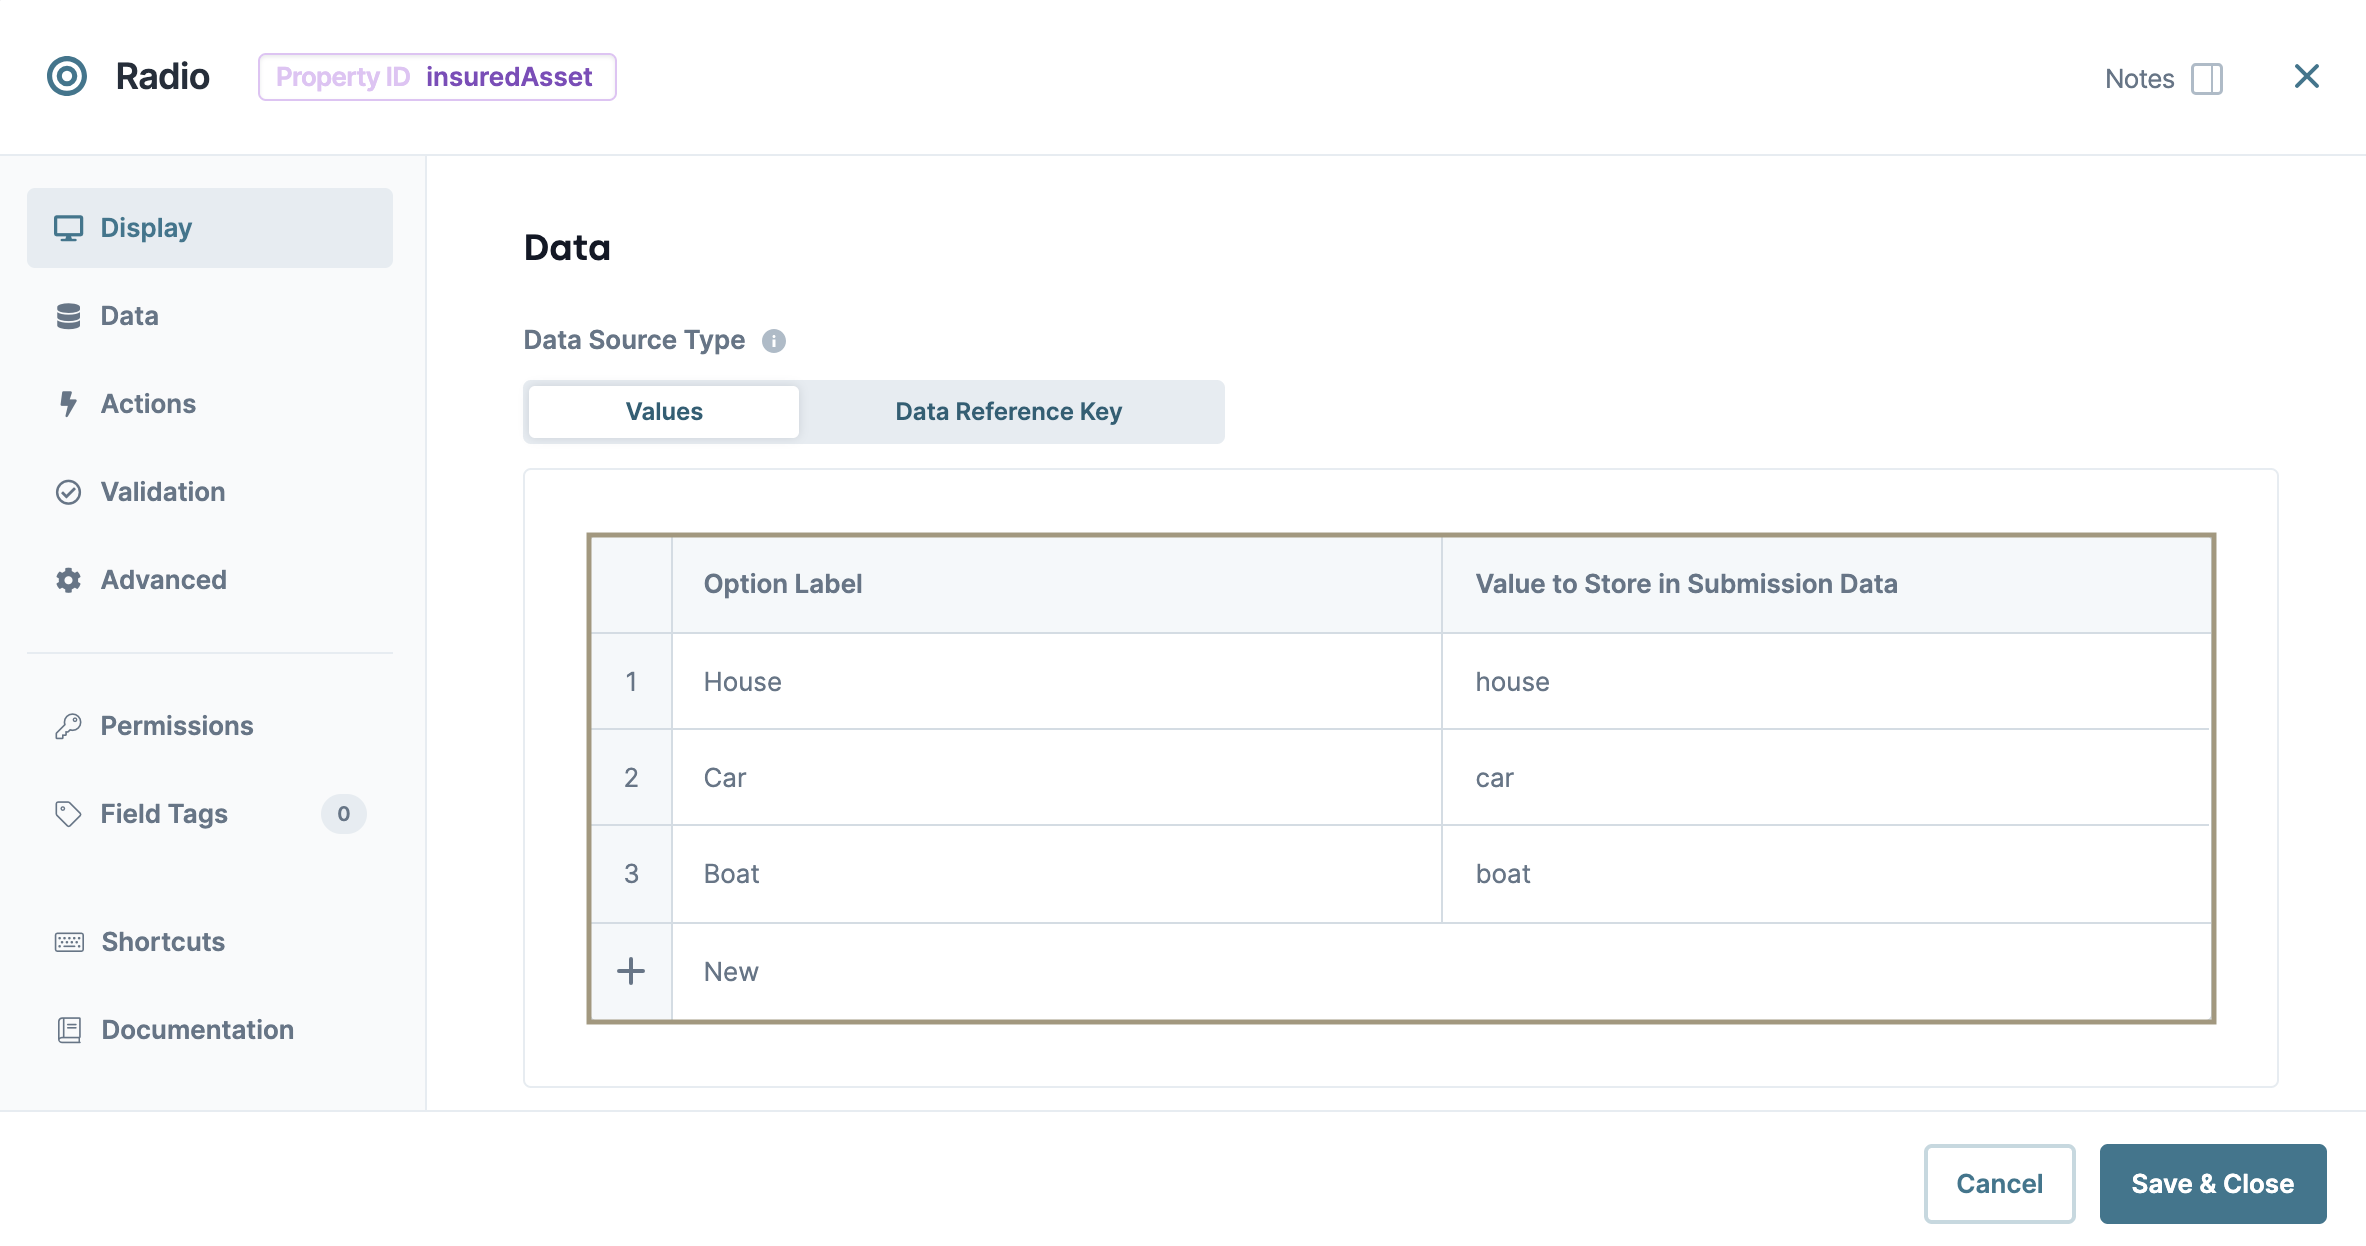
Click Save & Close.
Configure the Number Component
Next, use a Number component to add a field that asks for the age of the end-user's insured asset.
Drag and drop a Number component onto your canvas, placing it below your Radio Buttons component.
In the Property ID field, enter
assetAge.In the Label Text field, enter
How old is your home, vehicle, or boat?.Click Save & Close.
Configure the Text Field Component
Use a Text Field component to display the insurance cost for the asset. And because this field stores a monetary value, you'll set a dollar sign prefix.
Drag and drop a Text Field component onto your canvas, placing it below your Number component.
In the Property ID field, enter
insuranceRate.In the Label Text field, enter
Your insurance will cost:.In the Prefix field, enter
$.
Click Save & Close.
Save your module.
Here's how your Front-End module looks in the Module Builder:
Module 2 Configuration: Back-End Module
Next, create a new API module for the Back-End module. This module does not run any APIs, but to keep end-users from accessing the module. The Back-End module stores the data collected in your Front-End module and uses it to calculate the insurance rate.
Edit Default Components
Because this module is an API module, the Server Side Execution Only setting is enabled by default. Setting your module to server-side execute, your module becomes inaccessible to anyone without Module Builder access.
The Server Side Execution Only setting enables HTTP status code outputs in API modules. To learn more about HTTP Output, visit our HTTP Status Codes article.
Before adding components to your Back-End module, you'll remove the default API module components:
Remove the
panelInfoPanel component, and its contents.In the
panelRequest,panelConfig, andpanelResponsePanel components, delete all contents, leaving three empty Panel components.Save your module.
Configure the Hidden Components
First, you'll add Hidden components to store the data from your Front-End module.
Drag and drop two Hidden components inside the
panelRequestPanel component.In the Property ID and Canvas Label Text field, enter the following for each component:
#
Property ID
Canvas Label Text
1
insuredAsset
insuredAsset
2
assetAge
assetAge
Drag and drop another Hidden component inside the
panelResponsePanel component.In the Property ID and Canvas Label Text fields, enter
insuranceRate.Click Save & Close for each component as you add it.
Configure the calcHouse Calculator Component
This Calculator component uses the formula to calculate the home insurance rate.
Drag and drop a Calculator component inside the
panelConfigPanel component.In the Property ID and Canvas Label Text fields, enter
calcHouse.In the Inputs table, enter the following:
#
Source
Alias
Required
1
assetAge
A
(unchecked)In the Outputs table, enter the following:
#
Source
Formula
1
insuranceRate
=A*2
.png)
Click Save & Close.
Configure the calcCar Calculator Component
This Calculator component uses the formula to calculate the home insurance rate.
Drag and drop a Calculator component onto your canvas, placing it below your
calcHouseCalculator component.In the Property ID and Canvas Label Text fields, enter
calcCar.In the Inputs table, enter the following:
#
Source
Alias
Required
1
assetAge
A
(unchecked)In the Outputs table, enter the following:
#
Source
Formula
1
insuranceRate
=A

Click Save & Close.
Configure the calcBoat Calculator Component
This Calculator component stores the formula to calculate your boat insurance rate.
Drag and drop a Calculator component onto your canvas, placing it below your
calcCarCalculator component.In the Property ID and Canvas Label Text fields, enter
calcBoat.In the Inputs table, enter the following:
#
Source
Alias
Required
1
assetAge
A
(unchecked)In the Outputs table, enter the following:
#
Source
Formula
1
insuranceRate
=A*3
Click Save & Close.
Configure the Decisions Component
To trigger the correct Calculator component, you must set up a rule using a Decisions component. Your insuredAsset Hidden component works as the input for your Decisions component. So, the value in insuredAsset determines which Calculator component is triggered.
Drag and drop a Decisions component inside your
panelConfigPanel component.In the Property ID and Canvas Label Text fields, enter
ruleCalculator.In the Inputs table, enter the following:
Source
Alias
Type
insuredAsset
exact
In the Outputs table, enter the following:
Property ID
Type
calcHouse
trigger
calcCar
trigger
calcBoat
trigger
In the Micro Decisions table, enter the following:
insuredAsset
calcHouse_trigger
calcCar_trigger
calcBoat_trigger
house
GO
car
GO
boat
GO
Click Save.
Configure the Initializer Component
Now, you'll add an Initializer component that triggers the Decisions component.
Drag and drop an Initializer component onto your canvas, placing it below your Decisions component.
In the Property ID and Canvas Label Text fields, enter
initNewSubmission.From the Trigger Type drop-down, select New Submission.
In the Outputs table, enter the following:
#
Source
Type
Value
1
ruleCalculator
trigger
GO
Click Save & Close.
Save your module.
Here's how your Back End module looks in the Module Builder:
.png)
Updating the Front-End Module
Now that you have your Back-End module configured, you'll connect the two modules. You'll add a Plug-In component to your Front-End module to handle the remote execute and create each new submission. You'll also add a Button component so your end-user can submit their responses and trigger the Plug-In component.
Configure the Plug-In Component
Your Plug-In component makes an API call to execute your Back-End module based on your end-user's response.
Drag and drop a Plug-In component onto your canvas, placing it below your Number component.
In the Property ID and Canvas Label Text fields, enter
pluginRemoteExecute.From the Internal Services drop-down, select Execute Module. The Request Type and Data Source URL autopopulate.
In the Data Source URL, replace {moduleId} with the module ID of your Back-End module.
You can retrieve the module ID from the Back-End module’s URL as follows: https://training.unqork.io/#/form/5d9e06f2b5871a004223b54e/edit.
In the Inputs table, enter the following:
Property ID
Mapping
insuredAsset
data.insuredAsset
assetAge
data.assetAge
The Property ID column refers to the input fields in your Front-End module. The Mapping column refers to the destination fields in your Back-End module.
In the Outputs table, enter the following:
#
Property ID
Mapping
1
insuredRate
data.resolved.insuranceRate
Your Outputs table accepts the insurance rate calculated in your Back-End module. Then, it maps that insurance rate to your Text Field component for your end-user to view.

Click Save.
Configure the Button Component
Lastly, you'll add a Button component to trigger your Plug-In component. This button submits your end-user's response to the application. On button-click, data is sent to your Back-End module. Then, the corresponding Calculator component triggers and returns the insurance rate.
Drag and drop a Button component onto your canvas, placing it below your Plug-In component.
In the Property ID field, enter
btnSubmit.In the Label Text field, enter
Submit.In the On Click field, enter
pluginRemoteExecute.
Click Save & Close.
Save your module.
Here’s how your updated Front-End module looks in the Module Builder:
.png)