HMAC (Hash-based Message Authentication Code) authentication provides an additional layer of security by requiring a hashed value to accompany an API call. Many third-party APIs require this hashed key to verify the integrity and authenticity of the request.
In Unqork, you can configure an HMAC service and a corresponding authentication module. This guide demonstrates how to use the Create Hash of Passed String internal API, though configuration details vary depending on which API you're communicating with.
Preconfiguration
Set Up the HMAC Authentication Service
Begin by setting up an HMAC service in Services Administration.
You must have the public key from the party that's receiving and decrypting the files. They'll have to set up the public/private GPG keypair.
At the top right of the Unqork Designer Platform, click Administration.
Under Integration, select Services Administration.
Click + Add a Service.
In the Service Title* field, enter a title for your service. For example,
HMAC Authentication.In the Service Name* field, enter a name for your service. For example,
hmac-authentication.The Service Name value is final once created. You can update the Service Title value anytime.
In the Service Protocol + Host* field, enter a temporary value. You’ll delete this value in a later step.
Click Next.
In the Share To* field, specify which workspaces to make this service available.
Click Create. The Service page displays.
From the menu to the left, select Service-Type.
From the Service Type drop-down, select Encryption.
In the Service Protocol + Host field, delete the temporary value.
Set the Authentication Method to Encryption (GPG).
In the HMAC Private Key (Armored) field, enter the HMAC Key.
The Hash algorithm is specified when using the service.
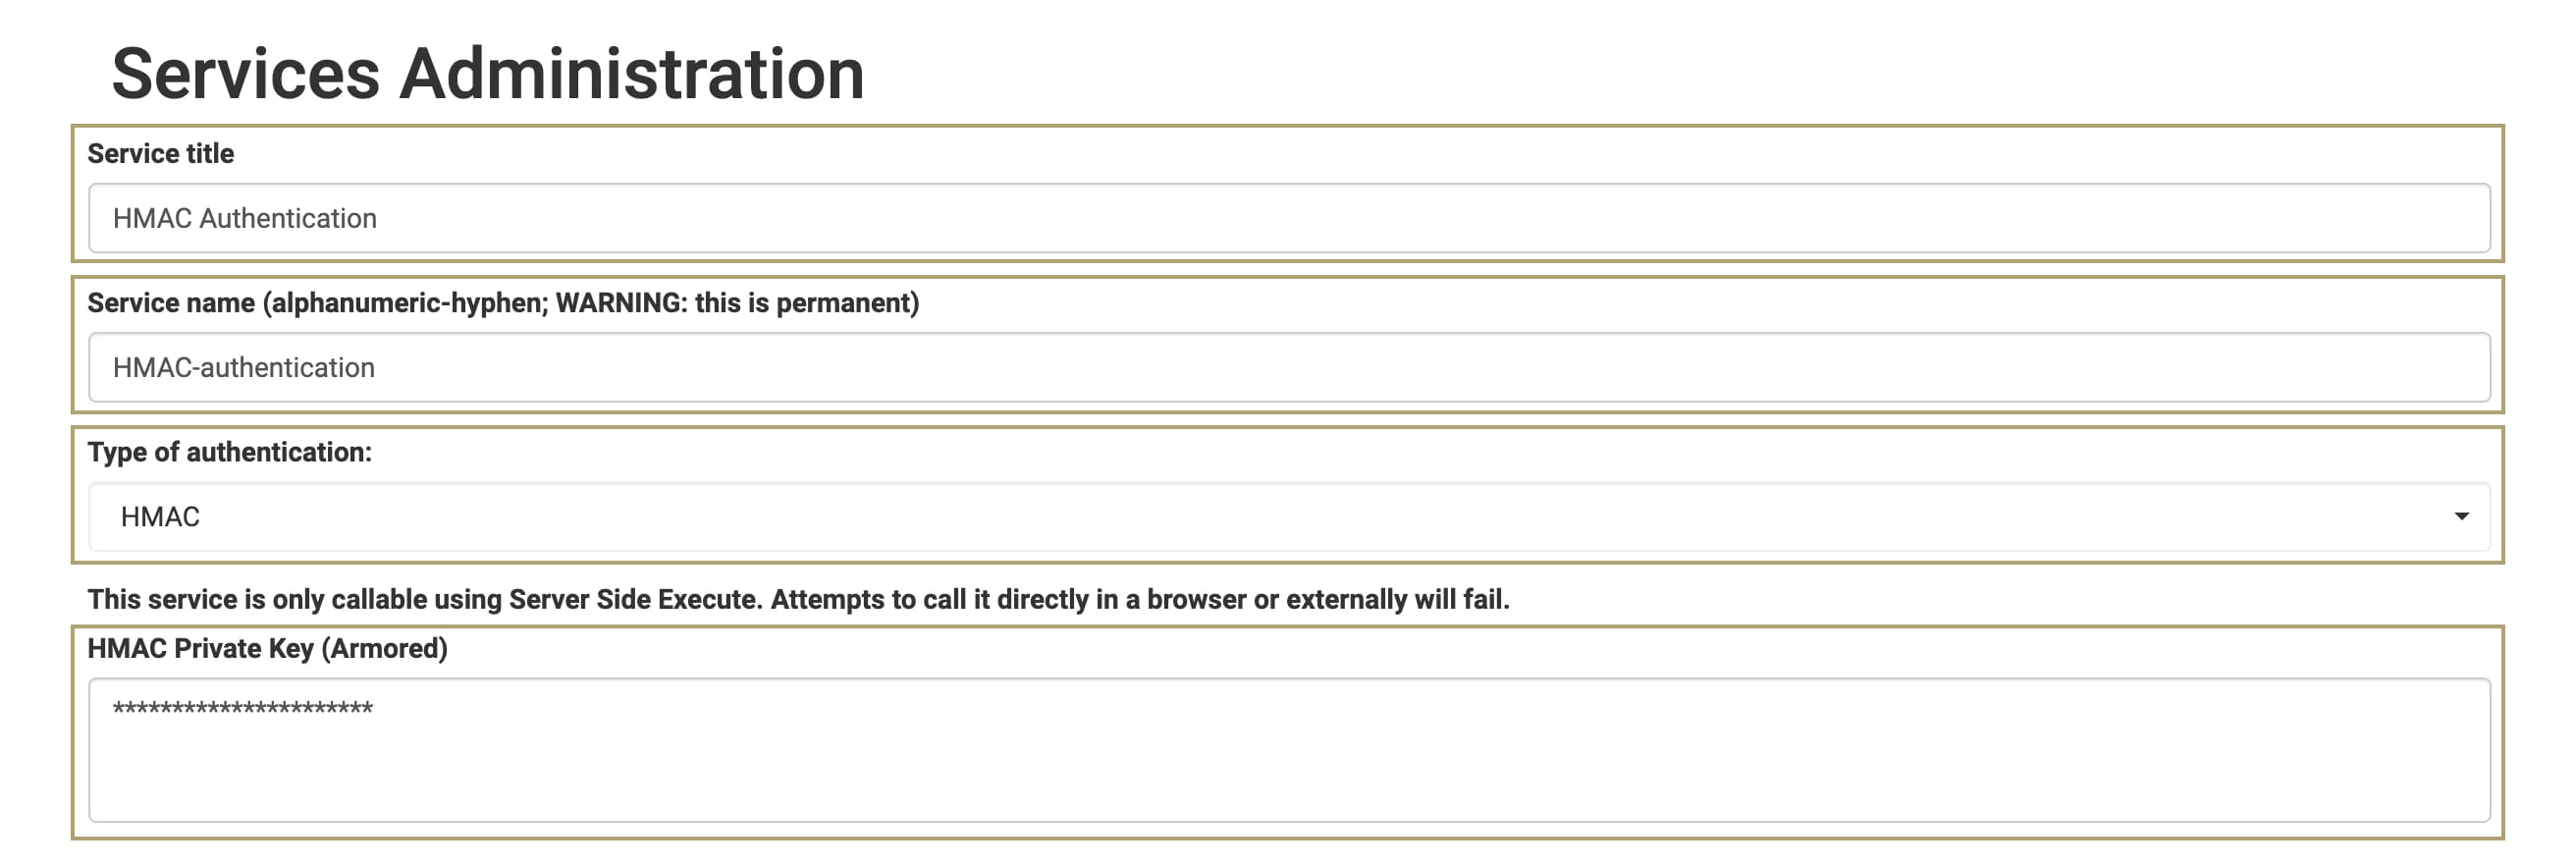
Click Save Changes.
After enabling the HMAC service, return to the Module Builder.
Select the tab that corresponds to your Unqork Designer experience:
Enable Server-Side Execution Only
To improve application security, configure your HMAC module to execute on the server-side. While API modules always execute server-side, your requirements might use a Front-End or Other module type containing the Plug-In component that calls the HMAC service.
From the Module Builder page:
Click the
 (ellipsis) button.
 Select Module Settings. The Settings modal displays.
To the left of the modal, click Module Settings.
Set Server Side Execution Only to
 (ON).
(ON).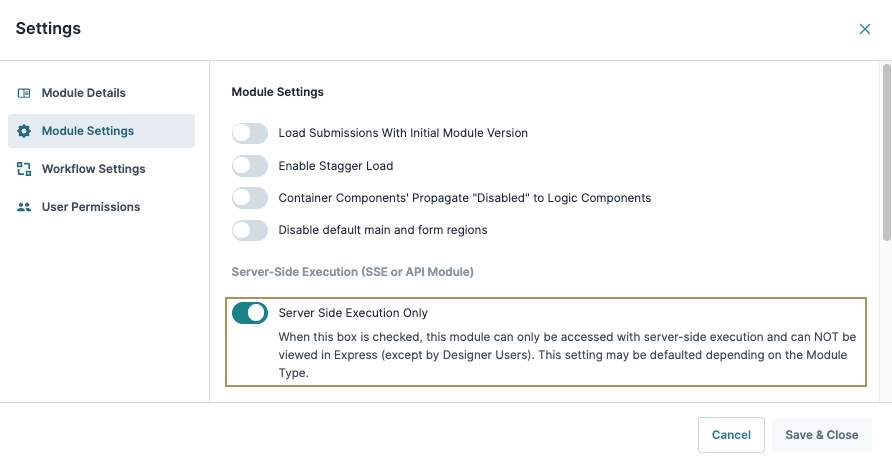
Click Save & Close.
Configure the Authentication Module
Now you're ready to set up the module that creates the hashed value.
Configure the Hidden Components
Configure two Hidden components. The first Hidden component stores the value to pass during the Create Hash of Passed String API call. The second component stores the returned hashed value.
In the Module Builder, drag and drop two Hidden components onto the canvas.
In the Property ID and Label Text fields, enter the following for each component:
#
Property ID
Label Text
1
valueToPass
valueToPass
2
hashedValue
hashedValue
Click Save Component for each component as you add and complete its configuration.
You'll notice this configuration does not include defining or passing a value to the
valueToPassHidden component. The value varies based on the API's requirements. Here, thevalueToPassHidden component acts as a placeholder. When applying these steps to your use case, remember to pass or define the string you want to use in the Create Hash of Passed String API call.
Configure the Initializer Component
Set up an Initializer component to trigger the Plug-In component you'll create next.
Drag and drop an Initializer component onto your canvas, placing it above your Hidden components.
In the Property ID and Canvas Label Text fields, enter
initPluginCreateHash.From the Trigger Type drop-down, select New Submission.
In the Outputs table, enter the following:
#
Property ID
Type
Value
1
pluginCreateHash
trigger
GO
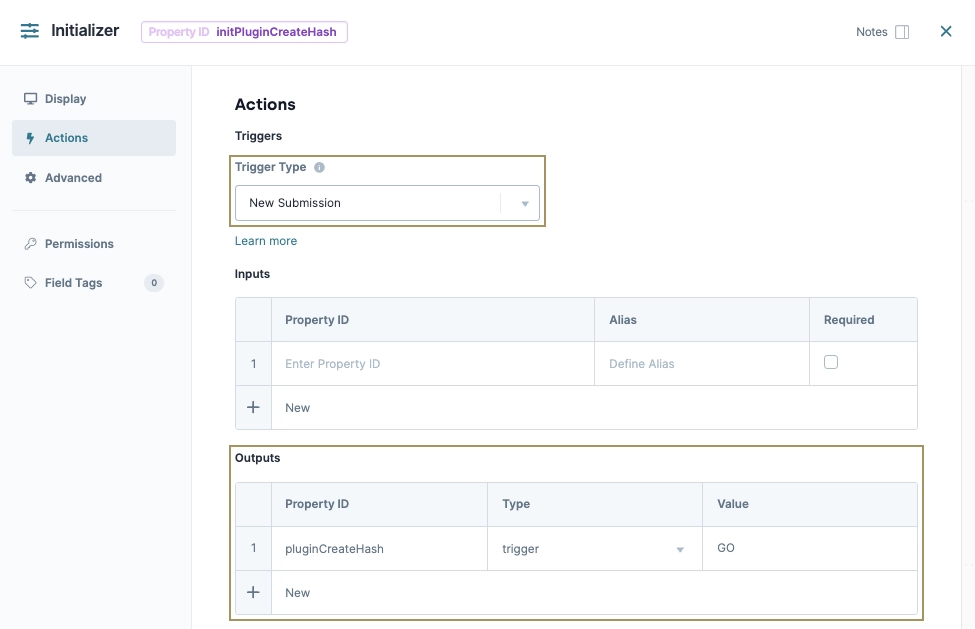
Click Save Component after adding each component.
Configure the Plug-In Component
Configure a Plug-In component to generate the hashed value using the Create Hash of Passed String internal service. To configure the Inputs table, use the parameters described below:
string: The Property ID of the component containing the string you want to hash. For example,valueToPass.algo: The hash function required by the HMAC authentication. Supported algorithms include SHA-256 and SHA-512. If left blank, it defaults to SHA-256.encoding: The encoding type for the returned hashed value. Supported values are Base64 or Hex. If left blank, it defaults to Hex.hmacServiceName: The Service Name of your HMAC authentication service.
You can test the Create Hash of Passed String endpoint using the Unqork Services page. To access the Unqork Services page, enter the following address into your browser:
https://{environment}.unqork.io/fbu/uapi/docs/documentation/#/Encryption/hashString. Replace{environment}with the name of your Unqork environment.
Drag and drop a Plug-In component onto the canvas, placing it below the
valueToPassHidden component.In the Property ID and Canvas Label Text fields, enter
pluginCreateHash.From the Internal Services drop-down, select Create Hash of Passed String.
In the Inputs table, enter the following:
#
Property ID
Mapping
1
valueToPass
string
2
'sha256'
algo
3
'base64'
encoding
4
'HMAC-authentication'
{{hmacServiceName}}
Ensure you use the hash function type, encoding type, and Service Name appropriate to your use case. For example, replace
{{hmacServiceName}}with the name of the service created during the Set Up the HMAC Authentication Service step.Always add single quotes around values in the Property ID column that are not actually Property IDs. For example,
valueToPassis the Property ID of your Hidden component. So, it does not need single quotes. HMAC-authentication, though, is not a Property ID in the module. So, it requires single quotes.In the Outputs table, enter the following:
#
Property ID
Mapping
1
hashedValue
hashed
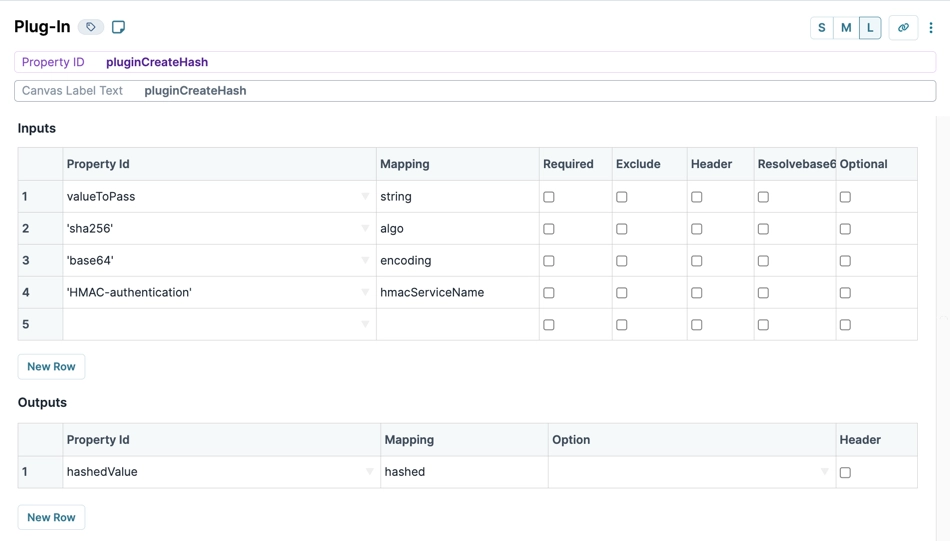
Click Save Component.
Here's how the final configuration looks in the Module Builder:

Now you have a hashed value that you can pass in an API call, stored in the hashedValue Hidden component. The details of how you'll pass that value vary based on what API you're communicating with. For example, whether the value should be part of an API Request Header or not, and even what the mapping should be. You can check the API's documentation for more details.
Enable Server-Side Execution Only
To improve application security, configure your HMAC module to execute on the server-side. While API modules always execute server-side, your requirements might use a Front-End or Other module type containing the Plug-In component that calls the HMAC service.
From the Module Builder page:
On the Module Builder header, click the
 (ellipsis) button.
 Select Settings. The Settings modal displays.
Navigate to the Module Settings tab.
Set Server Side Execution Only to
 (ON).
(ON).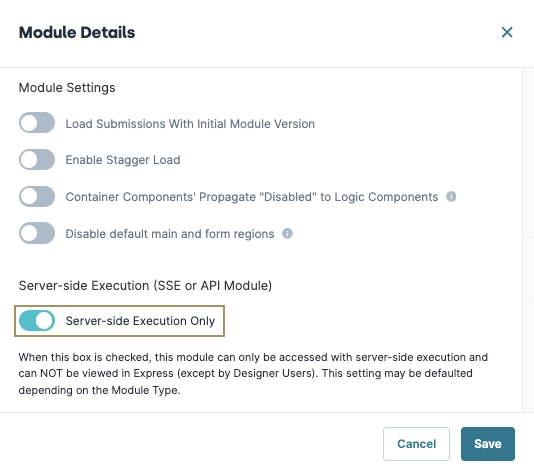
Click Save.
Configure the Authentication Module
Now you're ready to set up the module that creates the hashed value.
Configure the Hidden Components
Configure two Hidden components. The first Hidden component stores the value to pass during the Create Hash of Passed String API call. The second component stores the returned hashed value.
In the Module Builder, drag and drop two Hidden components onto the canvas.
In the Property ID and Label Text fields, enter the following for each component:
#
Property ID
Canvas Label Text
1
valueToPass
valueToPass
2
hashedValue
hashedValue
Click Save & Close for each component after you add it.
You'll notice this configuration does not include defining or passing a value to the
valueToPassHidden component. The value varies based on the API's requirements. Here, thevalueToPassHidden component acts as a placeholder. When applying these steps to your use case, remember to pass or define the string you want to use in the Create Hash of Passed String API call.
Configure the Initializer Component
Set up an Initializer component to trigger the Plug-In component you'll create next.
Drag and drop an Initializer component onto your canvas, placing it above your Hidden components.
In the Property ID and Canvas Label Text fields, enter
initPluginCreateHash.Navigate to the Actions settings.
From the Trigger Type drop-down, select New Submission.
In the Outputs table, enter the following:
#
Property ID
Type
Value
1
pluginCreateHash
trigger
GO

Click Save & Close.
Configure the Plug-In Component
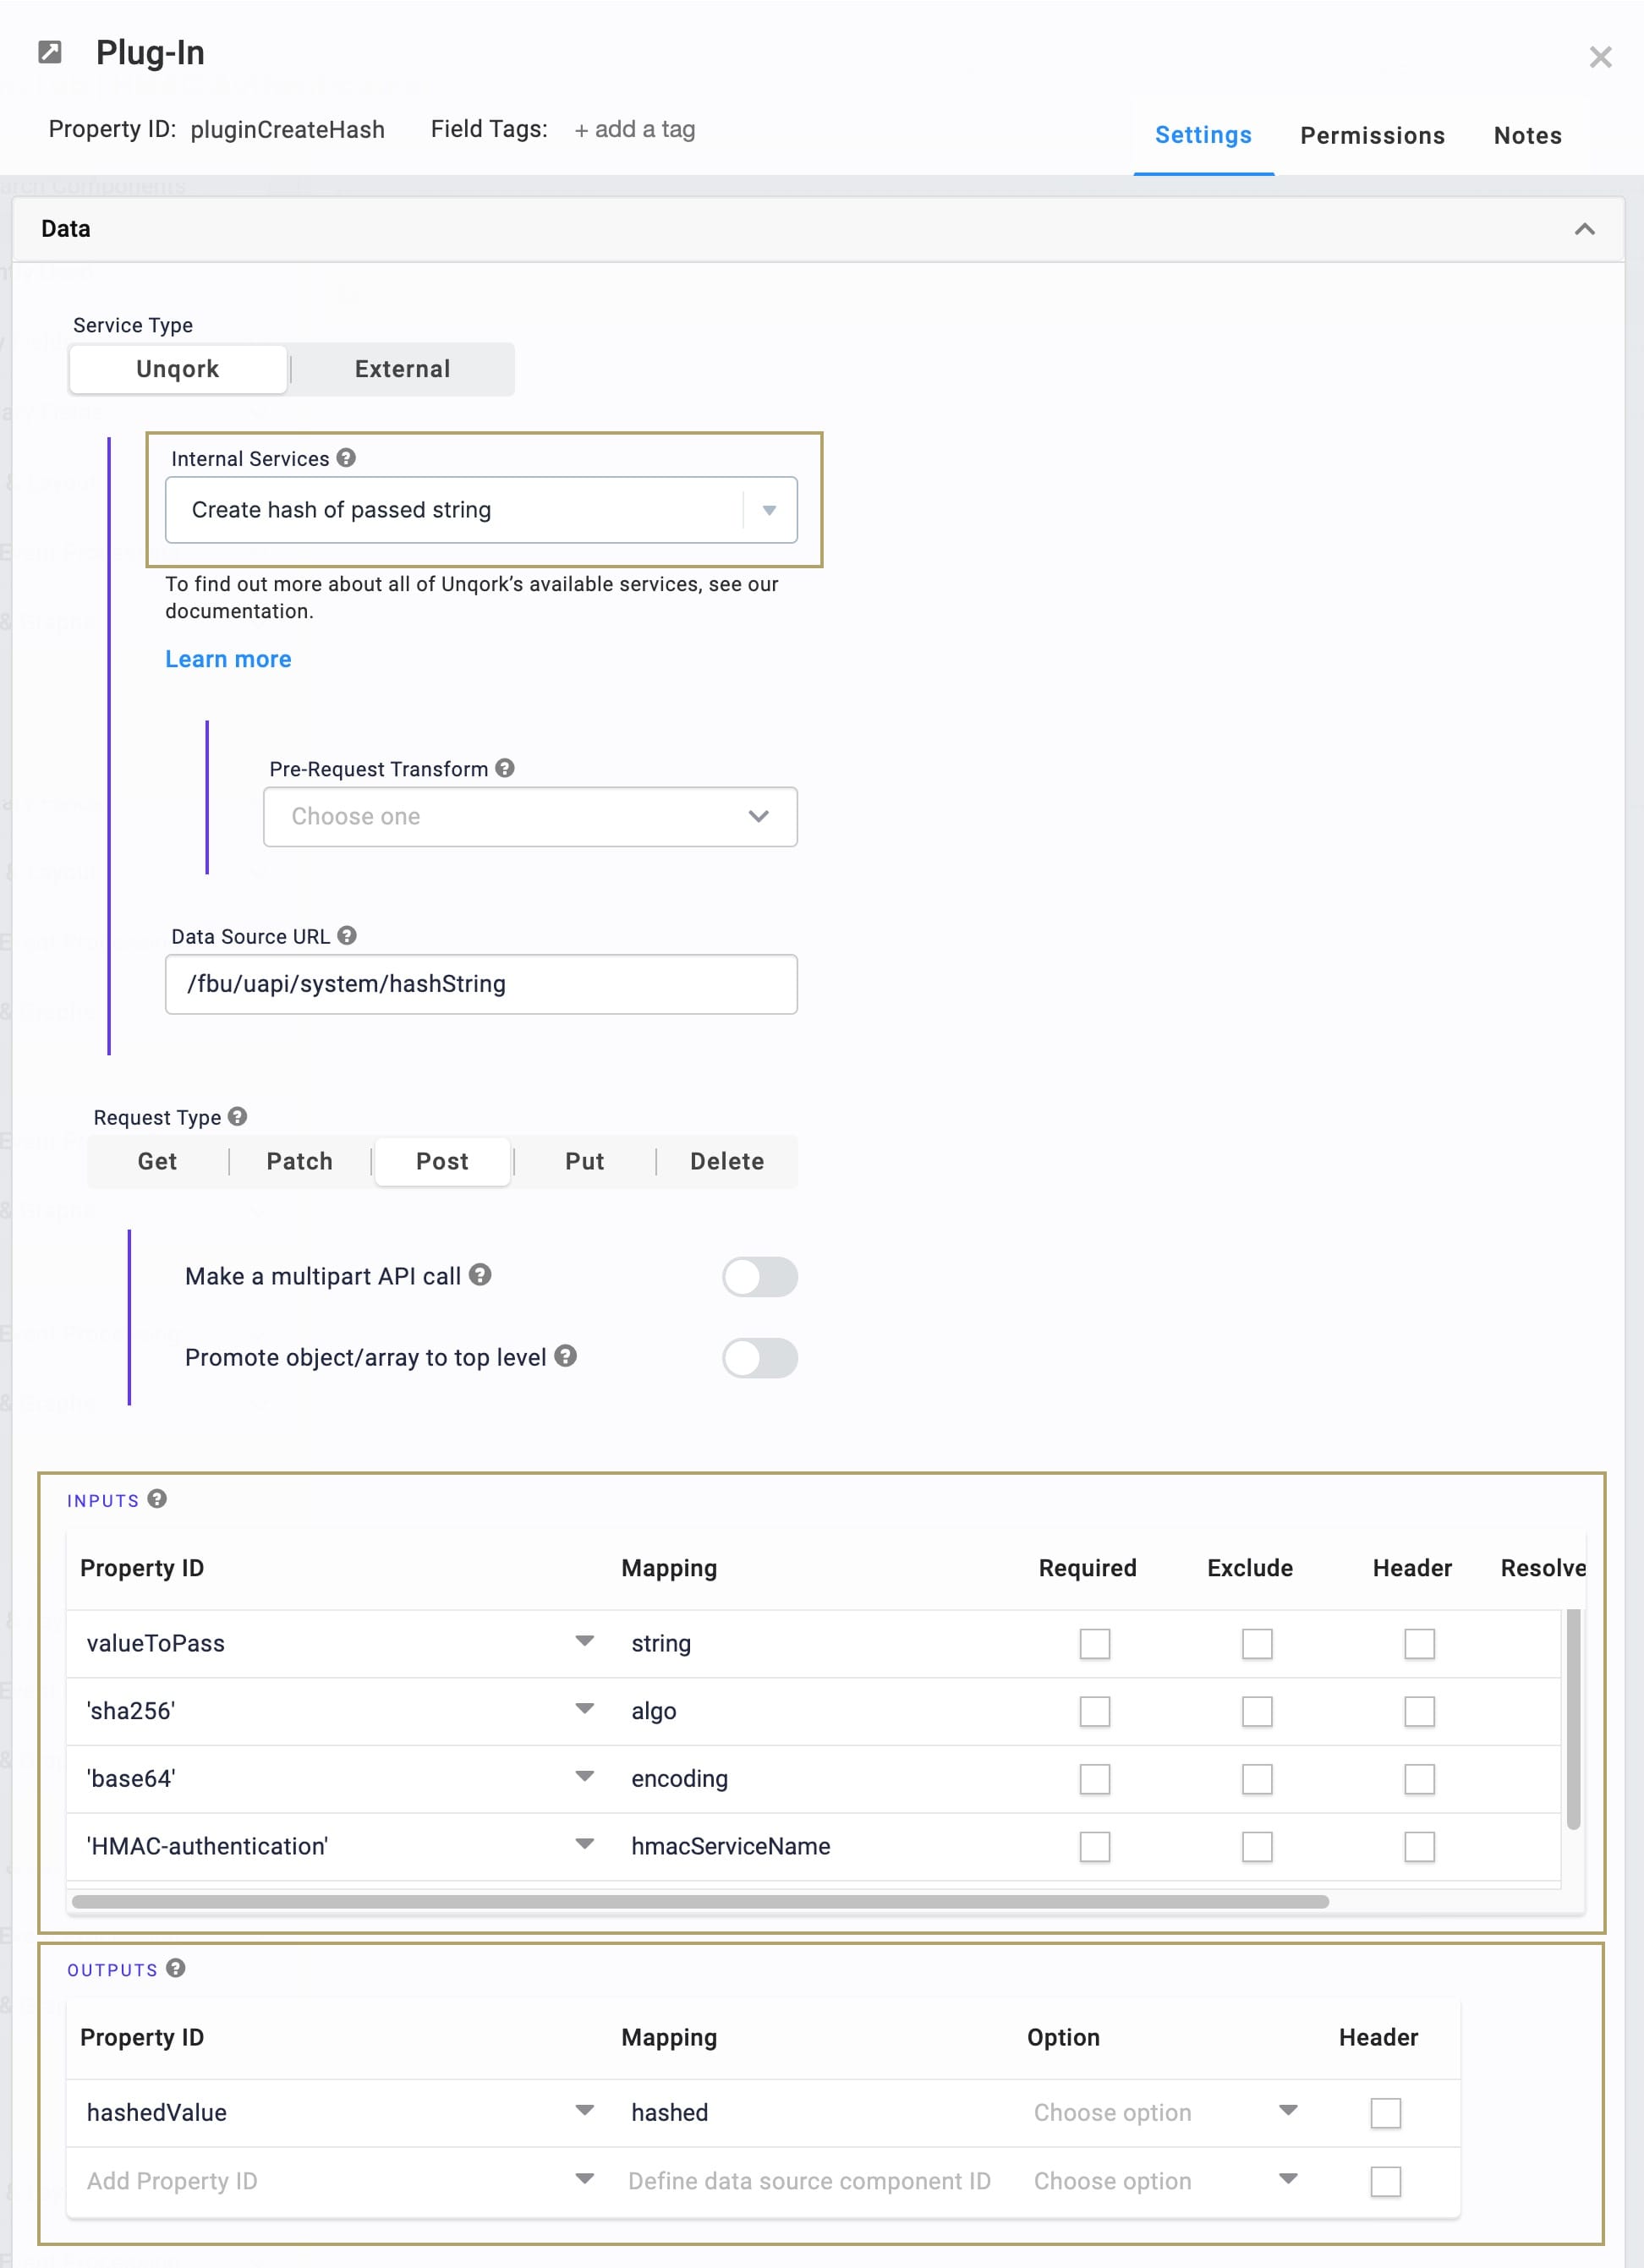
Configure a Plug-In component to generate the hashed value using the Create Hash of Passed String internal service. To configure the Inputs table, use the parameters described below:
string: The Property ID of the component containing the string you want to hash. For example,valueToPass.algo: The hash function required by the HMAC authentication. Supported algorithms include SHA-256 and SHA-512. If left blank, it defaults to SHA-256.encoding: The encoding type for the returned hashed value. Supported values are Base64 or Hex. If left blank, it defaults to Hex.hmacServiceName: The Service Name of your HMAC authentication service.
You can test the Create Hash of Passed String endpoint using the Unqork Services page. To access the Unqork Services page, enter the following address into your browser:
https://{environment}.unqork.io/fbu/uapi/docs/documentation/#/Encryption/hashString. Replace{environment}with the name of your Unqork environment.
Drag and drop a Plug-In component onto the canvas, placing it below the
valueToPassHidden component.In the Property ID and Canvas Label Text fields, enter
pluginCreateHash.From the Internal Services drop-down, select Create Hash of Passed String.
In the Inputs table, enter the following:
#
Property ID
Mapping
1
valueToPass
string
2
'sha256'
algo
3
'base64'
encoding
4
'HMAC-authentication'
{{hmacServiceName}}
Be sure to use the hash function type, encoding type, and Service Name appropriate to your use case. For example, replace
{{hmacServiceName}}with the name of the service created during the Set Up the HMAC Authentication Service step.Always add single quotes around values in the Property ID column that are not actually Property IDs. For example,
valueToPassis the Property ID of your Hidden component. So, it does not need single quotes. HMAC-authentication, though, is not a Property ID in the module. So, it needs single quotes.In the Outputs table, enter the following:
#
Property ID
Mapping
1
hashedValue
hashed
Click Save.
Here's how the final configuration looks in the Module Builder:
Now you have a hashed value that you can pass in an API call, stored in the hashedValue Hidden component. The details of how you'll pass that value vary based on what API you're communicating with. For example, whether the value should be part of an API Request Header or not, and even what the mapping should be. You can check the API's documentation for more details.