Combining Calculators and Decisions
Overview
Calculator and Decisions components can work together to create more complex logic-based configurations. In this
In this use case, you'll assess if your end-user pre-qualifies for a mortgage. Your end-user will answer a few questions, then immediately see whether they pre-qualify.
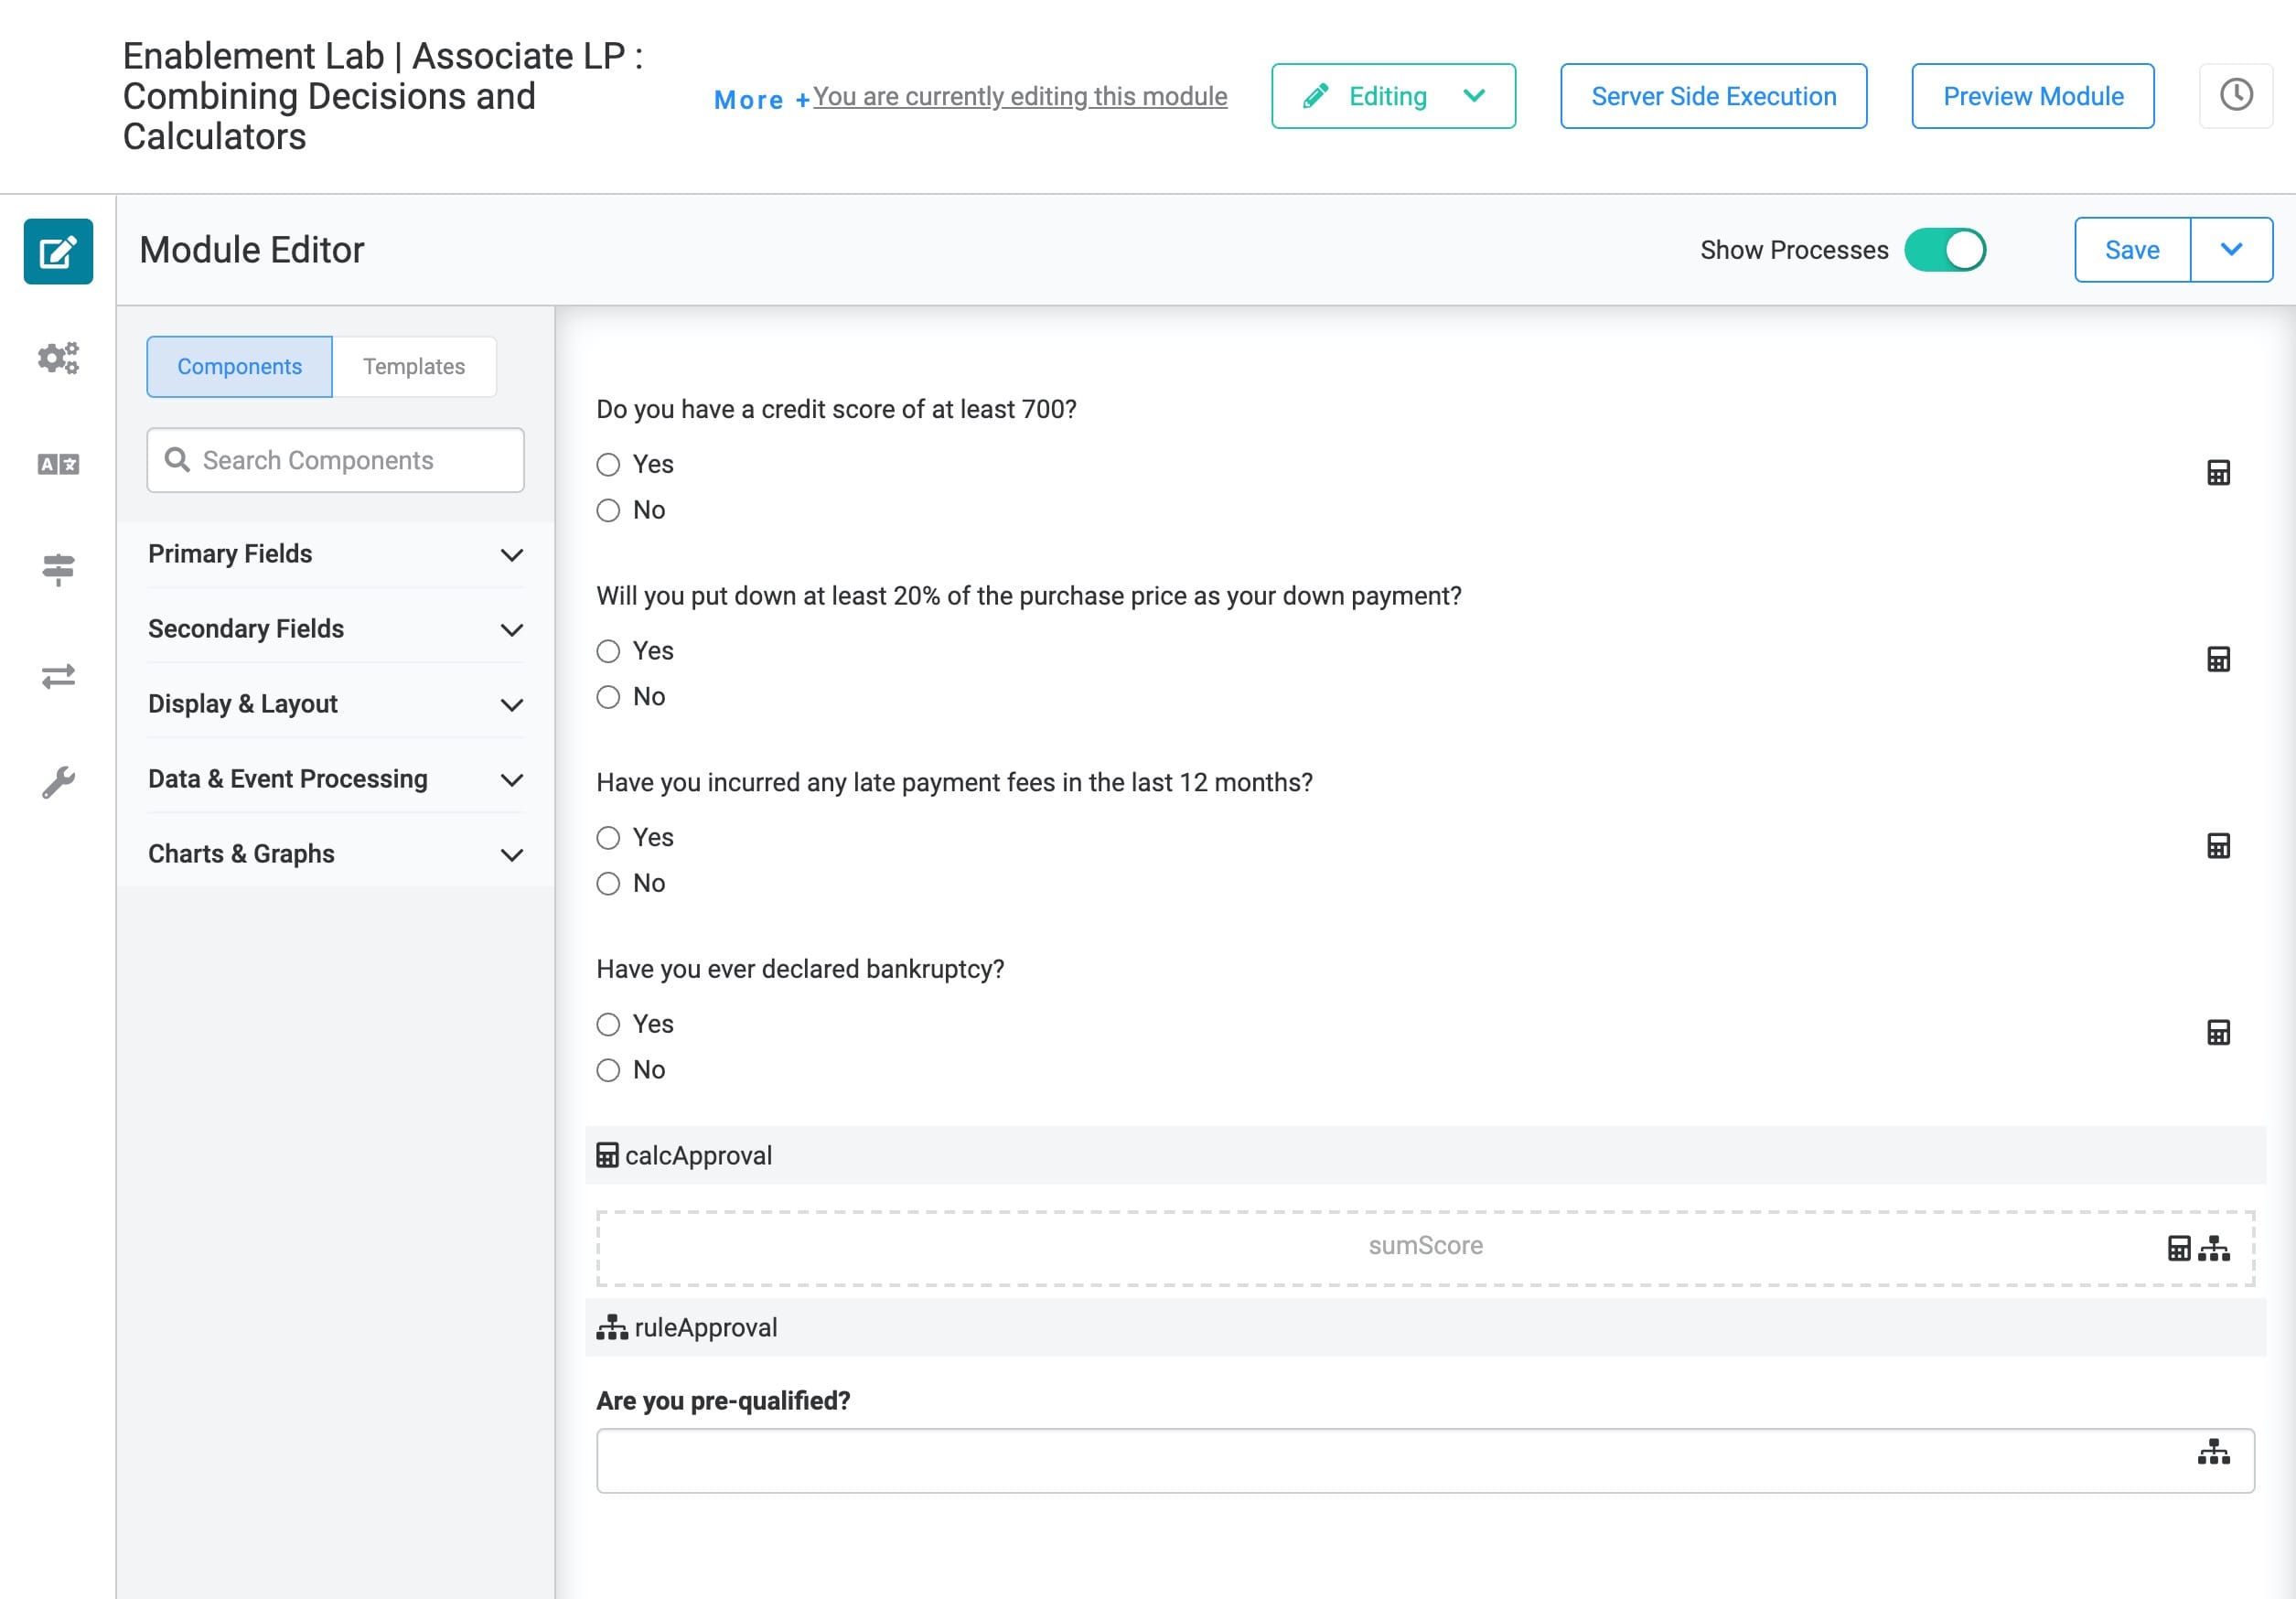
Here's how the completed use case will look in the Module Builder:
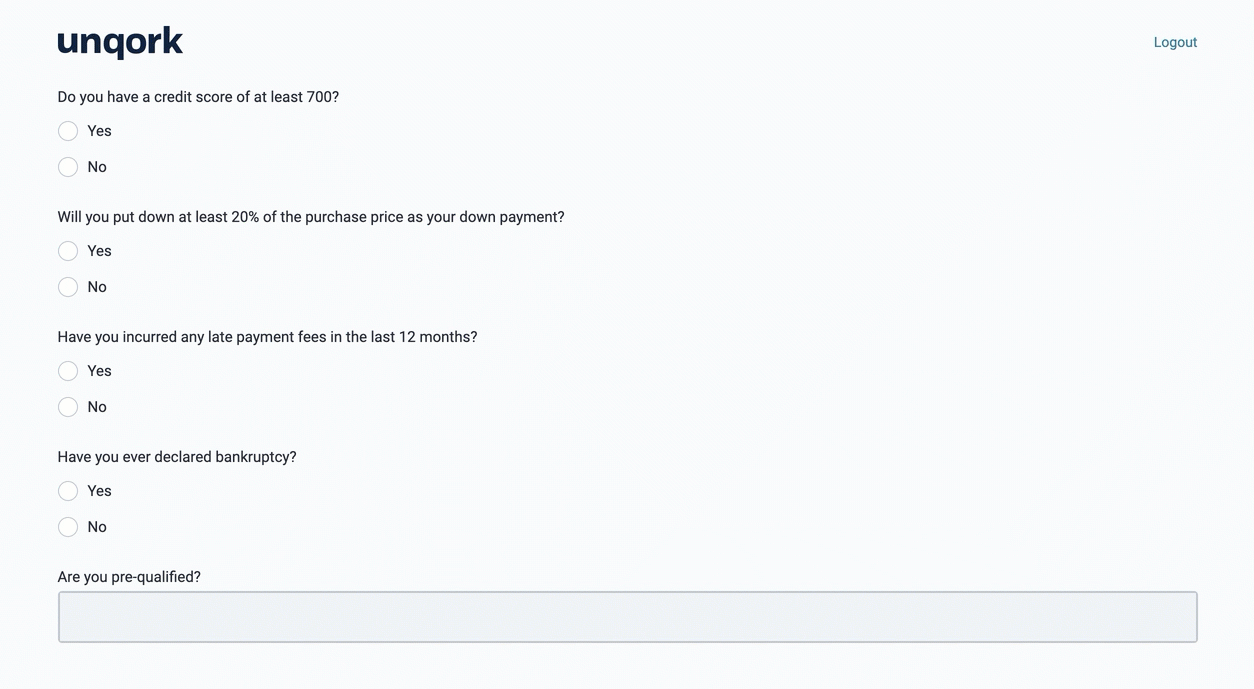
And here's how the completed use case will work in Express View:
What You'll Learn
In this
- Use a Calculator to calculate a combined score based on answers to questions.
- Use a Decisions component to set outcomes based on a calculated score.
What You'll Need
For this use case, you'll need:
- 4 Radio Buttons components
- 1 Calculator component
- 1 Hidden component
- 1 Decisions component
- 1 Text Field component
Configure the Radio Buttons Components
Let's start by setting up some questions for your end-user to answer. Here, you'll add 4 questions, each with 2 possible answers: Yes or No. You'll assign each answer a point value of 0 or 1. Your end-user's answers will help create a total score you can use to decide if they pre-qualify.
| 1. | Drag and drop 4 Radio Buttons components onto your canvas, placing them one below the other. |
| 2. | Complete their Property IDs and Label Text as follows: |
| # | Property ID | Label Text |
|---|---|---|
|
1 |
creditScore |
Do you have a credit score of at least 700? |
|
2 |
downPayment |
Will you put down at least 20% of the purchase price as your down payment? |
|
3 |
lateFees |
Have you incurred any late payment fees in the last 12 months? |
|
4 |
bankruptcy |
Have you ever declared bankruptcy? |
| 3. | For the creditScore and downPayment components, complete the Values table as follows: |
| Option Label | Value to Store in Submission Data |
|---|---|
|
Yes |
1 |
|
No |
0 |
| 4. | For the lateFees and bankruptcy components, complete the Values table as follows: |
| Option Label | Value to Store in Submission Data |
|---|---|
|
Yes |
0 |
|
No |
1 |
| 5. | Save each component as you add it. |
Configure the Hidden Component
In the next step, you'll use a Calculator to combine the point values of your questions. So, let's take a moment to set up a Hidden component to house that score.
| 1. | Drag and drop a Hidden component onto your canvas, placing it below the Radio Buttons components. |
| 2. | Enter sumScore in the Property ID and Label Text. |
| 3. | Click Save. |
Configure the Calculator Component
Now, let's set up the Calculator component. Your Calculator will have 4 inputs: your 4 Radio Buttons questions. To add the point value for each answer together, you'll use the Excel SUM function. You'll also give aliases to each of your inputs. This way, you can write the SUM formula using alias values instead of Property IDs.
| 1. | Drag and drop a Calculator component onto your canvas, placing it above your Hidden component. |
| 2. | Enter calcApproval in the Property ID and Label Text. |
| 3. | Complete the Inputs table as follows: |
| Property ID | Alias | Required |
|---|---|---|
|
creditScore |
A |
Yes (checked) |
|
downPayment |
B |
Yes (checked) |
|
lateFees |
C |
Yes (checked) |
|
bankruptcy |
D |
Yes (checked) |
| 4. | In the Outputs table, enter the following: |
| a. | ID: enter sumScore. |
| b. | Formula: enter =SUM(A,B,C,D). |
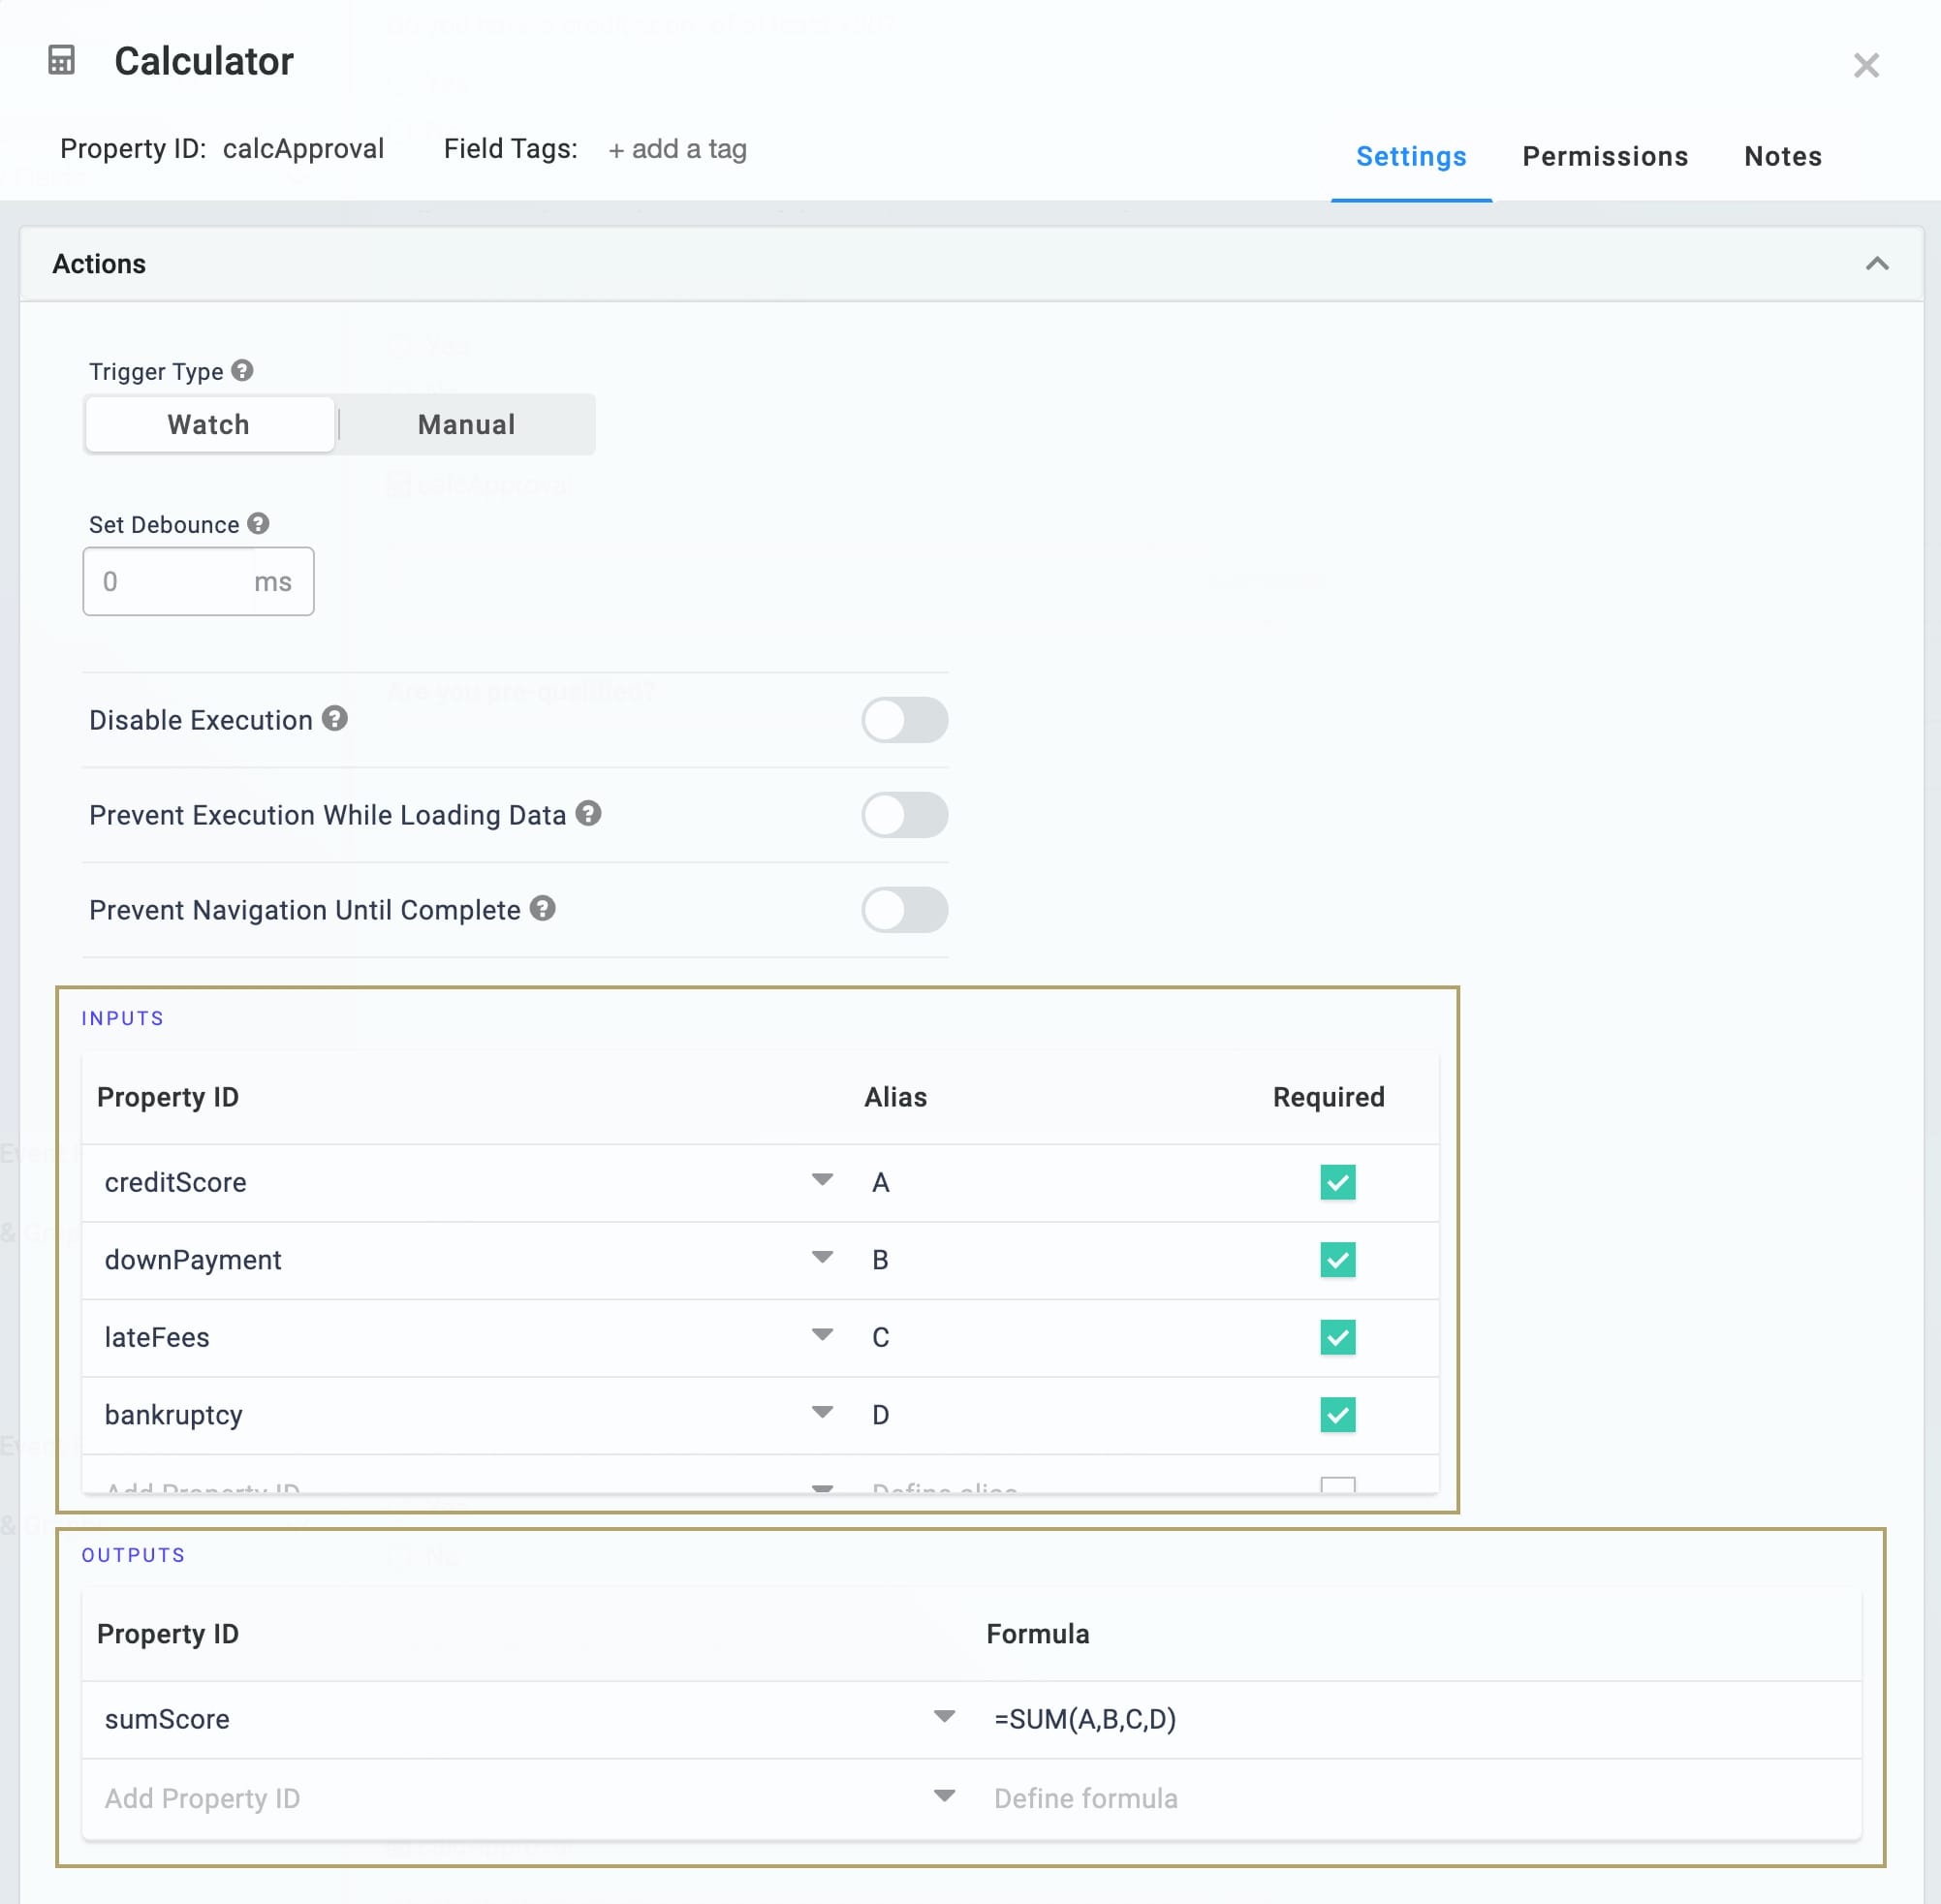
| 5. | Click Save. |
Configure the Text Field Component
In the next step, you'll use a Decisions component to create score-based outcomes. If your end user's score pre-qualifies, they'll see an approval message. If they don't pre-qualify, they'll get a rejection message. So, let's add a Text Field component to display the message.
| 1. | Drag and drop a Text Field component onto your canvas, placing it below the Calculator component. |
| 2. | Enter qualified in the Property ID. |
| 3. | Enter Are you pre-qualified? in the Label Text. |
| 4. | Set the Disable User Input toggle to ON. |
| 5. | Click Save. |
Configure the Decisions Component
Lastly, let's set up the Decisions component. This is where you'll actually create your score-based outcomes. If your end-user's combined score is between 0 and 2, they don't meet the criteria to pre-qualify. If their combined score is between 3 and 4, though, they're good to go. We can use the component to set these rules and also create the approval or rejection messages.
| 1. | Drag and drop a Decisions component onto your canvas, placing it above the Text Field component. |
| 2. | Enter Approval Decision in the Label. |
| 3. | Enter ruleApproval in the Property Name. |
| 4. | In the Inputs table, set the following: |
| a. | ID: enter sumScore. |
| b. | Type: enter range. |
| c. | Check the Required box. |
| 5. | In the Outputs table, set the following: |
| a. | ID: enter qualified. |
| b. | Type: enter value. |
| 6. | Complete the Micro Decisions table as follows: |
| sumScore_min | sumScore_max | qualified_value |
|---|---|---|
|
3 |
4 |
Congratulations! You pre-qualify. |
|
0 |
2 |
Sorry, but you don't pre-qualify at this time. |
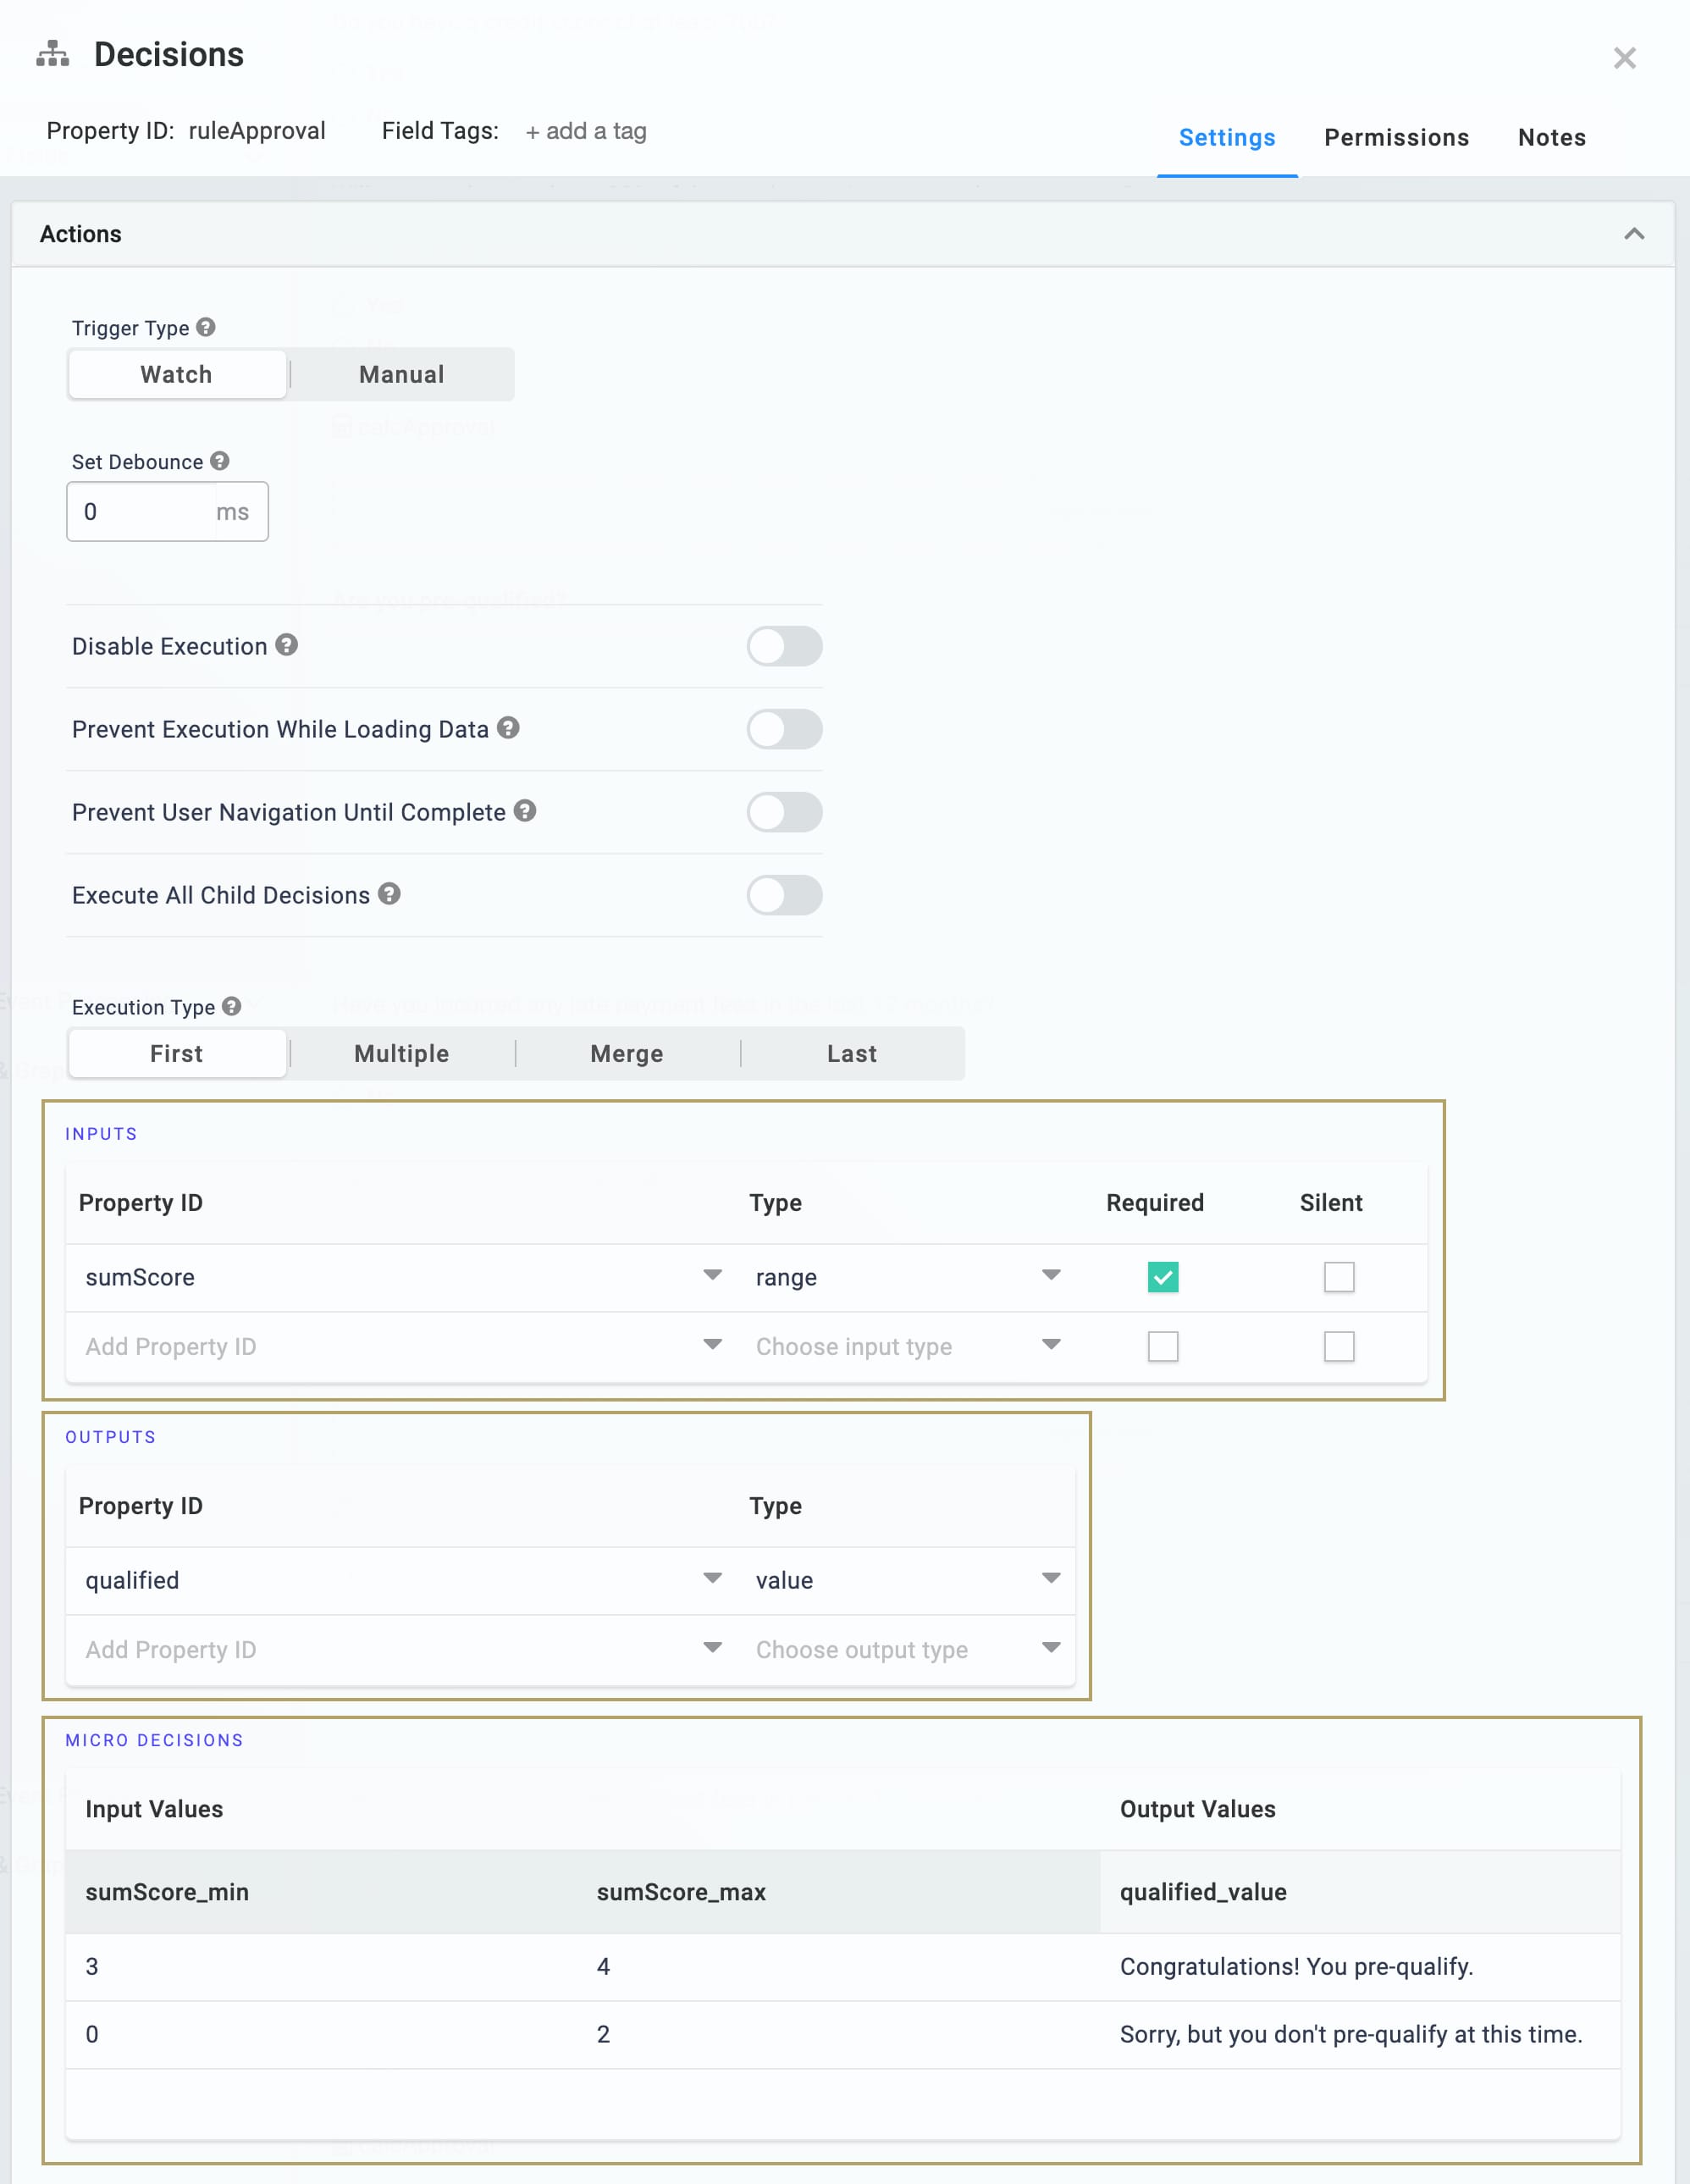
| 7. | Click Save. |
| 8. | Save your module. |
Now you're ready to test out your module. Preview your module in Express View and select some answers to your questions. Based on what you pick, you'll either see the approval or rejection message appear!
Lab
You can find the completed Combining Decisions and Calculators lab here: https://training.unqork.io/#/form/5f8e15ba85a56f024db7c2a3/edit.
