In this how-to guide, you’ll build an extension that checks a module for logic components using the On Watch setting. Components using On Watch are resource-intensive and might not meet an organization’s best practices. You’ll also test the extension to verify it performs its function using a test module.
Discover more about extensions in our Introduction to Extensions article.
Build an On Watch Checker Extension
The following process is required to build an On Watch checker extension:
Create and tag an extension module.
Configure the extension module to look for components using the On Watch setting.
Verify the extension’s function in a test module.
Create and Tag an Extension Module
While not required, extension modules can be built in their own application, or in an existing application. For this example, create an extension module in an existing application.
To create an extension module from the Application page:
Click + Create New.
Select Module. The Create Module modal displays.
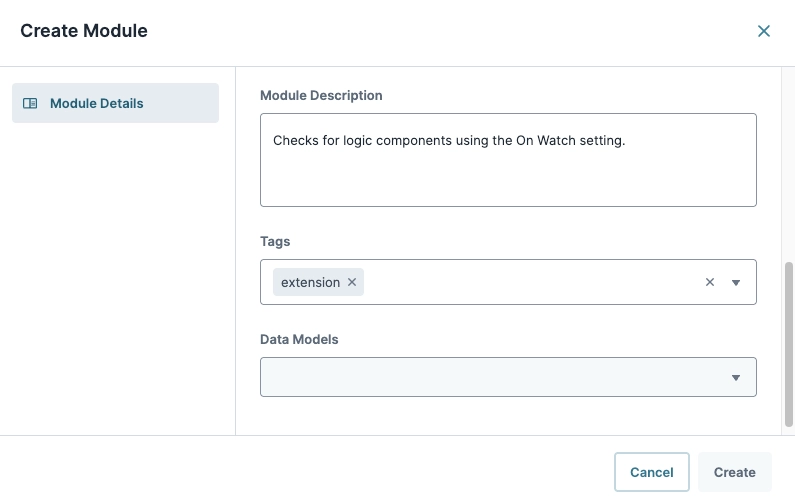
In the Module Name field, enter a name for your module. For example,
On Watch Checker Extension.
The Module Path field populates using the Module Name field’s value.From the Module Type drop-down, select Front-End.
In the Module Description field, enter
Checks for logic components using the On Watch setting.This field display’s in the Extension’s View Details modal.Click the Tags field, enter or select
extension. After creating the module, this tag converts the module to an extension module.
Click Create. A new page displays the extension module.
The module now functions as an extension and becomes available in the Module Extension Drawer.
Configure the Extension Module
Like standard Unqork Front-End modules, an extension module serves as the front-end UI for your extension. This example demonstrates building the UI layout. However, Creators can use the Extension Starter Kit Template’s Extension Layout Example module, which includes the minimum component layout required to display an extension module.
Configure the Extension Design Layout
The extension design layout uses two Field Group components. One contains the extension’s content, where input and logic components perform their function. The second contains the buttons for triggering the extension’s functions or closing the extension.
In the Module Builder, drag and drop a Field Group component onto the canvas.
In the Property ID field, enter
fgExtensionContent.In the Custom CSS Class field, enter
UD_ModalDialog_Content. This value styles the extension to match Unqork’s UDesigner style.Click Save Component.
Drag and drop a second Field Group component on the canvas, placing it below the
fgExtensionContentField Group component.In the Property ID field, enter
fgExtensionActions.In the Custom CSS Class field, enter
UD_ModalDialog_Actions. This value styles the extension to match Unqork’s UDesigner style.Click Save Component.
Configure the htmlOnWatch HTML Element Component
Use an HTML Element component to provide a simple description of what the extension does when the Creator runs it.
From the Module Builder, drag and drop an HTML Element component onto the canvas, placing it inside the
fgExtensionContentField Group component.In the Property ID field, enter
htmlOnWatch.In the Content field, enter
Check for components using "On Watch" trigger..Click Save Component.
Configure the componentsIn Hidden Component
The Hidden component stores the component data retrieved from a module that’s currently on the canvas. Configure its Property ID to use the componentsIn reserved value. This value is utilized by UDesigner extensions to store component data retrieved from a module that’s currently on the canvas.
Drop and drop a Hidden component onto the canvas, placing it below the
htmlOnWatchHTML element component.In the Property ID field, enter
componentsIn.Click Save Component.
Configure the componentsOnWatch Hidden Component
Configure a hidden component to receive an array of component Property IDs that use the On Watch setting.
Drop and drop a Hidden component onto the canvas, placing it below the
componentsInHidden component.In the Property ID and Label Text fields, enter
componentsOnWatch.Click Save Component.
Configure the htmlOnWatch2 HTML Element Component
Create a UI header that explains the extension’s results to the end-user.
Drag and drop an HTML Element component onto the canvas, placing it below the
componentsOnWatchHidden component.In the Property ID field, enter
htmlOnWatch2.In the Content field, enter
Components on watch:. This value acts as the header for the list that displays On Watch components in a module.In the Tag field, enter
h2.Click Save Component.
Configure the htmlComponentsOnWatch HTML Element Component
This component is purposely left empty. After the extension’s executes its logic, any On Watch components display in this component’s content field.
Drag and drop an HTML Element component onto the canvas, placing it below the
componentsOnWatchHidden component.In the Property ID field, enter
htmlComponentsOnWatch.Click Save Component.
Configure the dwfGetOnWatchComponents Data Workflow Component
Use a Data Workflow component to define the logic that retrieves component data from the componentsIn Hidden component and filters it for components that use the On Watch setting.
Drag and drop a Data Workflow component onto the canvas, placing it below the
componentsInHidden component.In the Property ID and Canvas Label Text fields, enter
dwfGetOnWatchComponents.Drop and drop an Input operator onto the Data Workflow canvas.
Configure the operator's Info window as follows:
Info
Category
Input
Component
componentsIn
Required
Yes
Source
Default
Drag and drop a Filter operator onto the Data Workflow canvas.
Configure the operator's Info window as follows:
Info
Category
Filter
Label
triggerType="watch"
Do Not Sanitize Formula
.jpg) (Checked).
(Checked).Preserve Argument Type
☐ (Unchecked)
Expression
triggerType="watch"
Connect the output port (right) of the
componentsInInput operator to the input port (left) of thetriggerType="watch"Filter operator.Drag and drop a Size operator onto the Data Workflow canvas.
Connect the output port (right) of the
componentsInInput operator to the input port (left) of the Size operator.Drag and drop a Decision operator onto the Data Workflow canvas.
Configure the operator's Info window as follows:
Info
Category
Decision
Input List
Preserve Argument Type
☐ (Unchecked)
Condition
_arg>0
Connect the output port (right) of the
triggerType="watch"Filter operator to the input port (left) of the_arg>0Decision operator.Connect the output port (right) of the Size operator to the argument port (top) of the
_arg>0Decision operator.Drag and drop a Set Outputs operator onto the Data Workflow canvas.
Configure the operator's Info window as follows:
Info
Category
Set Outputs
Component 1
htmlComponentsOnWatch
Component 2
Component 3
Component 4
Component 5
Action
content
setValue
No components using On Watch trigger.
Connect the bottom output port (right) of the
_arg>0Decision operator to the input port (left) of thehtmlComponentsOnWatchSet Outputs operator.Drag and drop a Col2Array operator onto the Data Workflow canvas.
Configure the operator's Info window as follows:
Info
Category
Col2Array
Label
key
Preserve Argument Type
☐ (Unchecked)
Path
key
Default Value
Connect the top output port (right) of the
_arg>0Decision operator to the input port (left) of thekeyCol2Array operator.Drag and drop an Outputs operator onto the Data Workflow canvas.
Configure the operator's Info window as follows:
Info
Category
Set Outputs
Component
componentsOnWatch
Action
value
Connect the bottom output port (right) of the
keyCol2Array operator to the input port (left) of thecomponentsOnWatchOutputs operator.Drag and drop a Convert To Value operator onto the Data Workflow canvas.
Configure the operator's Info window as follows:
Info
Category
Convert to Value
Label
Convert to String
Preserve Argument Type
☐ (Unchecked)
Cast to
String
Connect the bottom output port (right) of the
keyCol2Array operator to the input port (left) of theConvert to StringConvert Value operator.Drag and drop a Set Outputs operator onto the Data Workflow canvas.
Configure the operator's Info window as follows:
Info
Category
Set Outputs
Component 1
htmlComponentsOnWatch
Component 2
Component 3
Component 4
Component 5
Action
content
setValue
Your completed Data Workflow component looks like the following:
.webp)
Click Save Component.
Configure the initGetComponentsFlat Initializer Component
Use an Initializer component to emit the extension Events required to retrieve the current module’s component data, and store it in the componentsIn Hidden component.
Learn more about extension events in our Introduction to Extensions article.
Drag and drop an Initializer component onto the canvas, placing it above the
componentsInHidden component.In the Property ID and Canvas Label Text fields, enter
initGetComponentsFlat.In the Outputs table, enter the following:
#
Source
Type
Value
1
componentsIn
vegaOperation
[{"name":"dataOut","type":"GET_PROPERTY","options":{"targetKey":["postEventTriggerKey"],"property":"value"}},{"type":"EMIT_EVENT","options":{"event":"EXTENSION_EVENT","payload":{"event":"EXTENSION_READY_FOR_COMPONENTS_FLAT","includeOperationContext":true}}}]
2
dwfGetOnWatchComponents
trigger
GO
Click Save Component.
Configure the btnCloseExtension Button Component
Configure the Button componnent that closes the extension’s modal. This button mimics Unqork’s method used for closing modals.
Drop and drop a Button component onto the canvas, placing it inside the
fgExtensionActionsField Group component.In the Property ID field, enter
btnCloseExtension.In the Label Text field, enter
Close.Navigate to the Actions settings.
Set the Action Type to
Event.Next to Events & Operations, click Edit. The Events & Operations modal displays.
From the Add Event drop-down, enter or select
On Click.Click + Add Operation.
From the Operation Type drop-down, enter or select EMIT_EVENT.
In the Config field, enter
{"targetKey":"","event":"EXTENSION_EVENT","payload":{"event":"EXTENSION_READY_TO_CLOSE"}}.Click Save.
Click Close.
Navigate to the Advanced settings.
In the Custom CSS Styling field, enter
dup-mod-cancel.Click Save Component.
Configure the btnGetComponentsOnWatch Button Component
Finally, configure the button that triggers the initGetComponentsFlat Initializer component.
Drop and drop a Button component onto the canvas, placing it below the
btnCloseExtensionButton component.In the Property ID field, enter
btnGetComponentsOnWatch.In the Label Text field, enter
Get Components on Watch.Navigate to the Actions settings.
From the Action Type drop-down, select Event.
In the Triggers field, enter or select
initGetComponentsFlat.Click Save Component.
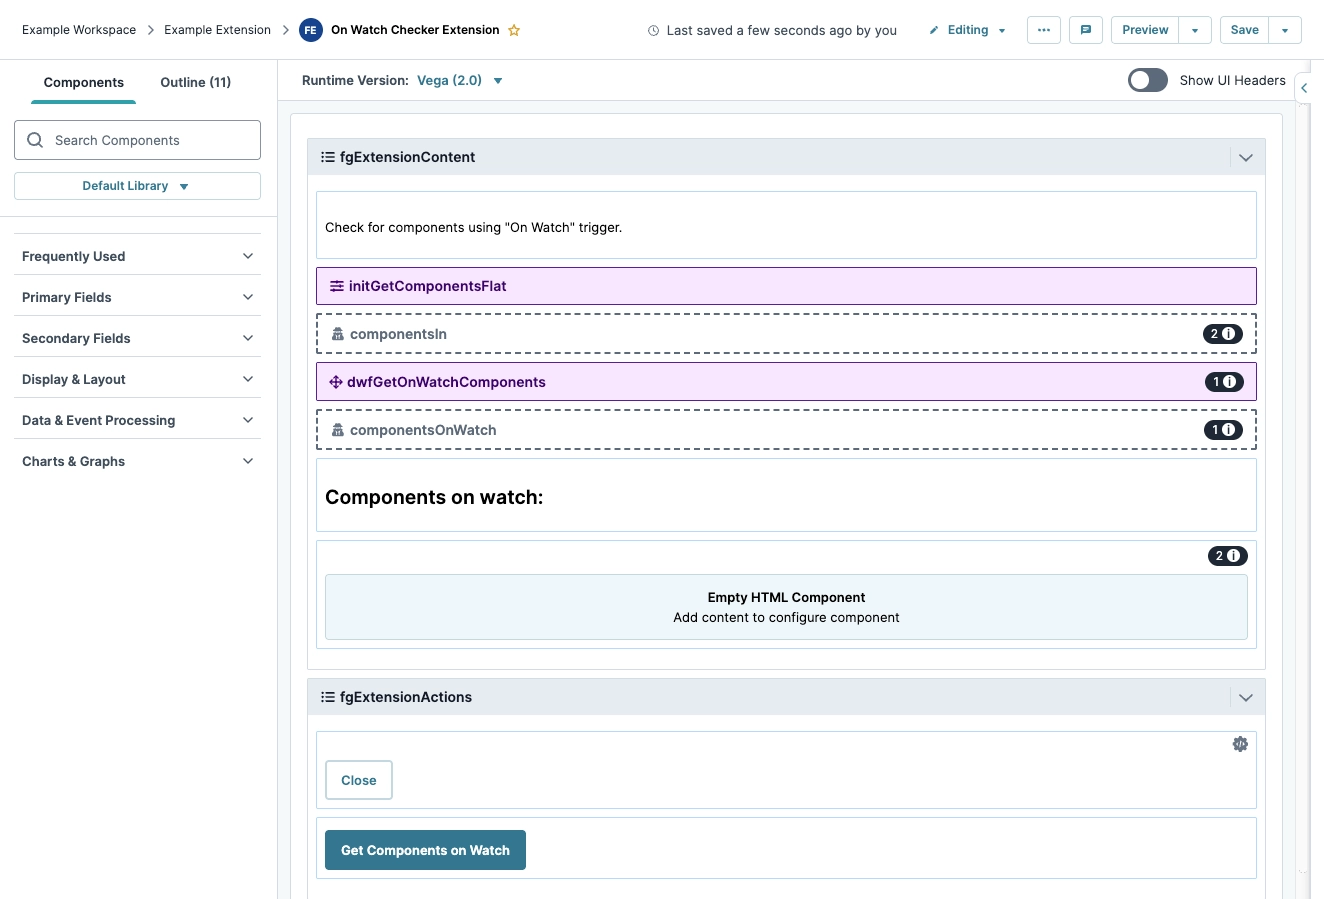
Save your module.
Your module looks like the following:

Test the Extension
Now that your extension module is tagged and configured, test it an an example module containing two logic components. One component is set to On Watch, and the other is set to Manual.
Configure the Test Module
This section assumes you have created a new module for testing.
Configure the initOnWatchTrigger Initializer Component
Configure an initializer component to use the On Watch trigger. Because this component is only for testing, it will not perform any other actions.
In the Module Builder, drag and drop an Initializer component on the canvas.
In the Property ID and Canvas Label Text fields, enter
initOnWatchTrigger.From the Trigger Type drop-down, enter or select
Watch.Click Save Component.
Configure the initmanualTrigger Initializer Component
Drag and drop an Initializer component on the canvas.
In the Property ID and Canvas Label Text fields, enter
initmanualTrigger.Click Save Component.
Save your module.
Your test module canvas looks like the following:

Open and Test the On Watch Extension
To test the extension:
In the Module Builder, click the
.png) (ellipsis) button.
(ellipsis) button.Click Extensions. The Extensions drawer displays.
From the Extensions list, navigate to the name of your extension. For example, On Watch Checker Extension.
Click Run. The extension modal displays.
Click Get Components on Watch.
Under Components on watch:, the
initOnWatchTriggerInitializer component displays.
If the extension works as intended, then it’s ready to be used by Creators in the development of Unqork applications.
If the extension generates errors or is missing features:
Return to the extension module and review its contents.
If issues are found, update the module’s logic.
Save the module.
Repeat the Open and Test the On Watch Extension steps.