The Extensions feature is currently in open beta. Please contact your Unqork representative for more details and access.
The Extension Starter Kit Template provides Creators with example extension modules for understanding how to design and customize their own extensions. The starter kit includes two layout and design modules, and a demonstration module that contains extension-specific events and operations needed to begin creating an extension.
To learn more about extensions, view our Introduction to Extensions article.
The Extensions feature is intended for developers who have a strong understanding of the Unqork Designer Platform, Operations Builder, and Vega (v2.0) Runtime.
Installing the Extension Starter Kit Template From the Unqork Marketplace
To use the Extension Starter Kit Template, you must first install it in your company environment. If the starter kit has already been installed, move on to the Creating an App From the Template section.
To add the Extension Starter Kit Template to your environment:
At the top right of the Unqork Designer Platform, click Marketplace.
You can also access the Unqork Marketplace at any time using the following link: https://marketplace.unqork.io.
In the Search the Listings Directory field, enter Extension Starter Kit.
Click the Extension Starter Kit listing tile.
Click Install to Environment.
NOTE
If you aren't logged in, you'll see a field for Environment URL and a Login button. Enter your environment's URL where you want to install the template. For example,
environmentname.unqork.io. Click the Login button. Then, return to step four and click Install to Environment again. Follow the remaining steps as listed.Click Install Template.
Now, you can use your newly installed listing in your environment.
Creating an App from the Template
After installing the Extension Starter Kit Template from the Marketplace, Creators can generate a new application using the template tool.
To create an Extension Starter Kit Template application:
At the top right of the Unqork Designer Platform, click Library.
Click Templates. The Template page displays.
Navigate to the Extension Starter Kit card. If your environment has many extensions, you might have to navigate through the paginated list.
Click Create App from Template. The Create App from Template modal displays.
Click the Workspace drop-down, select a workspace from the environment.
In the App Name field, enter a name for your Extension Starter Kit application.
The App Path value populates based on the App Name field.Click Create App.
The new application page displays the four Extension Start Kit modules.
Now, you can use your newly installed listing in your environment.
How the Template Works
The Extension Starter Kit template contains the following modules:
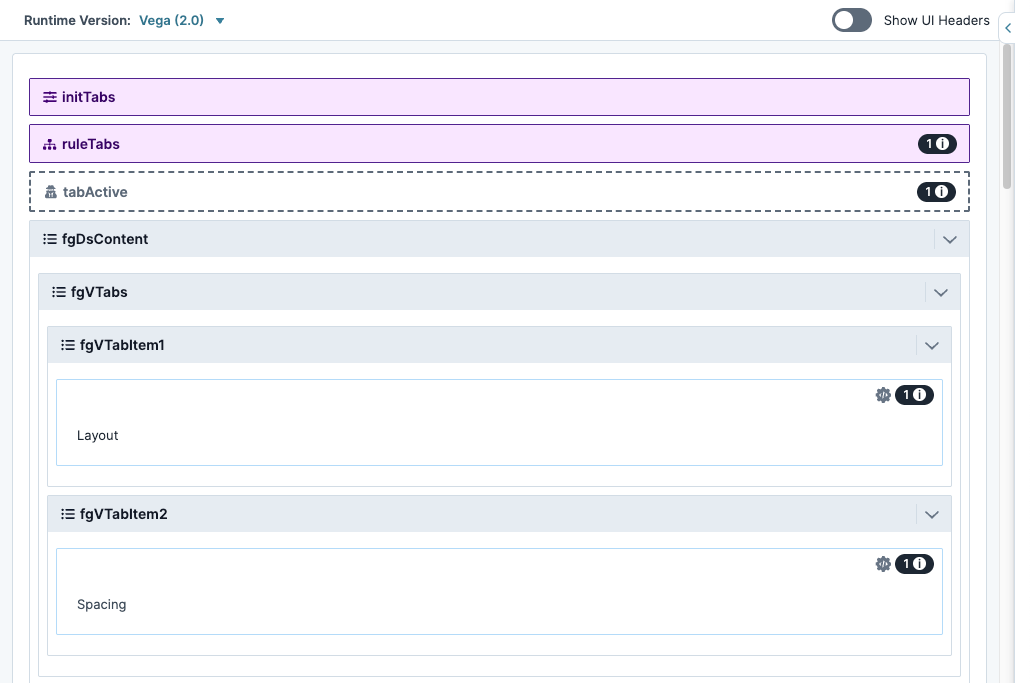
Extension Design Layout Module: An example of how an extension can be customized. Customization includes tab buttons and alignment for elements or text.
Extension Layout Module: The minimum design and layout required to build an extension.
Extension Interaction Module: A demo extension that enables Creators to view, edit, and update module JSON data.
Extensions (Entrypoint) Module: A placeholder module created during the templating process. This module does not affect the starter kit and can be deleted.
Click on the tabs below to learn more about each module:
How the Extension Design Module Works
The Extension Design module contains all the design and layout elements available to use in an extension. Creators can copy or manipulate these elements for their own extensions.
Elements include:
Horizontal Tabs: Create two or more tabs to organize data for end-users.
Element Alignment: Align elements to the left, vertical center, or right.
Element Distribution: Distribute elements to the left, horizontal center, or right.
Text Alignment: Align text to the left, horizontal, or right in an element.
Element Spacing: Extra-Small through Extra-Large padding and gap elements.

How the Extension Layout Module Works
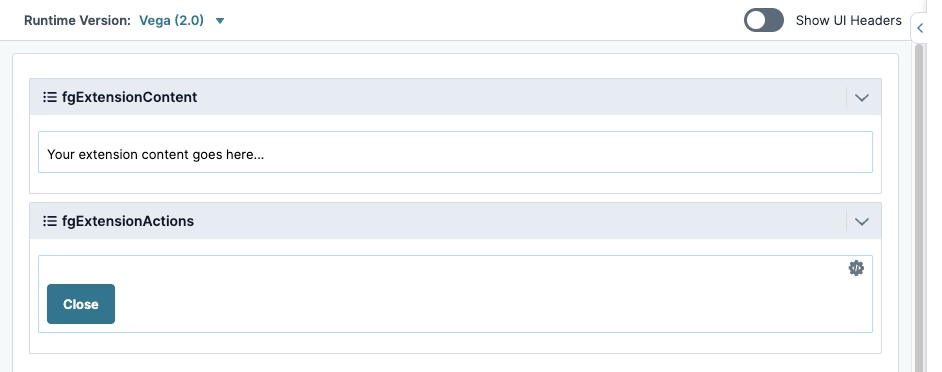
Every extension functions inside a modal. The Extension Layout module includes field groups for organizing and displaying an extension’s contents inside that modal. The module also includes a Button component for closing the extension’s modal, preventing Creators from becoming stuck.

How the Extension Interaction Module Works
This extension module contains examples of an extension that can retrieve, manipulate, and update data from the module it’s used on. It includes components that emit unique events to retrieve, manipulate, and update module data. When end-users run the extension or click the extension’s buttons, the events are emitted.
The Extension Interaction module includes the following functions:
Getting Component Data
Getting and Flattening (Unnesting) Component Data
Replacing Component Data
Updating Component Data
Displaying a Toast (On-Screen Notification)
Getting (And Flattening) Component Data
To manipulate a module in the Module Builder, an extension must first retrieve the module component data. For this extension example, Creators can retrieve component data as a JSON object using one of two different Initializer components:
InitGetComponentsInitializer Component: Uses theEXTENSION_READY_FOR_COMPONENTSevent to retrieve component data without modifying it.initGetComponentsFlatInitializer Component: Uses theEXTENSION_READY_FOR_COMPONENTS_FLATevent to retrieve flattened (unnested) component data. For example, components inside a Panel component are brought up a level.
After one of the two Initializer components emits the component data as a JSON object, the calcStringifyComponents Calculator component converts the object to a string.
Understanding the InitGetComponents Initializer Component
This Initializer component triggers when an end-user clicks the btnGetComponents Button component. The Initializer component’s primary purpose is to retrieve the current module’s component data by using the following JSON Vega operation:
[
  {
    "name": "dataOut",
    "type": "GET_PROPERTY",
    "options": {
      "targetKey": ["postEventTriggerKey"],
      "property": "value"
    }
  },
  {
    "type": "EMIT_EVENT",
    "options": {
      "inputs": [
        {
          "targetKey": "",
          "propertyPath": "",
          "alias": "",
          "required": false,
          "silent": false,
          "type": ""
        }
      ],
      "targetKey": "",
      "event": "EXTENSION_EVENT",
      "payload": {
        "event": "EXTENSION_READY_FOR_COMPONENTS",
        "includeOperationContext": true
      }
    }
  }
]
The operation includes the following parts:
The
GET_PROPERTY(Get Property) operation targets module components using thepostEventTriggerKeykey. Then, it retrieves the component’s values.The
EMIT_EVENT(Emit Event) operation, which emits an event calledEXTENSION_READY_FOR_COMPONENTS(Extension Ready For Components), containing the module’s component data in its payload.The payload containing the module’s data stores in the
componentsInHidden component and becomes available to the rest of the extension.
Understanding the InitGetComponents Initializer Component
Similar to the InitGetComponents Initializer component, this component uses the GET_PROPERTY and EMIT_EVENT operations to retrieve component values. It uses the EXTENSION_READY_FOR_COMPONENTS_FLAT event to retrieve component data. Unlike the EXTENSION_READY_FOR_COMPONENTS event, this event flattens the structure of the component data, separating any nested components.
For example, if a Panel component contains other components, flattening the data converts the contained (nested) components into a single-level key-value format.
The Initializer component retrieves the current module’s component data by using the following JSON Vega operation:
[
  {
    "name": "dataOut",
    "type": "GET_PROPERTY",
    "options": {
      "targetKey": ["postEventTriggerKey"],
      "property": "value"
    }
  },
  {
    "type": "EMIT_EVENT",
    "options": {
      "inputs": [
        {
          "targetKey": "",
          "propertyPath": "",
          "alias": "",
          "required": false,
          "silent": false,
          "type": ""
        }
      ],
      "targetKey": "",
      "event": "EXTENSION_EVENT",
      "payload": {
        "event": "EXTENSION_READY_FOR_COMPONENTS_FLAT",
        "includeOperationContext": true
      }
    }
  }
]
The operation includes the following parts:
The
GET_PROPERTY(Get Property) operation targets module components using thepostEventTriggerKeykey. Then, it retrieves the component’s values.The
EMIT_EVENT(Emit Event) operation, which emits an event calledEXTENSION_READY_FOR_COMPONENTS_FLAT(Extension Ready For Flattened Components), containing the module’s flattened component data in its payload.The payload containing the module’s data stores in the
componentsInHidden component and becomes available to the rest of the extension.
Understanding the calcStringifyComponents Calculator
This component converts the componentsIn Hidden component's JSON object data into a string that follows JSON syntax. This enables the data to be stored as text that can be edited by Creators in the extentionModuleComponents Text Area component.
Replacing Component Data
Creators use this part of the extension to replace all component data in the module they are editing. This method is similar to an API PUT action in that it does not update existing data, but replaces it entirely.
Understanding the initReplaceComponents Initializer
The initReplaceComponents Initializer component performs four functions:
Retrieves the stringified JSON data from the
extensionModuleComponentsReplaceText Area component.Converts the stringified JSON into a JSON object.
Emits the JSON object in the
EXTENSION_READY_TO_REPLACE_COMPONENTSevent's payload.Stores the payload in the
componentsOutHidden component. ThecomponentsOutkey replaces the current module’s component with the value entered into theextensionModuleComponentsReplaceText Area component.
The Initializer component replaces the current module’s component data by using the following JSON Vega Operation:
[
  {
    "name": "dataOut",
    "type": "GET_PROPERTY",
    "options": {
      "targetKey": ["componentsOut"],
      "property": "value"
    }
  },
  {
    "type": "EMIT_EVENT",
    "options": {
      "targetKey": "",
      "event": "EXTENSION_EVENT",
      "payload": {
        "event": "EXTENSION_READY_TO_REPLACE_COMPONENTS",
        "includeOperationContext": true
      }
    }
  }
]
The operation breaks down into the following parts:
The
GET_PROPERTY(Get Property) operation prepares theEMIT_EVENToperation to emit an event to thecomponentsOutHidden component.The
EMIT_EVENT(Emit Event) operation, which emits an event calledEXTENSION_READY_TO_REPLACE_COMPONENTS(Extension Ready To Replace Components). This event contains the component data payload.The payload containing the module’s data stores in the
componentsOutHidden component.
Updating Component Data
Instead of replacing component data, Creators can update existing values of the module’s component data. This method is similar to an API PATCH action; it updates existing data instead of replacing it.
Understanding the initUpdateComponents Initializer Component
Similar to the initReplaceComponents Initializer component, the initUpdateComponents Initializer component converts stringified JSON into a JSON object. Then, it emits the object in an event (EXTENSION_READY_TO_UPDATE_COMPONENTS). Instead of replacing the components, this event updates the components’ individual values.
The initUpdateComponents Initializer component performs the following functions:
Retrieves the stringified JSON data from the
extensionModuleComponentsUpdateText Area component.Converts the stringified JSON into a JSON object.
Emits the JSON object in the
EXTENSION_READY_TO_UPDATE_COMPONENTSevent's payload.Stores the payload in the
componentsOutHidden component. ThecomponentsOutkey updates the current module’s component with the value entered into theextensionModuleComponentsReplaceText Area component.
The Initializer component updates the current module’s component data by using the following JSON Vega operation:
[
  {
    "name": "dataOut",
    "type": "GET_PROPERTY",
    "options": {
      "targetKey": [
        "componentsOut"
      ],
      "property": "value"
    }
  },
  {
    "type": "EMIT_EVENT",
    "options": {
      "inputs": [
        {
          "targetKey": "",
          "propertyPath": "",
          "alias": "",
          "required": false,
          "silent": false,
          "type": ""
        }
      ],
      "targetKey": "",
      "event": "EXTENSION_EVENT",
      "payload": {
        "event": "EXTENSION_READY_TO_UPDATE_COMPONENTS",
        "includeOperationContext": true
      }
    }
  }
]
The operation includes the following parts:
The
GET_PROPERTY(Get Property) operation prepares theEMIT_EVENToperation to emit an event to thecomponentsOutHidden component.The
EMIT_EVENT(Emit Event) operation, which emits an event calledEXTENSION_READY_TO_UPDATE_COMPONENTS(Extension Ready To Replace Components). This event contains the component data payload.The payload containing the module’s data stores in the
componentsOutHidden component.
Creating a Toast Notification
A toast notification displays a bar of text at the bottom of the Module Builder page. This example uses a Text Field component to create the notification’s value, and an Initializer component to process that value into an event payload. The event payload displays as a text notification at the bottom of the Module Builder screen.
The initUpdateComponents Initializer component performs the following functions:
Retrieves the
toastContentText Field component’s value.Emits the text value using an Event (
EXTENSION_READY_TO_SHOW_TOAST) payload.
[
  {
    "name": "dataOut",
    "type": "GET_PROPERTY",
    "options": { "targetKey": ["toastContent"], "property": "value" }
  },
  {
    "type": "EMIT_EVENT",
    "options": {
      "inputs": [
        {
          "targetKey": "",
          "propertyPath": "",
          "alias": "",
          "required": false,
          "silent": false,
          "type": ""
        }
      ],
      "targetKey": "",
      "event": "EXTENSION_EVENT",
      "payload": {
        "event": "EXTENSION_READY_TO_SHOW_TOAST",
        "includeOperationContext": true
      }
    }
  }
]
The operation includes the following parts:
The
GET_PROPERTY(Get Property) operation retrieves thetoastContentText Field component’s value.The
EMIT_EVENT(Emit Event) operation emits an event calledEXTENSION_READY_TO_SHOW_TOAST(Extension Show Toast). This event contains the toast’s text value payload.The payload displays at the bottom of the page when the Creators click the
btnPopToastButton component.
Testing the Template
After installing and configuring a module extension, Creators can test the example configuration in the Module Builder.
Access the Extensions Drawer
To access extensions from the Application page:
Open a module in the Module Builder.
Click the
.png) (ellipsis) button.
(ellipsis) button.Click Extensions. The Extensions drawer displays.
To learn more about Module Builder Settings, view our Module Builder Settings Sidebar Option article.
Run the Extension
To run an extension from the Extension Drawer:
Navigate to or search for one of the three starter extensions in the list.
Click Run.
The extension displays a modal or executes the extension’s module contents.
Test the Extension
Test every setting and field of the extension to verify each function performs as expected. If an error or issue occurs, return to the extension’s module and adjust the configuration.