Overview
Use the Join operator to combine strings of a data array into a new array. For example, let's say you have an array of client names. You want to combine them into another array, with each name listed one after the other. The Join operator helps you reorganize these names into this new format. It also lets you separate them, so your list isn't one indecipherable line. The operator lets you use anything to separate your data, like a comma, colon, or semi-colon.
It's important to note that the Join operator only works with arrays. Data tables are arrays of objects. If you try to input a column of names from a Data Table component directly, [object Object] displays in the DevTools Console.
You'll find the Join operator under the Array group to the left of your Data Workflow canvas.
About the Info Window
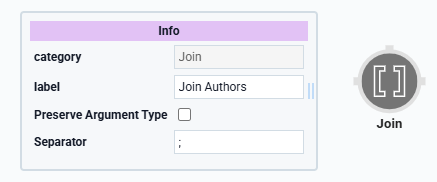
Here's a breakdown of the operator's Info window:
Setting | Description |
|---|---|
Category | Grayed out and non-adjustable setting indicating the operation type. |
Label | Sets the label for your operator, displaying below the operator on your Data Workflow canvas. This field is optional, but set a label if you use more than one of the same operator type. A label helps you identify your operators without opening any Info windows. |
Preserve Argument Type | When selected, this setting ensures the argument data type is respected when the operator executes. |
Separator | This is the character or symbol you use to separate your data. Examples are a comma, colon, hyphen, or semi-colon, but you can choose anything you want. You can also choose to use |
Adding a Join Operator
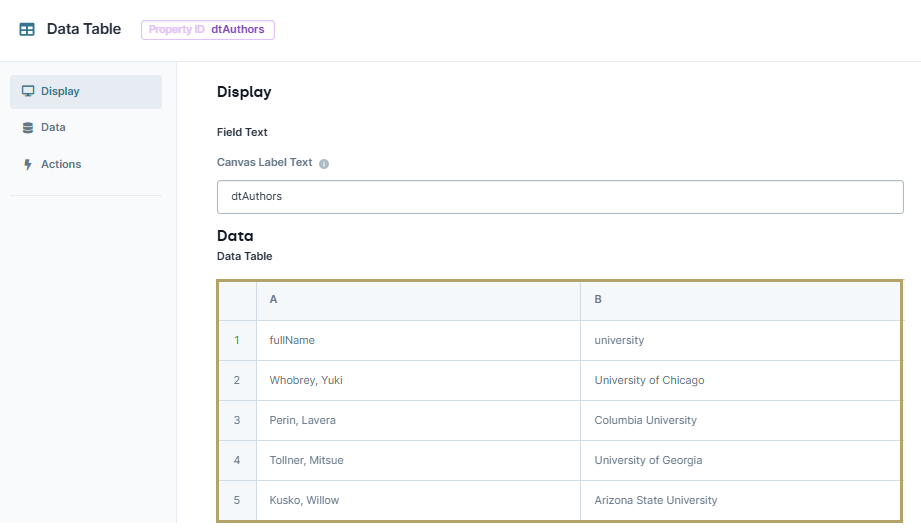
For this example, you'll configure a Data Table component with a list of contributing authors and the institutions where they work. Before you pass the data to a Join operator, you'll convert the table data to an array using a Col2Array operator. Then, you'll pass this data to the Join operator, separating the combined data using semi-colons.
These instructions assume you have a module open, saved, and with a title.
Configure the Data Table Component
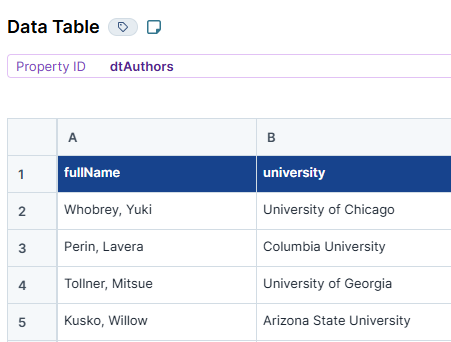
First, set up a Data Table component to store a list of contributing authors and the institutions where they work.
In the Module Builder, drag and drop a Data Table component onto your canvas.
In the Property ID and Canvas Label Text fields, enter
dtAuthors.In the data table, enter the following:
A
B
1
fullName
university
2
Whobrey, Yuki
University of Chicago
3
Perin, Lavera
Columbia University
4
Tollner, Mitsue
University of Georgia
5
Kusko, Willow
Arizona State University
Click Save Component.
Configure the Hidden Component
Next, configure a Hidden component to store your Data Workflow's output.
Drag and drop a Hidden component onto your canvas, placing it below your dtAuthors Data Table component.
In the Property ID and Canvas Label Text fields, enter
joinOutput.Click Save Component.
Configure the Data Workflow Component
Next, set up a Data Workflow component with a Col2Array operator to turn your table data into an array. Then, use the Join operator to combine all your author's names in one line, separated by semi-colons. To better help you watch the progress of your Data Workflow, add three Console operators to view the process.
Drag and drop a Data Workflow component onto your canvas, placing it between the dtAuthors Data Table and joinOutput Hidden components.
In the Property ID field, enter dwfJoinAuthors.
In theCanvas Label Text, enter
dwfJoinAuthors.
Configure the Input Operator
Drag and drop an Input operator onto your Data Workflow canvas.
Configure the operator's Info window as follows:
Info
Category
Input
Component
dtAuthors
Required
No
Source
Default
Configure the Col2Array Operator
Drag and drop a Col2Array operator onto your Data Workflow canvas.
Configure the operator's Info window as follows:
Info
Category
Col2Array
Label
fullName Array
Drop Empty
No
Path
fullName
Default Value
Connect the output port (right) of the dtAuthorsInput operator to the input port (left) of the fullName ArrayCol2Array operator.
Configure the Join Operator
Drag and drop a Join operator onto your Data Workflow canvas.
Configure the operator's Info window as follows:
Info
Category
Join
Label
Join Authors
Separator
;
The Separator is the punctuation character you want to use to separate your data. In this case, you'll choose a semi-colon (
;).Connect the output port (right) of the fullName ArrayCol2Array operator to the input port (left) of the Join AuthorsJoin operator.
Configure the Output Operator
Drag and drop an Output operator onto your Data Workflow canvas.
Configure the operator's Info window as follows:
Info
Category
Output
Component
joinOutput
Action
value
Connect the output port (right) of the Join AuthorsJoin operator to the input port (left) of the joinOutput Output operator.
Configure the First Console Operator
Drag and drop a Console operator onto your Data Workflow canvas.
Configure the operator's Info window as follows:
Info
Category
Console
Label
Before Array
Connect the output port (right) of the dtAuthors Input operator to the input port (left) of the Before Array Console operator.
Configure the Second Console Operator
Drag and drop another Console operator onto your Data Workflow canvas.
Configure the operator's Info window as follows:
Info
Category
Console
Label
fullName Array
Connect the output port (right) of the fullName Array Col2Array operator to the input port (left) of the fullName Array Console operator.
Configure the Third Console Operator
Drag and drop the final Console operator onto your Data Workflow canvas.
Configure the operator's Info window as follows:
Info
Category
Console
Label
Join Authors
Connect the output port (right) of the Join AuthorsJoin operator to the input port (left) of the Join Authors Console operator.
Click Save Component.
Save your module.
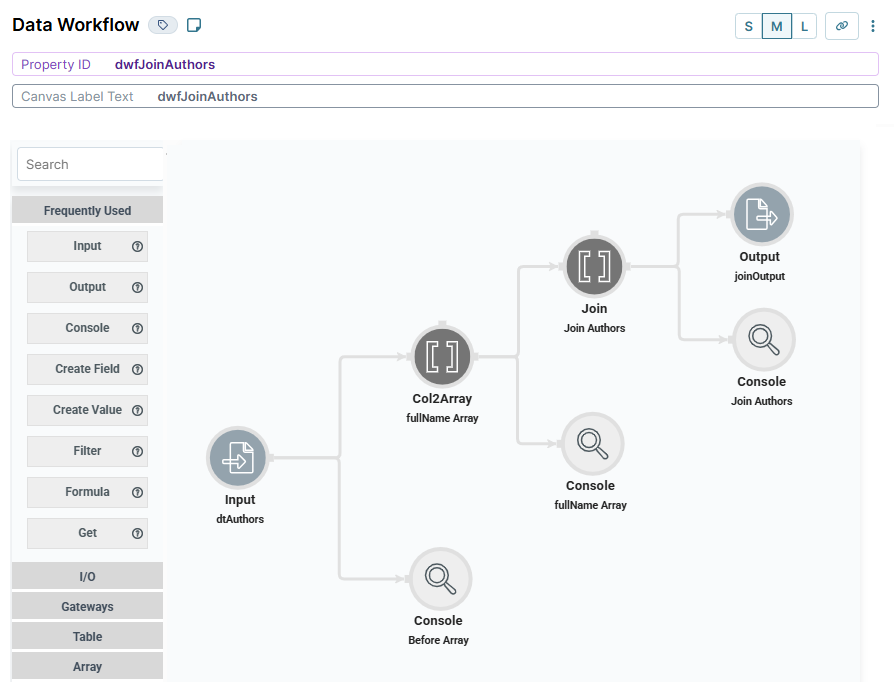
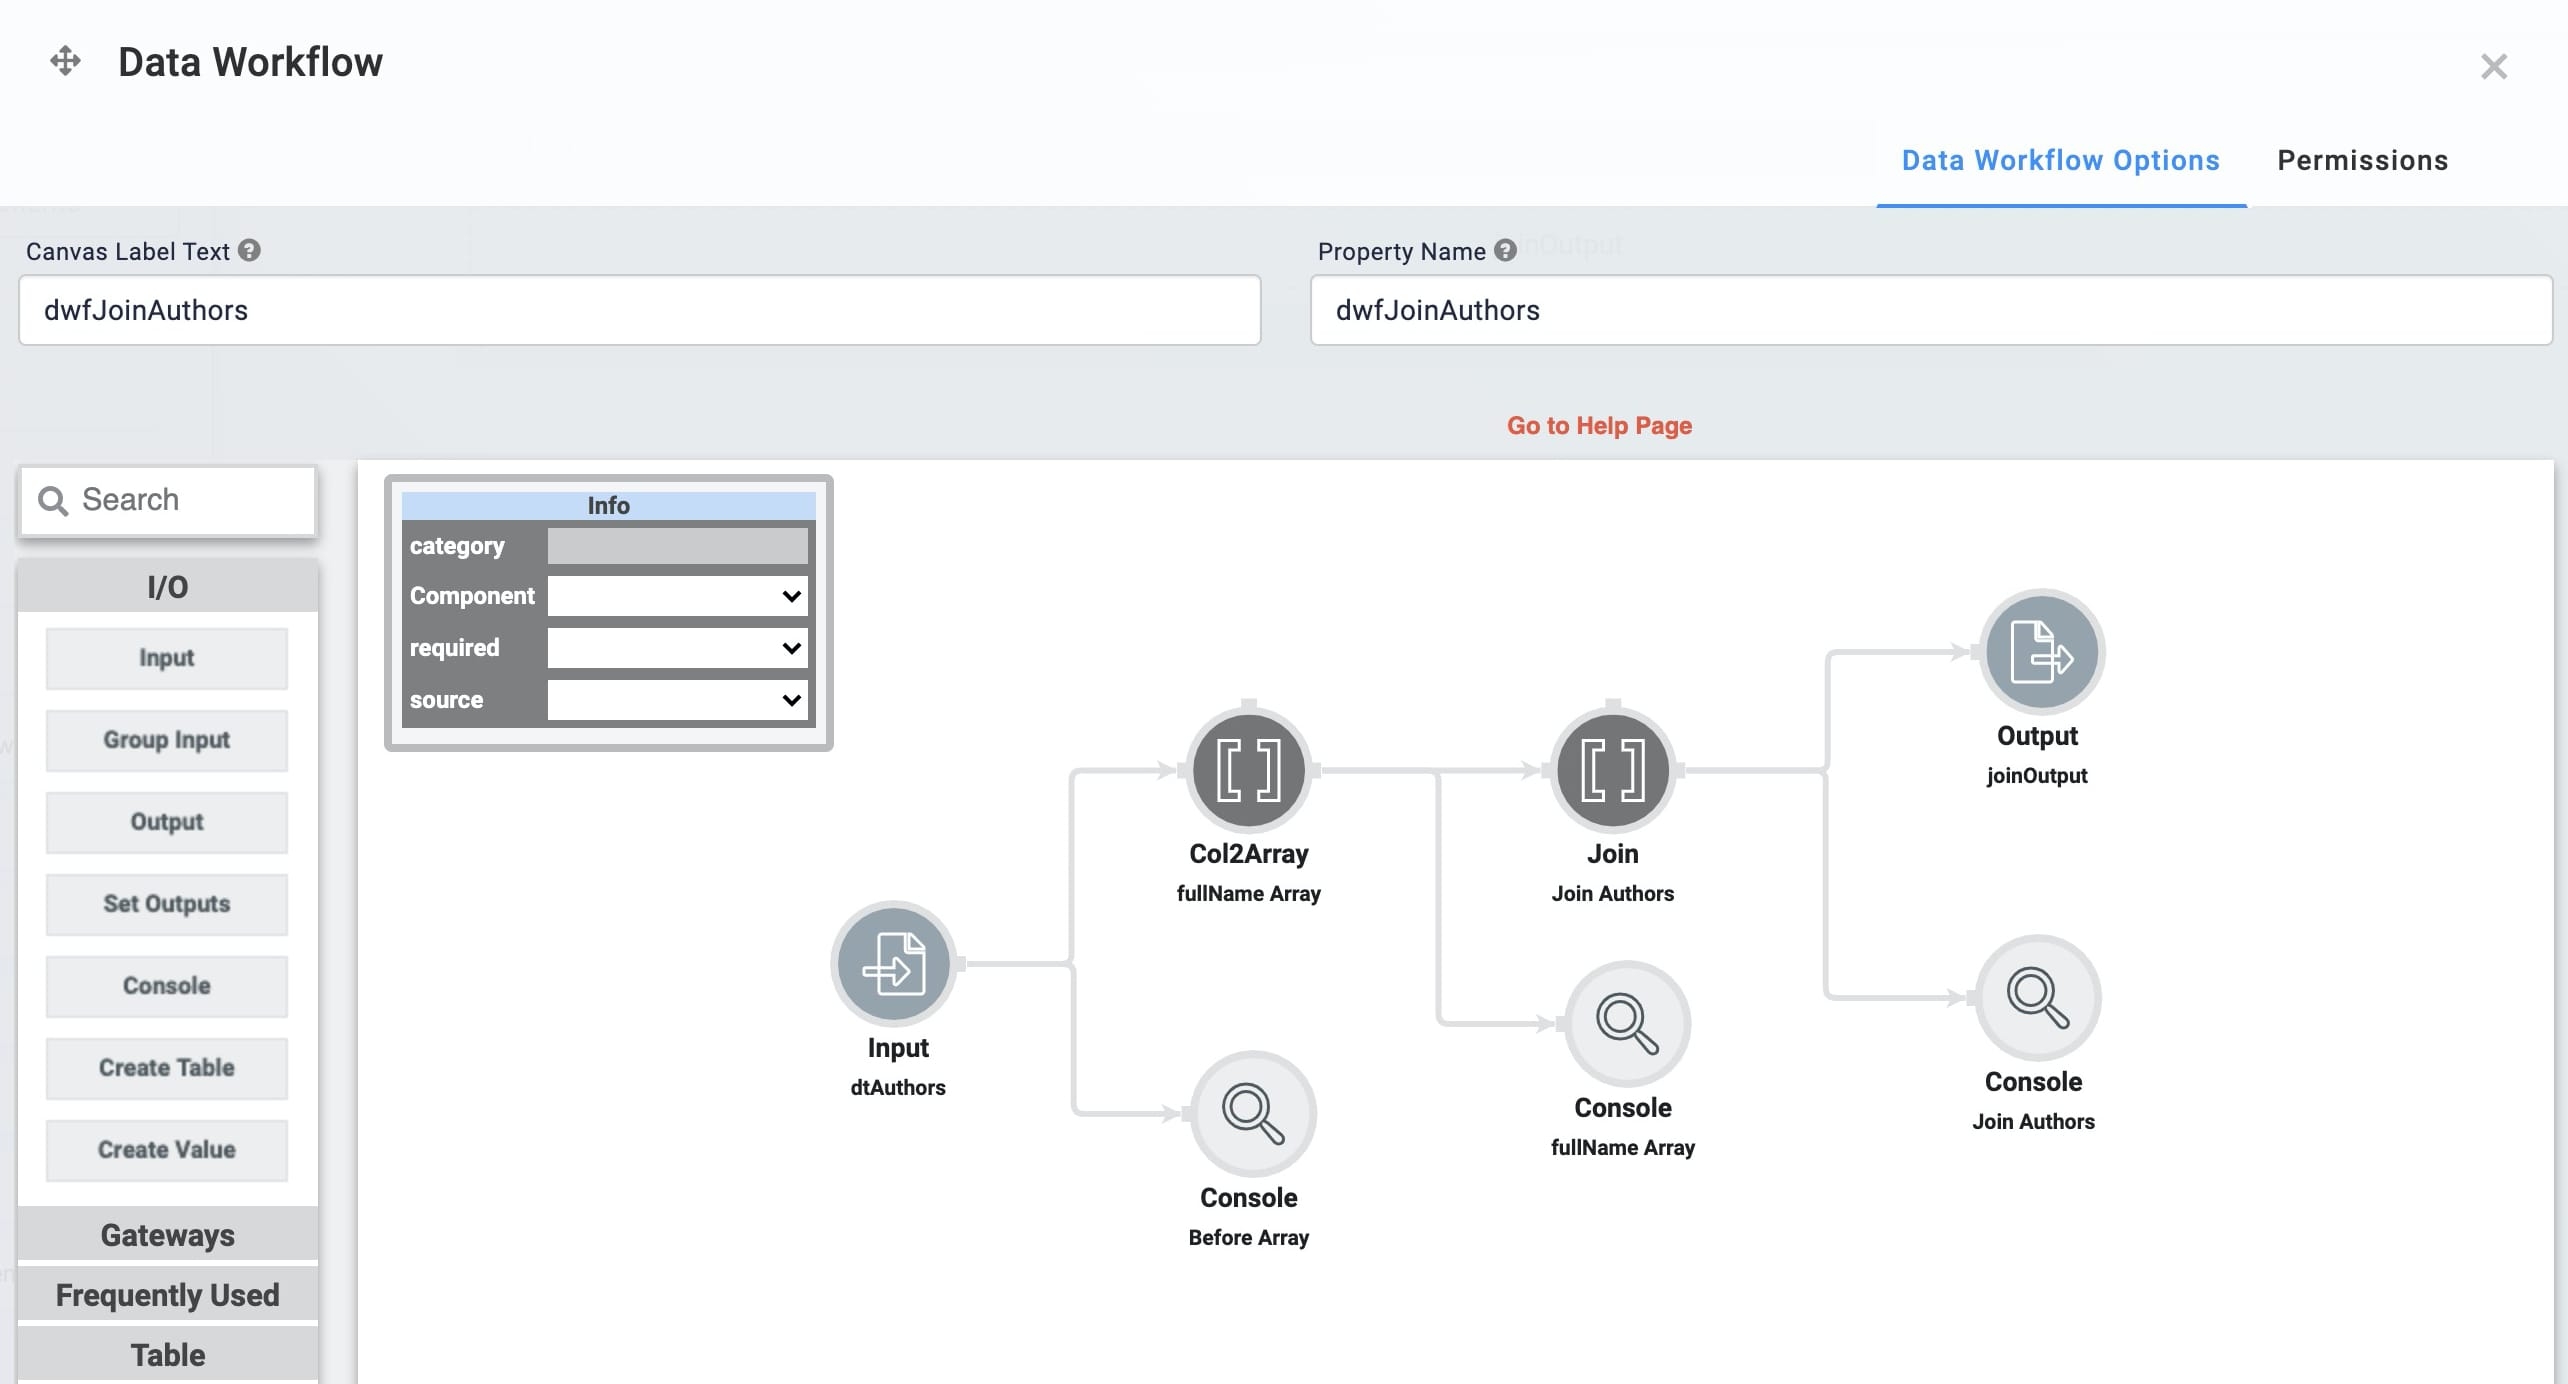
Here's how the completed example looks in the Module Builder:

Preview your module in Express View and open up the DevTools Console. When you expand the Console, you'll see the progression of your Data Workflow. First, your Col2Array operator puts your colleague's full names into an array. Then, your Join operator combines those names, separating each with a semi-colon.

Overview
Use the Join operator to combine strings of a data array into a new array. For example, let's say you have an array of client names. You want to combine them into another array, with each name listed one after the other. The Join operator helps you reorganize these names into this new format. It also lets you separate them, so your list isn't one indecipherable line. The operator lets you use anything to separate your data, like a comma, colon, or semi-colon.
It's important to note that the Join operator only works with arrays. Data tables are arrays of objects. If you try to input a column of names from a Data Table component directly, [object Object] displays in the DevTools Console.
You'll find the Join operator under the Array group to the left of your Data Workflow canvas.
About the Info Window
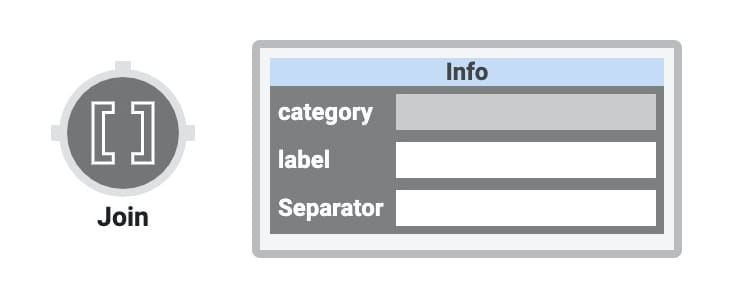
Learn more about each setting in the Join operator's Info window:
Setting | Description |
|---|---|
Category | Grayed out and non-adjustable setting indicating the operation type. |
Label | Sets the label for your operator, displaying below the operator on your Data Workflow canvas. This field is optional, but set a label if you use more than one of the same operator type. A label helps you identify your operators without opening any Info windows. |
Preserve Argument Type | When selected, this setting ensures the argument data type is respected when the operator executes. |
Separator | This is the character or symbol you use to separate your data. Examples are a comma, colon, hyphen, or semi-colon, but you can choose anything you want. You can also choose to use |
Adding a Join Operator
For this example, you'll configure a Data Table component with a list of contributing authors and the institutions where they work. Before you pass the data to a Join operator, you'll convert the table data to an array using a Col2Array operator. Then, you'll pass this data to the Join operator, separating the combined data using semi-colons.
These instructions assume you have a module open, saved, and with a title.
Configure the Data Table Component
First, set up a Data Table component to hold your contributing authors and the institutions where they work.
In the Module Builder, drag and drop a Data Table component onto your canvas.
In the Property ID and Canvas Label Text fields, enter
dtAuthors.In the data table, enter the following:
fullName
university
Whobrey, Yuki
University of Chicago
Perin, Lavera
Columbia University
Tollner, Mitsue
University of Georgia
Kusko, Willow
Arizona State University
Click Save & Close.
Configure the Hidden Component
Next, configure a Hidden component to hold your Data Workflow's output.
Drag and drop a Hidden component onto your canvas, placing it below your dtAuthors Data Table component.
In the Property ID and Canvas Label Text fields, enter
joinOutput.Click Save & Close.
Configure the Data Workflow Component
Now, it's time to set up your Data Workflow component. Use a Col2Array operator to turn your table data into an array. Then, use the Join operator to put all your author's names in one line. You can configure the operator to use a semi-colon to separate the names. To better help you watch the progress of your Data Workflow component, also add three Console operators.
Drag and drop a Data Workflow component onto your canvas, placing it between the dtAuthors Data Table component and joinOutput Hidden component.
In the Canvas Label Text and Property Name fields, enter
dwfJoinAuthors.
Configure the Input Operator
Drag and drop an Input operator onto your Data Workflow canvas.
Configure the Input operator's Info window as follows:
Setting
Value
Category
Input
Component
dtAuthors
Required
No
Source
Default
Configure the Col2Array Operator
Drag and drop a Col2Array operator onto your Data Workflow canvas.
Configure the Col2Array operator's Info window as follows:
Setting
Value
Category
Col2Array
Label
fullName Array
Drop Empty
No
Path
fullName
Default Value
Connect the output port (right) of the dtAuthorsInput operator to the input port (left) of the fullName ArrayCol2Array operator.
Configure the Join Operator
Drag and drop a Join operator onto your Data Workflow canvas.
Configure the Join operator's Info window as follows:
Setting
Value
Category
Join
Label
Join Authors
Separator
;
The Separator is the punctuation character you want to use to separate your data. In this case, you'll choose a semi-colon (
;).Connect the output port (right) of the fullName ArrayCol2Array operator to the input port (left) of the Join AuthorsJoin operator.
Configure the Output Operator
Drag and drop an Output operator onto your Data Workflow canvas.
Configure the Output operator's Info window as follows:
Setting
Value
Category
Output
Component
joinOutput
Action
value
Connect the output port (right) of the Join AuthorsJoin operator to the input port (left) of the joinOutputOutput operator.
Configure the First Console Operator
Drag and drop a Console operator onto your Data Workflow canvas.
Configure the Console operator's Info window as follows:
Setting
Value
Category
Console
Label
Before Array
Connect the output port (right) of the dtAuthors Input operator to the input port (left) of the Before Array Console operator.
Configure the Second Console Operator
Drag and drop another Console operator onto your Data Workflow canvas.
Configure the Console operator's Info window as follows:
Setting
Value
Category
Console
Label
fullName Array
Connect the output port (right) of the fullName ArrayCol2Array operator to the input port (left) of the fullName ArrayConsole operator.
Configure the Third Console Operator
Drag and drop the final Console operator onto your Data Workflow canvas.
Configure the Console operator's Info window as follows:
Setting
Value
Category
Console
Label
Join Authors
Connect the output port (right) of the Join AuthorsJoin operator to the input port (left) of the Join Authors Console operator.
Click Save.
Save your module.
Here's how the completed exampl looks in the Module Builder:

Preview your module in Express View and open up the DevTools Console. When you expand the Console, you'll see the progression of your Data Workflow. First, your Col2Array operator puts your colleague's full names into an array. Then, your Join operator combines those names, separating each with a semi-colon.
.jpg)
Lab
You can view this complete use case here: https://training.unqork.io/#/form/605ce8e29c2881024aa7b383/edit.