About this User Guide
The purpose of this guide is to show end-user functionality associated with the P&C Policy Administration Solution Accelerator. Using this guide, you'll explore how to generate an insurance quote and bind a policy to your customer. You'll also learn about post-issuance activities like endorsement, cancellation, and reinstatement.
These instructions assume that:
- That you have a basic understanding of Google Chrome or a similar web browser.
- That you'll use the application as a Senior Underwriting Manager, Underwriter, Carrier Admin, Agency Representative/Producer, Agency Admin, or System Administrator.
All images used in this guide are for illustrative purposes only. They do not contain actual information. Images are subject to change without notice. All images were correct at time of publication.
P&C Policy Administration Solution Accelerator
Overview
The P&C Policy Administration Solution Accelerator is a digital portal for agents and underwriters to coordinate key administrative workflows. You'll see that Home and Auto insurance products form part of this solution.
As you move through this guide, you'll learn how to:
- Rate, quote, bind, and issue new policies.
- Review and approve new policies as an underwriter.
- Cancel and reinstate existing policies.
- Apply mid-term endorsements to existing policies.
- Carry out other administrative tasks. These include adding customers, editing customers, user management, document management, and so on.
Application Login
Creating an Account
To log in to the P&C Policy Administration Solution Accelerator you'll first need an account. You can request an account by:
|
1.
|
Emailing Unqork’s GTM Product Operations team (gtm.prodops@unqork.com). |
|
2.
|
Contacting your supervisor. |
First-time Login
Using the email that you received from Unqork’s Production Support team, you'll confirm your account:
Your temporary password expires in 7 days.
|
1.
|
Click the Sign in From Here link. |
|
2.
|
At the Reset Password notification, click the OK button. |
|
3.
|
Enter a new password in the New Password and Confirm Password fields. |
|
4.
|
Click Change Password. |
Future Logins
After changing your password, the login process looks like this:
Make sure you use Google Chrome with this application. Using other browser options may result in a degraded user experience.
|
3.
|
Enter your E-mail Address. |
Requesting a New Password
If you forget your password, don't worry. You can always request a new one.
To request a new password:
Remember, we’ve optimized this application for Google Chrome. Using other browser options could result in a degraded user experience.
|
2.
|
At the Login screen, click the Forgot Password link. |
|
3.
|
Enter your email in the E-mail Address field. |
|
4.
|
Click Forgot Password. |
|
5.
|
At the info pop-up, click OK. You’re automatically redirected to the change password screen. |
|
6.
|
Enter your verification code in the Verification Code field. You’ll get the code from the “Your Verification Code” email. |
|
7.
|
Enter your new password in the New Password and Confirm New Password fields. |
|
8.
|
Click the Change Password link. |
You’re all set! Now you can log in using your new password.
Roles and Permissions
The P&C Policy Administration Solution Accelerator offers the following roles and permissions:
|
Senior Underwriting Manager
|
- View the Dashboard.
- View the customer list and details.
- Edit customer details and documents.
- View the quote list and details.
- Edit quote details.
- Process policy endorsements, cancellations, re-instatements, and policy copies.
- View the agency list and details.
- Add or edit an agency.
|
|
Underwriter
|
- View the Dashboard.
- View the customer list and details.
- Edit customer details and documents.
- View the quote list and details.
- Edit quote details.
- Process policy endorsements, cancellations, re-instatements, and policy copies.
- View the agency list and details.
- Add or edit an agency user.
|
|
Carrier Admin
|
- View the Dashboard.
- View the customer list and details.
- Edit customer details and documents.
- View the quote list and details.
- Edit quote details.
- Process policy endorsements, cancellations, re-instatements, and policy copies.
- View the agency list and details.
- Add or edit an agency.
|
|
Agency Representative/Producer
|
- View the Dashboard.
- View the customer list and details.
- Edit customer details.
- View the quote list and details.
- Edit quote details.
- Process policy endorsements, and cancellations.
|
|
Agency Administrator
|
- View the Dashboard.
- View the customer list and details.
- Edit customer details.
- View the quote list and details.
- Edit quote details.
- Process policy endorsements, and cancellations.
- View an agencies details.
- Add or edit an agency.
- Terminate an agency.
|
|
System Administrator
|
- View the Dashboard.
- Add, edit and delete internal user information.
- View the customer list and details.
- Edit customer details and documents.
- View the quote list and details.
- Edit quote details.
- Process policy endorsements, cancellations, re-instatements, and policy copies.
- View the agency list and details.
- Add or edit an agency.
- Terminate an agency.
|
Dashboard
The Dashboard is the home page for this Application. Here's what it looks like:

Let's explore the various features and functions that you'll see in this Dashboard:
|
Work Items Widget
|
Shows your outstanding tasks for completion.
- Open: Shows all incomplete tasks for completion.
- New Today: Shows all new tasks incomplete for the current date.
- Overdue: Shows all past due incomplete tasks for completion.
- Escalation: Shows all tasks escalated for completion.
- Rush: Shows all tasks marked as rush for completion.
|
|
Policies Widget
|
Shows the policies associated with you as an underwriter. So, your policies pending cancellation or recently canceled.
- Cancel Pending: The count of policies pending termination, by either the insured or the insurer.
- Recently Canceled: The count of policies terminated before expiration, by the insured or the insurer.
|
|
Quotes Widget
|
Shows the quotes associated with you as the underwriter. So, your open quotes, quotes pending review, and quotes where you completed your review.
- Open: The count of quotes considered as in progress with the agency.
- Pending UW Review: The count of quotes waiting on review by an underwriter.
- Review Completed: The count of quotes already reviewed by the underwriter.
|
|
Ribbon
|
Shows as a user interface element at the top of the application page. The ribbon stays visible regardless of where you navigate. Looking at the Ribbon from left to right, you'll see tabs for Dashboard, Work Items, Quotes, Customers, Policies, Agencies, Reports, Pay Bill, Resources, and Admin. Next, let's explore each tab in more detail:
- Dashboard: Selecting this tab from any other page, returns you to the Dashboard page.
- Work Items: Provides an aggregation of all tasks associated with the customer. Clicking the Add Task button takes you to the Add Task modal. From here you can add tasks set to a range of reasons (Claims, General, Billing, and so on). Feature not currently supported in demo-pa.
- Quotes: Selecting this tab takes you to the Quotes page. From here you can view and filter quotation information. Quotes represent an estimate of a customer's rate with a potential insurer. The Quotes grid shows at a minimum the following information: Quote Number, Customer Details, Effective Date, Product Program, Premium (quoted value), Risk State, Agency Details, Underwriter, and Status.
- Customers: Selecting this tab takes you to the Customers page. From here you can view existing customer information and add new customers. The Customers grid shows the following information: Customer Number, Name, Address, Phone, Agency, and Status.
- Policies: Selecting this tab takes you to the Policies page. From here you can view and filter policy information. A policy represents the terms and conditions of a customer's bound and issued contract of insurance. The Policies grid shows at a minimum the following information: Policy Number, Customer Details, Effective Date, Program, Risk State, Agency Details, Underwriter, Premium, Total Paid, Status, and Last Changed (date).
- Agencies: Selecting this tab takes you to the Agencies page. From here you can view and filter agency information. You can also add agencies, or export (feature not currently supported in demo-pa) their information from this page. An insurance agency, or brokerage, finds, writes, and connects policies from various insurance companies. The Agencies grid shows at a minimum the following information: Agent/Broker Number, Agency Details, Contact Information, and Status.
- Reports: Feature not currently supported in demo-pa.
- Pay Bill: Feature not currently supported in demo-pa.
- Resources: Feature not currently supported in demo-pa.
- Admin: Selecting this tab takes you to the Admin page. From here you can view existing user information and add new users. The User grid shows the following user information: Name, Email, Role, Branch, Team, and Status.
During the following processes, you'll interact with a few of these pages in more detail.
|
Internal User Setup
Next, you'll create your senior underwriting management, underwriters, and or Carrier Admin users. The same process applies if you're creating any of these roles. Internal User Setup is an ongoing activity that you'll return to from time to time.
Navigating the Admin Page
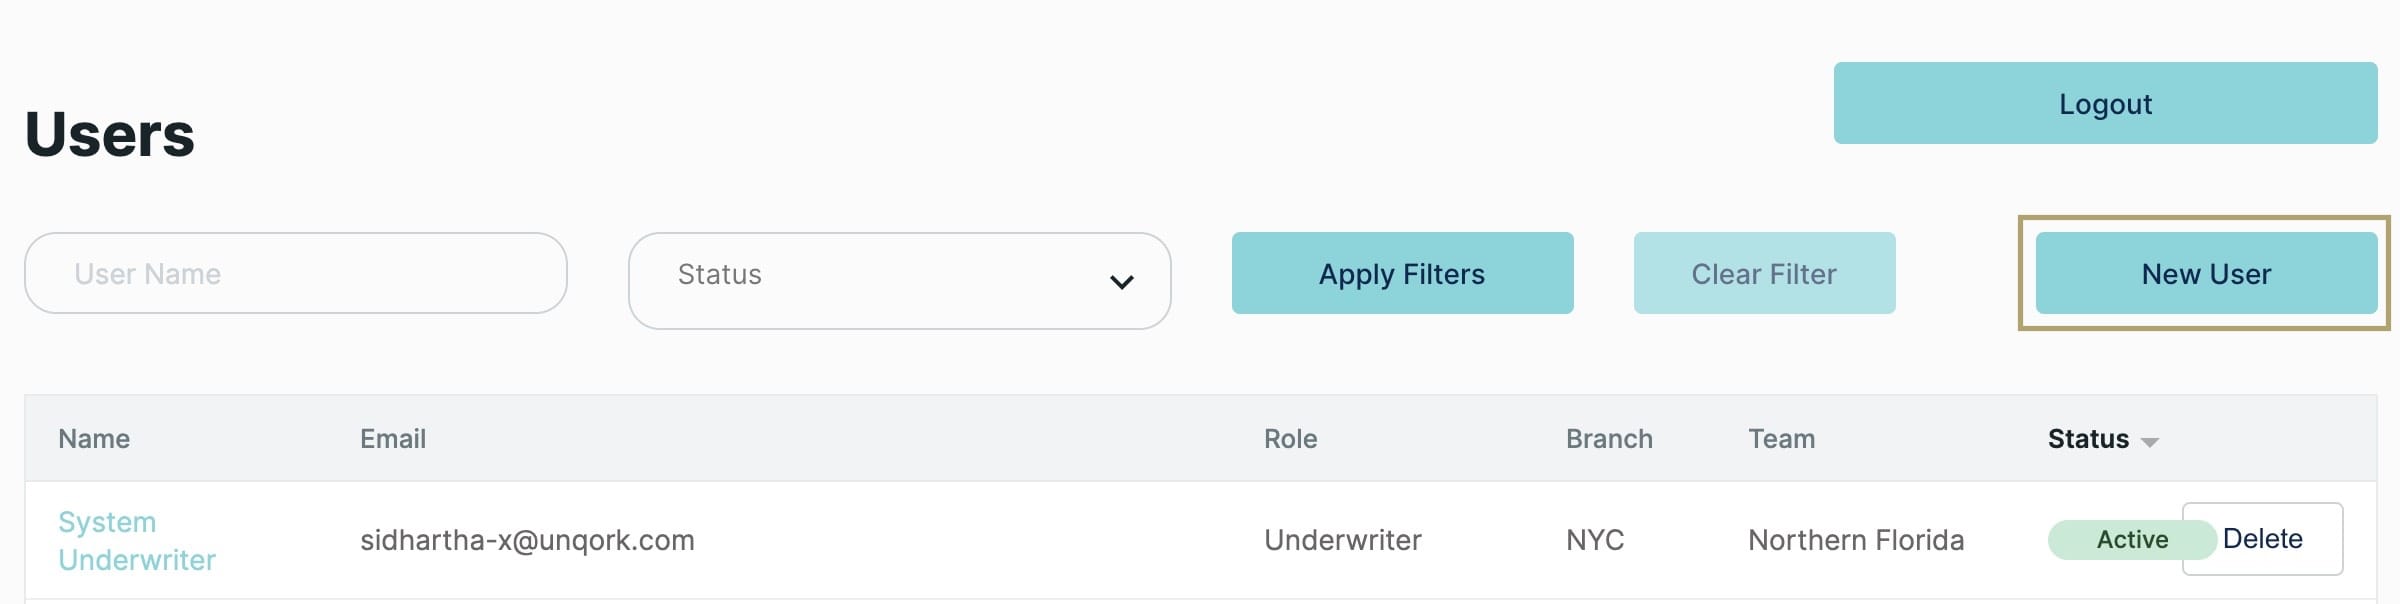
To go to the Admin page, click the Admin tab at the top right of the Ribbon. Here's what the Admin page looks like:

From the Admin page, you can:
- Invite senior underwriting management, underwriters and or a carrier admin to use this application.
- Edit existing users' information.
- Delete existing users and their user permissions.
Let's explore what functionality the Admin page has to offer:
|
Logout button
|
Clicking this button takes you out of the application, returning you to the Login page.
|
|
User Name filter
|
Reduces the number of records shown in the User grid, based on the User Name entered. Pressing Apply Filters applies this filter. Pressing Clear Filter clears this filter and resets the User grid to show all records.
|
|
Status filter
|
Reduces the number of records shown in the User grid, based on the Status selected. Available statuses include Active or Terminated. Pressing Apply Filters applies this filter. Pressing Clear Filter clears this filter and resets the User grid to show all records.
|
|
New User button
|
Opens the New User modal, where you can add a new user and assign their role. As a System Administrator, you can assign any of the following roles: Senior Underwriting Manager, Underwriter, and Carrier Admin.
|
|
User grid
|
A grid listing all users (Name, Email, Role, Branch, and Team) and their status in the system.
|
|
Delete button
|
Clicking this button removes the selected user from the User grid. You'll find a Delete button at the far right of each user record in the User grid.
|
Creating New Users
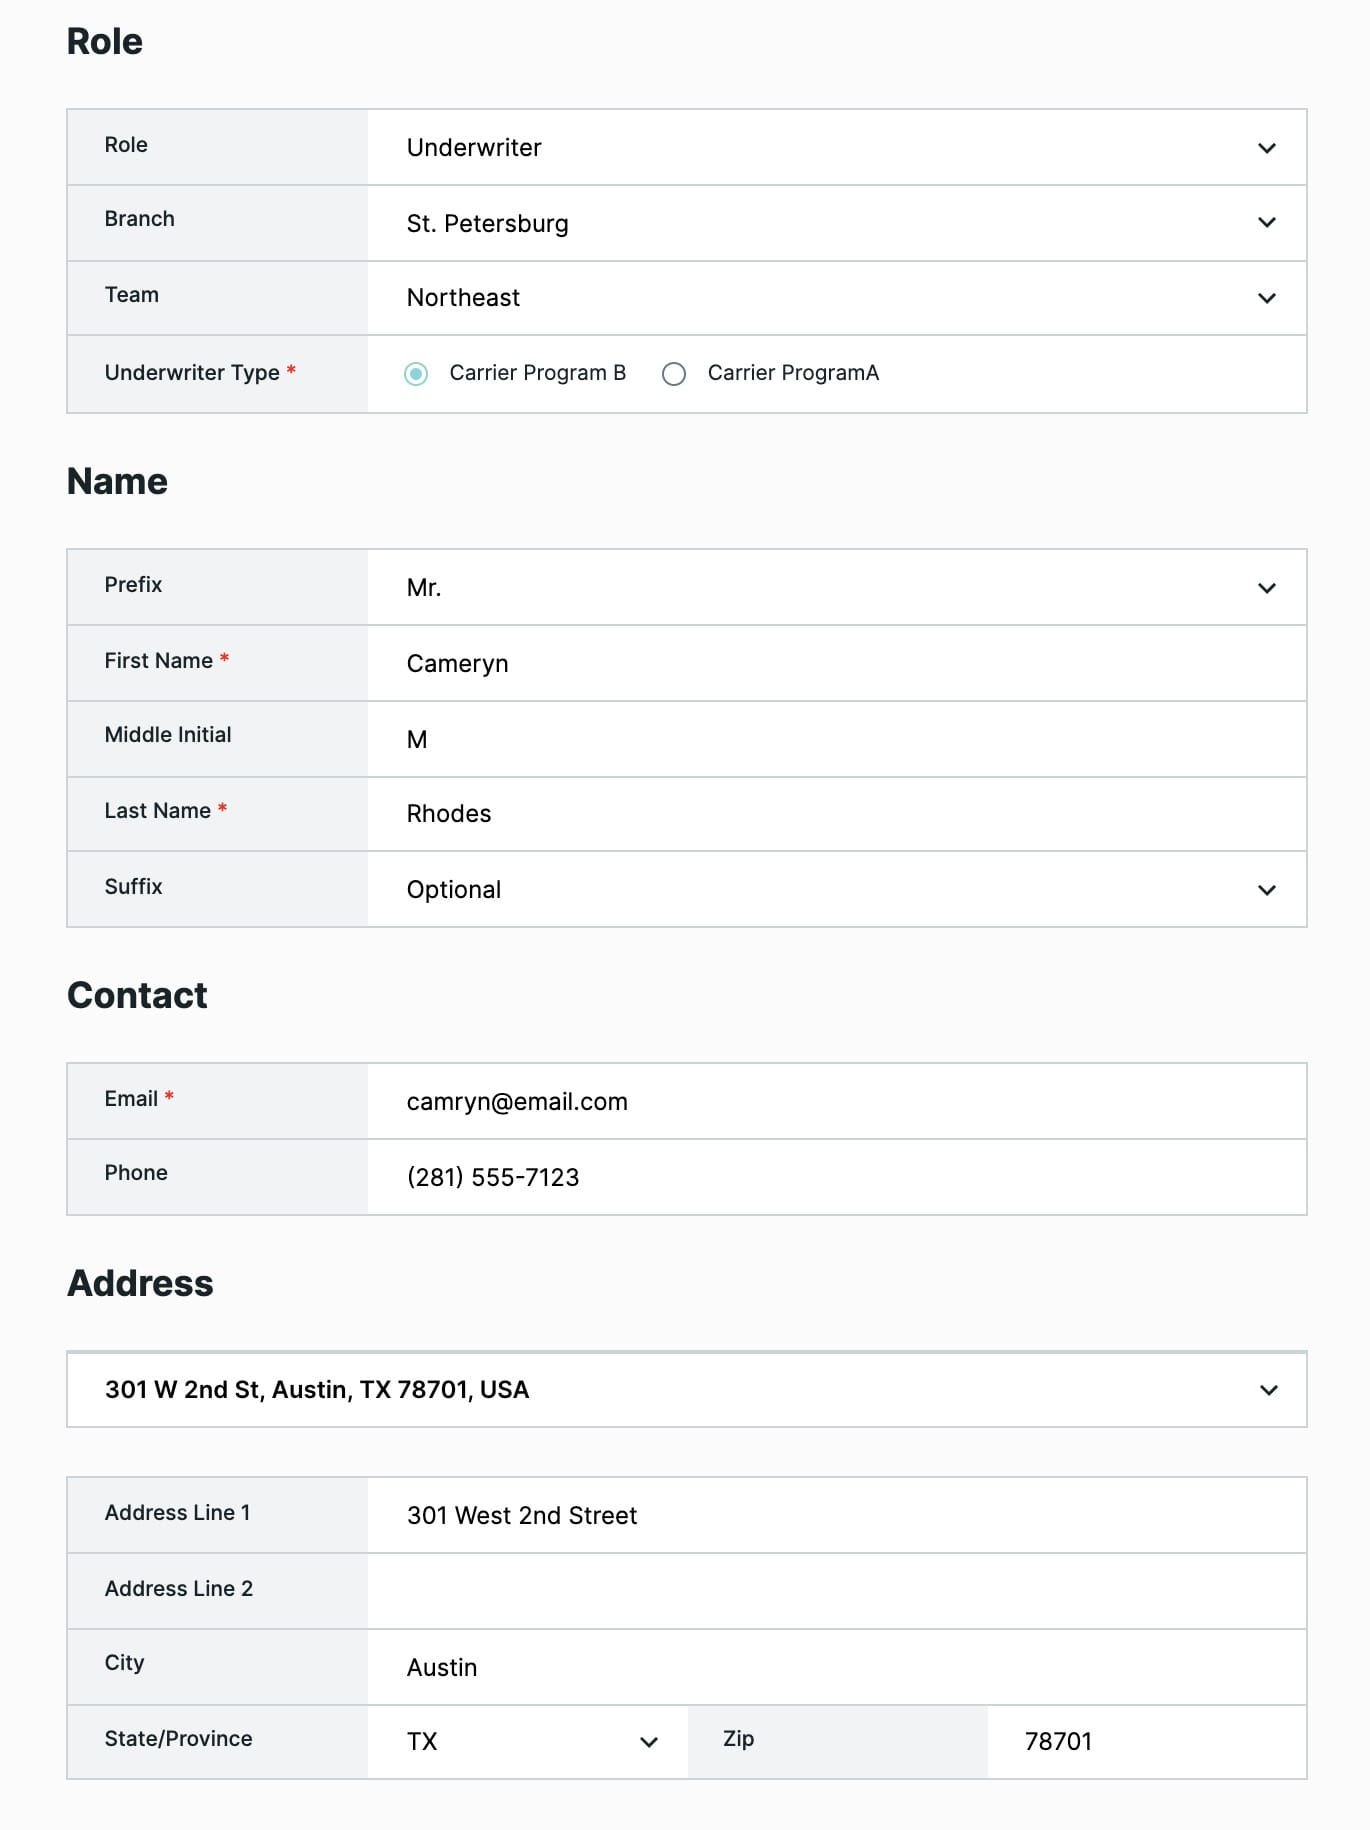
Now, you'll create your senior underwriting management, underwriters, and/or Carrier Admin users. The process is the same for creating any of these roles. To keep things simple, these instructions focus on adding an Underwriter role. An underwriter can create, endorse, cancel, and reinstate a policy or quote. They can also create a customer and an agency user. A Carrier Admin has the same privileges as the underwriter but can also create an agency.
When creating a new user, the following fields are required: Role, First Name, Last Name and Email.
The temporary password sends to this email address. The new user must use this email address during login.
Take care when entering details in the New User modal. Clicking outside of the modal, closes and clears the modal without saving.
|
1.
|
If you're not already at the Admin page, click the Admin tab now. |
|
2.
|
Click the New User button. |
|
3.
|
Select a Role from the drop-down. Roles can include any of the following options: |
|
a.
|
Underwriter: Underwriters typically evaluate and examine insurance requests to assess their risk. Based on the level of risk involved an insurance agreement is or isn't issued. Underwriters work closely with Actuaries, Insurance Agents, and Insurance Brokers. An underwriter user is the one who can create the quotes, do the approvals. They can also create agencies, agency users, and customers. They're a key role-player and so created first. |
|
b.
|
Senior Underwriting Manager: Similar in role to the Underwriter. |
|
c.
|
Carrier Admin: Same privileges as the underwriter but can also create an agency. |
Because you're creating an Underwriter user in this example, you'll select Underwriter from the drop-down. Based on this selection, the Underwriter Type field shows.
|
6.
|
Set the Underwriter Type. This field becomes important when you're actually creating a quote. Types include: |
|
a.
|
Vault E & S Insurance Company (Carrier Program A): Represents 1 of 2 programs that an Underwriter is affiliated with in the insurance carrier. |
|
b.
|
Vault Reciprocal Exchange (Carrier Program B): Represents 1 of 2 programs that an Underwriter is affiliated with in the insurance carrier. |
|
7.
|
Enter the new user's First Name. |
|
8.
|
Enter the new user's Last Name. |
|
9.
|
Enter the new user's Contact information. This includes: |
|
a.
|
Email: Add your new user's company email address here. |
|
b.
|
Phone: Add your new user's weekday telephone number here. By default, this field includes an Input Mask. As you enter the phone number, the Input Mask formats the value. |
|
10.
|
Now, you'll search for and add your Underwriter's residential Address. This Search Address field uses address matching. As you enter an address, Unqork autocompletes your entry. When the correct address presents, make your selection. Your selection auto-fills the Address Line 1, Address Line 2, City, State/Province, and Zip fields. |
|
11.
|
Scroll to the top of the modal and click Save. |
Each new underwriter receives an email, signaling that you've successfully created their account. This email also gives your new underwriter their temporary password and a link to log in. On first login, your underwriter must change their password. On successful login, your underwriter is considered an active user.
Agencies Setup
Navigating the Agencies Page
Agencies and brokerages act as intermediaries for various insurance companies. Agencies can choose which insurance carriers they'll represent and which products they'll offer.
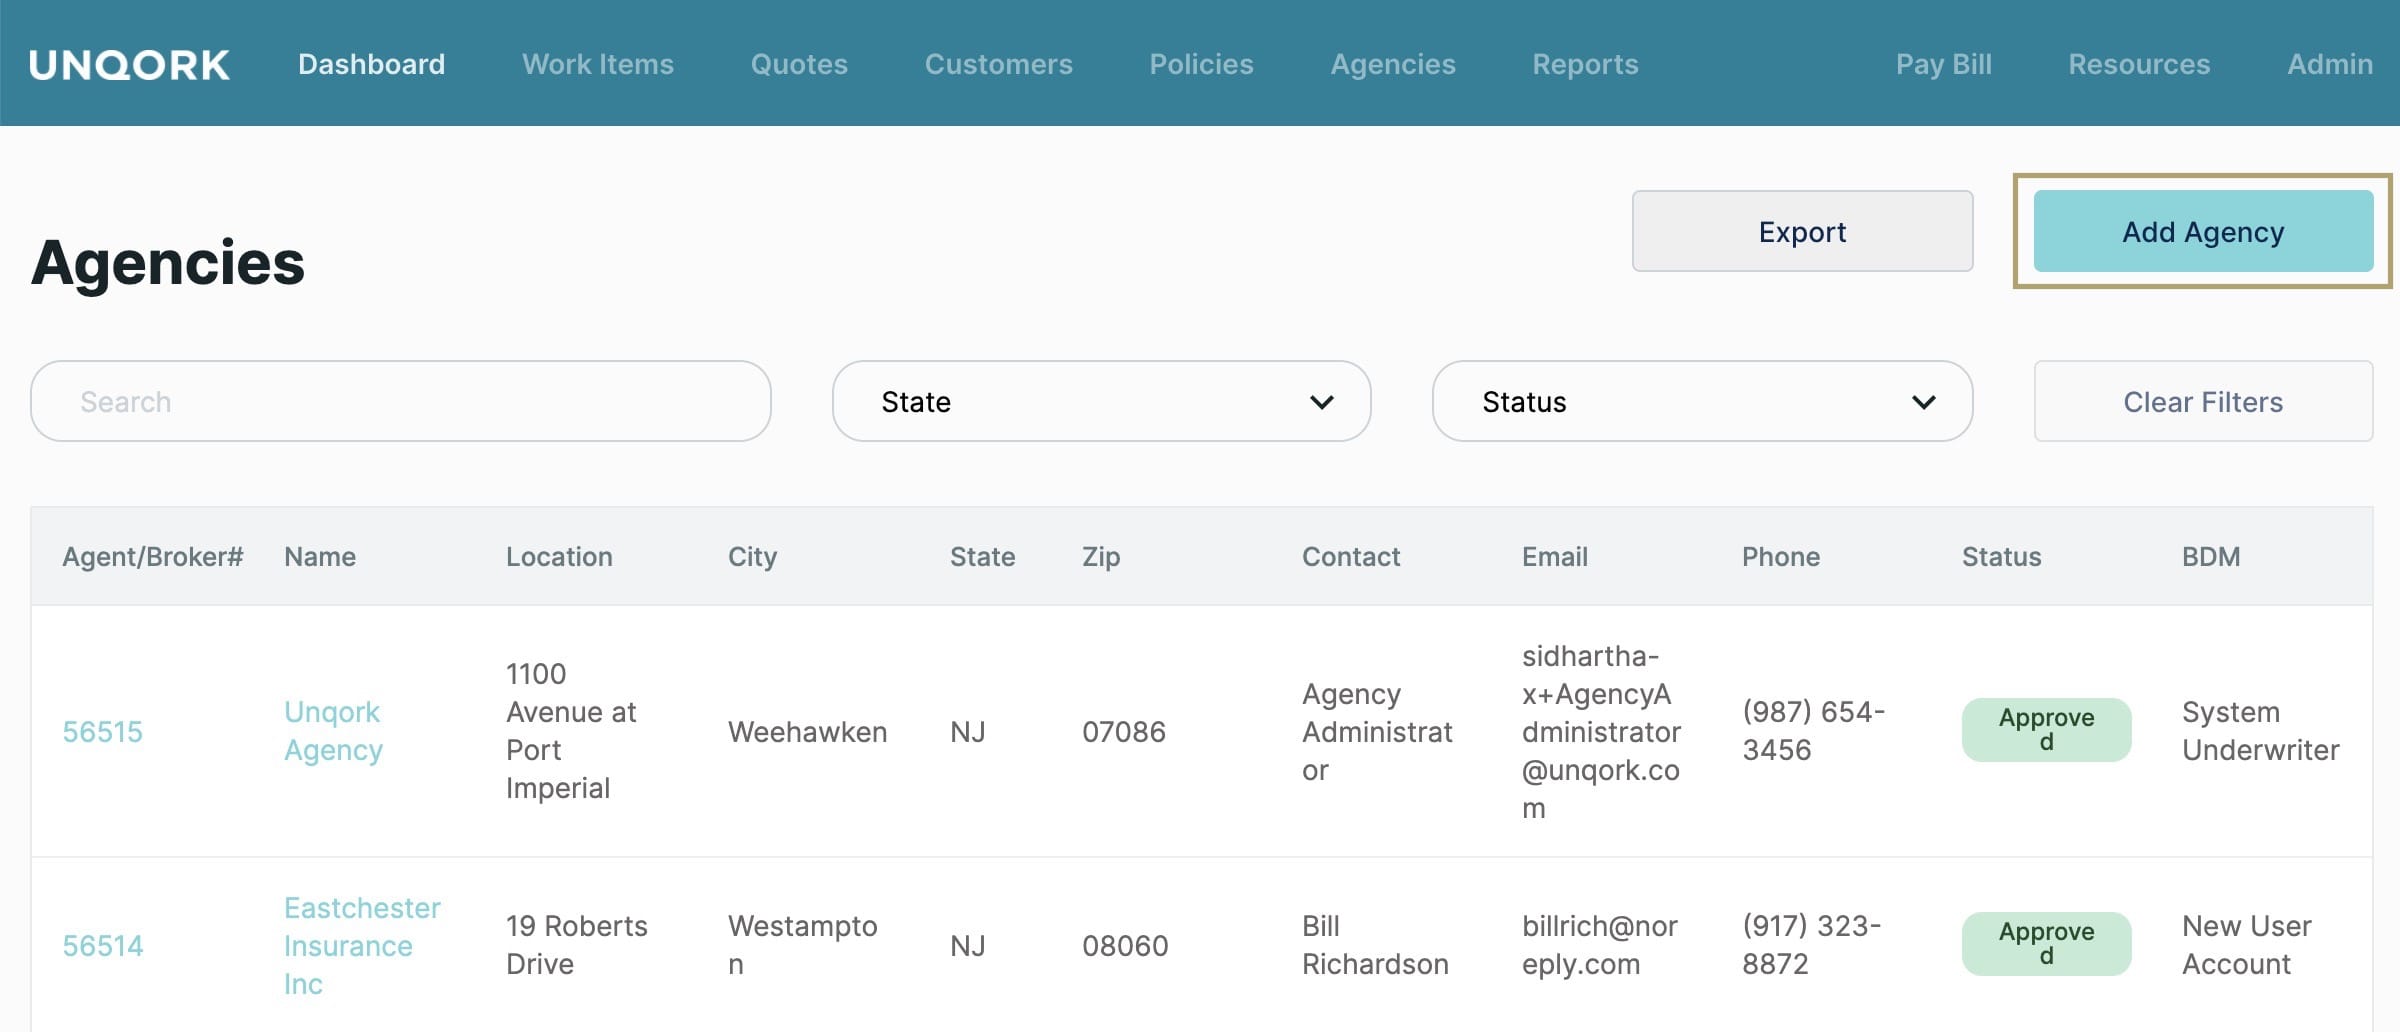
Next, you'll update your agency list. To go to the Agencies page, you'll click the Agencies tab at the top center of the Ribbon. Agency Setup is an ongoing activity that you'll return to from time to time. Here is what the Agencies page looks like:
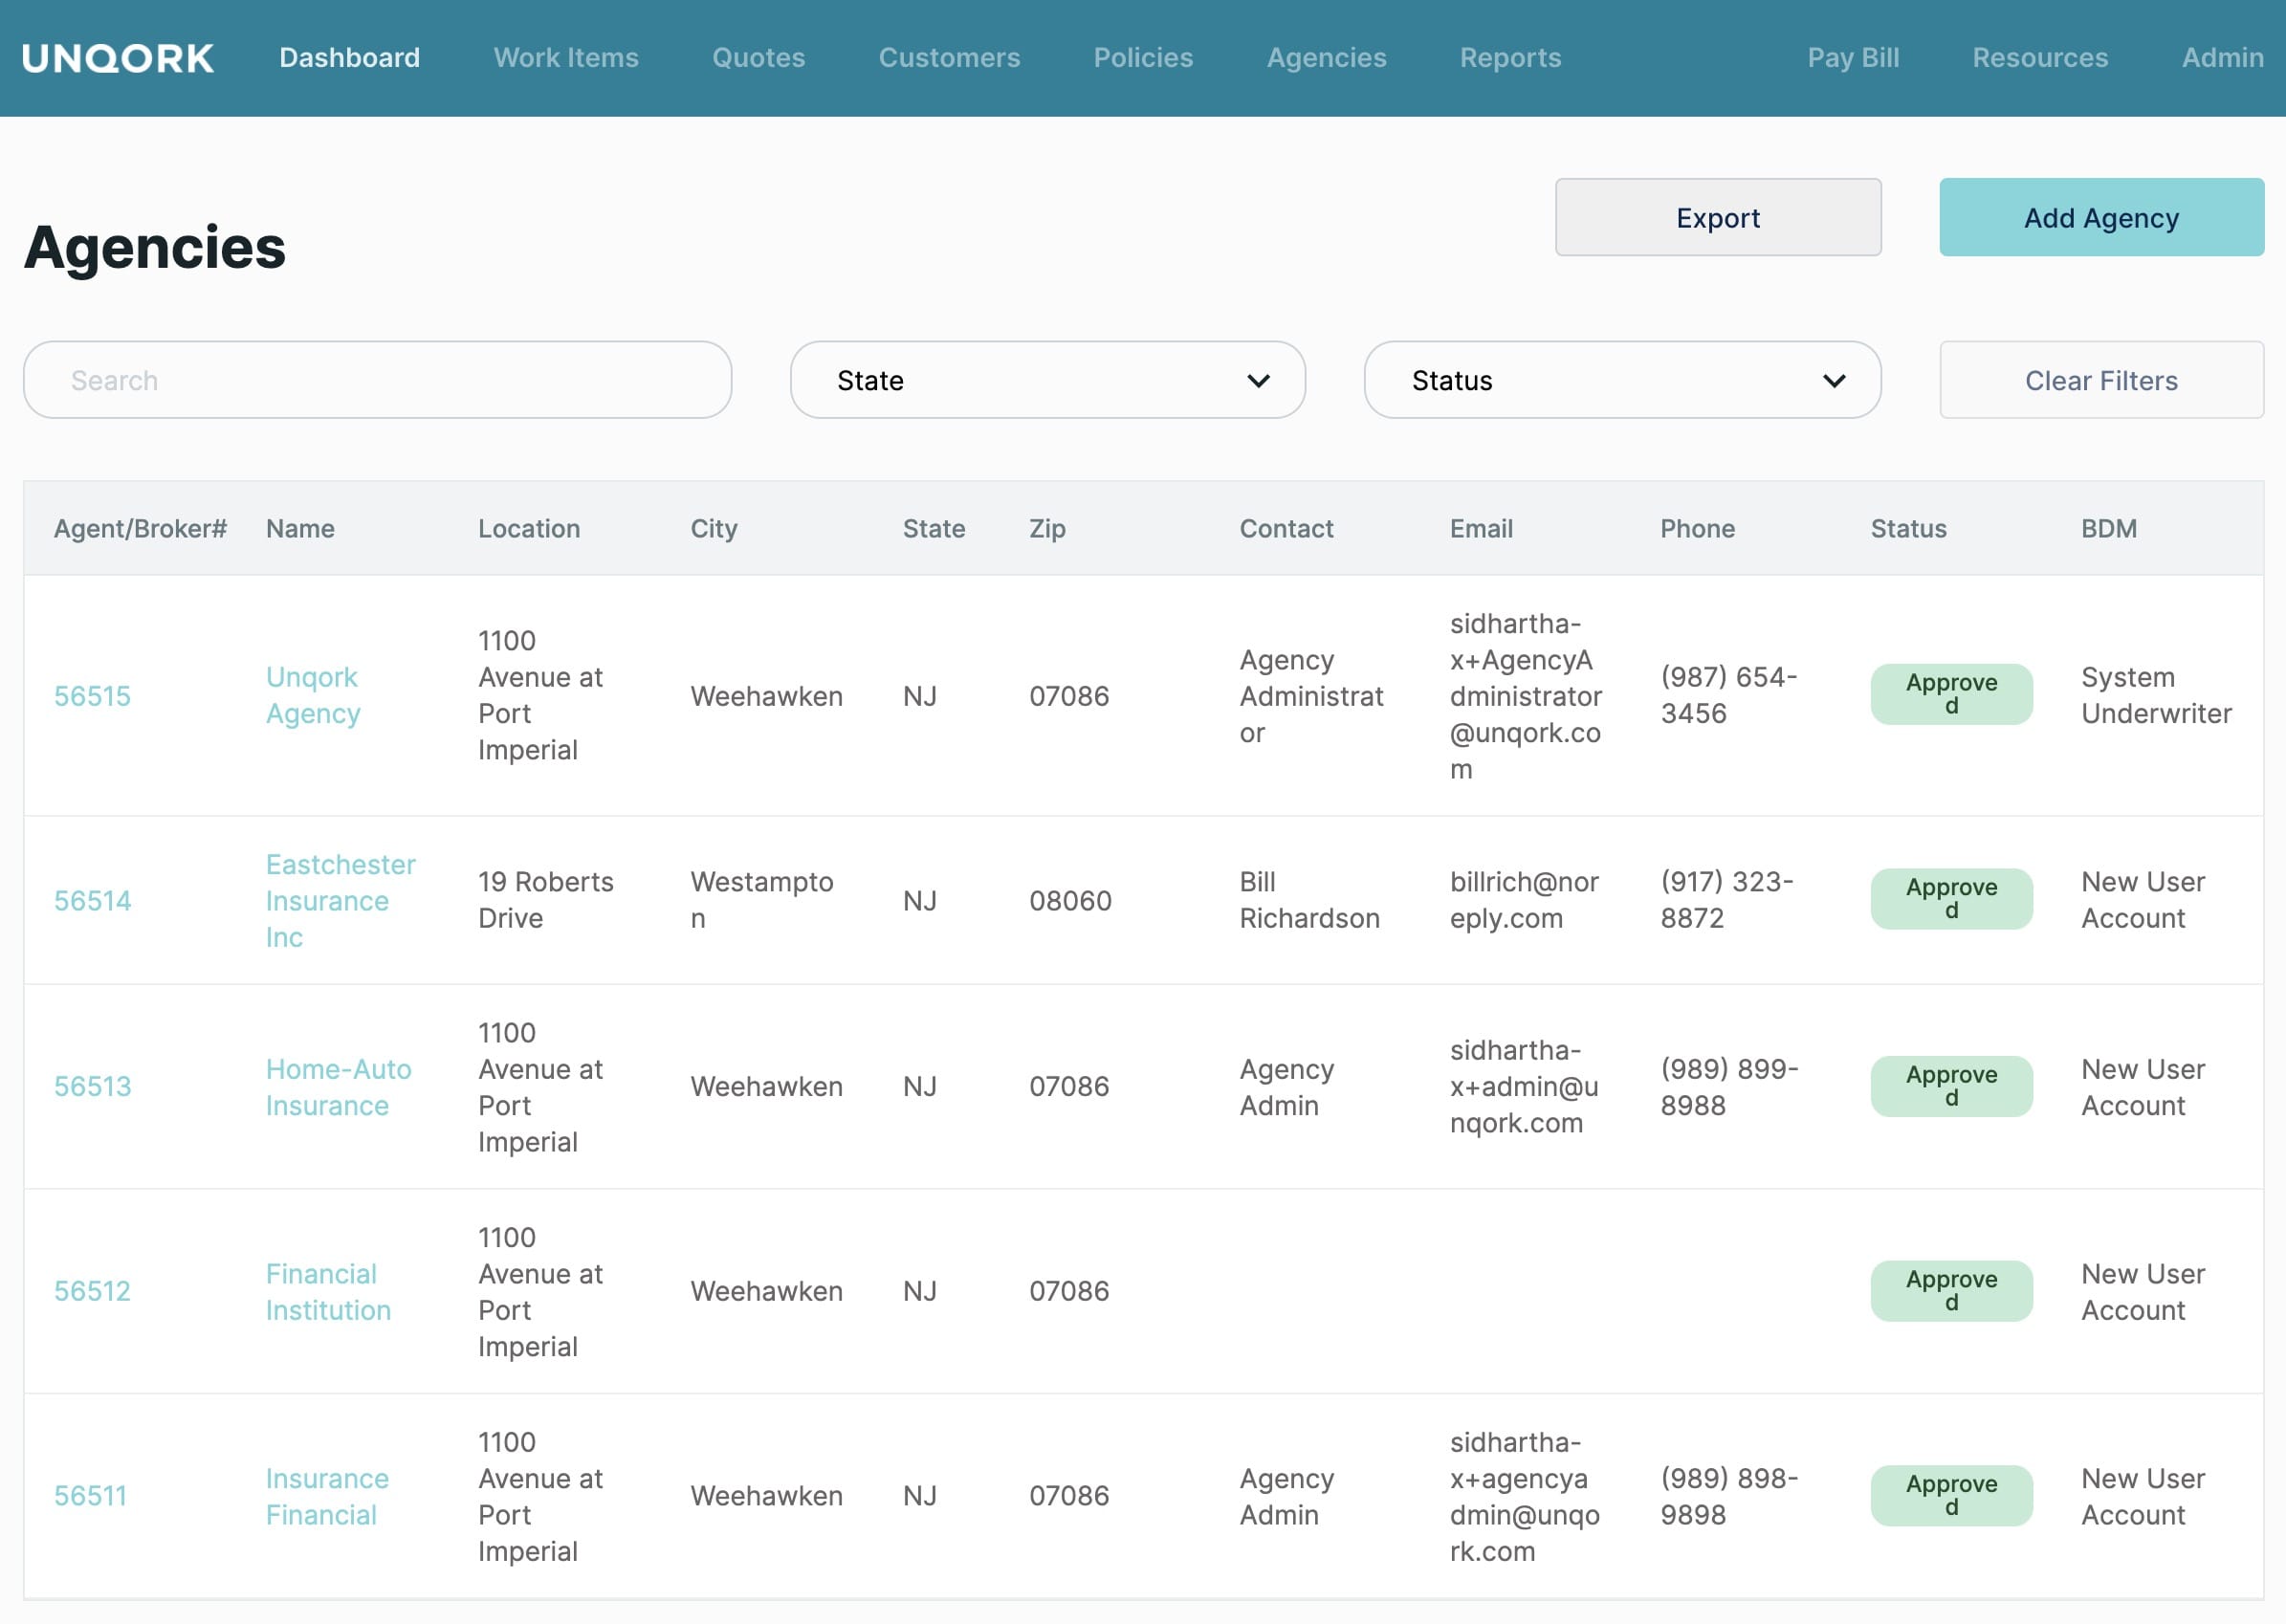
Using this Agencies page, you can:
- Add new agencies.
- Edit or update existing agency details.
- Change a new or existing agency's status to show as approved, declined, prospect, or terminated.
Let's explore what functionality the Agencies page has to offer:
|
Export button
|
Exports the full or filtered agencies list as an XLSX file type. You can view your XLSX file using any XLS viewer or open the file for editing using Microsoft® Excel.
|
|
Add Agency button
|
Opens the Agencies Summary page on button-press. From the Agencies Summary page, you can add an agency or access the following pages:
- Summary: Shows the Add Agency Summary page where you can set: Tax, Address, Team, Contacts, Communication, Banking Information, and the Errors & Omissions Policy.
- Users: Shows the list of agency users. Clicking the Add User button lets you add Agency Administrators and Agency Representative/Producer users.
- Licences: Lists the states where the agency may operate. From this page, you can add, edit, or delete a license, and export the full list of licenses.
- Agreements: Shows all active and in-active insurance groups and their location (state). Terms (start and end dates) can be set, updated, and saved from this page. From here you'll also validate whether an agency may operate in a particular state. When used with demo-pa, you must reference NJ as the state.
- Documents: Lists all documentation received for the agency. This could include their W9, Producer Agreement, ACH Form, and many others. An Upload Document button lets you upload more documents at any time. The Documents Received section shows a marker for all documents received or attached. The View Deleted Documents link opens the Document Deletion History page. This page lists all removed documents.
- Sub Agents: Feature not currently supported in demo-pa.
- Reports: Feature not currently supported in demo-pa.
|
|
Search bar
|
Filters the Agencies grid to show records associated with the entered search term.
|
|
State filter
|
Filters the Agencies grid to show records associated with the chosen State.
|
|
Status filter
|
Filters the Agencies grid to show records for the chosen status. Options include, approved, declined, prospect or terminated.
|
|
Clear Filters button
|
Pressing Clear Filters clears the Search bar, State and Status filters as set. At the same time, the Agencies grid resets to show all records.
|
|
Agencies grid
|
A grid listing all agencies (Agent/Broker #, Name, Location, Contact, and BDM) and their status. Selecting a agency from the grid, takes you to the Edit Agencies Summary page. From this page you can again access the following tabs: Users, Licenses, Agreements, Documents, Sub Agents and Reports.
|
Adding an Agency
When creating a new agency, all starred (*) fields are required. Where steps don't apply to the path for demo-pa, these steps are not featured.
|
1.
|
If you're not already at the Agencies page, click the Agencies tab now. |
|
2.
|
Click the Add Agency button. |
|
3.
|
Complete the following sections: |
General Information
|
1.
|
Enter the Agency Name. |
|
2.
|
Select the Agent/Broker Type. Options include: |
|
3.
|
Select the Individual/Business. Options include: |
|
a.
|
Legal Entity: Opens a new line for entry of the Entity Type and National Producer Number. From the Entity Type drop-down you'll select whether the entity is a Corporation, Sole Proprietor or Limited Liability Company. |
|
b.
|
Individual: Opens a new line for entering the individual's First Name, Middle Name, Last Name and Suffix. |
|
4.
|
Select the Agency Business Type. This refers to how the commission that each agent makes is reported back to the agency. Options include: |
|
5.
|
Enter the External Agency ID. |
|
6.
|
Enter the Legacy System Agent/Broker Number. |
|
7.
|
Select the Master Agreement. Options include: |
|
a.
|
Yes: A Master Agreement exists and can be attached. |
|
b.
|
No: A Master Agreement doesn't exist and can't be attached. |
|
8.
|
Enter the Agency Management System. |
|
9.
|
Enter the Agency Email. |
|
10.
|
Enter the LexisNexis Company Code Suffix. |
|
11.
|
Enter the Affiliation. |
Tax Information
|
1.
|
Enter the Tax ID Type. Options include: |
|
a.
|
Federal Employer Identification Number (FEIN) |
|
b.
|
Social Security Number (SSN) |
|
2.
|
Enter the Tax ID associated with the FEIN number or SSN selected earlier. |
Address Information
This is the address that the agency works from.
|
1.
|
Search for and add the Agencies Address. The Search Address field uses address matching. As you enter an address, the application autocompletes the entry. When the correct address presents, make your selection. Your selection auto-fills the Country, Address Line 1, Address Line 2, City, State and Zip fields as they apply. |
|
2.
|
Select the Location, Mailing, and or Commission Location checkbox based on which applies. |
Carrier Team Information
|
1.
|
Select a Business Development Manager. This is the person managing the agency from the insurance companies perspective. |
|
2.
|
Enter the Business Development Manager's Phone Number. |
|
3.
|
Select the Carrier PB Team Underwriter. Sets the Underwriter tasked with working with this agency. |
|
4.
|
Select the Carrier Underwriter. Also sets the Underwriter tasked with working with this agency. |
Banking Information
|
1.
|
Enter the Agency Name. |
|
2.
|
Enter the Bank Routing Number. |
|
3.
|
Enter the Bank Acount Number. |
|
4.
|
Enter the Name of Bank. |
|
5.
|
If you'd like, click the Commission Statement Email and add an email address. |
Errors & Omissions Policy
To add an errors and omissions policy:
|
1.
|
Click the Add New Policy button. |
|
2.
|
Enter the Company Name. |
|
3.
|
Enter the Policy Number. |
|
4.
|
Enter the Policy Limit in dollars. |
|
5.
|
Enter the policy's Effective Date. |
|
6.
|
Enter the policy's Expiration Date. |
|
8.
|
After you're done adding errors and omissions policies, click Save to save the agency. |
You should now see your newly added agency in the Agency grid.
Adding or Updating an Agencies Status
To add or update an existing agencies status:
|
1.
|
If you're not already at the Agencies page, click the Agencies tab now. |
|
2.
|
Select your agency from the Agency grid. |
After you click on an agency you're taken to the agency's Summary page. From this page you can access the following tabs: Users, Licenses, Agreements, Documents, and Sub Agents. If you click Edit, you can adjust the following agency details: General, Tax, Address, Team, Contacts, Communication, Banking Information and Errors & Omissions Policy.
|
3.
|
In the Status History section, click the Change Status link. |
|
4.
|
From the Status drop-down, make a selection: |
|
a.
|
Approved: Sets the agency to active, showing that it's an approved agency that you work with. |
|
b.
|
Declined: The agency's application was rejected by the insurance carrier. |
|
c.
|
Prospect: This is the default setting for all new agencies. |
|
d.
|
Terminated: The agency no longer works for the insurance carrier. |
|
5.
|
Add General Notes if necessary. These are dated and shown in the Status History area below the current status. |
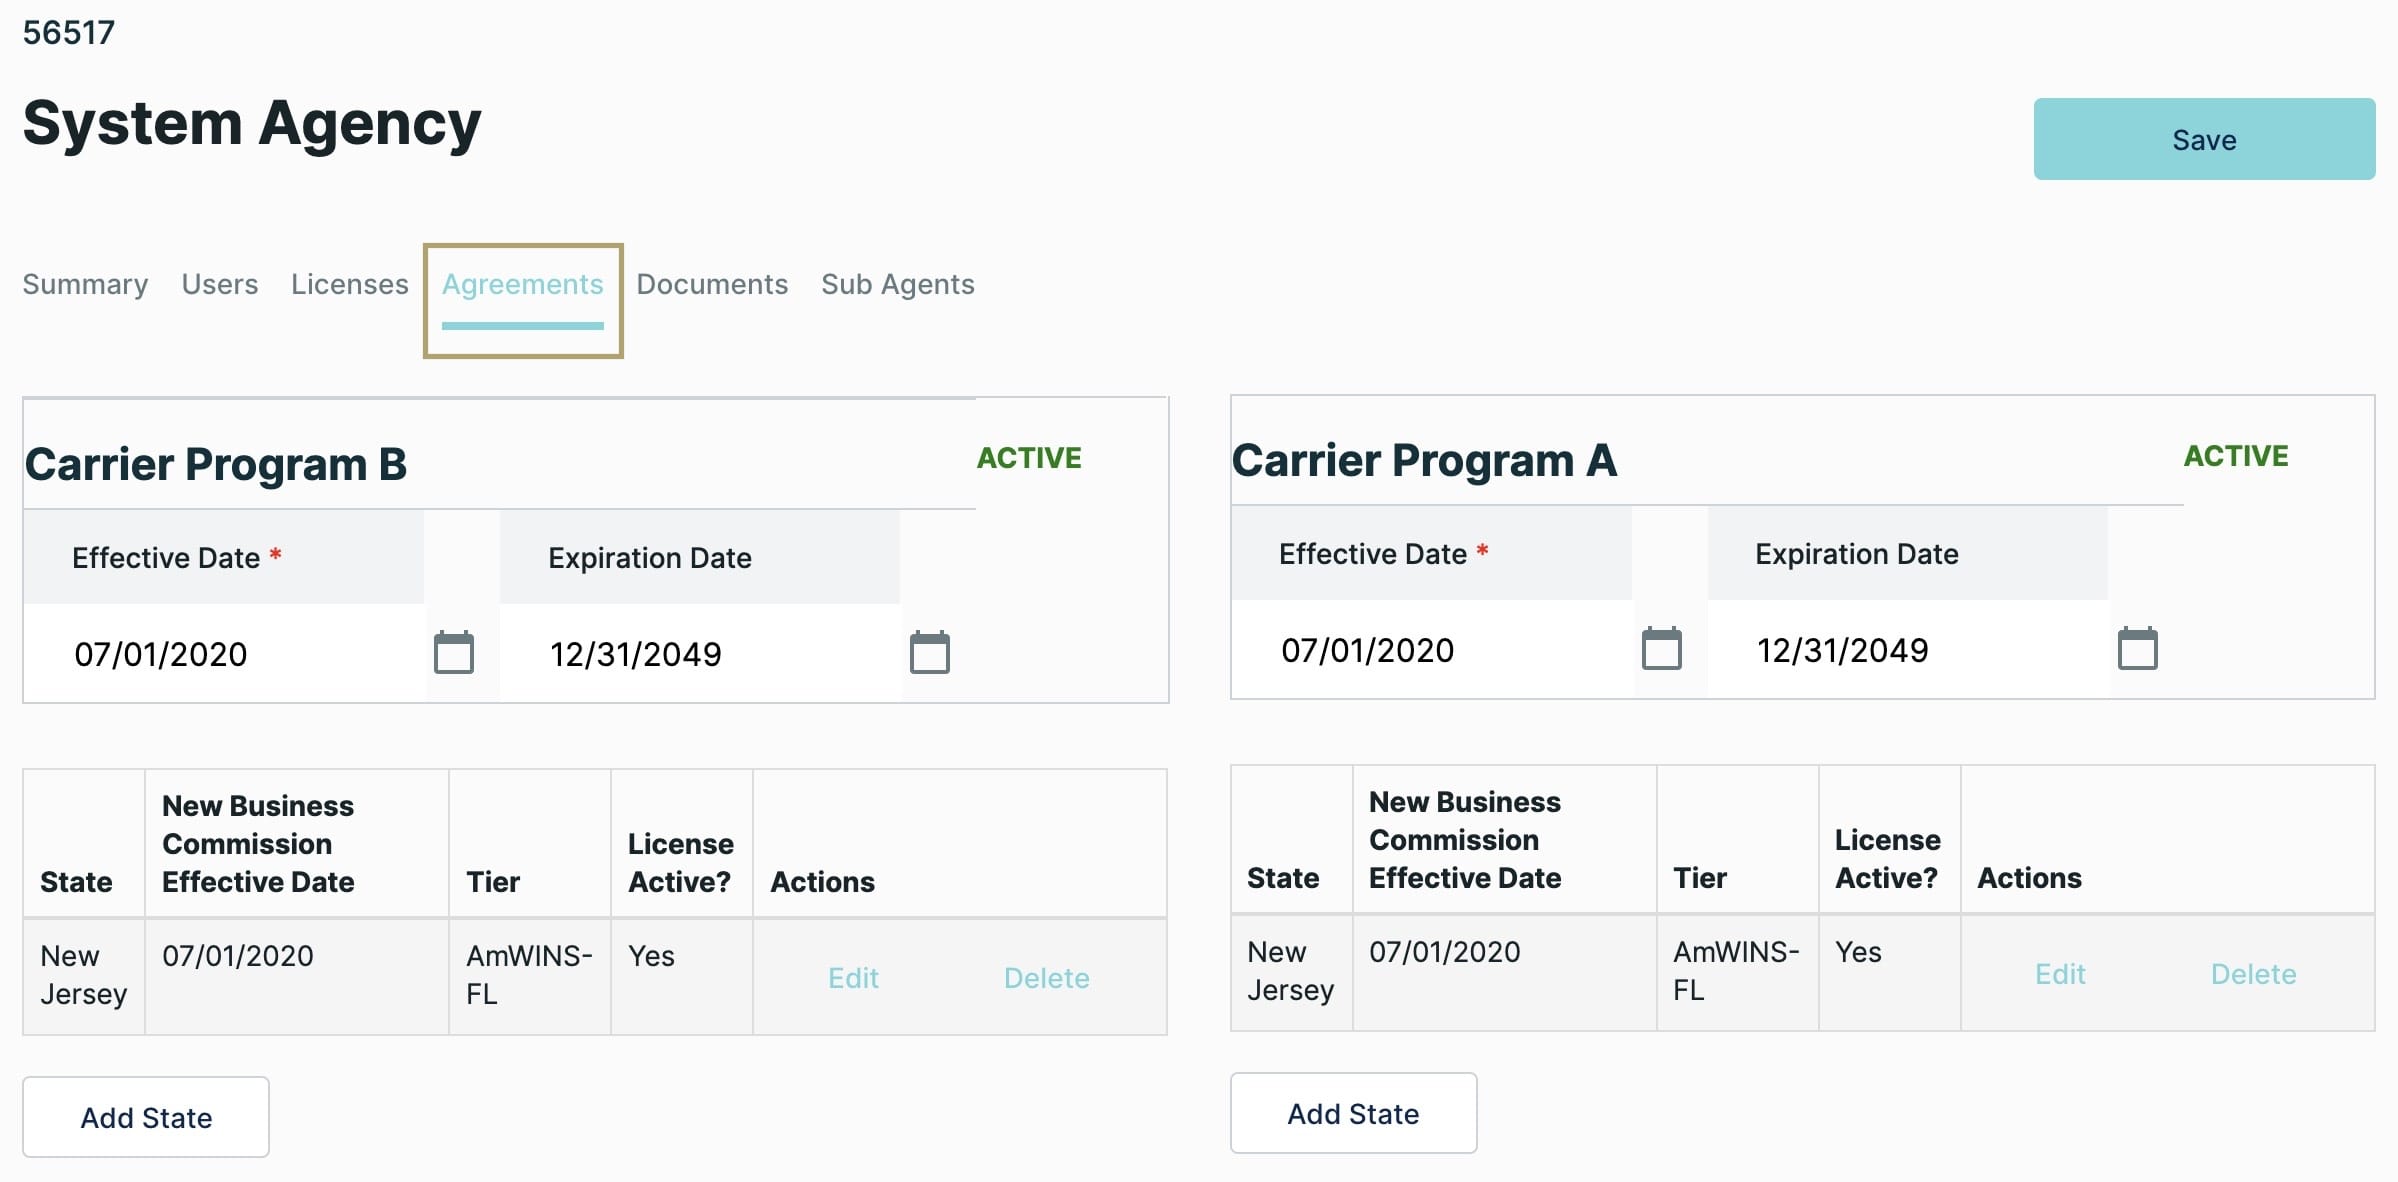
Approving an Agency for Business
Approving an agencies business means setting their related insurance companies active status. And setting which states an insurance company can operate within.
|
1.
|
If you're not already at the Agencies page, click the Agencies tab now. |
|
2.
|
Select an agency from the Agency grid. |
|
3.
|
Click the Agreements tab. |
Active and in-active insurance companies show as widgets, listing their Status, Effective Date and Expiration Date. Adjusting these dates sets the insurance companies status.
|
4.
|
Click the Add State button to set other states where the insurance company can operate. |
|
a.
|
Set the New Business Commission Effective date. |
|
b.
|
Set the New Business Commission Expiration date. |
|
c.
|
Select the State that the agency operates in. |
Adding Agency Users
Agency users have access to this application as part of their daily work environment. Your agency users would include an Agency Administrator and one or more Agency Representative/Producers. The Agency Administrator creates other new users. The Agency Representative/Producer creates quotes for review by an underwriter.
When creating a new agency user, all starred (*) fields are required.
|
1.
|
If you're not already at the Agencies page, click the Agencies tab now. |
|
2.
|
Select an agency from the Agency grid. |
|
4.
|
Click the Add User button. |
|
5.
|
From the User Type drop-down, make a selection. Options include: |
|
a.
|
Agency Administrator: Creates other new users. |
|
b.
|
Agency Representative/Producer: Creates quotes for review by the underwriter. |
|
6.
|
Enter the user's First Name, Middle Name and Last Name. |
|
8.
|
Enter the Branch Office. |
|
9.
|
Enter the user's Preferred Phone number. This refers to the user's daytime phone number. |
|
10.
|
Enter the user's Preferred Email. This refers to the user's daytime email address. |
|
11.
|
Select the Effective Date. This is the date from when you new user will become active in the system. |
|
12.
|
If this user will function as the primary contact for the agency, select the Set as Primary Contact checkbox. Agencies must have a primary contact set. |
|
13.
|
If this user will function as the secondary contact for the agency, select the Set as Secondary Contact checkbox. Setting a secondary contact is optional. |
|
14.
|
Select the Add as Carrier Communication. What does this do? |
Each new user receives an email, signaling that their account's been created. The email also gives your new user their temporary password along with a link to log into your application. On first login, new user's must change their password. On successful login, they're considered an active user.
Pre-Policy Issuance Process
This section covers the steps needed to prepare for the policy issuance process. Policy issuance is the process of preparing a policy and presenting it to the policyholder. To be able to prepare and present a policy, you must set up your customer accounts first.
You'll start the Pre-policy Issuance Process by establishing if your customer is an existing or new customer. For new customers, you'll continue with the Customer Setup process below. For existing customers, you'll skip ahead to the Policy Issuance Process.
Customers Setup
Navigating the Customers Page
To go to the Customers page, click the Customers tab at the top center of the Ribbon. Here is what the Customers page looks like:
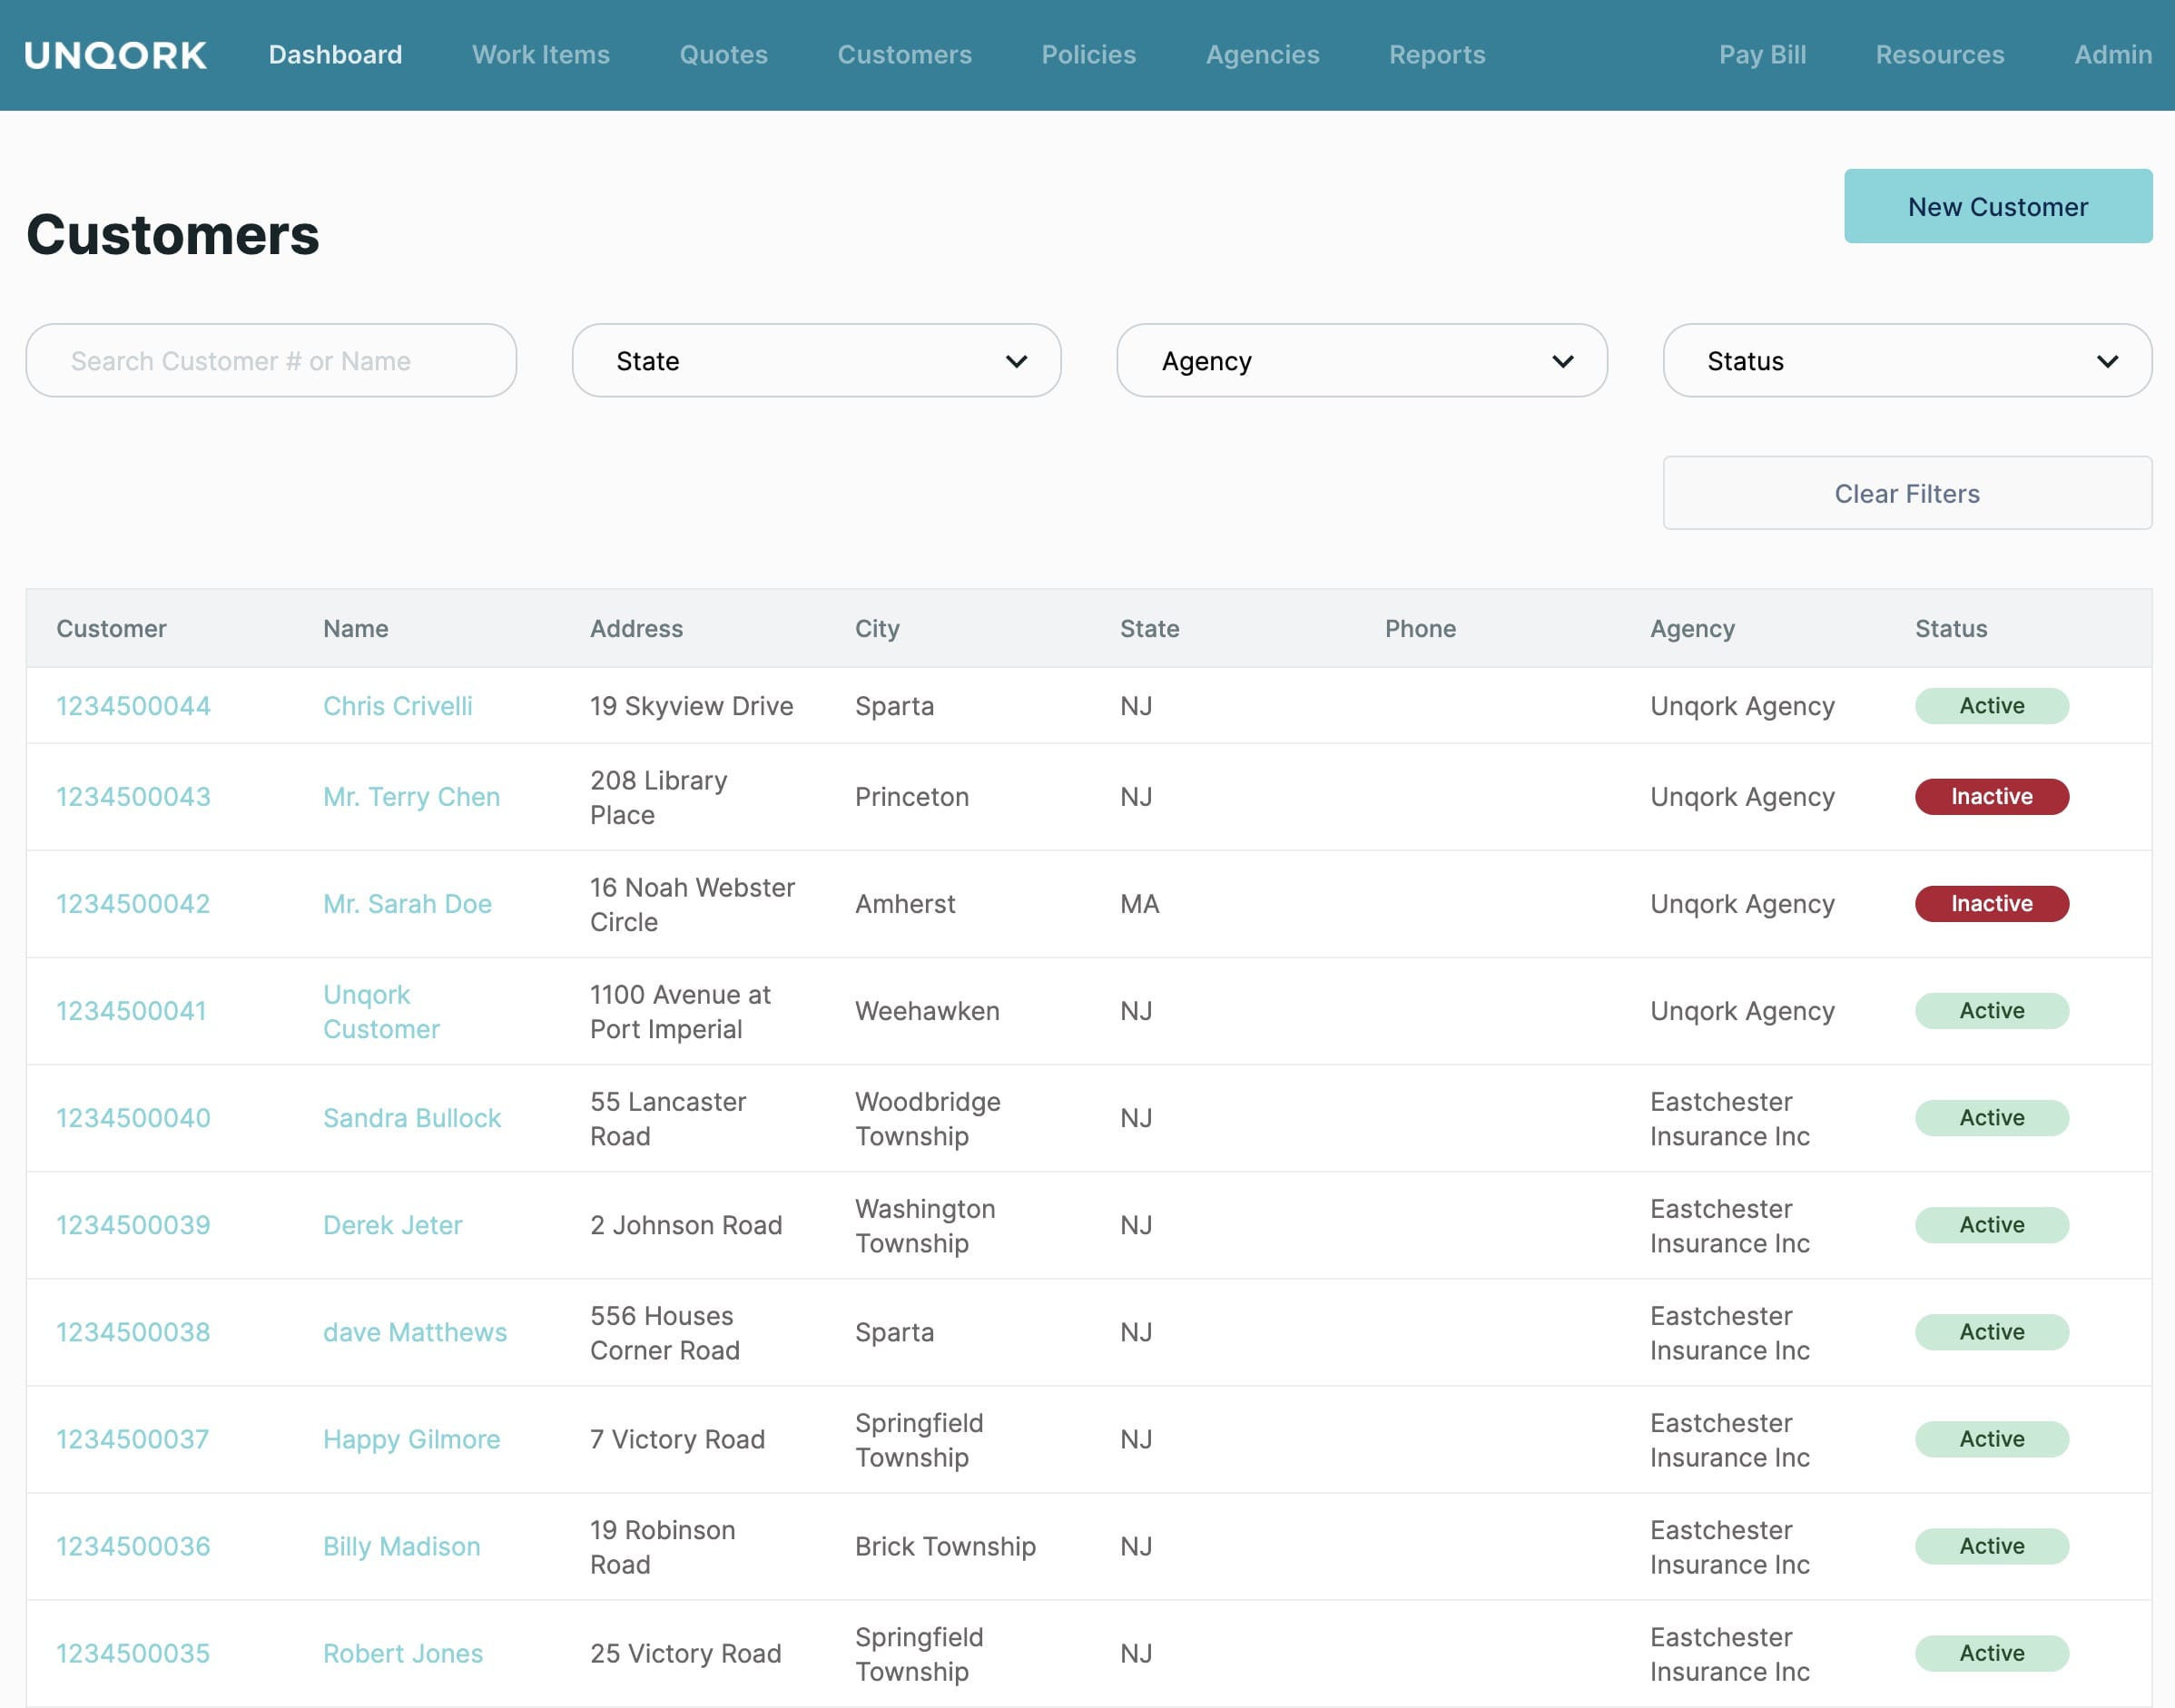
Using this Customers page, you can:
- Add new customers.
- Edit or update existing customer details.
Once open, the Customers page offers the following functionality:
|
New Customer button
|
Opens the Customer Info page on button-press. From this page, you can set up your first, second and third named insured customer details.
|
|
Search bar
|
Filters the Customers grid to show records associated with the entered search term.
|
|
State filter
|
Filters the Customers grid to show records associated with the chosen State.
|
|
Agency filter
|
Filters the Customers grid to show records associated with the chosen agency.
|
|
Status filter
|
Filters the Customers grid to show records for the chosen status. Options include, active or inactive.
|
|
Clear Filters button
|
Pressing Clear Filters clears the Search bar, State, Agency and Status filters as set. At the same time, the Customers grid resets to show all records.
|
|
Customers grid
|
A grid listing all customers (Customer, Name, Address and Contact) and their status in the system. Selecting a customer from the grid, takes you to the customer Overview page. From this page you can access the following tabs:
- Overview: Below the tabs and as part of the Overview, you'll see their Customer Information, details of their associated Agency and Alerts. You'll also see grids for the selected customers associated Quotes and Policies. A New Quote button lets you begin a new quote for the selected customer.
- Documents: Shows a grid listing all documentation received for or from the customer. This could include Cancellation, Appraisal, Inspection/Photos and many other document types. An Upload Document button lets you add more documents at any time. By default the Documents grid shows All document types. Other document type filters include Policy, Billing or All Other. In addition to the document type filter, you can filter by specific policy number. Pressing Clear Filters clears the policy number filter but does not reset the document types filter.
- Journal: Chronicles the customers journey from quotation through to approval and later endorsements. Clicking the Add Entry button takes you through to the Add Entry page, where you can save a new journal entry. The setting has not been approved for use in demo-pa.
- Billing: Below the tabs and as part of the Billing page, you'll see their Customer Information, details of their associated Agency and Alerts. You'll also see a grid listing all accounts (Total Premium, Received, Remaining Balance, Past Due, Current Due and Minimum Due) and their status in the system. The Pay Bill button is not currently supported in demo-pa.
- Work Items: Provides an aggregation of all tasks associated with the customer. Clicking the Add Task button takes you to the Add Task modal. From here you can add tasks set to a range of reasons (Claims, General, Billing and so on). Feature not currently supported in demo-pa.
|
Creating a Customer
Customers are associated to an Agency and a specific agency user. After setting up your customer, you're taken direct into the policy issuance flow.
When creating a new customer, all starred (*) fields are required.
|
1.
|
To go to the Customers page, click the Customers tab now. |
|
2.
|
Click the New Customer button. |
General Customer Information
|
1.
|
From the Agency list, make a selection. Remember, customers associate to a specific agency. |
|
2.
|
Set the Insured Type. Options include: |
|
a.
|
Individual: Means a person insured under an individual policy. If you selected Individual, you must enter extra general information identifying the individual. |
|
b.
|
Trust/LLC: Means a type of business entity. |
|
3.
|
If you selected Individual, you'll continue as follows: |
|
a.
|
Select the individual's Prefix. |
|
b.
|
Enter the individual's Name, Middle Name, and Last Name. |
|
c.
|
Select the individual's Suffix. |
|
d.
|
Enter the individual's Employer name. |
|
e.
|
Enter the individual's job Title. |
|
4.
|
If you selected Trust/LLC, enter the Trust/LLC Name. |
|
5.
|
Enter the Home Phone. You'll set the country using the drop-down, and then enter the area code and number associated with the customer's Home Phone. |
|
6.
|
Enter the Mobile Phone. Again, you'll set the country using the drop-down, and then enter the area code and number associated with the customer's Mobile Phone. |
|
7.
|
Enter the Date of Birth as MM/DD/YYYY. |
|
8.
|
Enter the Email. A valid email address is needed to issue the policy. |
|
9.
|
Select the VIP checkbox. This setting will be treated as optional in demo-pa. |
|
10.
|
To name another party on the policy, select the Second Named Insured checkbox. |
The second named insured has the same coverage under the policy as the named insured. As a minimum, where the second insured is an individual, you must enter the First Name, Last Name, Employer and Title. As a minimum and where the second insured is a Trust/LLC you must enter the Trust/LLC Name.
|
11.
|
To name a third party on the policy, select the Third Named Insured checkbox. |
Again, the third named insured has the same coverage under the policy as the named insured. As a minimum, where the third insured is an individual, you must enter the First Name, Last Name, Employer and Title. As a minimum and where the third insured is a Trust/LLC you must enter the Trust/LLC Name.
Mailing Address
This is the mailing address for the individual, trust or LLC.
|
1.
|
In the Start Typing Address field, search for and add the customer's address. The field uses address matching. As you enter an address, the application autocompletes the entry. When the correct address presents, make your selection. Your selection auto-fills the Address Line 1, Address Line 2, City, State and Zip fields as they apply. |
The mailing address state must match that of the risk state where the product is purchased.
Family Account
Family accounts cover your immediate family under a single policy.
|
1.
|
If your customer is part of a family account, select the Yes radio button. Continue as follows: |
|
a.
|
If your customer has a pre-existing family account, make a selection using the Family Accounts drop-down. This associates your customer with their pre-existing family account. |
|
b.
|
If your customer doesn't have a pre-existing family account, click the Create New Family Account button. |
|
c.
|
In the available field, enter a name for the family account. |
|
2.
|
If your customer is not part of a family account, select the No radio button. |
Policy Issuance Process
The Policy Issuance Process is the next part of this application. This process covers the creation of the quote and getting it approved and issued. This workflow focuses on homeowner and auto insurance for this application. This guide specifically covers the creation of a homeowners quote.
Navigating the Policy Issuance Process
In addition to being associated with an agency and agency user, customers are also associated with a specific quote. After setting up your customer, clicking New Quote takes you direct into the policy issuance flow (starting with the New Quote creation). Here is what the Start Quote page looks like:
The policy issuance process lets you do the following:
|
2.
|
Add policy information and set eligibility. |
|
3.
|
Set coverages, credits, and construction details. |
|
4.
|
Add optional coverages. |
|
5.
|
Get a premium summary. |
The Start Quote page contains the following functionality:
| Status |
An indicator positioned at the top right-side of the page. Based on where you are in the process, you could see any of the following status indications:
- Incomplete: An orange icon showing that the quote is unfinished.
- Indication: A green icon showing that the quote is ready. That is, all required fields are completed.
- Underwriting Review: An orange icon showing that the quote's entered the review stage.
- Conditional Approval: A green icon showing that the policy is successfully bound to a customer.
- Approved: A green icon showing that the quote is reviewed and approved.
- Declined: An red icon showing that the quote is reviewed and declined.
- Request Issue: A green icon showing that the policy has been approved and needs to be issued.
- Quote Expired: An red icon showing that the quote has expired.
|
|
Customer Name link
|
Selecting the customer name link, takes you to the customer Overview page. From the customer Overview page you can access the following tabs:
- Overview: Below the tabs and as part of the Overview, you'll see their Customer Information, details of their associated Agency and Alerts. You'll also see grids for the selected customers associated Quotes and Policies. A New Quote button lets you begin a new quote for the selected customer.
- Documents: Shows a grid listing all documentation received for or from the customer. This could include Cancellation, Appraisal, Inspection/Photos and many other document types. An Upload Document button lets you add more documents at any time. By default the Documents grid shows All document types. Other document type filters include Policy, Billing or All Other. In addition to the document type filter, you can filter by specific policy number. Pressing Clear Filters clears the policy number filter but does not reset the document types filter.
- Journal: Chronicles the customers journey from quotation through to approval and later endorsements. Clicking the Add Entry button takes you through to the Add Entry page, where you can save a new journal entry.
- Billing: Below the tabs and as part of the Billing page, you'll see their Customer Information, details of their associated Agency and Alerts. You'll also see a grid listing all accounts (Total Premium, Received, Remaining Balance, Past Due, Current Due and Minimum Due) and their status in the system. The Pay Bill button is not currently supported in demo-pa.
- Work Items: Provides an aggregation of all tasks associated with the customer. Clicking the Add Task button takes you to the Add Task modal, where you can add tasks set to a range of reasons (Claims, General, Billing and so on).
|
|
Journal link
|
Chronicles the customers journey from quotation through to approval and later endorsements. Clicking the Add Entry button takes you through to the Add Entry page, where you can save a new journal entry.
|
|
Documents link
|
Shows a grid listing all documentation received for or from the customer. This could include Cancellation, Appraisal, Inspection/Photos and many other document types. An Upload Document button lets you add more documents at any time. By default the Documents grid shows All document types. Other document type filters include Policy, Billing or All Other. In addition to the document type filter, you can filter by specific policy number. Pressing Clear Filters clears the policy number filter but does not reset the document types filter.
|
|
Work Items link
|
Provides an aggregation of all tasks associated with the customer. Clicking the Add Task button takes you to the Add Task modal, where you can add tasks set to a range of reasons (Claims, General, Billing and so on).
|
|
Add Journal Entry link
|
Takes you to a new page where you can create a new journal entry associated with the policy.
|
|
Unlock button
|
While the first internal or agency user edits a quote, a second internal or agency user sees a locked indicator. This shows the quote as locked by the first internal or agency user. Clicking the Unlock button claims the quote so the second internal or agency user can make edits.
|
|
Rate Quote button
|
Triggers the rating engine. The rating engine generates the quote based on the new parameters provided.
|
|
Continue button
|
Takes you to the next page in the policy issuance flow.
|
|
Navigation
|
A vertical navigation and progress widget positioned at the left of the quotation process. The tool shows the various pages that you'll move through as you complete your quote and your progress in the flow. As you move through the policy issuance flow, the marker moves to highlight your current position.
Selecting a specific navigation option, takes you direct to that page.
|
|
Save and Exit button
|
Saves your quotation at the point where you are in the policy issuance flow. On save, you're exited out of the flow. You can return to this point in the policy issuance flow later.
|
Creating a Quote
After you create a new customer, you'll be prompted to create a new quote. The following steps take you through the stages to setup a Homeowners quote. The process is similar for Auto.
|
1.
|
Click the Homeowners radio button. The other option is Auto. |
|
2.
|
Select the Risk State. This is the state where you want to be covered. |
Start Quote
As suggested by the name, Start Quote signals the start of the quotation process. On this page, you'll complete some basic policy terms. The following instructions touch on the required fields only:
Quote Name
Policy Term Information
|
1.
|
Select the policy Term. Options include: |
|
a.
|
12 Months: Presets the Policy Expiration Date at 12 months from the current date. The Policy Expiration Date is not editable. |
|
b.
|
Short Term: The Policy Expiration Date can't go past 1 year from the Policy Effective Date. The Policy Expiration Date is editable. |
|
2.
|
Select the Program Type radio button. Based on the carrier program selected, the Assigned Underwriter and Assigned underwriter Phone Number auto-populate. |
|
3.
|
Select the Agency User. |
Primary Risk Address
|
1.
|
Enter the Primary Risk Address details. By default this is the customer's address. You must enter the Residence Type, Country, Address Line 1, City and Zip to move on. |
Mailing Address
|
1.
|
Enter the Mailing Address details. You must enter the Country, Address Line 1, City, State/Province and Zip to move on. |
Policy Information and Eligibility
To be insured, a customer must meet all eligibility requirements. The following pages determine a customers eligibility for insurance and their premium.
Add Insured to This Location
|
1.
|
List all parties to be insured in the Add Insured to This Location grid. |
|
a.
|
Click Add Insured to add more parties to the same quote. |
|
b.
|
Click the Edit link to update the original customer's details. |
|
c.
|
Click the Remove Insured link to remove the original customer's details from the quote. |
Eligibility
Answers given in this section, impact pages later in the quotation process. Answer Yes or No to the following Eligibility questions:
|
1.
|
Have you had a foreclosure, repossession, bankruptcy, judgment or lien during the last five (5) years? |
|
2.
|
Have there been more than 3 losses within the last 5 years (other than Acts of God or valuable articles)? |
|
3.
|
Enter the Number of losses within the last 3 years (other than Acts of God or valuable articles)? Where this number is higher than 0, you'll state if the loss was water related. |
|
a.
|
Enter the Number of losses that were water related? |
|
4.
|
Do you keep any animals at any locations to be insured that have had any prior bite history? |
Location Eligibility
Answers given in this section impact pages later in the process.
|
1.
|
Select the Number of Mortgages from the drop-down. |
|
2.
|
Answer yes/no on the following Location Eligibility questions: |
|
a.
|
Is the property vacant or unoccupied? |
|
b.
|
Is the location to be insured currently undergoing construction or renovations? If yes, you're prompted for the following: |
|
i
|
Select the Type of Renovation from the drop-down. Options include Minor, Major, Major With Vacancy and Ground Up. |
|
ii
|
Pick the Anticipated Date of Completion from the date picker. |
|
c.
|
Is the location to be insured currently or planned to be rented to others for any duration less than 3 continuous months? |
|
d.
|
Is the property for sale? |
Coverages, Credits, and Construction Details
Limits
Here you'll add details specific to the home you're looking to insure.
Under Limits, set the following:
|
1.
|
Select the Dwelling Occupancy. Options include: |
|
a.
|
Primary: The dwelling where the customer lives, typically a house or an apartment. A person can only have one primary residence at any given time, though they can share it with other people. |
|
b.
|
Seasonal (with no Carrier Primary Residence): Any property that is rented for less than 6 months. |
|
c.
|
Seasonal (with Carrier Primary Residence): Any property that is rented for less than 6 months. |
|
d.
|
Rented to Others: A property where the owner receives payment from tenants, in return for occupying or using the property. |
|
e.
|
Vacant: A property where there is no personal property inside the home to allow for someone to live there. |
|
2.
|
Enter the Dwelling ($) limit value. Adding this value, with the Default Other Structures checkbox selected, auto populates the Other Structures ($) and Contents ($) values. |
|
3.
|
To default other coverages based on the Dwelling ($) value, leave the Default Other Coverages Based on Dwelling Limit as checked. To enter seperate values for Structures ($) and Contents ($), remove the checkmark. |
|
4.
|
Select the Loss of Use % value. Options include: Reasonable and Necessary Expenses, 0% or 10%. |
|
5.
|
Select Yes or No for the Personal Liability Exclusion. |
|
a.
|
Yes: Excludes personal liability coverage as part of the package. If selected the Personal Liability and Medical Payments options return to $0 and become inactive. |
|
b.
|
No: Includes personal liability coverage as part of the package. If selected the Personal Liability option becomes active. Medical Payments sets, but stays inactive. |
|
i
|
You can select a Personal Liablility of between $0 and $1,000,000. The default selection is $500,000. |
|
ii
|
Medical Payments is preset at $10,000. |
Deductibles
This is where you set the All Other Peril (AOP) deductible. This deductible applies to claims otherwise not covered under the policy's other deductibles.
|
1.
|
From the All Other Peril Deductible drop-down, make a selection. Preset options range from $500 to $5,000. The field defaults to $5,000. |
Construction Details
This section focuses on the construction of the home you're looking to insure. Again, answers given in this section, impact pages later in the quotation process. You could also be prevented from moving forward where you give answers outside of target limits.
|
1.
|
Enter the year the home was built in Year Built. |
|
2.
|
Select Yes or No in the Is There a Finished Basement? field. |
|
3.
|
Select Yes, or No in the Swimming Pool? field. |
|
4.
|
Select Yes, or No in the Was Home Renovated? field. Selecting Yes shows more options for: |
|
a.
|
Year Replaced - Roof: Enter the year corresponding with the last roof replacement. |
|
b.
|
Year Updated - Electrical: Enter the year corresponding with the last major electrical upgrade. |
|
c.
|
Year Updated - Plumbing: Enter the year corresponding with the last major plumbing upgrade. |
|
d.
|
Year Updated - Heating and A/C: Enter the year corresponding with the large major heating and cooling system upgrade. |
After completing this page, you're asked to confirm that these renovation details are correct. You can opt to change the information captured, or continue.
|
5.
|
Select the Roof Covering. Your options are: Concrete Tile / Clay Tile / Slate or Other. |
|
6.
|
Select the Roof Shape. Your options are: Flat, Hip, Gable or Other. |
|
7.
|
Select the Opening Protection. Your options are: None, Basic, Impact Shutter, Impact Glass or Unkown. |
|
8.
|
Select the Construction Type. Your options are: Frame, Frame Veneer, Masonry or Poured Concrete. |
|
9.
|
Select the Rating Zone. |
|
10.
|
Enter the Total Finished Square Feet of the home. |
|
11.
|
Enter the Number of Stories for the home. |
|
12.
|
Select the Fire Protection rating that applies to the home. Your options are P1 to P5, PP1 to PP5, UP6 to UP10, UP15, UP20, UP25, UP30, UP35, UP40, UP45 or UP45+ |
|
13.
|
Enter the Distance to the Responding Station. |
Protective Devices
Lists the range of protective devices which may be associated with the home. Radio buttons for these settings default to No. Set these fields as needed. There are no required fields in this section.
Reported Values
These fields concern the physical qualities of the property. Update these fields as needed. There are no required fields in this section.
Optional Coverages
This section covers various additional coverages, limitations, extended liability and exclusions.
Additional Coverages
By default Cyber Liability Coverage, Home Systems Protection and Service Line Protection are selected. These are considered as standard offerings. For these and other selected coverages, you must set a Limit, Deductible and or other specialized settings. There are no top-level required fields in this section.
|
1.
|
Where Cyber Liability Coverage is selected, select the Limit from the drop-down. Your options are: $25,000, $50,000, $100,000 or $250,000. The Deductible calculates based on your Limit selection. |
|
2.
|
Where Home Systems Protection is pre-selected, select the Limit from the drop-down. Your options are: $100,00, $250,000 or $500,000. |
Coverage Limitations
A typical insurance policy is a collection of coverages with limits. You'll likely have multiple limits within one policy. Here you have the option of limiting off premises losses, home reconstruction cost coverage and a few others. Update these fields as needed. There are no top-level required fields in this section.
Extended Liability
If the policyholder would like their liability to extended beyond their home, they can add Extended Liability to their policy. If selected, there is an Add a Location button where you can add locations to their liability policy.
Liability Exclusion
A policy with an Animal Liability Exclusion or Limitation Endorsement has limited or no coverage for liability caused by pets (animals). Likewise, Libel/Slander and Political Activities Exclusions offer no coverage for liability caused by defamation or political activity. There are no required fields in this section. Select these fields as needed. By default all fields are unselected.
You've now gone far enough through the quote process that you can rate your quote and issue the policy.
Additional Policy Information
After you've filled out the Optional Coverages section there are a series of other sections you can fill out if applicable. These are:
-
Additional Interests
-
Collections
-
Report Results
-
Claim Loss History
-
Inspection
-
Premium Adjustments
-
Commission
-
Reinsurance
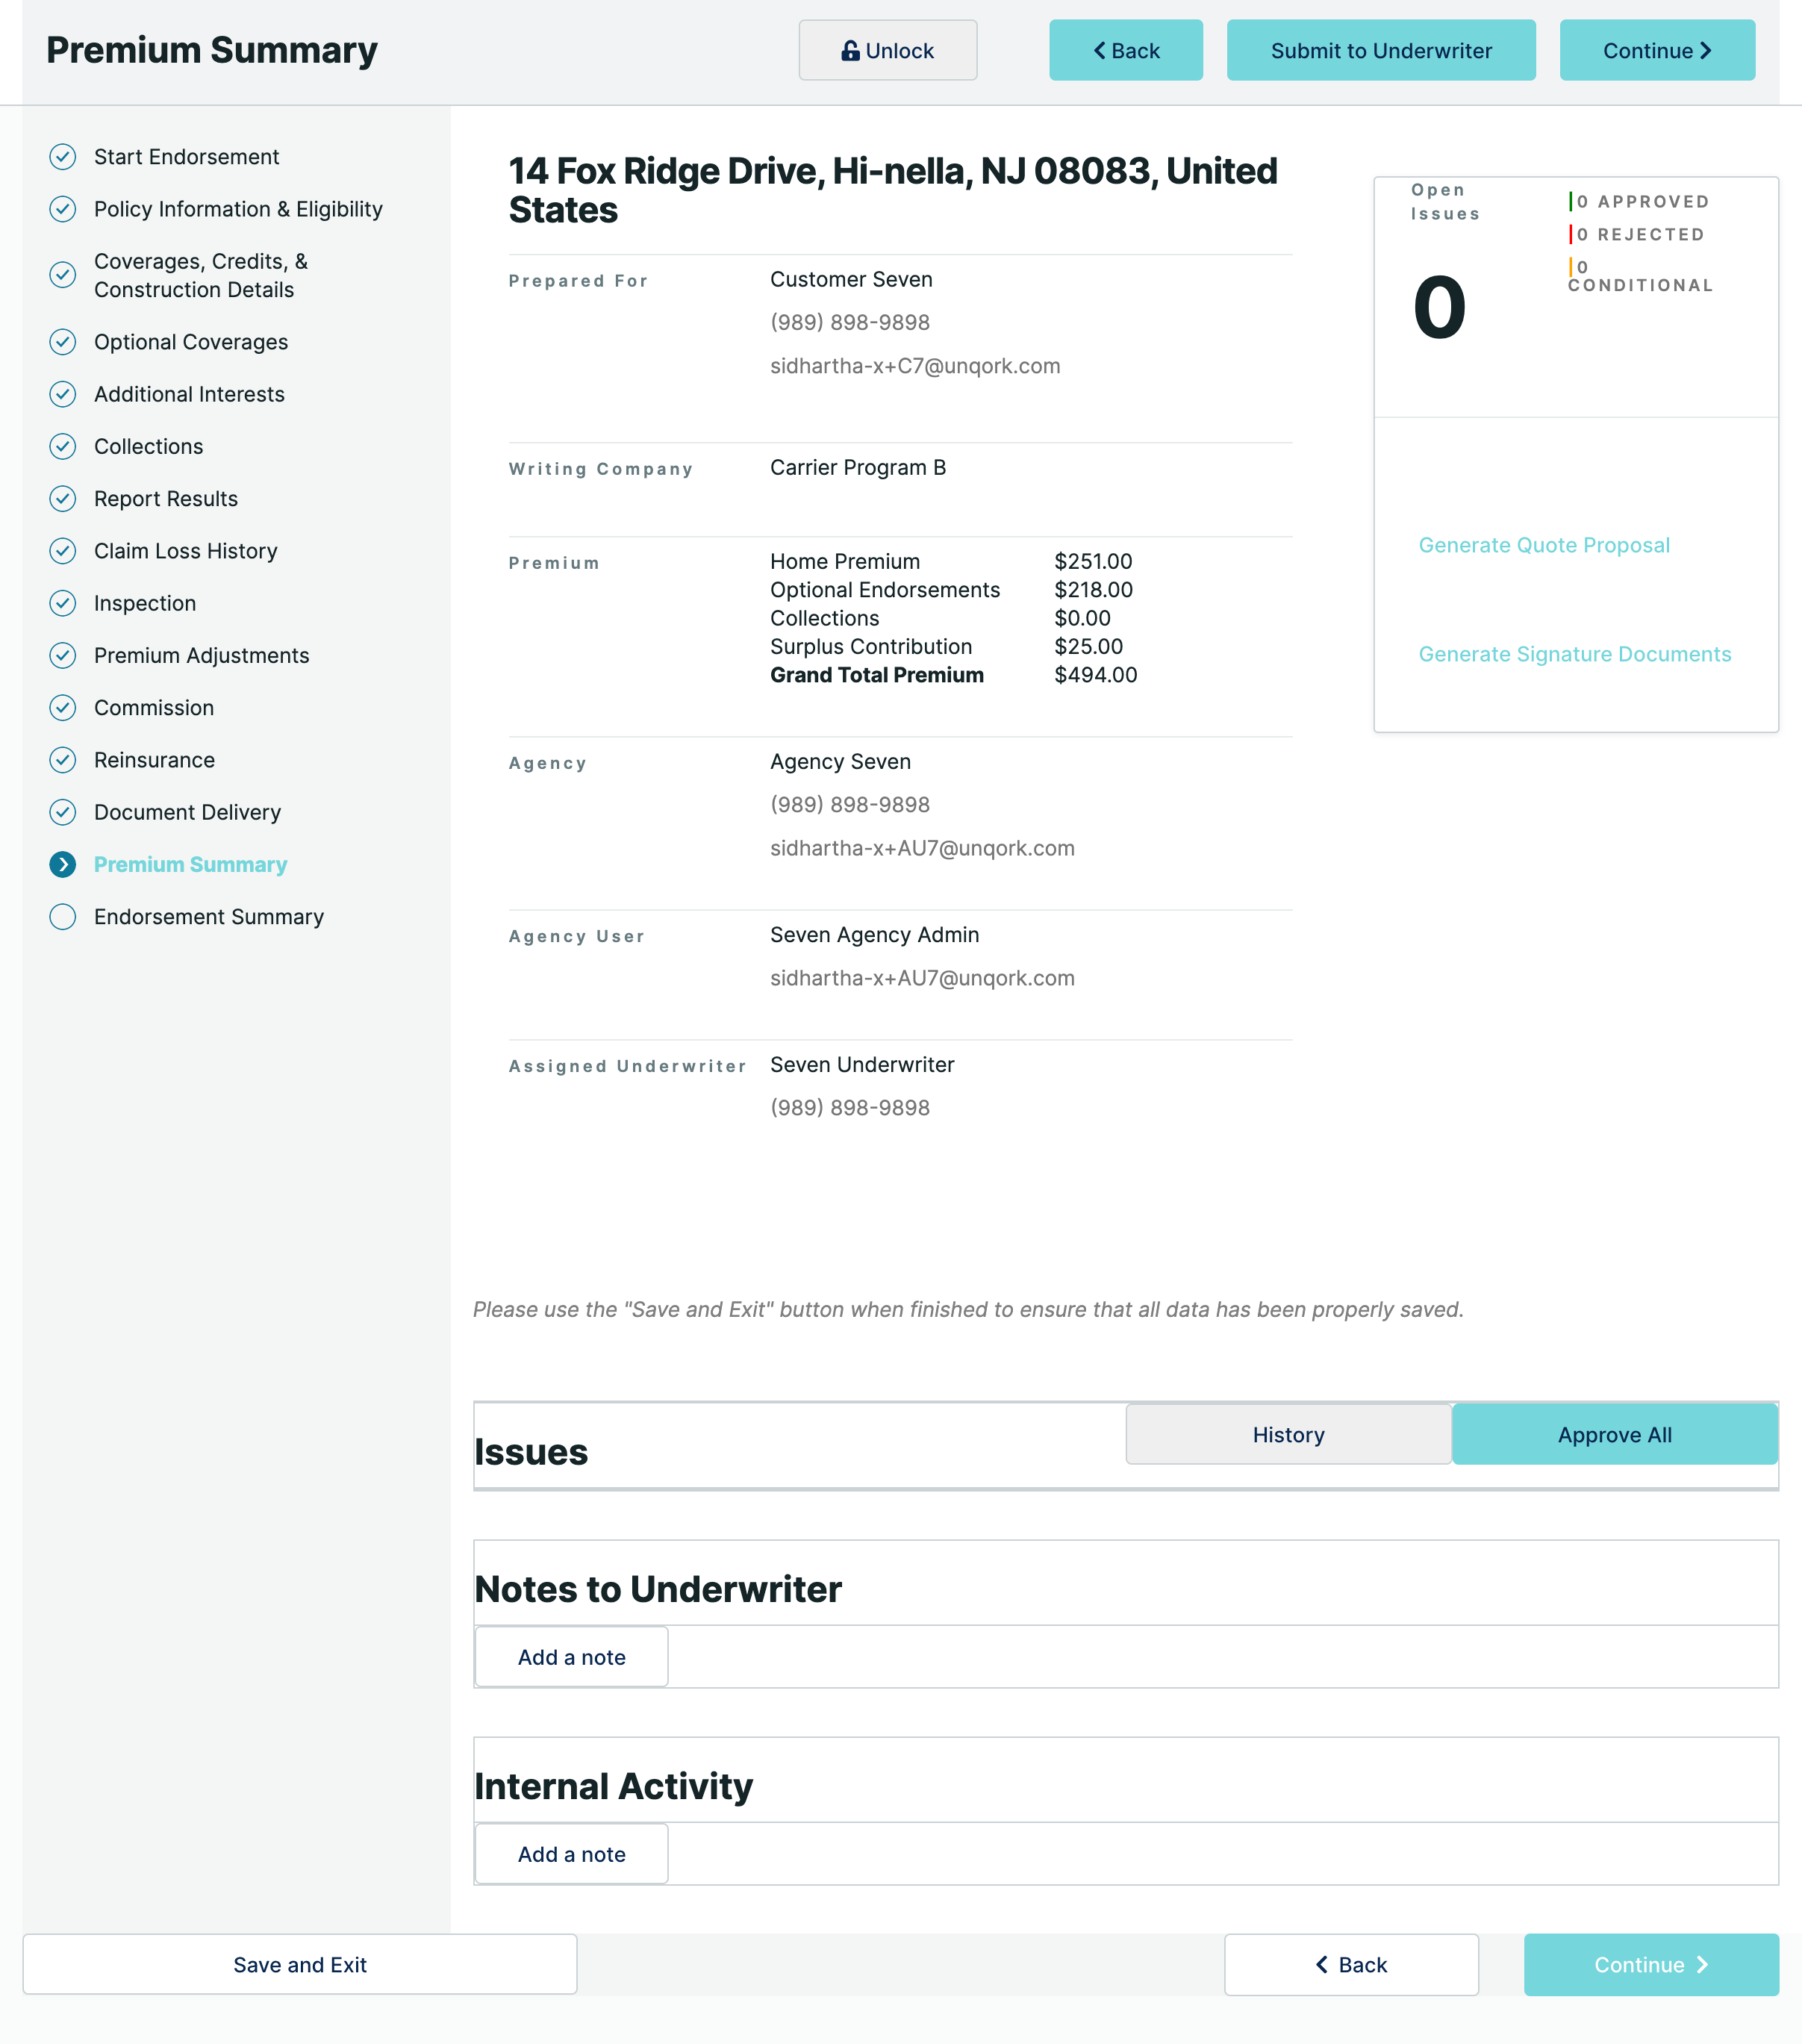
Premium Summary
Navigating the Premium Summary Page
After clicking Rate Quote, the application goes through a series of validations. There are a range of back-end rules applied and calculations to populate additional fields. On completion, the Premium Summary is generated.
From the Premium Summary page, you can:
- See the initial quote along with a range of premium calculations.
- See the quote status.
- See a table of open issues for review and action.
- Add notes for the Underwriters attention.
- Record details of internal activity and actions taken.
- Submit the quote to an underwriter for review.
Once open, the Premium Summary page offers the following functionality:
| Status |
An indicator positioned at the top right-side of the page. Based on where you are in the process, you could see any of the following status indications:
- Incomplete: An orange icon showing that the quote is unfinished.
- Indication: A green icon showing that the quote is ready. That is, all required fields are completed.
- Underwriting Review: An orange icon showing that the quote's entered the review stage.
- Conditional Approval: A green icon showing that the policy is successfully bound to a customer.
- Approved: A green icon showing that the quote is reviewed and approved.
- Declined: An red icon showing that the quote is reviewed and declined.
- Request Issue: A green icon showing that the policy has been approved and needs to be issued.
- Quote Expired: An red icon showing that the quote has expired.
|
|
Back Button
|
Takes you back to the previous page.
|
|
Submit to Underwriter button
|
Pushes the quote to an underwriter for review. Remember, underwriters decide whether to provide insurance, and the terms. They evaluate insurance applications and set coverage amounts and premiums.
|
|
Approve Quote button
|
Appears in place of the Submit to Underwriter button, while the quote is in Underwriting Review.
|
|
Open Issues
|
A widget that displays the number of open issues that need to be resolved. This widget aligns with the Issues grid displayed further down on the Premium Summary page. Taking action on the Issues grid updates the Approved, Rejected and Conditional counts shown in this widget.
You can choose to Approval All or add individual Producer Notes for each issue.
|
| Notes to Underwriter |
A grid showing date and time stamped notes for the underwriter. An Add a Note button opens a modal where you can add a new note for the underwriter. Once added, oldest notes show at the top of the grid and new notes append at the end. Agency users and Underwriters can Edit or Delete existing notes.
|
| Internal Activity |
A grid showing date and time stamped internal activity notes. An Add a Note button opens a modal where you can add a new internal activity note for yourself or other agency users. Once added, oldest notes show at the top of the grid, and new notes append at the end. Agency users can Edit or Delete existing notes.
When you escalate a note, you'll mark it for the attention of the Carrier Admin, or an Underwriter. You'll also set the escalation reason. Escalation reasons include Outside UW Authority and Loss History.
|
|
Navigation
|
A vertical navigation and progress widget positioned at the left of the quotation process. The tool shows the various pages that you'll move through as you complete your quote and your progress in the flow. As you move through the policy issuance flow, the marker moves to highlight your current position.
Selecting a specific navigation option, takes you direct to that page.
|
Reviewing and Approving a Quote
Reviews are carried out by the underwriter. So, it's the underwriter who decides whether to provide insurance and what the terms will be.
|
1.
|
To send a quote to the underwriter for review, click Submit to Underwriter. Subsequent steps are carried out by the underwriter. |
|
2.
|
As the first step in the approval process, you must review and address all open issues. To address these: |
|
a.
|
Scroll down and find the Issues grid. You can choose to Approval All or add individual Producer Notes for each issue. |
|
i
|
To add individual Producer Notes, pick an open issue, and click its Edit option. Save your Producer Note. |
|
ii
|
Alternatively, to move on without adding individual Producer Notes, click Approve All. |
|
3.
|
Scroll back to the top of the page, click Approve Quote. |
|
4.
|
Next, you'll Generate Signature Documents. The customer signs and returns these to you. |
|
a.
|
Click Generate Signature Documents. |
|
b.
|
Send the resulting PDF package to the customer for review and signature. |
|
5.
|
Scroll down and find the Required Documents section. This section populates after you've generated the signature documents only. To upload all outstanding required documents: |
|
a.
|
Click Upload Documents. |
|
b.
|
Select one, some, or all of the documents listed under Required Documents - Not Received. |
|
c.
|
Drag-and-drop or use the Browse function to upload the documents. |
Uploaded documents appear in a grid at the end of the Summary page. Each entry shows a time stamp, the document type, the requirements satisfied by the upload, and who uploaded the documents.
Issuing a Policy
You're on the home stretch. Here the policy gets issued and bound to the customer.
|
1.
|
Click Request Issue. You'll notice that 2 new options appear on the Navigation. These are for Billing and Document Delivery. |
Policy Billing Method
This section is only for data gathering only. This solution currently does not include a Billing System integration.
Required (*) fields include Payor, First Name, Last Name, Address and Payment Plan. These fields auto-populate, but can be adjusted as needed.
If not pre-populated, populate the following details:
|
1.
|
Select the customer name from the Payor drop-down. |
|
2.
|
Enter the customer's First Name. |
|
3.
|
Enter the customer's Last Name. |
|
4.
|
Enter an email address in the Email field. All billing correspondence associated with the policy goes to this address. |
|
5.
|
In the Search Address field, search for and add the customer's address. The field uses address matching. As you enter an address, the application autocompletes the entry. When the correct address presents, make your selection. Your selection auto-fills the Country, Address Line 1, Address Line 2, City, State and Zip fields as they apply. You must complete the Country, Address Line 1, City, State and Zip fields to continue. |
|
6.
|
Select a Payment Plan. |
Document Delivery
From here you can send all of the finalized documents out to recipients associated with the policy. This could include the customer, the agency user, or the underwriter. By default, the customer shows as the recipient. You'll click Add New Recipient to add others. Delete Checked Recipients lets you delete recipients who no longer apply.
To navigate document delivery, you must set document recipients and review the billing information on file. This is the last step in issuing the policy.
|
1.
|
To add a new recipient: |
|
a.
|
Click Add New Recipient. |
|
b.
|
Enter the recipient's First Name. |
|
c.
|
Enter the recipient's Last Name. |
|
d.
|
Select the Delivery Method. Your options are: |
|
i
|
Mail: Selecting this option, opens a new section where you can enter the recipient's address. In the Search Address field, search for and add the customer's address. The field uses address matching. As you enter an address, the application autocompletes the entry. When the correct address presents, make your selection. Your selection auto-fills the Country, Address Line 1, Address Line 2, City, State and Zip fields as they apply. You must complete the Country, Address Line 1, City, State and Zip fields to continue. |
|
ii
|
Email: Selecting this option requests the Primary Email address associated with this recipient. |
|
iii
|
Both: Displays both the above address and email options for completion. |
|
a.
|
Select the Delete Recipient? checkbox associated with the recipient or recipients for deletion. |
|
b.
|
Scroll down and click Delete Checked Recipients. |
|
c.
|
At the confirmation message, click OK. Clicking Cancel returns you to the Document Delivery page where you'll see all recipients still listed. |
|
3.
|
Now, click the Issue Policy button. |
The application saves and validates, and the policy is created in the back-end. Just give it a minute to work its magic!
The policy issuance process ends on the Summary page. The Summary page shows the following:
- The Status shows as Active (green).
- A Summary section shows the insured's name, the agency information, underwriter details and the policy's effective and expiry dates.
- A Coverages section lists all the various coverages and deductibles included under the policy.
- A History section lists the history of the policy. This includes any premium changes, endorsements or cancellations that take place on the policy.
- A Required Documents section lists all required documents that are essential for the policy.
- A Policy Change button becomes available on the page.
Policy Endorsement Process
This process becomes available once you've issued a policy and bound it to a customer. The policy is successfully bound when the policy status shows as Processed on the Policy Summary page.
An endorsement is a change or addition to an existing contract that changes the scope of the original policy. In simple terms, endorsements add, delete, exclude, or otherwise alter coverage. Any Active status policy can undergo an endorsement change.
Entering The Policy Endorsement Flow
To make a policy endorsement:
|
1.
|
If you are not already at the Policy Summary page, click the Policies tab now. |
|
2.
|
Search for and select the Policy number associated with the endorsement change. |
|
3.
|
At the Policy Summary page, click the Policy Change button. |
|
4.
|
Validate that the Policy Change modal shows the correct Name Insured and Policy Number. |
|
5.
|
Select Endorsement from the Type drop-down. |
|
6.
|
Set the Effective Date. |
|
7.
|
Click Submit. You're taken to the Endorsement Summary page. |
|
8.
|
Scroll to the end of the Endorsement Summary page and select the Endorsement Reason. Your choices narrow based on whether you're endorsing an automotive or homeowner policy: |
|
c.
|
Location Details/Credits |
|
e.
|
Vehicle Garaging Location |
|
j.
|
Insured(s)/Additional Interest |
Based on the reason selected above, you're taken back to that point in the quote flow to make the change. You can select one or more options to endorse multiple areas in the policy at once.
|
9.
|
Click Start Endorsement. |
Navigating the Endorsement Flow
After clicking Start Endorsement, the application goes through a series of validations. Policy data is retrieved and fields are populated. On completion the Endorsement flow opens.
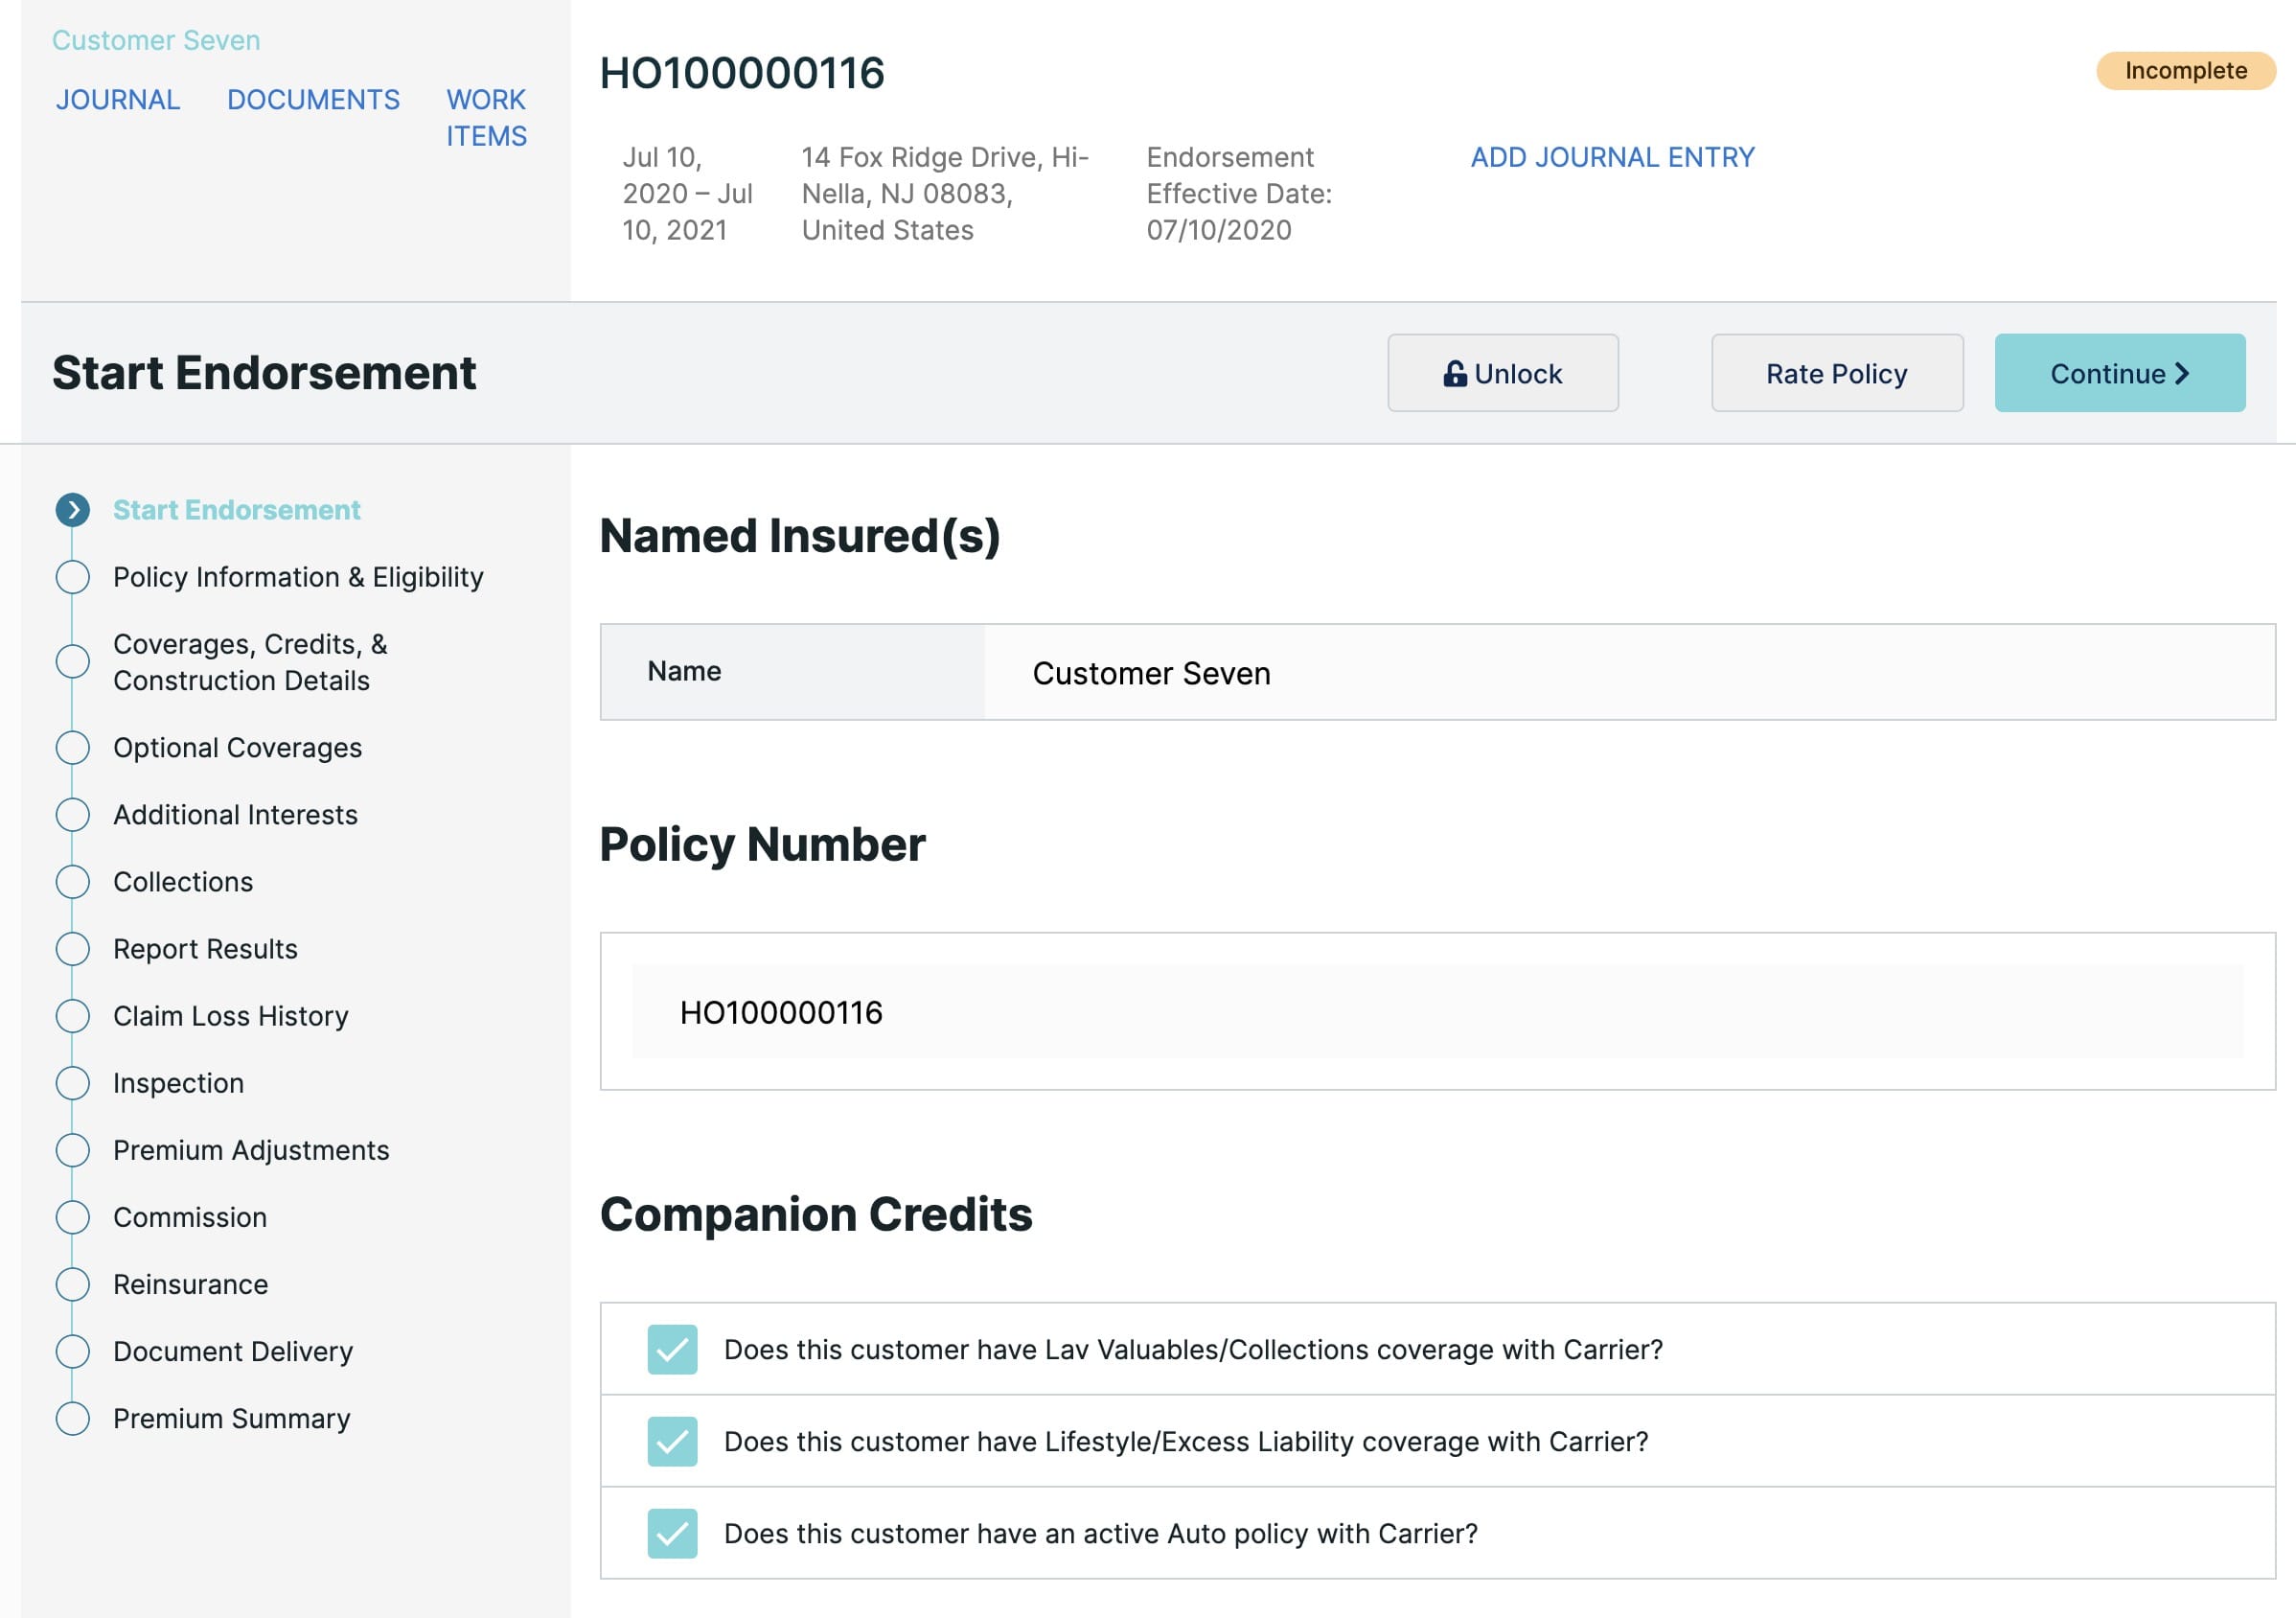
From here, you can update:
- Policy Information & Eligibility:
- Coverages, Credits, & Construction Details:
- Optional Coverages:
- Additional Interests:
- Collections:
- Report Results:
- Claim Loss History:
- Document Delivery:
- Premium Summary:
Once inside the Endorsement flow, you'll see the following functionality:
| Status |
An indicator positioned at the top right-side of the page. Based on where you are in the process, you could see the following status indicators:
- Incomplete: An orange marker showing that the policy is undergoing an endorsement.
- Indication: A green marker showing that the quote is ready. That is, all required fields are completed.
- Underwriting Review: An orange marker showing that the quote's entered the review stage.
- Approved: a green marker showing that the quote is reviewed and approved.
- Active: a green marker showing that the policy is now issued.
|
|
Customer Name link
|
Selecting the customer name link takes you to the customer Overview page. From the customer Overview page you can access the following tabs:
- Overview: Below the tabs and as part of the Overview, you'll see their Customer Information, details of their associated Agency and Alerts. You'll also see grids for the selected customers associated Quotes and Policies. A New Quote button lets you begin a new quote for the selected customer.
- Documents: Shows a grid listing all documentation received for or from the customer. This could include Cancellation, Appraisal, Inspection/Photos and many other document types. An Upload Document button lets you add more documents at any time. By default the Documents grid shows All document types. Other document type filters include Policy, Billing or All Other. In addition to the document type filter, you can filter by specific policy number. Pressing Clear Filters clears the policy number filter but does not reset the document types filter.
- Journal: Chronicles the customers journey from quotation through to approval and later endorsements. Clicking the Add Entry button takes you through to the Add Entry page, where you can save a new journal entry.
- Billing: Below the tabs and as part of the Billing page, you'll see their Customer Information, details of their associated Agency and Alerts. You'll also see a grid listing all accounts (Total Premium, Received, Remaining Balance, Past Due, Current Due and Minimum Due) and their status in the system. The Pay Bill button is not currently supported in demo-pa.
- Work Items: Provides an aggregation of all tasks associated with the customer. Clicking the Add Task button takes you to the Add Task modal, where you can add tasks set to a range of reasons (Claims, General, Billing and so on).
|
|
Journal link
|
Chronicles the customers journey from quotation through to approval and later endorsements. Clicking the Add Entry button takes you through to the Add Entry page, where you can save a new journal entry.
|
|
Documents link
|
Shows a grid listing all documentation received for or from the customer. This could include Cancellation, Appraisal, Inspection/Photos and many other document types. An Upload Document button lets you add more documents at any time. By default the Documents grid shows All document types. Other document type filters include Policy, Billing or All Other. In addition to the document type filter, you can filter by specific policy number. Pressing Clear Filters clears the policy number filter but does not reset the document types filter.
|
|
Work Items link
|
Provides an aggregation of all tasks associated with the customer. Clicking the Add Task button takes you to the Add Task modal, where you can add tasks set to a range of reasons (Claims, General, Billing and so on).
|
|
Add Journal Entry link
|
Takes you to a new page where you can create a new journal entry associated with the policy.
|
|
Unlock button
|
While the first internal or agency user edits a quote, a second internal or agency user sees a locked indicator. This shows the quote as locked by the first internal or agency user. Clicking the Unlock button claims the quote so the second internal or agency user can make edits.
|
|
Rate Quote button
|
Triggers the rating engine. The rating engine generates the quote based on the new parameters provided.
|
|
Continue button
|
Takes you to the next page in the endorsement flow.
|
|
Navigation
|
A vertical navigation and progress widget positioned at the left of the quotation process. The tool shows the various pages that you'll move through as you complete your endorsement and your progress in the flow. As you move through the endorsement flow, the marker moves to highlight your current position.
Selecting a specific navigation option, takes you direct to that page.
|
|
Save and Exit button
|
Saves your quotation at the point where you are in the policy issuance flow. On save, you're exited out of the flow. You can return to this point in the policy issuance flow later.
|
Updating the Policy
While in the endorsement flow, the Status changes to Incomplete. To officially update the policy:
|
1.
|
Make changes to the policy as needed. |
|
2.
|
Click the Rate Policy button. |
Premium Summary
Navigating the Premium Summary Page
After clicking Rate Policy, the application goes through a series of validations. There are a range of back-end rules applied and calculations to populate additional fields. Upon completion, the Premium Summary page is generated.
From the Premium Summary page, you can:
- See the revised premium along with premium calculations and endorsements.
- See the policy status.
- See a table of open issues for review and action.
- Add notes for the Underwriters attention.
- Record details of internal activity and actions taken.
- Upload new documents as requested by the application.
- Submit the endorsement to an underwriter for review.
Once open, the Premium Summary page offers the following functionality:
| Status |
An indicator positioned at the top right-side of the page. At this stage you'll see an orange marker showing that the quote's in the Underwriter Review stage.
|
|
Back button
|
Takes you back to the previous page.
|
|
Submit to Underwriter button
|
Pushes the quote to an Underwriter for review. Remember, underwriters decide whether to provide insurance, and the terms. They evaluate insurance applications and set coverage amounts and premiums.
|
|
Approve Quote button
|
Appears in place of the Submit to Underwriter button, while the quote is in Underwriting Review.
|
|
Open Issues
|
A widget displaying the number of open issues needing to be resolved. This widget aligns with the Issues grid displayed further down on the Premium Summary page. Taking action on the Issues grid updates the Approved, Rejected, and Conditional counts shown in the widget.
You can choose to Approval All or add individual Producer Notes for each issue.
|
|
Notes to Underwriter
|
A grid showing date- and time-stamped notes for the underwriter. An Add a Note button opens a modal where you can add a new note for the underwriter. Once added, oldest notes show at the top of the grid and new notes append at the end. Agency users and Underwriters can Edit or Delete existing notes.
|
| Internal Activity |
A grid showing date- and time-stamped internal activity notes. An Add a Note button opens a modal where you can add a new internal activity note for yourself or other agency users. Once added, oldest notes show at the top of the grid, and new notes append at the end. Agency users can Edit or Delete existing notes.
When you escalate a note, you'll mark it for the attention of the Carrier Admin, or an Underwriter. You'll also set the escalation reason. Escalation reasons include Outside UW Authority and Loss History.
|
|
Navigation
|
A vertical navigation and progress widget positioned at the left of the quotation process. The tool shows the various pages that you'll move through as you complete your quote and your progress in the flow. As you move through the policy issuance flow, the marker moves to highlight your current position.
Selecting a specific navigation option, takes you direct to that page.
|
Reviewing and Approving an Endorsement
Reviews are carried out by the underwriter. So, it's the underwriter who approves the endorsement.
|
1.
|
To send an endorsement to the underwriter for review, click Submit to Underwriter. Subsequent steps are carried out by the underwriter. |
|
2.
|
As the first step in the approval process, you must review and address all open underwriting issues. You'll note that the policy status is Underwriting Review at this stage. |
To address any underwriting issues:
|
a.
|
Scroll down to the Issues grid. You can choose to Approval All or add individual Producer Notes for each issue. |
|
i
|
To add individual Producer Notes, pick an open issue and click its Edit option. Save your Producer Note. |
|
ii
|
Alternatively, to move on without adding individual Producer Notes, click Approve All. |
|
3.
|
Scroll back to the top of the page, click Approve Endorsement. This approval process can take a few moments, while the application applies logic in the back-end. |
|
4.
|
Click Continue to go to the Endorsement Summary. |
The Endorsement Summary is the last step. The Endorsement Summary shows the changes that took place in the endorsement compared to the original policy. This includes a summary showing the Annual Total Premium Change and Premium % Change. A comparison breakdown of the individual settings affected by the change follows. The policy status shows as an Approved green marker.
|
5.
|
Click Issue Endorsement. |
After validation and rating logic applies, you're taken back to the customer's Summary page. You'll notice that the Summary, Coverages, and History sections now have updated information based on the endorsement.
|
6.
|
Download the policy document now. |
After processing the endorsement, an updated policy document becomes available. You'll download this from the History section of the Summary page. This documents that the endorsement is fully processed. The policy status shows as an Active marker.
Policy Cancellation Process
This process becomes available once you've issued a policy and bound it to a customer. The policy is successfully bound when the policy status shows as Processed on the Policy Summary page.
Cancellation refers to the ending of a policy before its expiration by either the insured or the insurer.
Creating the Policy Cancellation
To cancel a policy:
|
1.
|
If you are not already at the Policies Summary page, click the Policies tab now. |
|
2.
|
Search for and select the Policy number associated with the cancellation. |
|
3.
|
At the Policy Summary page, click the Policy Change button. |
|
4.
|
Validate that the Policy Change modal shows the correct Name Insured and Policy Number. |
|
5.
|
Select Cancellation from the Type drop-down. |
|
6.
|
Set the Effective Date. |
|
7.
|
Click Submit. You're taken to the Cancellation Summary page. |
Scroll to the end of the Cancellation Summary page and select the Cancellation Reason. Your choices include:
|
a.
|
Coverage Placed Elsewhere |
|
b.
|
Coverage No Longer Needed |
|
e.
|
Non Payment of Premium |
|
f.
|
Fraud/Material Misrepresentation |
|
8.
|
Set the Suppress Print - Policy (or Billing) Documents options. These set whether you'll send policy (or billing) documents out at the end of the cancellation process. For this setting you can select: |
|
a.
|
Yes - Suppress Email and Mail: Suppresses sending documents by email and mail. Are documents still sent by PDF using this option? |
|
b.
|
Yes - Suppress Email, Mail and PDF: Suppresses sending documents by email, mail and PDF. |
|
c.
|
No: Doesn't suppress sending documents. |
|
9.
|
Click Submit Cancellation. |
After clicking Submit Cancellation, the application goes through a series of validations. Policy data is retrieved and the policy updates. You're taken back to the customer's Summary page. You'll notice that the Summary, Coverages and History sections show updated information based on the cancellation. Revised Annual Premium and Total Policy Premium zero and the Pro-rated Change updates to show the original annual premium value. You'll note that the policy status shows as Canceled at this stage.
|
10.
|
Download the policy document now. |
After processing the cancellation, an updated policy document becomes available. You'll download this from the History section of the Summary page. This documents that the cancellation is fully processed. The policy status shows as a Canceled marker.
Policy Reinstatement Process
This process becomes available after you've canceled a policy. Reinstatement lets a previously canceled policy resume coverage. The insurer may require evidence of eligibility, such as an updated medical examination, or full payment of outstanding premiums.
After re-instatement, the Endorsement and Cancellation Processes are available again.
Creating the Policy Reinstatement
To reinstate a policy:
|
1.
|
If you are not already at the Policies Summary page, click the Policies tab now. |
|
2.
|
Search for and select the Policy number associated with the reinstatement. |
|
3.
|
At the Policy Summary page, click the Policy Change button. |
|
4.
|
Validate that the Policy Change modal shows the correct Name Insured and Policy Number. |
|
5.
|
Select Reinstatement from the Type drop-down. |
|
6.
|
Set the Effective Date. |
|
7.
|
Click Submit. You're taken to the Reinstatement Summary page. |
Scroll to the end of the Reinstatement Summary page and select the Reinstatement Reason. Your choices include:
|
8.
|
Set the Suppress Print - Policy (or Billing) Documents options. These set whether you'll send policy (or billing) documents out at the end of the reinstatement process. For this setting you can select: |
|
a.
|
Yes - Suppress Email and Mail: Suppresses sending documents by email and mail. Are documents still sent by PDF using this option? |
|
b.
|
Yes - Suppress Email, Mail and PDF: Suppresses sending documents by email, mail and PDF. |
|
c.
|
No: Doesn't suppress sending documents. |
|
9.
|
Click Reinstate Policy. |
After clicking Reinstate Policy, the application goes through a series of validations. Policy data is retrieved and the policy updates. You're taken back to the customer's Summary page where the policy shows as rolled back to the last known policy settings. You'll notice that the Summary, Coverages and History sections show these details. You'll note that the policy status shows as Active at this stage.
|
10.
|
Download the policy document now. |
After processing the reinstatement, an updated policy document becomes available. You'll download this from the History section of the Summary page. This documents that the reinstatement is fully processed. The policy status shows as an Activemarker.
Out of Sequence Transactions Process
You'll soon be able to make endorsements on canceled policies. This is considered an out of sequence transaction. Be on the lookout, as this feature is coming soon!