Production Single Email Snippets: Parts 1 & 2
Overview
The Production Single Email snippets let you send a custom email at the click of a button. These snippets use an integration with the SendGrid API (application programming interface). SendGrid lets Unqork deliver a fundamental tool of enterprise communication: an email. Most importantly, these snippets ensure the security needed in enterprise communication. Using server-side execution stops malicious actors from seeing any sensitive data. That sensitive data is instead hidden and processed only in the server-side module. So, the content of your email stays secure.
Setting up this feature needs 2 snippets, set up in 2 different modules:
-
Snippet 1: Production Single Email - Part 1. This is the Express View interface where end-users create their email. The email has customizable To, From, CC, BCC, Subject, and Message fields.
-
Snippet 2: Production Single Email - Part 2. This snippet provides server-side execution of the API call used to send the email. Server-side execution provides a layer of security. This means the Production Single Email snippets are suitable for production applications. This snippet also includes the ability to provide error or success messages. So, end-users can always know if their email sends successfully.
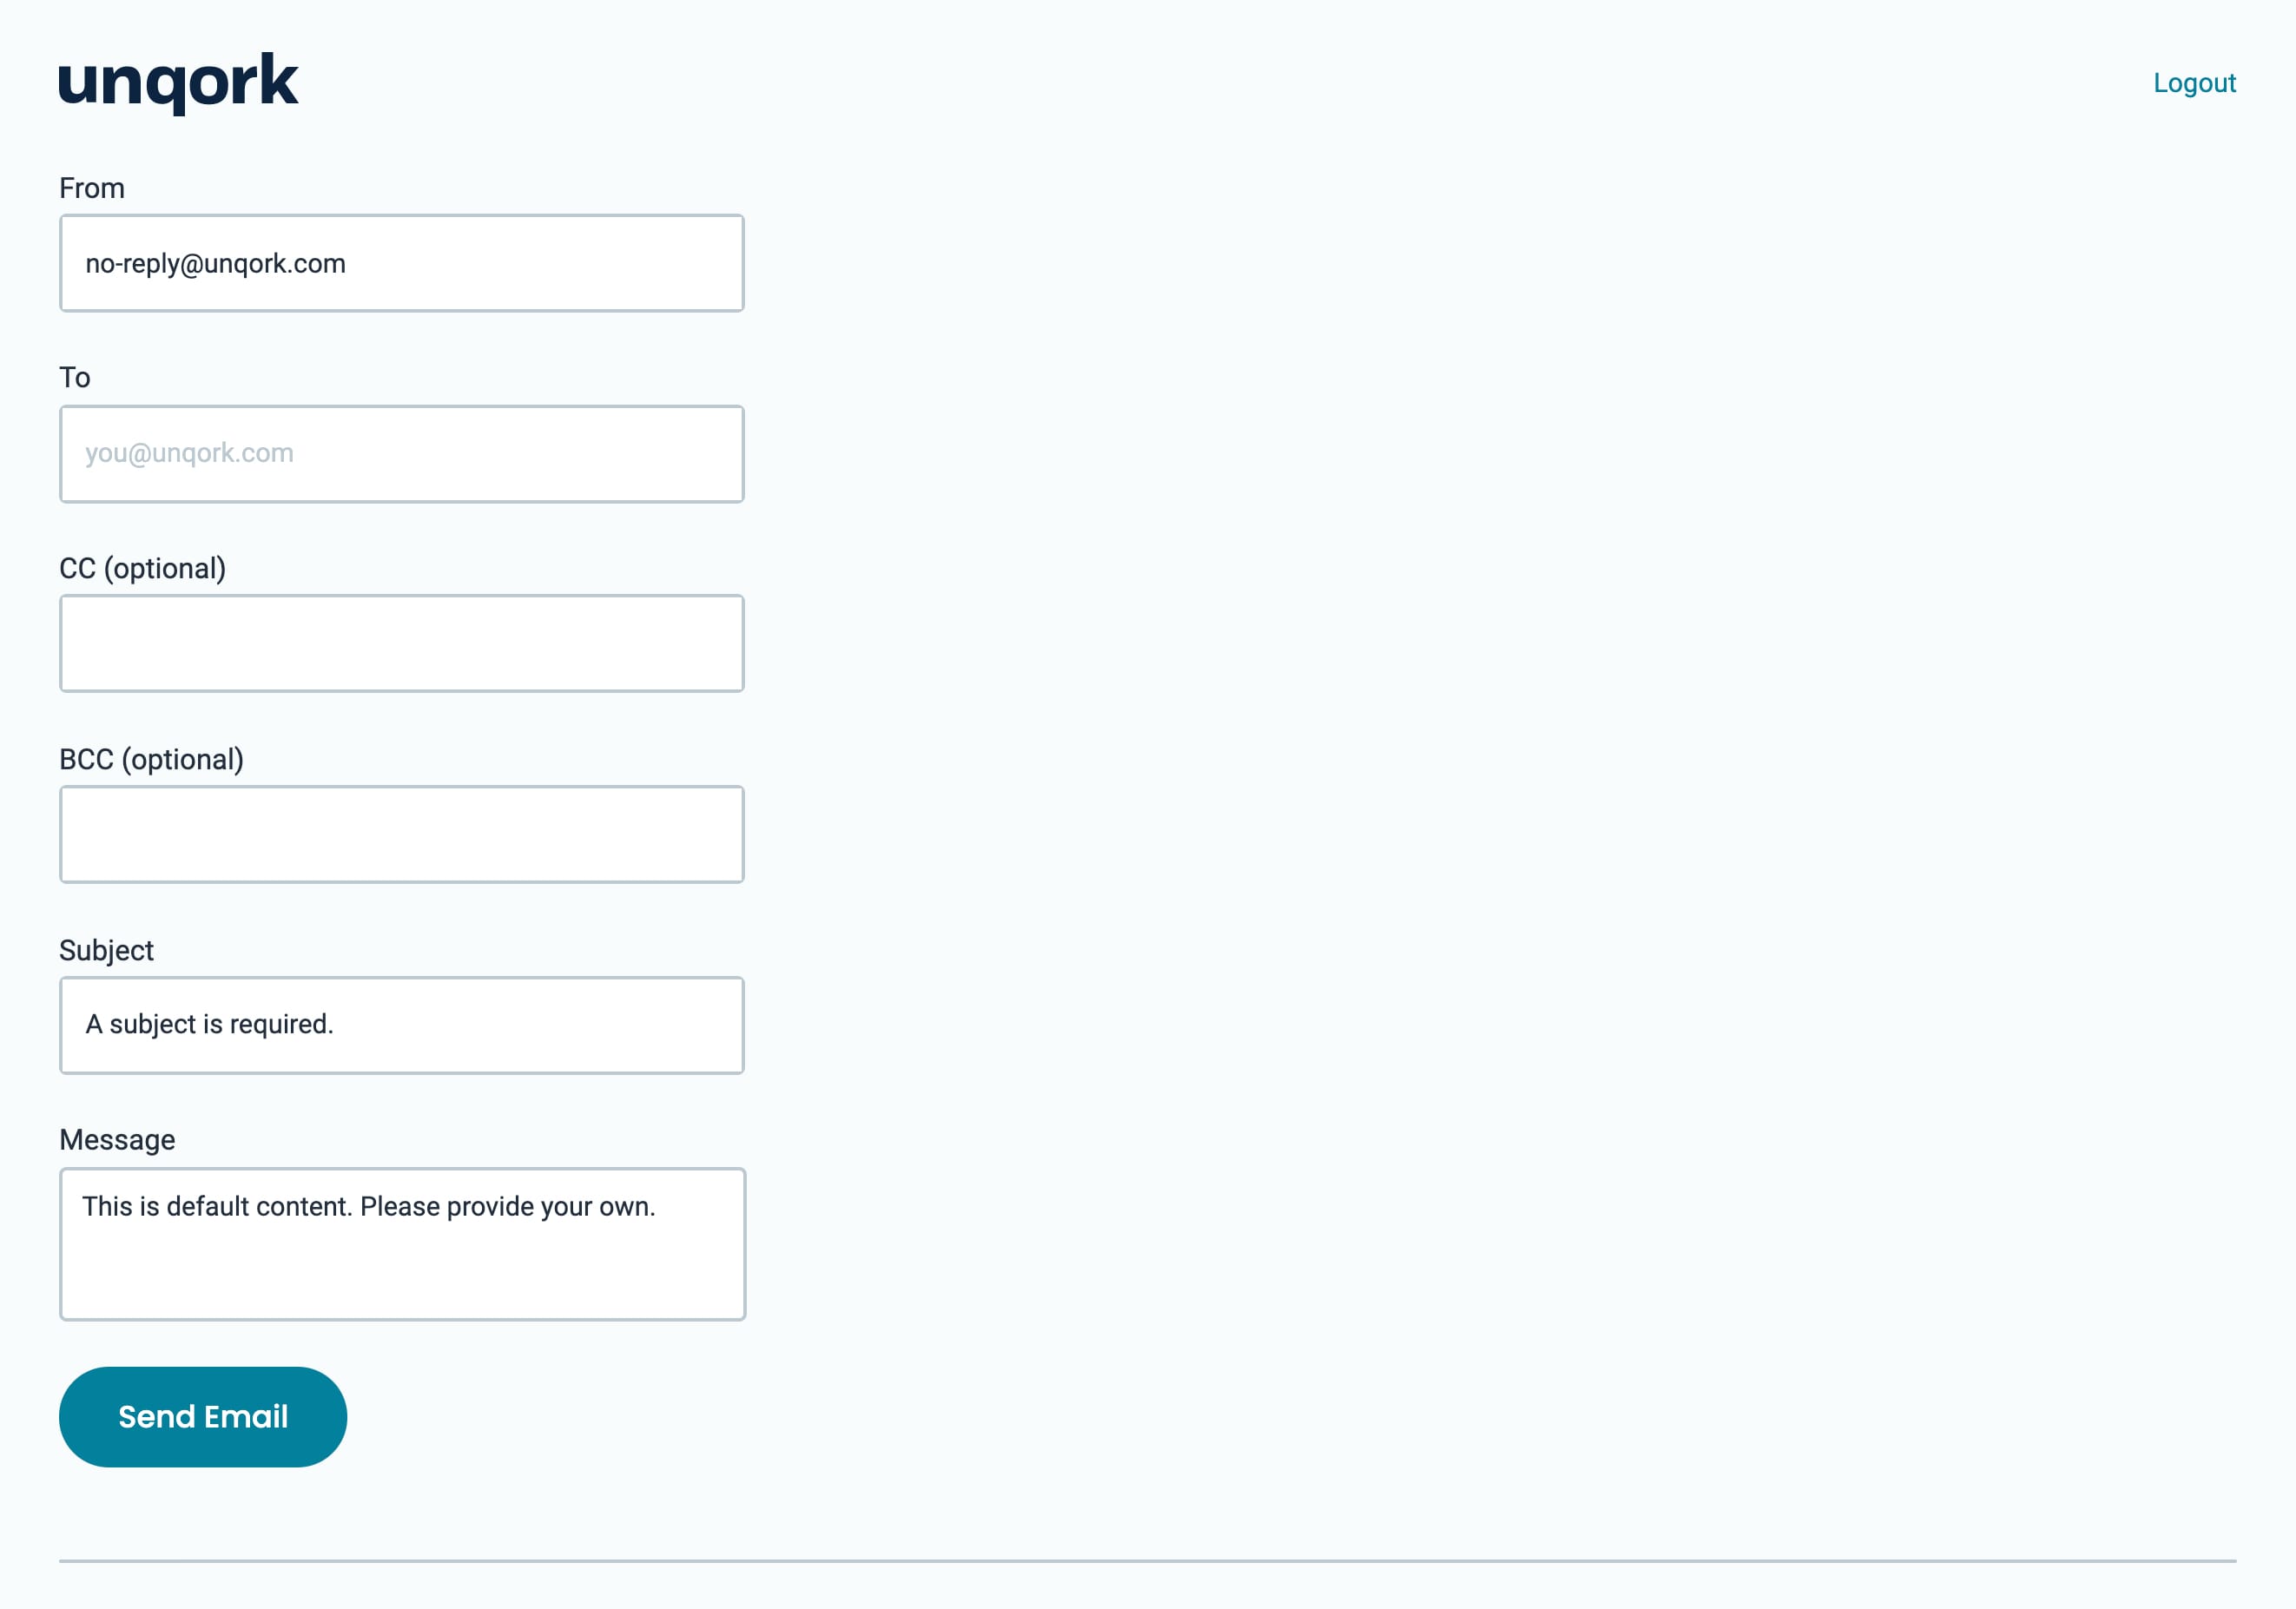
Here's how the Production Single Email - Part 1 snippet looks in Express View:
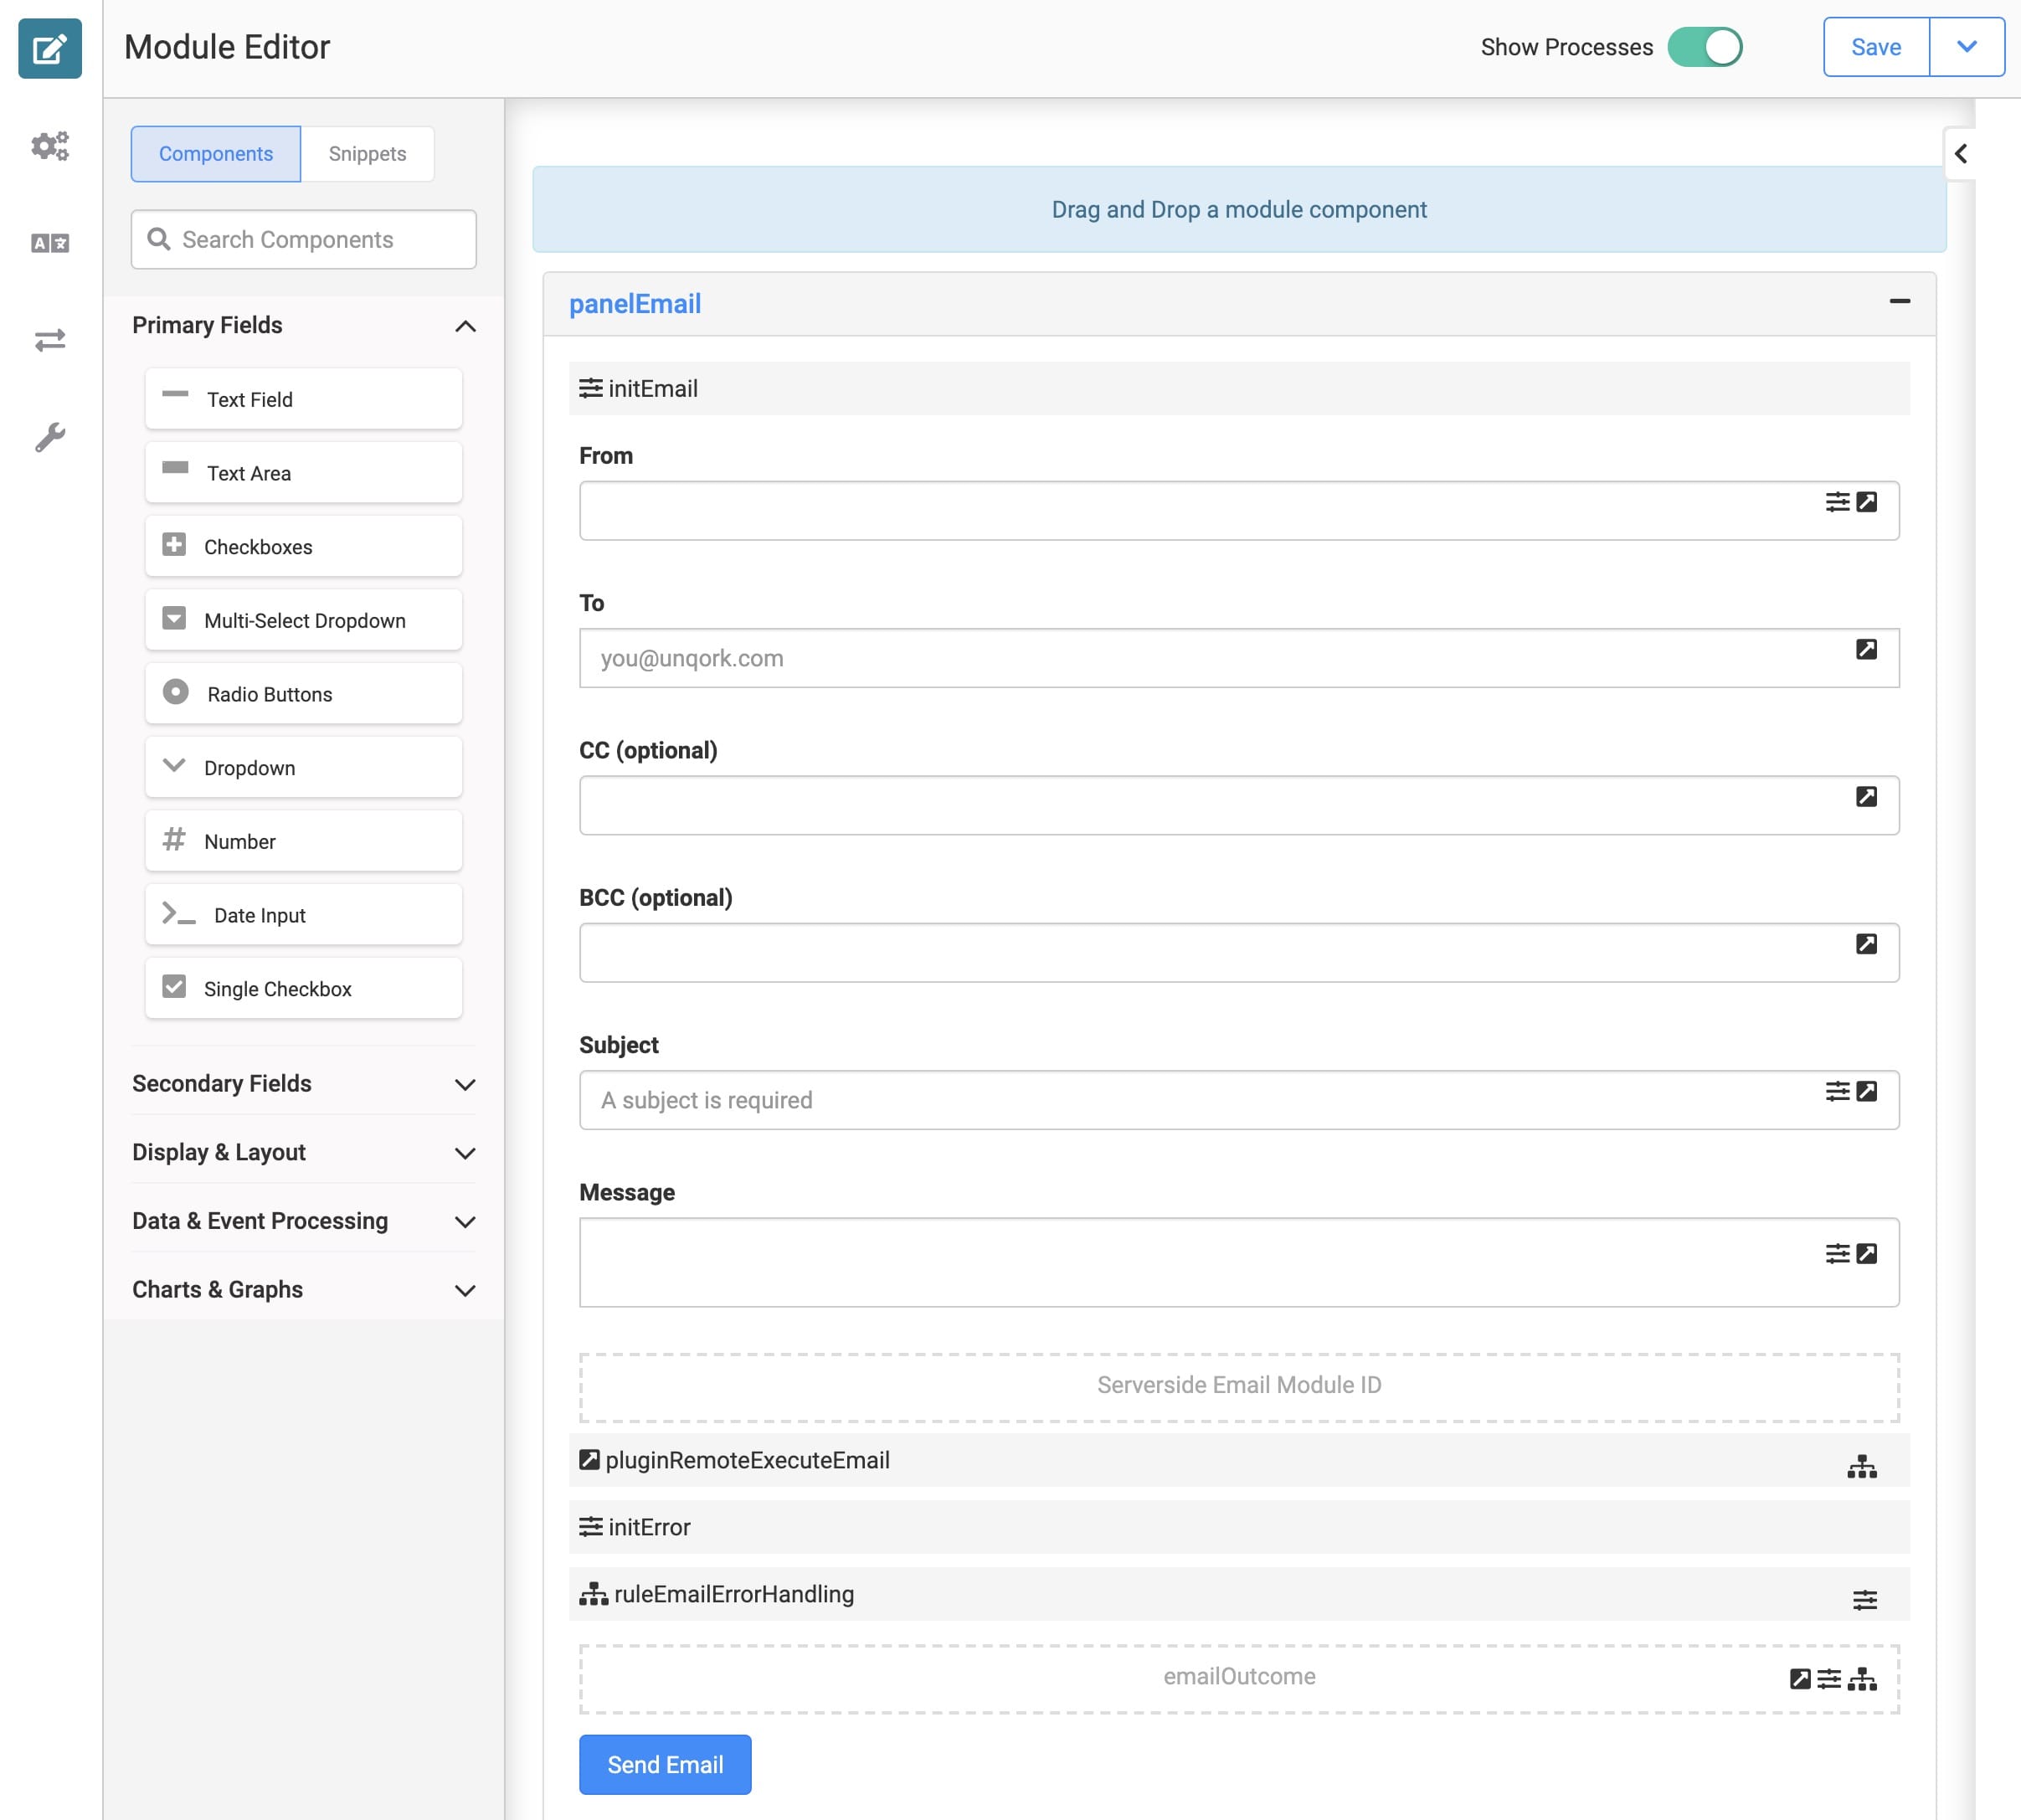
Here's how the Production Single Email - Part 1 snippet looks in the Module Builder:
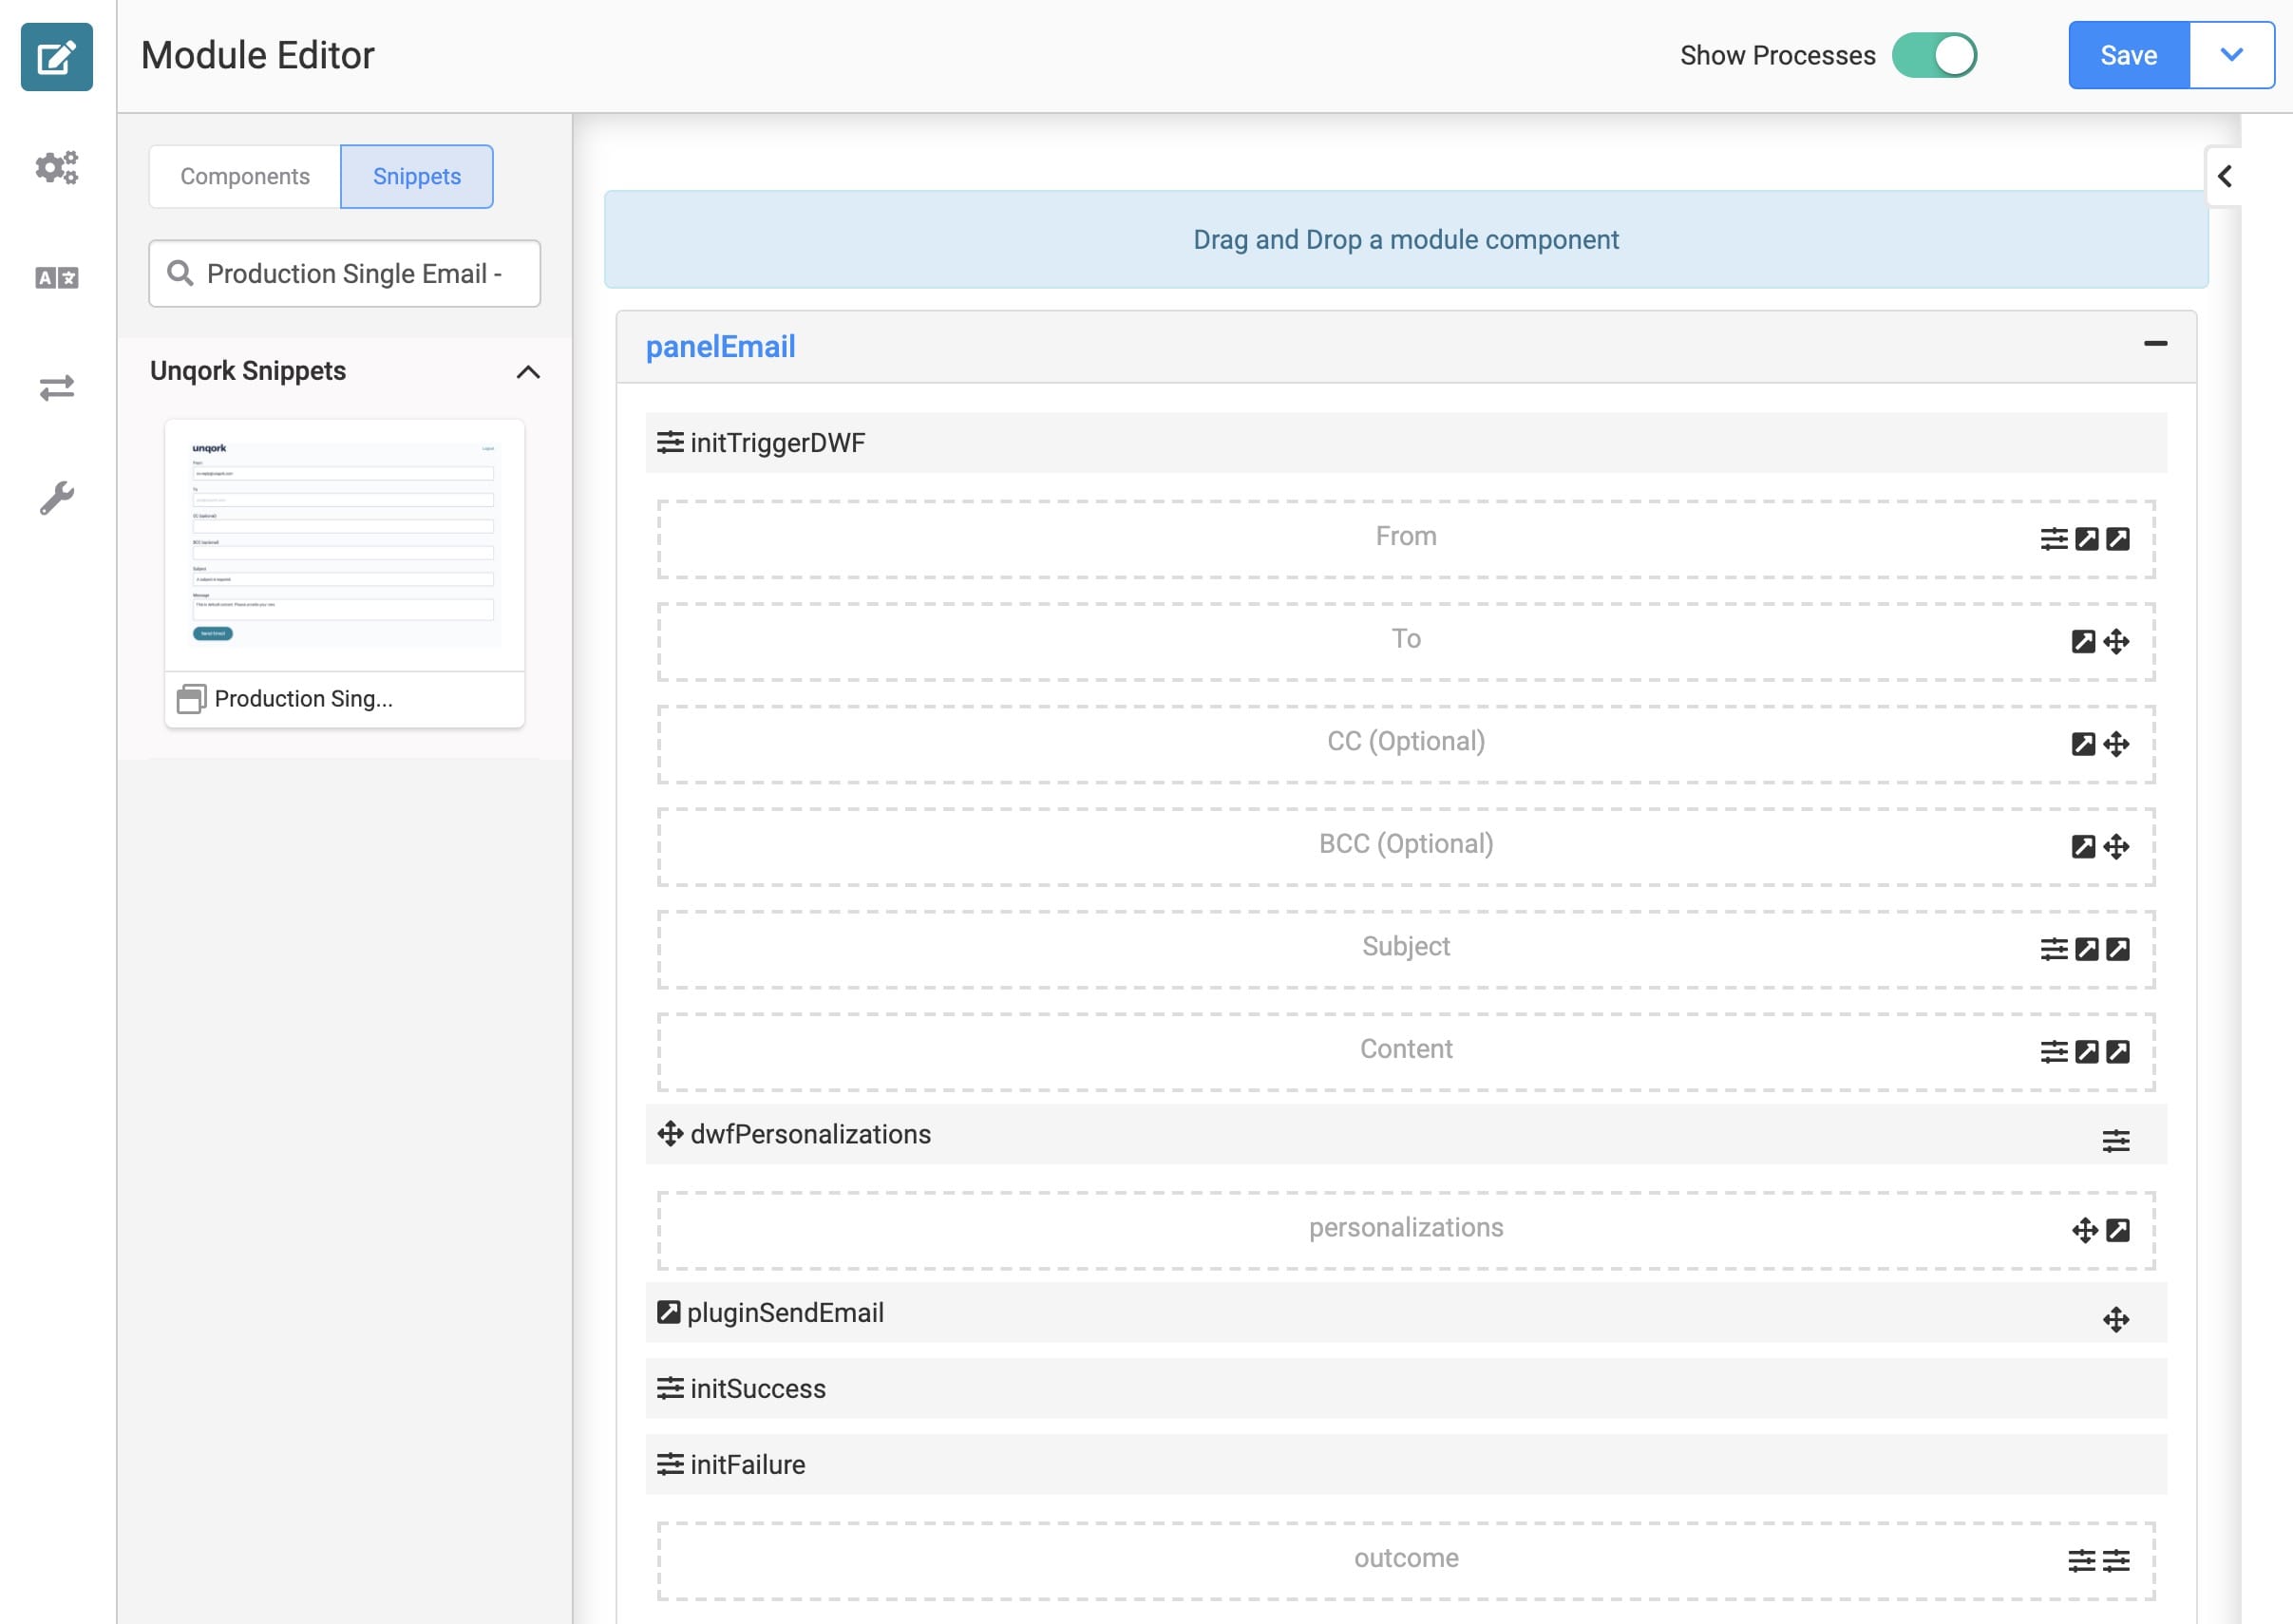
And here's how the Production Single Email - Part 2 snippet looks in the Module Builder:
What You'll Learn
In this article, you'll learn:
Adding the Snippets
To set up the Production Single Email snippets, you must create 2 modules:
-
Module 1: The first module will contain the Production Single Email - Part 1 snippet. We'll call this the Express Module.
-
Module 2: The second module will contain the Production Single Email - Part 2 snippet. We'll call this the Server-side Module.
Both modules must be in the same environment.
To add the Production Single Email - Part 1 snippet to your Express Module, do the following:
| 1. | In the left sidebar of Module Builder, click the Snippets button. |
| 2. | Enter Production Single Email - Part 1 in the search bar. |
| 3. | Drag and drop the Production Single Email - Part 1 snippet onto your canvas. |
| 4. | Save your module. |
To add the Production Single Email - Part 2 snippet to your Server-side Module, do the following:
| 1. | In the left sidebar of Module Builder, click the Snippets button. |
| 2. | Enter Production Single Email - Part 2 in the search bar. |
| 3. | Drag and drop the Production Single Email - Part 2 snippet onto your canvas. |
| 4. | Save your module. |
The Production Single Email snippets need some additional configuration. We cover these steps in the Setting Up the Snippets section.
How the Snippets Work
Let's take a moment to look at how the components in these snippets work together. We can break the process down into 3 stages:
-
Stage 1: The end-user customizes the email in the Express Module.
-
Stage 2: The Server-side Module sends the email behind the scenes.
-
Stage 3: The end-user receives confirmation in the Express Module.
Let's explore each stage in more detail:
Stage 1
The process starts in the Express Module. First, the initEmail Initializer pre-fills the From, Subject, and Message fields. For example, you could use a default From email address of no-reply@unqork.com.
Then, while in Express View, end-users can enter their own values in the From, To, CC, BCC, Subject, and Message fields.
When the end-user finishes entering values, they'll click the Send Email button. The button-click event triggers the pluginRemoteExecuteEmail Plug-In component.
The pluginRemoteExecuteEmail Plug-In pulls any values entered into the To, From, CC, BCC, Subject, and Message fields. Then, the Plug-In sends these values to the Server-side Module. The Server-side Module stores the values in dedicated Hidden components to reference later.
Stage 2
The pluginRemoteExecuteEmail Plug-In connects the Express Module to the Server-side Module. Think of the Server-side Module as the behind-the-scenes module. The Server-side Module completes the SendGrid API call and sends the email. We call this process a server-side execution, also known as a remote execute.
The first step in the remote execute is the initTriggerDWF Initializer firing. This Initializer triggers the dwfPersonalizations Data Workflow, which performs 4 actions:
-
First, it creates a personalizations array. Personalizations is a parameter in the SendGrid API. The parameter includes all To, CC, and BCC email addresses.
-
Next, the Data Workflow adds any values entered in the To, CC, and BCC fields to the personalizations array.
-
Then, the Data Workflow outputs the personalizations array to a Hidden component.
-
Finally, the Data Workflow triggers the pluginSendEmail Plug-In component. This trigger event initiates sending the email.
The pluginSendEmail Plug-In component is what forms the connection to the SendGrid API. The Plug-In component’s Inputs table maps the module’s fields to the SendGrid API’s parameters. Mapping tells the Plug-In to pull values entered by the end-user in Express View and use them in the API call.
Remember, the Server-side Module stores the end-user's values in dedicated Hidden components. You'll see these Hidden components listed in the pluginSendEmail Plug-In's Inputs table.
Next, the pluginSendEmail Plug-In triggers 1 of 2 Initializers. If the Plug-In completes its API call, it triggers the initSuccess Initializer. If the Plug-In fails, it triggers the initFailure Initializer. The triggered Initializer then passes a value to the outcome Hidden component. In the case of success, the initSuccess Initializer passes the value "pass". In the case of a failed API call, the initFailure Initializer passes the value "fail".
The outcome value, either pass or fail, then returns to the Express Module. This value forms the response body of the pluginRemoteExecuteEmail Plug-In's API call.
Stage 3
The final stage happens back in the Express Module. Here, the ruleEmailErrorHandling Decisions component comes into play. Based on which outcome value returns, pass or fail, the end-user sees 1 of 2 pop-ups. Pass outcomes lead to a success message. Failed outcomes lead to an error message. Either way, the end-user knows if they sent their email successfully.
The Express Module also contains an initError Initializer. If end-users forget to enter a required field, the pluginRemoteExecuteEmail Plug-In won't fire. Instead, the initError Initializer generates the value "fail". The ruleEmailErrorHandling Decisions component then displays an error message.
Setting Up the Snippets
Once you've added both Production Single Email snippets to your modules, setup is easy. All you need to do is connect the modules. For this, you'll need the module ID of your Server-side Module. You can get the module ID from the module's URL. For example: https://training.unqork.io/#/form/{module ID}/edit.
With this module ID in hand, you only need to update a Hidden component in the Express Module.
Update the Hidden Component
Here, you'll add your Server-side Module's module ID to the Production Single Email - Part 1 snippet. This lets the Express Module's Plug-In component connect to the Server-side Module. This connection makes a server-side execution of the API call possible.
| 1. | Open your Express Module, which contains the Production Single Email - Part 1 snippet. |
| 2. | Hover over the emailModuleID Hidden component. (Labeled as Serverside Email Module ID.) |
A 5-button toolbar appears above the component on hover-over.
| 3. | Using the toolbar, click the  (Settings) button. (Settings) button. |
| 4. | Enter the module ID of your Server-side Module in the Default Value field. |
| 5. | Click Save. |
| 6. | Save your module. |
After connecting your snippets, you're ready to test your new email functionality. Preview your Express Module in Express View. Then, complete all required fields and click the Send Email button. Check your email inbox and you'll see your custom email.
Customizing the Snippets
Once your snippets have been set up, they're ready to use. However, you can customize the Production Single Email - Part 1 snippet in a few ways:
-
Change the default values in the From, Subject, and Message fields.
-
Hardcode certain fields, to set up unchangeable values or content in the email.
Changing the Default From, Subject, and Message Values
By default, the From, Subject, and Message fields populate with the following text in Express View:
-
From: no-reply@unqork.com
-
Subject: A subject is required.
-
Message: This is default content. Please provide your own.
You can change these default values by adjusting the initEmail Initializer’s settings. To do this:
| 1. | Hover over the initEmail Initializer component. |
A 5-button toolbar appears above the component on hover-over.
| 2. | Using the toolbar, click the (Settings) button. |
| 3. | In the Outputs table, adjust the Value column as needed. |
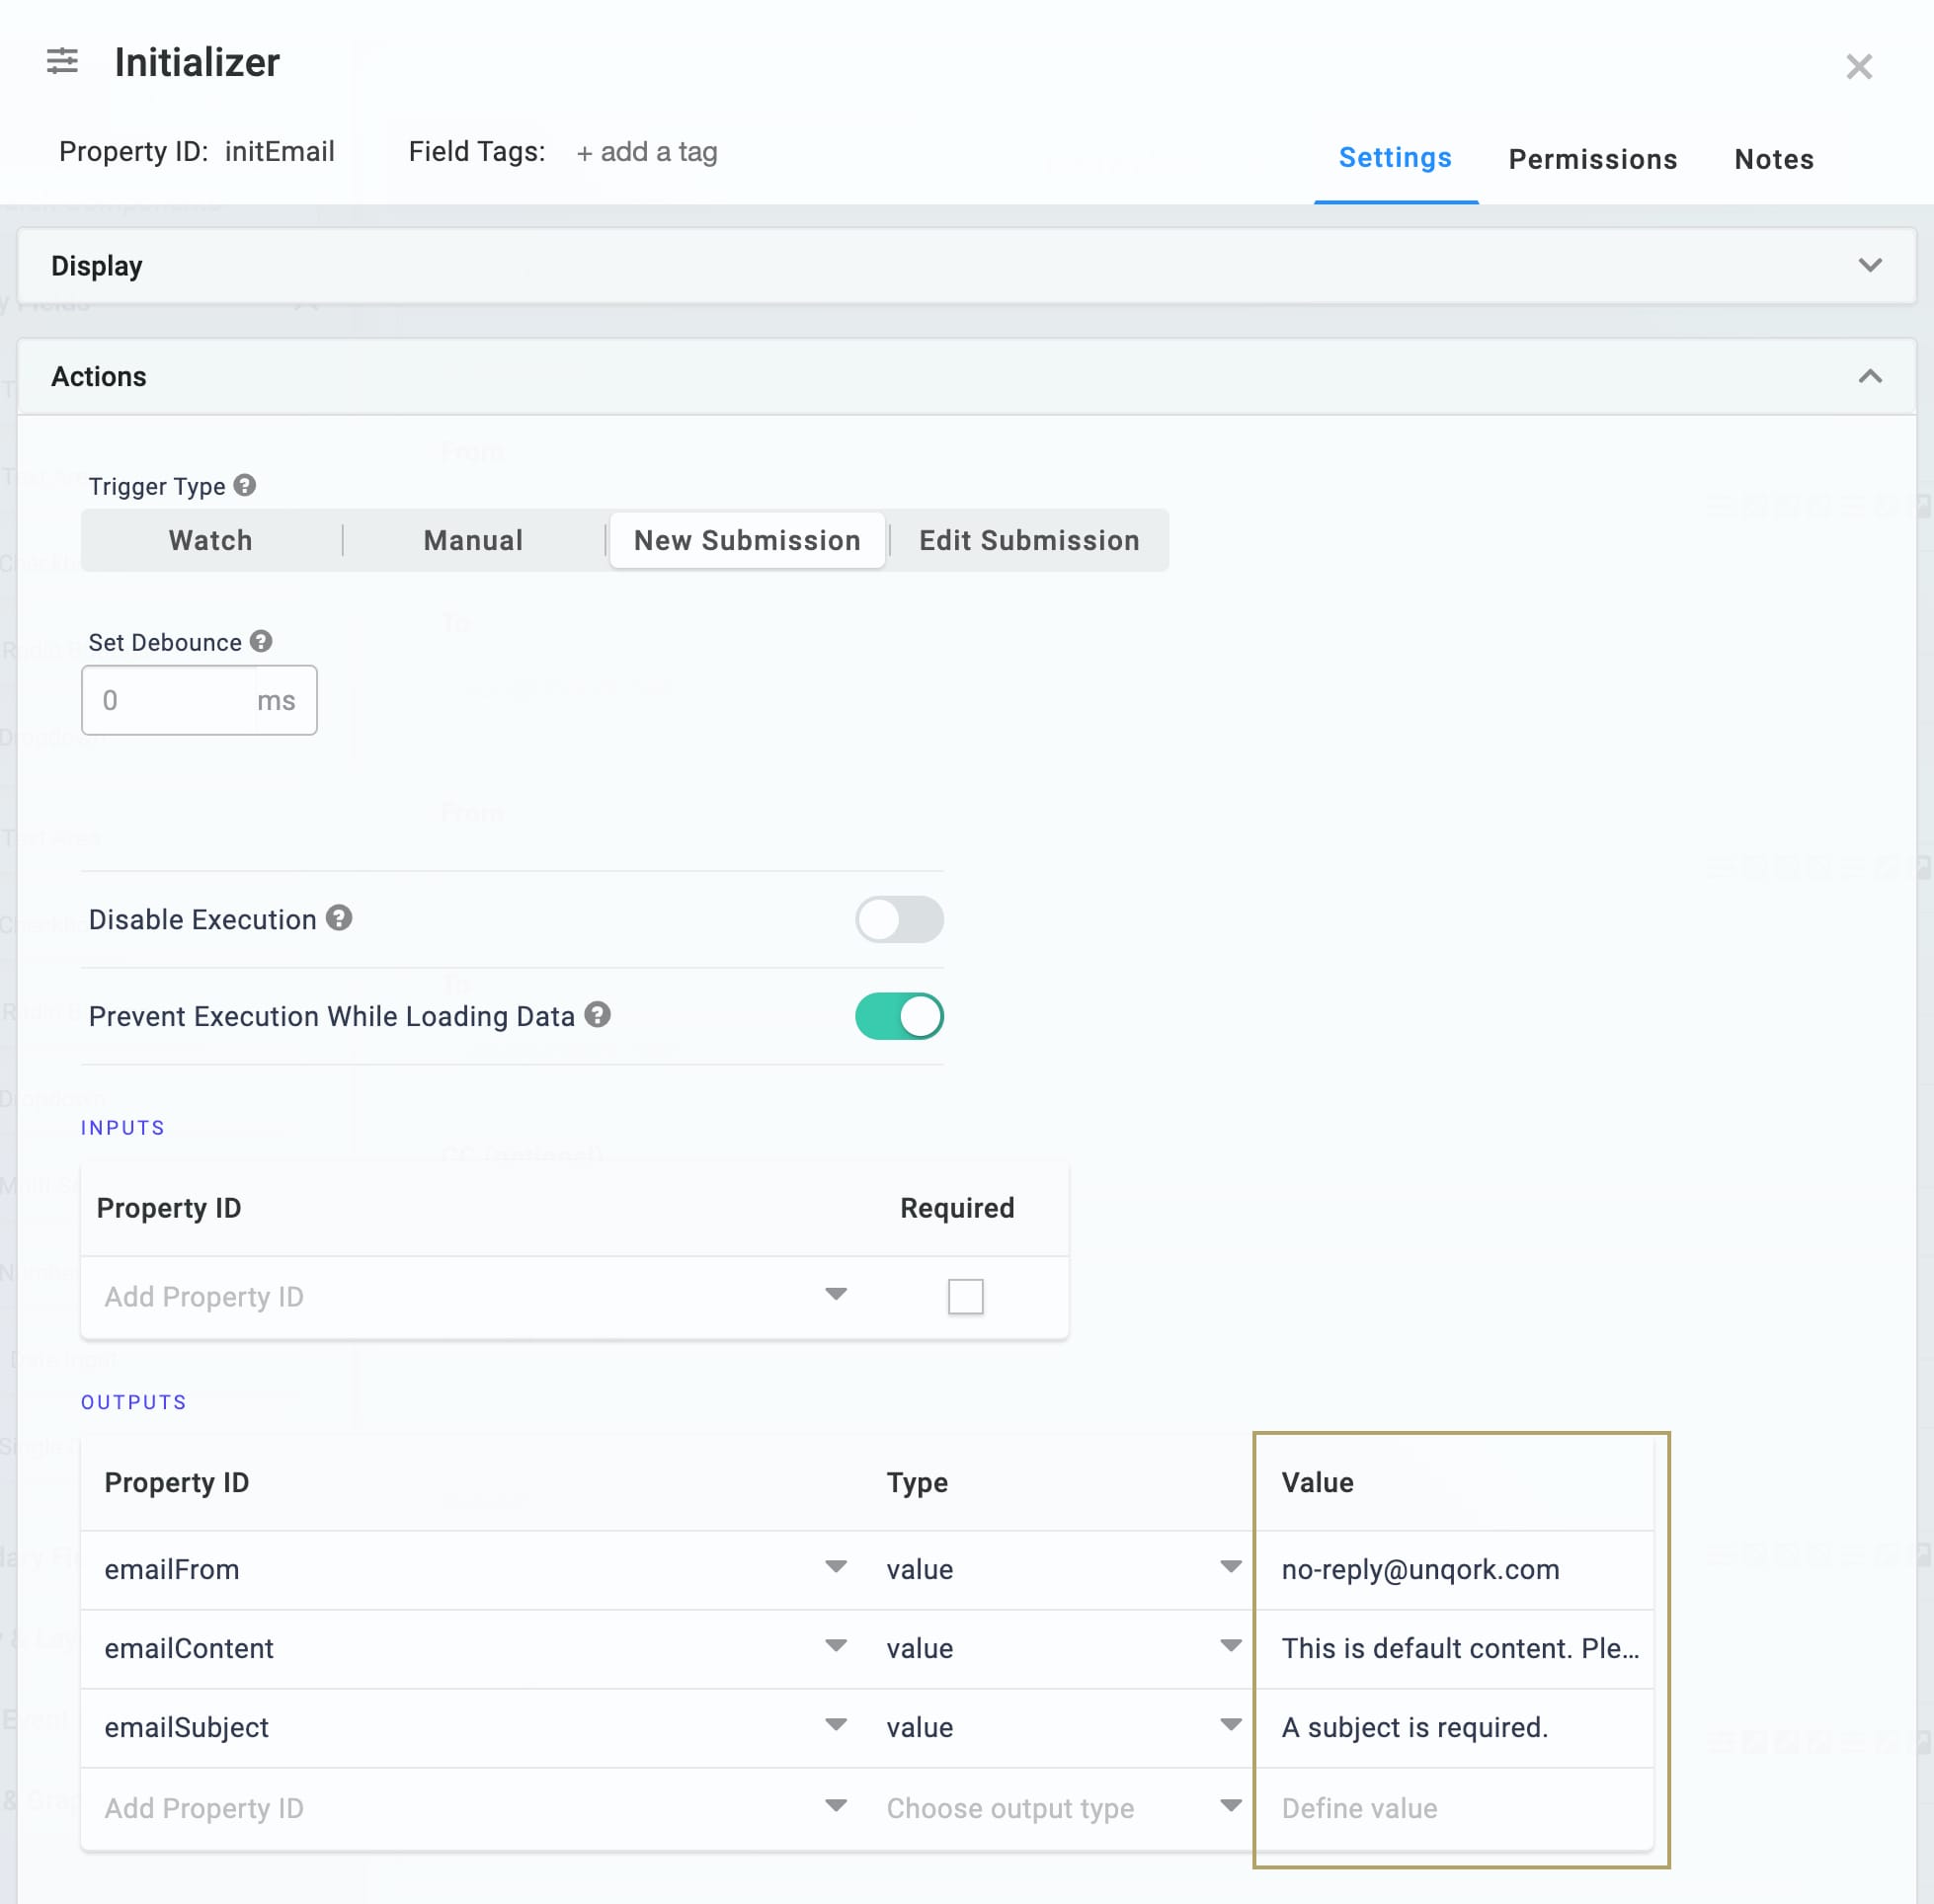
The emailFrom row corresponds to the default value in the From field. The emailContent row corresponds to the default value in the Message field. The emailSubject row corresponds to the default value in the Subject field.
| 4. | Click Save. |
Now, your email snippet will pre-fill with your own custom values.
Hardcoding Fields
In some cases, you'll want certain fields in the emails you send to always be the same. For example, having every email sent from the same email address. Or having the same message content in the body of the email. It's simple to set up these default and unchangeable values. All you need to do is hardcode these values in the pluginSendEmail Plug-In component. Specifically, you'll update the ID column of the Plug-In's Inputs table.
In this example, we'll show how to hardcode the subject line and content of the email.
Update the Plug-In Component
First, you'll hardcode the subject line and message into the API call.
| 1. | Hover over the pluginSendEmail Plug-In component. |
A 5-button toolbar appears above the component on hover-over.
| 2. | Using the toolbar, click the (Settings) button. |
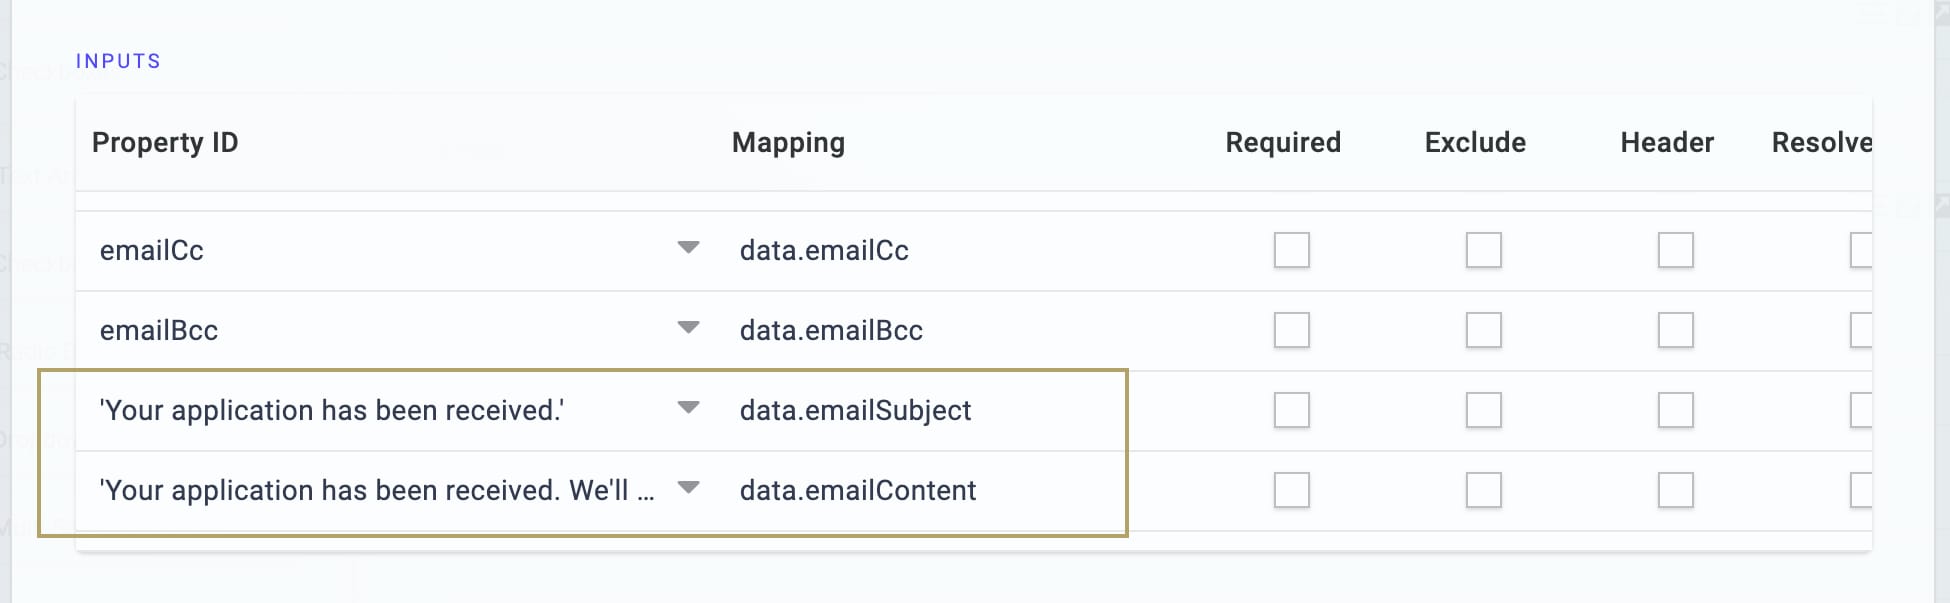
| 3. | In the Inputs table, locate the emailSubject cell in the ID column. |
| 4. | Replace the value emailSubject with your subject line, surrounded by single quotes. |
For example, 'Your application has been received.'
This adjustment severs the connection to the emailSubject Short Answer component. Instead, the text you've entered in the ID column maps to the subject parameter.
| 5. | In the Inputs table, find the emailContent cell in the ID column. |
| 6. | Replace the value emailContent with your message, surrounded by single quotes. |
For example, 'Your application has been received. We'll be in touch soon. Thank you!'
Like before, this adjustment severs the connection to the emailContent Long Answer component. Instead, the text in the ID column maps to the content parameter.
| 7. | Click Save. |
Delete the emailSubject Short Answer and emailContent Long Answer Components
The Plug-In no longer pulls values from your emailSubject Short Answer and emailContent Long Answer components. Accordingly, you can now delete these fields.
| 1. | Hover over the emailSubject Short Answer component. |
A 5-button toolbar appears above the component on hover-over.
| 2. | Click the  (Remove) button. (Remove) button. |
| 3. | Hover over the emailContent Long Answer component. |
A 5-button toolbar appears above the component on hover-over.
| 4. | Click the (Remove) button. |
Update the Initializer Component
Finally, you'll update the initEmail Initializer component. With your Short and Long Answer components removed, the Initializer no longer needs to pre-fill them.
| 1. | Hover over the initEmail Initializer component. |
A 5-button toolbar appears above the component on hover-over.
| 2. | Using the toolbar, click the (Settings) button. |
| 3. | In the Outputs table, delete the emailSubject and emailContent rows. |
| 4. | Click Save. |
| 5. | Save your module. |
Now you have your own ready-to-send email with a custom subject and message.
Removing the Snippets
If you want to remove a snippet from your module, the process is simple. To delete the Production Single Email snippets from either module:
| 1. | In the Module Builder, hover over the panelEmail Panel. |
A 5-button toolbar appears above the component on hover-over.
| 2. | Using the toolbar, click the (Remove) button. |
| 3. | Save your module. |
