Overview
The Sort operator helps you organize table data in ascending or descending order. This operator is specifically useful when you want to prioritize, group, or analyze values in your application.
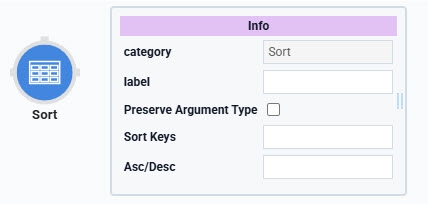
You'll find the Sort operator under the Table operators group to the left of the Data Workflow canvas.
About the Info Window
Here's a breakdown of each setting in the Sort operator's Info window:
Info | |
|---|---|
Category | Grayed out and non-adjustable setting indicating the operation type. |
Label | Sets the label for your operator, displaying below the operator on your Data Workflow canvas. This field is optional, but set a label if you use more than one of the same operator type. A label helps you identify your operators without opening any Info windows. |
Preserve Argument Type | When selected, this setting ensures the argument data type is respected when the operator executes. |
Sort Keys | Defines the key (column) by which you want to sort the table. Enter |
Asc/Desc | Defines if you want to sort the table in ascending or descending order. Enter either
|
Adding a Sort Operator
Now, let's explore the Sort operator to sort table data. This example predefines the sort order as ascending. You can test it by adjusting the sort order to descending, too. Later, in Express View, you can use a Dropdown component to pick the key (column) to sort the table by.
These instructions assume you have a new module open and saved with a title.
Configure the Data Table Component
You'll begin by adding a Data Table component and populate it with data that you want to sort.
In the Module Builder, drag and drop a Data Table component onto your canvas.
In the Property ID field, enter dtTable.
In the data table, enter the following:
A
B
1
age
firstName
2
43
Mitsue
3
17
Leota
4
28
Abel
5
91
Alishia
6
26
Willow
7
42
Jose
8
75
Emerson
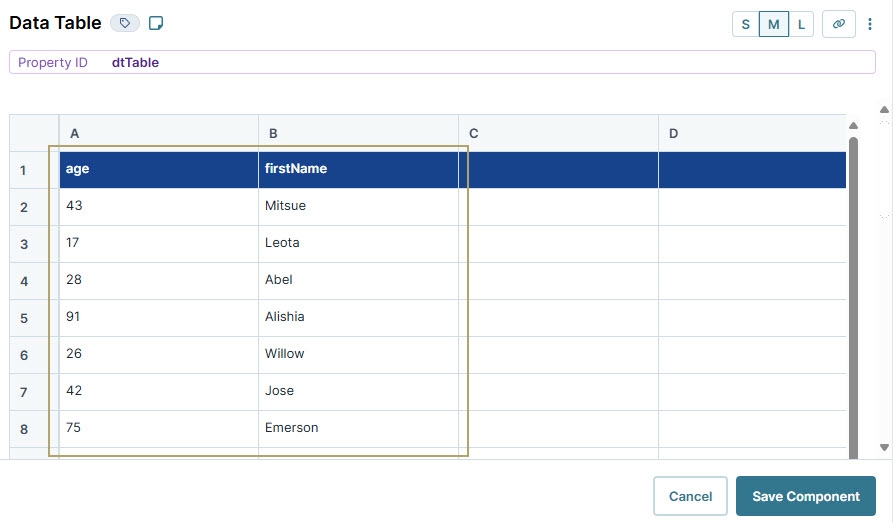
Click Save Component.
Configure the Dropdown Component
Next, add a Dropdown component to select the key to sort the table by. The keys correspond to the column headers in your Data Table component. You'll define the age and firstName keys in the Dropdown component's Values table.
Drag and drop a Dropdown component onto your canvas, placing it below the Data Table component.
In the Property ID field, enter sortBy.
In the Label Text, enter
Sort by:.In the Values table, enter the following:
Option Label
Data Source Values
1
Age (Youngest to Oldest)
age
2
First Name (Alphabetical Order)
firstName
These Option Labels set the Sort operator to sort in ascending order. If you decide to sort in descending order, remember to adjust the Option Labels.
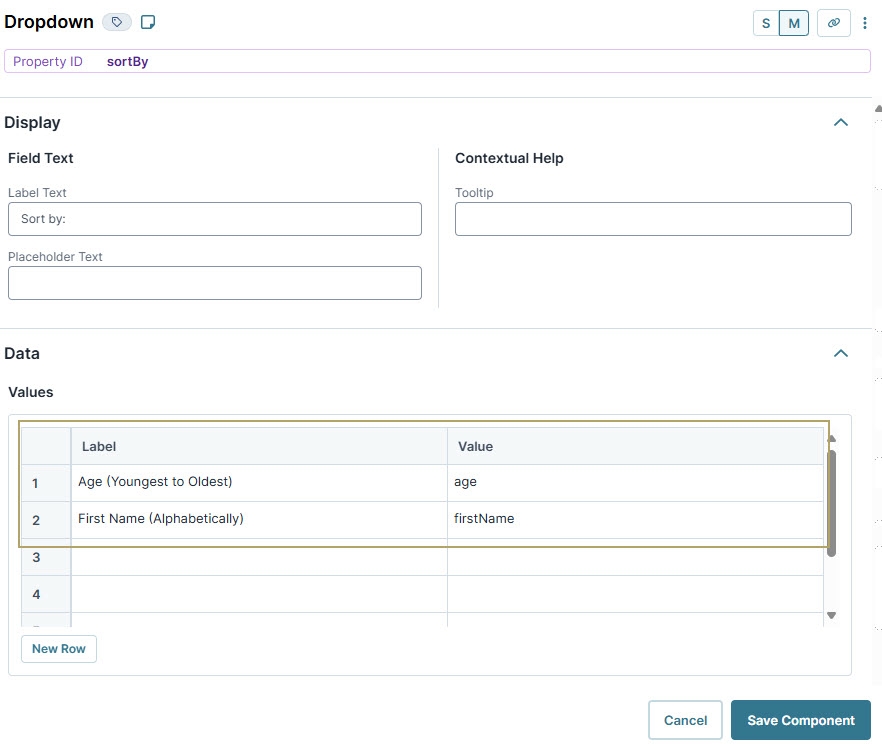
Click Save Component.
Configure the Data Workflow Component
Next, you'll configure the Data Workflow component, which performs the sort operation.
Drag and drop a Data Workflow onto your canvas, placing it below the sortBy Dropdown component.
In the Property ID and Canvas Label Text fields, enter
dwfSort.
Configure the Input Operators
Drag and drop an Input operator onto your Data Workflow canvas.
Configure the operator's Info window as follows:
Info
Category
Input
Component
dtTable
Required
Yes
Source
Default
Drag and drop a another Input operator onto your Data Workflow canvas.
Configure the second operator's Info window as follows:
Info
Category
Input
Component
sortBy
Required
Yes
Source
Default
Configure the Sort Operator
Now set up the Sort operator. There are two settings to pay attention to in the Info window:
Sort Keys: Enter
_arghere because you're using the sortByInput operator's value to set the sort key. The_argstatement acts as an alias for whatever input is coming into the Sort operator's argument port.Asc/Desc: Entering
ascsorts by the specified key in ascending order. Entering desc sorts by the specified key in descending order. Here, enterasc, but feel free to try both options.
Drag and drop a Sort operator onto your Data Workflow canvas.
Configure the operator's Info window as follows:
Info
Category
Sort
Label
Sort Data
Sort Keys
_arg
Asc/Desc
asc
Connect the output port (right) of the dtTable Input operator to the input port (left) of the Sort Data Sort operator.
Connect the output port (right) of the sortBy Input operator to the argument port (top) of the Sort Data Sort operator.
Configure the First Console Operator
Now, add a Console operator before the Sort operator to view the current order in the DevTools Console.
Drag and drop a Console operator onto your Data Workflow canvas.
Configure the operator's Info window as follows:
Info
Category
Console
Label
Before Sorting
Connect the output port (right) of the dtTable Input operator to the input port (left) of the Before Sorting Console operator.
Configure the Second Console Operator
Then, add a second Console operator to view the sorted data after the data passes through the Sort operator.
Drag and drop another Console operator onto your Data Workflow canvas.
Configure the operator's Info window as follows:
Info
Category
Console
Label
After Sorting
Connect the output port (right) of the Sort Data Sort operator to the input port (left) of the After Sorting Console operator.
.jpg)
Click Save Component.
Configure the Button Component
Lastly, configure a Button component to trigger the Data Workflow in Express View.
Drag and drop a Button component onto your canvas, placing it between the sortBy Dropdown and dwfSortData Workflow component.
In the Property ID field, enter btnRunDWF.
In the Label Text field, enter
Run Sort.From the Action Type drop-down, select Event.
From the On Click drop-down, select dwfSort.
.jpg)
Click Save Component.
Save your module.
Here's how the completed example looks in the Module Builder:
.jpg)
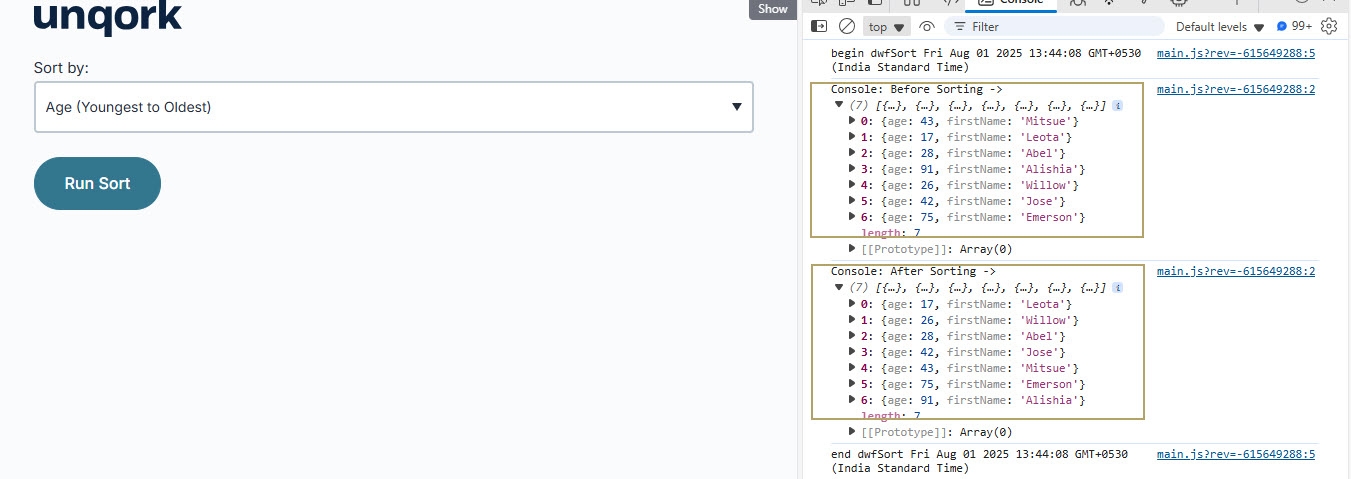
Preview your module in Express View and open the DevTools Console. Click Run Sort and view the data getting sorted based on age.
Overview
The Sort operator helps you organize table data in ascending or descending order. This is specifically used when you want to prioritize, group, or analyze values in your application.
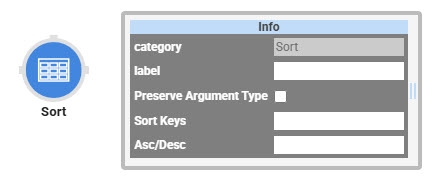
You'll find the Sort operator under the Table operators group to the left of the Data Workflow canvas.
About the Info Window
Here's a breakdown of each setting in the Rename Field operator's Info window:
Setting | Description |
|---|---|
Category | Grayed out and non-adjustable setting indicating the operation type. |
Label | Sets the label for your operator, displaying below the operator on your Data Workflow canvas. This field is optional, but set a label if you use more than one of the same operator type. A label helps you identify your operators without opening any Info windows. |
Preserve Argument Type | When selected, this setting ensures the argument data type is respected when the operator executes. |
Sort Keys | Defines the key (column) by which you want to sort the table. Enter |
Asc/Desc | Defines if you want to sort the table in ascending or descending order. Enter either
|
Adding a Rename Field Operator
Now, let's explore the Sort operator to sort table data. This example predefines the sort order as ascending. You can test it by adjusting the sort order to descending, too. Later, in Express View, you can use a Dropdown component to pick the key (column) to sort the table by.
These instructions assume you have a new module open and saved with a title.
Configure the Data Table Component
You'll begin by adding a Data Table component and populate it with data that you want to sort.
In the Module Builder, drag and drop a Data Table component onto your canvas.
In the Property ID and Canvas Label Text fields, enter
dtTable.To the left of the component's configuration window, click Data.
In the data table, enter the following:
A
B
age
firstName
43
Mitsue
17
Leota
28
Abel
91
Alishia
26
Willow
42
Jose
75
Emerson
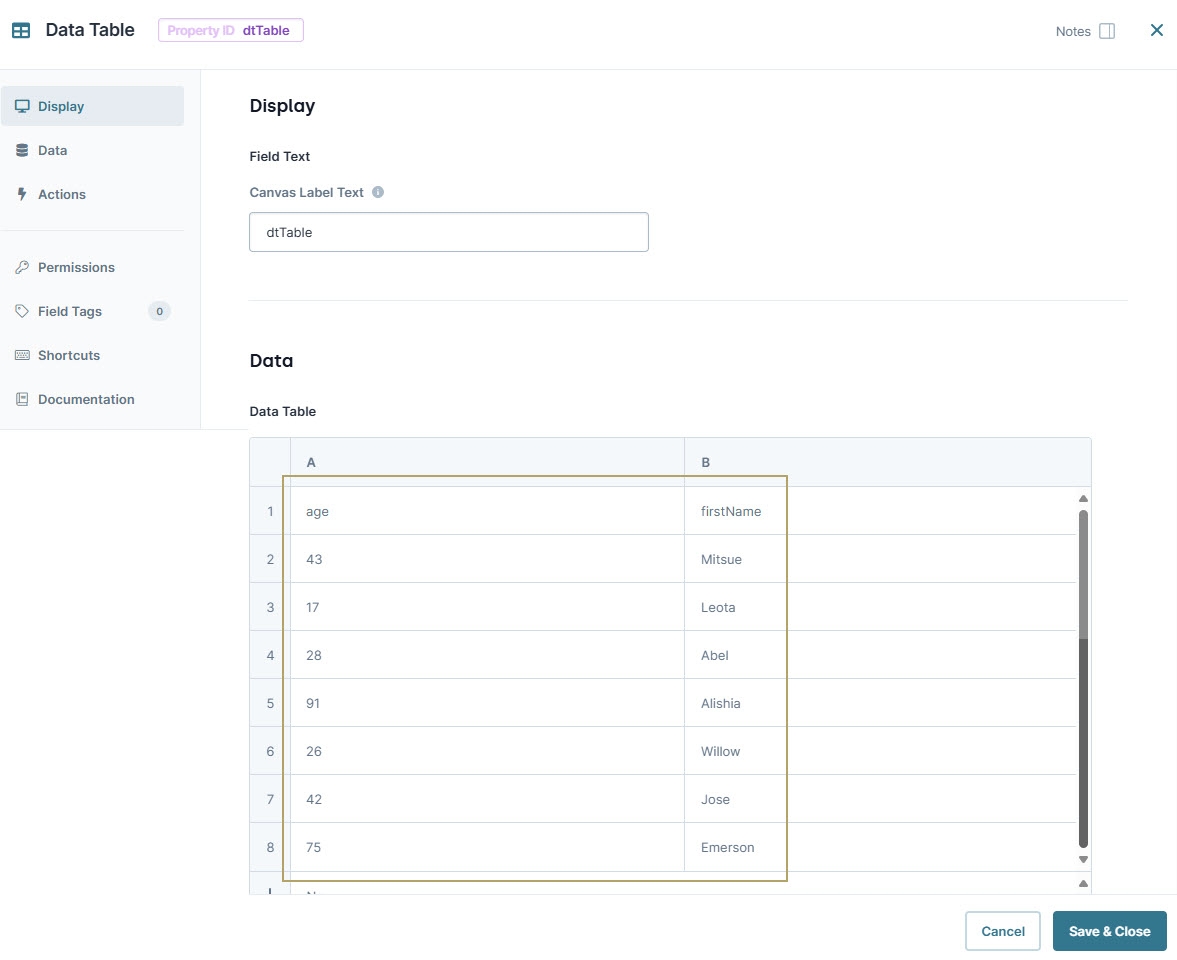
Click Save & Close.
Configure the Dropdown Component
Next, add a Dropdown component to select the key to sort the table by. The keys correspond to the column headers in your Data Table component. You'll define the age and firstName keys in the Dropdown component's Values table.
Drag and drop a Dropdown component onto your canvas, placing it below the Data Table component.
In the Property ID field, enter sortBy.
In the Label Text, enter
Sort by:.In the Values table, enter the following:
Option Label
Data Source Values
Age (Youngest to Oldest)
age
First Name (Alphabetical Order)
firstName
These Option Labels set the Sort operator to sort in ascending order. If you decide to sort in descending order, remember to adjust the Option Labels.
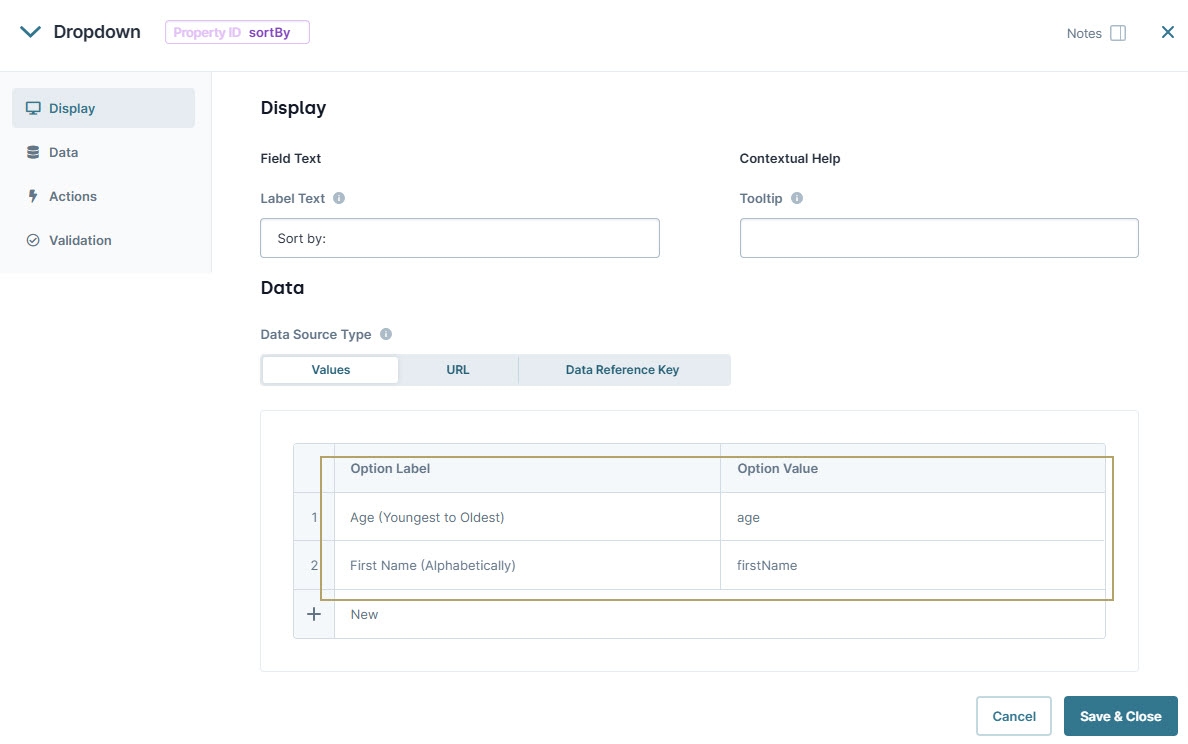
Click Save & Close.
Configure the Data Workflow Component
Next, you'll set up the Data Workflow component, which performs the sort operation.
Drag and drop a Data Workflow onto your canvas, placing it below the sortBy
.png) Dropdown component.
Dropdown component.In the Canvas Label Text and Property ID fields, enter
dwfSort.
Configure the Input Operators
Drag and drop an Input operator onto your Data Workflow canvas.
Configure the Input operator's Info window as follows:
Setting
Value
Category
Input
Component
dtTable
Required
Yes
Source
Default
Drag and drop a second Input operator onto your Data Workflow canvas.
Configure the second operator's Info window as follows:
Setting
Value
Category
Input
Component
sortBy
Required
Yes
Source
Default
Configure the Sort Operator
Now set up the Sort operator. There are two settings to pay attention to in the Info window:
Sort Keys: Enter
_arghere because you're using the sortBy Input operator's value to set the sort key. The _arg statement acts as an alias for whatever input is coming into the Sort operator's argument port.Asc/Desc: Entering
ascsorts by the specified key in ascending order. Enteringdescsorts by the specified key in descending order. Here, enterasc, but feel free to try both options.
Drag and drop a Sort operator onto your Data Workflow canvas.
Configure the operator's Info window as follows:
Setting
Value
Category
Sort
Label
Sort Data
Sort Keys
_arg
Asc/Desc
asc
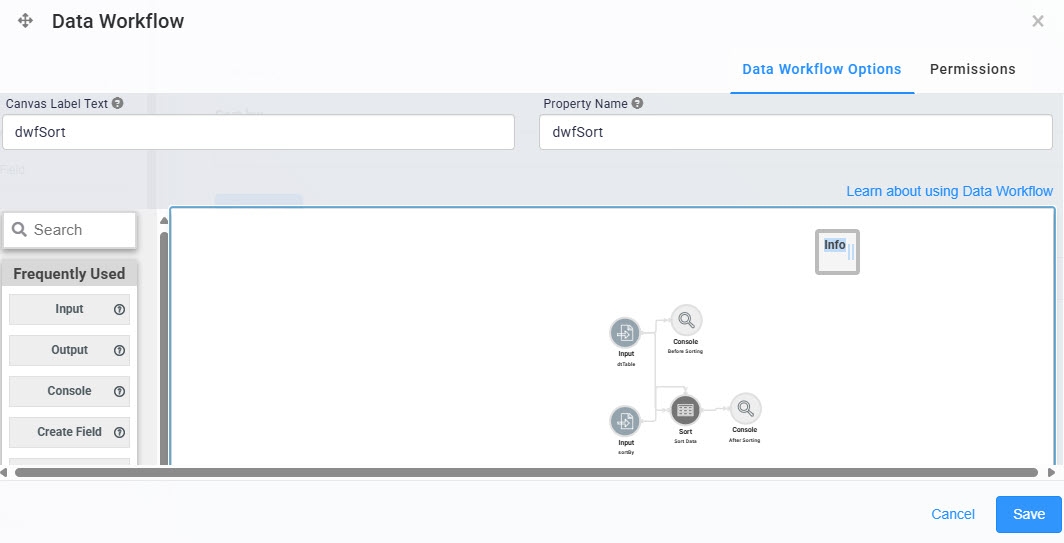
Connect the output port (right) of the dtTable Input operator to the input port (left) of the Sort DataSort operator.
Connect the output port (right) of the sortBy Input operator to the argument port (top) of the Sort DataSort operator.
Configure the First Console Operator
Now, add a Console operator before the Sort operator to view the current order in the DevTools Console.
Drag and drop a Console operator onto your Data Workflow canvas.
Configure the operator's Info window as follows:
Setting
Value
Category
Console
Label
Before Sorting
Connect the output port (right) of the dtTableInput operator to the input port (left) of the Before SortingConsole operator.
Configure the Second Console Operator
Then, add a second Console operator to view the sorted data after the data passes through the Sort operator.
Drag and drop another Console operator onto your Data Workflow canvas.
Configure the operator's Info window as follows:
Setting
Value
Category
Console
Label
After Sorting
Connect the output port (right) of the Sort DataSort operator to the input port (left) of the After Sorting Console operator.
Click Save.
Here's how the completed Data Workflow looks:
Configure the Button Component
Lastly, configure a Button component to trigger the Data Workflow in Express View.
Drag and drop a Button component onto your canvas, placing it between the sortBy
.png) Dropdown and dwfSortData Workflow component.
Dropdown and dwfSortData Workflow component.In the Property ID field, enter btnRunDWF.
In the Label Text field, enter
Run Sort.To the left of the component's configuration window, click Actions.
Set the Action Type as Event.
From the On Click drop-down, select dwfSort.
.jpg)
Click Save & Close.
Save your module
Here's how the completed example looks in the Module Builder:
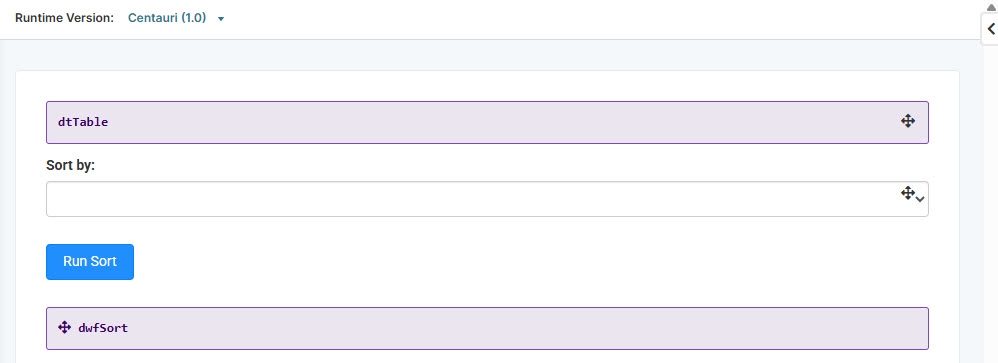
Preview your module in Express View and open the DevTools Console. Click Run Sort and view the data getting sorted based on age.
.jpg)