Learn how to merge a branch of an application into another branch or application version. Merging a branch takes elements of a Source branch, and places it into a Target branch. If an element exists in both branches, then no changes occur. If an element exists, but is different between the branches, then a conflict occurs. Creators must resolve all conflicts during the branch merging process.
Merging a Branch
The following example demonstrates how to merge a branch into another branch. Merging a branch is separated into three stages:
Initialize: Choose to push merges into a target branch, or pull a target branch’s elements into the source branch.
Resolve Conflicts: Review and resolve changes between the Source and Target branches.
Finalize: Choose to update the target branch or create a new branch with the merge changes.
Each stage is detailed in the steps below.
Begin a Merge
To Merge from the application or Module Builder page:
At the top of the page, click the
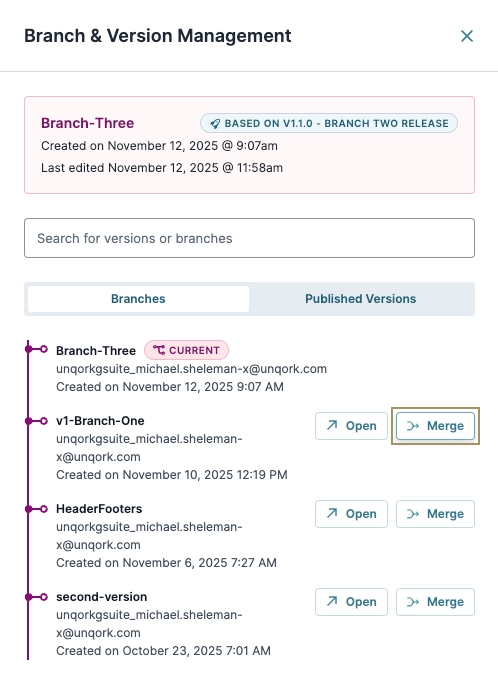
 (branch) icon. The Branch & Version Management pane displays to the right of the page.
Navigate the Branches or Published Versions tab to find the branch or version you want to merge into.
Click Merge. The Initiate page displays.

Initiate Page
Use the Initiate page to merge (push) changes into the Target branch, or initiate a “pull” by swapping the target and source branches. A pull enables Creators to take the contents of another branch and bring it into their current branch.
(Optional) To pull the target branch’s changes into the current branch, click Swap Order.
From the top-right corner, click Next. The Resolve Conflicts page displays.
Swapping the target and the source branches is similar to a version control software “pull”. The Target branch becomes the Source, and overwrites changes in the Source branch that is now the Target branch.
Resolve Conflicts Page
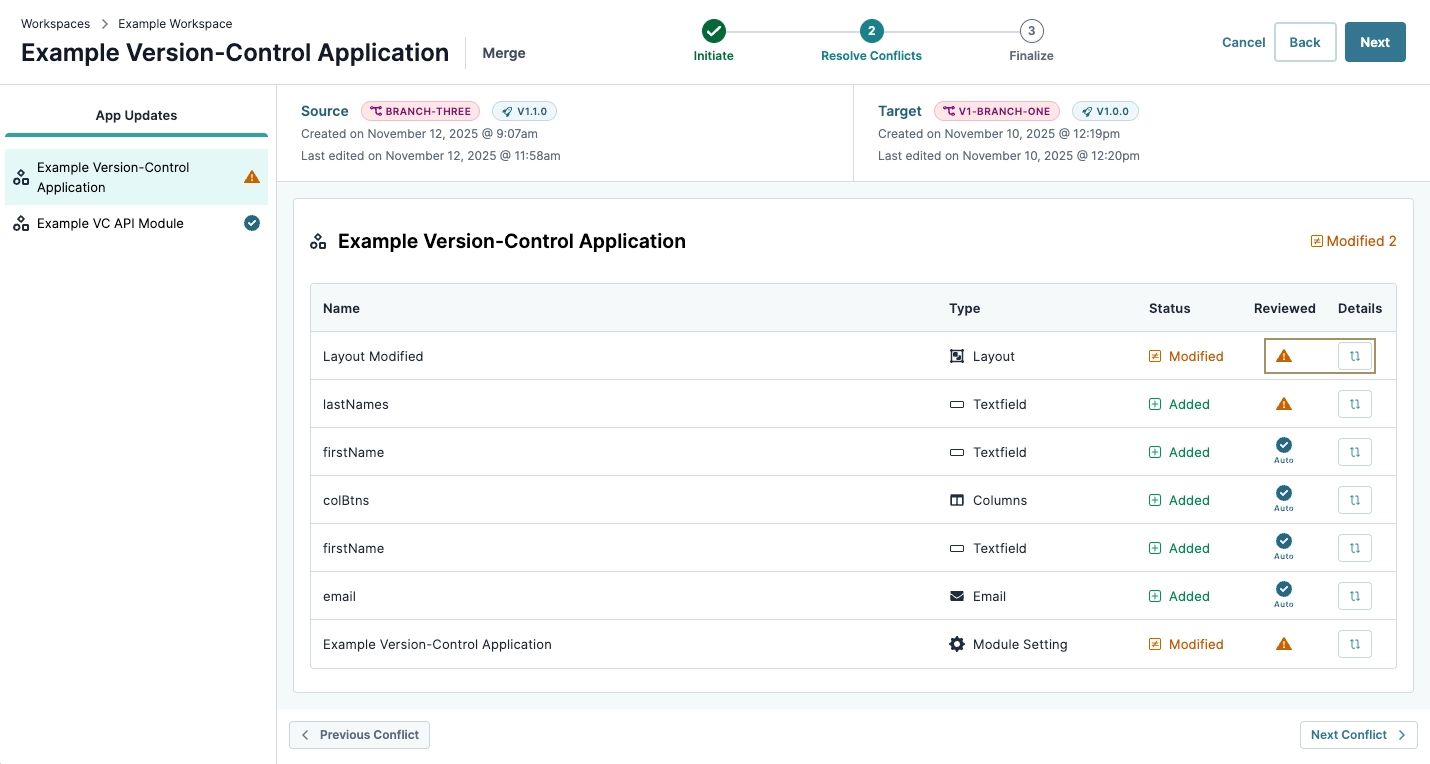
On the Resolve Conflicts page, review and approve element changes between the Source and Target branches. All conflicts must be resolved before moving on to the Finalize page.
If all conflicts have been auto-resolved, as designated by the green circle and the word auto, Creators can click next and move onto the Finalize page section.
Learn more about resolving conflicts in our Merge Tool article.
To resolve conflicts listed in the Resolve Conflicts list:
If an element displays an exclamation mark in a yellow triangle in the Reviewed column, click the Details button. The Conflict Review modal displays.

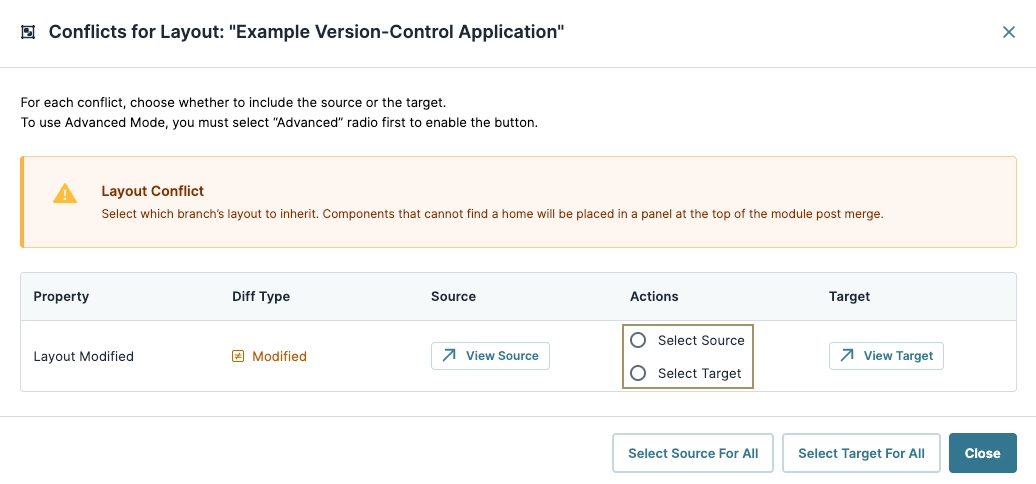
The Conflict Review modal’s content layout changes depending on the element being displayed. In most cases, Creators must select an option from the Actions column to resolve the conflict.
Review the element’s property changes, compare the Source and Target values by clicking View Source and View Target.
To merge the new changes into the Target branch, set the Actions column to
Select Source.(Optional) If the new changes are not wanted, set the Actions column to
Select Target.
Click Close.
Repeat the process for all conflicts.
Click Next. The Finalize page displays.
Finalize Page
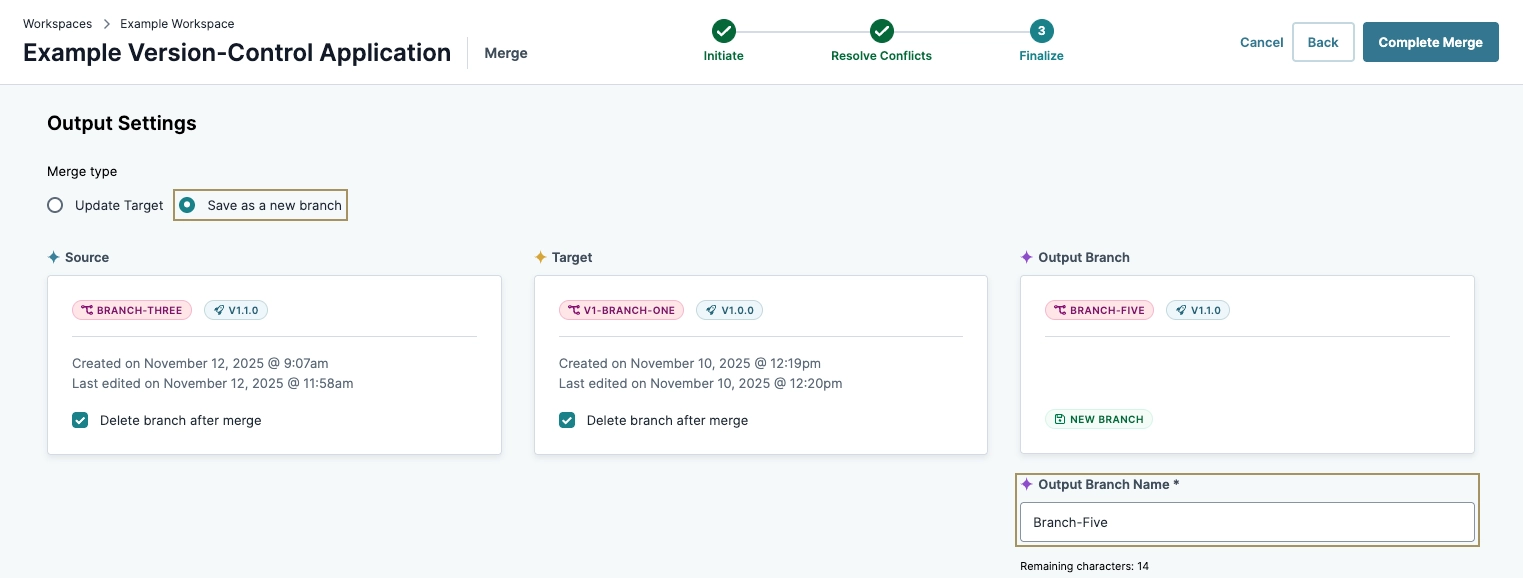
The Finalize page presents output settings for the merge. Creators use this page to decide the type of merge (branch-to-branch merges only) and if they want to delete the source branch after the merge completes.
Merging into a published version locks the merge type to Save as a New Branch. Merging into a published version creates a new branch, Creators must publish the new branch if they want to replace the published version.
The merge type is important for maintaining a streamlined workspace. Considering the following for each type:
Update Target: Merges changes into the existing target branch or version. This setting does not create a new branch.
Save as New Branch: Retains the Target branch and creates a new branch that includes the Source change to the Target branch.
Use the tabs below to complete the process based on the merge type:
Merge Type: Update Target
This option enables creators to update a Target branch with the changes from the source version. This option does not create a new branch.
Merge Source branch changes into the target branch or version:
From the Merge Type options, select Update Target or Save As New Branch.
(Optional) If the Source branch is no longer required, check the Delete Branch After Merge option. This permanently deletes the source branch from the versioned application.

Click Complete Merge.
The application page displays the new branch version.
Merge Type: Save as a New Branch
This option enables Creators to create a new branch from the merge changes in the Target branch. It also lets them retain the Target branch or delete both the Source and Target branches.
To Save as a new branch:
From the Merge Type options, select Save As New Branch.
(Optional) If the Source or Target branch is no longer required, select the Delete Branch After Merge option. This permanently deletes the Source or Target branch from the versioned application.
In the Output Branch Name field, enter a name for the new branch.

Click Complete Merge.
The application page displays the new branch version.
Ready to publish a branch? View our How to: Publish a Branch article