.png)
The Map Values operator updates multiple values in a table. Using a mapping table, you can quickly modify many values across multiple keys in a single step. This process is known as data normalization, which enables you to introduce consistency and accuracy across module data.
Use the Map Values operator to:
Update values before presenting them to your end-user. For example, convert text from camel case title or sentence case.
Refresh values imported from external or outdated sources.
Standardize data across multiple data sets.
Align similar values within a single data set, such as correcting spelling variations or abbreviations.
You’ll find the Map Values operator under the Table group to the left of the Data Workflow canvas.
Similar Data Workflow Operators
The Map Values, Map Keys, and Create Field operators are closely related but serve different purposes.
Here are the comparisons:
Map Keys operator: The Map Keys operator updates the keys in a set of key/value pairs. In comparison, Map Values updates the values in a set of key/value pairs.
Create Field operator: Similar to Map Values, Create Field can also update values in key/value pairs. However, Create Field lets you use conditional logic with if statements and doesn’t rely on a mapping table. Instead, you define the value changes directly in the operator’s Info window.
About the Info Window
Here's a breakdown of each setting in the Map Values operator’s Info window:
Setting | Description |
|---|---|
Category | Grayed out and non-adjustable setting indicating the operation type. |
Label | Sets the label for your operator, displaying below the operator on your Data Workflow canvas. This field is optional, but set a label if you use more than one of the same operator type. A label helps you identify your operators without opening any Info windows. |
Preserve Argument Type | When selected, this setting ensures the argument data type is respected when the operator executes. |
Source Column | Enter the name (column header) of the column in your mapping table that defines the original values. |
Target Column | Enter the name (column header) of the column in your mapping table that defines the new values. |
Keys | Enter which keys contain values you want the operator to update, according to the mapping table. To list multiple keys, use a comma-separated list. If left empty, the operator updates all keys with values that match the mapping table. |
Adding a Map Values Operator
In this example, you'll use the Map Values operator to update values in a table. You'll also explore the importance of using the operator's Keys setting when the same value exists across multiple keys. Because the Map Values operator updates table-based data, begin by configuring a Data Table component.
You can use the Map Values operator with any table-based data, not just data created with a Data Table component. For example, you can use Map Values with data returned by the List Submissions for Dashboard API call. In that case, set up a Hidden component to store the data returned by the Plug-In running the API call. Then, use a simple Input-to-Output Data Workflow to move the data from Plug-In to Hidden component. The Hidden component is then used as the input in your Map Values Data Workflow.
These instructions assume you have a new module open, saved, and with a title.
Configure the First Data Table Component
Configure a Data Table component that you can use as a data source. It will include location data with the same value in two columns. In this case, the value CA refers to both the country Canada and the state California.
In the Module Builder, drag and drop a Data Table component onto your canvas.
In the Property ID field, enter
dtData.In the data table, enter the following:
#
A
B
1
country
stateprovince
2
US
CA
3
US
NY
4
CA
ON
5
CA
NS
6
CA
BC
7
US
AZ
8
CA
AB
9
US
CA
.png)
Click Save Component.
Configure the Second Data Table Component
The second Data Table component is an essential part of using the Map Values operator. Here, you'll create a two-column table that acts as a mapping table. In the first column, oldValue, you'll list all the values you want the Map Values operator to update. In the second column, newValue, you'll list the new values you want to use. Then, you'll reference the mapping table's column headers in the Map Values operator's Info window. Let's update the abbreviation US to be USA and the abbreviation CA to be CAN.
Drag and drop a Data Table component onto your canvas, placing it below the first Data Table component.
In the Property ID field, enter
dtMapping.Complete the data table as follows:
#
A
B
1
oldValue
newValue
2
CA
CAN
3
US
USA
You don't need to include quotation marks around your values.
You can list the values you want to change in any order in the oldValue column. As long as the values exist in the data source, the Map Values operator will know to update them.
.png)
Click Save Component.
Configure the Hidden Component
Next, you'll configure a Hidden component to store your final data and reference it in your Data Workflow.
Drag and drop a Hidden component onto your canvas, placing it below the
dtDataanddtMappingData Table components.In the Property ID and Label Text fields, enter
updatedTable..png)
Click Save Component.
Configure the Data Workflow Component
Next, let's configure the Data Workflow. With the help of your mapping table, it'll use a Map Values operator to update the CA and US values.
Drag and drop a Data Workflow component onto your canvas, placing it below the
updatedTableHidden component.In the Property ID and Canvas Label Text fields, enter
dwfMapValues.
Configure the Input Operators
Drag and drop two Input operators onto your Data Workflow canvas.
Configure the first Input operator's Info window as follows:
Setting
Value
Category
Input
Component
dtData
Required
Yes
Source
Default
Configure the second Input operator's Info window as follows:
Setting
Value
Category
Input
Component
dtMapping
Required
Yes
Source
Default
Configure the Console Operators
Next, add a pair of Console operators. These will help you compare the before and after of the Data Workflow. One will display the data before the Map Values operator, and the other will serve as a reminder of how you set up your mapping table.
Drag and drop two Console operators onto your Data Workflow canvas.
Configure the first Console operator's Info window as follows:
Setting
Value
Category
Console
Label
Mapping Table
Connect the output port (right) of the
dtMappingInput operator to the input port (left) of theMapping TableConsole operator.Configure the second Console operator's Info window as follows:
Setting
Value
Category
Console
Label
Before Map Values
Connect the output port (right) of the
dtDataInput operator to the input port (left) of theBefore Map ValuesConsole operator.
Configure the Map Values Operator
Now you're ready to set up the Map Values operator. Notice that the values you'll enter in the Info window's Source Column and Target Column fields match the column headers in the dtMapping Data Table component, which is your mapping table. The Source Column field should always reference the column with your old values. The Target Column field should always reference the column with your new values.
The Map Values operator has two input ports. Always connect the data source to the upper input port and the mapping table to the lower input port.
Drag and drop a Map Values operator onto your Data Workflow canvas.
Complete the operator's Info window as follows:
Setting
Value
Category
Map Values
Label
Map New Value
Source Column
oldValue
Target Column
newValue
Keys
country
You need to add country in the Keys field to avoid updating all instances of the value CA to CAN. Remember, your data includes the value CA as a reference to California as well.
Connect the output port (right) of the
dtDataInput operator to the upper input port (left) of theMap New ValueMap Values operator.Connect the output port (right) of the
dtMappingInput operator to the lower input port (left) of theMap New ValueMap Values operator.
Configure the Third Console Operator
Next, let's add another Console operator to display the data after using the Map Values operator, helping you compare the before and after of your Data Workflow.
Drag and drop a Console operator onto your Data Workflow canvas.
Configure the operator's Info window as follows:
Setting
Value
Category
Console
Label
After Map Values
Connect the output port (right) of the
Map New ValueMap Values operator to the input port (left) of theAfter Map ValuesConsole operator.
Configure the Output Operator
In the last step of the Data Workflow, output your updated table to the Hidden component you created earlier.
Drag and drop an Output operator onto your Data Workflow canvas.
Configure the operator's Info window as follows:
Setting
Value
Category
Output
Component
updatedTable
Action
value
Connect the output port (right) of the
Map New ValueMap Values operator to the input port (left) of theupdatedTableOutput operator..png)
Click Save Component.
Configure the Button Component
Lastly, configure a Button component that you can click in Express View to trigger your Data Workflow.
Drag and drop a Button component onto your canvas, placing it below the
dwfMapValuesData Workflow component.In the Property ID field, enter
btnRunDWF.In the Label Text field, enter
Run Map Values.From the Action Type drop-down, select Event.
From the On Click drop-down, select dwfMapValues.
.png)
Click Save Component.
Save your module.
Here's how the completed example looks in the Module Builder:
.png)
Here's how the completed example works in Express View. Preview your module in Express View and open the DevTools Console. Click the Run Map Values button and view how the data displays in the console.
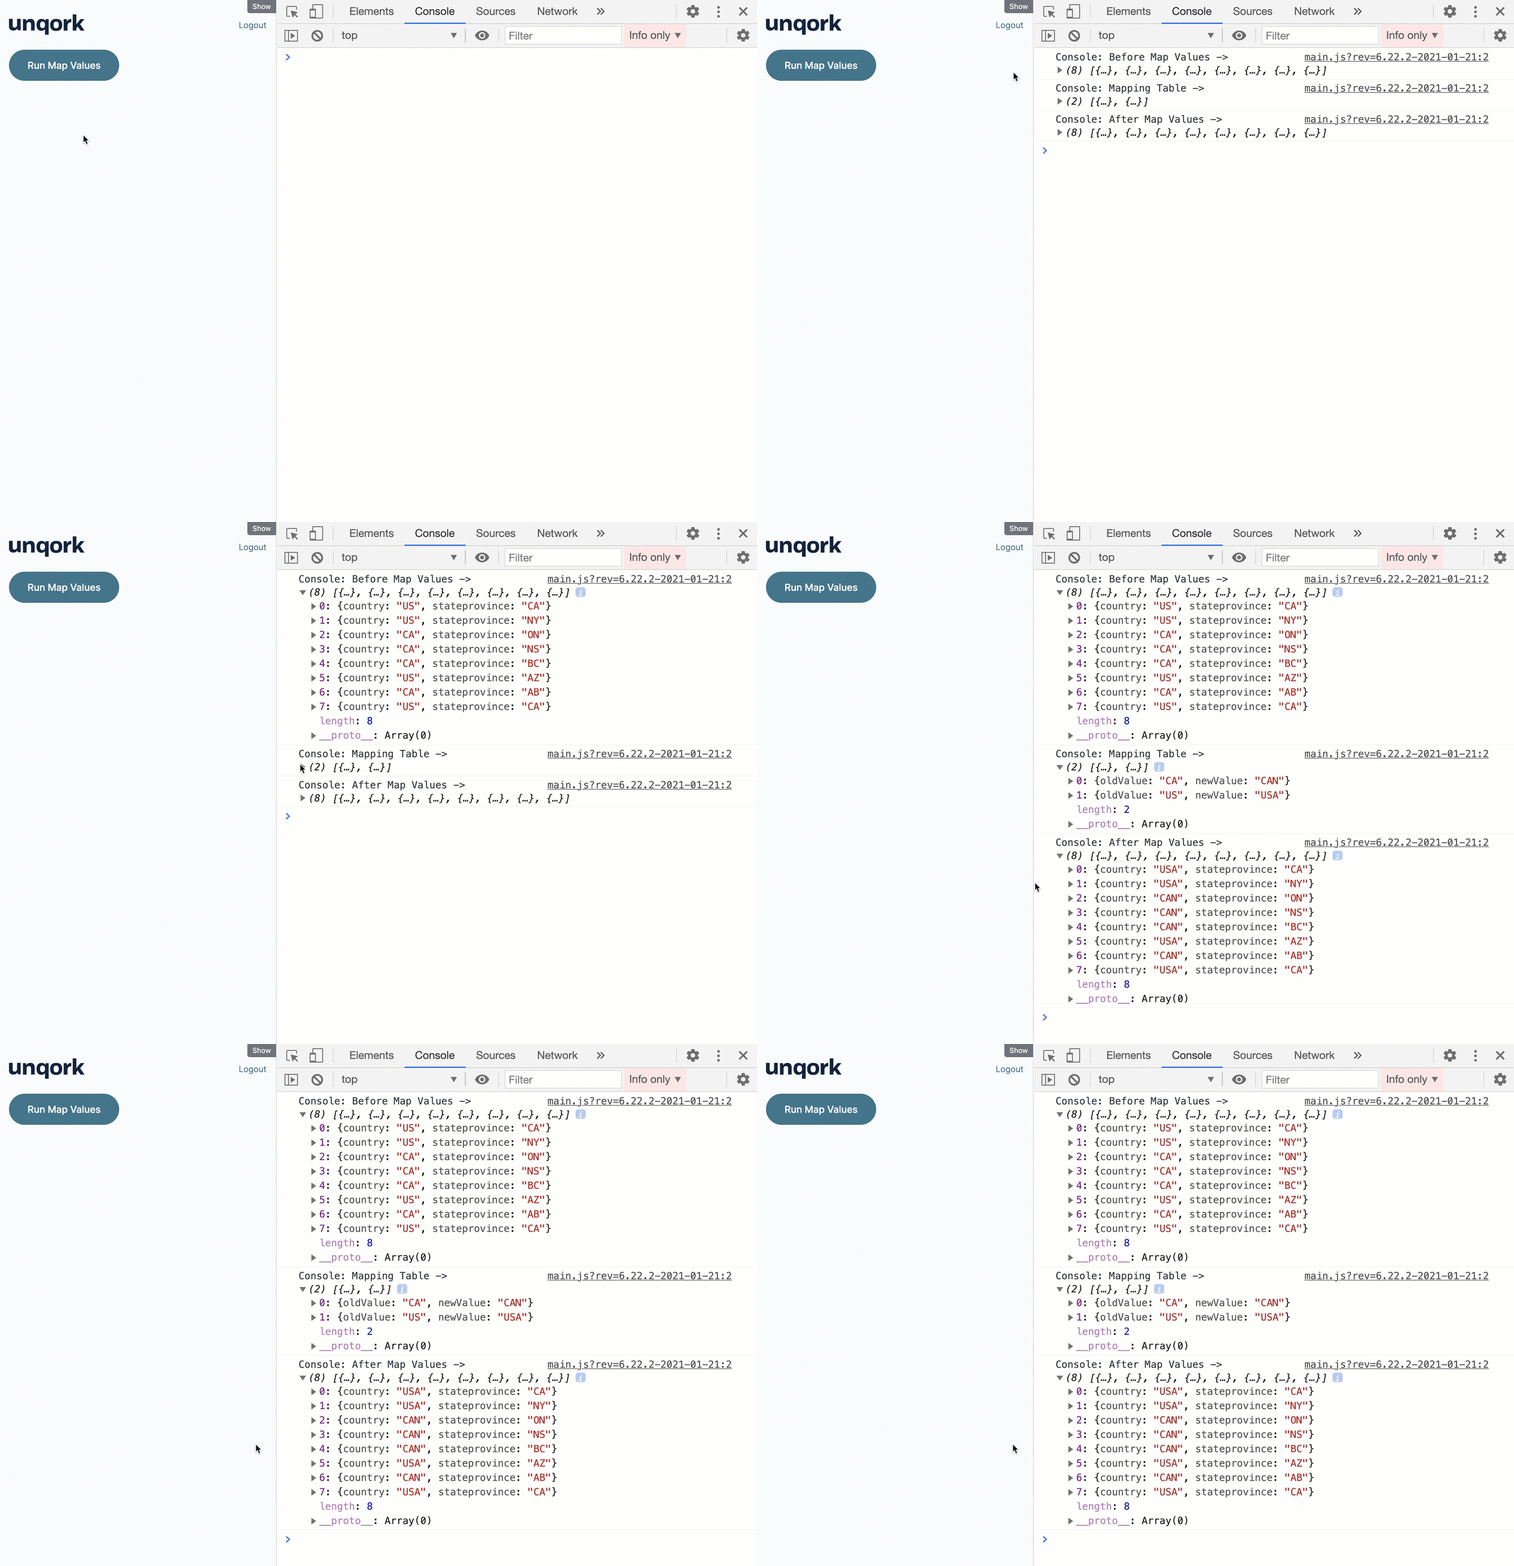
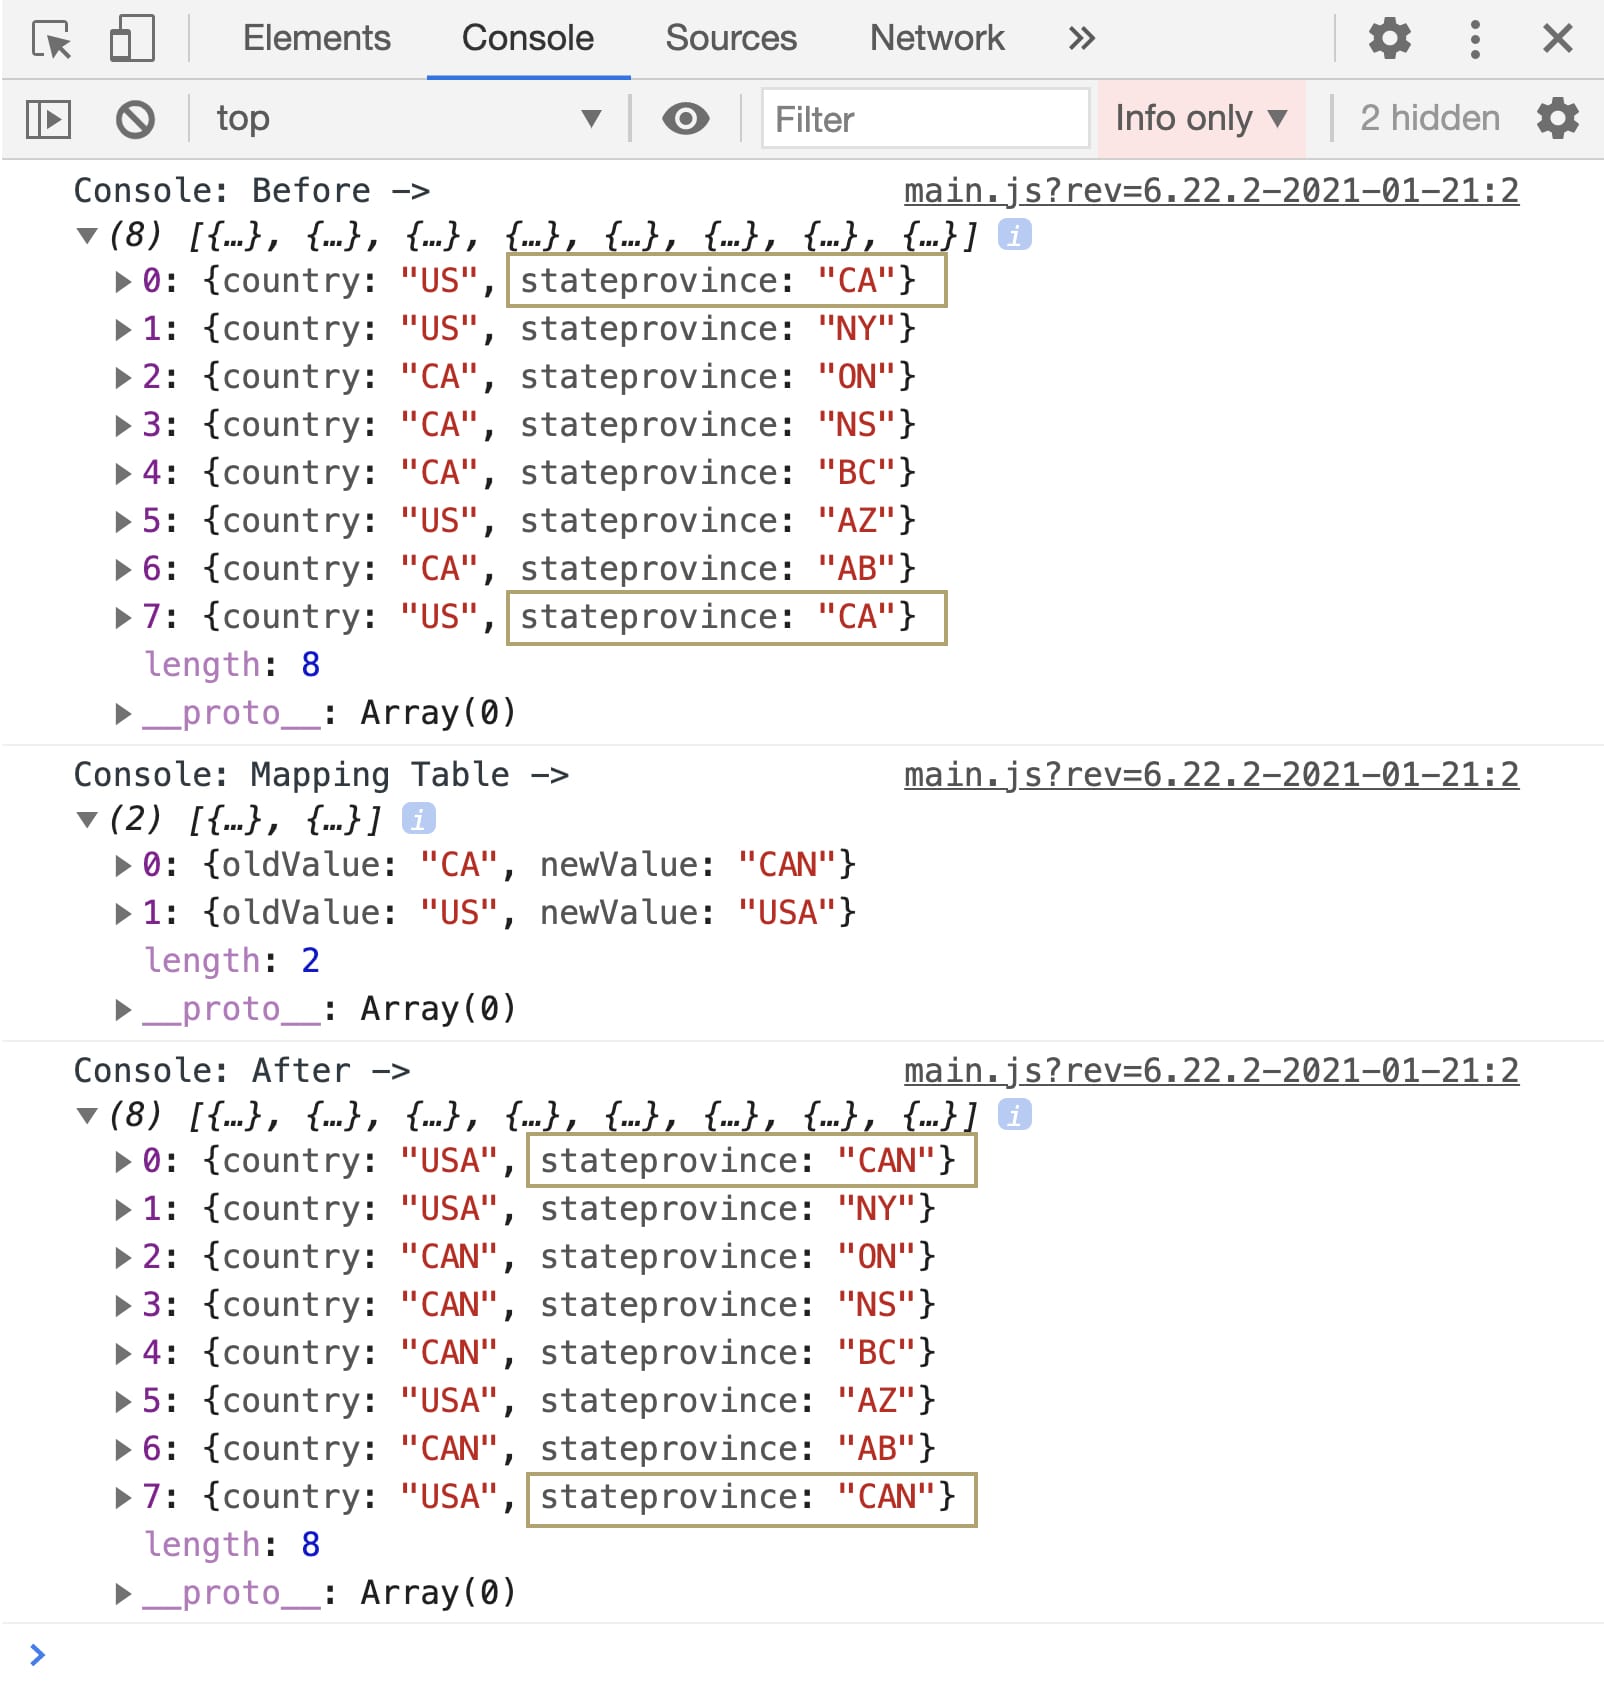
It's a good idea to use the Keys setting when updating values that occur across multiple keys. Let's look at what would have occurred if you didn't add country in the Map Values operator's Keys setting. Without specifying a key to update, the operator would have replaced all instances of CA with CAN and included the stateprovince value CA. This means the abbreviation for the state of California would have also changed to CAN. Here's what that would have looked like:
.png)
The Map Values operator updates multiple values in a table. Using a mapping table, you can quickly modify many values across multiple keys in a single step. This process is known as data normalization, which enables you to introduce consistency and accuracy across module data.
Use the Map Values operator to:
Update values before presenting them to your end-user. For example, convert text from camel case title or sentence case.
Refresh values imported from external or outdated sources.
Standardize data across multiple data sets.
Align similar values within a single data set, such as correcting spelling variations or abbreviations.
You’ll find the Map Values operator under the Table group to the left of the Data Workflow canvas.
Similar Data Workflow Operators
The Map Values, Map Keys, and Create Field operators are closely related but serve different purposes.
Here are the comparisons:
Map Keys operator: The Map Keys operator updates the keys in a set of key/value pairs. In comparison, Map Values updates the values in a set of key/value pairs.
Create Field operator: Similar to Map Values, Create Field can also update values in key/value pairs. However, Create Field lets you use conditional logic with if statements and doesn’t rely on a mapping table. Instead, you define the value changes directly in the operator’s Info window.
About the Info Window
Here's a breakdown of each setting in the Map Values operator’s Info window:
Setting | Description |
|---|---|
Category | Grayed out and non-adjustable setting indicating the operation type. |
Label | Sets the label for your operator, displaying below the operator on your Data Workflow canvas. This field is optional, but set a label if you use more than one of the same operator type. A label helps you identify your operators without opening any Info windows. |
Preserve Argument Type | When selected, this setting ensures the argument data type is respected when the operator executes. |
Source Column | Enter the name (column header) of the column in your mapping table that defines the original values. |
Target Column | Enter the name (column header) of the column in your mapping table that defines the new values. |
Keys | Enter which keys contain values you want the operator to update, according to the mapping table. To list multiple keys, use a comma-separated list. If left empty, the operator updates all keys with values that match the mapping table. |
Adding a Map Values Operator
In this example, you'll use the Map Values operator to update values in a table. You'll also explore the importance of using the operator's Keys setting when the same value exists across multiple keys. Because the Map Values operator updates table-based data, begin by configuring a Data Table component.
You can use the Map Values operator with any table-based data, not just data created with a Data Table component. For example, you can use Map Values with data returned by the List Submissions for Dashboard API call. In that case, set up a Hidden component to store the data returned by the Plug-In running the API call. Then, use a simple Input-to-Output Data Workflow to move the data from Plug-In to Hidden component. The Hidden component is then used as the input in your Map Values Data Workflow.
These instructions assume you have a new module open, saved, and with a title.
Configure the First Data Table Component
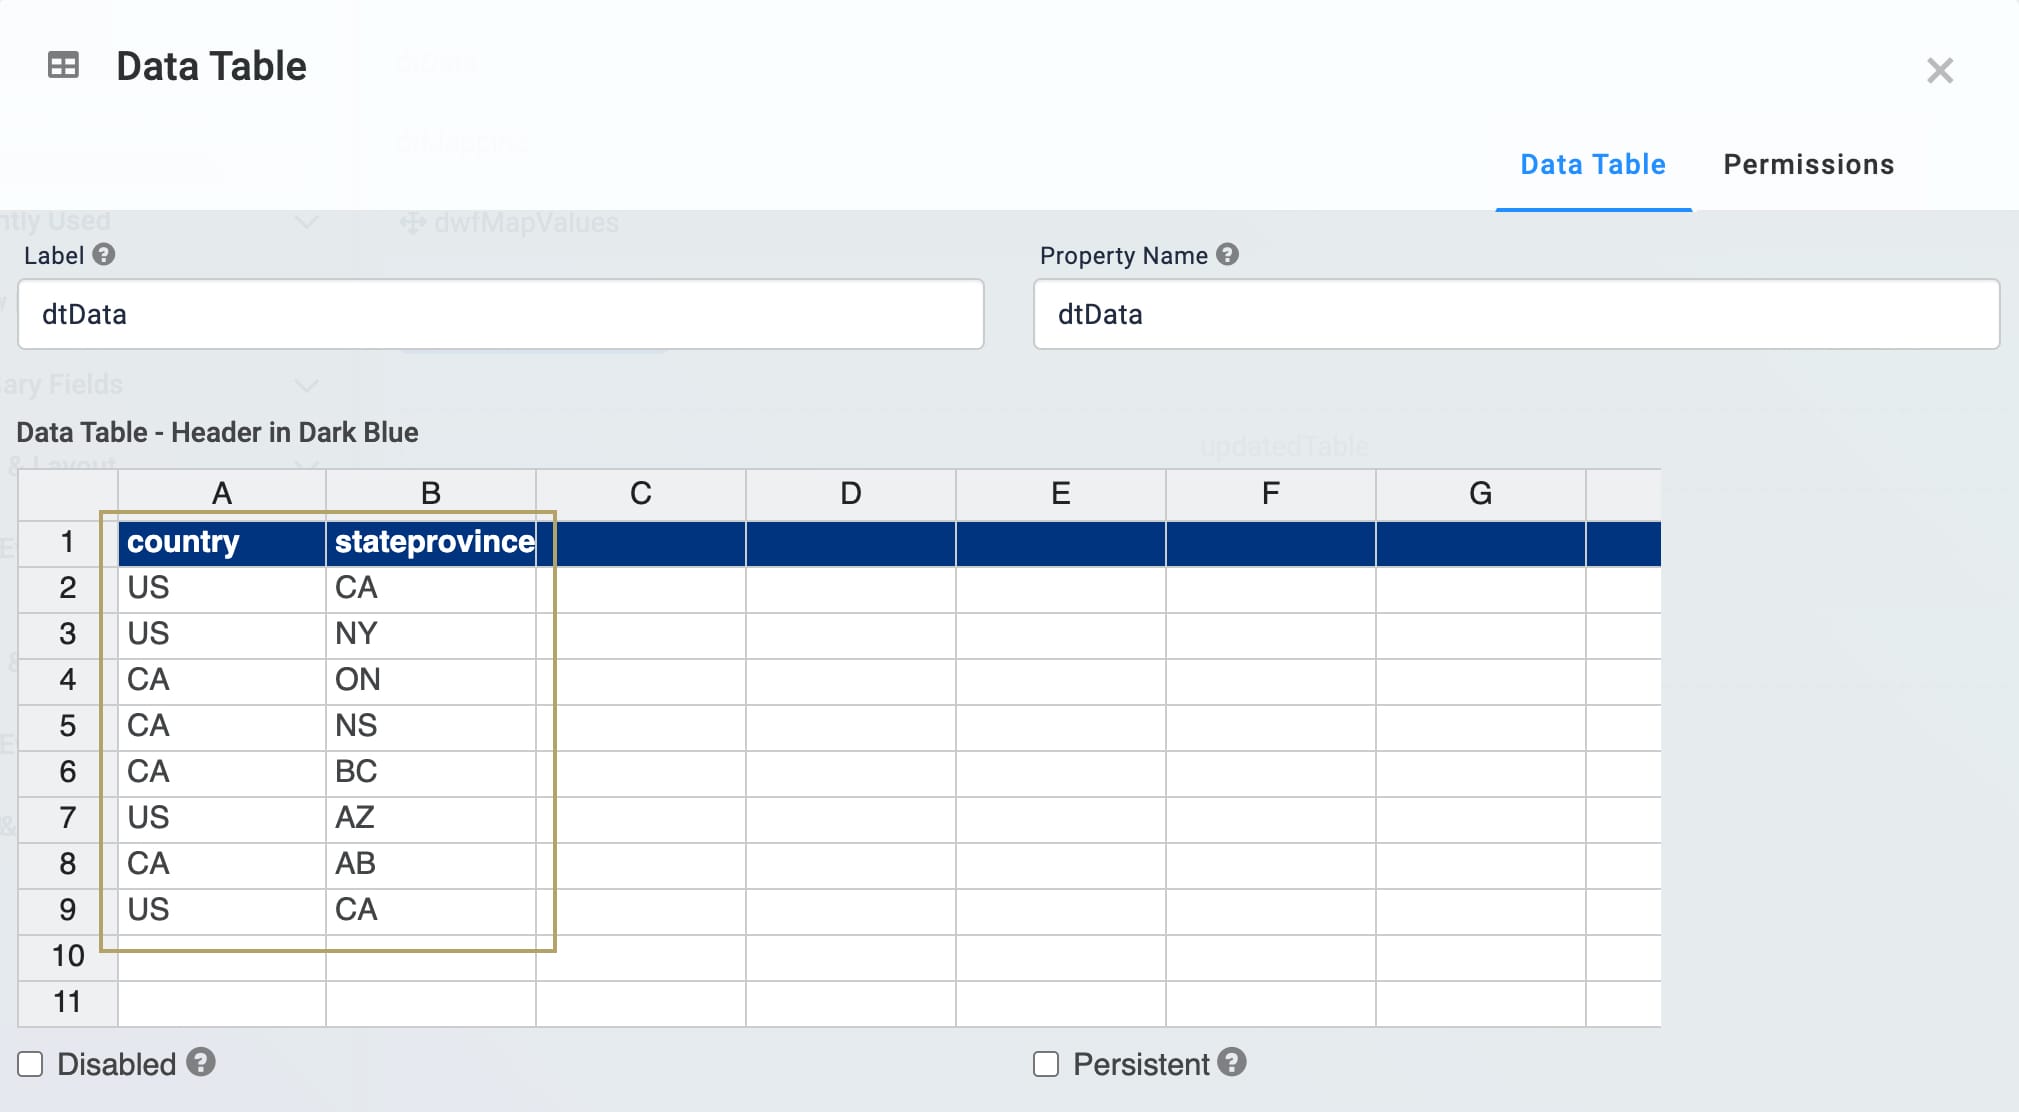
Configure a Data Table component that you can use as a data source. It will include location data with the same value in two columns. In this case, the value CA refers to both the country Canada and the state California.
In the Module Builder, drag and drop a Data Table component onto your canvas.
In the Label and Property Name fields, enter
dtData.In the data table, enter the following:
#
A
B
1
country
stateprovince
2
US
CA
3
US
NY
4
CA
ON
5
CA
NS
6
CA
BC
7
US
AZ
8
CA
AB
9
US
CA
Click Save.
Configure the Second Data Table Component
The second Data Table component is an essential part of using the Map Values operator. Here, you'll create a two-column table that acts as a mapping table. In the first column, oldValue, you'll list all the values you want the Map Values operator to update. In the second column, newValue, you'll list the new values you want to use. Then, you'll reference the mapping table's column headers in the Map Values operator's Info window. Let's update the abbreviation US to be USA and the abbreviation CA to be CAN.
Drag and drop a Data Table component onto your canvas, placing it below the
dtDataData Table component.In the Label and Property Name fields, enter
dtMapping.Complete the data table as follows:
#
A
B
1
oldValue
newValue
2
CA
CAN
3
US
USA
You don't need to include quotation marks around your values.
You can list the values you want to change in any order in the
oldValuecolumn. As long as the values exist in the data source, the Map Values operator will know to update them.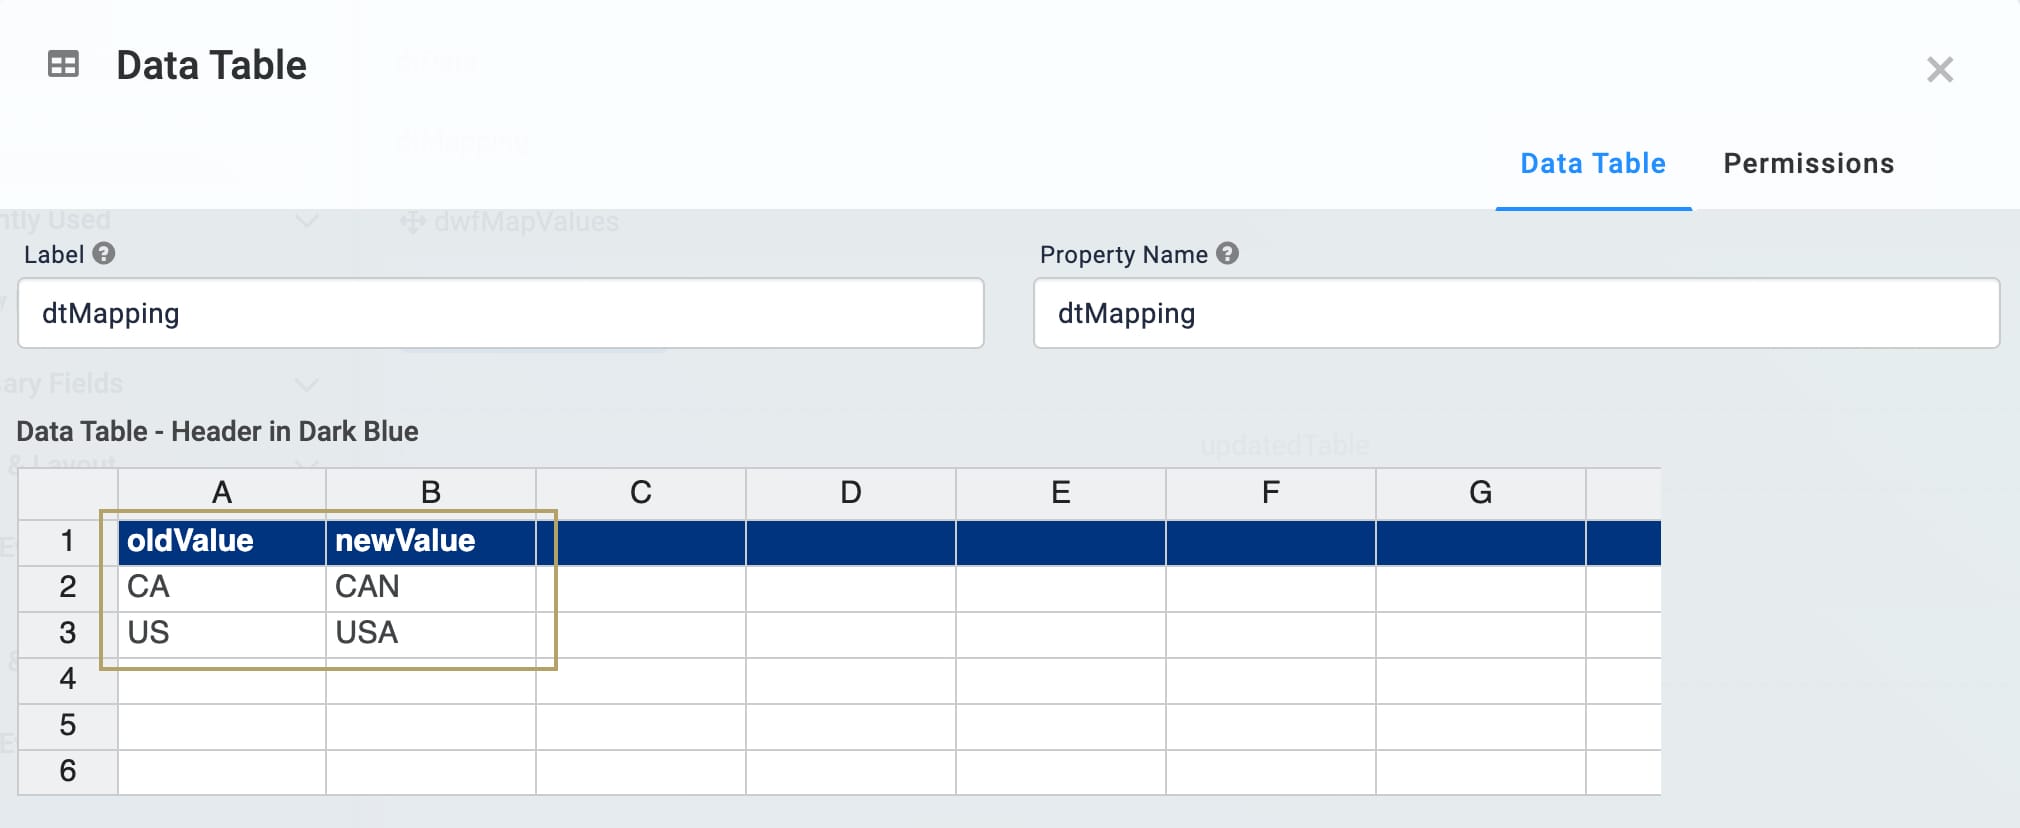
Click Save.
Configure the Hidden Component
Next, you'll configure a Hidden component to store your final data and reference it in your Data Workflow.
Drag and drop a Hidden component onto your canvas, placing it below the
dtDataanddtMappingData Table components.In the Property ID and Canvas Label Text fields, enter
updatedTable..png)
Click Save.
Configure the Data Workflow Component
Next, let's configure the Data Workflow. With the help of your mapping table, it'll use a Map Values operator to update the CA and US values.
Drag and drop a Data Workflow component onto your canvas, placing it below the
updatedTableHidden component.In the Canvas Label Text and Property Name fields, enter
dwfMapValues.
Configure the Input Operators
Drag and drop two Input operators onto your Data Workflow canvas.
Configure the first Input operator's Info window as follows:
Setting
Value
Category
Input
Component
dtData
Required
Yes
Source
Default
Configure the second Input operator's Info window as follows:
Setting
Value
Category
Input
Component
dtMapping
Required
Yes
Source
Default
Configure the Console Operators
Next, add a pair of Console operators. These will help you compare the before and after of the Data Workflow. One will display the data before the Map Values operator, and the other will serve as a reminder of how you set up your mapping table.
Drag and drop two Console operators onto your Data Workflow canvas.
Configure the first Console operator's Info window as follows:
Setting
Value
Category
Console
Label
Mapping Table
Connect the output port (right) of the
dtMappingInput operator to the input port (left) of theMapping TableConsole operator.Configure the second Console operator's Info window as follows:
Setting
Value
Category
Console
Label
Before Map Values
Connect the output port (right) of the
dtDataInput operator to the input port (left) of theBefore Map ValuesConsole operator.
Configure the Map Values Operator
Now you're ready to set up the Map Values operator. Notice that the values you'll enter in the Info window's Source Column and Target Column fields match the column headers in the dtMapping Data Table component, which is your mapping table. The Source Column field should always reference the column with your old values. The Target Column field should always reference the column with your new values.
The Map Values operator has two input ports. Always connect the data source to the upper input port and the mapping table to the lower input port.
Drag and drop a Map Values operator onto your Data Workflow canvas.
Complete the operator's Info window as follows:
Setting
Value
Category
Map Values
Label
Map New Value
Source Column
oldValue
Target Column
newValue
Keys
country
You need to add country in the Keys field to avoid updating all instances of the value CA to CAN. Remember, your data includes the value CA as a reference to California as well.
Connect the output port (right) of the
dtDataInput operator to the upper input port (left) of theMap New ValueMap Values operator.Connect the output port (right) of the
dtMappingInput operator to the lower input port (left) of theMap New ValueMap Values operator.
Configure the Third Console Operator
Next, let's add another Console operator to display the data after using the Map Values operator, helping you compare the before and after of your Data Workflow.
Drag and drop a Console operator onto your Data Workflow canvas.
Configure the operator's Info window as follows:
Setting
Value
Category
Console
Label
After Map Values
Connect the output port (right) of the
Map New ValueMap Values operator to the input port (left) of theAfter Map ValuesConsole operator.
Configure the Output Operator
For the last step of the Data Workflow, let's output your updated table to the Hidden component you created earlier.
Drag and drop an Output operator onto your Data Workflow canvas.
Configure the operator's Info window as follows:
Setting
Value
Category
Output
Component
updatedTable
Action
value
Connect the output port (right) of the
Map New ValueMap Values operator to the input port (left) of theupdatedTableOutput operator.
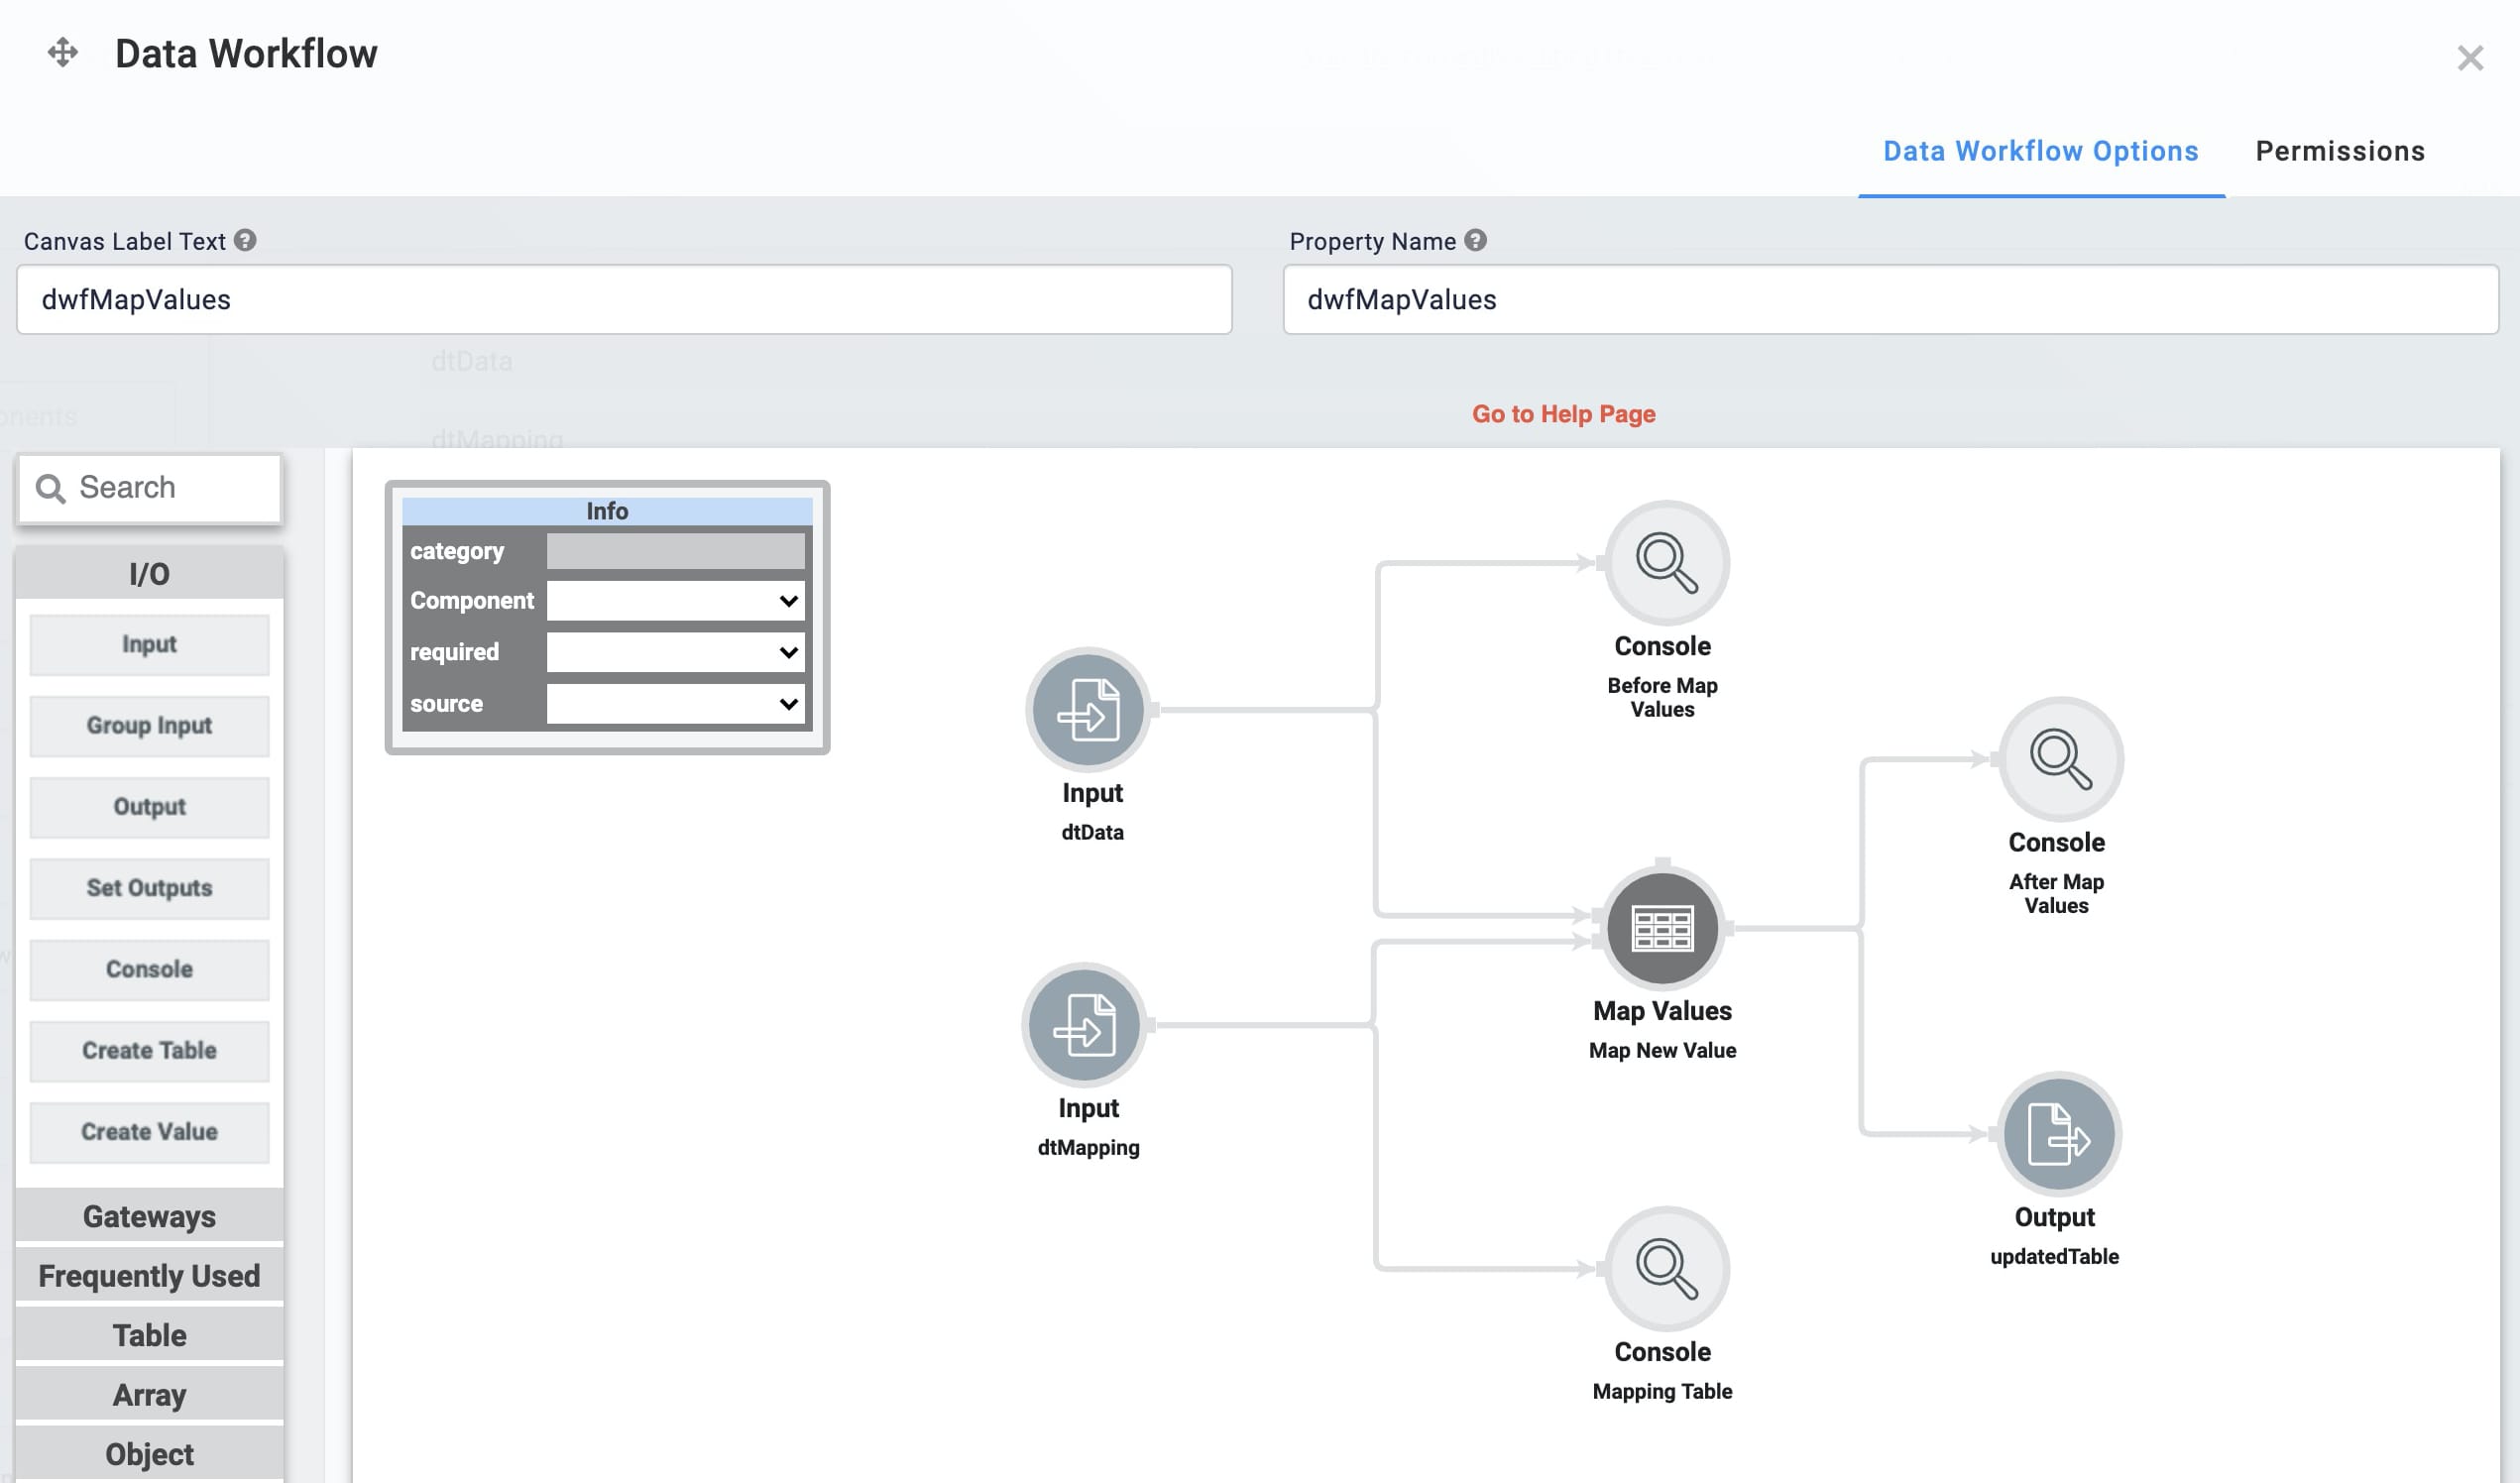
Click Save.
Configure the Button Component
Lastly, configure a Button component that you can click in Express View to trigger your Data Workflow.
Drag and drop a Button component onto your canvas, placing it below the
dwfMapValuesData Workflow component.In the Property ID field, enter
btnRunDWF.In the Label Text field, enter
Run Map Values.To the left of the component’s configuration window, click Actions.
Set the Action Type as Event.
From the On Click drop-down, select dwfMapValues.
.png)
Click Save & Close.
Save your module.
Here's how the completed example looks in the Module Builder:
.png)
Here's how the completed example works in Express View. Preview your module in Express View and open the DevTools Console. Click the Run Map Values button and view how the data displays in the console.

It's a good idea to use the Keys setting when updating values that occur across multiple keys. Let's look at what would have occurred if you didn't add country in the Map Values operator's Keys setting. Without specifying a key to update, the operator would have replaced all instances of CA with CAN and included the stateprovince value CA. This means the abbreviation for the state of California would have also changed to CAN. Here's what that would have looked like:
