The GraphQL sandbox will slowly be phased out in favor of REST API endpoints. To access Unqork’s API documentation, append
/#/apidocsto the end of your environment URL. For example,https://training.unqork.io/#/apidocs.
Each environment comes with its own GraphQL sandbox for requesting environment audit and event logs. Accessing this sandbox requires modifying your environment URL to the following: https://{unqorkEnv}/api/graphql, where {unqorkEnv} is the name of your environment. Once accessed, you can authenticate the sandbox using the environment's unqorkioToken cookie.
In production environments, the GraphQL sandbox is not available for access by browser. Instead, use the
curlcommand that displays on the GraphQL page to query the endpoint.
What You'll Learn
In this article, you'll learn how to retrieve the cookie, authenticate the sandbox, and begin requesting data.
Locating the Authentication Token
To use your environment's GraphQL sandbox, you first need to find your environment's unqorkio authentication token:
Log in to your environment on the Unqork Designer Platform.
Right mouse-click anywhere on your Workspaces page.
Click Inspect. DevTools open as a panel on the right side of your page.
If you’re using a Mac, Command + Option + i also opens the DevTools.
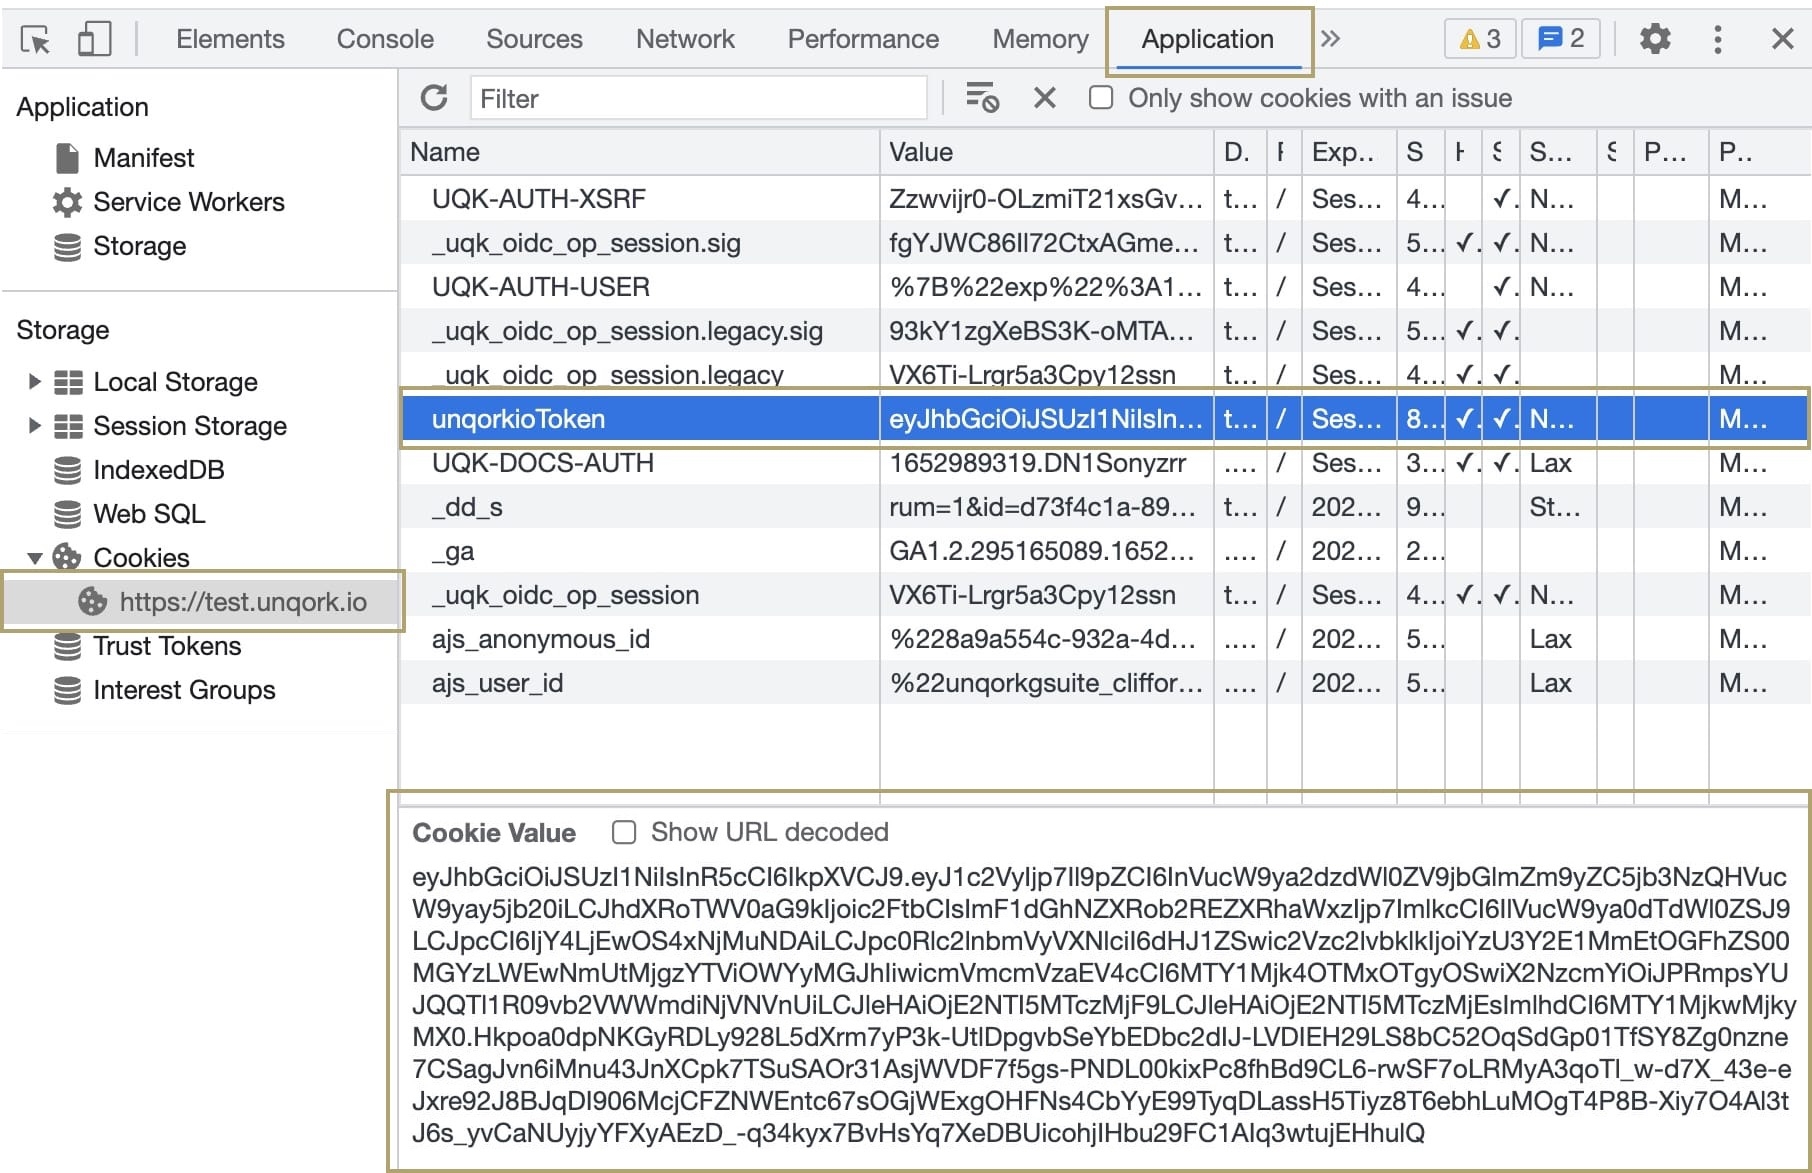
At the top of the panel, select the Application tab.
In the menu to the left, find the Storage section.
Under Cookies, select the environment web page address. For example, https://test.unqork.io.
In the right panel, find and select the unqorkioToken key.
At the bottom of the panel, copy the unqorkioToken cookie value.
Accessing the Environment API GraphQL Sandbox
To access your environment's API GraphQL sandbox:
Open a new browser page.
In the browser bar, insert https://{unqorkEnv}/api/graphql, where {unqorkEnv} is the name of your environment. For example: https://training.unqork.io/api/graphql.
Press Enter (Return). The GraphQL for the specified environment loads.
An authentication token is required to perform queries or mutations. On initial page load, the "Unable to reach server" modal displays. Next, you need to authenticate your GraphQL sandbox to request logs.
Authenticating the GraphQL Sandbox
Authenticate access to the environment by inserting your unqorkio token into HTTP Headers, this is required to perform any function in the GraphQL.
To authentic access to your environment:
At the bottom left of the GraphQL editor, click Headers.
In the Header Key field, enter unqork-auth-token. No quotes necessary.
In the Value field, paste the cookie value you obtained in the Locating the Authentication Token section of this article. No quotes necessary.
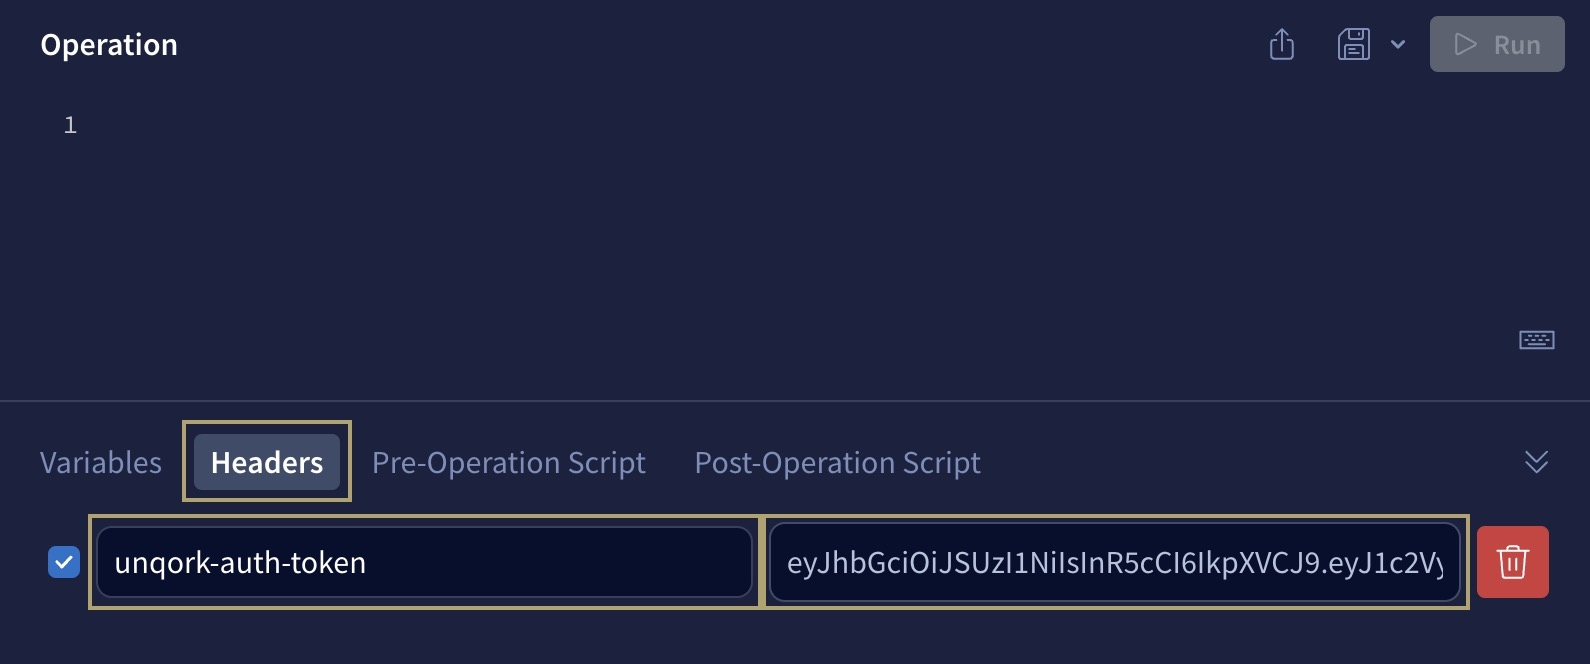
Successful authentication is denoted by the error message modals clearing from the Response panel. You can now create queries or mutations for your environment.
Performing API Calls
You can use your environment's GraphQL sandbox to perform queries and mutations. The GraphQL sandbox comes with preconfigured Root Types so you can quickly set up for API calls. After selecting the query or mutation you want to perform, you'll specify the parameters and run the call.
In Unqork, you'll use the GraphQL sandbox for the following features:
Performing queries on audit logs.ao
Performing queries and mutations on Application Versioning.
To learn more about audit logs, view our Audit Logs Reference Guides. To learn more about Application Versioning, view our Application Versioning article.
Querying Audit Logs
You can use the GraphQL sandbox to query audit logs for a specific one-hour range. Depending on the events that occurred in the requested time span, the API call might return data specific to environment logins, password changes, or administration modifications. Remember, you must authenticate the sandbox before proceeding.
To learn how to authenticate and access the environment GraphQL sandbox, see the How to: Use the GraphQL Environment. .
In the Editor panel, remove the example query.
In the side panel to the left of the Editor panel, click
 (Explorer).
 Under Root Types, select
 query.
Select
instrumentation.Select
auditlogs. Select
listAuditLogs. Select all Arguments and Fields.
As you make your selections, you'll see parameters automatically display in the Variables panel. Next, you'll use this panel to specify the start and end time, schema version, and log location for the audit logs you want to query.
To query audit logs for a specific one-hour range, follow these steps to manipulate the parameters in the Variables panel:
For the "startDateTime" key, replace the null value with the date and time you want start querying audit logs. You must use the YYYY-MM-DDThh:mm:ssZ format, where the YYYY is year, MM is the month, DD is the day, hh is the hour, mm is the minutes, and ss is the seconds.
Ensure the seconds (ss) are 00 or are fully omitted to avoid errors.
For the "endDateTime" key, replace the null value with the date and time you want end the query. You must use the YYYY-MM-DDThh:mm:ssZ format, where the YYYY is year, MM is the month, DD is the day, hh is the hour, mm is the minutes, and ss is the seconds.
You can only run queries for a one-hour range. For example, "2022-12-19T19:00:00Z" to "2022-12-19T20:00:00Z".
For the "schemaVersion" key, replace the null value with "1.0".
Click Query. A successful query returns as a URL array in the Response panel.
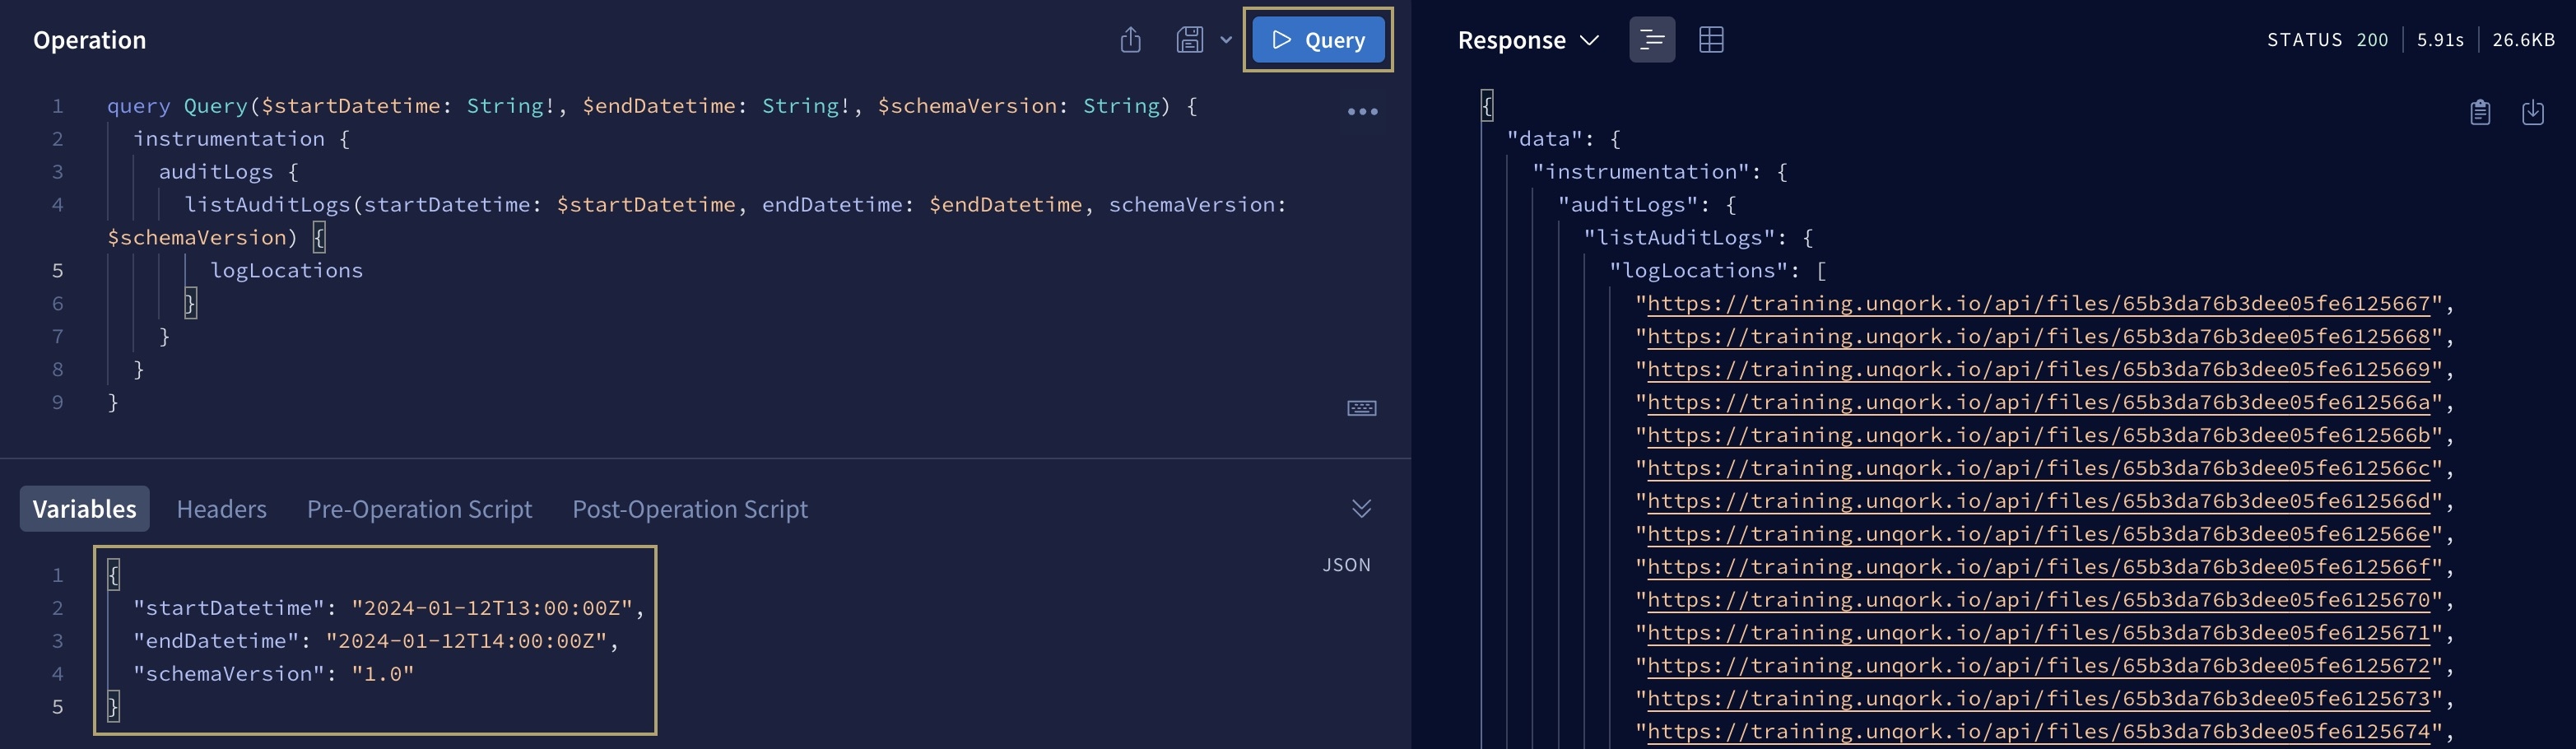
The response lasts 15 minutes before you need to perform another query.
Hover over one of the files and click Follow Link. The file automatically downloads to your computer.
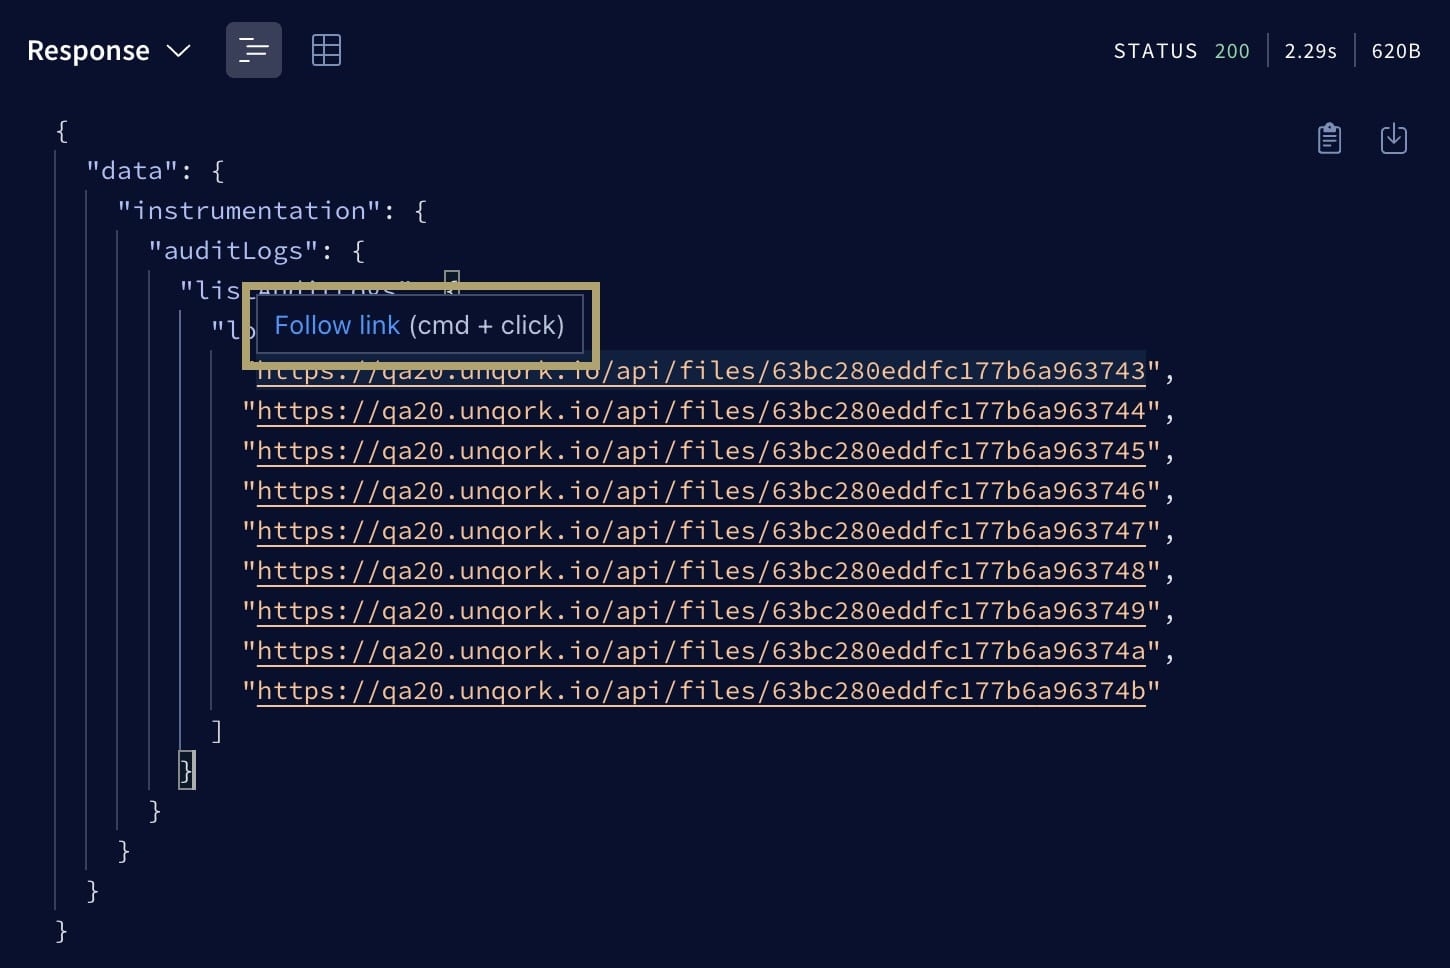
Using your computer's text editor, open the file from your Downloads folder.
Use a JSON beautification tool to format the returned data for easier legibility. For example: https://jsonformatter.org/.
Querying Application Versions
There are various queries you can run related to Application Versioning. This example highlights how to query all versions for an application.
To learn more about Application Versioning, view our Application Versioning article. To learn more about all the Application Versioning queries you can perform, view our Application Versioning: API Reference guide.
In the Editor panel, remove the example query.
In the side panel to the left of the Editor panel, click
(Explorer). Under Root Types, select
query. Select
administration. Select
application. Select
getApplicationVersionsBatch. Under Arguments, select
getApplicationVersionsBatchInput. Under Input Fields, select
applicationId. This input is required so you can enter an application ID in the Variables panel.
At the top of the Documentation panel, click
 (back) to return to the previous panel.
 Under Fields, select
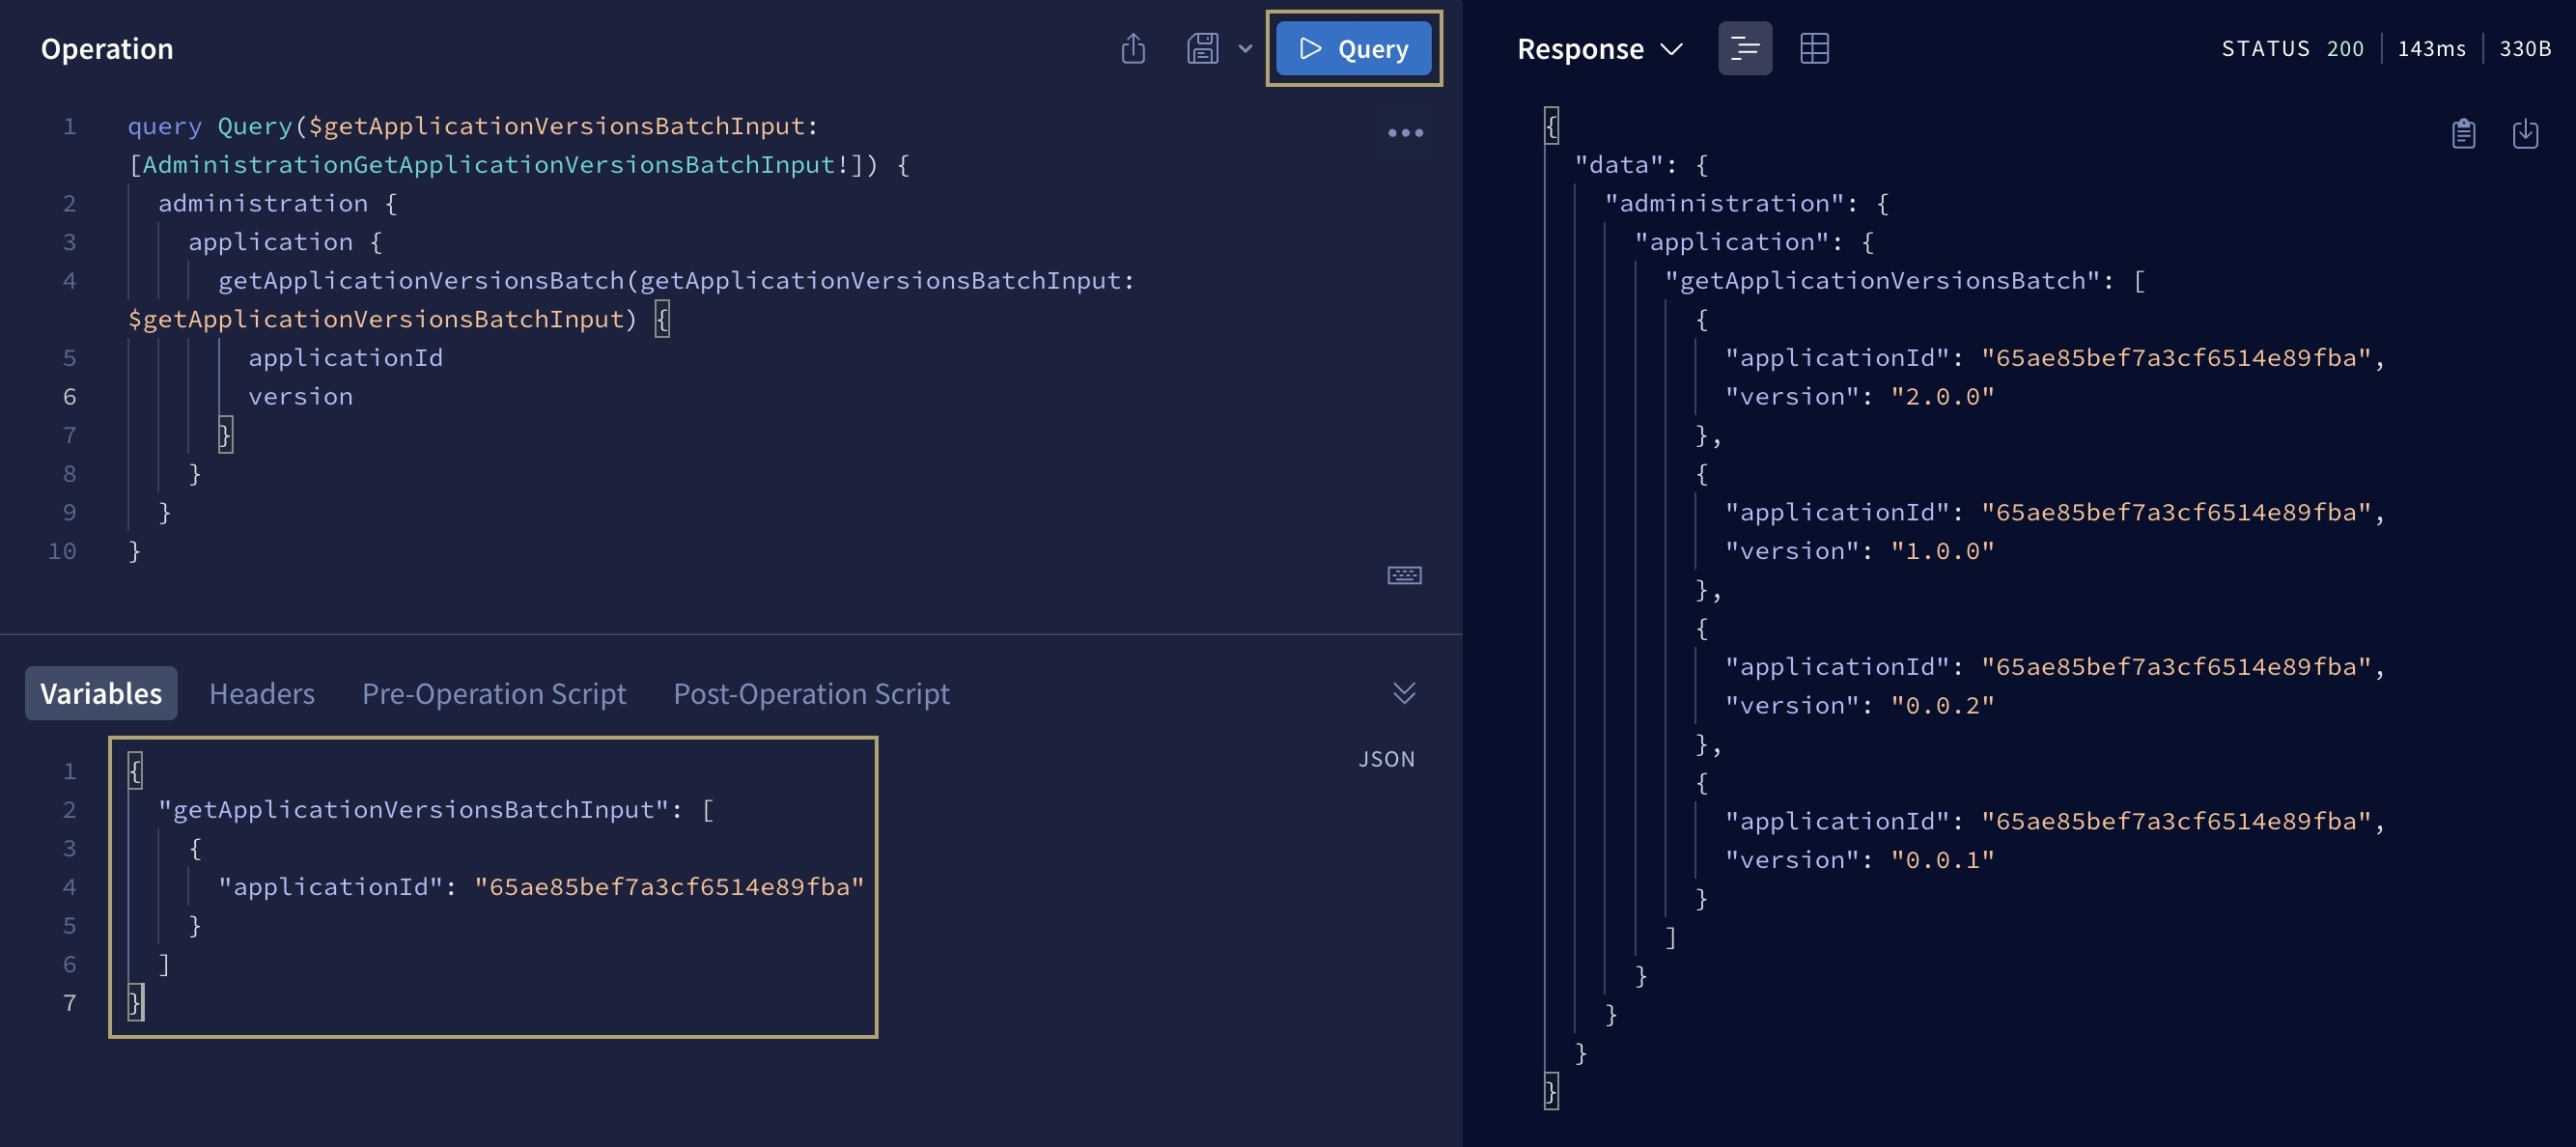
applicationId and version.Selecting these fields will display the application's ID and all versions.
As you make your selections, you'll see parameters automatically display in the Variables panel. Next, you'll use this panel to specify the application whose versions you want to query.
To query versions for a specific application, follow these steps to manipulate the parameters in the Variables panel:
Remove the null from the parameters.
Enter the application ID of the versioned application whose versions you want to query.
Click Query. A successful query displays the application versions in the Response panel.
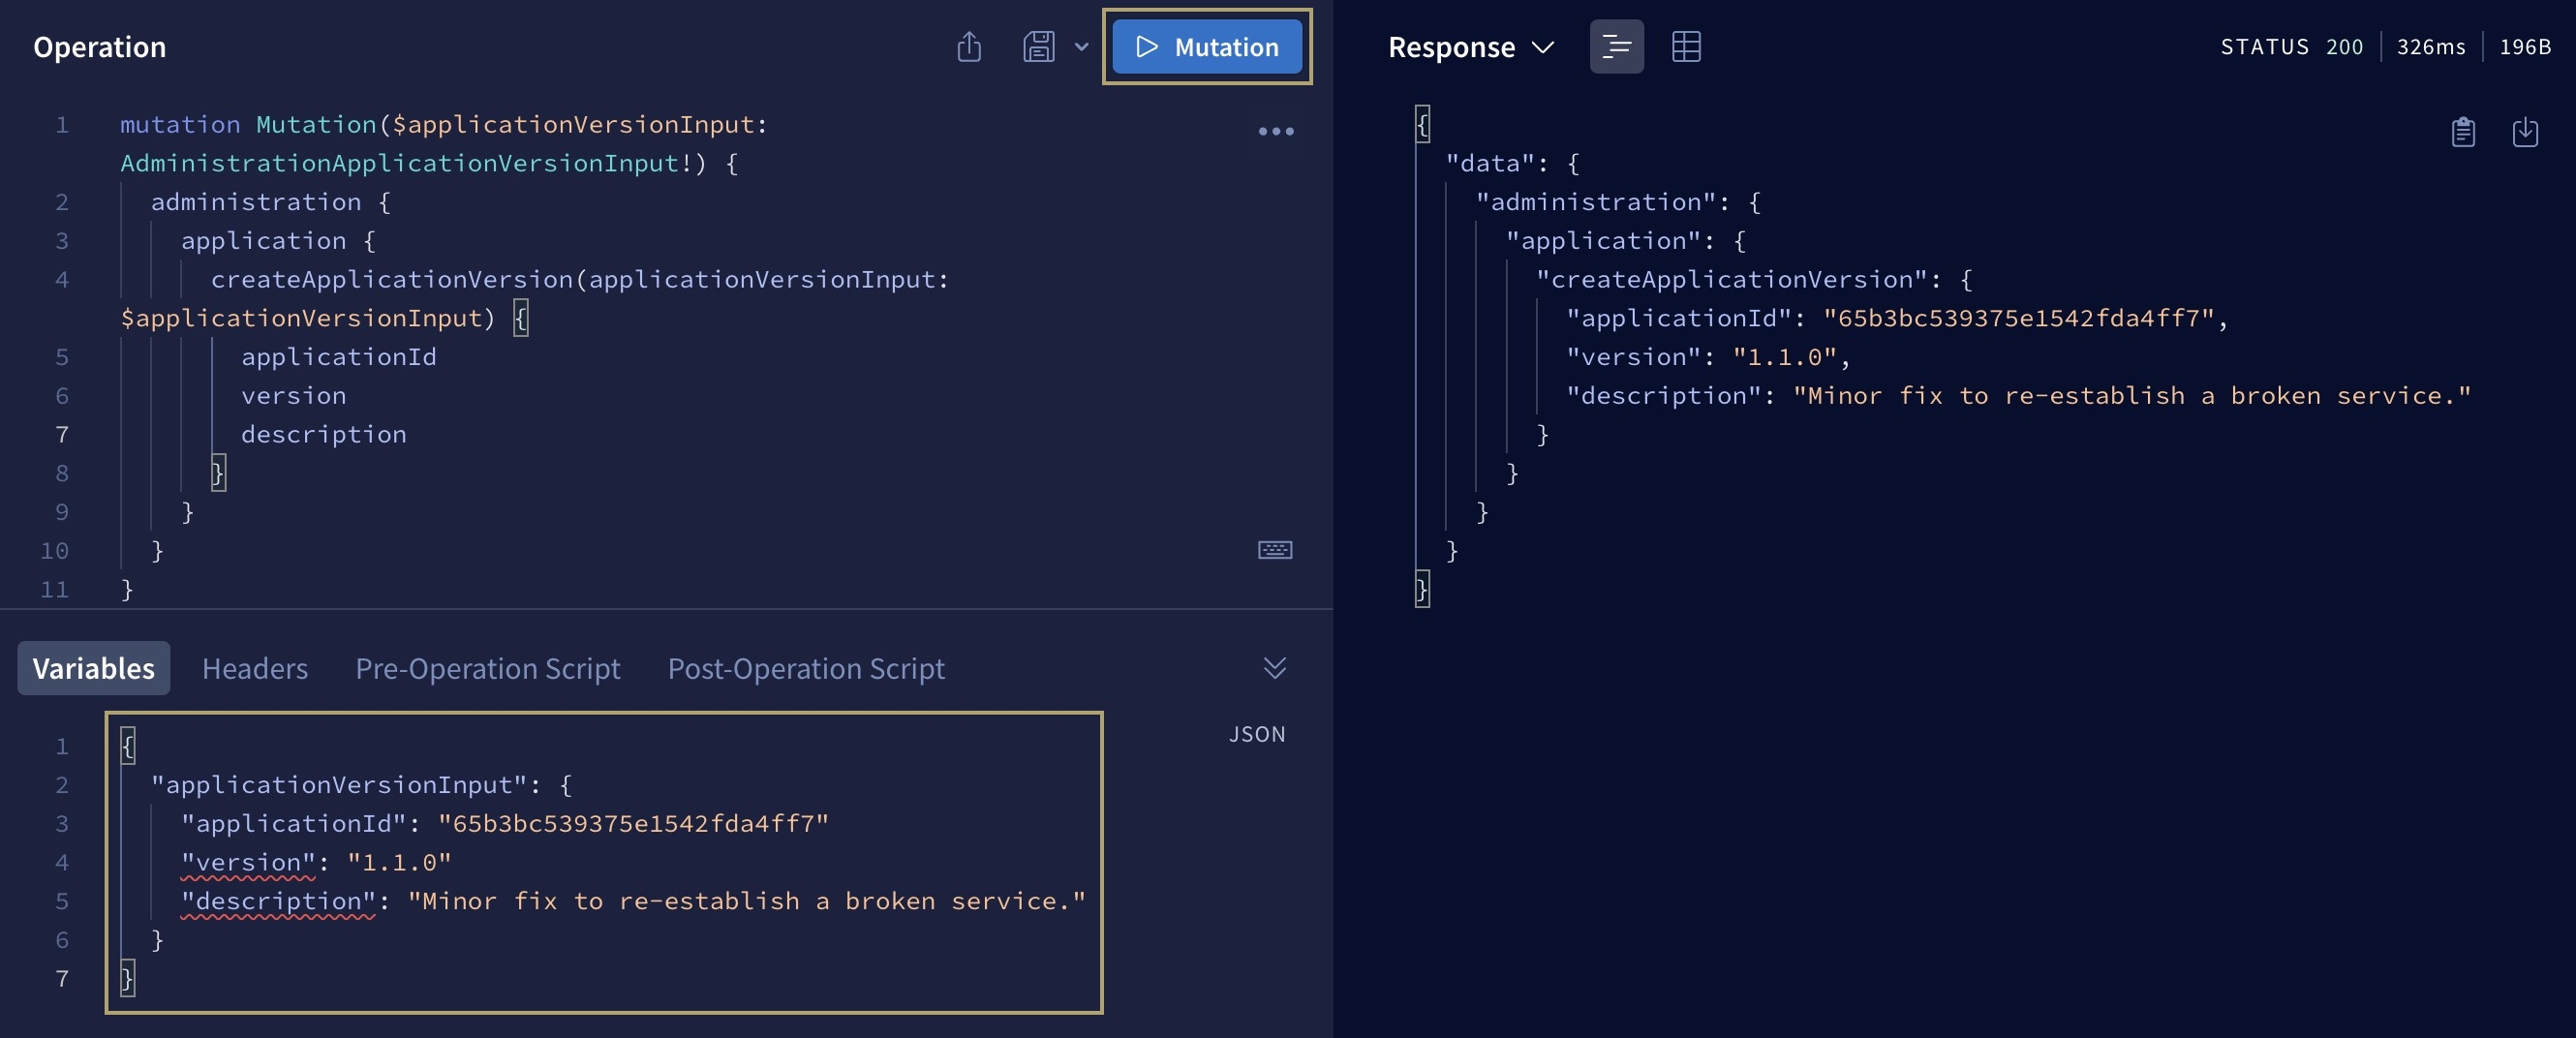
Creating a New Application Version
You can also use the GraphQL sandbox to perform mutations. This example provides steps for creating a new version of an application.
To learn more about Application Versioning, view our Application Versioning article. To learn more about all the Application Versioning mutations you can perform, view our Application Versioning: API Reference guide.
To a new application version:
In the Editor panel, remove the example query.
In the side panel to the left of the Editor panel, click
(Explorer). Under Root Types, select
mutation. Select
administration. Select
application. Select
createApplicationVersion. Under Arguments, select
applicationVersionInput. Under Fields, select
applicationId, description, and version.This input is required so you can enter an application ID, a description of the changes, and the version number in the Variables panel.
As you make your selections, you'll see parameters automatically display in the Variables panel. Next, you'll use this panel to specify the application where you'll create a new version with a description of the changes.
To query versions for a specific application, follow these steps to manipulate the parameters in the Variables panel:
Remove the null from the parameters.
Create a new object using curly brackets ({}).
On a new line, enter "applicationId": "{your-application-ID}", where you'll replace {your-application-ID} with the application ID you where you want to create the new version.
On a new line, enter "version": "{new-version-number}", where you'll replace {new-version-number} with the new version number you want to use. For example, 1.1.0 for a minor change.
To learn more about version number best practices, view our Application Versioning article.
On a new line, enter "description": "{description-of-changes}", where you'll replace {description-of-changes} with a brief description of the changes that were made to the application. For example, Minor fix to re-establish a broken service..
Click Mutation. A successful query displays the new application version number and description in the Response panel.