In this how-to guide, you'll learn how to use Unqork's Application Versioning feature to merge branches of your application. Merging lets you insert changes from a branch into another version, thereby creating a new branch. After merging changes, Creators can publish the primary version to update their application.
Discover how to create and publish branches in our How to: Create and Publish an Application Branch article.
Accessing the Merge Tool
To access the Merge tool, open the application or module's Branch & Version Management pane at the Application level or in the Module Builder. Then, navigate to a branch or published application version and click the ![]() (merge) button.
(merge) button.
Branches can only merge into published versions, or other branches. You cannot merge a branch into itself.
Understanding the Merge Tool
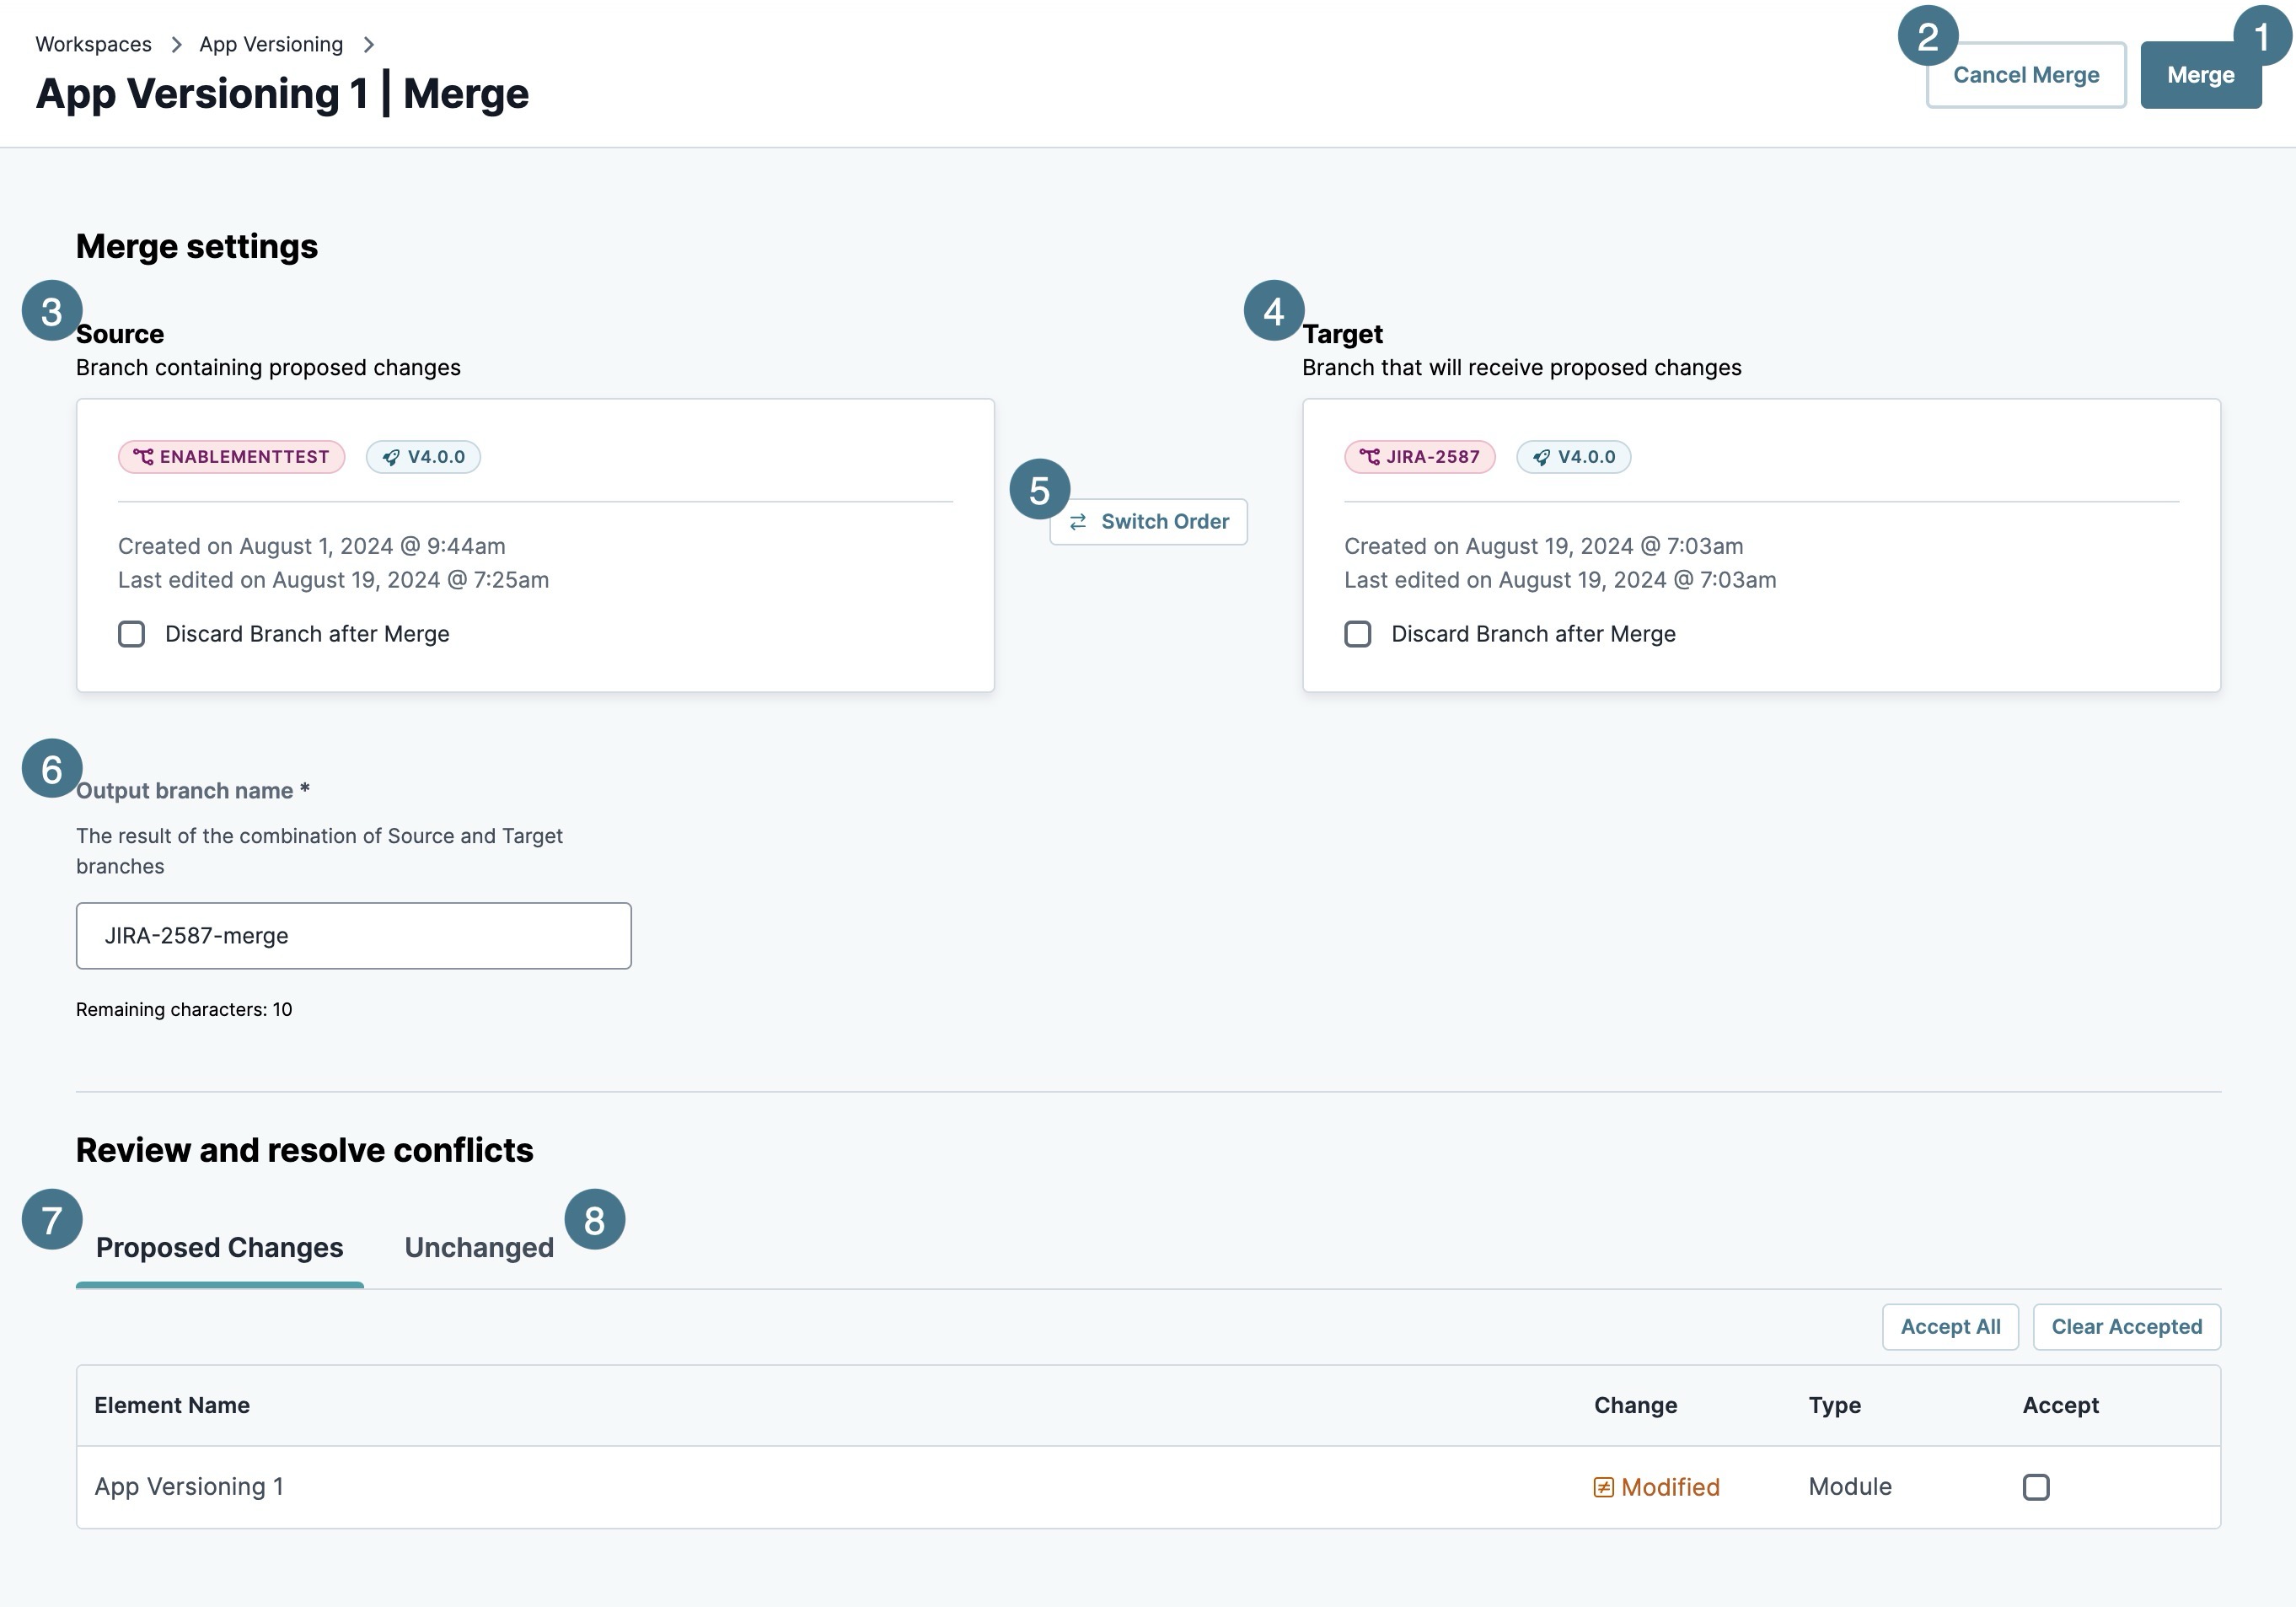
The Merge page displays the following information:
# | Attribute | Description |
|---|---|---|
1 | Merge | After reviewing and resolving conflicts, click the Merge button to combine the Source branch into the Target version.
|
2 | Cancel Merge | Cancels the merge and returns the Creator to the Module or Application view. |
3 | Source | Displays the branch containing the changes you want to merge into the Source version. |
☐ Discard Branch after Merge (Branches only) | Set to | |
4 | Target | Displays the branch or application version that is modified by the Source version once the merge is complete. |
☐ Discard Branch after Merge (Branches only) | Set to
| |
5 | Switch Order | Switches the Target version and the Source version. |
6 | Output Branch Name* | Enter a name for the new branch. After merging, the Output Branch Name displays as a red pill in the Module Builder and Branch & Version Management pane. For example, entering V1.3-Merge in the Output Branch Name field creates V1.3-Merge. *This field requires a value to merge. |
Review and Resolve Conflicts | Contains the Proposed Changes and Unchanged elements lists. Evaluate and accept any changes displayed in the Proposed Changes list. | |
7 | Proposed Changes | Displays a list of elements that were modified from the Target version. Review and accept elements to include them in the merge.
|
Accept All | Selects all elements to merge, setting all ☐(unchecked) boxes in the Accept column to (checked). | |
Clear Accepted | Deselects all elements to merge, setting all | |
Element Name | The name of the element. | |
Change | The type of change made to the element. Changes include:
| |
Type | The type of element. Elements include Modules. | |
Accept | After reviewing changes to the element, set it to By default, boxes in this column are ☐ (unchecked). Unchecked elements are not included in the merge. | |
8 | Unchanged | This table displays a list of elements that do not require review or approval because they are unmodified. |
Merging
After accessing the Merge page, Creators review and accept proposed changes between the Source and Target versions. You can merge branches into other branches or published application versions using the same merge process.
Merging creates a new branch. To publish a branch, view our How to: Create and Publish an Application Branch article.
To merge a branch using the Merge tool:
In the Output Branch Name* field, enter a unique name for the output branch.
In the Proposed Changes list, click Review. The Merge Review page displays.
To see setting descriptions for the Merge Review page, view our Application Versioning Merge Review Tool article.
Review each element in the Change Application Elements list. Elements in this list contain a table displaying the element name, type, and how it’s been changed.
After confirming changes, set 1 of x Accept Changes ☐ to
.png) (checked).
(checked).If there is more than one module element that has changed, click Next Conflict >, then repeat step 4.
Click Return to Merge Settings.
In the Proposed Changes list Accept column, verify elements have been
(checked).To prevent a change from being merged, leave the box ☐ (unchecked).
Click Merge. The Merge confirmation modal displays.
Verify the Source, Target, and Output Branch Name, then click Confirm.
The page refreshes and displays the new application branch. The Merge pill displays the Output Branch Name.
Using the tabs below, access the Merge tool:
Access the Merge Tool to Merge Into Another Branch
To merge branches into other branches, you'll use the Branch & Version Management pane.
To merge a branch into another branch:
Navigate to your versioned application.
At the top of the Application level page or the Module Builder, click the
.png) (branch) button. The Branch & Version Management pane displays to the right.
(branch) button. The Branch & Version Management pane displays to the right.In the Branches of X list, navigate to a branch you wish to merge, and click the
 (merge) button. The Merge tool displays.
Access the Merge Tool to Merge Into a Published App Version
To merge branches into the published application version, you'll use the Branch & Version Management pane.
Merging a branch into a Published App Version creates a new branch. To publish changes from a branch, follow our How to: Create and Publish an Application Branch article.
To merge a branch into a published app version:
Navigate to your versioned application.
At the top of the Application level page or the Module Builder, click the
(branch) button. The Branch & Version Management pane displays to the right.Click Published App Versions.
In the Published App Versions list, navigate to a published version you wish to merge, and click the
(merge) button. The Merge tool displays.