You’ll typically create a batch loop in a Data Workflow to act on a large set of data simultaneously. Imagine you’re working with a large data set that must be converted into Unqork submissions. To accomplish this task, you’ll use one of Unqork’s internal APIs. But the Create Submissions API used to create each submission has a limit. You can only create up to 50 submissions per call. So, you must group your data into batches of 50 before sending it through the API. To handle that batching process, you’ll build a Batch Loop Data Workflow.
What Is a Batch Loop?
A Batch Loop Data Workflow separates your data into groups of a certain size. You can set the number of items you want in each batch while configuring your Data Workflow. Then, the Data Workflow separates your data and assigns each group its own index. This batch index is what the looping Data Workflow references.
These instructions assume you’re working in a new module that has been opened, saved, and given a title.
Configuration
In this how-to guide, you’ll use the Create Submissions API with a data set of Fortune 500 companies that includes each company’s name, rank, revenue, and profit. You want to convert each company into its own Unqork submission. The most efficient way to achieve this task is to process the data in batches using an API call. First, you’ll configure one Data Workflow to split the data into groups of 50 companies. Then, you’ll configure a second Data Workflow to send each batch of 50 through a Create Submissions API call.
Configure the Data Table Component
The Data Table component you'll use in this example is quite large. Typically, you would use a Batch Loop Data Workflow to handle submissions of this size. To simulate this scenario, the sample data table contains 500 rows. For convenience, we’ve provided a version you can copy directly into your module: https://training.unqork.io/#/form/6086c37bb08e7e0a26942e1f/edit.
Open the following module: https://training.unqork.io/#/form/6086c37bb08e7e0a26942e1f/edit.
Hover over the
dtFortuneFiveData Table component and click Copy from the toolbar.Navigate to your module.
At the top right of your module, click the
 (ellipsis) button.
Select Paste Module Definition.
In the Module Definition field, paste the copied definition and click Paste. The
dtFortuneFiveData Table component has now been added to your canvas.Open the Data Table component to verify that the data is copied successfully. Your Data Table component should have 500 rows.
Configure the Hidden Component
Each row in your table has an index. In a simple loop, you reference this row index as the loop runs. In a batch loop, one index represents a group of rows, allowing the Data Workflow to process multiple records simultaneously.
In your module, drag and drop a Hidden component onto your canvas, placing it below the
dtFortuneFiveData Table component.In the Property ID and Label Text fields, enter
indexLoopBulk.In the Default Value field, enter
0.Set the Hidden component’s Default Value to
0so you can increment it with each batch.Click Save Component.
Configure the Data Workflow Component
Next, you’ll begin building the loop using a Data Workflow component. The configuration might seem complex, but the purpose of each operator is explained as added.
Drag and drop a Data Workflow component onto your canvas, placing it below the
indexLoopBulkHidden component.In the Property ID and Canvas Label Text fields, enter
dwfLoopGroup.
Configure the First Input Operator
This Input operator references your indexLoopBulk Hidden component so your Data Workflow knows which group of data needs to be processed next.
Drag and drop an Input operator onto the Data Workflow canvas.
Configure the operator's Info window as follows:
Setting
Value
Category
Input
Component
indexLoopBulk
Required
No
Source
Default
Configure the First Console Operator
You'll add several Console operators during this configuration so you can view the process.
Drag and drop a Console operator onto the Data Workflow canvas.
Configure the operator's Info window as follows:
Setting
Value
Category
Console
Label
Current Index
Connect the output port (right) of the
indexLoopBulkInput operator to the input port (left) of theCurrent IndexConsole operator.
Configure the First Formula Operator
This Formula operator adds 1 to the index of the previous index group processed. That way, your Data Workflow knows that it's processed each group when the loop repeats. The formula =SUM(A,1) takes the value passed to the operator (A) and adds 1 to it. The A value acts as an alias for other values entering an operator's input port.
Drag and drop a Formula operator onto your Data Workflow canvas.
Configure the operator's Info window as follows:
Setting
Value
Category
Formula Value
Label
Iterate
Formula/Expression
=SUM(A,1)
Connect the output port (right) of the Input operator to the input port (left) of the
IterateFormula operator.
Configure the First Output Operator
This Output operator replaces the value in your indexLoopBulk Hidden component with the result of your Formula operator. Without this step, your Data Workflow would continue to process the index group 0, because that is the Hidden component’s Default Value. Now, with each loop of the Data Workflow, the value passed into the indexLoopBulk Input operator will increment accordingly.
Drag and drop an Output operator onto the Data Workflow canvas.
Configure the operator's Info window as follows:
Setting
Value
Category
Output
Component
indexLoopBulk
Action
value
Connect the output port (right) of the
IterateFormula operator to the input port (left) of theindexLoopBulkOutput operator.
Configure the Second Input Operator
This Input operator brings the data into the Data Workflow.
Drag and drop another Input operator onto the Data Workflow canvas.
Configure the operator's Info window as follows:
Setting
Value
Category
Input
Component
dtFortuneFive
Required
No
Source
Default
Configure the Create Index Operator
When processing items individually, you can use the index of each row in your table. To process items in groups, a new index is required to represent a batch. Creating this new index requires a few operators. To begin, let’s create an index that you can manipulate by adding a Create Index operator.
Drag and drop a Create Index operator onto the Data Workflow canvas.
Configure the operator's Info window as follows:
Setting
Value
Category
Create Index
Label
Indexer
Index Name
indexer
Starting Index
0
Keys
Connect the output port (right) of the
dtFortuneFiveInput operator to the input port (left) of theIndexerCreate Index operator.
Configure the Create Field Operator
Once your data has passed through the Create Index operator, each row now has a new field called indexer. That way, you have a version of your index to work with. So, let's assign each row in your table to a group. You'll store this index assignment in a new field using a Create Field operator.
Remember, each group can hold 50 items. So, you'll divide the value in the indexer field by 50. You'll also round that value down to the nearest integer, so the same value is assigned to 50 items. You'll store the result of this equation in a new field called indexGrp. So, your complete formula is indexGrp=INT(indexer/50).
Drag and drop a Create Field operator onto the Data Workflow canvas.
Configure the operator's Info window as follows:
Setting
Value
Category
Formula
Label
Index Group
Do Not Sanitize Formula
.png) (checked)
(checked)Preserve Argument Type
.png) (unchecked)
(unchecked)Field 1
indexGrp=INT(indexer/50)
Field 2
Field 3
Field 4
Field 5
Connect the output port (right) of the
indexerCreate Index operator to the input port (left) of theIndex GroupCreate Field operator.
Configure the Second Console Operator
This Console operator lets you see the new group indexes assigned to your data.
Drag and drop another Console operator onto the Data Workflow canvas.
Configure the operator's Info window as follows:
Setting
Value
Category
Console
Label
Index Group
Connect the output port (right) of the
Index GroupCreate Field operator to the input port (left) of theIndex GroupConsole operator.
Configure the Size Operator
To split your data into groups of 50, you must determine how many total groups you'll have. The first step is to determine the size of your data table using a Size operator.
Drag and drop a Size operator onto the Data Workflow canvas.
Configure the operator's Info window as follows:
Setting
Value
Category
Size
Label
Total Size of Array
Connect the output port (right) of the
dtFortuneFiveInput operator to the input port (left) of theTotal Size of ArraySize operator.
Configure the Second Formula Operator
Next, you must divide the size of your table by the intended size of your groups. In this case, we want each group to store 50 pieces of data. So, you'll use the formula =INT(A/50). Here, A refers to the data passed through the operator's input port. And =INT turns the resulting value into an integer. You'll want an integer because you'll always have a whole number of indexes.
Drag and drop a Formula operator onto the Data Workflow canvas.
Configure the operator's Info window as follows:
Setting
Value
Category
Formula Value
Label
Grouped Index
Formula/Expression
=INT(A/50)
Connect the output port (right) of the
Total Size of ArraySize operator to the input port (left) of theGrouped IndexFormula operator.
Configure the Third Formula Operator
Just like in a simple looping Data Workflow, you need to construct a way to know if there is more data to process or if you've reached the end of your data set. You'll use a Formula operator with the formula =CONCATENATE(A,"<=",_arg) to do that. Here, A is the value in your indexLoopBulk Hidden component. And _arg is the value found by your groupedIndex Formula operator. Later, you'll use a Decision operator to determine whether this statement is true.
Drag and drop another Formula operator onto the Data Workflow canvas.
Configure the operator's Info window as follows:
Setting
Value
Category
Formula Value
Label
Decision Argument
Formula/Expression
=CONCATENATE(A,"<=",_arg)
Connect the output port (right) of the
indexLoopBulkInput operator to the input port (left) of theDecision ArgumentFormula operator.Connect the output port (right) of the
Grouped IndexFormula operator to the argument port (top) of theDecision ArgumentFormula operator.
Configure the Third Console Operator
This Console operator lets you view the result of your Decision Argument Formula operator.
Drag and drop another Console operator onto your Data Workflow canvas.
Configure the operator's Info window as follows:
Setting
Value
Category
Console
Label
Index Argument
Connect the output port (right) of the
Decision ArgumentFormula operator to the input port (left) of theIndex ArgumentConsole operator.
Configure the Decision Operator
The Decision operator determines whether there are more submissions to create by evaluating the expression from your Decision Argument Formula operator. If the expression is true, the Decision operator passes your data through the upper output port. If false, it passes the data through the lower output port. Here, your Create Field operator provides the input, passing data from your dtFortuneFive Data Table component, and the Decision Argument Formula operator provides the argument.
Let’s review why the Decision operator determines whether the statement A <= _arg is true. You need a way to tell your Data Workflow when to stop looping. The loop should end when there are no more rows or, in this case, no more batches to process. The expression A <= _arg checks whether the number stored in the index Hidden component is less than the total number of grouped indexes.
After the first loop, the value in the indexLoopBulk Hidden component is 1, so the next loop processes the second group (index 1). The <= operation ensures that any leftover rows that do not fit evenly into batches of 50 are included in the final loop. Once the statement evaluates to false, the Decision operator stops the Data Workflow, providing a clear end condition.
Drag and drop a Decision operator onto the Data Workflow canvas.
Configure the operator's Info window as follows:
Setting
Value
Category
Decision
Input List
Condition
_arg
Connect the output port (right) of the
Index GroupCreate Field operator to the input port (left) of the Decision operator.Connect the output port (right) of the
Decision ArgumentFormula operator to the argument port (top) of the Decision operator.
Configure the Convert Value Operator
Next, we want to filter the data based on the index group currently being processed. You’ll reference that index group number by converting the value in your indexLoopBulk Hidden component to a number using a Convert Value operator.
Drag and drop a Convert Value operator onto the Data Workflow canvas.
Configure the operator's Info window as follows:
Setting
Value
Category
Convert to Value
Label
Index to Number
Cast To
Number
Connect the output port (right) of the
indexLoopBulkInput operator to the input port (left) of theIndex to NumberConvert Value operator.
Configure the Filter Operator
Next, add a Filter operator to isolate the data in the current index group.
Drag and drop a Filter operator onto the Data Workflow canvas.
Configure the operator's Info window as follows:
Setting
Value
Category
Filter
Label
indexGrp=_arg
Do Not Sanitize Formula
(checked)Expression
indexGrp=_arg
Connect the output port (right) of the Decision operator to the input port (left) of the
indexGrp=_argFilter operator.Connect the output port (right) of the
Index to NumberConvert Value operator to the argument port (top) of theindexGrp=_argFilter operator.Set the expression to
indexGrp = _arg. Matching data passes through the Filter operator’s upper output port, and non-matching data passes through the lower output port.Click Save Component.
Configure the Second Hidden Component
Before configuring the rest of the Data Workflow, add a Hidden component to store each group of data retrieved by the Filter operator. The loop overwrites it each time, so it only contains the data for the group currently being processed.
Drag and drop a Hidden component onto your canvas, placing it below the
dwfLoopGroupData Workflow component.In the Property ID and Label Text fields, enter
selectedGroup.Click Save Component.
Update the First Data Workflow Component
Now that you have a Hidden component to store your output, let's add that to your Data Workflow. Doing so tells your Filter operator where to store the data it retrieves. You'll later reference this data in a separate Data Workflow. While the first Data Workflow manages your loop, the second one creates your submissions.
Hover over the
dwfLoopGroupData Workflow component.Click Settings to open the Data workflow component’s configuration drawer.
Configure the Second Output Operator
This Output operator stores the final results from your Filter operator.
Drag and drop a Output operator onto the Data Workflow canvas.
Configure the operator's Info window as follows:
Setting
Value
Category
Output
Component
selectedGroup
Action
value
Connect the upper output port (right) of the
indexGrp=_argFilter operator to the input port (left) of theselectedGroupOutput operator.
Configure the Fourth Console Operator
This Console operator displays the data separated by the Filter operator and passed to the selectedGroup Hidden component.
Drag and drop another Console operator onto your Data Workflow canvas.
Configure the operator's Info window as follows:
Setting
Value
Category
Console
Label
Rows
Connect the upper output port (right) of the
indexGrp=_argFilter operator to the input port (left) of theRowsConsole operator.Click Save Component.
Configure the Second Data Workflow Component
Now that you have your loop configured, you can set up a Data Workflow to create your submissions.
This article is focused on the looping aspect of a Data Workflow. So, we won't build the entire logic to create submissions. Instead, we'll focus on what you need in this second Data Workflow so your loop runs.
Drag and drop another Data Workflow component onto your canvas, placing it below the
selectedGroupHidden component.In the Property ID and Canvas Label Text fields, enter
dwfOperationGroup.
Configure the Input Operator
This Input operator brings in the data stored in your selectedGroup Hidden component. When creating your submissions, you’ll reference this data instead of your larger data table because this Hidden component only stores the data for one group of 50 entries at a time.
Drag and drop an Input operator onto the Data Workflow canvas.
Configure the operator's Info window as follows:
Setting
Value
Category
Input
Component
selectedGroup
Required
Yes
Source
Default
Configure the Console Operator
This is the only Console operator you'll add in this Data Workflow. This Console operator lets you view the data brought into your Data Workflow from the selectedGroup Hidden component.
Drag and drop a Console operator onto your Data Workflow canvas.
Configure the operator's Info window as follows:
Setting
Value
Category
Console
Label
Create Module Submissions
Connect the output port (right) of the
selectedGroupInput operator to the input port (left) of theCreate Module SubmissionsConsole operator.
Configure the Output Operator
Next, you'll add an Output operator to run your first Data Workflow again once your submissions are created.
Drag and drop an Output operator onto the Data Workflow canvas.
Configure the operator's Info window as follows:
Setting
Value
Category
Output
Component
dwfLoopGroup
Action
trigger
Connect the output port (right) of the
selectedGroupInput operator to the input port (left) of thedwfLoopGroupOutput operator..png)
Click Save Component.
Update the First Data Workflow Component
Now that you have a Data Workflow configured to run your operation, update your first Data Workflow to trigger it. In this step, you’ll also add a way to stop your loop once you've created all of your submissions.
Hover over the
dwfLoopGroupData Workflow component.Click Settings to open the Data workflow component’s configuration drawer.
Configure the Third Output Operator
You'll configure another Output operator to trigger the second Data Workflow to run.
Drag and drop another Output operator onto your Data Workflow canvas.
Configure the operator's Info window as follows:
Setting
Value
Category
Output
Component
dwfOperationGroup
Action
trigger
Connect the upper output port (right) of the
indexGrp=_argFilter operator to the input port (left) of thedwfOperationGroupOutput operator.
Configure the Fourth Output Operator
Remember, your Decision operator knows whether more submissions need to be created. If there are not more submissions to be created, the Decision operator passes data through its lower output port. So, let's add an Output operator to that port to stop the looping process.
Drag and drop another Output operator onto the Data Workflow canvas.
Configure the operator's Info window as follows:
Setting
Value
Category
Output
Component
_self
Action
value
Connect the lower output port (right) of the Decision operator to the input port (left) of the
_selfOutput operator.Click Save Component.
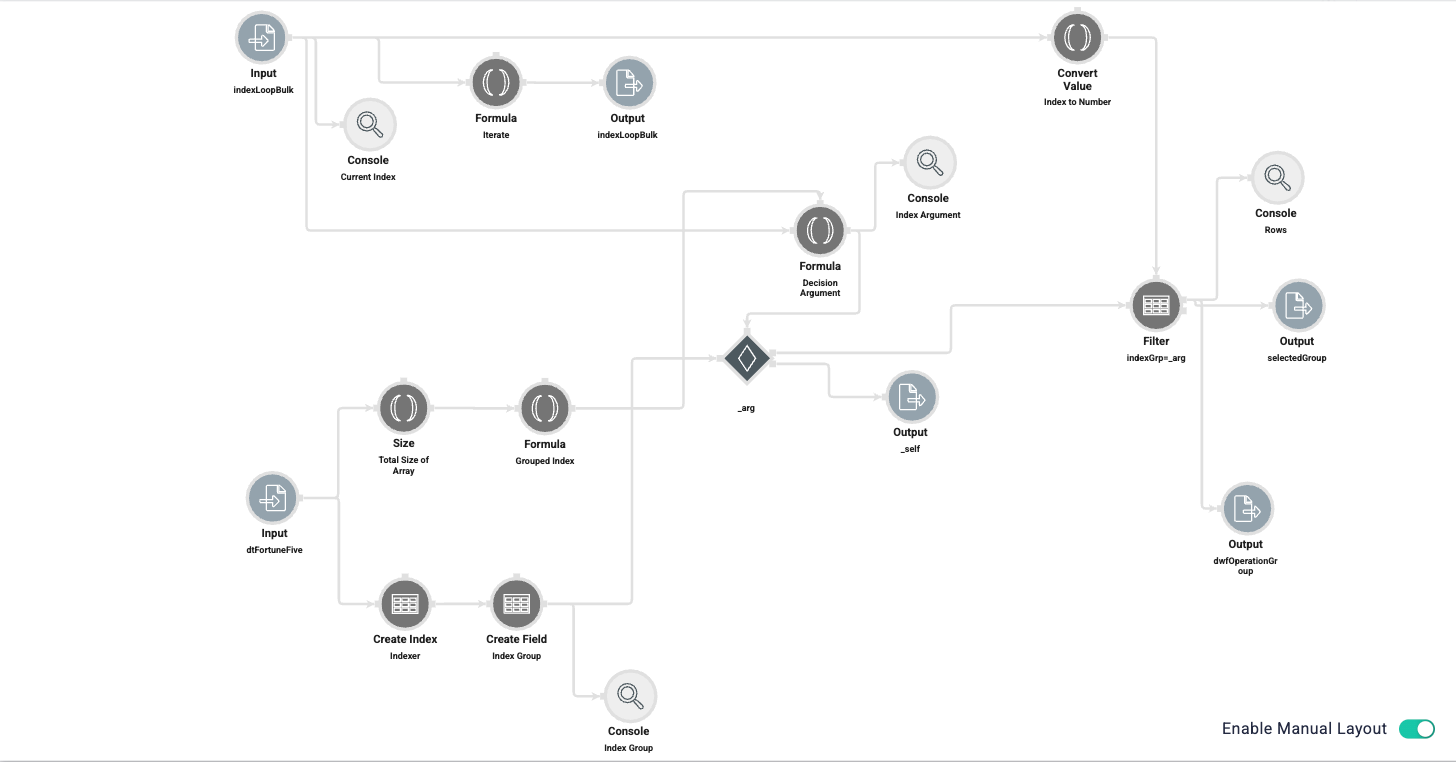
The image below displays the completed dwfLoopGroup Data Workflow:
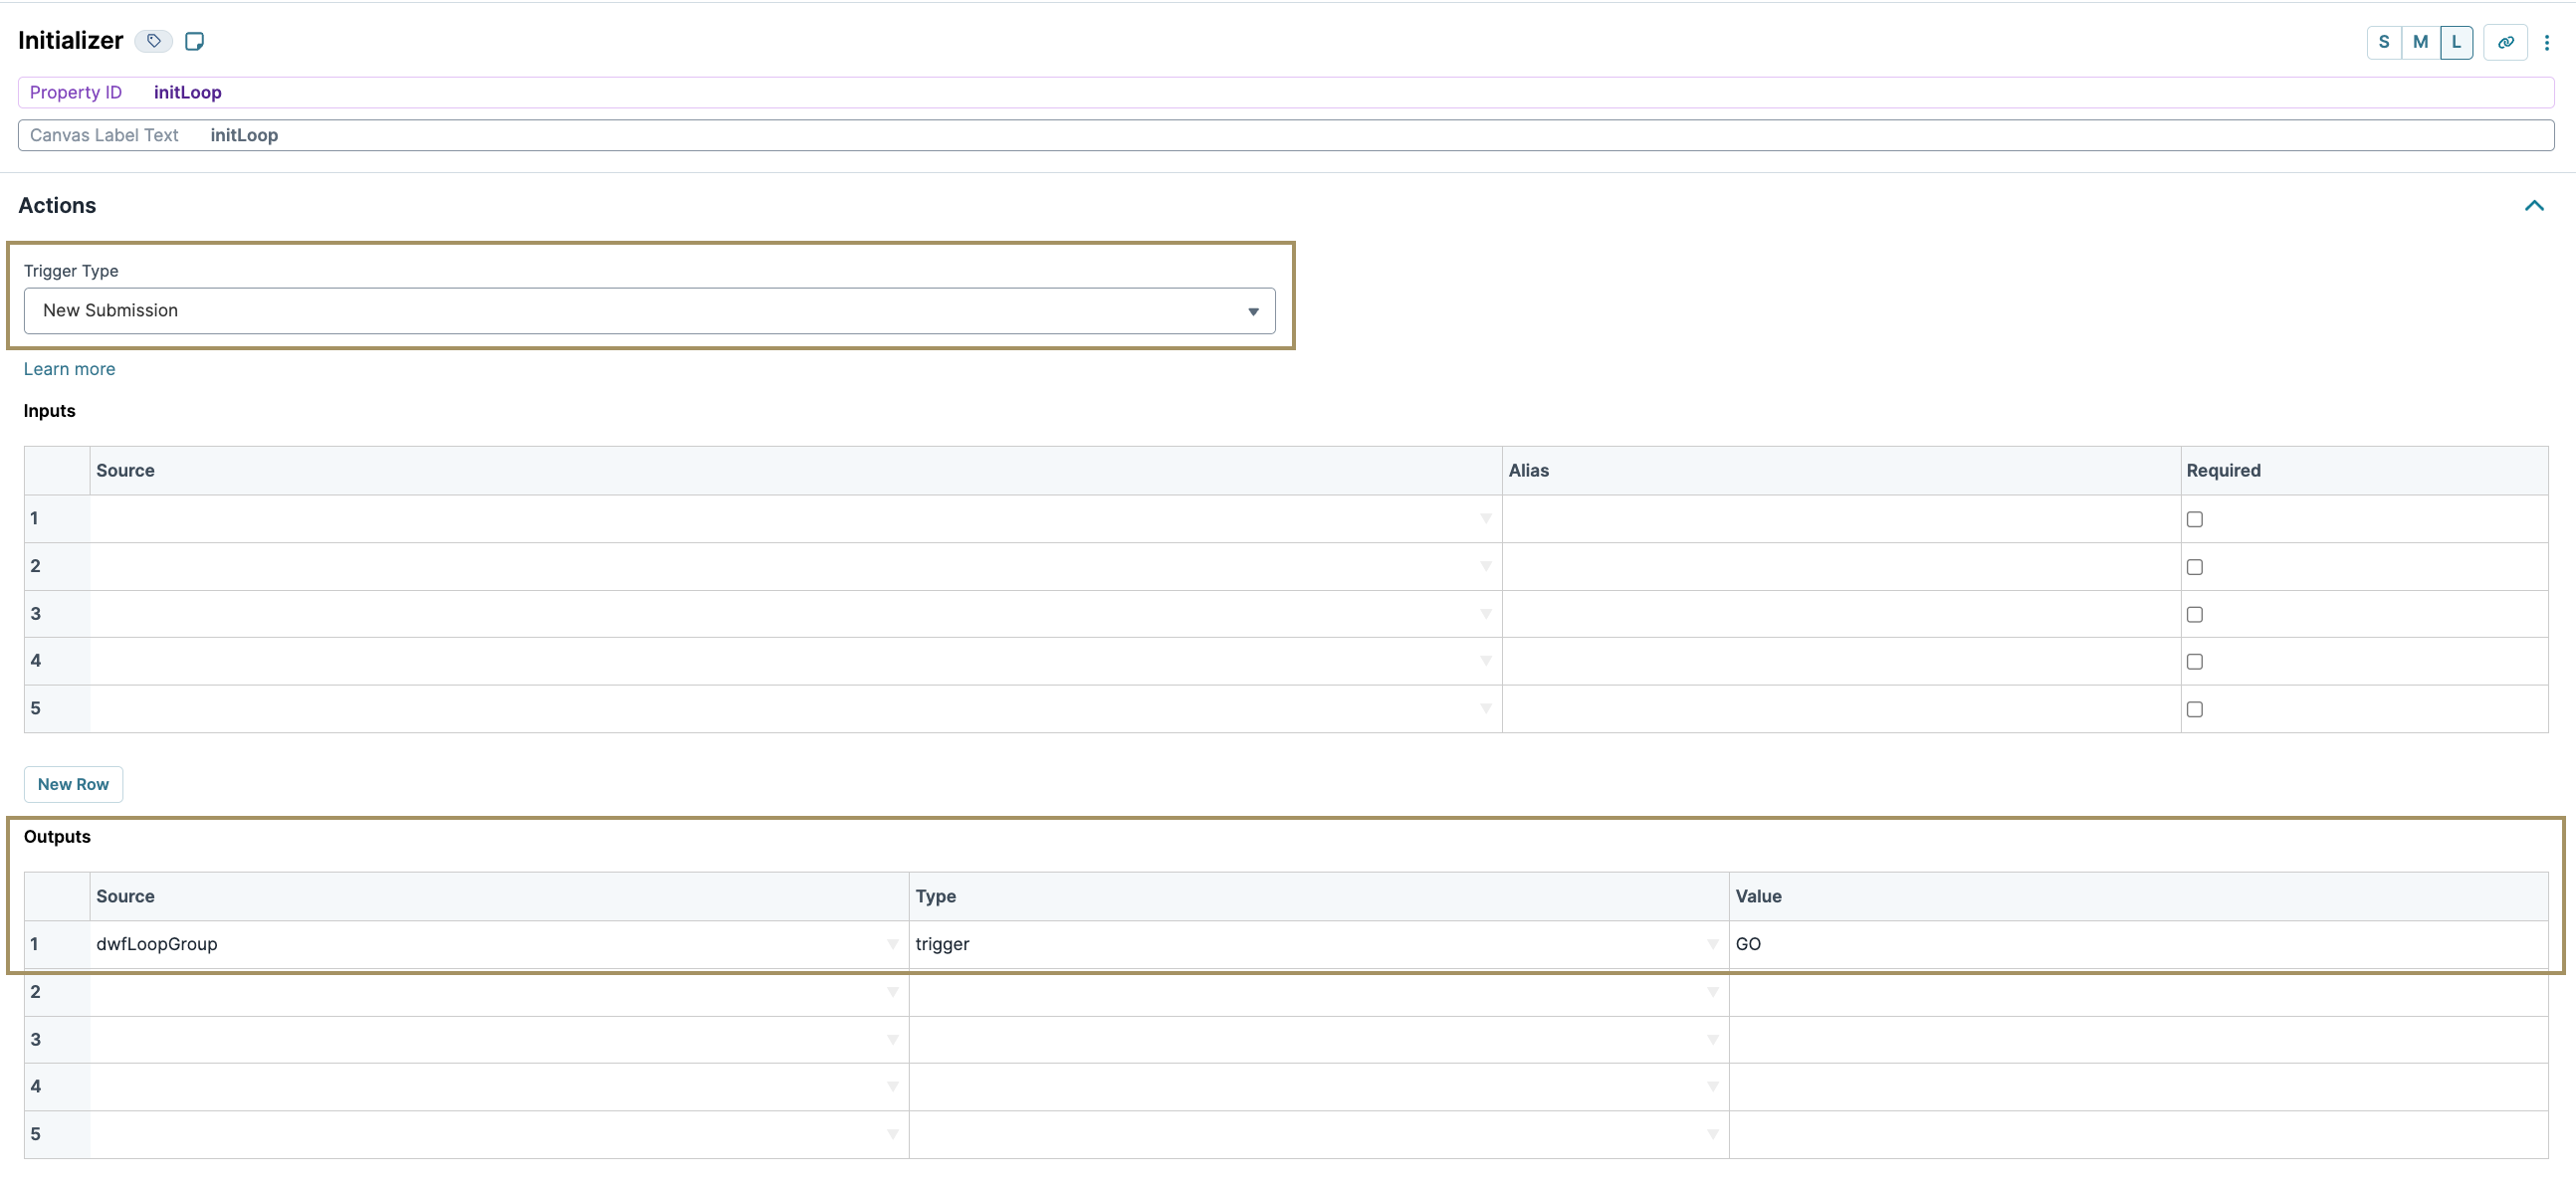
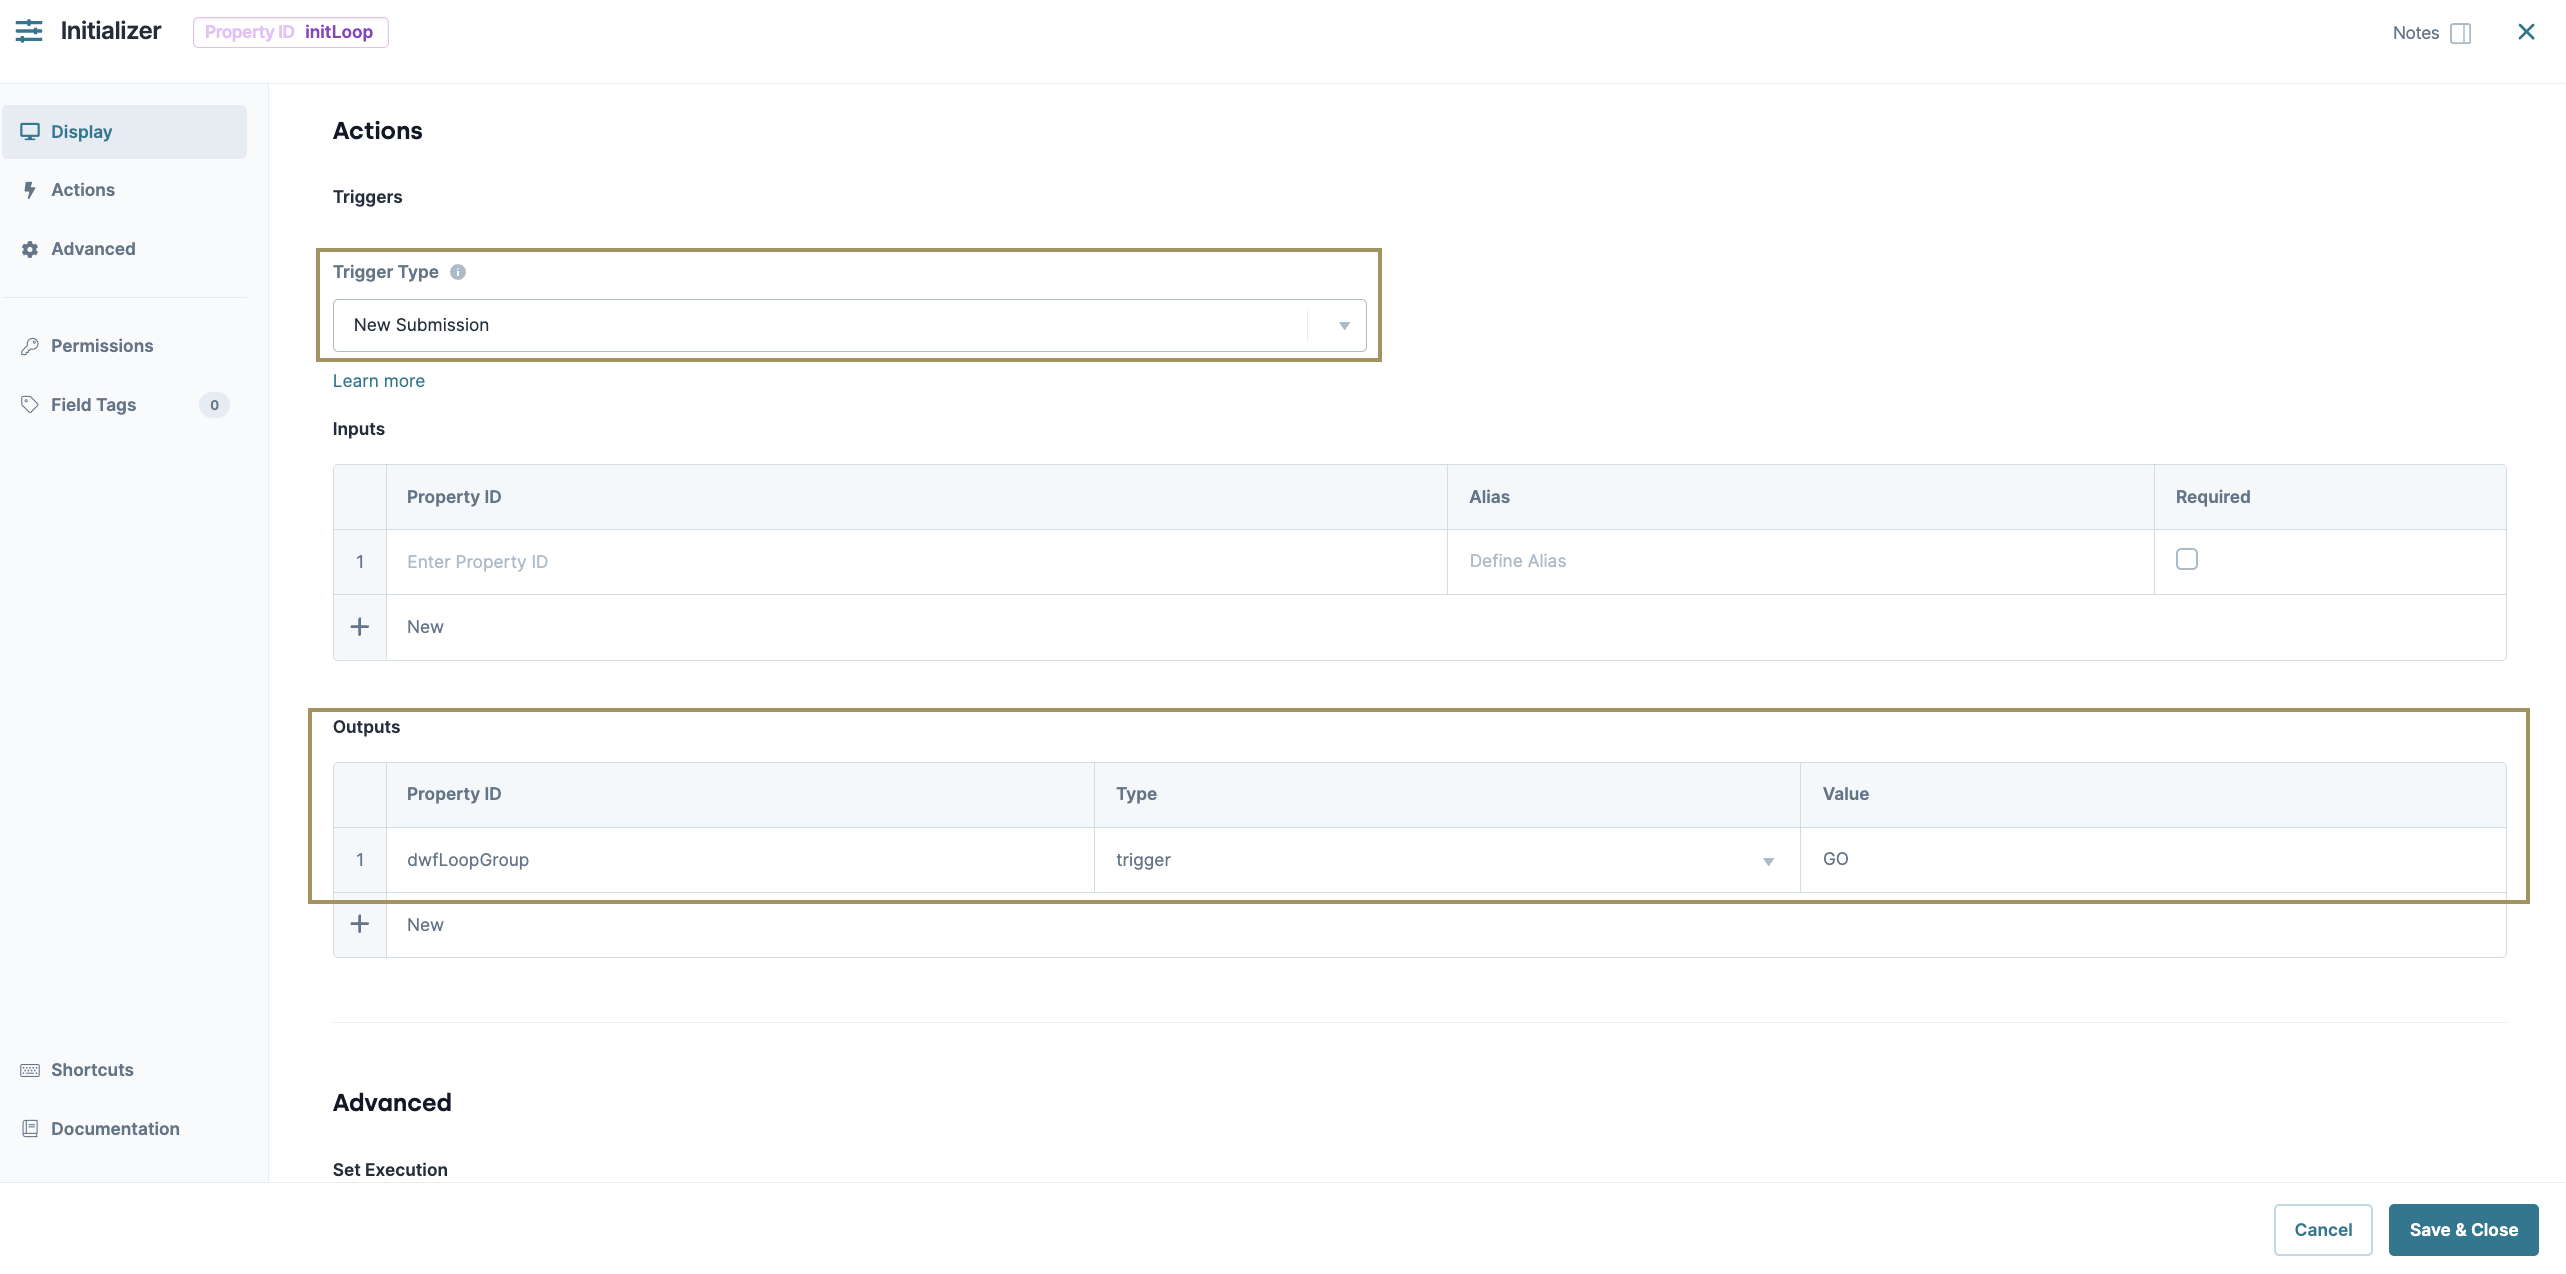
Configure the Initializer Component
Lastly, let's add an Initializer component to begin the entire operation. You'll set this component to trigger your dwfLoopGroup Data Workflow.
Drag and drop an Initializer component onto your canvas, placing it below the
dtFortuneFiveData Table component.In the Property ID and Canvas Label Text fields, enter
initLoop.From the Trigger Type drop-down, select New Submission.
In the Outputs table, enter the following:
Source
Type
Value
dwfLoopGroup
trigger
GO
Click Save Component.
Save your module.
Here’s how the completed module looks in the Module Builder
Preview your module in Express View and open the DevTools Console. You'll see a lot of activity from your various Console operators, suggesting your loop is working correctly. Let's look at some crucial points.
First, you'll see your Index Group Console operator as your Data Workflow assigns the index group. So, the first 50 items display an indexGrp of 0, the next 50 display an indexGrp of 1, and so on.
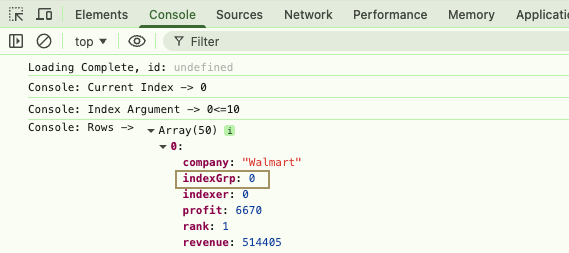
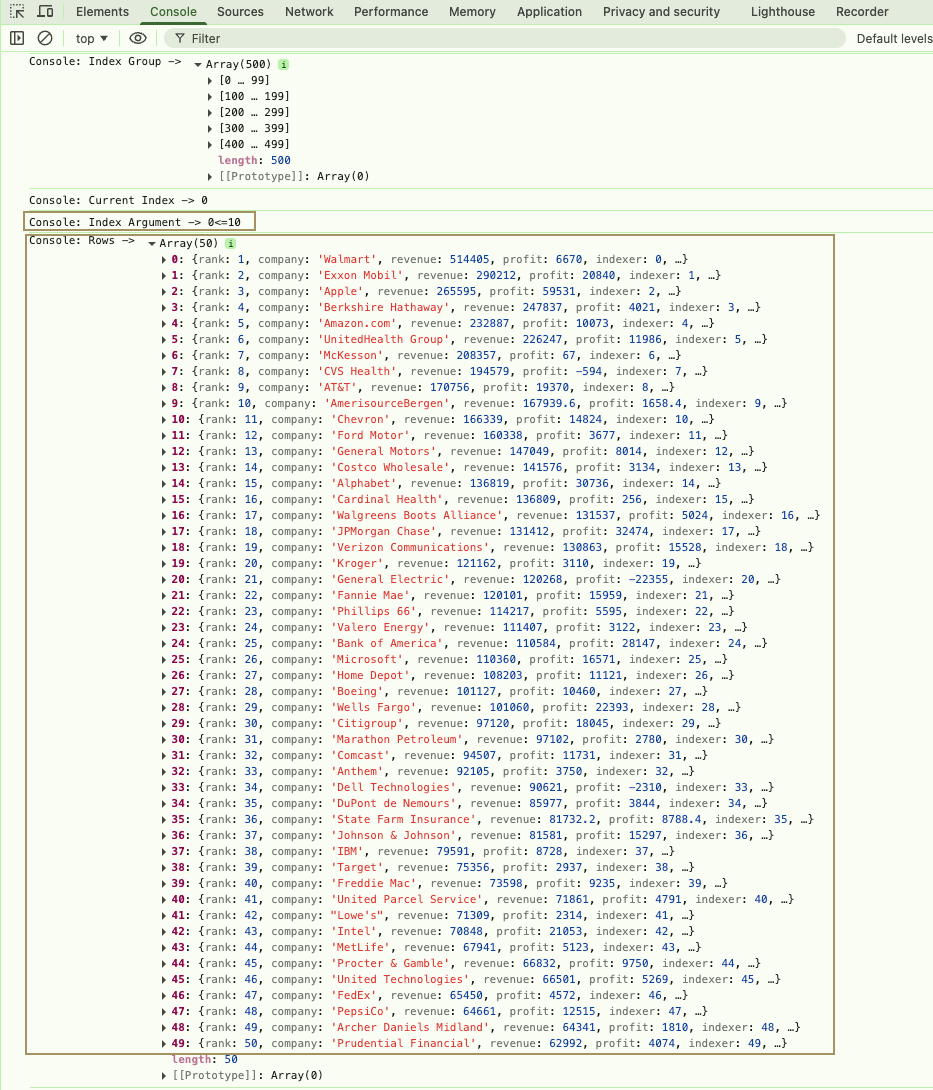
From there, you'll see your Current Index Console operator. This operator displays which indexGrp is being processed. In the below image, you'll see the current indexGrp is 0. Next, you'll see your Index Argument and Rows Console operators. These operators show how your Data Workflow checked to see if there was more data to process, and the data as it's passed through your Filter operator. Here, you'll only see 50 pieces of data at a time because you're only seeing each group as it passes through this portion of your Data Workflow.
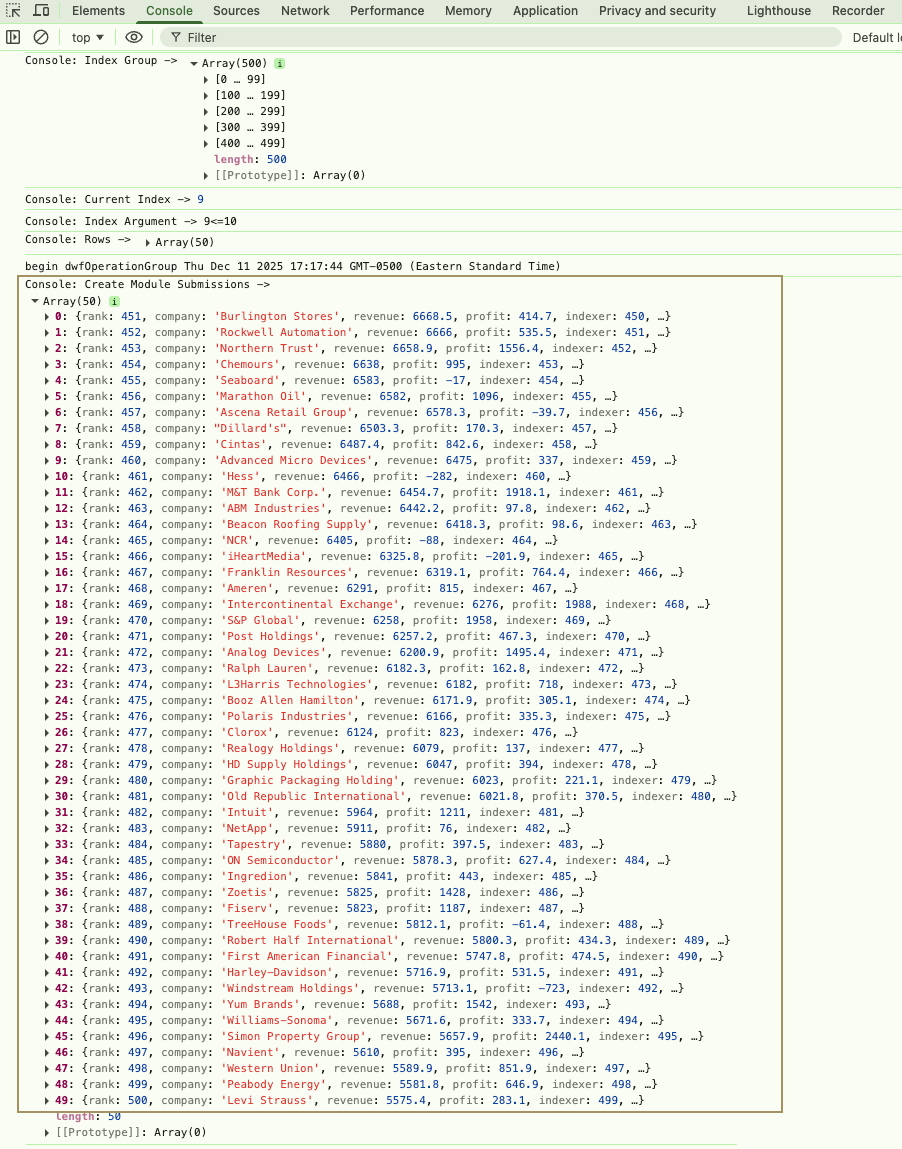
Lastly, you'll see your Create Module Submissions Console operator displaying that your batch of data has made it to your second Data Workflow. You'll see each of these steps repeated until all your data has been processed.
You’ll typically create a batch loop in a Data Workflow to act on a large set of data simultaneously. Imagine you’re working with a large data set that must be converted into Unqork submissions. To accomplish this task, you’ll use one of Unqork’s internal APIs. But the Create Submissions API used to create each submission has a limit. You can only create up to 50 submissions per call. So, you must group your data into batches of 50 before sending it through the API. To handle that batching process, you’ll build a Batch Loop Data Workflow.
What Is a Batch Loop?
A Batch Loop Data Workflow separates your data into groups of a certain size. You can set the number of items you want in each batch while configuring your Data Workflow. Then, the Data Workflow separates your data and assigns each group its own index. This batch index is what the looping Data Workflow references.
These instructions assume you’re working in a new module that has been opened, saved, and given a title.
Configuration
In this how-to guide, you’ll use the Create Submissions API with a data set of Fortune 500 companies that includes each company’s name, rank, revenue, and profit. You want to convert each company into its own Unqork submission. The most efficient way to achieve this task is to process the data in batches using an API call. First, you’ll configure one Data Workflow to split the data into groups of 50 companies. Then, you’ll configure a second Data Workflow to send each batch of 50 through a Create Submissions API call.
Configure the Data Table Component
The Data Table component you'll use in this example is quite large. Typically, you would use a Batch Loop Data Workflow to handle submissions of this size. To simulate this scenario, the sample data table contains 500 rows. For convenience, we’ve provided a version you can copy directly into your module: https://training.unqork.io/#/form/6086c37bb08e7e0a26942e1f/edit.
Open the following module: https://training.unqork.io/#/form/6086c37bb08e7e0a26942e1f/edit.
Hover over the
dtFortuneFiveData Table component and click Copy from the toolbar.Navigate to your module.
At the top right of your module, click the
(ellipsis) button.Select Paste Module Definition.
In the Module Definition field, paste the copied definition and click Paste. The
dtFortuneFiveData Table component has now been added to your canvas.Open the Data Table component to verify that the data is copied successfully. Your Data Table component should have 500 rows.
Configure the Hidden Component
Each row in your table has an index. In a simple loop, you reference this row index as the loop runs. In a batch loop, one index represents a group of rows, allowing the Data Workflow to process multiple records simultaneously.
Drag and drop a Hidden component onto your canvas, placing it below the
dtFortuneFiveData Table component.In the Property ID and Canvas Label Text fields, enter
indexLoopBulk.In the Default Value field, enter
0.Set the Hidden component’s Default Value to
0so you can increment it with each batch.Click Save & Close.
Configure the Data Workflow Component
Next, you’ll begin building the loop using a Data Workflow component. The configuration might seem complex, but the purpose of each operator is explained as added.
Drag and drop a Data Workflow component onto your canvas, placing it below the
indexLoopBulkHidden component.In the Canvas Label Text and Property Name fields, enter
dwfLoopGroup.
Configure the First Input Operator
This Input operator references your indexLoopBulk Hidden component so your Data Workflow knows which group of data needs to be processed next.
Drag and drop an Input operator onto the Data Workflow canvas.
Configure the operator's Info window as follows:
Setting
Value
Category
Input
Component
indexLoopBulk
Required
No
Source
Default
Configure the First Console Operator
You'll add several Console operators during this configuration so you can view the process.
Drag and drop a Console operator onto the Data Workflow canvas.
Configure the operator's Info window as follows:
Setting
Value
Category
Console
Label
Current Index
Connect the output port (right) of the
indexLoopBulkInput operator to the input port (left) of theCurrent IndexConsole operator.
Configure the First Formula Operator
This Formula operator adds 1 to the index of the previous index group processed. That way, your Data Workflow knows that it's processed each group when the loop repeats. The formula =SUM(A,1) takes the value passed to the operator (A) and adds 1 to it. The A value acts as an alias for other values entering an operator's input port.
Drag and drop a Formula operator onto your Data Workflow canvas.
Configure the operator's Info window as follows:
Setting
Value
Category
Formula Value
Label
Iterate
Formula/Expression
=SUM(A,1)
Connect the output port (right) of the Input operator to the input port (left) of the
IterateFormula operator.
Configure the First Output Operator
This Output operator replaces the value in your indexLoopBulk Hidden component with the result of your Formula operator. Without this step, your Data Workflow would continue to process the index group 0, because that is the Hidden component’s Default Value. Now, with each loop of the Data Workflow, the value passed into the indexLoopBulk Input operator will increment accordingly.
Drag and drop an Output operator onto the Data Workflow canvas.
Configure the operator's Info window as follows:
Setting
Value
Category
Output
Component
indexLoopBulk
Action
value
Connect the output port (right) of the
IterateFormula operator to the input port (left) of theindexLoopBulkOutput operator.
Configure the Second Input Operator
This Input operator brings the data into the Data Workflow.
Drag and drop another Input operator onto the Data Workflow canvas.
Configure the operator's Info window as follows:
Setting
Value
Category
Input
Component
dtFortuneFive
Required
No
Source
Default
Configure the Create Index Operator
When processing items individually, you can use the index of each row in your table. To process items in groups, a new index is required to represent a batch. Creating this new index requires a few operators. To begin, let’s create an index that you can manipulate by adding a Create Index operator.
Drag and drop a Create Index operator onto the Data Workflow canvas.
Configure the operator's Info window as follows:
Setting
Value
Category
Create Index
Label
Indexer
Index Name
indexer
Starting Index
0
Keys
Connect the output port (right) of the
dtFortuneFiveInput operator to the input port (left) of theIndexerCreate Index operator.
Configure the Create Field Operator
Once your data has passed through the Create Index operator, each row now has a new field called indexer. That way, you have a version of your index to work with. So, let's assign each row in your table to a group. You'll store this index assignment in a new field using a Create Field operator.
Remember, each group can hold 50 items. So, you'll divide the value in the indexer field by 50. You'll also round that value down to the nearest integer, so the same value is assigned to 50 items. You'll store the result of this equation in a new field called indexGrp. So, your complete formula is indexGrp=INT(indexer/50).
Drag and drop a Create Field operator onto the Data Workflow canvas.
Configure the operator's Info window as follows:
Setting
Value
Category
Formula
Label
Index Group
Do Not Sanitize Formula
(checked)Preserve Argument Type
(unchecked)Field 1
indexGrp=INT(indexer/50)
Field 2
Field 3
Field 4
Field 5
Connect the output port (right) of the
indexerCreate Index operator to the input port (left) of theIndex GroupCreate Field operator.
Configure the Second Console Operator
This Console operator lets you see the new group indexes assigned to your data.
Drag and drop another Console operator onto the Data Workflow canvas.
Configure the operator's Info window as follows:
Setting
Value
Category
Console
Label
Index Group
Connect the output port (right) of the
Index GroupCreate Field operator to the input port (left) of theIndex GroupConsole operator.
Configure the Size Operator
To split your data into groups of 50, you must determine how many total groups you'll have. The first step is to determine the size of your data table using a Size operator.
Drag and drop a Size operator onto the Data Workflow canvas.
Configure the operator's Info window as follows:
Setting
Value
Category
Size
Label
Total Size of Array
Connect the output port (right) of the
dtFortuneFiveInput operator to the input port (left) of theTotal Size of ArraySize operator.
Configure the Second Formula Operator
Next, you must divide the size of your table by the intended size of your groups. In this case, we want each group to store 50 pieces of data. So, you'll use the formula =INT(A/50). Here, A refers to the data passed through the operator's input port. And =INT turns the resulting value into an integer. You'll want an integer because you'll always have a whole number of indexes.
Drag and drop a Formula operator onto the Data Workflow canvas.
Configure the operator's Info window as follows:
Setting
Value
Category
Formula Value
Label
Grouped Index
Formula/Expression
=INT(A/50)
Connect the output port (right) of the
Total Size of ArraySize operator to the input port (left) of theGrouped IndexFormula operator.
Configure the Third Formula Operator
Just like in a simple looping Data Workflow, you need to construct a way to know if there is more data to process or if you've reached the end of your data set. You'll use a Formula operator with the formula =CONCATENATE(A,"<=",_arg) to do that. Here, A is the value in your indexLoopBulk Hidden component. And _arg is the value found by your groupedIndex Formula operator. Later, you'll use a Decision operator to determine whether this statement is true.
Drag and drop another Formula operator onto the Data Workflow canvas.
Configure the operator's Info window as follows:
Setting
Value
Category
Formula Value
Label
Decision Argument
Formula/Expression
=CONCATENATE(A,"<=",_arg)
Connect the output port (right) of the
indexLoopBulkInput operator to the input port (left) of theDecision ArgumentFormula operator.Connect the output port (right) of the
Grouped IndexFormula operator to the argument port (top) of theDecision ArgumentFormula operator.
Configure the Third Console Operator
This Console operator lets you view the result of your Decision Argument Formula operator.
Drag and drop another Console operator onto your Data Workflow canvas.
Configure the operator's Info window as follows:
Setting
Value
Category
Console
Label
Index Argument
Connect the output port (right) of the
Decision ArgumentFormula operator to the input port (left) of theIndex ArgumentConsole operator.
Configure the Decision Operator
The Decision operator determines whether there are more submissions to create by evaluating the expression from your Decision Argument Formula operator. If the expression is true, the Decision operator passes your data through the upper output port. If false, it passes the data through the lower output port. Here, your Create Field operator provides the input, passing data from your dtFortuneFive Data Table component, and the Decision Argument Formula operator provides the argument.
Let’s review why the Decision operator determines whether the statement A <= _arg is true. You need a way to tell your Data Workflow when to stop looping. The loop should end when there are no more rows or, in this case, no more batches to process. The expression A <= _arg checks whether the number stored in the index Hidden component is less than the total number of grouped indexes.
After the first loop, the value in the indexLoopBulk Hidden component is 1, so the next loop processes the second group (index 1). The <= operation ensures that any leftover rows that do not fit evenly into batches of 50 are included in the final loop. Once the statement evaluates to false, the Decision operator stops the Data Workflow, providing a clear end condition.
Drag and drop a Decision operator onto the Data Workflow canvas.
Configure the operator's Info window as follows:
Setting
Value
Category
Decision
Input List
Condition
_arg
Connect the output port (right) of the
Index GroupCreate Field operator to the input port (left) of the Decision operator.Connect the output port (right) of the
Decision ArgumentFormula operator to the argument port (top) of the Decision operator.
Configure the Convert Value Operator
Next, we want to filter the data based on the index group currently being processed. You’ll reference that index group number by converting the value in your indexLoopBulk Hidden component to a number using a Convert Value operator.
Drag and drop a Convert Value operator onto the Data Workflow canvas.
Configure the operator's Info window as follows:
Setting
Value
Category
Convert to Value
Label
Index to Number
Cast To
Number
Connect the output port (right) of the
indexLoopBulkInput operator to the input port (left) of theIndex to NumberConvert Value operator.
Configure the Filter Operator
Next, add the Filter operator to isolate the data in the current index group.
Drag and drop a Filter operator onto the Data Workflow canvas.
Configure the operator's Info window as follows:
Setting
Value
Category
Filter
Label
indexGrp=_arg
Do Not Sanitize Formula
(checked)Expression
indexGrp=_arg
Connect the output port (right) of the Decision operator to the input port (left) of the
indexGrp=_argFilter operator.Connect the output port (right) of the
Index to NumberConvert Value operator to the argument port (top) of theindexGrp=_argFilter operator.Set the expression to
indexGrp = _arg. Matching data passes through the Filter operator’s upper output port, and non-matching data passes through the lower output port.Click Save.
Configure the Second Hidden Component
Before configuring the rest of the Data Workflow, add a Hidden component to store each group of data retrieved by the Filter operator. The loop overwrites it each time, so it only contains the data for the group currently being processed.
Drag and drop a Hidden component onto your canvas, placing it below the
dwfLoopGroupData Workflow component.In the Property ID and Canvas Label Text fields, enter
selectedGroup.Click Save & Close.
Update the First Data Workflow Component
Now that you have a Hidden component to store your output, let's add that to your Data Workflow. Doing so tells your Filter operator where to store the data it retrieves. You'll later reference this data in a separate Data Workflow. While the first Data Workflow manages your loop, the second one creates your submissions.
Hover over the
dwfLoopGroupData Workflow component.Click Settings to open the Data workflow component’s configuration drawer.
Configure the Second Output Operator
This Output operator stores the final results from your Filter operator.
Drag and drop a Output operator onto the Data Workflow canvas.
Configure the operator's Info window as follows:
Setting
Value
Category
Output
Component
selectedGroup
Action
value
Connect the upper output port (right) of the
indexGrp=_argFilter operator to the input port (left) of theselectedGroupOutput operator.
Configure the Fourth Console Operator
This Console operator displays the data separated by the Filter operator and passed to the selectedGroup Hidden component.
Drag and drop another Console operator onto your Data Workflow canvas.
Configure the operator's Info window as follows:
Setting
Value
Category
Console
Label
Rows
Connect the upper output port (right) of the
indexGrp=_argFilter operator to the input port (left) of theRowsConsole operator.Click Save.
Configure the Second Data Workflow Component
Now that you have your loop configured, you can set up a Data Workflow to create your submissions.
This article is focused on the looping aspect of a Data Workflow. So, we won't build the entire logic to create submissions. Instead, we'll focus on what you need in this second Data Workflow so your loop runs.
Drag and drop another Data Workflow component onto your canvas, placing it below the
selectedGroupHidden component.In the Canvas Label Text and Property Name fields, enter
dwfOperationGroup.
Configure the Input Operator
This Input operator brings in the data stored in your selectedGroup Hidden component. When creating your submissions, you’ll reference this data instead of your larger data table because this Hidden component only stores the data for one group of 50 entries at a time.
Drag and drop an Input operator onto the Data Workflow canvas.
Configure the operator's Info window as follows:
Setting
Value
Category
Input
Component
selectedGroup
Required
Yes
Source
Default
Configure the Console Operator
This is the only Console operator you'll add in this Data Workflow. This Console operator lets you view the data brought into your Data Workflow from the selectedGroup Hidden component.
Drag and drop a Console operator onto your Data Workflow canvas.
Configure the operator's Info window as follows:
Setting
Value
Category
Console
Label
Create Module Submissions
Connect the output port (right) of the
selectedGroupInput operator to the input port (left) of theCreate Module SubmissionsConsole operator.
Configure the Output Operator
Next, you'll add an Output operator to run your first Data Workflow again once your submissions are created.
Drag and drop an Output operator onto the Data Workflow canvas.
Configure the operator's Info window as follows:
Setting
Value
Category
Output
Component
dwfLoopGroup
Action
trigger
Connect the output port (right) of the
selectedGroupInput operator to the input port (left) of thedwfLoopGroupOutput operator.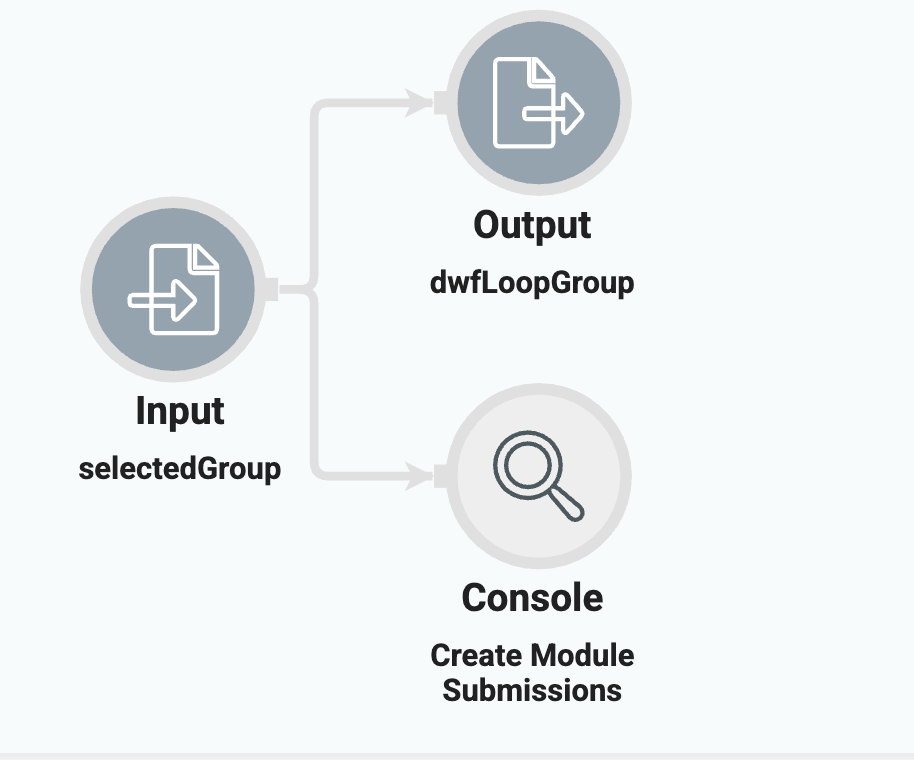
Click Save.
Update the First Data Workflow Component
Now that you have a Hidden component to store your output, let's add that to your Data Workflow. Doing so tells your Filter operator where to store the data it retrieves. You'll later reference this data in a separate Data Workflow. While the first Data Workflow manages your loop, the second one creates your submissions.
Hover over the
dwfLoopGroupData Workflow component.Click Settings to open the Data workflow component’s configuration drawer.
Configure the Third Output Operator
You'll configure another Output operator to trigger the second Data Workflow to run.
Drag and drop another Output operator onto your Data Workflow canvas.
Configure the operator's Info window as follows:
Setting
Value
Category
Output
Component
dwfOperationGroup
Action
trigger
Connect the upper output port (right) of the
indexGrp=_argFilter operator to the input port (left) of thedwfOperationGroupOutput operator.
Configure the Fourth Output Operator
Remember, your Decision operator knows whether more submissions need to be created. If there are not more submissions to be created, the Decision operator passes data through its lower output port. So, let's add an Output operator to that port to stop the looping process.
Drag and drop another Output operator onto the Data Workflow canvas.
Configure the operator's Info window as follows:
Setting
Value
Category
Output
Component
_self
Action
value
Connect the lower output port (right) of the Decision operator to the input port (left) of the
_selfOutput operator.Click Save.
The image below displays the completed dwfLoopGroup Data Workflow:
Configure the Initializer Component
Lastly, let's add an Initializer component to begin the entire operation. You'll set this component to trigger your dwfLoopGroup Data Workflow.
Drag and drop an Initializer component onto your canvas, placing it below the
dtFortuneFiveData Table component.In the Property ID and Canvas Label Text fields, enter
initLoop.From the Trigger Type drop-down, select New Submission.
In the Outputs table, enter the following:
Source
Type
Value
dwfLoopGroup
trigger
GO
Click Save & Close.
Save your module.
Here’s how the completed module looks in the Module Builder
.png)
Preview your module in Express View and open the DevTools Console. You'll see a lot of activity from your various Console operators, suggesting your loop is working correctly. Let's look at some crucial points.
First, you'll see your Index Group Console operator as your Data Workflow assigns the index group. So, the first 50 items display an indexGrp of 0, the next 50 display an indexGrp of 1, and so on.
From there, you'll see your Current Index Console operator. This operator displays which indexGrp is being processed. In the below image, you'll see the current indexGrp is 0. Next, you'll see your Index Argument and Rows Console operators. These operators show how your Data Workflow checked to see if there was more data to process, and the data as it's passed through your Filter operator. Here, you'll only see 50 pieces of data at a time because you're only seeing each group as it passes through this portion of your Data Workflow.
Lastly, you'll see your Create Module Submissions Console operator displaying that your batch of data has made it to your second Data Workflow. You'll see each of these steps repeated until all your data has been processed.