Overview
The Includes operator verifies that workflow data contains a specific value. If there's a match, the operator outputs true. If there is not a match, the operator outputs false. This functionality is similar to a Boolean logic check.
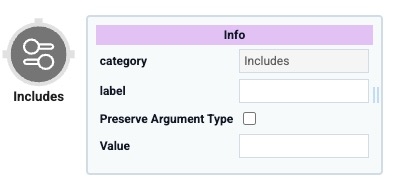
The Includes operator only works with a single value or an array. To process data from a table, use a Get or Col2Array operator to select a specific value or array.
You'll find the Includes operator under the Array group to the left of your Data Workflow canvas.
About the Info Window
Learn more about each setting in the Includes operator's Info window:
Setting | Description |
|---|---|
Category | Grayed out and non-adjustable setting indicating the operation type. |
Label | Sets the label for your operator, displaying below the operator on your Data Workflow canvas. This field is optional, but set a label if you use more than one of the same operator type. A label helps you identify your operators without opening any Info windows. |
Preserve Argument Type | When selected, this setting ensures the argument data type is respected when the operator executes. |
Value | The value the Includes operator locates from the data passed to it. If your data contains this value, the operator produces true as the output. If the data does not contain this value, the operator produces false as the output. |
Adding an Includes Operator
For this example, set up a Data Table component with a list of users and their roles. Then, use an Includes operator in a Data Workflow component to verify that a specific user has the role of administrator.
These instructions assume you have a new module open, saved, and with a title.
Configure the Data Table Component
First, configure a Data Table component with a list of users and their roles.
In the Module Builder, drag and drop a Data Table component onto your canvas.
In the Property ID field, enter dtUsers.
In the data table, enter the following:
A
B
1
userName
role
2
rmoose
architect
3
kbell
administrator
4
rgreen
authenticated
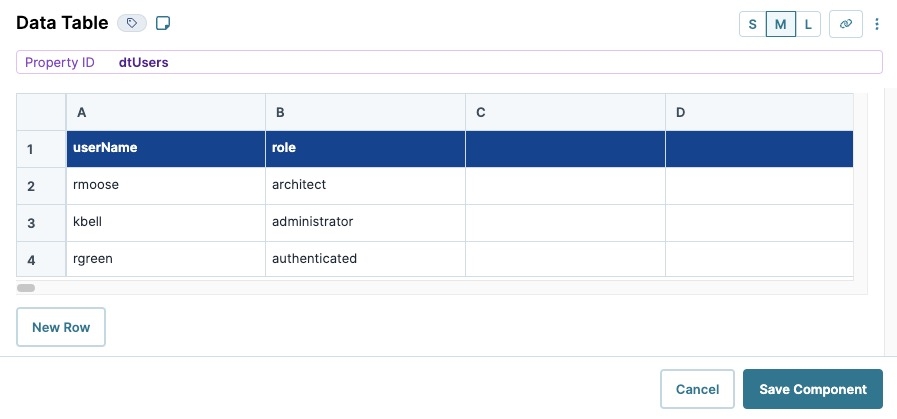
Click Save Component.
Configure the Data Workflow Component
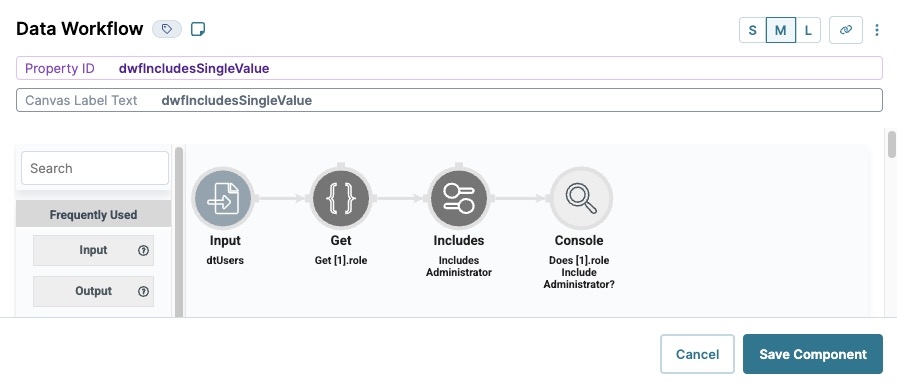
Now, let's configure the Data Workflow component that uses a Get operator to retrieve the role of the second user in your data table. Next, configure an Includes operator to verify that the data contains the administrator value. Finally, add a Console operator to view how the data is passed.
Drag and drop a Data Workflow component onto your canvas, placing it below the dtUsers Data Table component.
In the Property ID field, enter dwfIncludesSingleValue.
In the Canvas Label Text field, enter
dwfIncludesSingleValue.
Configure the Input Operator
Drag and drop an Input operator onto your Data Workflow canvas.
Configure the operator's Info window as follows:
Info
Category
Input
Component
dtUsers
Required
Yes
Source
Default
Configure the Get Operator
Drag and drop a Get operator onto your Data Workflow canvas.
Configure the operator's Info window as follows:
Info
Category
Get
Label
Get [1].role
Preserve Argument Type
☐ (unchecked)
Path
[1].role
Connect the output port (right) of the Input operator to the input port (left) of the Get operator.
Configure the Includes Operator
Drag and drop an Includes operator onto your Data Workflow canvas.
Configure the operator's Info window as follows:
Info
Category
Includes
Label
Includes Administrator
Preserve Argument Type
☐ (unchecked)
Value
administrator
Connect the output port (right) of the Get operator to the input port (left) of the Includes operator.
Configure the Console Operator
Drag and drop a Console operator onto your Data Workflow canvas.
Configure the operator's Info window as follows:
Info
Category
Console
Label
Does [1].role Include Administrator?
Connect the output port (right) of the Includes operator to the input port (left) of the Console operator.
Click Save Component.
Here's how the completed Data Workflow looks:
Configure the Initializer Component
Lastly, configure an Initializer component to trigger the Data Workflow.
Drag and drop an Initializer component onto your canvas, placing it above the dtUsers Data Table component.
In the Property ID field, enter initDwf.
In theCanvas Label Text, enter
initDwf.From the Trigger Type drop-down, select New Submission.
In the Outputs table, enter the following:
Source
Type
Value
1
dwfIncludesSingleValue
trigger
GO
Click Save Component.
Save your module.
Your completed module looks like the following:
.jpg)
Preview your module in Express View and open the DevTools Console. You'll see the Does [1].role Include Administrator? key displays a value of true.
.jpg)
Overview
The Includes operator verifies that workflow data contains a specific value. If there's a match, the operator outputs true. If there is not a match, the operator outputs false. This functionality is similar to a Boolean logic check.
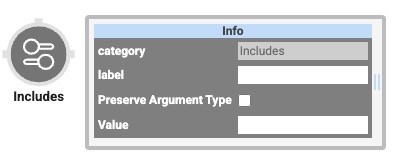
The Includes operator only works with a single value or an array. To process data from a table, use a Get or Col2Array operator to select a specific value or array.
You'll find the Includes operator under the Array group to the left of your Data Workflow canvas.
About the Info Window
Learn more about each setting in the Includes operator's Info window:
Setting | Description |
|---|---|
Category | Grayed out and non-adjustable setting indicating the operation type. |
Label | Sets the label for your operator, displaying below the operator on your Data Workflow canvas. This field is optional, but set a label if you use more than one of the same operator type. A label helps you identify your operators without opening any Info windows. |
Preserve Argument Type | When selected, this setting ensures the argument data type is respected when the operator executes. |
Value | The value the Includes operator locates from the data passed to it. If your data contains this value, the operator produces true as the output. If the data does not contain this value, the operator produces false as the output. |
Adding an Includes Operator
For this example, set up a Data Table component with a list of users and their roles. Then, use an Includes operator in a Data Workflow component to verify that a specific user has the role of administrator.
These instructions assume you have a new module open, saved, and with a title.
Configure the Data Table Component
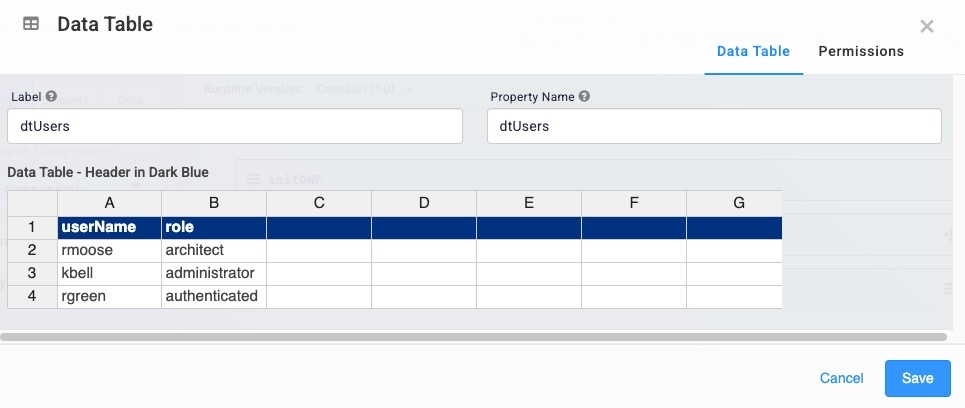
First, configure a Data Table component with a list of users and their roles.
In the Module Builder, drag and drop a Data Table component onto your canvas.
In the Label and PropertyName fields, enter
dtUsers.In the data table, enter the following:
A
B
1
userName
role
2
rmoose
architect
3
kbell
administrator
4
rgreen
authenticated
Click Save.
Configure the Data Workflow Component
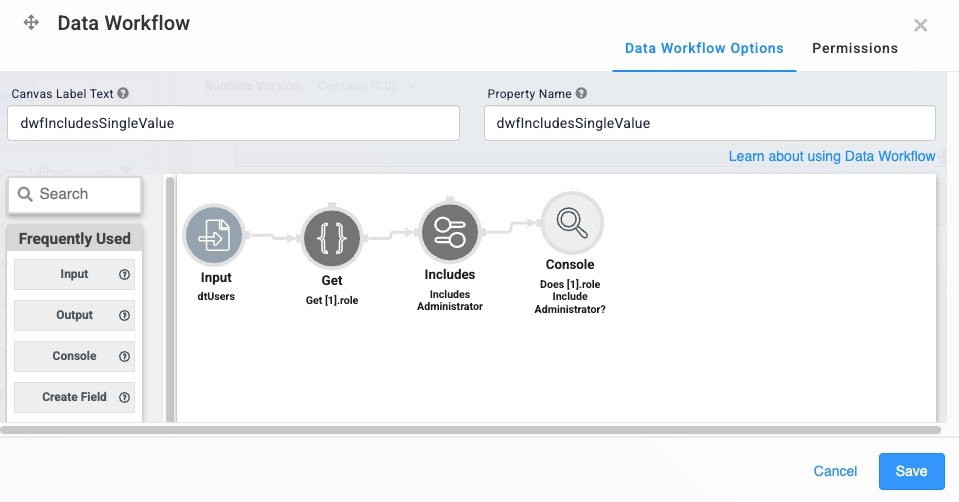
Now, let's configure the Data Workflow component that uses a Get operator to retrieve the role of the second user in your data table. Next, configure an Includes operator to verify that the data contains the administrator value. Finally, add a Console operator to view how the data is passed.
Drag and drop a Data Workflow component onto your canvas, placing it below the dtUsers Data Table component.
In the Canvas Label Text and Property Name fields, enter
dwfIncludesSingleValue
Configure the Input Operator
Drag and drop an Input operator onto your Data Workflow canvas.
Configure the operator's Info window as follows:
Setting
Value
Category
Input
Component
dtUsers
Required
Yes
Source
Default
Configure the Get Operator
Drag and drop a Get operator onto your Data Workflow canvas.
Configure the operator's Info window as follows:
Setting
Value
Category
Get
Label
Get [1].role
Preserve Argument Type
☐ (unchecked)
Path
[1].role
Connect the output port (right) of the Input operator to the input port (left) of the Get operator.
Configure the Includes Operator
Drag and drop an Includes operator onto your Data Workflow canvas.
Configure the operator's Info window as follows:
Setting
Value
Category
Includes
Label
Includes Administrator
Preserve Argument Type
☐ (unchecked)
Value
administrator
Connect the output port (right) of the Get operator to the input port (left) of the Includes operator.
Configure the Console Operator
Drag and drop a Console operator onto your Data Workflow canvas.
Configure the operator's Info window as follows:
Setting
Value
Category
Console
Label
Does [1].role Include Administrator?
Connect the output port (right) of the Includes operator to the input port (left) of the Console operator.
Click Save.
Here's how the completed Data Workflow looks:
Configure the Initializer Component
Lastly, configure an Initializer component to trigger the Data Workflow.
Drag and drop an Initializer component onto your canvas, placing it above the dtUsers Data Table component.
In the Property ID field, enter initDwf.
In theCanvas Label Text field, enter
initDwf.From the Trigger Type drop-down, select New Submission.
In the Outputs table, enter the following:
Source
Type
Value
1
dwfIncludesSingleValue
trigger
GO
Click Save & Close.
Save your module.
Your completed module looks like the following:
.jpg)
Preview your module in Express View and open the DevTools Console. You'll see the Does [1].role Include Administrator? key displays a value of true.
.jpg)