---
title: "Repeater Component"
slug: "repeater-component"
updated: 2025-12-04T19:23:44Z
published: 2025-12-04T19:23:44Z
canonical: "docs.unqork.io/repeater-component"
---
> ## Documentation Index
> Fetch the complete documentation index at: https://docs.unqork.io/llms.txt
> Use this file to discover all available pages before exploring further.
# Repeater Component
UDesignerClassic Designer
The **Repeater component** lets you interface with table-based data by adding multiple components inside it to display repeating rows of data.
The Repeater component offers a simplified method to display and review table-based data. Displaying data with a Repeater component involves three essential parts:
1. A table-based data source, like a [Data Table](/v1/docs/data-table-component) component.
2. Fields placed inside the Repeater component display values from each row of the data source. The fields' Property IDs must match the data source's column headers, or keys.
3. A [Data Workflow](/v1/docs/data-workflow-component) component that links the data source to the Repeater component.
You'll find the Repeater component in the [Display & Layout](/v1/docs/display-layout) group to the left of the [Module Builder](/v1/docs/introduction-to-the-module-builder).
## About the Configuration Window
> To learn more about general component settings, view our [General Component Settings](/v1/docs/general-component-settings) article.
## Display Settings
### Field Text
| Setting | Description |
| --- | --- |
| **Label Text** | Label Text conveys what the input component is and what information it displays. Enter the purpose of the corresponding component or field. User-friendly labels make your module more accessible. Keep labels short and descriptive (a word or two) using title case. For longer entries, use sentence case. |
### Contextual Help
| Setting | Description |
| --- | --- |
| **Tooltip** | A short hint that displays when an end-user positions their cursor over the  (**Tooltip**) icon. Tooltips can display across more than one line. |
[](https://cdn.us.document360.io/15548f06-2fba-434c-b0c1-5df88317dbd7/Images/Documentation/display(15).jpg?sv=2026-02-06&spr=https&st=2026-11-07T17%3A57%3A42Z&se=2026-11-07T18%3A57%3A42Z&sr=c&sp=r&sig=iN9G2rh8Hpx9rtQEo5ThQLF6%2FhP5VTMZwmkAxohoFvI%3D)
### Default State Options
| Setting | Description |
| --- | --- |
| **Hide Label** | Setting Hide Label to  **(ON)** prevents the Label Text from displaying in Express View. Your Label Text still displays in the Module Builder. By default, Hide Label is set to  **(ON)**. |
| **Hide Field** | Displays or hides the component from view. Setting Hide Field to  **(ON)** hides the component in Express View. Setting it to .png?sv=2026-02-06&spr=https&st=2026-11-07T17%3A57%3A42Z&se=2026-11-07T18%3A57%3A42Z&sr=c&sp=r&sig=iN9G2rh8Hpx9rtQEo5ThQLF6%2FhP5VTMZwmkAxohoFvI%3D) **(OFF)** displays the component. The component is always visible in the Module Builder. By default, Hide Field is set to .png?sv=2026-02-06&spr=https&st=2026-11-07T17%3A57%3A42Z&se=2026-11-07T18%3A57%3A42Z&sr=c&sp=r&sig=iN9G2rh8Hpx9rtQEo5ThQLF6%2FhP5VTMZwmkAxohoFvI%3D) **(OFF)**. |
## Data Settings
### Data Storage
| Setting | Description |
| --- | --- |
| **Store Data in Database** | The Store Data in Database setting affects how data persists through your application. When set to  **(ON)**, Unqork stores values entered into the field to the database (server-side submission). This occurs in three scenarios: - Navigating between Panels in a Navigation component. On navigation between pages (Panels), the component’s value saves to the database. - Triggering a module save event using a Button component with an Action Type of Save. - Navigating between screens of a workflow. On navigation between screens, the component’s value saves to the database. > [!NOTE] > By default, workflows persist data from all fields in the client-side submission when navigating between screens. However, only values from fields with Store Data in Database enabled store in the server-side submission. Set the toggle to .png?sv=2026-02-06&spr=https&st=2026-11-07T17%3A57%3A42Z&se=2026-11-07T18%3A57%3A42Z&sr=c&sp=r&sig=iN9G2rh8Hpx9rtQEo5ThQLF6%2FhP5VTMZwmkAxohoFvI%3D) **(OFF)** when you don’t want to store the values from this field in the database. > [!NOTE] > When using a Plug-In to remote execute a module, ensure data moving between modules is persistent. You can optionally enable Store Data in Database for components in the source module. But any components in the API module whose values are included in an API response must have Store Data in Database enabled. When a component’s data is not persistent, the data isn't included in an API call's response. So, Plug-Ins or external services requesting data from the API module can't receive non-persistent data in the response. > [!TIP] > Store Data in Database also affects what data is tracked using Unqork’s built-in tracker. When the **Enable Tracker** and **Track Value** toggles are set to  **(ON)** in Module Settings, only values from fields with Store Data in Database enabled are tracked. By default, this toggle is set to .png?sv=2026-02-06&spr=https&st=2026-11-07T17%3A57%3A42Z&se=2026-11-07T18%3A57%3A42Z&sr=c&sp=r&sig=iN9G2rh8Hpx9rtQEo5ThQLF6%2FhP5VTMZwmkAxohoFvI%3D) **(OFF)**. |
[](https://cdn.us.document360.io/15548f06-2fba-434c-b0c1-5df88317dbd7/Images/Documentation/data(9).jpg?sv=2026-02-06&spr=https&st=2026-11-07T17%3A57%3A42Z&se=2026-11-07T18%3A57%3A42Z&sr=c&sp=r&sig=iN9G2rh8Hpx9rtQEo5ThQLF6%2FhP5VTMZwmkAxohoFvI%3D)
## Actions Settings
### Triggers
| Setting | Description |
| --- | --- |
| **Edit Row** | Enter the Property ID of the component to trigger after editing a field displayed in a Repeater component row. |
| **Row Generation** | Enter the Property ID of the component to trigger after refreshing the Repeater component's data source. |
[](https://cdn.us.document360.io/15548f06-2fba-434c-b0c1-5df88317dbd7/Images/Documentation/actions(6).jpg?sv=2026-02-06&spr=https&st=2026-11-07T17%3A57%3A42Z&se=2026-11-07T18%3A57%3A42Z&sr=c&sp=r&sig=iN9G2rh8Hpx9rtQEo5ThQLF6%2FhP5VTMZwmkAxohoFvI%3D)
## Advanced Settings
### Additional Styling
| Setting | Description |
| --- | --- |
| **Custom CSS Class** | Enter a Custom CSS Class to apply to your component. Custom CSS lets you maintain a consistent look and feel when the field or element is part of a template or multiple modules. Updated CSS styling applies to all components that reference this custom class name. |
[](https://cdn.us.document360.io/15548f06-2fba-434c-b0c1-5df88317dbd7/Images/Documentation/advanced(14).jpg?sv=2026-02-06&spr=https&st=2026-11-07T17%3A57%3A42Z&se=2026-11-07T18%3A57%3A42Z&sr=c&sp=r&sig=iN9G2rh8Hpx9rtQEo5ThQLF6%2FhP5VTMZwmkAxohoFvI%3D)
## Adding a Repeater Component
In this example, you'll configure a page where your end-users can review the data they submitted. On this page, end-users can edit fields and save any changes to their [submission data](/v1/docs/submission-data). A Data Table component acts as the data source, and you'll configure a Text Field, Radio Buttons, and Number component inside the Repeater component. That way, the Repeater component can display the Data Table component's values. Lastly, you'll connect the Data Table and Repeater components with a Data Workflow component.
These instructions assume that you have an open module saved with a title.
### Configure the Data Table Component
First, set up your data source using a [Data Table](/v1/docs/data-table-component) component.
1. In the Module Builder, drag and drop a **D****ata Table** component onto your canvas.
2. In the Property ID field, enter **dtData**.
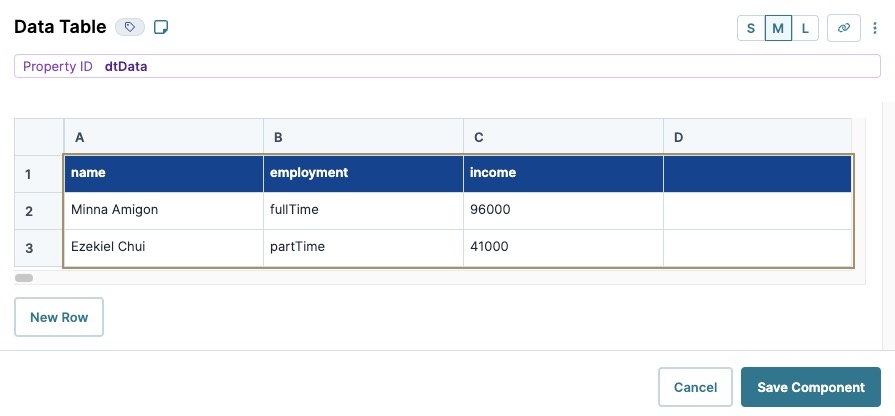
3. In the data table, enter the following:
| | A | B | C |
| --- | --- | --- | --- |
| 1 | name | employment | income |
| 2 | Minna Amigon | fullTime | 96000 |
| 3 | Ezekiel Chui | partTime | 41000 |
[](https://cdn.us.document360.io/15548f06-2fba-434c-b0c1-5df88317dbd7/Images/Documentation/dt%20example.jpg?sv=2026-02-06&spr=https&st=2026-11-07T17%3A57%3A42Z&se=2026-11-07T18%3A57%3A42Z&sr=c&sp=r&sig=iN9G2rh8Hpx9rtQEo5ThQLF6%2FhP5VTMZwmkAxohoFvI%3D)
4. Navigate to the **Display** settings.
5. In the Label Text field, enter `dtData`.
6. Click **Save Component**.
### Configure the Repeater Component
Next, configure a Repeater component to act as a container for the [Text Field](/v1/docs/text-field-component), [Radio Buttons](/v1/docs/radio-buttons-component), and [Number](/v1/docs/number-component) components.
1. Drag and drop a **R****epeater** component onto your canvas, placing it below the **dtData** **D****ata Table** component.
2. In the Property ID and Label Text fields, enter `repeater`.
3. Click **Save Component**.
### Configure the Columns Component
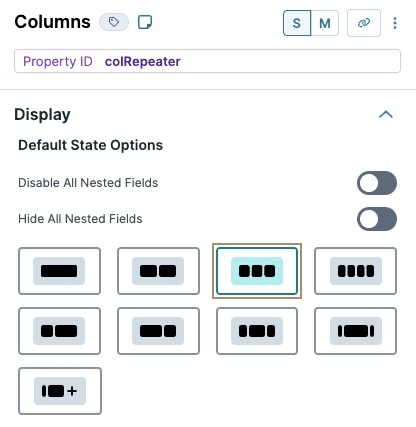
Your Data Table component has three columns of data. So, use a [Columns](/v1/docs/columns-component) component to add three display columns inside the Repeater component. That way, the Name, Employment, and Income fields display side-by-side.
1. Drag and drop a ** Columns** component onto your canvas, placing it inside the **repeater** **R****epeater** component.
2. In the Property ID field, enter **colRepeater**.
3. Under **Formatting**, click  (Three Columns).
[](https://cdn.us.document360.io/15548f06-2fba-434c-b0c1-5df88317dbd7/Images/Documentation/columns.jpg?sv=2026-02-06&spr=https&st=2026-11-07T17%3A57%3A42Z&se=2026-11-07T18%3A57%3A42Z&sr=c&sp=r&sig=iN9G2rh8Hpx9rtQEo5ThQLF6%2FhP5VTMZwmkAxohoFvI%3D)
4. Click **Save Component**.
### Configure the Text Field Component
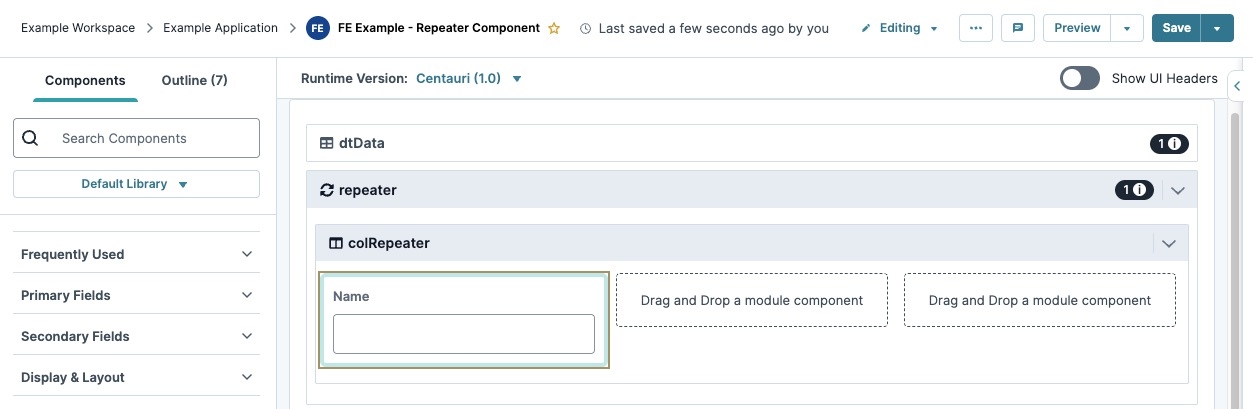
This [Text Field](/v1/docs/text-field-component) component displays the values from the **name** column of the Data Table component. It's important that the Property ID matches the column header in the Data Table component.
1. Drag and drop a **T****ext Field** component onto your canvas, placing it in **column1** of the **colRepeater** ** Columns** component.
2. In the Property ID field, enter **name**.
3. In the Label Text field, enter `Name`.
4. Click **Save Component**.
[](https://cdn.us.document360.io/15548f06-2fba-434c-b0c1-5df88317dbd7/Images/Documentation/col1.jpg?sv=2026-02-06&spr=https&st=2026-11-07T17%3A57%3A42Z&se=2026-11-07T18%3A57%3A42Z&sr=c&sp=r&sig=iN9G2rh8Hpx9rtQEo5ThQLF6%2FhP5VTMZwmkAxohoFvI%3D)
### Configure the Radio Buttons Component
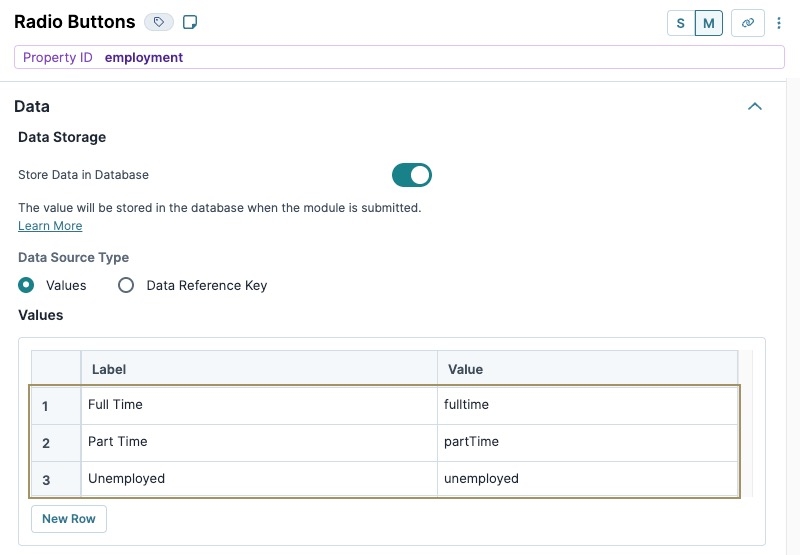
This [Radio Buttons](/v1/docs/radio-buttons-component) component displays the values from the **employment** column of your Data Table component. Match the values in the component's **Value to Store in Submission Data** column to those in the Data Table component. Doing so lets the Repeater component preselect the values in Express View based on the value in your Data Table component.
1. Drag and drop a **R****adio Buttons** component onto your canvas, placing it in **column2** of the **colRepeater** ** Columns** component.
2. In the Property ID field, enter **employment**.
3. In the Label Text field, enter `Employment`.
4. Navigate to the **Data** settings.
5. In the **Values** table, enter the following:
| | Label | Value |
| --- | --- | --- |
| 1 | Full Time | fullTime |
| 2 | Part Time | partTime |
| 3 | Unemployed | unemployed |
> [!NOTE]
> Values entered in the **Value to Store in Submission Data** column must match the values entered in the Data Table component.
[](https://cdn.us.document360.io/15548f06-2fba-434c-b0c1-5df88317dbd7/Images/Documentation/rdoButtons.jpg?sv=2026-02-06&spr=https&st=2026-11-07T17%3A57%3A42Z&se=2026-11-07T18%3A57%3A42Z&sr=c&sp=r&sig=iN9G2rh8Hpx9rtQEo5ThQLF6%2FhP5VTMZwmkAxohoFvI%3D)
6. Click **Save Component**.
### Configure the Number Component
This [Number](/v1/docs/number-component) component will display the values from the **income** column of your Data Table component. Again, the Property ID must match the column header from your Data Table component.
1. Drag and drop a **N****umber** component onto your canvas, placing it in **column3** of the **colRepeater** ** Columns** component.
2. In the Property ID field, enter **income**.
3. In the Label Text field, enter `Annual Pre-Tax Income`.
4. Click **Save Component**.
### Configure the Data Workflow Component
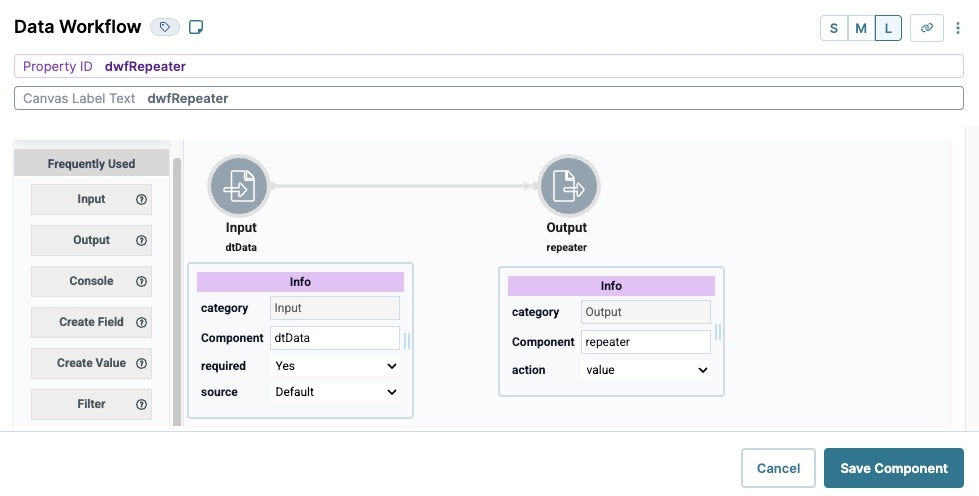
This [Data Workflow](/v1/docs/data-workflow-component) component connects your Data Table component to the Repeater component.
1. Drag and drop a **D****ata Workflow** component onto your canvas, placing it below the **repeater** **R****epeater** component.
2. In the Property ID and Canvas Label Text fields, enter `dwfRepeater`.
#### Configure the Input Operator
1. Drag and drop an **Input** operator onto your Data Workflow canvas.
2. Configure the operator's **Info** window as follows:
| Info |
| --- |
| **category** | Input |
| **Component** | dtData |
| **required** | Yes |
| **source** | Default |
#### Configure the Output Operator
1. Drag and drop an **Output** operator onto your Data Workflow canvas.
2. Configure the operator's **Info** window as follows:
| Info |
| --- |
| category | Output |
| Component | repeater |
| action | value |
3. Connect the output port (right) of the dtData **Input** operator to the input port (left) of the repeater **Output** operator.
[](https://cdn.us.document360.io/15548f06-2fba-434c-b0c1-5df88317dbd7/Images/Documentation/dwfRepeater.jpg?sv=2026-02-06&spr=https&st=2026-11-07T17%3A57%3A42Z&se=2026-11-07T18%3A57%3A42Z&sr=c&sp=r&sig=iN9G2rh8Hpx9rtQEo5ThQLF6%2FhP5VTMZwmkAxohoFvI%3D)
4. Navigate to the Data Workflow component's **Actions** settings.
5. Set the **Trigger Type** to  **Watch**.
6. Click **Save Component**.
7. **Save** your module.
**Preview** your module in Express View. Notice how each of the fields auto-populate, including the preselected Radio Buttons.
[](https://cdn.us.document360.io/15548f06-2fba-434c-b0c1-5df88317dbd7/Images/Documentation/expressView(3).jpg?sv=2026-02-06&spr=https&st=2026-11-07T17%3A57%3A42Z&se=2026-11-07T18%3A57%3A42Z&sr=c&sp=r&sig=iN9G2rh8Hpx9rtQEo5ThQLF6%2FhP5VTMZwmkAxohoFvI%3D)
The **Repeater component** lets you interface with table-based data by adding multiple components inside it to display repeating rows of data.
The Repeater component offers a simplified method to display and review table-based data. Displaying data with a Repeater component involves three essential parts:
1. A table-based data source, like a [Data Table](/v1/docs/data-table-component) component.
2. Fields placed inside the Repeater component display values from each row of the data source. The fields' Property IDs must match the data source's column headers, or keys.
3. A [Data Workflow](/v1/docs/data-workflow-component) component that links the data source to the Repeater component.
You'll find the Repeater component in the [Display & Layout](/v1/docs/display-layout) group to the left of the [Module Builder](/v1/docs/introduction-to-the-module-builder).
## About the Configuration Window
> To learn more about general component settings, view our [General Component Settings](/v1/docs/general-component-settings) article.
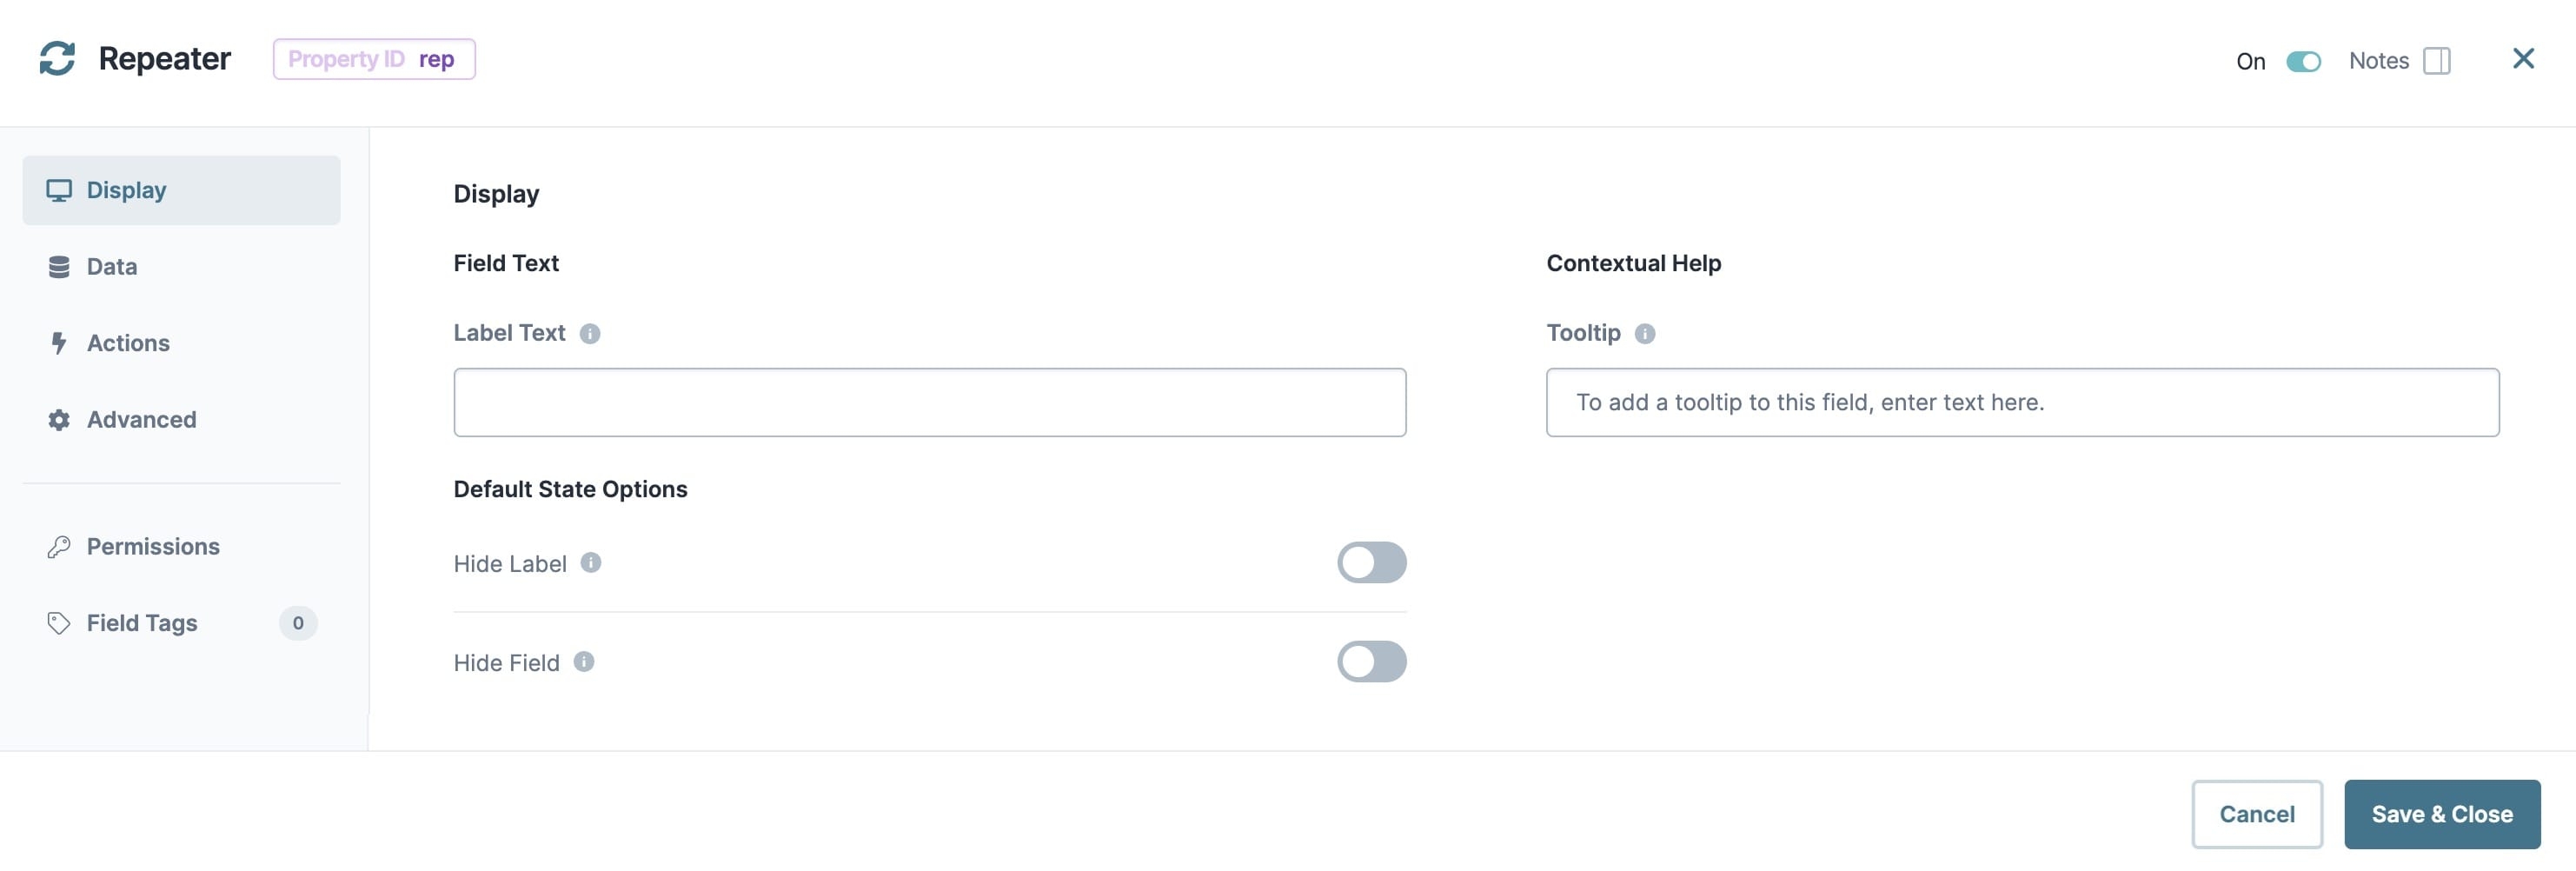
## Display Panel
[](https://cdn.us.document360.io/15548f06-2fba-434c-b0c1-5df88317dbd7/Images/Documentation/Repeater%20Display.jpg?sv=2026-02-06&spr=https&st=2026-11-07T17%3A57%3A42Z&se=2026-11-07T18%3A57%3A42Z&sr=c&sp=r&sig=iN9G2rh8Hpx9rtQEo5ThQLF6%2FhP5VTMZwmkAxohoFvI%3D)
### Field Text
| Setting | Description |
| --- | --- |
| **Label Text** | Label Text conveys what the input component is and what information it displays. Enter the purpose of the corresponding component or field. User-friendly labels make your module more accessible. Keep labels short and descriptive (a word or two) using title case. For longer entries, use sentence case. |
### Contextual Help
| Setting | Description |
| --- | --- |
| **Tooltip** | A short hint that displays when an end-user positions their cursor over the  (**Tooltip**) icon. Tooltips can display across more than one line. |
### Default State Options
| Setting | Description |
| --- | --- |
| **Hide Label** | Setting Hide Label to  **(ON)** prevents the Label Text from displaying in Express View. Your Label Text still displays in the Module Builder. By default, the Hide Label toggle is set to  **(ON)**. |
| **Hide Field** | Displays or hides the component from view. Setting Hide Field to  **(ON)** hides the component in Express View. Setting it to .png?sv=2026-02-06&spr=https&st=2026-11-07T17%3A57%3A42Z&se=2026-11-07T18%3A57%3A42Z&sr=c&sp=r&sig=iN9G2rh8Hpx9rtQEo5ThQLF6%2FhP5VTMZwmkAxohoFvI%3D) **(OFF)** displays the component. The component is always visible in the Module Builder. By default, Hide Field is set to .png?sv=2026-02-06&spr=https&st=2026-11-07T17%3A57%3A42Z&se=2026-11-07T18%3A57%3A42Z&sr=c&sp=r&sig=iN9G2rh8Hpx9rtQEo5ThQLF6%2FhP5VTMZwmkAxohoFvI%3D) **(OFF)**. |
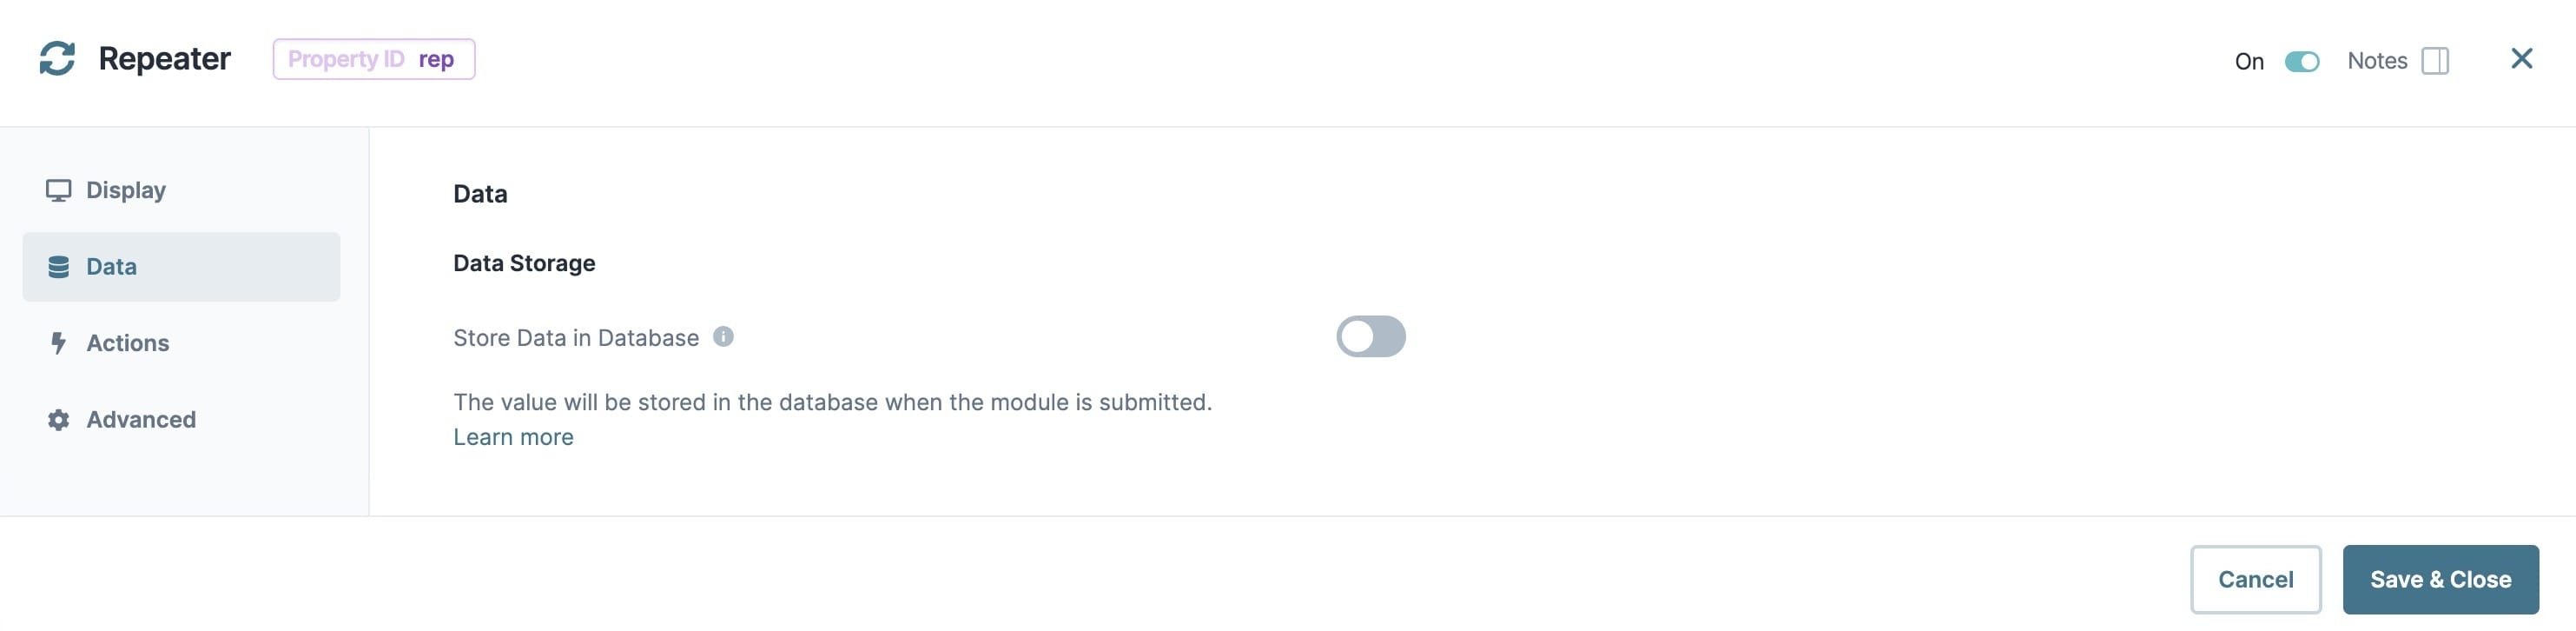
## Data Panel
[](https://cdn.us.document360.io/15548f06-2fba-434c-b0c1-5df88317dbd7/Images/Documentation/Repeater%20Data.jpg?sv=2026-02-06&spr=https&st=2026-11-07T17%3A57%3A42Z&se=2026-11-07T18%3A57%3A42Z&sr=c&sp=r&sig=iN9G2rh8Hpx9rtQEo5ThQLF6%2FhP5VTMZwmkAxohoFvI%3D)
### Data Storage
| Setting | Description |
| --- | --- |
| **Store Data in Database** | The Store Data in Database setting affects how data persists through your application. When set to  **(ON)**, Unqork stores values entered into the field to the database (server-side submission). This occurs in three scenarios: - Navigating between Panels in a Navigation component. On navigation between pages (Panels), the component’s value saves to the database. - Triggering a module save event using a Button component with an Action Type of Save. - Navigating between screens of a workflow. On navigation between screens, the component’s value saves to the database. > [!NOTE] > By default, workflows persist data from all fields in the client-side submission when navigating between screens. However, only values from fields with Store Data in Database enabled store in the server-side submission. Set the toggle to .png?sv=2026-02-06&spr=https&st=2026-11-07T17%3A57%3A42Z&se=2026-11-07T18%3A57%3A42Z&sr=c&sp=r&sig=iN9G2rh8Hpx9rtQEo5ThQLF6%2FhP5VTMZwmkAxohoFvI%3D) **(OFF)** when you don’t want to store the values from this field in the database. > [!NOTE] > When using a Plug-In to remote execute a module, ensure data moving between modules is persistent. You can optionally enable Store Data in Database for components in the source module. But any components in the API module whose values are included in an API response must have Store Data in Database enabled. When a component’s data is not persistent, the data isn't included in an API call's response. So, Plug-Ins or external services requesting data from the API module can't receive non-persistent data in the response. > [!TIP] > Store Data in Database also affects what data is tracked using Unqork’s built-in tracker. When the **Enable Tracker** and **Track Value** toggles are set to  **(ON)** in Module Settings, only values from fields with Store Data in Database enabled are tracked. By default, this toggle is set to .png?sv=2026-02-06&spr=https&st=2026-11-07T17%3A57%3A42Z&se=2026-11-07T18%3A57%3A42Z&sr=c&sp=r&sig=iN9G2rh8Hpx9rtQEo5ThQLF6%2FhP5VTMZwmkAxohoFvI%3D) **(OFF)**. |
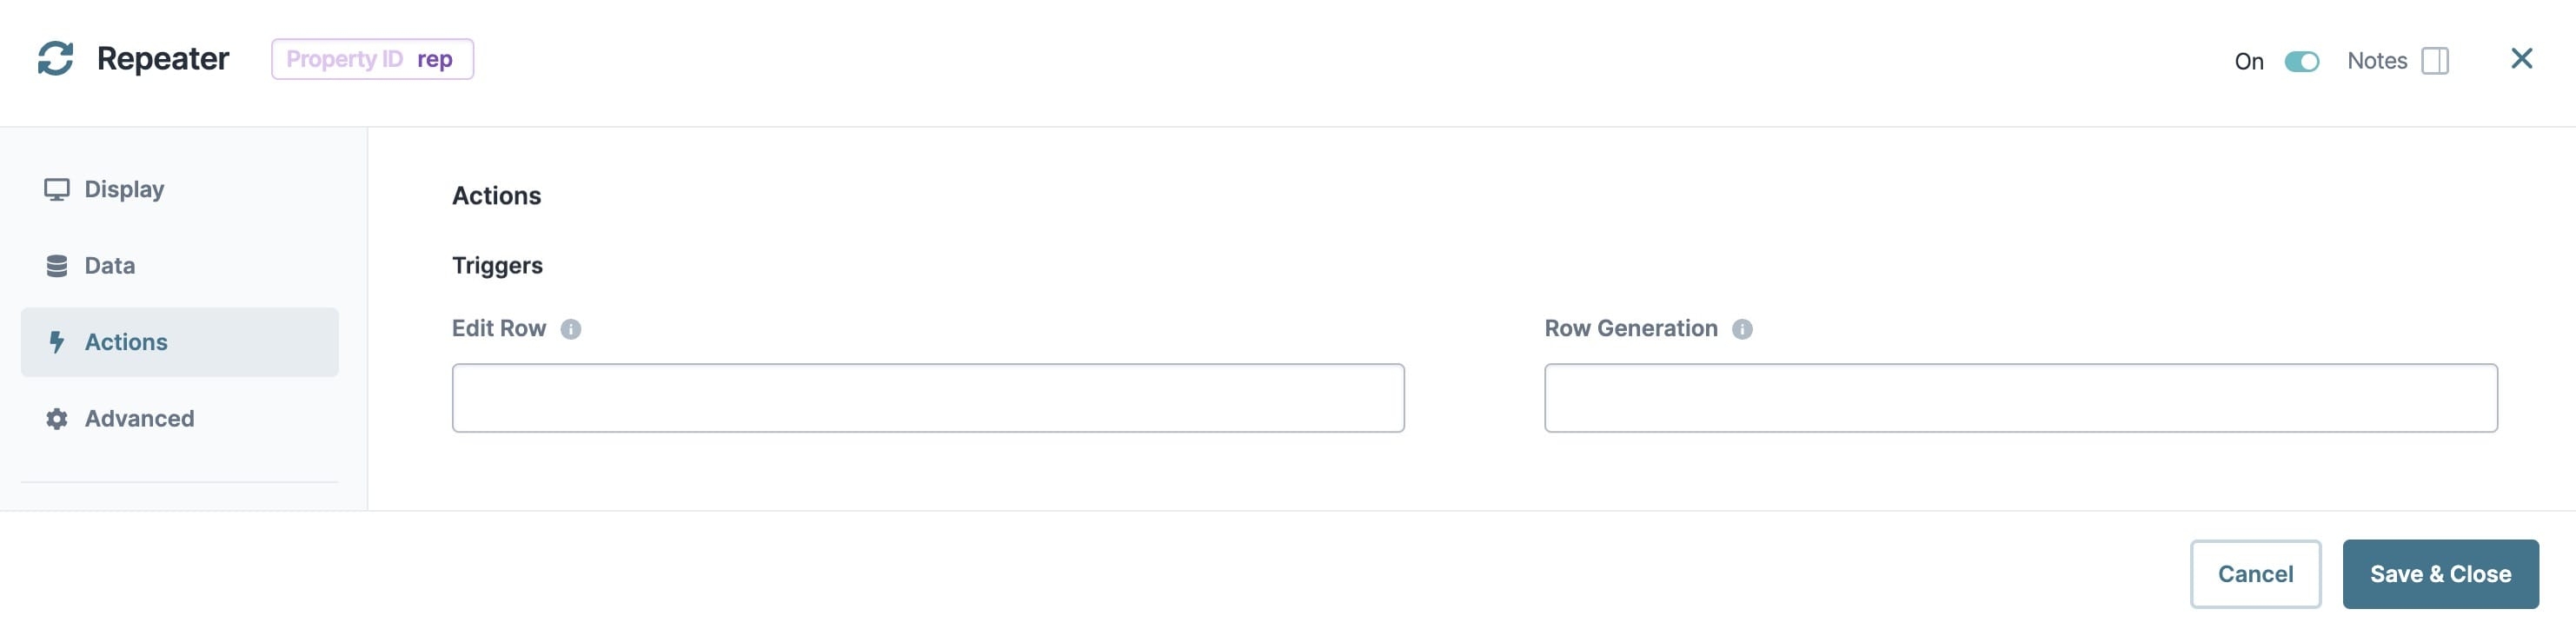
## Actions Panel
[](https://cdn.us.document360.io/15548f06-2fba-434c-b0c1-5df88317dbd7/Images/Documentation/Repeater%20Actions.jpg?sv=2026-02-06&spr=https&st=2026-11-07T17%3A57%3A42Z&se=2026-11-07T18%3A57%3A42Z&sr=c&sp=r&sig=iN9G2rh8Hpx9rtQEo5ThQLF6%2FhP5VTMZwmkAxohoFvI%3D)
### Triggers
| Setting | Description |
| --- | --- |
| **Edit Row** | Enter the Property ID of the component to trigger after editing a field displayed in a Repeater component row. |
| Setting | Description |
| --- | --- |
| **Row Generation** | Enter the Property ID of the component to trigger after refreshing the Repeater component's data source. |
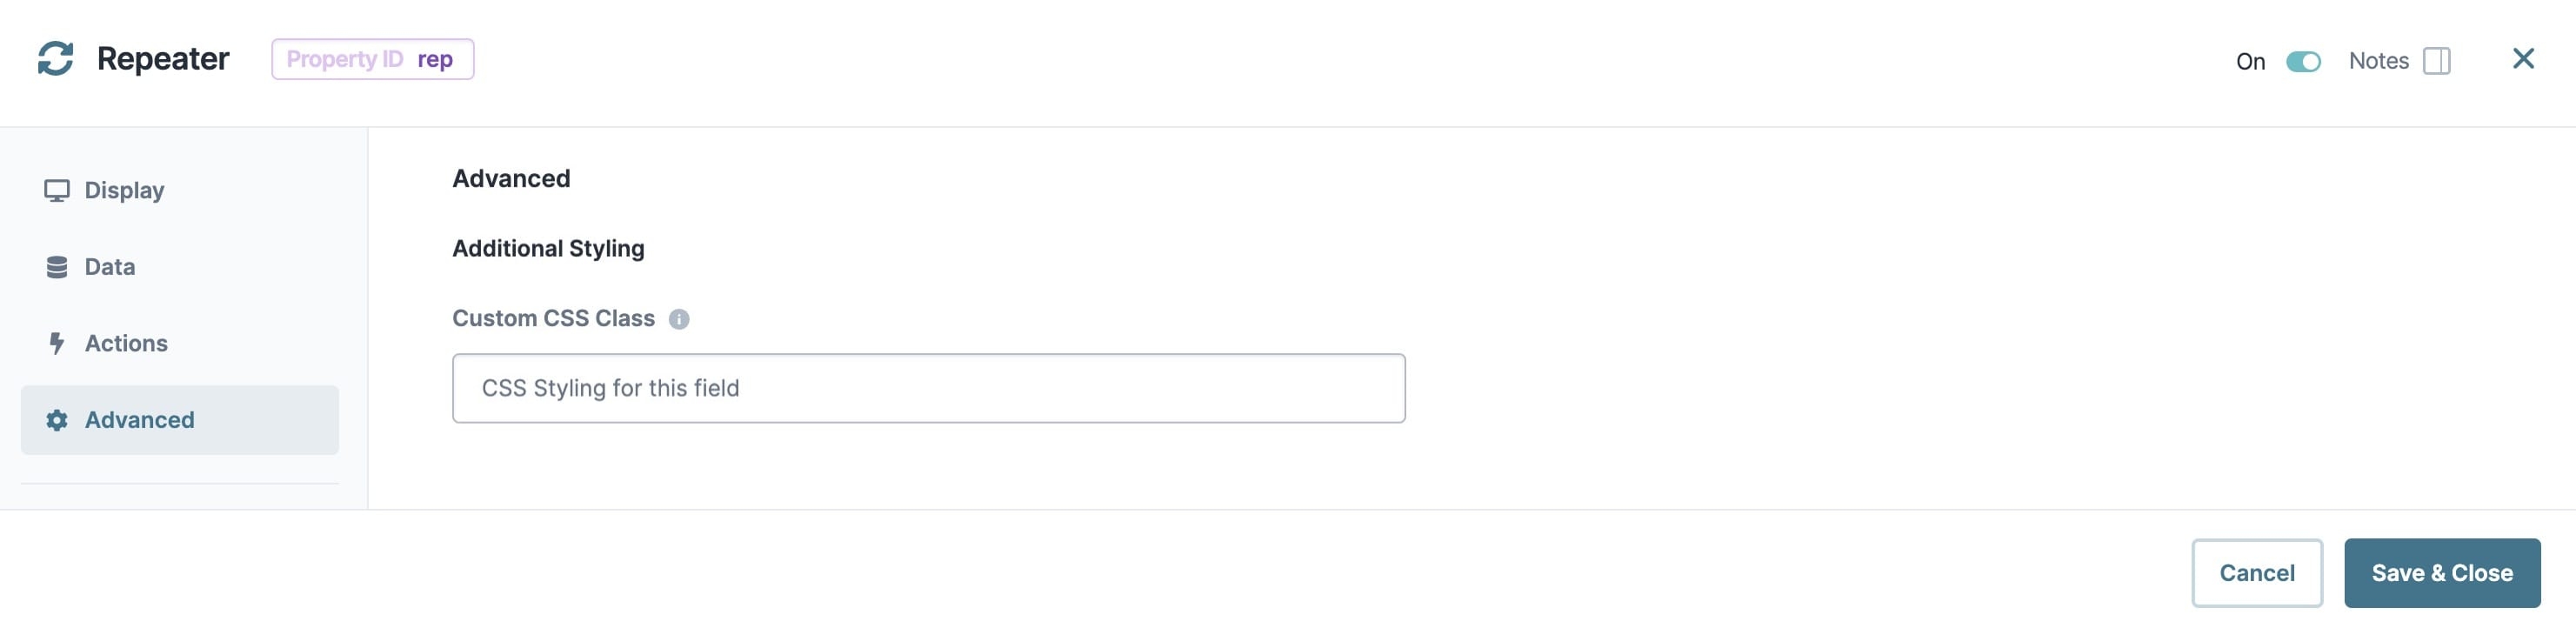
## Advanced Panel
[](https://cdn.us.document360.io/15548f06-2fba-434c-b0c1-5df88317dbd7/Images/Documentation/Repeater%20Advanced.jpg?sv=2026-02-06&spr=https&st=2026-11-07T17%3A57%3A42Z&se=2026-11-07T18%3A57%3A42Z&sr=c&sp=r&sig=iN9G2rh8Hpx9rtQEo5ThQLF6%2FhP5VTMZwmkAxohoFvI%3D)
### Additional Styling
| Setting | Description |
| --- | --- |
| **Custom CSS Class** | Enter a Custom CSS Class to apply to your component. Custom CSS lets you maintain a consistent look and feel when the field or element is part of a template or multiple modules. Updated CSS styling applies to all components that reference this custom class name. |
## Adding a Repeater Component
In this example, you'll configure a page where your end-users can review the data they submitted. On this page, end-users can edit fields and save any changes to their [submission data](/v1/docs/submission-data). A Data Table component acts as the data source, and you'll configure a Text Field, Radio Buttons, and Number component inside the Repeater component. That way, the Repeater component can display the Data Table component's values. Lastly, you'll connect the Data Table and Repeater components with a Data Workflow component.
These instructions assume that you have an open module saved with a title.
### Configure the Data Table Component
First, set up your data source using a [Data Table](/v1/docs/data-table-component) component.
1. In the Module Builder, drag and drop a **D****ata Table** component onto your canvas.
2. In the **Label** and **Property Name** fields, enter `dtData`.
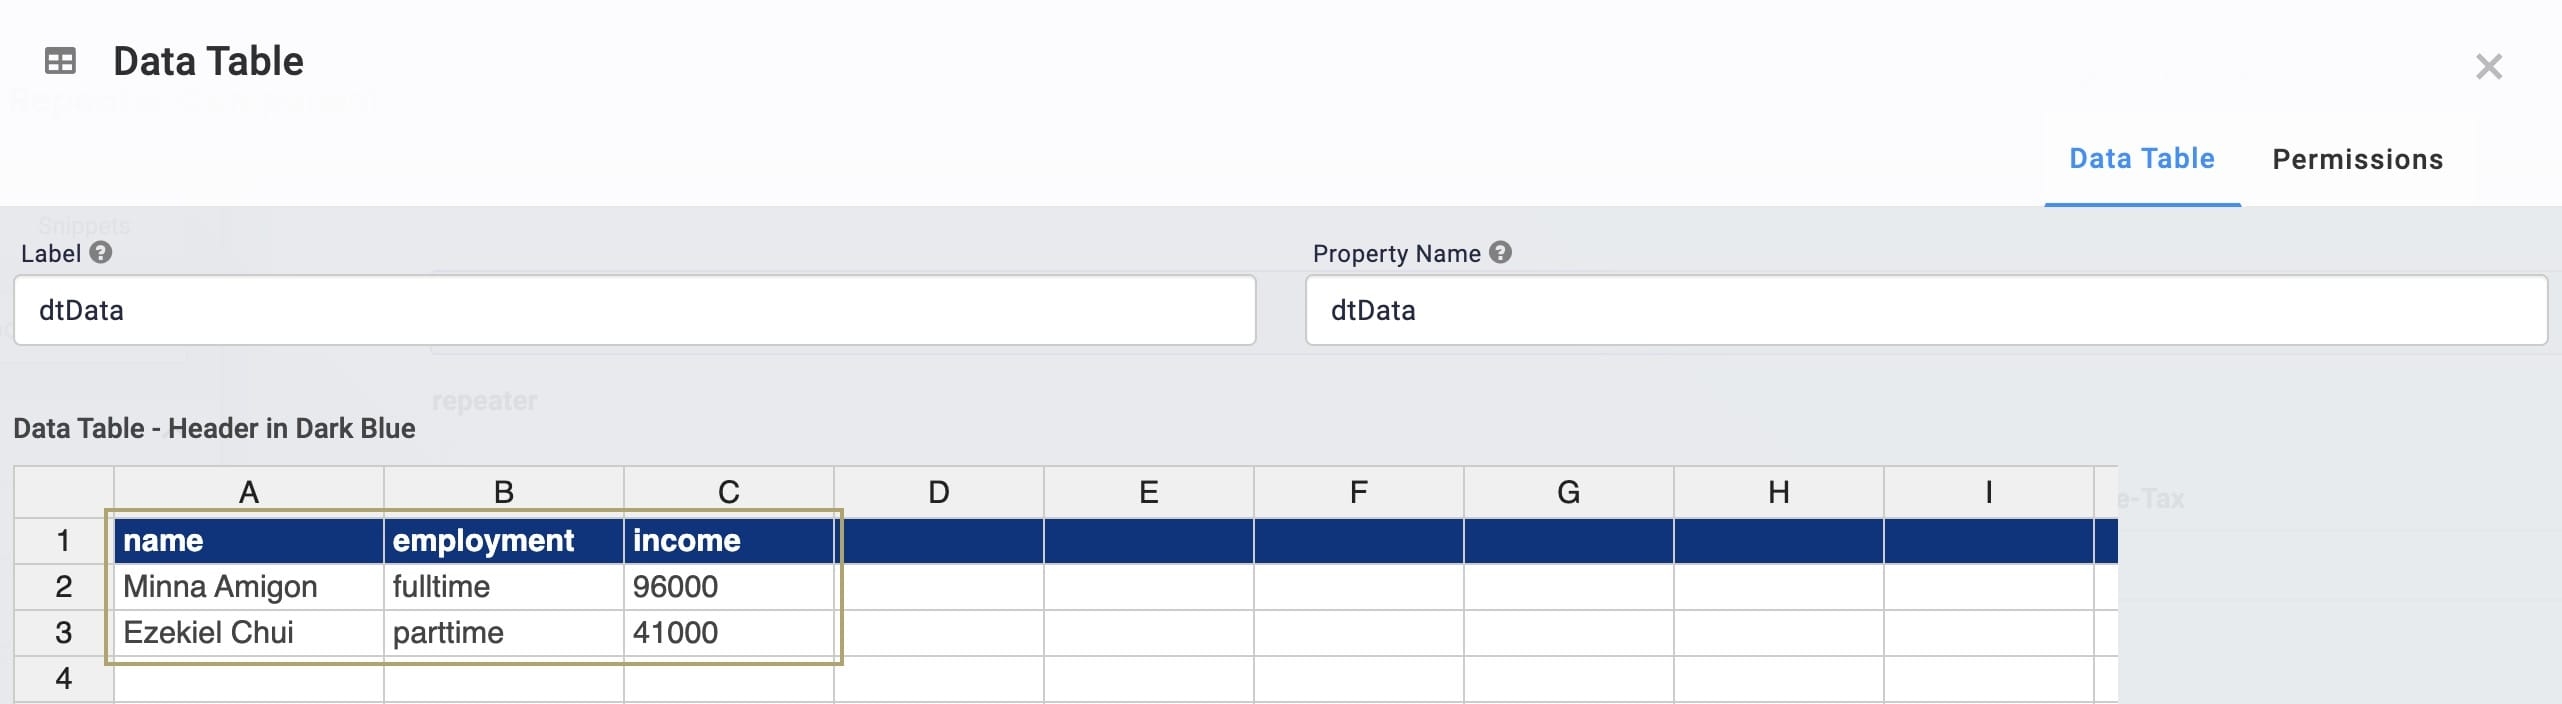
3. In the data table, enter the following:
| | A | B | C |
| --- | --- | --- | --- |
| 1 | name | employment | income |
| 2 | Minna Amigon | fulltime | 96000 |
| 3 | Ezekiel Chui | parttime | 41000 |
[](https://cdn.us.document360.io/15548f06-2fba-434c-b0c1-5df88317dbd7/Images/Documentation/Repeater%20DataTable.jpg?sv=2026-02-06&spr=https&st=2026-11-07T17%3A57%3A42Z&se=2026-11-07T18%3A57%3A42Z&sr=c&sp=r&sig=iN9G2rh8Hpx9rtQEo5ThQLF6%2FhP5VTMZwmkAxohoFvI%3D)
4. Click **Save**.
### Configure the Repeater Component
Next, configure a Repeater component to act as a container for the [Text Field](/v1/docs/text-field-component), [Radio Buttons](/v1/docs/radio-buttons-component), and [Number](/v1/docs/number-component) components.
1. Drag and drop a **R****epeater** component onto your canvas, placing it below the **dtData** **D****ata Table**.
2. In the Property ID and Label Text field, enter **repeater**.
3. Click **Save & Close**.
### Configure the Columns Component
Your Data Table component has three columns of data. So, use a [Columns](/v1/docs/columns-component) component to add three display columns inside the Repeater component. That way, the Name, Employment, and Income fields display side-by-side.
1. Drag and drop a ** Columns** component onto your canvas, placing it inside the **repeater** **R****epeater** component.
[Video](https://cdn.us.document360.io/15548f06-2fba-434c-b0c1-5df88317dbd7/Images/Documentation/Repeater_ColumnsAdd.webm?sv=2026-02-06&spr=https&st=2026-11-07T17%3A57%3A42Z&se=2026-11-07T18%3A57%3A42Z&sr=c&sp=r&sig=iN9G2rh8Hpx9rtQEo5ThQLF6%2FhP5VTMZwmkAxohoFvI%3D)
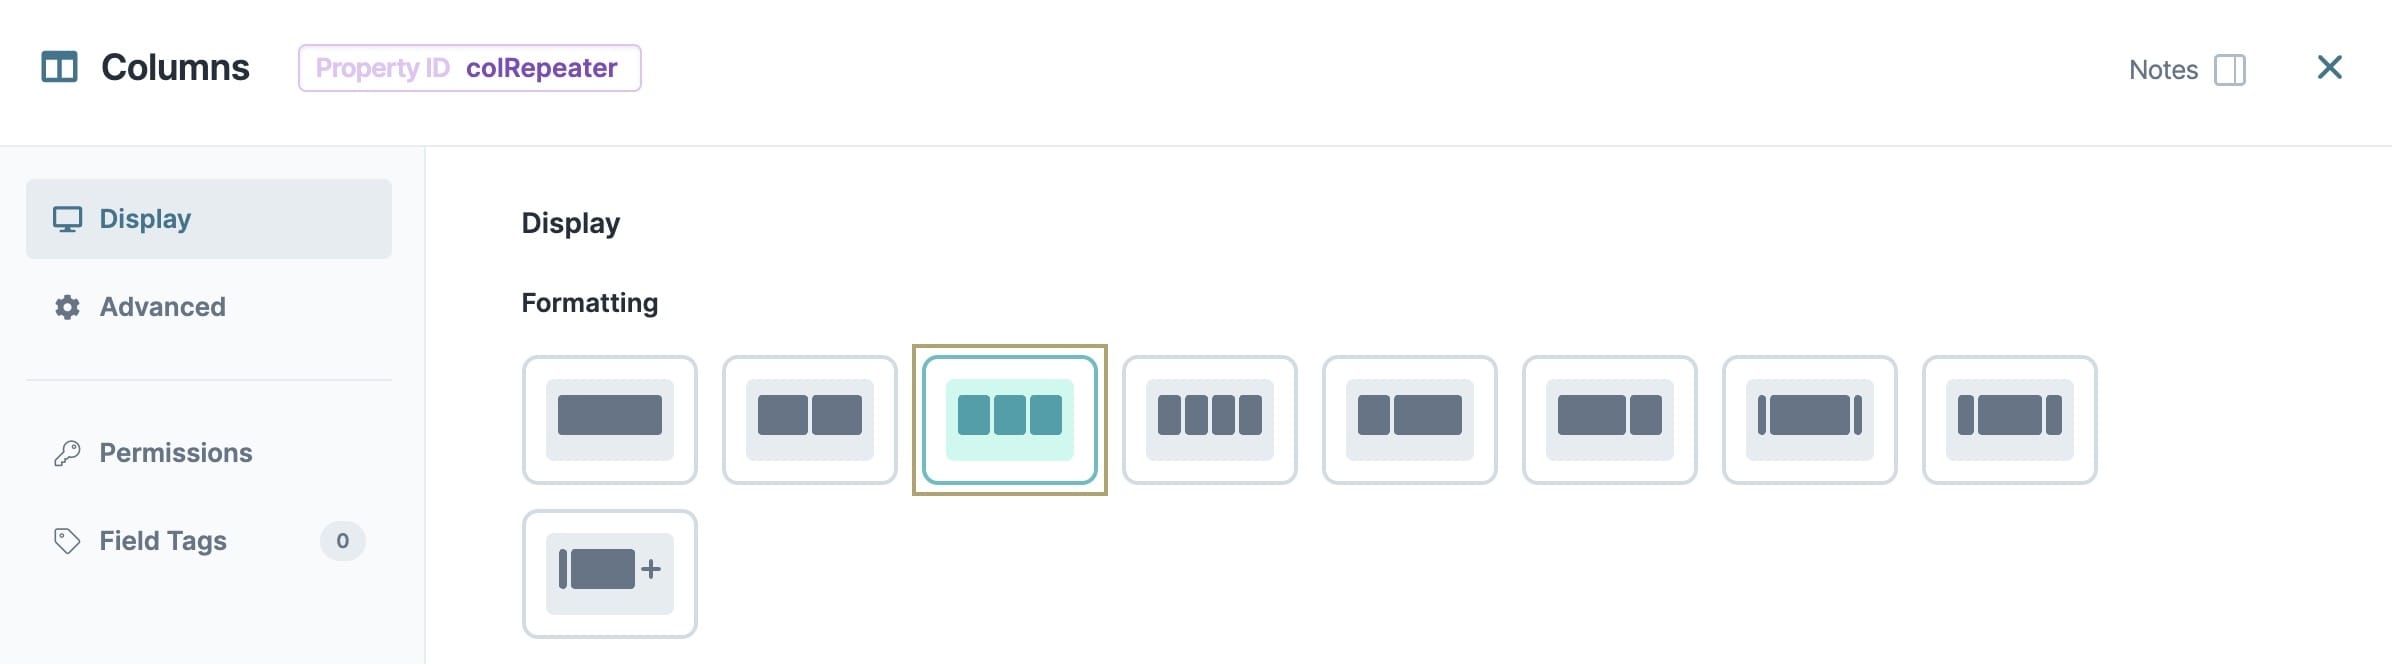
2. In the Property ID field, enter **colRepeater**.
3. Under **Formatting**, click  (Three Columns).
[](https://cdn.us.document360.io/15548f06-2fba-434c-b0c1-5df88317dbd7/Images/Documentation/Repeater%20Columns.jpg?sv=2026-02-06&spr=https&st=2026-11-07T17%3A57%3A42Z&se=2026-11-07T18%3A57%3A42Z&sr=c&sp=r&sig=iN9G2rh8Hpx9rtQEo5ThQLF6%2FhP5VTMZwmkAxohoFvI%3D)
4. Click **Save & Close**.
### Configure the Text Field Component
This [Text Field](/v1/docs/text-field-component) component displays the values from the **name** column of the Data Table component. It's important that the Property ID matches the column header in the Data Table component.
1. Drag and drop a **T****ext Field** component onto your canvas, placing it in **column1** of the **colRepeater** ** Columns** component.
[Video](https://cdn.us.document360.io/15548f06-2fba-434c-b0c1-5df88317dbd7/Images/Documentation/Repeater_TextFieldAdd.webm?sv=2026-02-06&spr=https&st=2026-11-07T17%3A57%3A42Z&se=2026-11-07T18%3A57%3A42Z&sr=c&sp=r&sig=iN9G2rh8Hpx9rtQEo5ThQLF6%2FhP5VTMZwmkAxohoFvI%3D)
2. In the Property ID field, enter **firstName**.
3. In the Label Text field, enter `First Name`.
4. Click **Save & Close**.
### Configure the Radio Buttons Component
This [Radio Buttons](/v1/docs/radio-buttons-component) component displays the values from the **employment** column of your Data Table component. Match the values in the component's **Value to Store in Submission Data** column to those in the Data Table component. Doing so lets the Repeater component preselect the values in Express View based on the value in your Data Table component.
1. Drag and drop a **R****adio Buttons** component onto your canvas, placing it in **column2** of the **colRepeater** ** Columns** component.
2. In the Property ID field, enter **employment**.
3. In the Label Text field, enter `Employment`.
4. In the component's configuration window, click the ** Data** tab.
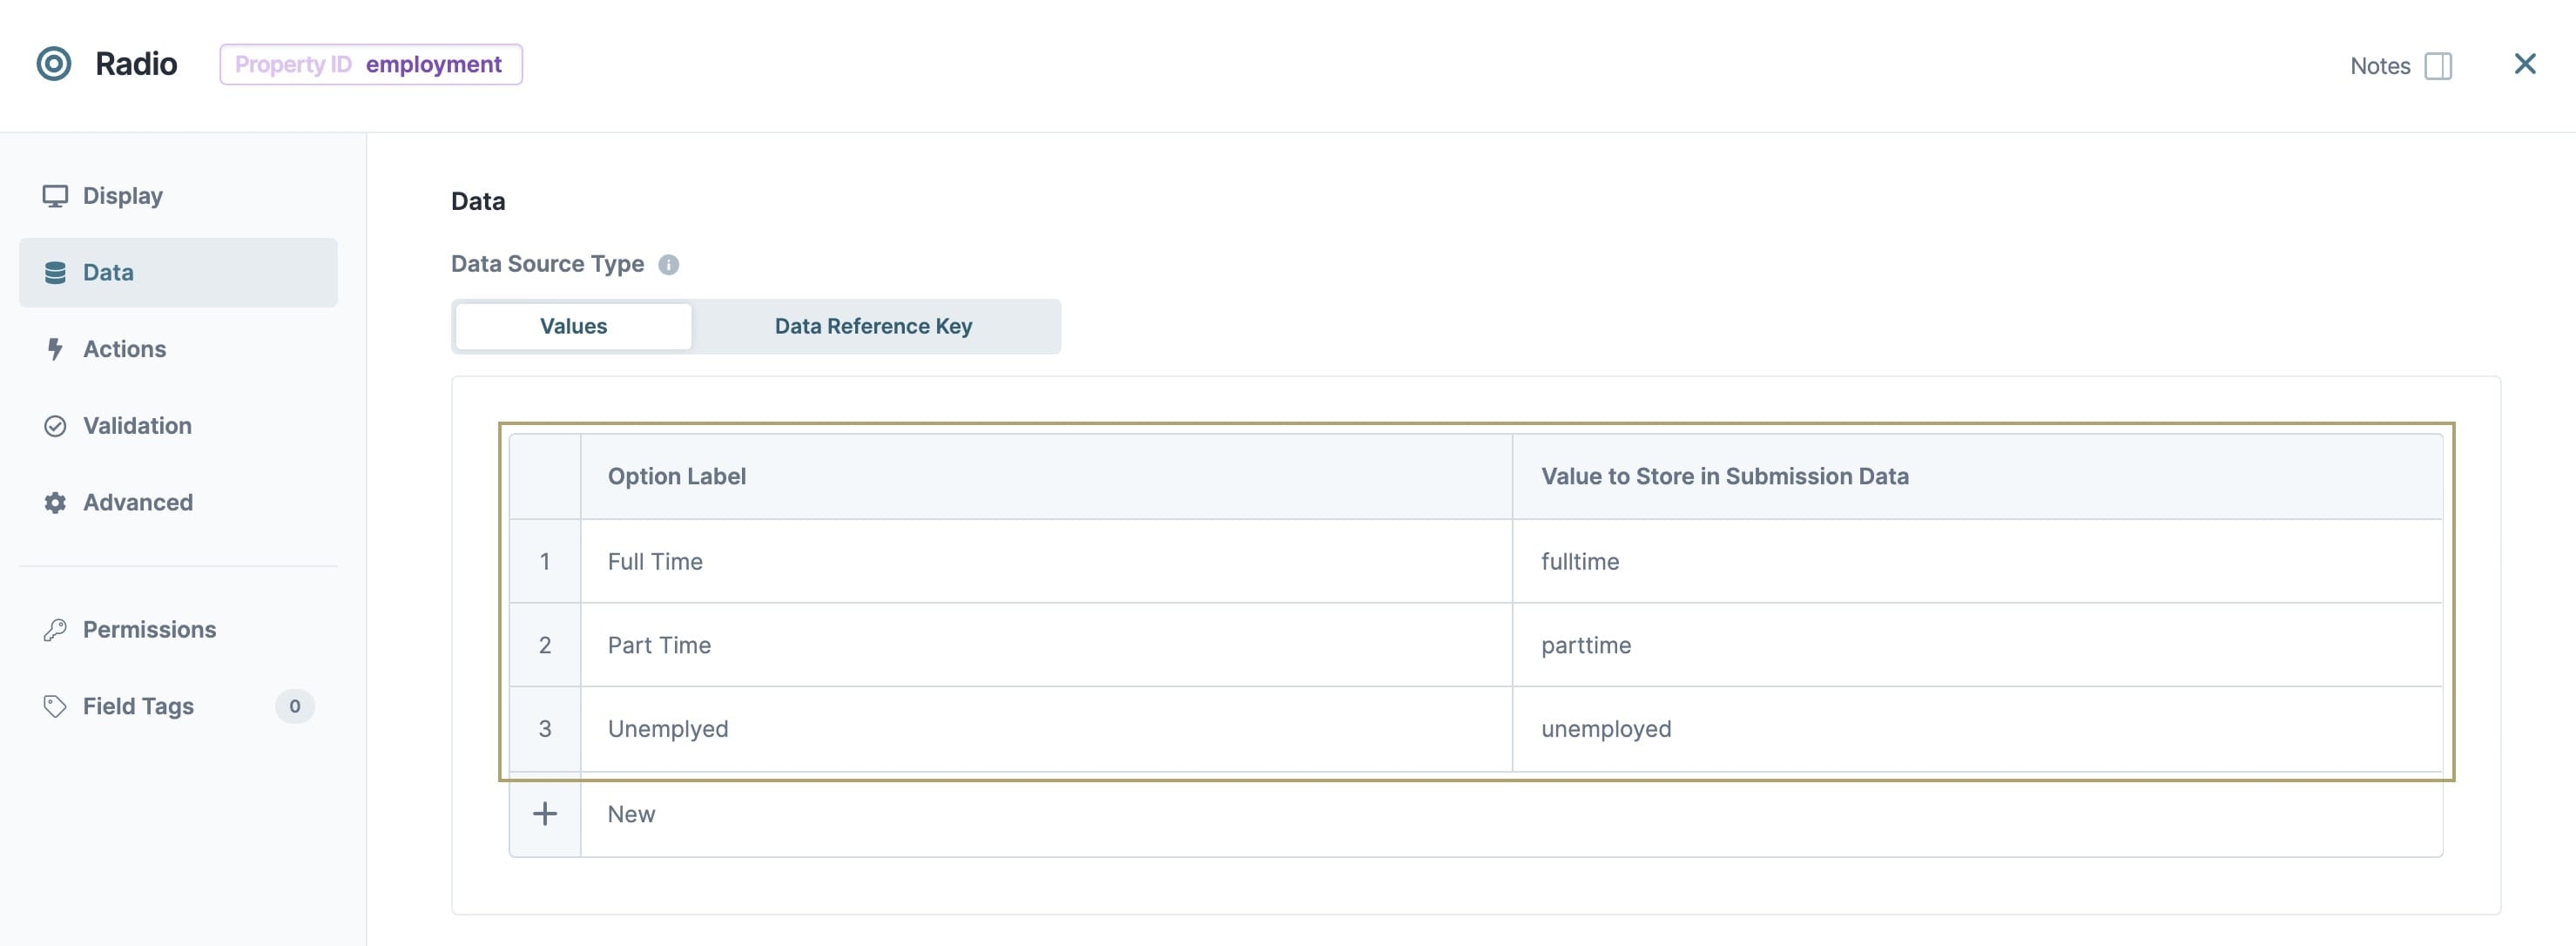
5. Set your **Option Label** and **Value to Store in Submission Data** as shown below:
| | Option Label | Value to Store in Submission Data |
| --- | --- | --- |
| 1 | Full Time | fulltime |
| 2 | Part Time | partime |
| 3 | Unemployed | unemployed |
> [!NOTE]
> Values entered in the **Value to Store in Submission Data** column must match the values entered in the Data Table component.
[](https://cdn.us.document360.io/15548f06-2fba-434c-b0c1-5df88317dbd7/Images/Documentation/Repeater%20RadioButtons.jpg?sv=2026-02-06&spr=https&st=2026-11-07T17%3A57%3A42Z&se=2026-11-07T18%3A57%3A42Z&sr=c&sp=r&sig=iN9G2rh8Hpx9rtQEo5ThQLF6%2FhP5VTMZwmkAxohoFvI%3D)
6. Click **Save & Close**.
### Configure the Number Component
This [Number](/v1/docs/number-component) component will display the values from the **income** column of your Data Table component. Again, the Property ID must match the column header from your Data Table component.
1. Drag and drop a **N****umber** component onto your canvas.
2. In the Property ID field, enter **income**.
3. In the Label Text field, enter `Annual Pre-Tax Income`.
4. Click **Save & Close**.
### Configure the Data Workflow Component
This [Data Workflow](/v1/docs/data-workflow-component) component connects your Data Table component to the Repeater component.
1. Drag and drop a **Data Workflow** component onto your canvas, placing it below the **repeater** **R****epeater** component.
2. In the **Label** and **Property Name** fields, enter **dwfRepeater**.
3. Set the **Trigger Type** to **Watch**.
#### Configure the Input Operator
1. Drag and drop an **Input** operator onto your Data Workflow canvas.
2. Configure the operator's **Info** window as follows:
| Setting | Value |
| --- | --- |
| Category | Input |
| Component | dtData |
| Required | Yes |
| Source | Default |
#### Configure the Output Operator
1. Drag and drop an **Output** operator onto your Data Workflow canvas.
2. Configure the operator's **Info** window as follows:
| Setting | Value |
| --- | --- |
| Category | Output |
| Component | repeater |
3. Connect the output port (right) of the **Input** operator to the input port (left) of the **Output** operator.
[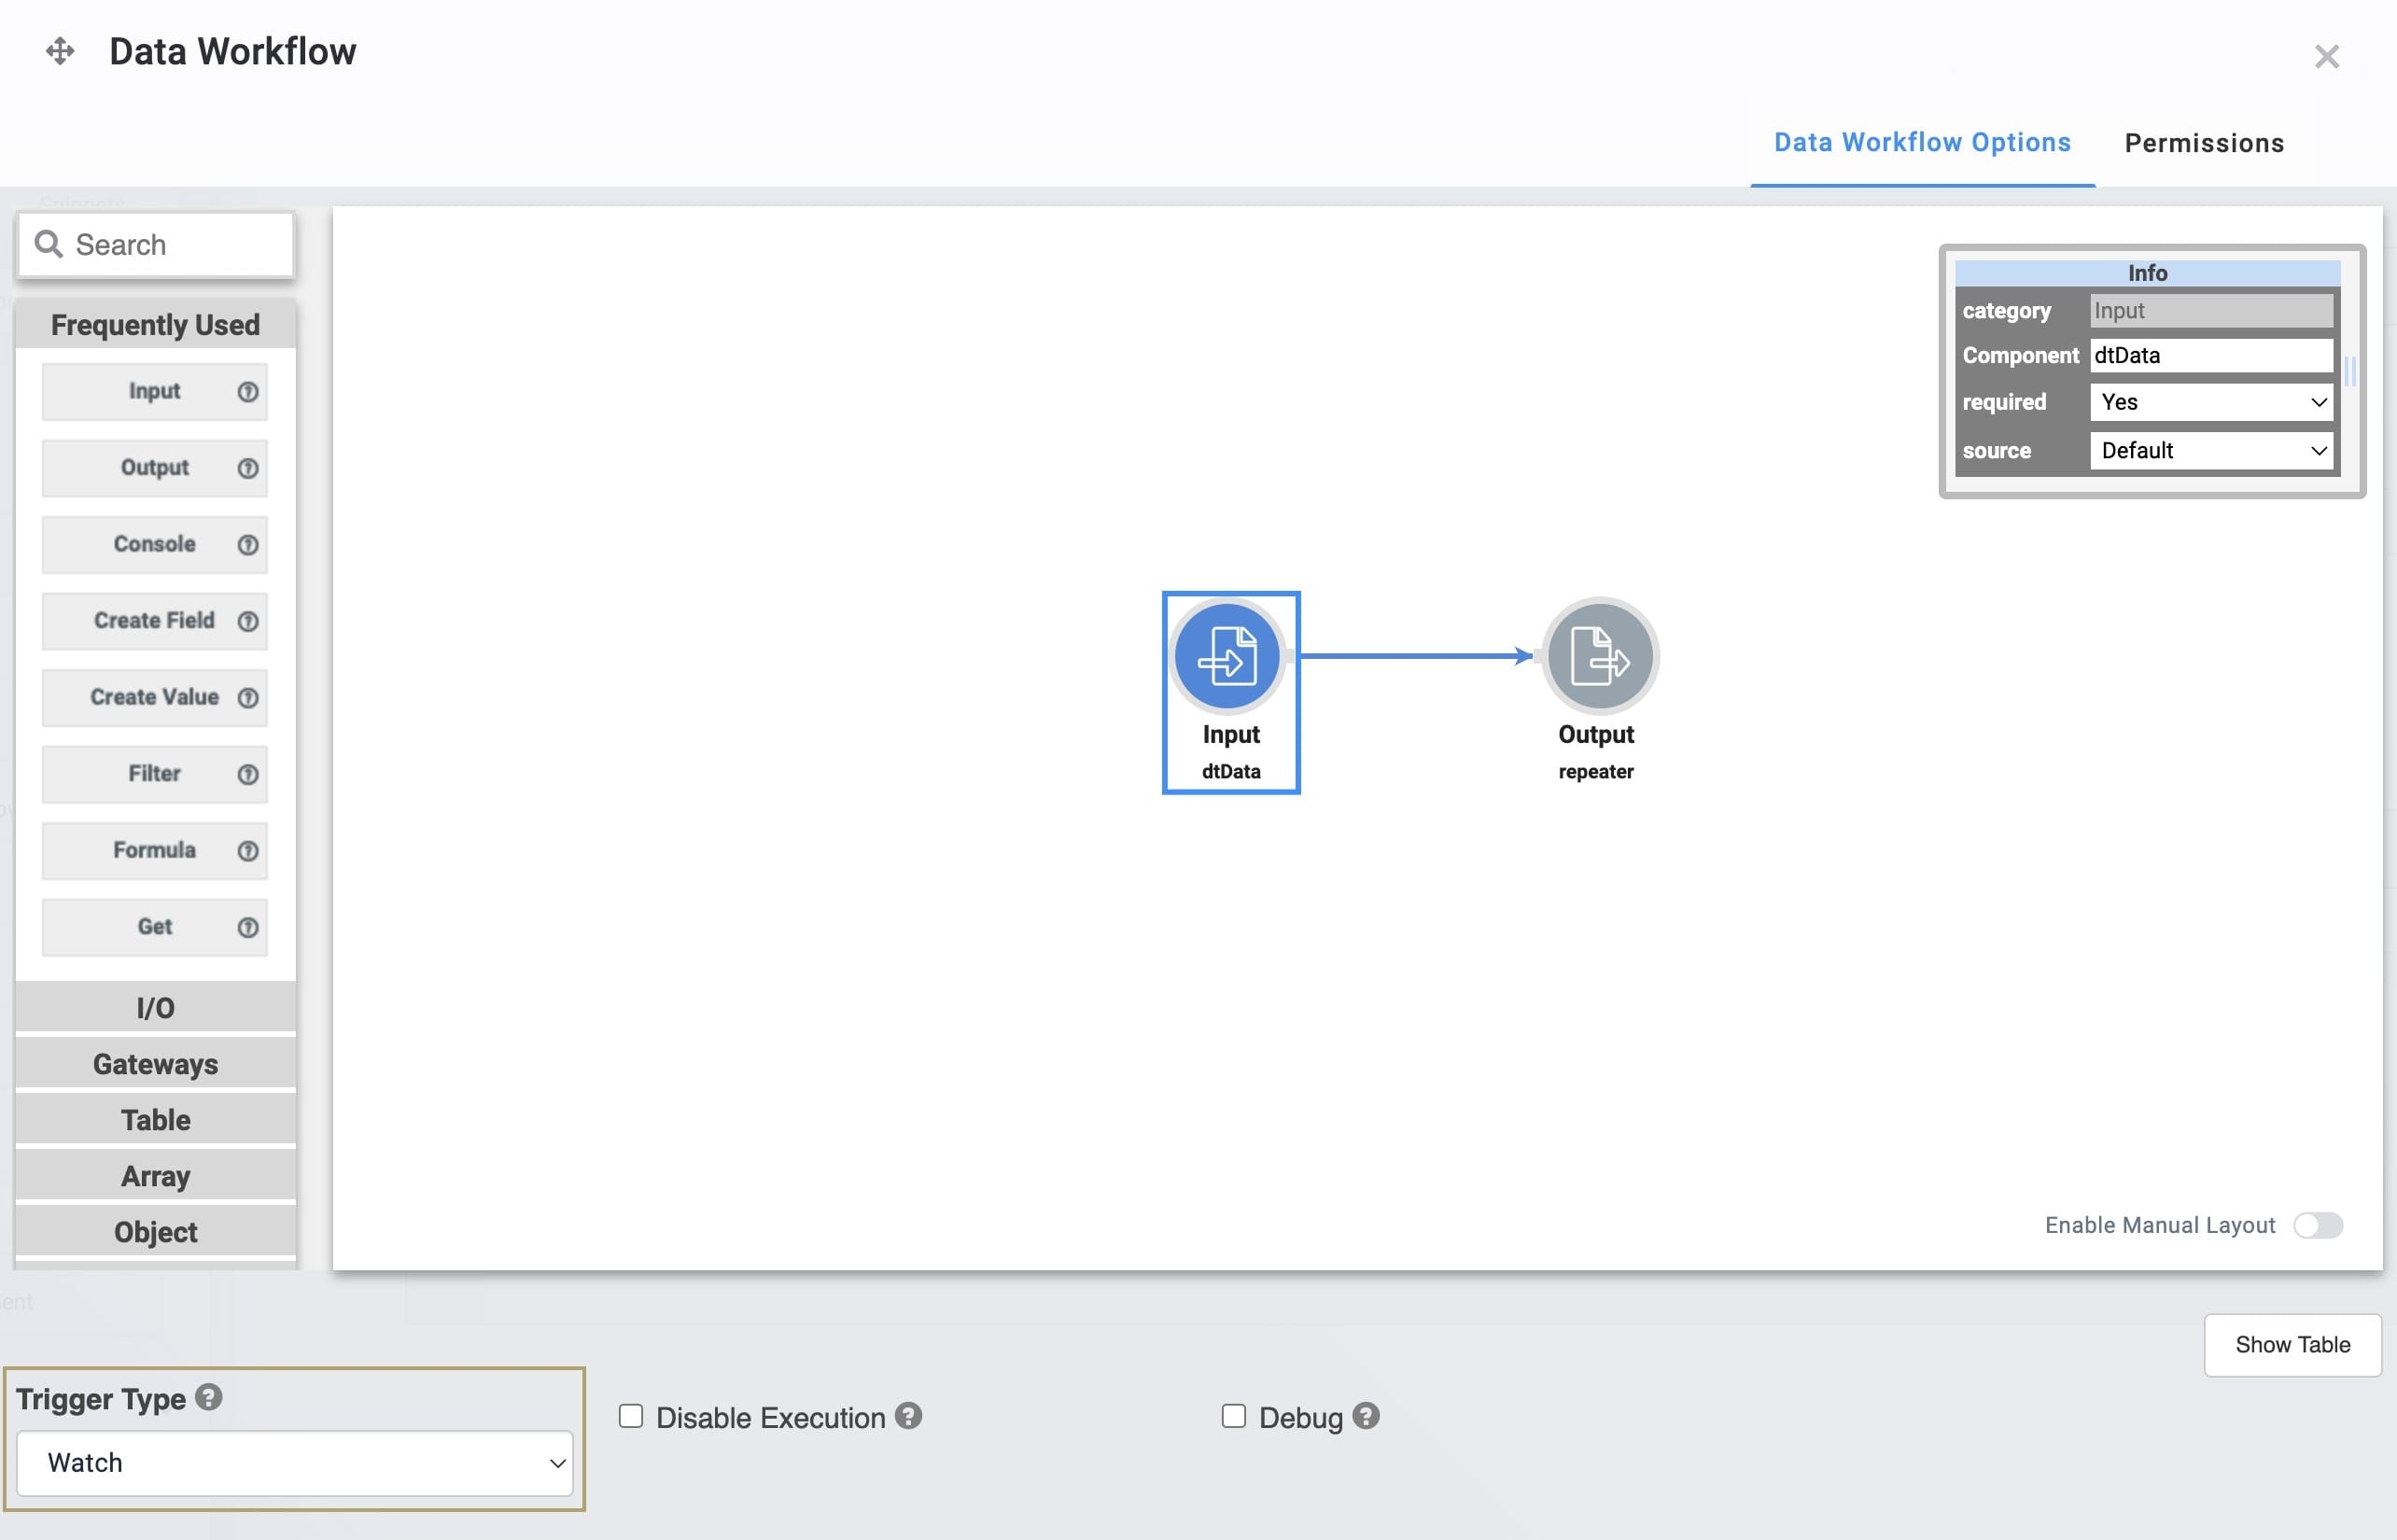](https://cdn.us.document360.io/15548f06-2fba-434c-b0c1-5df88317dbd7/Images/Documentation/Repeater%20DWF.jpg?sv=2026-02-06&spr=https&st=2026-11-07T17%3A57%3A42Z&se=2026-11-07T18%3A57%3A42Z&sr=c&sp=r&sig=iN9G2rh8Hpx9rtQEo5ThQLF6%2FhP5VTMZwmkAxohoFvI%3D)
4. Click **Save**.
### Configure the HTML Element Component
Lastly, let's configure an [HTML Element](/v1/docs/html-element-component) component to display some instructions so your end-user knows what to do.
1. Drag and drop a **H****TML Element** component onto your canvas, placing it below the **dwfRepeater** **D****ata Workflow** component.
2. In the Property ID and Canvas Label Text fields, enter `html`.
3. In the **Content** field, enter the following:
```xml
Have any of these details changed?
If yes, please update your information here.
```
4. Click **Save & Close**.
5. **Save** your module.
Preview your module in Express View. Notice how each of the fields auto-populate, including the preselected Radio Buttons.
[](https://cdn.us.document360.io/15548f06-2fba-434c-b0c1-5df88317dbd7/Images/Documentation/Repeater%20Express.jpg?sv=2026-02-06&spr=https&st=2026-11-07T17%3A57%3A42Z&se=2026-11-07T18%3A57%3A42Z&sr=c&sp=r&sig=iN9G2rh8Hpx9rtQEo5ThQLF6%2FhP5VTMZwmkAxohoFvI%3D)
## Resources
- [Modify the Repeater component using the toolbar settings](/v1/docs/component-toolbar-settings).
- [Data Table Component](/v1/docs/data-table-component).
- [Data Workflow Component](/v1/docs/data-workflow-component).
- [Get help in the Community Hub](https://community.unqork.com/search?q=repeater).
A Property ID is the unique field ID used by Unqork to track and link components in your module.
Express View is how your end-user views your application. Express View also lets you preview your applications to test your configuration and view the styling. This is also the view your end-users will see when interacting with your application. After configuring a module, click Preview in the Module Builder to interact with the module in Express View.
Cascading Style Sheets (CSS) is a style sheet language used for presenting how a HTML or XML document looks to end-users.
End-users, also known as Express Users, are the individuals accessing an application through Express View. In most cases, end-users are the customers using the product.
A Property ID is the unique field ID used by Unqork to track and link components in your module.
Label Text conveys what the input component is and what information it displays. Enter the purpose of the corresponding component or field.
Canvas Label Text indicates the purpose of the corresponding field or component. For non-input components, the Canvas Label Text isn't end-user facing, and only appears in the .