The Nest By operator groups multiple rows of data based on one or more specified fields, creating a nested structure. It’s especially useful when you want to consolidate related records under a common parent—for example, grouping multiple orders under a single customer. This operator outputs a single row per group, with a nested array containing all the grouped records. It’s ideal for preparing data for display in repeating panels or for organizing complex datasets before further processing.
These instructions assume you have a new module open, saved, and with a title.
Configuration
In this how-to guide, you'll create a data table of information and nest all the rows into a single array.
Configure the Data Table Component
First, you'll set up a Data Table component with a list of customers, account values, and account numbers.
In the Module Builder, drag and drop a Data Table component onto your canvas.
In the Property ID and Label Text fields, enter
dtAccountInfo.In the data table, enter the following:
firstName
lastName
accountValue
accountNumber
Josephine
Darakjy
543891
12345
Lenna
Paprocki
1000000
12346
Sage
Wieser
1000000
12346
Abel
Maclead
7432572
12347
Ernie
Stenseth
5000000
12348
Valentine
Gillian
5439294
12349
Dyan
Oldroyd
17890
12346
Fatima
Saylors
19578
12347
Willow
Kusko
54389
12347
You purposely added duplicate information to show the power of the Nest By operator.
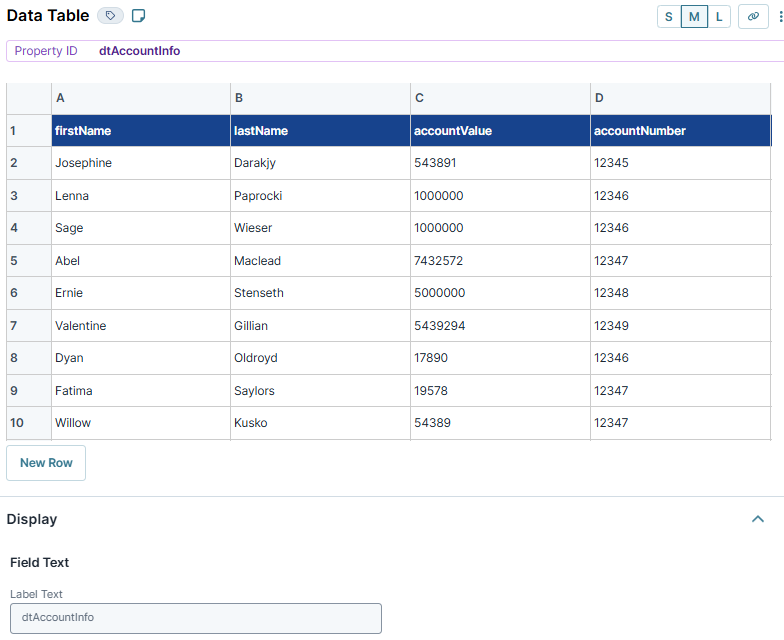
Click Save Component.
Configure the Data Workflow Component
Drag and drop a Data Workflow component onto your canvas, placing it below the Data Table component.
In the Property ID and Canvas Label Text fields, enter
dwfNestByChild.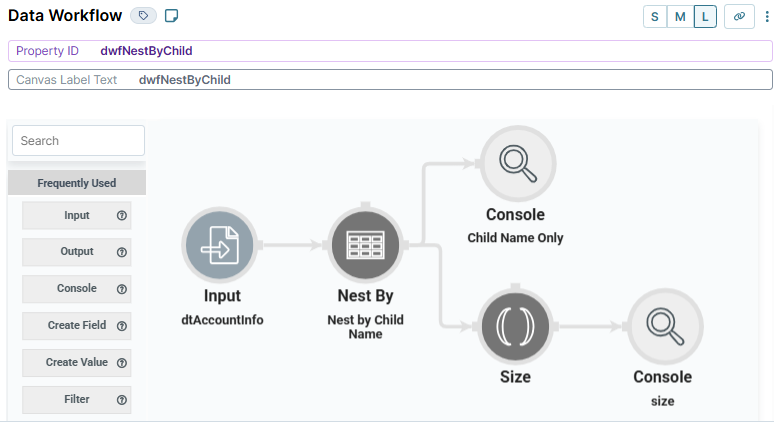
Configure the Input Operator
Drag and drop an Input operator onto your Data Workflow canvas.
Configure the operator's Info window as follows:
Setting
Value
category
Input
Component
dtAccountInfo
required
No
source
Default
Configure the Nest By Operator
Drag and drop a Nest By operator onto your Data Workflow canvas.
Configure the operator's Info window as follows:
Setting
Value
category
Nest By
label
Nest by Child Name
Parent Keys
Child Name
account
Connect the output port (right) of the
dtAccountInfoInput operator to the input port (left) of theNest by Child NameNest By operator.
Configure the Console Operator
Drag and drop a Console operator onto your Data Workflow canvas.
Configure the operator's Info window as follows:
Setting
Value
category
Console
label
Child Name Only
Connect the output port (right) of the
Nest by Child NameNest By operator to the input port (left) of theChild Name OnlyConsole operator.Click Save Component.
Configure the Button Component
Lastly, configure a Button component to trigger your Data Workflow.
Drag and drop a Button component onto your canvas, placing it below your Data Workflow component.
In the Property ID field, enter
btnNestByChild.In the Label Text field, enter
Nest by Child Name.From the Action Type drop-down, select Event.
In the On Click field, enter
dwfNestByChild.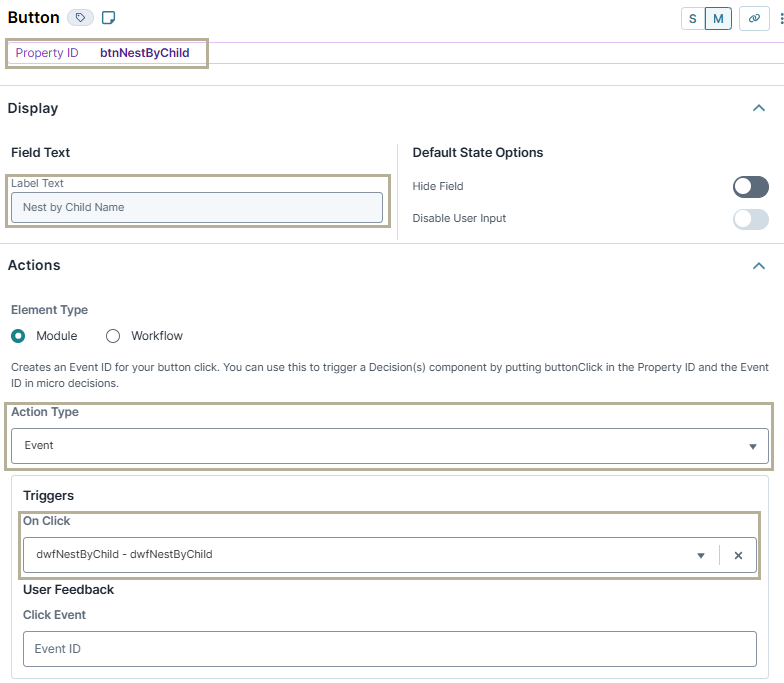
Click Save Component.
Save your module.
Here's how your module looks in the Module Builder:

Preview your module in Express View and open the DevTools Console. Click the Nest by Child Name button, and you'll see all nine of your table rows nested in a single array with account as the child name.

The Nest By operator groups multiple rows of data based on one or more specified fields, creating a nested structure. It’s especially useful when you want to consolidate related records under a common parent—for example, grouping multiple orders under a single customer. This operator outputs a single row per group, with a nested array containing all the grouped records. It’s ideal for preparing data for display in repeating panels or for organizing complex datasets before further processing.
These instructions assume you have a new module open, saved, and with a title.
Configuration
In this how-to guide, you'll create a data table of information and nest all the rows into a single array.
Configure the Data Table Component
First, you'll set up a Data Table component with a list of customers, account values, and account numbers.
In the Module Builder, drag and drop a Data Table component onto your canvas.
In the Property ID and Canvas Label Text fields, enter
dtAccountInfo.In the data table, enter the following:
firstName
lastName
accountValue
accountNumber
Josephine
Darakjy
543891
12345
Lenna
Paprocki
1000000
12346
Sage
Wieser
1000000
12346
Abel
Maclead
7432572
12347
Ernie
Stenseth
5000000
12348
Valentine
Gillian
5439294
12349
Dyan
Oldroyd
17890
12346
Fatima
Saylors
19578
12347
Willow
Kusko
54389
12347
You purposely added duplicate information to show the power of the Nest By operator.
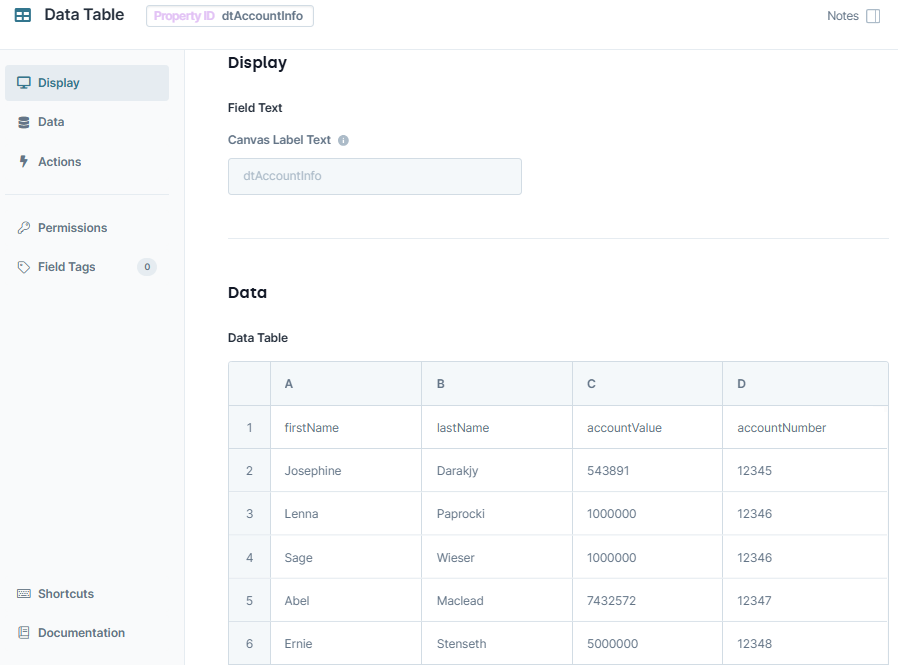
Click Save & Close.
Configure the Data Workflow Component
Drag and drop a Data Workflow component onto your canvas. Place it below the Data Table component.
In the Canvas Label Text and Property Name fields, enter
dwfNestByChild.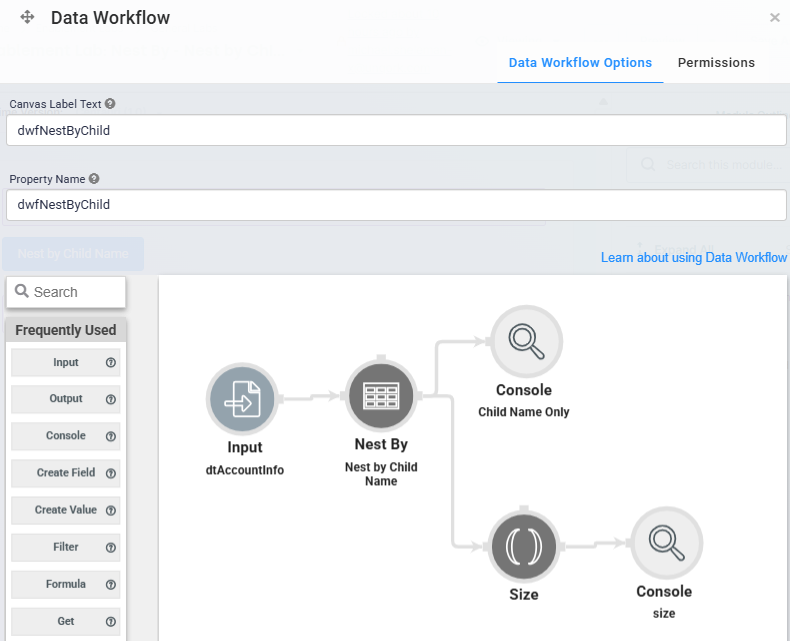
Configure the Input Operator
Drag and drop an Input operator onto your Data Workflow canvas.
Configure the operator's Info window as follows:
Setting
Value
category
Input
Component
dtAccountInfo
required
No
source
Default
Configure the Nest By Operator
Drag and drop a Nest By operator onto your Data Workflow canvas.
Configure the operator's Info window as follows:
Setting
Value
category
Nest By
label
Nest by Child Name
Parent Keys
Child Name
account
Connect the output port (right) of the
dtAccountInfoInput operator to the input port (left) of theNest by Child NameNest By operator.
Configure the Console Operator
Drag and drop a Console operator onto your Data Workflow canvas.
Configure the operator's Info window as follows:
Setting
Value
category
Console
label
Child Name Only
Connect the output port (right) of the
Nest by Child NameNest By operator to the input port (left) of theChild Name OnlyConsole operator.Click Save.
Configure the Button Component
Lastly, configure a Button component to trigger your Data Workflow.
Drag and drop a Button component onto your canvas, placing it below the Data Workflow component.
In the Property ID field, enter
btnNestByChild.In the Label Text field, enter
Nest by Child Name.Set the Action Type as Event.
In the On Click field, enter
dwfNestByChild.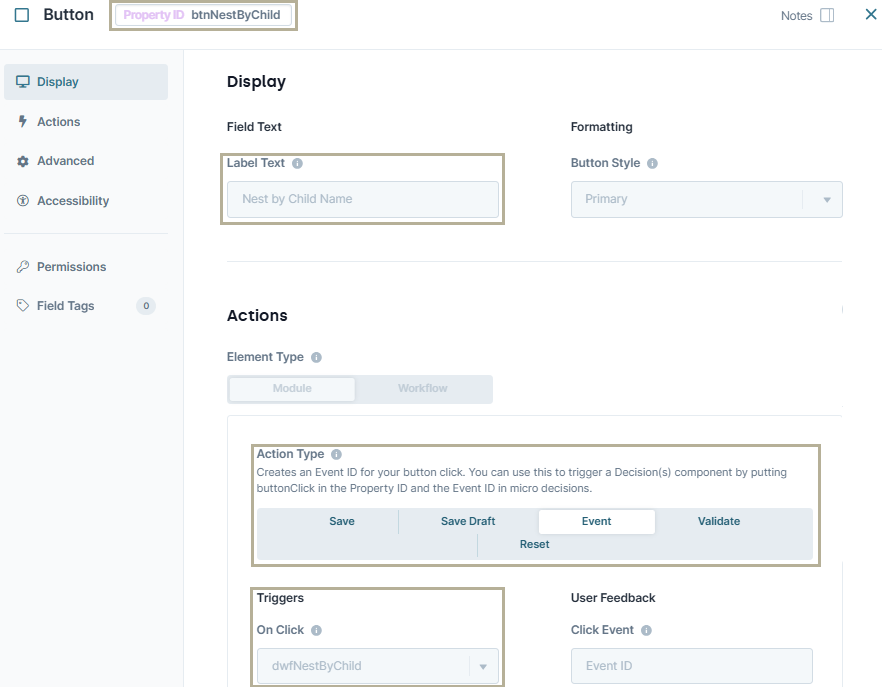
Click Save & Close.
Save your module.
Here's how your module looks in the Module Builder:

Preview your module in Express View and open the DevTools Console. Click the Nest by Child Name button, and you'll see all nine of your table rows nested in a single array with account as the child name.
