Data Collections, also known as term data or reference data, are static data referenced by an Unqork application. Data Collections in Unqork resemble spreadsheets of rows and columns containing values. These values are static and cannot be modified by the application.
Creators use Data Collections for various purposes, including:
Displaying a drop-down list of options using a Dropdown component.
A data set used in calculations.
Unqork Data Collections can only be configured at the Application level.
Discover more about Unqork Data Collections by clicking on the tabs below.
Creating a Data Collection
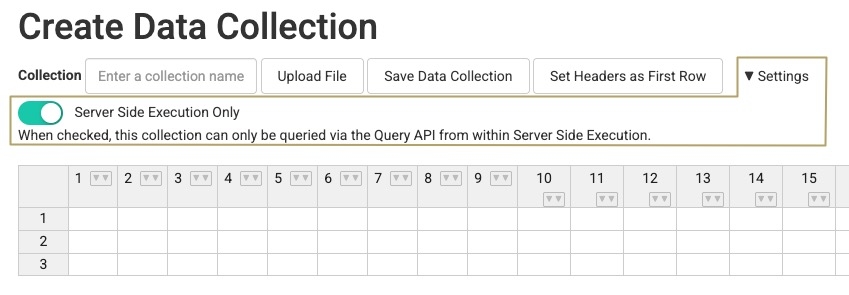
There are two ways to create a Data Collection using the Create Data Collection page. You can create it from scratch or upload a CSV file.
To create a Data Collection from the Application page:
At the top right of your Application page, click + Create New.
Select Data Collection. The Data Collections page displays.
Click + Create New. The Create Data Collection page displays in a new browser tab.
In the Collection field, enter a unique
Data Collection Name. Data Collection names save to your environment and must be unique. New Data Collections do not successfully save if the name conflicts with another already saved.Avoid using spaces in your Data Collection name. Spaces added to Data Collections encode
%20in the back-end, making it more difficult to reference.From here, you have two options:
If your information is stored in a CSV file, click Upload File and select your file. Your Data Collection populates with the information from your CSV file.
Enter your data manually into the provided spreadsheet.
Click Save Data Collection.
Return to your application to see your new Data Collection in the list.
Data Collection Settings
Clicking the ▾ Settings button displays the additional Server Side Execution Only setting related to your Data Collection.
By default, Server Side Execution Only is set to ![]() (ON). This is a security best practice that controls who can access your Data Collection. This setting is important when your Data Collection includes PII. When set to
(ON). This is a security best practice that controls who can access your Data Collection. This setting is important when your Data Collection includes PII. When set to ![]() (ON), the only way to query the Data Collection is with a Plug-In component and the Get Rows from Reference Data API service. The Plug-In component must be in a module that has Server Side Execution Only enabled under Module Settings. When set to
(ON), the only way to query the Data Collection is with a Plug-In component and the Get Rows from Reference Data API service. The Plug-In component must be in a module that has Server Side Execution Only enabled under Module Settings. When set to ![]() (OFF), any end-user can query the entire Data Collection from Express View.
(OFF), any end-user can query the entire Data Collection from Express View.
Do not disable Server Side Execution Only for Data Collections used in Production applications. You should only disable this setting for testing purposes. Remember, when set to
(OFF), any end-user can query the entire Data Collection from Express View.
Navigating the Data Collection Ellipsis Menu
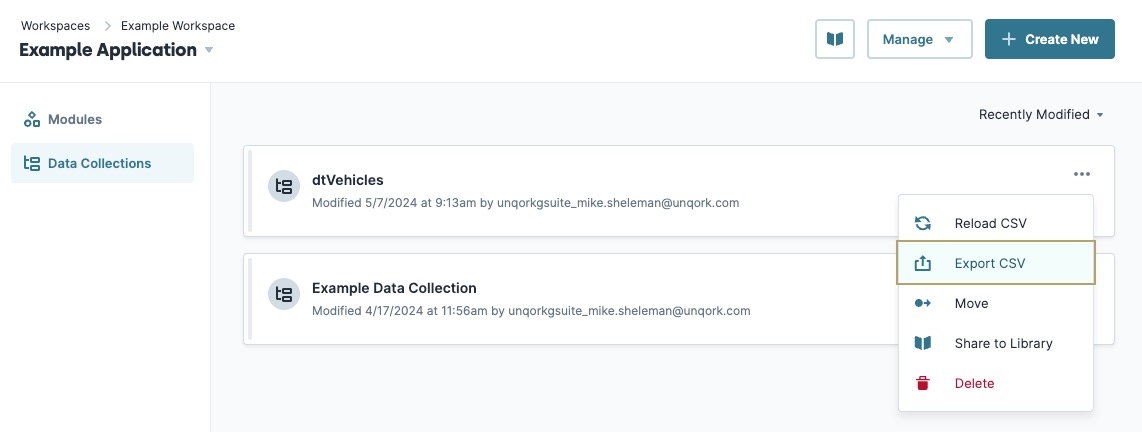
Most administrative actions for Data Collections are available under the App Elements tab. When you click the (ellipsis) button on your Data Collection's element tile, a menu displays. Here are descriptions of the Data Collection tile's ellipsis menu options:
If this is a shared Data Collection, the ellipsis menu might display differently. To learn more, view our Unqork Library Elements article.
Reloading a Data Collection
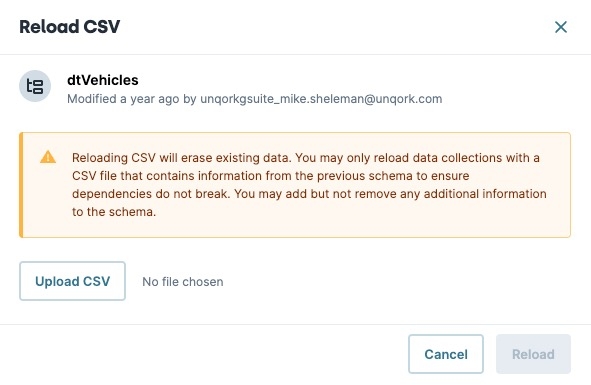
Upload a new version of the Data Collection file to replace the existing one. Reloading a file erases the existing data in the collection.
To upload a new reference data file to an existing Data Collection on the Data Collections page:
In the element tile you want to update, click the
.png) (ellipsis) button.
(ellipsis) button.Click Reload CSV. The Reload CSV modal displays.
Click Upload CSV.
Select the new file to upload.
Click Reload.
Your uploaded file replaces the original file in the Data Collection list.
Exporting a Data Collection
You can also export a file as a CSV file type.
To export a Data Collection file from the Data Collections page:
In the element tile you want to export, click the
.png) (ellipsis) button.
(ellipsis) button.Click Export CSV. A new browser page briefly displays before the download begins.
The exported file displays in the browser's Downloads folder.
Moving a Data Collection
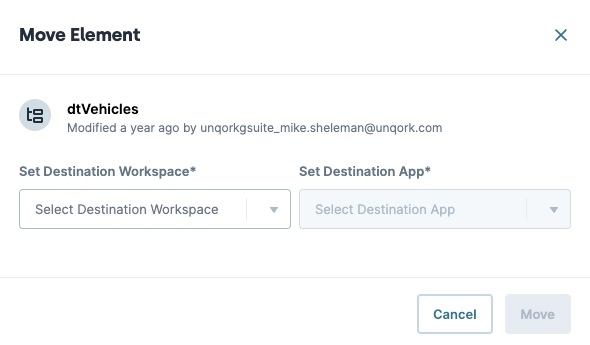
The Move feature lets you move your Data Collection to another application for use. If you move the Data Collection to a new application, previous references no longer work. When moving your Data Collection, ensure you remove or replace the reference in your application.
To move a Data Collection using the Data Collections page:
In the element tile you want to move, click the
.png) (ellipsis) button.
(ellipsis) button.Click Move.
From the Set Destination Workspace* drop-down, select the destination workspace.
From the Set Destination App* drop-down, select the destination application.
Click Move.
Sharing a Data Collection With the Library
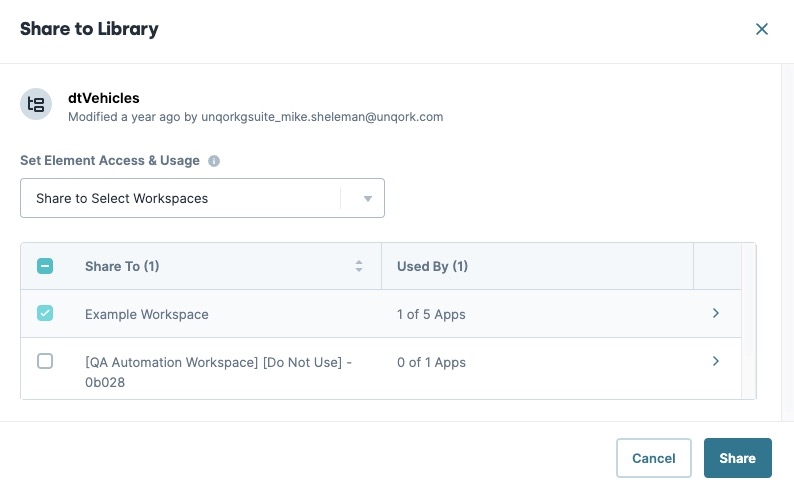
The Share to Library feature lets you share your Data Collection with one or more workspaces.
Discover shared elements in our Unqork Library Elements article.
To share a Data Collection using the Data Collections page:
In the element tile you want to share, click the
.png) (ellipsis) button.
(ellipsis) button.Click Share to Library.
From the Set Element Access & Usage drop-down, select whether you want to share the Data Collection with the environment or with select workspaces.
(Optional) If sharing with select workspaces, use the Share To list to select one or more workspaces.
Click Share.
Deleting a Data Collection
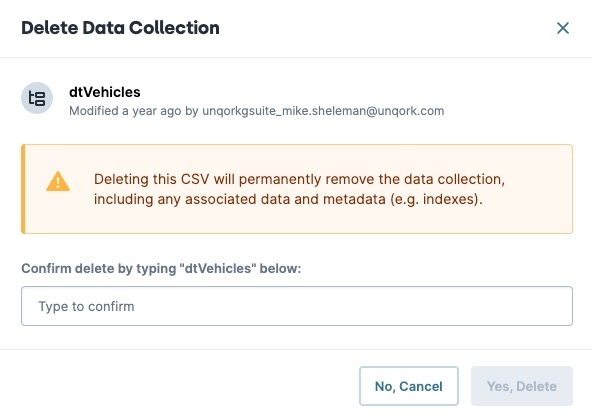
To remove a Data Collection, use the delete function. If an application references a deleted data Collection, references no longer work. Before deleting a Data Collection, remove or replace the reference in your application.
To delete a Data Collection from the Data Collections page.:
